
Why this matters: Instruments, equipment and care environments can transmit infection when contaminated material is not removed and the correct reprocessing method is not used. Nurses must distinguish cleaning, decontamination, disinfection and sterilisation, then match each item to its risk. Understanding proper protocols, such as the 4-bucket system, ensures patient safety, halts healthcare-associated infections (HAIs), and extends the lifespan of critical medical instruments.
- Define cleaning, decontamination, disinfection, antisepsis and sterilisation.
- Classify patient-care items by risk (Spaulding Classification) and select appropriate processing.
- Execute the 4-bucket system for instrument decontamination effectively.
- Describe chemical and physical disinfection, factors affecting effectiveness and safe workflow.
- Apply safe and effective decontamination procedures to spills, environment, and reusable instruments.
| Term | Meaning | Example |
|---|---|---|
| Cleaning | Physical removal of dirt, organic material (bioburden), and many organisms using water, detergent, and friction. | Washing a surgical tray or scrubbing a trolley before disinfection. |
| Decontamination | The overarching process that makes an item or area safe to handle by removing or reducing harmful microorganisms. | Cleaning, then applying bleach to a blood-contaminated surface. |
| Disinfection | Process that destroys many or all pathogenic microorganisms on inanimate objects, but may not reliably destroy bacterial spores. | Using a 0.5% chlorine solution on a non-critical device. |
| Antisepsis | Use of an antimicrobial agent on living tissue/skin to inhibit microorganism growth. | Skin preparation with alcohol or iodine before venepuncture. |
| Sterilisation | Validated, highly-controlled process that destroys all microbial life, including highly resistant bacterial spores. | Autoclaving surgical instruments at 121°C. |
| Category | Contact Level | Required Processing | Examples |
|---|---|---|---|
| Critical | Enters sterile tissue or the vascular system. | Sterilisation (e.g., Autoclave, Dry Heat, Ethylene Oxide). | Surgical instruments, implants, cardiac catheters, needles. |
| Semi-critical | Touches mucous membranes or non-intact skin. | High-Level Disinfection (HLD) (Destroys all pathogens except massive amounts of spores) or Sterilisation if possible. | Respiratory therapy equipment, vaginal specula, endoscopes, oral airways. |
| Non-critical | Touches intact skin but not mucous membranes. | Cleaning and Low/Intermediate-Level Disinfection (Kills vegetative bacteria and most viruses). | BP cuffs, stethoscopes, bed rails, crutches, environmental surfaces. |
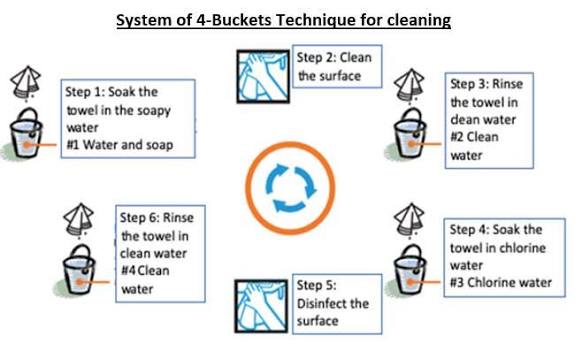
The 4-bucket system is a standardized, highly effective batch-processing method used in healthcare settings to process reusable instruments. It physically isolates the washing, rinsing, and chemical disinfection stages to prevent cross-contamination.
| Bucket | Contents | Purpose & Action |
|---|---|---|
| Bucket 1: Wash | Warm soapy water (Enzymatic detergent is ideal) | Clean: Physical removal of organic matter (blood, tissue). Instruments must be fully submerged and scrubbed under the water line to prevent splashing and harmful aerosols. |
| Bucket 2: First Rinse | Clean water | Rinse: Removes soap residue and loosened debris. Soap can easily neutralize chemical disinfectants, making thorough rinsing crucial. |
| Bucket 3: Disinfect | Disinfectant solution (e.g., 0.5% Chlorine or Glutaraldehyde) | Disinfect: Destroys pathogens. Items must be completely submerged for the precise contact time (e.g., 10-15 minutes). Never add new dirty instruments once the timer starts. |
| Bucket 4: Final Rinse | Clean, boiled, or sterile water | Final Rinse: Removes chemical disinfectant residue to prevent tissue burns to patients and to stop the corrosion/rusting of metal instruments. |
- Chemical Disinfectants:
- Alcohols (70-90% Isopropyl/Ethyl): Fast-acting, leaves no residue. Ideal for small surfaces, skin (antisepsis), and medication vials. Evaporates quickly, making it poor for large spills.
- Chlorine (Bleach / Sodium Hypochlorite): Broad-spectrum and affordable. Low concentrations (0.05%) for surfaces; high concentrations (0.5%) for blood spills and instrument soaking. Corrosive to metals if left too long unrinsed.
- Glutaraldehyde (≥2%): High-level disinfectant for semi-critical items. Requires a long soak and excellent ventilation due to toxic fumes.
- Sterilisation Methods:
- Autoclaving (Moist Heat): The gold standard. Uses steam under pressure (e.g., 121°C for 15 minutes). Penetrates fabrics and wrapped instruments.
- Dry Heat: Used for items that rust or cannot tolerate moisture (powders, oils). Requires higher temperatures and longer times (e.g., 160°C for 2 hours).
- Ethylene Oxide (Gas): Highly effective for heat-sensitive plastics or electronics, but toxic and requires prolonged aeration.
- Organic load: Blood, pus, faeces, and dirt neutralise chemicals. Pre-cleaning is absolutely mandatory.
- Concentration and Product: Using the correct dilution. Never guess dilutions; measure accurately according to protocol.
- Contact time: The surface or instrument must remain wet (or fully submerged) for the stated period (e.g., 10 minutes). Wiping it dry early stops the killing process.
- Type and number of organisms: Bacterial spores (e.g., C. diff, tetanus) and biofilms are highly resistant and require specialized/extended processing.
- Temperature and pH: Most disinfectants work best at room temperature; extreme heat or altered water pH can degrade their efficacy.
- Item characteristics: Crevices, hinges, lumens, and porous materials are harder to clean and require specific brushes and attention.
Proper decontamination follows a unidirectional flow: from dirty, to clean, to sterile zones, ensuring recontamination never occurs.
- Segregate and Transport: Place used items in a leak-proof container and transport them to the dirty utility room/decontamination area immediately.
- Protect Yourself (PPE): Don heavy-duty utility gloves, a fluid-resistant apron/gown, a mask, and eye protection (goggles/face shield) before handling dirty instruments.
- Pre-clean / Wash: Remove visible soil safely using friction and brushes under water. (Bucket 1)
- Rinse: Thoroughly remove all detergent residue. (Bucket 2)
- Disinfect/Sterilise: Apply a validated chemical soak (Bucket 3) or package items for the autoclave.
- Final Rinse & Dry: Rinse chemicals off (Bucket 4) and dry thoroughly using clean, lint-free cloths or air drying.
- Inspect and Store: Check for damage or remaining debris. Store processed items in a designated clean, dry area away from moisture and traffic. Document according to facility policy.
Managing spills correctly minimizes the risk of Bloodborne Pathogen transmission (like HIV, Hep B, Hep C).
- Secure the Area: Restrict access and warn others.
- PPE: Wear appropriate protective gear (gloves, apron, eye protection).
- Containment & Removal: Do not spray directly (causes aerosols). Cover the spill with absorbent paper towels or spill granules. Use tools (forceps/scoop) to pick up any broken glass or sharps—never your hands.
- Clean: Remove the organic material with detergent and water first.
- Disinfect: Apply an approved high-level disinfectant (e.g., 0.5% / 5,000-10,000 ppm chlorine solution) over the area. Leave for the required contact time (usually 10 minutes).
- Dispose & Wash: Dispose of all materials in clinical infectious waste bags. Remove PPE safely and perform hand hygiene immediately.
Shared stethoscope: It is a non-critical item but can easily transfer organisms between patients. Clean and wipe it with a 70% alcohol swab between patients, especially after contact precautions.
Processing a Vaginal Speculum: This semi-critical item requires High-Level Disinfection (HLD). After donning PPE, the nurse utilizes the 4-bucket system: scrubbing in soapy water, rinsing, soaking in 0.5% chlorine for 10-15 minutes, and doing a final rinse with boiled/clean water before air-drying.
Surgical Scissors for an Invasive Procedure: Surface wiping or intermediate soaking is not enough. As a critical item, after undergoing the washing and rinsing phases, it must be packaged, undergo validated sterilisation (e.g., autoclaving), and be stored in a sterile environment.
- Skipping the cleaning phase: Attempting to disinfect a dirty item. (Chemicals cannot penetrate heavy organic loads).
- Breaking the 4-bucket rules: Adding new dirty instruments to the disinfectant bucket while a batch is already soaking, which restarts the timer and introduces fresh bioburden to the chemical.
- Confusing antiseptic for disinfectant: Antiseptics (like chlorhexidine) are formulated for living tissue; disinfectants are for inanimate surfaces.
- Ignoring contact time: Wiping a surface with a disinfectant and immediately drying it off before the chemical has time to kill pathogens.
- Recontaminating processed equipment: Handling freshly sterilised or disinfected items with unwashed hands, or storing them in damp, dirty areas.
- Differentiate cleaning, disinfection, antisepsis and sterilisation.
- Explain the specific purpose of each bucket in the 4-bucket decontamination system.
- Why does blood/organic matter reduce the effectiveness of disinfectants?
- Classify a scalpel, a respiratory tube, and a bed rail by Spaulding reprocessing risk classification.
- Outline the safe management of a large blood spill involving broken glass.