
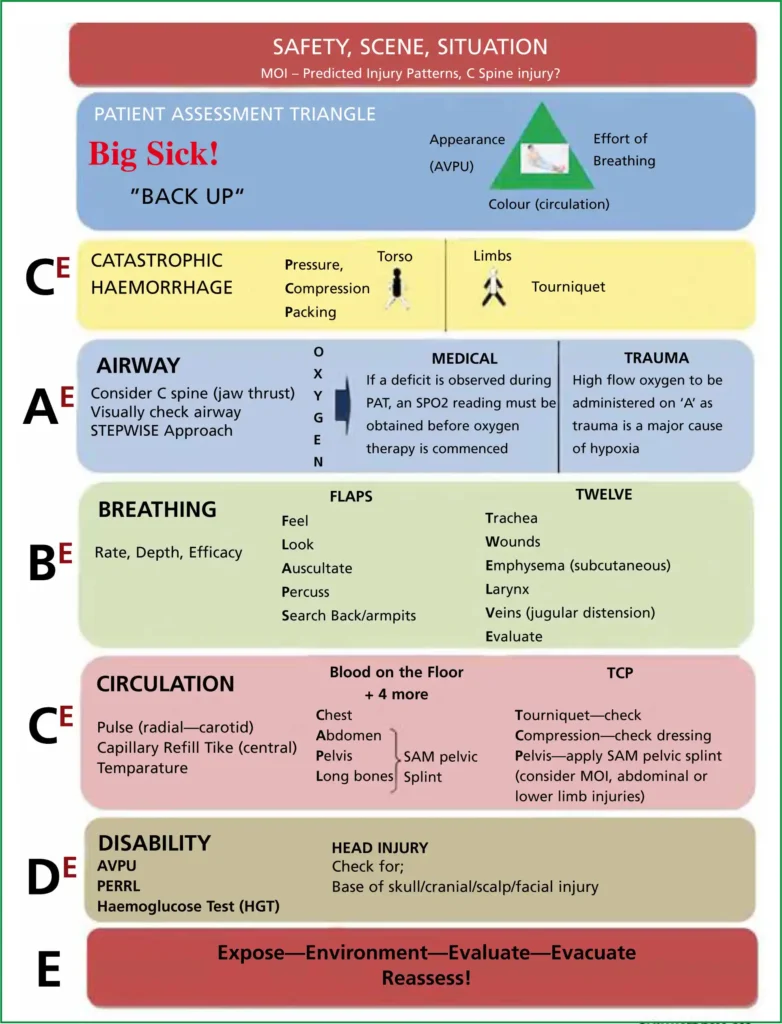
Before diving into the trauma assessment, it is critical to establish our foundational goals. By the end of this module, you should be able to:
- Define the Primary Survey: Understand its purpose, scope, and critical timing in emergency trauma care.
- Understand ABCDE: Master the systematic, alphabetized approach to life-threatening injuries.
- Understand AVPU: Rapidly and accurately assess a trauma patient's baseline level of consciousness.
The primary survey is the absolute foundation of trauma resuscitation. In the chaos of a severe trauma bay, the primary survey provides a strict, unwavering framework to keep the medical team focused on what kills the patient fastest.
- Initial Assessment: It is the initial assessment specifically designed and performed to detect and treat any immediate, life-threatening injuries.
- Prioritizes the ABCs: It forces the clinician to treat Airway before Breathing, and Breathing before Circulation. You cannot move to the next letter until the current letter's life-threat is stabilized.
- Organizes Evaluation: It strictly organizes the way trauma patients are evaluated, ensuring a unified approach whether the patient is in a rural clinic or a Level 1 Trauma Center.
- The "First Chance": This is the first chance the trauma team has to figure out what happened to the patient (mechanism of injury) and to begin immediate life-saving treatments.
The trauma assessment is not a single event; it is divided into three distinct phases. The process actually begins the moment the patient comes into your line of sight.
- Across the Room Assessment: Before you even touch the patient, you look for massive, uncontrolled external hemorrhage. If you see arterial bleeding, you stop and control it (the "C" before ABC, or the MARCH protocol). You also form a rapid visual impression of their breathing and skin color.
- Primary Assessment (The ABCDEs): The structured, hands-on evaluation to identify and intervene on life-threats.
- Secondary Assessment (The Head-to-Toe): Only performed after the primary survey is complete and the patient is stabilized. It includes a comprehensive head-to-toe examination, detailed history, and looking for non-life-threatening injuries (like isolated fractures or lacerations).
The "A" step is the most critical. Without an open airway, oxygen cannot reach the lungs, rendering all other interventions useless.
Before physically assessing the airway, quickly assess the patient's level of alertness. Ask a simple question like, "What is your name?" or "What happened to you?" Their response dictates their AVPU score and proves if their airway is currently patent.
- A (Alert): The patient is awake, eyes open, and tracking you. (If they can speak in full sentences, their airway is patent).
- V (Alert to Verbal stimuli): The patient is drowsy or eyes are closed but opens them or responds when you call their name loudly.
- P (Alert to Pain): The patient does not respond to voice but responds (moans, withdraws, or localizes) to a painful stimulus.
- U (Unresponsive to all stimuli): The patient exhibits absolutely no response to voice or pain. An unresponsive patient cannot protect their own airway and requires immediate intervention.
When testing for a response to pain, you must use central stimuli (testing the brain's response) rather than peripheral stimuli (which might just elicit a local spinal reflex). Acceptable methods include:
- Supraorbital Pressure: Firmly pressing your thumb into the bony ridge just beneath the eyebrow (avoid the eye itself).
- Trapezius Squeeze: Grabbing and firmly squeezing the trapezius muscle at the base of the neck/shoulder.
- Sternal Pressure (Sternal Rub): Applying firm, grinding pressure to the center of the patient's sternum with your knuckles. (Note: Use with caution to avoid severe bruising).
In trauma, you must assume a cervical spine injury until proven otherwise. Any movement of a fractured neck can sever the spinal cord, causing permanent paralysis or sudden death.
- Place the patient in a supine position (flat on their back).
- Perform in-line stabilization manually. One provider's sole job is to hold the patient's head completely still, keeping the nose aligned with the umbilicus.
- Apply immobilization devices such as a properly sized rigid cervical collar and secure them to a backboard (if indicated by current local protocols).
(Reference Note: Supplemental demonstration videos on C-Spine application were included in the original presentation: https://youtu.be/PqiaHVYaK3c)
Once the C-spine is protected, look inside the mouth. Are there broken teeth? Vomit? Blood? Smashed facial bones?
- Airway Assessment: Look, listen, and feel. Listen for stridor, snoring, or gurgling (which indicate obstruction).
- Treatment if Airway is NOT patent:
- Suction: Use a rigid Yankauer suction catheter to aggressively clear blood, vomit, or secretions.
- Remove debris: Carefully remove loose teeth or foreign objects using forceps or a gloved finger (only if the object is visible; avoid blind finger sweeps).
- Insert airway adjunct: Use a nasopharyngeal airway (NPA) in conscious/semi-conscious patients. Use an oropharyngeal airway (OPA) only in completely unresponsive patients without a gag reflex.
- Prepare for definitive airway: Prepare to assist the MD/Provider in inserting a definitive airway, such as an endotracheal tube (ETT). Gather the laryngoscope, blades, and tubes.
Failure to secure an airway rapidly is the leading cause of preventable trauma death. Watch out for:
- Delay in recognizing the compromised airway: Waiting too long to intervene when a patient is struggling to breathe.
- Visual Cues Missed:
- Comatose Patient: A patient with a Glasgow Coma Score (GCS) of 8 or less. (Remember the trauma adage: "GCS less than 8, Intubate!")
- Combative / Agitated / Altered Mental Status: Never assume a trauma patient is just "drunk or high." Agitation is the premier sign of Hypoxia (brain screaming for oxygen). It can also be caused by Drugs/Alcohol, or a Traumatic Brain Injury (TBI).
- Emesis and/or blood in the airway: Can rapidly lead to deadly aspiration pneumonia or total occlusion.
Once the airway is open, you must ensure the lungs are actually exchanging gas. An open pipe (airway) is useless if the bellows (lungs) are broken.
You are assessing to see if the patient is breathing adequately and regularly. Look for symmetrical chest rise, feel for broken ribs (crepitus), and listen to lung sounds bilaterally.
- Treatment if breathing is present (but inadequate or patient is critical):
- Administer highly concentrated oxygen via a non-rebreather mask at 15 Liters per minute to maximize oxygen delivery to traumatized tissues.
- Check breathing using end-tidal CO2 (Capnography) to monitor the actual effectiveness of ventilation.
- Treatment if breathing is absent (or agonizingly slow/shallow):
- Open the airway further using a jaw thrust maneuver with a second person (we use jaw thrust instead of head-tilt-chin-lift to protect the C-spine).
- Insert an airway adjunct (OPA or NPA) to keep the tongue off the back of the throat.
- Assist ventilation with a bag-mask device (BVM) connected to high-flow oxygen.
- Prepare to assist the MD in inserting a definitive airway such as an endotracheal tube.
Missing subtle signs of respiratory failure can lead to sudden cardiac arrest. Ensure attention is paid to visual cues:
- Pallor: Pale, white skin indicating poor oxygenation and poor perfusion.
- Cyanosis: Blue or purplish discoloration around the lips, mucous membranes, or fingertips indicating severe hypoxia.
- Altered mental status: Brain hypoxia causes severe confusion and lethargy.
- Pulse oximeter reading falling or not tracking: Do not ignore the monitor. If the SpO2 drops below 94% on high-flow oxygen, suspect a massive chest injury (like a tension pneumothorax or massive hemothorax) immediately.
Oxygenated blood must be pumped to the organs. Shock is essentially a failure of this circulatory system, most commonly due to massive blood loss (hypovolemic/hemorrhagic shock) in trauma.
- Palpate for Pulses: Check for the presence of both central (carotid, femoral) and peripheral (radial, pedal) pulses. Note the rate (is it dangerously tachycardic?) and the rhythm.
- Check the Skin: Assess skin color, temperature, and moisture. Pale, cool, and diaphoretic (moist) skin is a classic, undeniable sign of clinical shock.
- Treatment if pulses are absent:
- Initiate basic life-saving CPR immediately.
- Assess for the underlying cause (e.g., did they bleed to death, or do they have a tension pneumothorax compressing the heart?).
- Hemorrhage Assessment:
- Inspect carefully for any uncontrolled external or internal hemorrhage.
- Look for skin color changes and massive bruising (ecchymosis) which can indicate gallons of blood pooled under the skin.
- Treatment if there is uncontrolled hemorrhage:
- Use direct manual pressure on the wound.
- Elevate the bleeding extremity above the level of the heart if possible.
- Apply commercial tourniquets high and tight on extremities for massive arterial bleeding that pressure cannot stop.
- Initiate rapid infusion of warmed isotonic crystalloid solution (e.g., Normal Saline or Lactated Ringers) via two large-bore IVs.
- Prepare for possible blood administration (Massive Transfusion Protocol) and the use of a rapid infuser system to blast warmed blood into the patient under pressure.
If a trauma patient is in shock but you do not see blood on the floor, they are bleeding into one of these internal compartments:
- External bleeding: Obvious lacerations, amputations, or open fractures.
- Intra-thoracic bleeding: Bleeding into the chest cavity (Massive Hemothorax); a single side of the chest can hold up to 3 liters of blood.
- Intra-abdominal bleeding: Liver or spleen lacerations pouring blood into the belly.
- Intra-pelvic bleeding: Smashed pelvic bones shredding major blood vessels (can hold massive amounts of blood; requires a pelvic binder).
- Long bone fractures: A single femur fracture can hide 1 to 1.5 liters of blood in the thigh tissues.
- Retroperitoneal bleeding: Bleeding behind the abdominal cavity (often from kidneys or severe pelvic trauma).
This step involves assessing the patient's neurological baseline and screening for severe Traumatic Brain Injury (TBI).
- Inspect Pupils: Check for PERRL (Pupils that are Equal, Round, and Reactive to Light). Unequal or "blown" pupils indicate massive brain swelling and impending brain herniation.
- Glasgow Coma Scale (GCS): Calculate the score based on Eye, Verbal, and Motor responses.
- Treatment / Interventions:
- Obtain blood glucose (Hypoglycemia perfectly mimics severe brain injury and is easily reversible).
- Obtain ABGs (Arterial Blood Gases) to monitor oxygen, CO2, and acid-base balance.
- Prepare the patient for an urgent Head CT scan.
Legend: The GCS is obtained by adding the value for each category. Minimal = 3, Maximum = 15.
| Score | Eye Opening | Verbal Response | Motor Response |
|---|---|---|---|
| 1 | None | None | No movements |
| 2 | Open to painful stimulation | Incomprehensible sounds | Extends to pain (Decerebrate posturing) |
| 3 | Open to voice | Inappropriate words | Abnormal flexion to pain (Decorticate) |
| 4 | Open spontaneously | Confused, disoriented | Withdraws to pain |
| 5 | - | Oriented, converses | Localizes to painful stimulus |
| 6 | - | - | Obeys commands |
(Reference Note: A supplemental GCS video was noted: https://youtu.be/_BGMQDmwRmA)
You cannot treat what you cannot see. The trauma patient must be completely exposed to find hidden injuries, but they must be immediately protected from the environment to prevent deadly heat loss.
- Assessment:
- Remove all clothing. Cut the clothing off with trauma shears rather than manipulating broken limbs.
- Preserve any clothing evidence: If there is a bullet hole or stab tear, cut around it, not through it, and place items in paper bags for law enforcement.
- Reassess for any uncontrolled bleeding that was hidden by thick clothing.
- Note any obvious injuries (lacerations, bruising, deformities) that will need to be addressed in the secondary survey.
- Treatment: Apply warm blankets to the patient immediately after the exam is complete.
Hypothermia in a trauma patient is a highly preventable complication. Cold blood does not clot properly. A cold trauma patient will continue to bleed internally, leading to the "Trauma Triad of Death" (Hypothermia, Coagulopathy, and Acidosis).
- Keeping IV fluids warm in a specialized incubator.
- Transfusing blood through an in-line fluid warmer.
- Keeping the resuscitation area/room warm (turn up the thermostat, limit traffic in and out of the room).
- Using active warming blankets (like a Bair Hugger) and overhead heating lights.
- Keep the patient covered as soon as the physical exam is done.
- Cover particularly high heat exchange areas like the scalp. (The head loses massive amounts of body heat).
Once the ABCDEs are managed and the patient is exposed and warmed, formal vital parameters are documented, and the family is incorporated into the care plan.
Obtain a complete baseline set of vital signs. This includes:
- Pulse (Heart Rate)
- Oxygenation (SpO2)
- Blood pressure (Manual or automated)
- Temperature (Core temperature if possible)
- Respirations (Rate and quality)
- Weight (Crucial for pediatric weight-based drug dosing)
- Pain score
Always continuously monitor and trend for changes. A steadily dropping blood pressure and rising heart rate is a massive red flag for ongoing internal bleeding.
Trauma affects the entire family system. Using an assigned liaison (like a social worker, chaplain, or dedicated nurse), communicate effectively with the family:
- Explain the current status of the patient in clear, non-jargon terms.
- Explain the immediate plan of care.
- Inform them of the next steps: Is the patient going to emergency surgery? Being admitted to MedSurg or ICU? Or being transferred to a higher-level trauma center?
The "G" step represents the additional tools, tests, and tubes needed to fine-tune the resuscitation effort.
- Laboratory Studies: Draw blood for trauma panels (CBC, Comprehensive Metabolic Panel, Lactic acid, Coagulation studies, Type and Crossmatch for blood transfusions).
- Monitoring: Connect the patient to continuous cardiac rhythm and rate monitoring (Telemetry/ECG).
- Gastric Tubes: Insertion of a nasogastric (NGT) or orogastric (OGT) tube to decompress the stomach, prevent vomiting, and reduce aspiration risk. (Note: Avoid nasogastric tubes if severe facial/basilar skull fractures are suspected; use orogastric instead).
- Foley Catheter: Insert a foley catheter if the patient is intubated or if needed due to severe injury, to accurately monitor precise hourly urine output (the best indicator of organ perfusion).
- Oxygenation/Ventilation tracking: Continually apply and adjust supplemental oxygenation. Monitor ventilatory status precisely with End-Tidal CO2 (Capnography).
- Pain Assessment and Treatment: Trauma is excruciating. Assess pain formally and administer appropriate pharmacological (IV opioids) and non-pharmacological treatments once the patient is hemodynamically stable.
The protocols and structural layout of the primary survey in this presentation are based on established trauma guidelines, notably the Emergency Nurses Association (ENA) Trauma Nursing Core Course (TNCC).
- http://www.trauma.org/archive/nurse/tertiarysurvey.html
- http://www.ncbi.nlm.nih.gov/m/pubmed/2352294/
- http://www.biomedcentral.com/content/pdf/1757-7241-20-77.pdf
- Additional reference: (2014) TNCC 7th edition p. 39-52
Quick Quiz
Primary Survey Quiz
Health Assessment
Privacy: Your details are used only for quiz tracking and certificates.
Primary Survey Quiz
Health Assessment
Preparing questions...
Choose your answer and keep your streak alive.
Great effort.
Here is your quick performance summary.