
INSTILLATION OF EYE DROPS/ OINTMENT.
Instillation Of Eye Drops/ Ointment is the process of application of medication into the patients’ eyes.
Objectives
- Identify the requirements for instilling eye drops/ointment.
- Prepare the requirements for instilling eye drops/ointment.
- Instill the eye drops/ointment to the eyes.
Indications:
For Eye Drops:
- To treat infections: Antibiotic eye drops are commonly used to combat bacterial infections like conjunctivitis (pink eye).
- To keep eyes moist: Artificial tears or normal saline drops are used to lubricate the eye and relieve dryness, often prescribed after cataract surgery.
- To anaesthetize the eye: Anaesthetic drops numb the eye surface, used for procedures like cataract surgery or foreign body removal.
- To dilate the pupil: Mydriatic drops widen the pupil, facilitating eye exams or helping treat certain eye conditions.
- To reduce inflammation: Steroid eye drops are used to reduce inflammation in the eye, often prescribed after eye injury or surgery.
- To lower intraocular pressure: Glaucoma medications are often administered as eye drops to control eye pressure and prevent further damage.
For Eye Ointment:
- To protect the vision of neonates: Prophylactic antibiotic ointment is routinely applied to newborns’ eyes to prevent infections.
- To treat infections: Antibiotic ointments can be used to treat bacterial eye infections, often preferred for overnight treatment due to their longer-lasting effect.
- To lubricate and soothe dry eyes: Ointments can provide a longer-lasting lubricating effect than drops, especially helpful for severe dryness.
- To treat certain eye allergies: Steroid ointments can be used to reduce allergic inflammation.
Requirements
- Patient’s medication chart.
Tray:
- Prescribed eye drops/eye ointment
- Gallipot of cotton balls
- Receiver
- Gloves
- Eye pad in a sterile bowl
- Strapping
At the Bedside:
Hand washing equipment
Screen
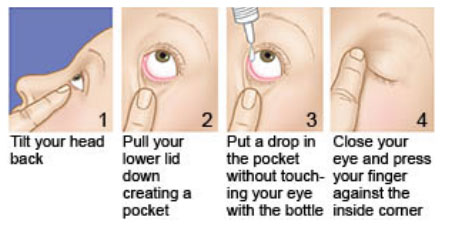
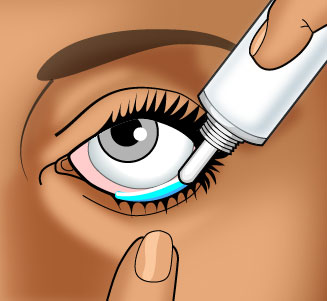
Procedure for eye drop
General Principles – Application of Eye Ointment
- Ointment may be prescribed in addition to drops. If both are prescribed, drops should be instilled first, followed by ointment after a 3-minute interval.
- Ointment may be prescribed for structures other than the eye. This could include wounds on the lids, face, or eye socket.
- Ointment may be prescribed for use after the first dressing. This might not happen for up to a week in some oculoplastic surgery cases.
- If requested, visual acuity should be recorded before ointment is applied. This is because ointment clouds vision. Any existing ointment excess should be removed before taking the measurement.
- A 5-mm strip of ointment should be applied to the inner edge of the lower fornix of the appropriate eye.
- The patient should close his eye and remove excess ointment with a swab.
- The patient should be advised that the ointment is likely to cause blurring of vision due to its viscous nature.
- In the case of wounds on the lids, face, or eye socket, ointment should be squeezed directly onto the wound. It can be dispersed using a moistened swab. If the ophthalmic surgeon requests it, the wound or scar should be massaged using the ointment.
Procedure of Instillation of Eye Ointment
Eye Irrigation
Eye irrigation involves flushing the eye with a sterile solution to remove foreign bodies, irritants, or discharge. This process helps cleanse the eye, reduce inflammation, and improve visual clarity.
Eye irrigation is the washing of the conjunctiva sack with a stream of fluid(water). The gentle flow of the irrigation solution washes away the offending substance from the eye. The solution is typically sterile and isotonic to minimize irritation.
Purpose/Aims of Eye Irrigation:
- To remove foreign bodies from the eye: This includes dust, dirt, small particles, or insects that may have entered the eye.
- To remove chemicals which have been accidentally splashed into the eye(s): This includes chemicals, smoke, fumes, or allergens that may cause irritation.
- To washout discharge: This includes mucus, pus, or other secretions that may accumulate in the eye.
- Reduce inflammation: The flushing action can help reduce inflammation and swelling.
- Improve visual clarity: Removal of foreign objects or discharge can improve vision.
- Before administration of medication: Irrigation can help prepare the eye for medication application.
- In preparation for eye operations: Irrigation can help cleanse the eye before surgery.
Indications for Eye Irrigation:
- Foreign body sensation: If a patient feels something in their eye, such as a speck of dust or a small insect.
- Chemical or irritant exposure: If the eye has come into contact with a chemical or irritant.
- Discharge or secretions: If there is excessive discharge or secretions from the eye.
- Eye infections: In some cases, eye irrigation can help remove infectious material and reduce inflammation in certain eye infections.
Requirements
Tray-sterile
- Irrigating solution-Normal saline at 37°C or plain boiled cooled water(sterile).
- Sterile gloves, patient’s towel
- Lid retractor
- Litmus paper
- Undine or any small container with a pouring spout e.g. feeding cup, bulb syringe or Sterile irrigation set
- Eye pad/waterproof pad
- Gallipot of cotton balls or facial tissues
- 2 receivers, mackintosh cape and towel/dressing mackintosh
- Boric acid 2 to 4 %
- Gallipot of cotton
At the bedside
- Wash hand equipment
- Screen
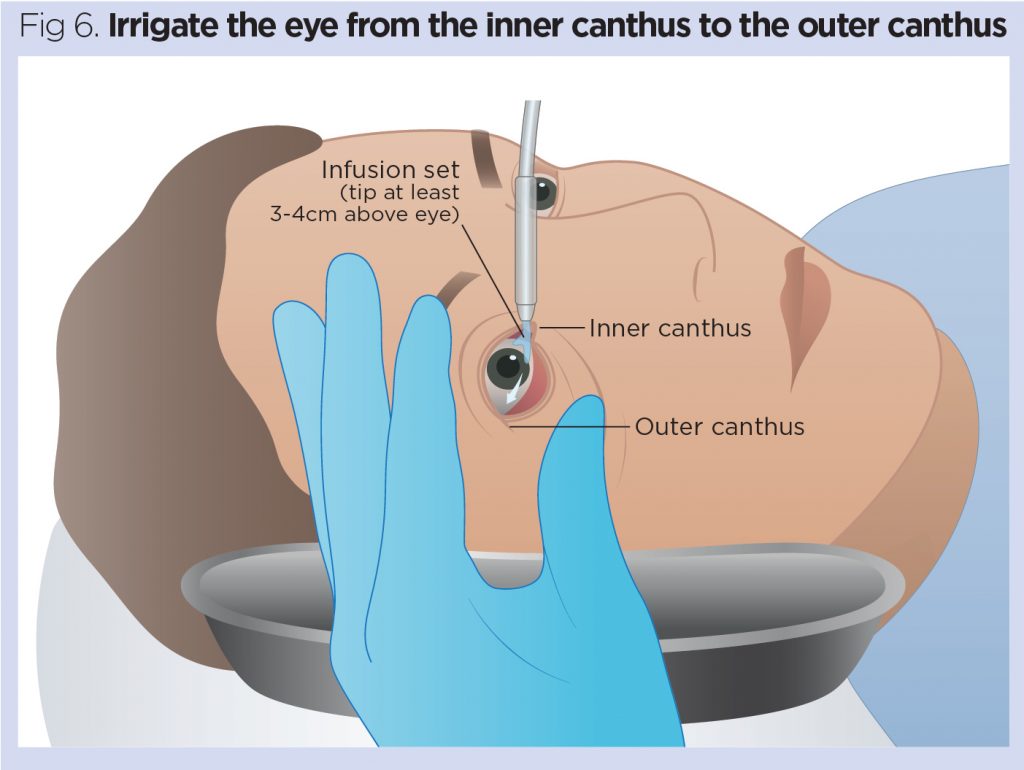
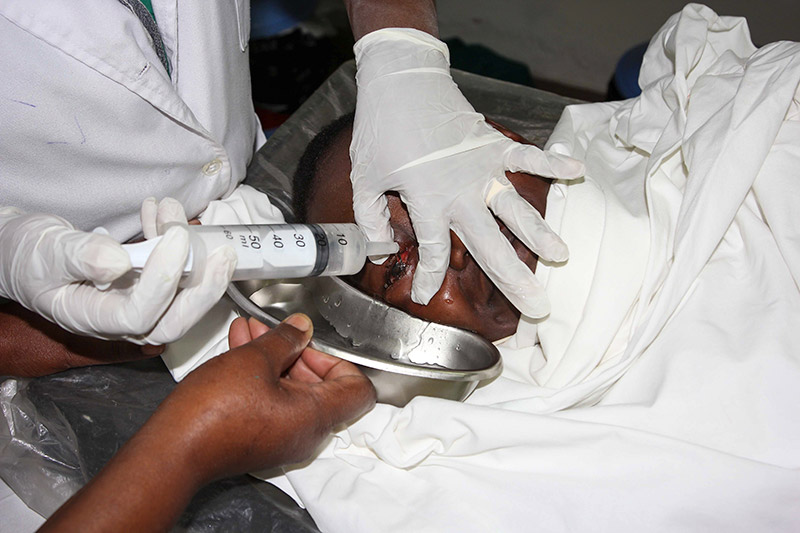
Procedure
Points to remember
- For chemical burns, irrigate each eye for at least 15 minutes with normal saline solution to dilute and wash out the harsh chemicals.
- If the patient cannot identify the specific chemical, use litmus paper to determine if the chemical is acidic or alkaline or to be sure the eye has been irrigated adequately.
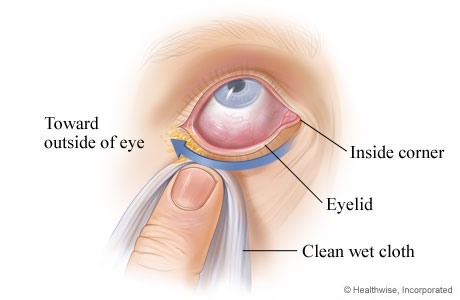
- When irrigating both eyes, ask the patient to tilt his head towards the side being irrigated to avoid contamination.
- An irrigation fluid may be pre-packed in a disposable set for use or a sterile 50ml syringe may be used.
Thanks so much for the good work done…
Good and summarised neat notes
Thanks
Well summarised thank you