

Perform bladder and bowel care (PEX 1.3.3)
Bladder and bowel care is vital for patient comfort, hygiene, and preventing complications like incontinence-associated dermatitis, UTIs, constipation, and fecal impaction.
This PEX focuses on demonstrating the skills required to:
- Assess the patient's bladder and bowel function (e.g., continence, frequency, consistency).
- Assist patients with using a bedpan or urinal (as detailed in the 'Giving a Urinal' and 'Giving a Bed Pan' sections below).
- Provide perineal care as needed (as detailed in the 'Perineal Care' section below).
- Implement measures to promote regular bowel elimination, such as offering fluids and fiber (within dietary restrictions).
- Monitor and record output/elimination.
- Identify signs of bladder or bowel issues and report them.

Giving a Urinal
Urinal is used for male patients to void the urine; the nurse should be able to assist the bed ridden patient to void into a urinal (a plastic or steel receptacle for urine in bed) by taking the penis with a towel and placing it into the urinal.
In case of female patients, a nurse should provide a bedpan for the bedridden to collect the urine.
Purpose:
- To promote comfort
- To assist to void
- To prevent bed wetting
- To maintain the urinary output record
- To minimize the physical and emotional strain.
Timing of patients to void: It is advisable to offer the patient a bed pan or urinal at the following times;
- Early morning when the patient wakes up.
- Before doctor’s round in the morning.
- After mid-day meal.
- After 4PM tea.
- After supper.
- When a night nurse comes on duty, and further when necessary at night.
Requirements (for giving a urinal/bedpan):
Trolley:
Top shelf:
- Gloves
- Clean linen if required
- Hand washing basin/mug and water
- Soap in a soap dish
- Basin and rowel
Bottom shelf:
- Clean urinal/bed pan (female patient)
- Measuring jar
- Toilet paper if required
- Mackintosh and draw sheet
- Mackintosh and towel
At the bedside:
- Screens
Procedure:
- Collect the equipment needed.
- Explain the procedure to the patient.
- Provide adequate privacy to help the patient relax and able to void.
- Wash hands thoroughly and put on gloves.
- Place the patient in a proper body alignment.
- Place a mackintosh and draw sheet on the bed to prevent soiling of the bed or the patient’s body.
- Lift the beddings or roll back and position the urinal so that the patient may grasp the handle and allow him place it rightly, if he is conscious or else position the penis into the urinal when he is not able.
- Remain with helpless patients, get assistance from relatives if need be.
- Remove the urinal/bed pan after the patient has voided.
- Assist the patient to wash the perineal area or dry up with the tissue for the case of female patients and to wash hands.
- Change the bed linen if required.
- Place the patient in a proper comfortable position.
- Measure and empty the urine in the sluice room and clean the urinal/bed pan ready for the next use. Specimen is kept if necessary or sent to the laboratory as ordered.
- Remove the gloves and wash hands after the procedure.
- Record the procedure and the findings to the patient’s chart and remember to fill in the amount in the fluid balance chart of the patient (input output chart)
- Report any abnormalities to the nurse in-charge or physician.
Giving a Bed Pan
Bed pan is made of steel or plastic device to meet the elimination need of the patient confined in bed. Bed pans are used by female patients for voiding and fecal elimination and males for elimination of feces.
Purpose:
- To promote comfort
- To facilitate bowel and bladder emptying.
- To collect specimen for diagnostic purpose.
- To promote continence during bowel and bladder training.
- To give perineal wash.
Indications (for giving a bedpan):
- patients with spinal injury
- post operative patients
- patients with fractures and on traction
- chronic bed ridden patients
- Patients who are on strict bed rest.
Requirements: Same as for giving a urinal, but with a Bedpan with lid on the Bottom shelf.
Procedure:
- Collect all the equipment needed.
- Explain the procedure to the patient and to assist in the lifting of the hip.
- Provide adequate privacy to help in elimination.
- Position the patient for easy lifting by lowering the head of the bed so the patient in in supine position.
- Wash hands and put on gloves.
- Place the mackintosh under the buttocks to prevent soiling.
- Assist the patient to lateral position using the side rail for support or 2nd nurse or relative.
- Place the warm, dry bed pan under the patient’s buttocks; powder the bed pan if necessary.
- While holding the bed pan with one hand, help the patient to roll on his/her back while pushing against the bedpan towards the center of the bed to hold it in place. OR
- Assist the patient to lift the buttocks while in supine position by supporting the back with the left hand and slip the bed pan under the patient’s buttocks placing it firmly and in a right position. If the patient is not able to lift him/herself, two nurses or three nurses should help to lift the patient onto the bedpan.
- Encourage the patient to assume a normal position for defecation if possible.
- Provide adequate time to pass motion/urine.
- Once the patient has passed, permit to clean self by giving a toilet paper. Assist to pour water to wash hands on completion.
- If the patient is unable to clean, pour water and clean using long artery forceps and cotton balls.
- Remove the bed pan by carefully lifting the patient with the help of more nurses if not able by him/herself. OR
- Ask the patient to raise his/her hips and withdraw gently the bed pan.
- Cover it immediately and dry the wet mackintosh or remove if an extra one was used.
- Secure or put back the draw sheet and position the patient comfortably.
- Bring the bed pan to the sluice room, empty, clean and disinfect if necessary. Dry and keep for the next use.
- Specimen may be kept if needed or sent to the laboratory as ordered.
- Remove the gloves and wash hands thoroughly after the procedure.
- Record and report the findings to the nurse in-charge or physician.
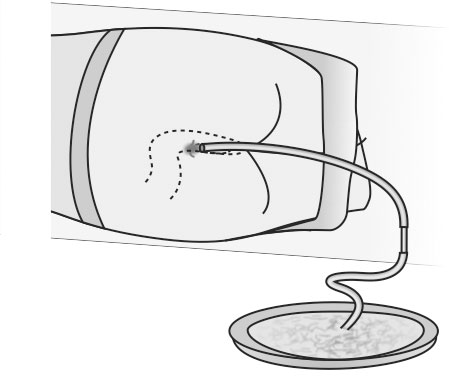
Passing a flatus tube (PEX 1.3.4)
INSERTION OF THE FLATUS TUBE A flatus tube is passed to relieve flatulence in the abdomen. It is a special kind of tube with the opening at the end, not at the side like the catheter.
A flatus tube is passed to relieve abdominal distention due to accumulation of gas in the lower bowel often after abdominal operation.
Requirement: Tray
- Galipot of swabs
- Galipot of lubricant
- Bowl containing; flatus tube, glass connection, rubber tubing
- Receiver for used tube
- Receiver for used swabs
- Dressing towel
- Bowl of water
- Gloves
Procedure:
- Collect the equipment needed for the procedure.
- Explain the procedure to the patient.
- Provide the patient with privacy using screens and closing of adjacent windows.
- Position the patient in a comfortable position e.g. in left lateral position.
- Wash hands and put on gloves.
- Place the mackintosh and towel in position.
- Connect up the apparatus and lubricate the flatus tube.
- Place the end of the rubber tubing under the water in the bowl and pass the lubricated end of the flatus tube 10-15cm into the rectum. Watch for air bubbles passing out of the end of the tube through the water.
- The tube may be left in position for 30 minutes if necessary. If not, remove the tube.
- Leave the patient comfortable and clear away.
- Wash the flatus tube with soap and water, autoclave or sterilize the tube for 5 minutes. Wash the equipment, dry and put away (keep for the next use).
- Remove the gloves and wash hands.
- Record the procedure and report the results to the physician or in-charge.

Administration of enemata (PEX 1.3.5)
ENEMAS/CLYSIS An enema is a solution introduced into the rectum and sigmoid colon to remove fecal matter and/or flatus. Enema can also be used to instill medications or nutrition (nourishment.) The commonest enema used is the cleansing enema. This type of enema stimulates peristalsis via irritation of the colon/rectum and by causing intestinal distention with fluid.
There are types of cleansing enema i.e. the large volume and small volume enema.
- Large volume enema - is designed to clean the colon off as much feces as possible, between 500 to 1000ml of fluid is instilled into the colon.
- Small volume enema - is designed to clear the rectum and the sigmoid colon off the fecal matter, between 50 to 200ml is most frequently administered using pre-packed disposal kit making it ideal for home care use.
Purpose:
- To promote defecation by stimulating peristalsis (primary purpose) - purgative enema.
- To relieve constipation or fecal impaction.
- To prevent involuntary defecation during surgical procedure.
- To promote visualization of the intestinal tract by x-ray film or instrument examination; diagnostic purpose - barium enema.
- To help establish regular bowel function during bowel training program.
- To relieve flatulence and fecal matter.
- To reduce temperature e.g. cold enema.
- To check diarrhea e.g. starch opium enema.
- To cleanse the bowel before x-ray studies.
- To induce anesthesia e.g. anesthetic enema.
- To administer medications.
- To destroy intestinal parasites e.g. anti-helminthic enema.
- To administer fluids and nutrients (for nutrition)
- To relieve inflammation.
Classification of enemas: Enema is classified as cleansing, retention and return flow/Harris flush enema.
Cleansing enema: Removes feces from the colon, the most frequently used solution types are; tap water (hypotonic), normal saline solution (isotonic), soap suds solution and low volume hypertonic solution.
The large volumes of solution may present a danger to the patient with weakened intestinal walls, so the suggested maximum volume according to age group of the patients are as follows;
- Infant - 150-250ml at the T° of 100°F
- Toddler - 250-350ml at the T° of 100°F
- School age - 350-500ml at the T° of 100°F
- Adolescent - 500-750ml at the T° of 100°F
- Adults - 750-1000ml at the T° 105 to 110°F
N.B. Soap suds may be added to tap water or saline to create the irritating effect to the intestinal tract. Only pure castle soap is safe or plain yellow soap/soft soap. Soaps or detergents can cause serious bowel inflammation. The recommended ratio of soap solution is 5ml (1 tea spoon) of castle soap to 100ml of warm water or saline.
Retention enema: These are retained in the bowel for a prolonged period for different reasons as given below;
- Oil enema - it is given to soften the fecal matter in cases of constipation, to make defecation easier. It must be retained for ½ or 1 hour, about 115 to 200ml of solution is administered to adults at the temperature of 100°F (37.8°C). The solutions used are olive oil, gingerly oil, castor at the ratio of 1:2.
- Carminative enema - it is also known as antispasmodic enema. It is given to relieve gaseous distention of the abdomen by increasing peristalsis and expulsion of flatus. Common solutions used include 8 to 16ml of turpentine mixed thoroughly with 600ml to 120ml of soap solution, milk (warm) and molasses enema 90 to 230ml well mixed with equal quantity, and the MCW enema (30ml of magnesium sulphate, 60ml of glycerin and 90ml of warm water)
- Medicated enema - used to administer medication that are absorbed through the rectal mucosa e.g. dexamethasone for ulcerative colitis, neomycin solution before bowel surgery.
- Anti-helminthic enema - is given to destroy and expel intestinal parasites (worms). Cleansing enema must be given prior to anti helminthic enema so that the drug comes in to direct contact with worms and the lining of the intestines. The solution used is infusion of quassia 15gm of chips to 600ml of water or hypertonic saline solution (sodium chloride) 60ml with 600ml of water - amount of solution given is 250ml.
- Nutritive/nutrient enema - it is given to supply food and fluids to the body rectally. Secretion of the fluids depend upon the ability of the colon to absorb it, nutrient enema is particularly useful in condition like hemophilia. The solution used is normal saline, glucose saline 250ml 5%, peptonized milk 120ml. amount of solution used is 110 to 1700ml in 24 hours or 180 to 270ml 4 hourly intervals. The temperature of the solution is 100°F (37.8°C)
- Cold enema/ice-water enema - is given to reduce body temperature in hyper pyrexia and heat stroke. It is given in the form of colonic irrigations, the temperature of the solution is 80 to 90°F (27 to 32°C)
- Glycerin enema - given to children, fever patients and post operative patients. Pure glycerin and water at ratio of 1:2 is given.
- Astringent enema - given to contract the tissues and blood vessels and helps to check bleeding and inflammation hence lessening the amount of mucus discharge and gives temporary relief in the inflamed area. It is usually given in colitis and dysentery. The solution used are tannic acid 25g to 600ml of water, alum 30g to 600ml of water and silver nitrate 2%(silver nitrate is dissolved in distilled water)
- Sedative enema - this contains an anesthetic drug to produce anesthesia in the patient. The commonly used drugs are paraldehyde and over tin, the dose given is as per the doctor’s order. Or starch and opium is given.
- Stimulant enema - given to treat shock and collapse. Coffee enema is given in case of opium poisoning. Solution used are black coffee 1 teaspoon of coffee powder to 300ml of water and amount used is 180 to 240ml at the temperature of 108 to 110°F (42- 43°C)
- Emollient enema/starch enema - given in case of diarrhea to relieve irritation in an inflamed mucous membrane. The solution used is starch and opium Tr, opium 1 to 2ml added to 120-180ml of starch mucilage or rice water at the temperature of 100 to 105°F (37.8 to 40.5°C)
Contraindications (Enemas):
- Acute myocardial infarction and cardiac problems
- Acute renal failure (sodium retention problem)
- Dehydrated patients
- Young infants
- Appendicitis
- Obstetrical and gynecological problems e.g. fistulae (RVF) etc.
Methods of giving enema:
- Enema can and tube method - when large amounts of fluid are to be given, this method is used e.g. soap and water enema.
- Funnel and catheter method - when small quantity of fluid is to be given, this method is used e.g. oil enema.
- Glycerin syringe and catheter method - when small quantity of fluid is to be given, this method is used e.g. purgative enema.
- Rectal drip method - when fluid is to be administered very slowly in -order to aid in its absorption e.g. nutrient enema.
General Rules (Enema Administration):
- The appropriate size of rectal catheter or rectal tube of enema is affine Jacques or French 22’’ for adults, 12’’ for infants and 14 to 18’’ for school age children.
- The rectal tube needs to be smooth and flexible.
- The rectal tube is lubricated with water soluble lubricant or Vaseline to facilitate insertion and to decrease irritation of the rectal mucosa.
- The temperature of the solution needs to be adjusted according to the purpose of the enema.
- The amount of the solution to be administered depends upon the type of enema, the age and the size of the person.
- The patient should be placed in left lateral position, when enema is to be administered. In this position the sigmoid colon is below the rectum thus facilitating instillation of the fluid.
- The distance to which the tube is inserted depends upon the age and the size of the patient. For an adult it is normally 7.5 -10cm (3 to 4 inches), for children 2.5 to 3.75cm (1 ½ inches)
- The height of enema should not be above 18 inches (20cm) from the anus.
- The length of the time that enema solution is to be retained depends on the purpose. For example oil enema retention is usually for 2-3 hours and other cleansing enemas are normally retained for 5 to 10 minutes.
- Pre-packed enema will have its own instructions which need to be followed.
- Prevent air from entering into the rectum by expelling air from the tube.
- If the rectum is impacted, attempt to remove the fecal matter with a gloved finger.
- Make sure the whole apparatus used for the administration of enema is in good condition before beginning the procedure.
- Regulate the flow of fluid according to the type of enema.
- Listen to the patient’ complaints while giving the enema and do not ignore and discomfort however small it is.
- The solution should be given slowly. So that the patient does not experience discomfort and expel the solution for the case of retention enema.
Requirements (Enema Administration):
Trolley:
Top shelf:
- Funnel or enema can/container
- Rubber tubing
- Glass connection
- Rectal catheter in different sizes according to the patient in a kidney dish
- Gate clip/screw clamp and nozzle
- Lubricant and applicator (Vaseline or KY jelly)
- Swabs in galipot
- Jug of fluid/solution
- Thermometer for enema solution (lotion thermometer)
- Gloves
Bottom shelf:
- Receiver for used swabs and applicator
- Receiver for used catheter
- Bed pan or bedside commode, if patient will not be able to ambulate to the toilet.
- Urinal with cover.
- Toilet paper
- Strapping and scissors
- Mackintosh and towel
- Sterile drainage bottle, if catheter to remain in position
- Basin and wash cloth
- Clean bed linen, if needed
At the bedside:
- Screens
- Hamper if necessary
- I.V stand pole
Procedure (Enema Administration - Detailed):
- Collect all the necessary equipment needed.
- Explain the procedure to the patient.
- Position the patient in left lateral position
- Wash hands thoroughly and put on gloves.
- Attach tubing to enema can and clamp the tube.
- Prepare the solution at required temperature and check the temperature using bath thermometer.
- Hang the enema can/solution on I.V stand and adjust the height to 18 inches from the bed.
- Place the mackintosh and towel beneath the patient.
- If there is a question regarding the patient’s ability to hold the solution, place a bed pan on the bed nearby.
- Pour the solution into the can, expel the air and clamp the tube. Air entry into the rectum may cause discomfort.
- Lubricate the tube (tip) 5cm (2 inches)
- Separate the patient’s buttocks and visualize the anus clearly, insert rectal tube gently to a distance of 2-4 inches.
- Encourage the patient to take deep breaths during administration of the fluid.
- Clamp or pinch the rectal tube if the fluid is about to get over to avoid air entry.
- Remove the rectal tube and dispose it off properly.
- Instruct the patient to hold the solution for 10-15 minutes.
- Clean the lubricant, any solution, any feces from the anus with toilet tissue.
- Have the patient to continue to lie on the left side for the prescribed length of time.
- When the patient has retained the enema for the prescribed time, assist to the bedside commode or toilet or position in supine onto the bedpan.
- When the patient has finished expelling the enema, assist to clean the perineal area if not able to do so.
- Return the patient to comfortable position. Place the clean dry protective pad under the patient to catch any solution or feces that may continue to be expelled.
- Clear away, clean and replace the equipment.
- Remove gloves and wash hands thoroughly.
- Record the procedure to the patient’s chart and report any abnormalities to the nurse in-charge or physician.
Assignment: Read and make short notes on other types of enemas.
Carry out relevant investigations (PEX 1.3.6)
Nurses assist with various investigations to help diagnose and monitor patient conditions. This PEX involves demonstrating the ability to prepare for and assist with these investigations, potentially including collecting specimens or preparing the patient.
Based on the detailed notes, the procedure for Urine Testing is provided, which aligns with carrying out relevant investigations.
Urine Testing

URINE TESTING Is the observation and examination of urine in order to diagnose illness.
Points to observe and report (“CASDORA”)
- C-Color
- A-Amount
- S-Specific Gravity
- D-Deposits
- O-Odor
- R-Reaction (PH)
- A-Abnormalities
Color: Normal urine color is clear amber. It can be pale if a lot of fluids is taken and darker when no or little fluid is taken, in this case the urine is described as concentrated.
- Blood - small amount give smoky appearance, large amount give a red color.
- Bile - small amount give a dark brown color (like strong tea), larger amounts give a brownish green color.
Amount: The average adult passes 1 to 1 ½ liters of urine in 24 hours depending on fluid intake.
Specific gravity: Is the density of fluid compared to that of an equal volume of water. The specific gravity of normal urine is 1010-1025.
Deposits: Urine contains 4% solids which are in solution. Deposits which may be found in urine are;
- Mucus - this forms a white fluffy cloud at the bottom of the glass.
- Urates - these form a pink deposit at the bottom of the glass. Usually present when urine is concentrated.
- Phosphates - white sediment at the bottom of the glass.
- Pus - this is seen as a white ropy deposit in the urine.
Odor: The characteristic odor of urine may be altered by the presence of;
- Acetone - the urine has a sweet smell like new mown grass.
- Infection - the urine may have an offensive fishy odor e.g. in gonorrhea.
- Ammonia - this is due to decomposition of urine.
Reaction: Urine is normally acidic but becomes alkaline if allowed to stand for some time, due to the presence of ammonia. The reaction is tested using a litmus paper or multi test urine sticks. Acid urine turns the blue litmus paper red. Alkaline urine turns the red litmus paper blue. Urine which does not change the color of either litmus paper is neutral.
Multi-test urine sticks have an indicator strip which gives the reaction of urine in terms of ph. The stick is dipped into the urine and the color change compared with the given chart.
Abnormality: The abnormalities to be detected are;
- Protein - color changes to green indicating that protein is present.
- Sugar/glucose - if glucose is present, the color turns to blue.
- Acetone (ketone bodies) - the color turns to mauve to dark purple depending on the amount of ketones present in the urine.
Requirements:
Tray:
- Rack of test tubes
- Reagent: Benedict’s solution
- Acetest tablets
- Esbach’s tube
- Spirit lamps or candles or paraffin lamp
- Glass container
- Glass rode
- Acetic acid, acetest powder
- Uristix/clinistix tablets
- Box of matches
- Ethylated spirit
- White paper/filter paper
Or (for testing with litmus/urine sticks)
- Red and blue litmus paper or urine sticks
- Clean gloves
- Receiver for used litmus paper or urine sticks
- Receiver for used gloves
- Urine container (must be clean) and marked and urine in it
- Pipette in a kidney dish or dropper/syringe
- Urinometer
- Pen and form to record
Procedure:
- Collect the equipment needed.
- Wash hands and put on the gloves.
- Observe the urine for color and deposits/appearance. Presence of pus and mucus, blood, phosphates etc. color amber yellow or not
- Measure the amount of urine using the measuring jar.
- Place the urinometer in the container containing urine allow it to float to measure the specific gravity.
- Use a dropper/pipette and drop the urine onto the litmus paper and observe the color to test the ph. Or dip the urine stick into the urine and color change compared with the given color in the chart.
- Clear away and wash hands thoroughly.
- Record the findings and report any abnormalities to the nurse in-charge or physician.
Testing Urine Abnormalities
Testing urine abnormalities involves specific chemical tests:
| Abnormality | Reagent | Method | Result |
|---|---|---|---|
| Protein (any of the methods may be used) | Boiling method | Urine must be acidic in reaction. If necessary add 2-3 drops of acetic acid Half fill the test tube with urine; boil the top 1/3 over the lamp. If a white cloud appears, add 2 drops of acetic acid. |
If the cloud persists, protein is present. Interpret according to the thickness of the urine. |
| Albustix | Dip the treated end of the stick into the urine. Remove immediately and wipe the back part of the strip on the edge of the container to remove the extra urine. Compare with the scale on the container. Do not handle the treated end with fingers. | The result is read immediately. A change of color will show the approximate amount of protein present as shown on the color chart. | |
| Sugar/glucose | Benedict’s test | Put 5mls of Benedict’s reagent in a clean test tube and add 8 drops of urine. Boil the bottom end of the test tube for 2 minutes over a spirit lamp. | Sugar is present if the color changes as follows: green +, yellow ++, orange +++, brick red ++++. |
| Clinistix | Dip the treated end of the stick into the urine. Compare with the scale on the container. Do not handle the treated end with fingers. | The result is read immediately. A change of color will show the approximate amount of sugar present as shown on the color chart. | |
| acetone | Acetest tablets/powder | One acetest tablet is placed on a clean white surface. One drop of urine is put on to the table and results read in 30 seconds. | The tablet turns mauve to dark purple depending on the amount of ketones present in the urine. Compare the color of the tablet to the color chart. |