Suturing

SUTURING OF THE WOUND

Suturing

Suturing is the process of closing a wound by stitching the wound edges together using a surgical needle and thread. 

It is a fundamental technique in wound management and surgical procedures to facilitate healing, prevent infection, and restore tissue integrity.


Purpose of Suturing

The primary goals of suturing are:

  • ✅ To approximate wound edges until healing occurs.
    ✅ To speed up the wound healing process by stabilizing the tissue.
    ✅ To minimize the risk of infection by reducing the open surface area.
    ✅ To improve cosmetic outcomes and minimize scarring.
    ✅ To provide additional support in high-tension areas or deep wounds.
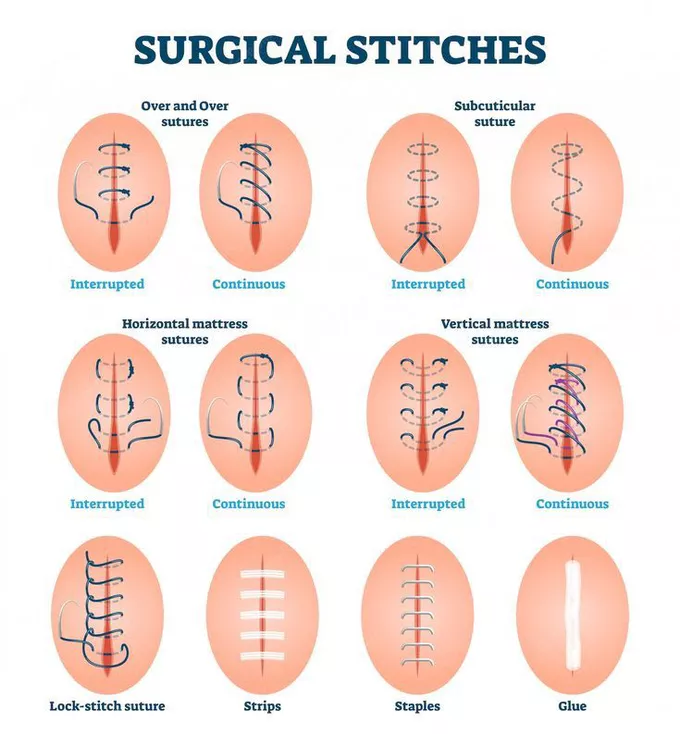
Types of Sutures

Types of Sutures

Sutures are broadly categorized into interrupted and continuous sutures.

1. Interrupted Sutures

  • In interrupted suturing, each stitch is placed individually and tied separately.
  • This is the most commonly used wound closure technique.
  • The individual stitches are not connected, reducing the risk of wound dehiscence if one stitch fails.

✅ Advantages:
✔ Easy to place.
✔ High tensile strength.
✔ Individual stitches can be removed if infection occurs without affecting the entire closure.

❌ Disadvantages:
✖ Takes more time to place compared to continuous sutures.
✖ Requires more suture material.
✖ Each knot increases the risk of infection.


2. Continuous Sutures

  • A single thread runs through the wound in a series of stitches and is tied only at the beginning and end.
  • The stitches are connected, making it faster for long wounds or surgical incisions.

✅ Advantages:
✔ Faster than interrupted sutures.
✔ Requires less suture material.
✔ Distributes tension evenly along the wound.

❌ Disadvantages:
✖ If the suture breaks, the entire closure may fail.
✖ Increased risk of dehiscence in high-tension areas.

Retention Sutures:
These are large interrupted sutures placed in addition to standard skin sutures.

  • They support deep incisions, particularly in obese patients or high-risk wounds where dehiscence is likely.
  • Often reinforced with rubber tubing to prevent the sutures from cutting into the skin.
  • Retention sutures are typically removed after 14–21 days (longer than regular sutures).

Suturing Patterns

Based on the pattern of suturing, stitches can be classified as:

Suturing Pattern

Description

Plain Interrupted

Single, unconnected stitches; most common technique.

Plain Continuous

One continuous stitch running along the wound, tied at both ends.

Mattress Interrupted

Provides deeper support, with stitches looping through multiple layers.

Mattress Continuous

A continuous version of mattress suturing for stronger wound closure.

Blanket Continuous (Locking Stitch)

Each stitch loops into the previous one, creating a stronger hold.

💡 Suturing Technique Tip: Each suture should be placed as deep as it is wide, and the distance between the sutures should be equal to the depth and width of the wound to ensure proper healing.

Suture Materials

Suture Materials

A suture material is the thread used to stitch a wound

These materials vary in absorption, strength, and application.

Suture materials are classified into:

Type

Examples

Usage

Absorbable Sutures

Surgical gut (catgut)

Used for internal tissues (e.g., beneath the skin) where the sutures dissolve naturally.

Non-Absorbable Sutures

Silk, Nylon, Dacron, Stainless Steel

Used for skin closure, removed after healing.


1. Absorbable Sutures

Absorbable sutures naturally break down and are absorbed by the body over time.

✅ Advantages:
✔ No need for suture removal.
✔ Ideal for internal tissues (e.g., intestines, muscles, and subcutaneous tissues).
✔ Available in multiple sizes (ranging from 0000000 to No. 5).

❌ Disadvantages:
✖ May cause an inflammatory reaction as they degrade.
✖ Not suitable for long-term wound support.

Types of Absorbable Sutures

Type

Absorption Time

Description

Plain Catgut

5–10 days

Rapid absorption, used in fast-healing tissues.

Chromic Catgut

10–40 days

Coated with chromium salts to prolong absorption and reduce irritation.


2. Non-Absorbable Sutures

Non-absorbable sutures do not dissolve and need to be manually removed once the wound has healed.

✅ Advantages:
✔ High tensile strength – they do not easily break.
✔ Minimal tissue reaction, reducing inflammation.
✔ Can be used for ligatures to tie off blood vessels.

❌ Disadvantages:
✖ Requires removal after healing.
✖ Can cause irritation if left in place too long.

Common Non-Absorbable Suture Materials

Material

Properties

Usage

Silk

Soft, flexible, easy to handle

Used in skin closure and ligatures.

Nylon

High tensile strength, minimal reactivity

Used for skin sutures and deep tissue repair.

Dacron/Polyester

Strong, durable

Used in cardiovascular and orthopedic procedures.

Stainless Steel

Extremely strong, resistant to infection

Used for bone repair and surgical staples.

🔹 Ligature (Tie Sutures):
A ligature is a free piece of suture material used to tie off blood vessels that have been clamped with artery forceps to prevent bleeding.


Suture Removal Guidelines

The time for removing sutures varies depending on the wound location and type.

Wound Location

Suture Removal Time

Face

3–5 days

Neck

5–7 days

Scalp

7–10 days

Trunk & Upper Limbs

10–14 days

Lower Limbs & Joints

14–21 days

Retention Sutures

14–21 days


Nursing Considerations in Suturing

  • Choose the appropriate suture material based on wound type, location, and required tensile strength.
  • Use absorbable sutures for internal tissues to avoid the need for removal.
  • Use non-absorbable sutures for skin closure, ensuring proper follow-up for suture removal.
  • Place sutures evenly to distribute tension and prevent scarring.
  • Monitor for infection (redness, swelling, pus formation) and remove affected sutures if needed.
  • Ensure wound edges are well-approximated but not overly tight to avoid necrosis.
Suture Needles

Suture Needles

Suture needles are essential tools in wound closure and are classified based on their shape, function, and method of attachment to the suture material.

1. Classification Based on Shape

Type of Needle

Description

Common Uses

Straight Needles

Used without a needle holder

Suturing skin layers and easily accessible wounds

Curved Needles

Require a needle holder; allow precise control

Deep wounds, internal tissues, and confined spaces

Half-Circle Needles

A variation of curved needles, providing greater maneuverability

Used in deeper surgical procedures

Straight Needles: Are used for superficial wounds where access is easy. They are often manipulated without a needle holder, making them suitable for skin closure.

Curved Needles: Preferred for deeper wounds or when working in confined spaces. They require a needle holder for precise placement and controlled passage through tissue. Curved needles are further categorized by the degree of curvature (e.g., 1/2 circle, 3/8 circle).


2. Classification Based on Function

Needle Type

Description

Common Uses

Cutting Needle

Three-edged triangular needle; sharp enough to cut through dense tissue

Used for skin, tendons, and the cervix

Reverse Cutting Needle

Has the cutting edge on the outside curve

Reduces risk of sutures pulling through the tissue

Non-Cutting Needle (Round Body Needle)

Rounded tip; does not cut through tissue

Used for delicate tissue like intestines, blood vessels, and subcutaneous tissues

Cutting Needles: Characterized by three-edged, triangular points designed to cut through dense tissues. Commonly used for skin, tendons, and the uterine cervix.

Non-Cutting (Round Body) Needles: Feature a rounded point that separates rather than cuts through tissues. Ideal for delicate tissues beneath the skin, reducing trauma and the risk of tearing.


3. Classification Based on Suture Attachment

Needle Type

Description

Advantages

Traumatic Needle (Eye Needle)

Has an eye/opening at one end to thread the suture

Can use different suture materials; cost-effective

Atraumatic Needle (Swaged Needle)

Suture material is pre-attached to the needle

Minimizes tissue trauma and provides better handling

Traumatic (Eyed) Needles: These needles have an eye through which the suture material is threaded. The suture diameter is larger than the needle, causing more tissue trauma during passage.

Atraumatic (Swaged/Eyeless) Needles: In these needles, the suture is directly attached to the needle during manufacturing. This results in a suture diameter equal to or smaller than the needle, minimizing tissue trauma. Atraumatic needles are preferred for delicate tissues like intestines, brain, mucous membranes, and nerves.

Suturing

Wound Suturing

In addition to standard dressing materials, the following sterile equipment is required for wound suturing:

  • Sterile gloves
  • Sterile drapes (hole sheet)
  • Sterile needle holder
  • Sterile round needle(s)
  • Sterile cutting needle(s)
  • Sterile suture material (silk, catgut, etc.)
  • Sterile tissue forceps
  • Sterile suture scissors
  • Sterile dressing forceps
  • Antiseptic solution (e.g., iodine)
  • Local anesthetic

Nurse’s Responsibilities in Wound Suturing

In most healthcare settings, suturing is the responsibility of doctors. However, in some hospitals, nurses may be responsible for suturing small wounds, depending on institutional policies.

Preliminary Wound Assessment Before Suturing

Assessment Factor

Purpose

Circumstances of injury

Helps determine wound contamination risk.

Nature of the wound

Identifies if it is caused by a sharp or blunt object, influencing suturing decisions.

Time elapsed since injury

Older wounds are at higher risk of infection and may need debridement.

Patient’s medical history

Conditions like diabetes can affect healing.

Previous wound healing history

Assesses abnormal bleeding, keloid formation, or past wound dehiscence.

Medications

Drugs like corticosteroids delay healing.

Allergy history

Checks for allergic reactions to local anesthesia.

Tetanus immunization status

Tetanus toxoid should be given if necessary.

Wound depth and location

Determines whether general anesthesia is required.

Foreign bodies

Must be removed before suturing to prevent infection.

Devitalized tissues

May need debridement before closure.

Bleeding control

Bleeding points should be ligated before suturing.

Associated complications

Identifies fractures, nerve damage, or tendon injuries requiring further intervention.

Preliminary Assessment

  1. Assess the circumstances under which the wound was produced. This will help to evaluate the possibility of wound contamination.
  2. Assess the nature of the wounding object e.g., blunt, sharp, etc. this will help to assess the depth of penetration of the object and also to identify the puncture wounds.
  3. Assess the duration of time after the injury. This will help to assess the healing process. If the wound is exposed for a prolonged period, there always is the possibility of wound infection.
  4. Check the presence of existing illness in the patient that may influence the healing process e.g. Diabetes mellitus.
  5. Prior healing history is to be assessed. This will help us to find out abnormal bleeding time, wound dehiscence in the past, formation of excessive scar tissue etc.
  6. Check the drugs, the injured person has been taking e.g., cortico-steroids. This will delay the healing process.
  7. Take a history of allergies in the past, especially allergic reaction to local anaesthetics.
  8. Date of most recent tetanus immunization. All patients with a roadside injury should be given tetanus toxoid to prevent tetanus.
  9. Wound location and the type of wound. A penetrating wound should be sutured under general anaesthesia. There is the possibility of injury of the underlying organs.
  10. Watch for the presence of foreign bodies, presence of penetrating objects etc. penetrating objects should not be disturbed until everything is ready for suturing, for fear of bleeding.
  11. Assess the presence of devitalized tissues. This necessitates debridement prior to suturing.
  12. Presence of bleeding. The bleeding points have to be ligated before suturing to prevent further bleeding.
  13. Presence of complications such as fractures, shock, tendon injuries, nerve injuries etc. this necessitates further treatment.
  14. Check the consciousness of the patient and the ability to follow.

Preparation of the Patient and the Environment

  1. Explain the procedure to win the confidence and co-operation of the patient. Explain the sequence of the procedure and tell the patient how he can cooperate with you. Reassure the patient and his relatives.
  2. Get the signature of the patient or his guardian in case anaesthesia is to be given.
  3. Prepare the wound area for a surgical procedure. Shave the hairy regions. Clean the surrounding skin thoroughly with an antiseptic. While shaving and cleaning the area, place a sterile cotton pad or gauze piece over the wound to prevent future contamination of the wound.
  4. Give analgesics if the patient is in pain.
  5. Provide privacy with curtains and drapes, if necessary.
  6. Protect the bed with a mackintosh and towel.
  7. Call for assistance if necessary e.g., to hand over the sterile supplies, to restrain the patient etc.
  8. Place the patient in a comfortable position. See that the doctors or the nurse are also in a comfortable position to do the procedure.
  9. Apply restraints in case of children.
  10. See that the unit is in order with no unnecessary articles. Clear the bedside table or over-bed table and arrange the articles conveniently.
  11. See that there is sufficient light. Adjust the spot light to provide maximum light in the wound area.
  12. Turn the patient’s head away from the wound to prevent the patient from seeing the wound and getting worried.

Wound Suturing Procedure

Step

Action

Rationale

1

Explain procedure to patient

To reduce anxiety and gain patient cooperation.

2

Adjust light

To provide optimal visualization of the wound.

3

Wash your hands

To reduce the risk of infection.

4

Clean the wound thoroughly

To remove debris and bacteria from the wound site.

5

Wash your hands again

To further minimize the risk of infection before donning sterile gloves.

6

Put on sterile gloves

To maintain a sterile field.

7

Drape the wound with the hole-sheet

To create a sterile field around the wound and isolate the area.

8

Infiltrate the edges of the wound to be sutured with local anesthesia.

To minimize patient discomfort during the procedure.

9

Approximate the edges of the fascia with the help of the tissue forceps and using the round needle and cat-gut. Suture the fascia layer first.

To close the deeper tissue layers and provide support.

10

Using the cutting needle and silk, suture the outer layer of skin approximating the edges with the help of the tissue forceps.

To close the skin edges and promote healing.

11

Clean with iodine and cover with sterile gauze.

To disinfect the wound and protect it from infection.

12

Remove the hole-sheet

To remove the drapes.

13

Make patient comfortable

To ensure patient well-being.

14

Remove all equipment, wash and return to its proper place or send for sterilization.

To maintain a clean environment and prepare instruments for future use.

After Care of the Patient and the Articles

  1. Following wound closure, clean the wound again and apply a multilayered dressing to absorb drainage and to arrest bleeding by exerting pressure.
  2. Secure the dressings with a roller bandage or adhesive tapes. As far as possible, avoid covering the wound area with adhesive straps, completely, because it may foster accumulation of moisture and subsequent maceration of the wound edges.
  3. Keep the wound as dry as possible.
  4. Remove the mackintosh and towel. Replace the bed linen. Change the garments if necessary. Make the patient comfortable by adjusting his position in bed.
  5. Ask the patient to rest in bed to prevent fainting attacks.
  6. Elevate the injured part above the heart level to minimize the oedema and pain. Mild analgesics may be given to reduce pain.
  7. Take all the articles to the utility room. Discard the soiled dressing and send it for incineration. Wash and clean the articles first in the cold water and then with warm water and soap. Wash them thoroughly and dry them. Reset the suturing tray and send for autoclaving. Replace all articles to their proper places.
  8. Wash hands. Record on the nurses record with date and time the type of the wound, the number of sutures applied, type of drainage tube applied, if any etc.
  9. Return to the bedside to assess the comfort of the patient and to observe the condition of the wound. Watch for any bleeding from the wound area. Change the dressing if there is excessive bleeding. Report to the doctor.
  10. Watch for the vital signs regularly to detect early signs of shock and collapse on the first day and signs of infection on subsequent days.
  11. Unless signs of infection occur, the dressing should be left undisturbed until time for suture removal. Changing the dressing frequently causes friction on the wound edges and increases the possibility of the wound infection.
  12. Inject tetanus toxoid, if it is not given previously.
  13. On discharge of the patient, the patient should be given the instructions about the care of the wound, and the time when he has returned for the removal of sutures.
Suture Removal Guidelines

Suture Removal Guidelines

Sutures should be removed based on wound location and healing progress. In all cases the surgeon gives the written order for the removal of the sutures.
The sutures may be removed by the surgeons or by the nurses according to the hospital customs.

Wound Location

Suture Removal Time

Face & Scalp

2–5 days

Abdominal wounds

7–10 days

Lower limbs

10–14 days


General Instructions

  1. Confirm the doctor’s orders for the removal of the sutures.
  2. The suture removal is done in conjunction with a dressing change.
  3. Toothed dissecting forceps and a pair of scissors with a short, curved, cutting tip that readily slide under the suture are used.
  4. The suture line is cleansed before and after suture removal.
  5. While removing interrupted sutures, alternate ones are removed first. The remaining sutures are removed a day or two later. If wound dehiscence occurs, the remaining sutures may then be left in place.
  6. Suture material that is beneath the skin is considered free from bacteria, and those visible outside are in contact with the resident bacteria of the skin. It is important that no part of the stitch which is above the skin level enters and contaminates the tissues under the skin.
  7. Suture material left beneath the skin acts as a foreign body and elicits the inflammatory response. While removing sutures, care to be taken to remove them completely. Each suture should be examined for its completeness. Every interrupted suture will have one knot and four ends when removed completely. The number of sutures should be counted before and after removal.
  8. If wound dehiscence occurs during the removal of the sutures, inform the surgeon immediately. In case of abdominal wounds, resuturing is imperative to prevent evisceration. In other places, if resuturing is not necessary, adhesive tapes should be applied to approximate the wound edges as closely as possible.
  9. After the removal of sutures, even if the wound is dry, a small dressing is applied for a day or two to prevent infection. The patient should be told about the care of the wound. He is advised to take rest after removal of sutures of an abdominal wound. The patient should be told not to strain the part e.g., not to cough or lift heavy weight after removal of sutures from the abdomen. This will prevent wound dehiscence.
  10. If wound discharge occurs, the patient should be instructed to contact the surgeon. Presence of pain and swelling at the wound line are the signs of complications.
  11. Abdominal belts or many tailed bandages may be applied on the abdomen after removal of abdominal sutures in obese patients to prevent wound dehiscence and evisceration.

Suture Removal Technique

  • To remove the interrupted sutures, grasp the suture at the knot with a toothed forceps and pull it gently to expose the portion of the stitch under the skin. Cut the suture with sharp scissors between the knot and the skin on one side either below the knot or opposite the knot. Then pull the thread out as one piece. The suture which is already above the skin should not be drawn under the skin.
  • After removal of sutures, every suture should be examined for its completeness. The number of sutures should be counted before and after removal. (it is not uncommon to find some sutures
    laid bury under the skin).
  • Mattress interrupted sutures have two threads underlying the skin. The visible part of the suture opposite the knot should be cut and the suture is removed by pulling it in the direction of the knot.
  • If a continuous suture is applied, it is cut through, close at each skin orifice on one side and the cut sections are removed through the opposite side by gentle traction.

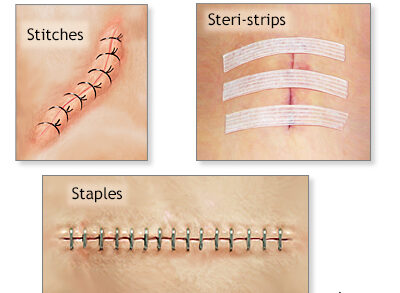
Clips (Metal Sutures) in Wound Closure

Clips, also known as metal sutures or surgical staples, are used to close the skin after a surgical procedure or deep wound

Unlike traditional sutures, clips provide a fast, secure, and uniform wound closure, minimizing tissue trauma.


Purpose of Clips in Wound Closure

The primary objectives of using clips are similar to those of suturing with stitches, including:

✅ To approximate wound edges until healing occurs.
✅ To speed up wound closure and healing.
✅ To reduce the risk of infection by minimizing handling.
✅ To provide a strong and secure closure, especially for long surgical incisions.
✅ To improve cosmetic outcomes by minimizing scarring.
✅ To reduce operation time compared to conventional suturing.


Equipment Required for Clip Removal

In addition to standard equipment for dressing a septic wound, the following specialized instruments are required for removing clips:

Equipment

Purpose

Sterile Clip Removal Forceps

Specially designed to safely remove surgical clips without causing tissue trauma.

Receiver

Used to collect removed clips.

Benzene or Ether

Used to clean the surrounding skin and remove adhesive residue.

Sterile Gauze

To receive and hold the removed clips.

Antiseptic Solution

Used for cleansing the wound.

Adhesive Tape or Bandage

Secures dressing after clip removal.


Procedure for Removing Clips

Pre-Procedure Preparation

1️⃣ Explain the procedure to the patient to gain cooperation and reduce anxiety.
2️⃣ Gather and organize all necessary equipment.
3️⃣ Position the patient comfortably and drape appropriately for privacy.
4️⃣ Protect the bedding with a rubber sheet and cover to prevent contamination.
5️⃣ Remove the old dressing and discard it properly.

Clip Removal Procedure

1️⃣ Clean the wound using an antiseptic solution, starting from the cleanest area to the most contaminated part.
2️⃣ Place a sterile gauze pad near the wound to collect removed clips.
3️⃣ Hold the clip removal forceps in the right hand and the dissecting forceps in the left hand.
4️⃣ Insert the lower blade of the clip remover under the center of the clip.
5️⃣ Use the dissecting forceps to hold the clip in place as the removal forceps are squeezed.
6️⃣ Gently press the forceps together – this action bends the clip outward, disengaging it from the skin.
7️⃣ Carefully remove the clip and place it on the sterile gauze.
8️⃣ Repeat the process until all clips are removed.
9️⃣ Apply iodine or antiseptic to the puncture sites to prevent infection.
🔟 Dress the wound if necessary and secure the dressing with adhesive tape or a bandage.
🔟 Ensure patient comfort and adjust their position as needed.
🔟 Document the procedure, noting the appearance of the scar, wound healing progress, and any complications.
🔟 Dispose of all used materials properly and return reusable instruments for sterilization.

Post-Procedure Care and Monitoring

✅ Assess the wound for signs of infection or delayed healing.
✅ Monitor for bleeding or wound dehiscence (reopening of the wound).
✅ Advise the patient to avoid excessive movement that could stress the healing wound.
✅ Provide pain relief if needed.
✅ Instruct the patient on proper wound care and when to seek medical attention.


Clinical Appearance of the Wound Bed

The appearance of the wound bed provides insight into healing progress and potential complications.

Wound Bed Type

Description

Clinical Significance

Granulating

Healthy red/pink moist tissue with newly formed collagen, elastin, and capillary networks. Tissue is well vascularized and bleeds easily.

Indicates active healing and proper blood supply.

Epithelializing

Pink or whitish thin layer forming on top of granulation tissue.

Sign of wound closure and final healing stage.

Sloughy

Yellowish devitalized tissue, composed of dead cells and fibrin, often misinterpreted as pus.

Requires debridement to promote healing.

Necrotic

Black, hard, or dry tissue with greyish dead connective tissue. Prevents healing and may lead to infection.

Needs immediate debridement and intervention.

Hypergranulating

Granulation tissue grows above the wound margin, caused by bacterial imbalance or excessive irritation.

Delays wound healing and requires adjustments in wound care.

Spread the love

Leave a Comment

Your email address will not be published. Required fields are marked *

Contact us to get permission to Copy

We encourage getting a pen and taking notes,

that way, the website will be useful.

Scroll to Top