

TRACTION
Traction is a pull exerted on the part of the limb against a pull of compared strength in the opposite direction.
This is a system in fracture management in which a continuous pull is applied and maintained on a limb or other parts of the body by the use of cords and weights.
It involves applying a pulling force to a part of the body in order to realign bones, relieve pressure on joints, or stretch muscles and soft tissues. This method is commonly used to stabilize fractures, reduce dislocations, and alleviate pain.
Indications for Traction
Traction is indicated in a variety of clinical situations, including:
- Fractures: To realign fractured bones and facilitate proper healing.
- Dislocations: To reduce dislocations and restore proper joint alignment.
- Muscle Spasms: To relieve muscle spasms by stretching the affected muscles.
- Deformities: To correct skeletal deformities, such as scoliosis or leg length discrepancies.
- Joint Pain: To alleviate pain associated with arthritis or other joint conditions.
- Post–Surgical Stabilization: Following surgical procedures to maintain proper alignment and support healing.
- Preoperative or Postoperative Care: To prepare for or support recovery from surgical interventions.
- Joint Deformities: To correct joint deformities effectively.
- Separation of Joint Surfaces: To prevent further spread of infection, such as tuberculosis of the joints (e.g., hips, knees).
- Prevention of Muscle Spasms: To help alleviate muscle spasms.
- Prevention of Bone Overriding: To maintain bones in the correct position during the healing process.
Types of Traction
Traction can be classified into several types based on the method of application and the area of the body affected:
1. Skeletal Traction: Involves the insertion of pins, wires, or screws into the bone, which are then attached to weights to apply traction.
2. Skin Traction: Utilizes adhesive strips or traction bands applied to the skin to distribute the pulling force.
- Hamilton Russell Traction: A specific type of skin traction often used for lower limb conditions.
- Gallows Traction: A technique primarily used in paediatrics for maintaining alignment in lower limb fractures.
3. Pulp Traction: This is the type of traction used for management of displaced phalanges, metacarpals and metatarsal fractures. .
4. Halo Traction: A specialized system involving a halo device that encircles the head, used for cervical spine stability.
5. Skull Tongs Traction: Involves the application of tongs inserted into the skull to provide traction to the cervical spine.
6. Fixators: Devices used to stabilize fractures or deformities.
- Internal Fixators: Implanted devices within the body to hold bones in place.
- External Fixators: Devices applied externally to stabilize fractures through the skin.
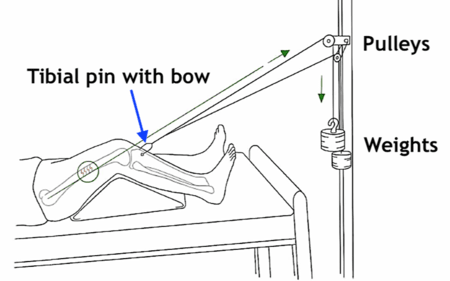
SKELETAL TRACTION
Skeletal traction is the type of traction in which a pin, nail, or wire is passed through a bone. This type of traction is mainly used for the treatment of fractures and works better for well-built strong persons.
Common sites for introducing the pins include:
- The condyles of the femur
- The tubercles of the tibia
- Calcaneus at the heels of the foot
Metallic equipment used in skeletal traction:
- Steinmann’s pins: This is a rigid steel pin passed through a bone and attached to a special stirrup. Because of the presence of the stirrup, the surgeon is able to alter the line of the pull without moving the pin.

- Kirschner wire: This is a narrow steel wire which is not rigid unless pulled on by a stirrup. When the stirrup is rotated, it can move the wire, increasing the risk of infection. Therefore, it is not as commonly used compared to Steinmann’s pin.
Preparation of the patient for skeletal traction:
- Explain the procedure to the patient and provide reassurance to allay anxiety
- Shave the area if the patient is hairy
- Administer premedication if prescribed
- Establish an intravenous line
After preparation, the patient is taken to the theater with the leg in a Thomas splint with skin traction applied. The operation is performed under general anesthesia to insert the Steinmann’s pin through the bone. A stirrup is then attached to the pin, and the patient is returned to the ward.
Requirements for Setting up Skeletal Traction
Top Shelf | Bottom Shelf | At the Bedside |
– Extension cord | – Knee piece for Thomas’ splint | – Balkan Beam |
– 6-8 metal pulleys | – Foot piece for Thomas’ splint | – Bed blocks |
– Cotton wool in a gallipot | – Strong slings, safety pins | – Fracture boards |
– Receiver of forceps and scissors Gallipot of gauze | – Weights in various kilograms |
Procedure
Steps | Action | Rationale |
1 | The patient is prepared and taken to theatre when the Thomas’ splint and skin traction are applied. | To immobilize the fractured bones and promote healing. |
2 | The pin: Observe for signs of inflammation, discharge, or movement of the pin to the nurse in charge. | To detect infections and take appropriate intervention. |
3 | Traction: Observe the cords and pulleys to ensure they are free and smoothly running. | To ensure accurate counterbalance and function of the traction. |
4 | Inspection: – Check the patient’s foot and leg for signs of inflammation. – Make sure the stirrup is not placing on the patient’s skin. | To detect infections and take appropriate intervention. |
General Nursing Care of a Patient on Traction
Action | Rationale |
1. The patient is nursed on fracture boards on the bed, and the foot of the bed elevated at all times with bed blocks. | Foot of the bed elevated to aid venous return. |
2. Weights must not be lifted or removed unless required. | To provide constant traction. |
3. Traction must be maintained 24 hours a day. | Sudden cessation of traction irritates diseased joints, causes displacement in a fracture, and is very painful for the patient. |
4. Lubricate with a drop or two of oil if necessary. | |
5. Keep a cork on the sharp point of the pin. | So that it’s not loose. |
6. See that the patient’s bed is provided with an overhead lifting pole and chain. | To help the patient lift himself/herself. |
7. When giving a bed pan, ask the patient to lift him/herself or get another nurse to help. | Patient lifting himself makes participation more active. |
8. Change the bottom sheet from top to bottom. | To provide comfort. |
9. Make patient participate in activities of daily living (e.g., bathing in bed, feeding, active exercises, etc.). |
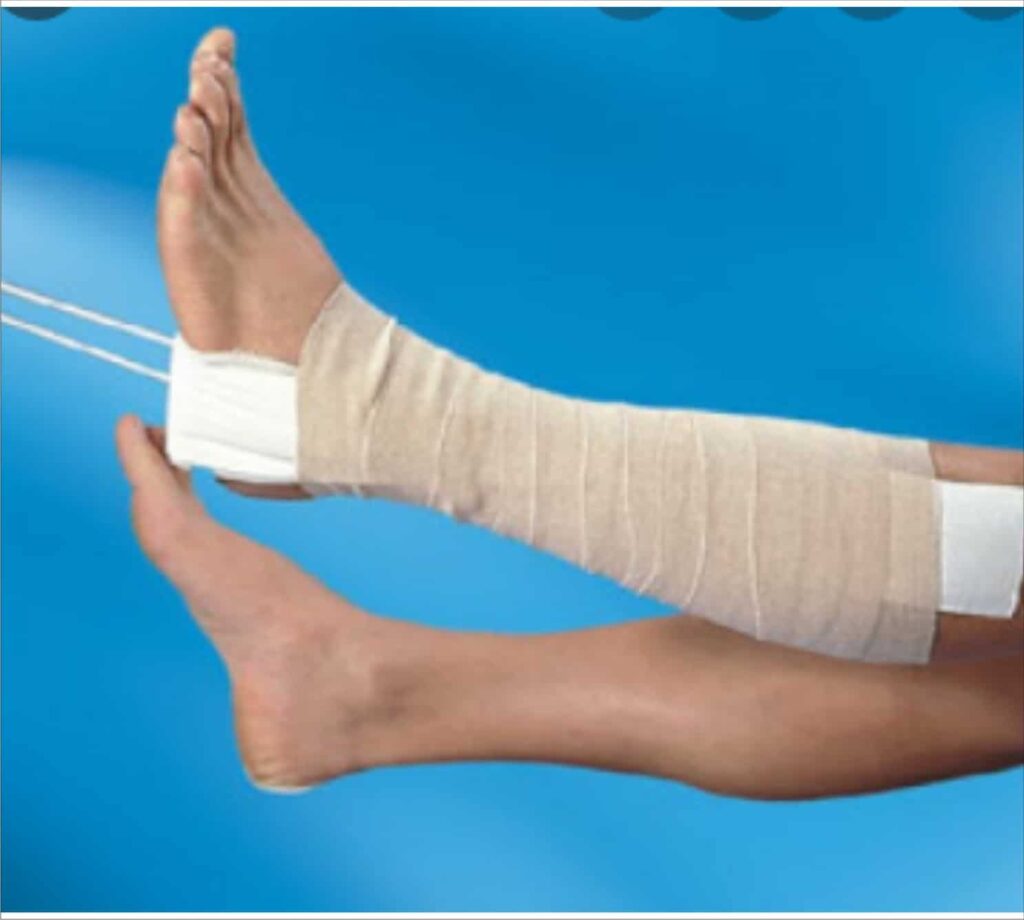
SKIN TRACTION
It involves applying splints, bandages, or adhesive tapes to the skin directly below the fracture. Once the material has been applied, weights are fastened to it. The affected body part is then pulled into the right position using a pulley system attached to the hospital bed.
Preparation of the Patient for Skin Traction
- Provide relevant explanations to the patient to ensure cooperation. It is important to explain the procedure to the relatives as well, who may consider the apparatus cruel.
- Ensure the bed has a firm base and a comfortable mattress.
- Ensure privacy for the patient, then wash the leg and dry it thoroughly. Observe for any abrasions and report them immediately.
- Shave the leg if necessary, taking care not to cause any skin damage.
- Paint the skin with tincture of benzoin compound to prevent allergic reactions to the strapping and to enhance its adhesive properties.
- Protect the bony prominences by applying adhesive felt, latex foam, or orthopedic wool.
Bed Setup:
- The bed should have a firm base; use fracture boards if necessary.
- Use a soft mattress to ensure patient comfort.
- Arrange bedclothes in separate packs for the trunk and the limb not in traction.
- Keep the patient warm and ensure the bed remains tidy at all times, as this helps maintain the patient’s morale.
- Use a bed cradle if both legs are in traction to ensure that the bedclothes do not interfere with the efficiency of the traction.
- If there is an overhead beam, attach a trapeze to allow the patient to lift themselves, helping to prevent pressure sores and hypostatic pneumonia.
- Bedclothes are necessary if the patient’s own weight is used as counter traction.
Requirements
Top Shelf | Bottom Shelf | Bedside |
– Shaving tray Receiver containing: – A pair of dressing forceps, 21 dissecting forceps – Bowl containing swabs – Extension plaster – A pair of scissors – Crepe bandages – Tape measure – Skin pencil | – Receiver for used swabs – Spreader – Cordially, Brown wool or sorbo pads – Tincture of benzoin co. – Dressing mackintosh and towel – A small blanket to cover the limb – Balkan Beam – Bed blocks | – Hand washing equipment – Screens – Bucket for used equipment – Weights in various kilograms – On the bed: Pulleys, Fracture board |
Procedure for Skin Traction
Steps | Action | Rationale |
1 | Explain procedure to the patient. | Explanation encourages patient’s cooperation and relieves anxiety. |
2 | Inspect the limb for sores. If skin has no lesions, put a mackintosh under the limb. | To prevent soiling the bed linen. |
3 | Gently wash and dry the limb. | To prevent infections. |
4 | Shave the part where the extension is to be applied. | To prevent loose hair entering into the wound. |
5 | Apply tincture benzoin co. on the limb. | Benzoin co. reduces the irritating effect that strapping has on a sensitive skin. |
6 | Measure the patient’s legs from the head of the tibia to above the malleoli line. | This will prevent the extension from sticking to the ankle. |
7 | Cut an adequate extension strap, to fit on each side of the limb. Place a large wooden spreader in the middle of the limbs. | A wide spreader bar prevents the traction tape from rubbing on the patient’s bony prominences which can lead to sores. |
8 | Position the limb gently and firmly while the doctor or Orthopaedic officer applies the strapping. | To maintain bone alignment and promote healing. |
9 | Apply crepe bandage over the strapping leaving the malleoli free. Put a soft padding over the ankles. | To prevent friction that can cause pressure sores. |
10 | Make a knot at the end of the cord into the hole in the center of the spreader. Pass the cord over the pulley and attach to the weights. | The weights apply the pull for the traction. Properly hanging weights and correct patient positioning ensures accurate counterbalance and function of the traction. |
Points to Remember
- Traction: Check that the strapping does not slip. Bandages should be secure and unwrinkled to avoid friction.
- Inspection: Check the circulation of the foot and toes by noting color, temperature, sensation, and power. Neurovascular assessments aid in early identification of complications.
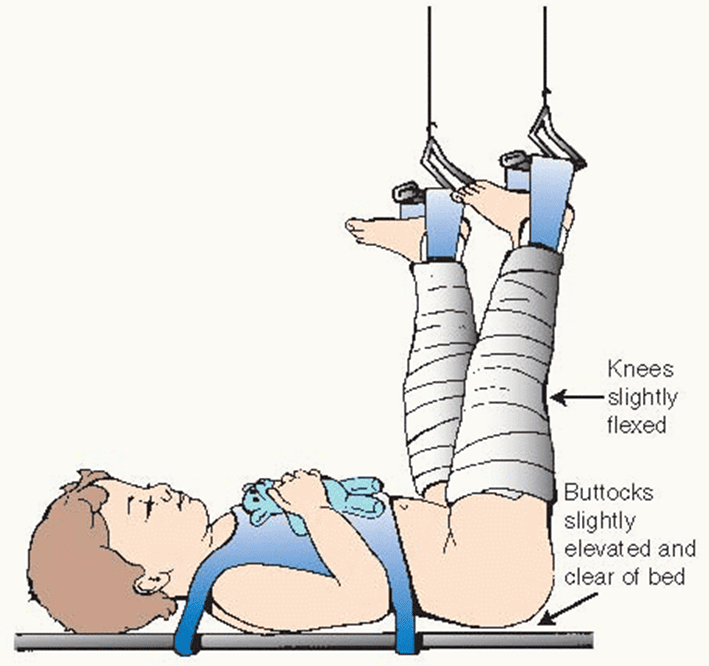
Gallows Traction(Bryant’s Traction)
This is commonly used in treating fractured femurs in smaller children below 5 years.
Additional Requirement for Skin Traction Procedure
- Beam Above the Cot
Steps | Action | Rationale |
1 | Apply skin traction to both the child’s legs. | To elevate the sacrum. |
2 | Suspend the legs so that the pelvis is off the bed and a hand can be slipped between the buttocks and the bed. | To reduce the fracture and hold the fragments in position. |
3 | Observe for adherence and firmness of strapping and bandage respectively. | To avoid friction tightness and loosening of the bandage. |
4 | Check the bandages regularly. | To avoid exerting uneven pressure that can cause pressure sores and gangrene. |
5 | Maintain the traction on for approximately 3 weeks or according to prescription. | To allow proper healing. |
6 | Monitor gentle weight bearing starting at 6 weeks initially in the cot. | To identify gradual weight bearing on the limb using crutches. |
7 | Physiotherapy: Monitor gentle and gradual weight bearing on the limb using crutches. | To identify blood circulation interference. |
8 | Observe the circulation of the toes on both limbs by noting their color, edema, pain, and temperature. | To identify blood circulation interference. |
9 | Respond to child’s cries and restlessness. | This could be the first sign of ischemia or skin irritation. |
Management of a Patient with Skin Traction
Acute Management:
1. Documentation of Traction Order:
- Ensure the order for skin traction is properly documented by the orthopedic team, including the weight to be applied in kilograms.
2. Preparation of Equipment:
- Gather all necessary equipment before starting the procedure.
3. Pain Relief:
- A femoral nerve block is the preferred method for pain management and should be administered in the emergency department before admission to the ward.
- Diazepam and Oxycodone should always be charted and used alongside the femoral nerve block.
4. Distraction and Education:
- Explain the procedure to both the patient and their parents before starting.
- Plan appropriate distraction activities, such as play therapy, or involve parents and nursing staff.
5. Application of Traction:
- Ensure the correct amount of water is added to the traction weight bag as per the medical order.
- Fold the foam stirrup around the heel, ankle, and lower leg of the affected limb. Apply a bandage, starting at the ankle and wrapping up the lower leg using a figure-8 technique. Secure with sleek tape.
- Place the rope over the pulley and attach the traction weight bag. Trim the rope if necessary to ensure the bag is suspended in the air and not resting on the floor.
Ongoing Management:
6. Maintain Skin Integrity:
- Monitor the patient’s legs, heels, elbows, and buttocks for potential pressure areas due to immobility and bandages.
- Place a rolled-up towel or pillow under the heel to relieve pressure.
- Encourage the patient to reposition themselves or perform pressure area care every four hours.
- Remove the foam stirrup and bandage once per shift to relieve pressure and inspect the skin condition.
- Keep the sheets dry.
- Document the condition of the patient’s skin in progress notes and the care plan.
- Assess and document the pressure injury prevention score and plan.
7. Traction Care:
- Ensure the traction weight bag hangs freely and does not rest on the bed or floor.
- Replace frayed ropes.
- Ensure the rope stays in the pulley tracks.
- Check that the bandages are free from wrinkles.
- Tilt the bed if necessary to maintain counter traction.
8. Observations:
- Perform neurovascular observations on the patient hourly and record the findings in the medical record.
- If the bandage is too tight, it can slow blood circulation. Monitor for swelling of the femur to detect compartment syndrome.
- If neurovascular compromise is detected, remove the bandage and reapply it more loosely. If circulation does not improve, notify the orthopedic team immediately.
9. Pain Assessment and Management:
- Pain assessment is crucial to ensure that the right analgesic is administered for effective relief.
- Paracetamol, Diazepam, and Oxycodone should be charted and administered as needed.
- Pre-emptive analgesia should be considered, especially before pressure area care, to manage the patient’s pain effectively.
- Assess and document the outcomes of pain management strategies.
10. Activity:
- The patient can sit up in bed and engage in quiet activities such as crafts, board games, and watching TV. Play therapy can be beneficial for long-term traction patients.
- Non-pharmacological activities and distractions will help improve patient comfort.
- The patient can move in bed as tolerated to complete hygiene care.
- Long-term traction patients may require referral to the education department.
11. Transport to Theatre:
- The patient should be transported to the operating theatre in traction to reduce pain and maintain proper alignment.
Special Considerations:
- The foam stirrup, bandage, and rope are for single-patient use only.
Potential Complications:
- Skin Breakdown/Pressure Areas: Pressure from the traction or immobilization can lead to skin damage.
- Neurovascular Impairment: Monitor for issues with circulation, oxygenation, and nerve function in the limbs.
- Compartment Syndrome: Increased pressure in muscle compartments can affect muscles and nerves, requiring urgent care.
- Joint Contractures: Prolonged immobility may result in stiffening of the joints.
- Constipation: This can result from immobility and the use of analgesics.
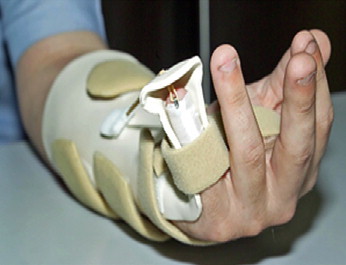
PULP TRACTION
This is the type of traction used for management of displaced phalanges, metacarpals and metatarsal fractures. A structure is put through the pulp of the fingers and fastened to an extension wire which is incorporated in the plaster.
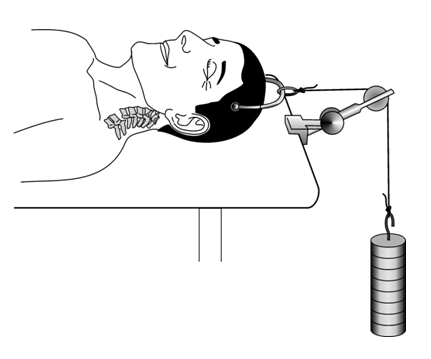
Skull Tongs Traction
Skull tongs traction is used to immobilize the cervical spine in cases of unstable fractures or dislocations of the cervical vertebrae.
Types of Skull Tongs Traction:
- Crutchfield Tongs
- Gardner-Wells Tongs: More commonly used, as it is less likely to pull out compared to Crutchfield tongs.
Procedure
Steps | Action | Rationale |
1 | Prepare the patient for surgery (see pre-operative care). | |
Following surgery | ||
2 | Nurse the patient in supine position on a special frame instead of the regular hospital bed. | In order to maintain the neck in position. |
3 | Assist the patient with any turning movements if a hospital bed is used. Elevate the head of the bed if necessary. | To prevent twisting of the neck that can result in complications. |
4 | Apply the same precautions to all patients on traction. | To prevent complications. |
Head of the bed raised, bed on castors so that it can be wheeled to the X-ray department.
After the Procedure:
- The patient is placed on a special bed with a therapeutic mattress and frames.
- The patient remains in a complete supine position with a small pillow under the head.
- As patients are in this traction for extended periods, similar precautions used for skeletal traction are applied.
- The head of the bed is elevated to provide counter-traction.
- Castors are placed on the bed for easy movement, such as for X-rays.
Points to Remember:
- Assist with daily activities as the patient will have difficulty performing them independently.
- Prevent infection at the tong sites through regular cleaning.
- Suggest recreational or occupational activities to address restlessness and boredom.
- Teach the patient range of motion exercises.
- Ensure proper nutrition.
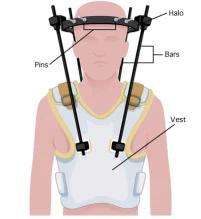
Halo Traction
Halo traction is similar to skull tongs traction but includes a vertical frame that extends to the body, allowing the patient to move out of bed without disrupting its function. The pin is inserted into the skull, and the frame provides stabilization for fractured cervical vertebrae.
- The frame is not removable, as any movement of the vertebrae could damage the spinal cord.
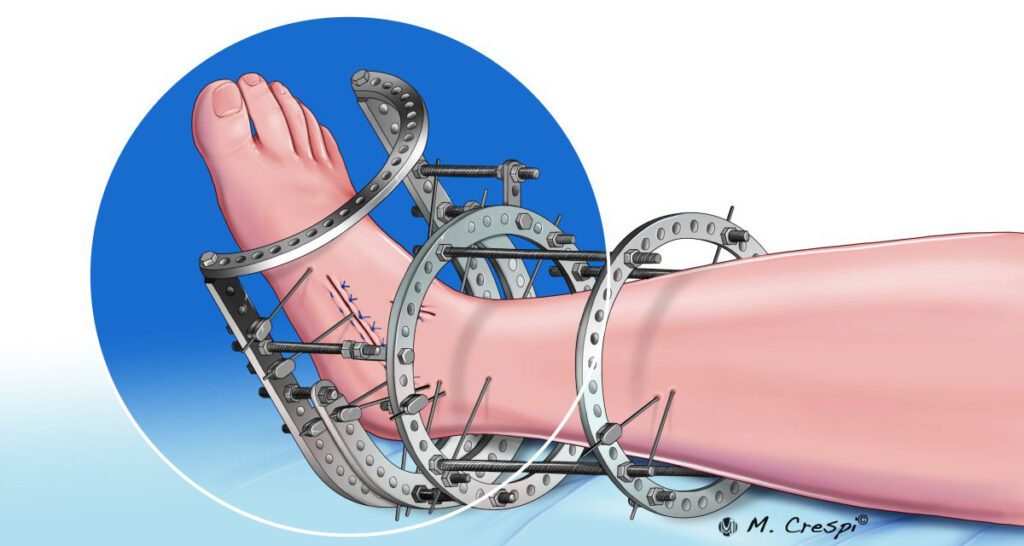
Fixators
Fixators are metallic rods passed through a bone to ensure stability.
Types:
1. External Fixation Devices:
- A frame of metal rods that connect skeletal pins. These rods provide traction between the pin sites.
- External fixators can be simple with 2-3 rods or complex with many rods arranged at different angles to maintain fractured bone fragments.
Advantages:
- Useful for immobilizing many bone fragments.
- Used in cases with open wounds to reduce infection risk, a concern with casts.
2. Internal Fixators:
- Metallic devices used to replace or treat certain bones or fractures.
- Can be temporary or permanent, such as replacing a dead bone like the femoral head.
General Nursing Care of a Patient on Traction
- Traction should be applied during the day.
- The patient is nursed with fracture boards on the bed to maintain firmness.
- Elevate the foot or head of the bed, depending on the traction site (skull or limbs).
- Do not lift, move, or remove weights unless instructed by a doctor.
- Ensure cords are always pulling and that weights do not rest on the bed.
- Traction is maintained 24/7 because sudden cessation can cause displacement of the fracture, leading to pain.
- Cords must run freely over regularly oiled pulleys.
- Check the color of the toes to ensure satisfactory circulation.
Care for Skeletal Traction:
- Keep the puncture site clean and dry.
- Seal the wound with tincture of benzoin.
- Ensure free movement of the screws on either side of the pin and lubricate if necessary.
- Keep a cork on the sharp pin end to prevent injury.
- Provide an overhead lifting pole and chain to help the patient move.
- Assist with bathing where needed, especially for areas like the back and legs.
- Pay close attention to pressure areas, especially around the ring of the Thomas splint.
- Maintain a full diet and encourage foods rich in vitamins and minerals such as iron, milk, and liver.
- Teach daily muscle exercises, particularly moving the knee and ankle joints.
- Provide psychological support through regular reassurance.
- Offer indoor games to keep the patient occupied.
Care of Plaster of Paris (P.O.P.)
- Elevate the limb on a pillow and the foot of the bed.
- Wash plaster powder off the toes.
- Expose the P.O.P. to room temperature.
- Check toes for good blood supply and encourage the patient to move them regularly.
- Conduct half-hourly pressure checks for signs of nerve compression.
- Observe the color, temperature, and any swelling of the toes.
- Monitor for pain, numbness, or tingling, which may indicate nerve pressure.
- Check for blood stains on the P.O.P., which may indicate bleeding.
Physiotherapy:
- Encourage deep breathing exercises.
- Promote limb movement for the affected site.