
While parenteral routes involve injections, non-parenteral routes utilize the gastrointestinal tract, skin, and mucous membranes. This section covers specialized topical, mucosal, and enteral tube administration methods.
Otic (ear) medications are typically instilled to treat localized ear infections, reduce inflammation, alleviate pain, or soften cerumen (earwax) for removal. The internal structures of the ear are highly sensitive to temperature extremes, making careful preparation of the medication crucial.
- Provides a direct, localized effect with a high concentration of medication at the target site.
- Minimizes systemic absorption, thereby reducing the risk of systemic side effects.
- Can cause severe vertigo, nausea, or vomiting if the instilled solution is too cold or too hot.
- Contraindicated in certain cases of ruptured or perforated tympanic membranes unless specifically formulated and sterile.
- Cotton tipped applicators.
- Cotton balls.
- Bowl with warm normal saline.
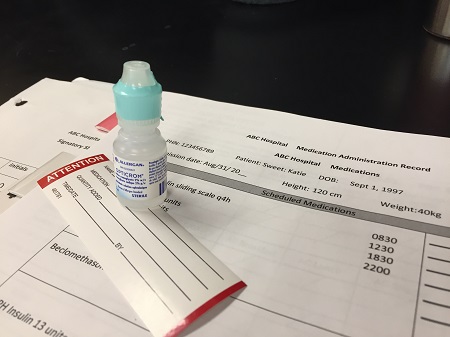
- Medication bottle with dropper.
- Receiver.
- Clean gloves.
- Screen
- Vomit bowl
| Step | Action | Rationale |
|---|---|---|
| 1 | Refer to general rules on nursing procedure and medicine administration. | Ensures foundational safety standards and adherence to the 6 rights of medication administration. |
| 2 | Obtain assistance in case of children or infants. | Prevents accidental injury due to sudden movement during the procedure. |
| 3 | Using a cotton-tipped applicator, clean the meatus of the ear canal. | Removes any discharge before instillation. |
| 4 | Warm medication container in hands or place in warm normal saline. | Promotes patient’s comfort and prevents vertigo and vomiting. |
| 5 | Fill ear dropper, particularly with medication. | Ensures the accurate dose is ready for instillation. |
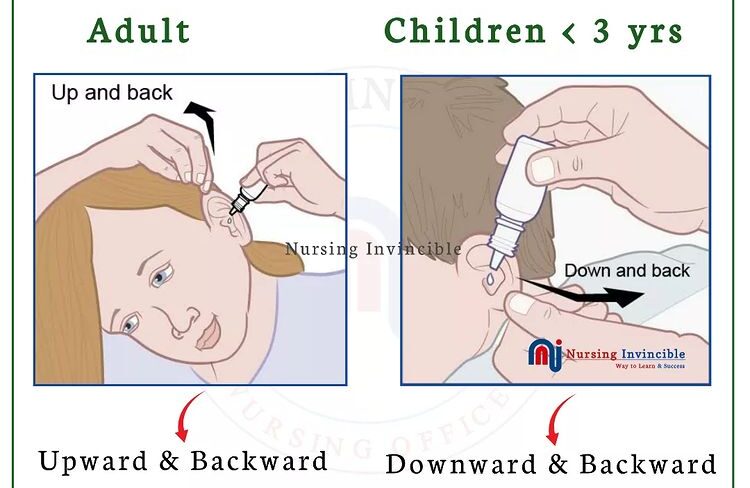
| 6 | Straighten auditory canal: – For infants or children under 3 years, pull pinna down and back. – For an adult or child older than 3 years, pull pinna upward and backward. |
Straining the canal ensures the solution flows the entire length of the auditory canal. |
| 7 | Instill the correct number of drops along the side of the ear canal by holding the dropper ½ to 1 cm above the ear canal. | Reduces trauma to the tympanic membrane. |
| 8 | Press gently and firmly a few times on the tragus of the ear. | Pressing assists the flow of medication into the ear canal. |
| 9 | Request the patient to remain in a side-lying position for about 5 minutes. | Prevents drops from escaping and enables medication to reach all sides of the canal. |
| 10 | Insert a small piece of cotton swab at the meatus of the auditory canal for 15-20 minutes. | Cotton helps to retain medication when the patient is upright. |
| 11 | Assess for patient comfort, response, and check for discharge/drainage from the ear. | Evaluates the immediate effects and potential adverse reactions to the medication. |
| 12 | Replace requirements and wash hands. | Reduces the spread of microorganisms. |
| 13 | Document medication administration, name of medication administered, and patient’s response. | Ensures accurate record keeping and continuity of care. |
- Use sterile technique in administration when administering medication in perforated tympanic membrane.
- Consider side effects and toxic effects and contraindications of various medicines.

Ophthalmic medications (eye drops or ointments) are instilled into the conjunctival sac to treat localized conditions such as infections (conjunctivitis), glaucoma, inflammation, or to dilate the pupil for examination. The cornea is extremely sensitive, so direct instillation onto the cornea must always be avoided to prevent injury and severe discomfort.
- Provides rapid localized action directly to the ocular structures.
- Can be absorbed relatively quickly into the anterior chamber of the eye.
- Tearing can rapidly wash the medication away, reducing absorption time.
- If systemic absorption occurs via the nasolacrimal duct, unintended systemic side effects can happen (e.g., bradycardia from beta-blocker eye drops).
- Ointments can cause temporary blurred vision.
- Sterile gloves sterile cotton balls soaked in sterile normal saline.
- Dry cotton balls.
- Adhesive strapping.
- Receiver.
- Dry sterile dressing pad.
- Medication.
- Screen.
| Step | Action | Rationale |
|---|---|---|
| 1 | Refer to general rules on nursing procedure and medicine administration. | Promotes standardized safety and infection control protocols. |
| 2 | Check ophthalmic preparation for name, name expiry date. | Prevention medication error. |
| 3 | Request the patient to look up the ceiling and give the patient a sterile absorbent cotton swab. | If looking up prevents blinking and in this position the cornea is protected by an upper lid. |
| 4 | Expose the lower conjunctival sac by pacing thumb or fingers of non-dominant hand just below the eye on the zygomatic arch and gently draw down the skin on the cheek. | Placing fingers on the bony prominence avoids pressure to the eyeball and prevents a person from blinking or squinting. |
| 5 | For liquid medication; discard the first drop. For ointment; discard the first ointment bead, hold the tube above the conjunctival sac from the canthus outwords. |
It is considered to be contaminated. |
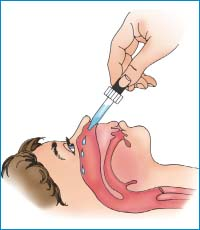
| 6 | Approach the eye from the side and instill the correct number of drops into the outer third of the conjunctiva holding the dropper 1-2 cm above the eye. | Patient is less likely to blink if a side approach is used. |
| 7 | Request the patient to squeeze on nasolacrimal duct for at least 30 seconds after instilling liquid medication. | Pressure prevents medication running down the duct. |
| 8 | Request the patient to close eyes but not to squeeze them. | Squeezing can injure eye and push out medication. |
| 9 | Clean the eyelid as needed by wiping from inner canthus to outer canthus. | Prevents spread of infection into the lacrimal duct. |
| 10 | Apply eye pad if required and secure it, request patient not to rub the eye. | Reduces risk of injury. |
- If more than one eye drop is ordered, wait 5 minutes between each medication.
- If medication for both eyes, place, in the unaffected eye first.
Nasal drops or sprays are utilized to administer medications directly into the nasal passages. This route is typically chosen to relieve nasal congestion, moisten the mucous membranes, or treat localized sinus infections. Because the nasal mucosa contains a highly vascular network, it can also be used for systemic absorption of certain medications.
- Provides rapid relief for local congestion and inflammation.
- Offers an alternative route for systemic drug delivery that bypasses first-pass metabolism.
- Excessive use of local decongestants can lead to mucosal dystrophy and severe rebound congestion.
- Drops may flow backward into the posterior pharynx, leaving an unpleasant taste or causing potential aspiration.
- Prepared medication.
- Pen light.
- Receiver toilet paper.
- Clean dropper.
- Facial flannels.
- Screen
- Small pillow.
| Step | Action | Rationale |
|---|---|---|
| 1 | Refer to general rules on nursing procedure and medicine administration. | Validates patient identity and medication accuracy. |
| 2 | Inspect the condition of the nose and sinuses using a penlight and palpate sinuses for tenderness. | Provides baseline data to monitor effects. |
| 3 | Wash hands and put on gloves. | Promotes infection prevention. |
| 4 | Request patient to clear or blow nose gently unless contraindicated (increased intracranial pressure or nose bleeds). | Removes mucous and secretions that can block the nasal passages. |
| 5 | Position patient supine, and position head properly for access to the posterior pharynx, tilt patient’s head backward. | Allows medication to flow into affected sinuses. |
| 6 | Support the patient’s head with the non-dominant hand and instruct the patient to breathe through the mouth. | Prevents straining of the muscles and mouth breathing reduces the chances of aspirating nasal drops. |
| 7 | Hold dropper ½ – 1 cm above nares and instill prescribed number of drops towards the midline of the ethmoid bone. | Avoids contamination of the dropper. |
| 8 | Have the patient remain in the supine position for 5 minutes and offer a facial towel to blot the nose but do not blow. | Prevents premature loss of medication through nares and allows maximum dose to be absorbed. |
| 9 | Assist patient to a comfortable position after the medication is absorbed. | Restores comfort. |
| 10 | Assess patient response, replace requirements, and wash hands. | To detect reactions and maintain a hygienic environment. |
| 11 | Document and record administration of medication. | Ensures accurate record keeping and continuity of care. |
A Naso-Gastric (NG) tube is a flexible tube passed through the nose, down the esophagus, and into the stomach. Administering medications via this route is essential for patients who have an intact and functioning gastrointestinal tract but cannot swallow safely (e.g., due to dysphagia, unconsciousness, or intubation).
- Allows for the delivery of vital enteral medications when the oral route is strictly contraindicated.
- Provides a direct pathway to the stomach for exact volume dosing.
- Risk of fatal aspiration if the tube is accidentally displaced into the lungs.
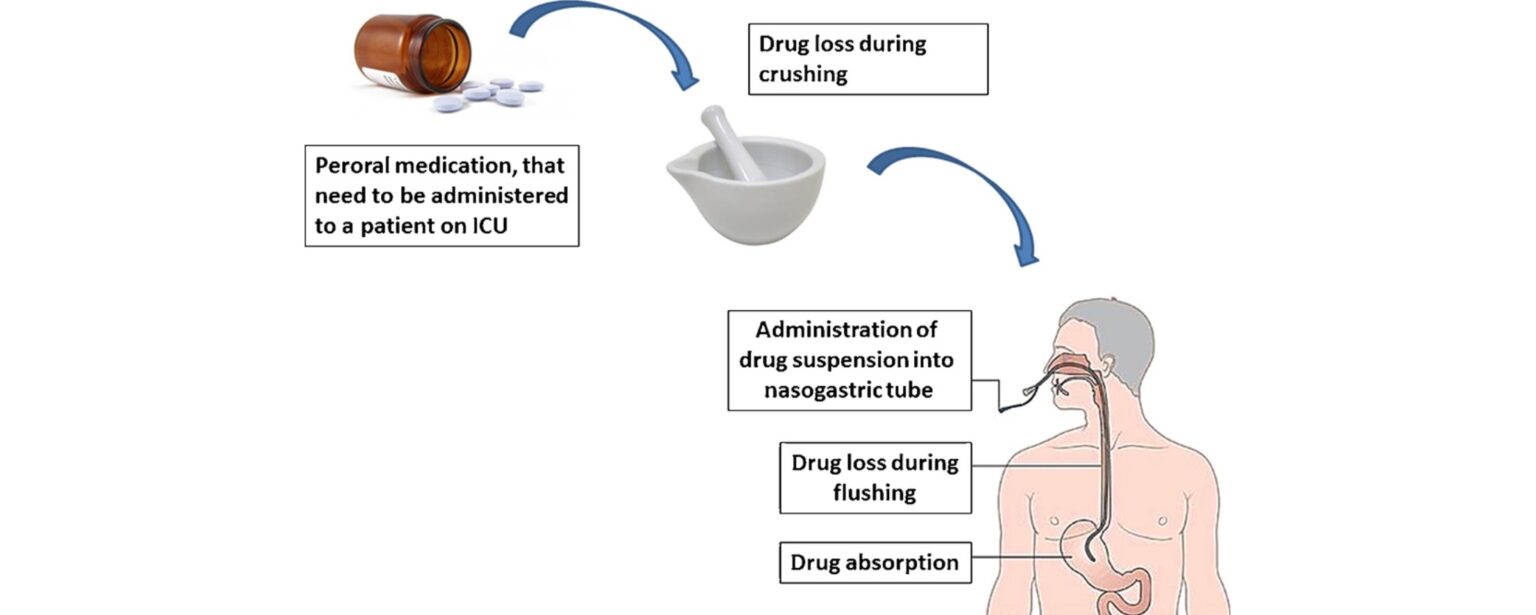
- Thick medications or improperly crushed pills can clog the tube.
- Enteric-coated or sustained-release capsules cannot be crushed for NG administration.
- All requirements for passing a tube.
- Medication.
- Mortar or pestle if tablets are used.
- Screen
| Step | Action | Rationale |
|---|---|---|
| 1 | Refer to general rules on nursing procedure and medicine administration. | Verifies safety protocols, dosages, and right patient. |
| 2 | Position patient and place mackintosh and towel under the chest. | Protects patient from spillage. |
| 3 | Elevate the head of the bead 35° -45° | Protects patient from aspiration. |
| 4 | Assess placement of the tube, if correct flush 15-30ml of water (adults) or 5-10ml in children. | Helps to maintain tube patency. |
| 5 | Administer the prepared medication in the same manner as feeds are administered. Administer each medication and flush with 5ml after each, do not mix medications. | To avoid medicine reactions. |
| 6 | After administering the prescribed medications flush the tubing with at least 30 ml of water. | Prevents clogging of feeding tube. |
| 7 | Assess patient response, replace requirements and wash hands. | Promotes patient comfort and limits cross-contamination. |
| 8 | Document and record administration of medication. | Ensures precise clinical communication and adherence to legal documentation standards. |

Topical medications are applied directly to intact skin or mucous membranes. They exist in various formulations such as lotions, creams, ointments, pastes, powders, sprays, and transdermal patches. Their primary goal is usually to produce a localized effect, protecting skin, providing local anesthesia, or treating localized skin conditions.
- Painless and non-invasive procedure.
- Delivers therapy directly to the targeted skin area, avoiding systemic side effects (except in the case of transdermal patches).
- Can be messy or stain patient clothing.
- May cause localized skin irritation or allergic contact dermatitis.
- Nurses must wear gloves to avoid unintentionally absorbing the medication systemically through their own skin.
- Gloves
- Water in a bowl
- Soap in a dish
- Cotton balls or gauze pieces
- Medicine (ointment, lotion or liniment) in appropriate container
- Adhesive tape and dressing pad
| Step | Action | Rationale |
|---|---|---|
| 1 | Refer to general rules on nursing procedure and medicine administration. | To maitain Standards. |
| 2 | Expose only the area where lotion/liniment is to be applied. | Preserves the patient's dignity and prevents chilling. |
| 3 | Powders; make sure the skin surface is dry and sprinkle evenly over the area till a fine layer covers the skin. Cover Area if required. | Dry skin ensures the powder does not clump and prevents unwanted friction. |
| 4 | Lotions; shake the container and put a small amount of lotion on a gauze dressing pad and apply it evenly in the direction of hair growth. | Ensures homogeneous mixture of medication; applying in the direction of hair growth prevents folliculitis. |
| 5 | Creams, ointments, and pastes; take a small quantity of medication in gloved hand, smear it evenly over skin using long strokes in the direction of hair growth. | Gloves prevent absorption by the nurse. Long strokes ensure an even coat and avoid skin trauma. |
| 6 | Spray; shake the container well to mix the contents, hold the container at 15 – 30 cm away from the area and spray, ensuring that it does not enter the eyes. | Provides an even mist over the targeted area without concentrating pressure. Protects highly sensitive mucosa like the eyes. |
| 7 | Transdermal patches; select clean dry area which is free of air, take the patch holding it without holding the adhesive edges and apply it firmly using palm of hand and press it for 10 seconds, remove the patch at the appropriate time. | Ensures secure, uniform adherence to the skin allowing steady systemic absorption, and proper rotation prevents skin breakdown. |
| 8 | Observe the area carefully for changes in color, swelling appearance of a rash. | Monitors for signs of local hypersensitivity or allergic contact dermatitis. |
| 9 | Document and record administration of medication. | Secures an accurate record in the patient's chart. |
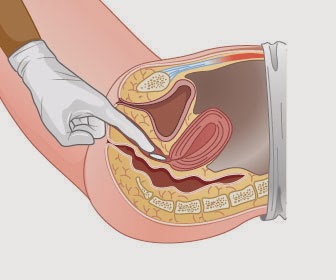
Rectal and vaginal administration involves introducing medication in the form of suppositories, creams, foams, or ointments into the respective body cavities. Rectal routes are often utilized for localized effects (like bowel evacuation) or when a patient cannot tolerate oral medications due to vomiting. Vaginal medications are generally intended for localized treatment of infections or inflammation.
- Bypasses upper gastrointestinal irritation and partial first-pass hepatic metabolism (rectal).
- Provides an effective alternate route for unconscious, vomiting, or uncooperative patients.
- Can cause physical discomfort, anxiety, or embarrassment for the patient.
- Absorption from the rectal mucosa can sometimes be slow, unpredictable, or erratic.
- Rectal suppository.
- Clean gloves.
- Application plunger in case of vaginal cream.
- Receiver.
- Lubricating jelly.
- Toilet paper receiver.
- Swabs in a gallipot.
- Mackintosh and towel.
- Screen
| Steps | Action | Rationale |
|---|---|---|
| 1. | Refer to general nursing procedures. | Keeps standard. |
| 2. | Review patient’s information about the medicine. | Ensures safe and correct medical administration. |
| 3. | Receive patient knowledge about the intended administration. | Ensures patient privacy and positions ensures easy access to anus. |
| 4. | Screen bed and position patient in left lateral with upper leg flexed. | Provides privacy. |
| 5. | Wash hands and put on gloves. | Reduces transfer of infection. |
| 6. | Keep the patient draped with only the anal area exposed. | Maintains privacy and facilitates relaxation. |
| 7. | Remove suppository from foil wrap and lubricate rounded end with jelly, lubricate gloved finger of dominant hand. | Lubrication reduces friction. |
| 8. | Request the patient to take slow deep breaths. | Facilitating suppository through constricted sphincter causes less pain. |
| 9. | Retract patient’s buttocks with non-dominant hand, with index finger of dominant hand insert suppository along rectal wall to 10 cm in adult and 5 cm in children. | Promotes eventual absorption. |
| 10. | Withdraw your finger and wipe the patient’s anal area with toilet paper. | Promotes comfort. |
| 11. | Request the patient to remain flat or on one side for 5 minutes. | Prevents expulsion of the medication. |
| 12. | Check within 5 minutes to determine the suppository is in place, request the patient to retain the suppository for 30-45 minutes. | Ensures effectiveness of medication. |
| 13. | Clean, remove gloves and wash hands. | Infection prevention. |
| 14. | Record and report all patients’ responses to medication including any reactions. | Ensures the effect of medicine. |
| Steps | Action | Rationale |
|---|---|---|
| 1. | Explain to the patient that insertion is painless and will bring relief from itching, pain and discomfort. | Reduces anxiety and ensures cooperation. |
| 2. | Request patient to empty bowel and bladder. | Promotes effectiveness. |
| 3. | Position patient in semi recumbent, cover patient leaving the perineal area only. | Ensures patient privacy. |
| 4. | Prepare requirements, unwrap suppository, for cream, fill applicator as instructed. | Promotes infection control. |
| 5. | Put on gloves, inspect perineal/vaginal discharge. | Prevents infection. |
| 6. | Apply medicine gently into the vaginal wall. | Ensures correct administration. |
| 7. | Request the patient to remain flat or on one side for 5-10 minutes following insertion. | Ensures absorption. |
| 8. | Apply a clean perineal pad if excessive discharge or cream leakage. | Promotes patient’s comfort. |
| 9. | Clean, remove gloves and wash hands. | Infection prevention. |
| 10. | Record and report all patients’ responses to medication including any reactions. | Promotes communication between team members. |
- Potter, P. A., Perry, A. G., Stockert, P. A., & Hall, A. M. (2021). Fundamentals of Nursing (10th ed.). Elsevier.
- Lynn, P. (2018). Taylor's Clinical Nursing Skills: A Nursing Process Approach (5th ed.). Wolters Kluwer.
- Berman, A., Snyder, S., & Frandsen, G. (2020). Kozier & Erb's Fundamentals of Nursing: Concepts, Process, and Practice (11th ed.). Pearson.

Very interesting sincerely…….
Thanks so much bwana kubwa
Very interesting 🙏
Thank you so much,I have really enjoyed reading and refreshing my knowledge
Generally very nice 👍
recommendable site for educational assistance
summerized notes thnks very much appreciated
good notes thnks very much appreciated