
Table of Contents
ToggleWOUND DRESSING
Wound dressing is a method of carrying out surgical dressing and operative treatment with an aim to prevent the entry of Microorganisms into the wound.
Indications for wound dressing
- To protect the wound from further injury or infection
- To absorb exudates such as pus or serum.
- To immobilize and support the injured part.
- To apply pressure on the wound to control bleeding or approximate the wound
- To provide psychological and physical comfort for the patient.
Wound : A cut or break in the normal continuity of the skin or body structure internally or externally.

Classification of Wounds
Wounds can be classified based on manner of production, bacterial content, extent, and time. Below is a detailed breakdown of each classification:
1. Classification by Manner of Production
Abraded Wound (Abrasion)
- Caused by friction that removes the superficial layer of the skin.
- Commonly occurs due to falls on rough surfaces, such as sand, concrete, or gravel.
Incised Wound
- Resulting from a sharp cutting instrument that produces a clean and well-defined separation of tissue.
- Example: Surgical incisions or cuts made by a sharp knife.
Contused Wound
- Caused by a blunt object, leading to significant injury to the soft tissue.
- Characterized by bruising (hemorrhage) and swelling due to damaged blood vessels.
- Example: Injuries from a blow, impact from a falling object, or trauma from a blunt force.
Lacerated Wound
- Involves tearing of tissue, resulting in irregular and ragged wound edges.
- Commonly caused by injuries from glass, metal, machinery accidents, or animal bites.
Penetrating Wound
- A wound that pierces through deep tissues and may enter a body cavity or organ.
- Example: Stab wounds caused by knives, long nails, or gunshot injuries.
Punctured Wound
- Made by a sharp, narrow, and pointed object.
- Usually deep with a small entry point, increasing the risk of infection.
- Example: Injuries caused by nails, splinters, or glass fragments.
2. Classification by Bacterial Content
Clean Wound
- Contains no pathogenic organisms and is made under sterile conditions.
- Example: Surgical wounds created with aseptic techniques.
- While surgical wounds are clean, the skin cannot be completely sterilized, making some microbial presence inevitable. However, the body’s immune system prevents infection.
Contaminated Wound
- A wound that contains a significant number of microorganisms.
- All accidental wounds fall into this category since they occur in an uncontrolled environment where aseptic precautions are absent.
Septic (Infected) Wound
- A wound infected by pathogenic microorganisms that lead to tissue destruction and pus formation.
- Even a previously clean or contaminated wound can become septic if unsterile techniques are used during dressing or if the body’s immune response fails.
3. Classification by Extent
Open Wound
- There is a break in the skin or mucous membrane, exposing the underlying tissue to external contaminants.
- Open wounds pose a higher risk of infection due to potential entry of microorganisms and foreign objects.
- Example: Incisions, abrasions, lacerations, and puncture wounds.
Closed Wound
- The skin remains intact, but underlying tissue is damaged.
- Internal bleeding, swelling, or bruising (hematoma) may occur.
- Example: Contusions (bruises) caused by blunt trauma.
4. Classification by Time
Acute Wound
- A wound that heals within four weeks.
- Includes surgical wounds, minor cuts, and abrasions that heal without complications.
Chronic Wound
- A wound that fails to heal within four weeks and remains in the inflammatory phase of healing.
- Chronic wounds may be associated with conditions such as diabetes, poor circulation, or infection.
- Example: Pressure ulcers, diabetic foot ulcers, and venous leg ulcers.

WOUND HEALING
Wound healing refers to the body’s natural process of replacing destroyed tissue with new, living tissue.
This complex biological process involves multiple phases and can be influenced by various internal and external factors.
Factors Affecting Wound Healing
Several factors determine the rate and effectiveness of wound healing:
1. Age
- Younger individuals tend to heal faster due to higher cellular activity and collagen production.
- Elderly individuals may experience delayed healing due to reduced skin elasticity, lower immune response, and slower cell regeneration.
2. Nutritional Status
- Proper nutrition is essential for wound healing. Deficiencies in proteins, carbohydrates, lipids, vitamins (especially A, C, and E), and minerals (such as zinc and iron) can delay the process.
- Proteins are crucial for cell growth and tissue repair.
- Vitamin C is essential for collagen formation, while Vitamin A aids in immune function and epithelial cell formation.
3. Type of Wound
- Clean surgical wounds heal faster than contaminated or infected wounds.
- Deep wounds with tissue loss take longer to heal than superficial wounds.
4. Blood Supply to the Affected Area
- Adequate blood circulation ensures oxygen and nutrient delivery to the wound, promoting faster healing.
- Conditions like diabetes, peripheral artery disease, and smoking can impair circulation and slow healing.
5. Presence of Foreign Bodies
- Dirt, debris, sutures, or other foreign materials in the wound can delay healing and increase infection risk.
6. Infection and Foreign Bodies in the Wound
- Infections introduce bacteria into the wound, causing inflammation, pus formation, and delayed healing.
- The presence of bacteria prevents new tissue from forming properly.
7. Lack of Rest of the Affected Part
- Continuous movement or strain on a wound can prevent proper tissue formation and delay healing.
- Immobilization and rest allow new cells to regenerate effectively.
8. Hemorrhage (Excessive Bleeding)
- Uncontrolled bleeding can prevent clot formation, delaying the healing process.
- Blood loss reduces oxygen supply to the wound, which is crucial for tissue repair.
9. Presence of Dead Space in the Wound
- Dead space refers to empty spaces between tissues where fluid can accumulate, increasing infection risk.
- Proper wound closure techniques (suturing or packing) help eliminate dead spaces.
10. Malnutrition
- An inadequate supply of proteins, carbohydrates, lipids, vitamins, and trace elements can slow down all phases of wound healing.
11. Medications
Certain medications can impair the healing process, such as:
- NSAIDs (Non-Steroidal Anti-Inflammatory Drugs): May interfere with inflammation, which is crucial for wound healing.
- Chemotherapy and Immunosuppressive Drugs: Reduce cell proliferation, slowing tissue repair.
- Corticosteroids: Suppress the immune response and delay new tissue formation.
12. Stress, Anxiety, and Depression
- Emotional and psychological stress can negatively affect immune function and hormone balance, leading to slower wound healing.
13. Underlying Diseases
- Conditions such as diabetes, autoimmune disorders, anemia, and cancer can impair wound healing by reducing immune function, circulation, and tissue regeneration.
14. Infection
- A wound that becomes infected requires additional time to heal due to the presence of bacteria that compete with new tissue growth.
- Infections can lead to chronic wounds if left untreated.
Types of Wound Healing (Wound Closure)
1. Healing by Primary Intention (First Intention)
- The wound edges are brought together (approximated) using sutures, staples, or adhesive strips.
- Occurs in clean, minimal tissue loss wounds such as surgical incisions.
- Healing is quick with minimal scarring.
2. Healing by Secondary Intention (Granulation Healing)
- Happens when there is significant tissue damage or infection, preventing the wound edges from being approximated.
- The wound heals from the bottom up, filling with granulation tissue (new connective tissue and blood vessels).
- Requires daily wound dressing as the open wound is at risk of infection.
- Healing time is longer, and scarring is more prominent.
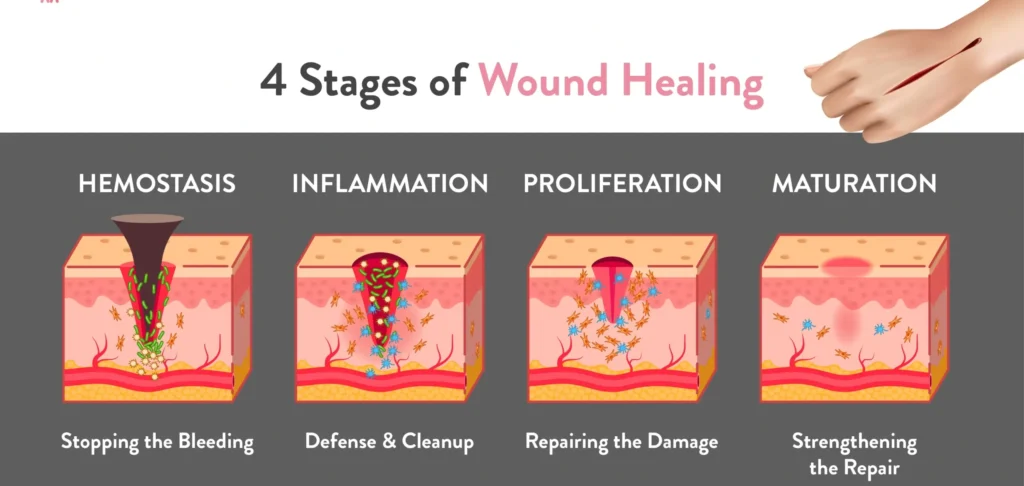
Phases of Wound Healing
The wound healing process consists of four overlapping phases, commonly referred to as the “cascade of healing.”
1. Hemostasis Phase (Bleeding Control Phase): The immediate response to physical injury, ensuring that bleeding is controlled.
Includes:
- Vasoconstriction (narrowing of blood vessels to reduce bleeding).
- Platelet response (platelets form a clot at the injury site).
- Biochemical response (release of clotting factors to stabilize the wound).
2. Inflammatory Phase: Damaged cells release cytokines that attract white blood cells to fight infection.
Key events:
- Histamine, serotonin, and kinins cause temporary blood vessel constriction, followed by dilation to allow immune cells to reach the wound.
- Neutrophils arrive within 24 hours to remove bacteria and dead tissue.
3. Proliferative Phase: Begins once neutrophils have cleared cellular debris.
Key processes:
- Fibroblasts migrate to the wound and produce collagen (Type III initially) to provide structural support.
- Angiogenesis (formation of new blood vessels) starts within 48 hours.
- Wound strength increases significantly during this phase.
This phase lasts up to 3 weeks.
4. Maturation (Remodeling) Phase: Begins around week 3 and continues for 9 to 12 months.
- Collagen Type III is replaced with Collagen Type I, increasing tensile strength up to 80% of normal skin.
- The wound contracts, and scar tissue forms.
Care of Wounds
Dressing Methods
- Dressing Method – Covers the wound to promote healing.
- Non-Dressing Method – Leaves the wound open to air for healing.
Advantages of Dressing
- Absorbs wound drainage.
- Protects from contamination (feces, urine, vomit, etc.).
- Provides immobilization and prevents mechanical injuries.
- Helps with hemostasis (prevents bleeding).
- Provides psychological and physical comfort for the patient.
Advantages of Non-Dressing Method
- Prevents bacterial growth by eliminating warmth and moisture.
- Allows better observation of the wound.
- Facilitates bathing without disrupting healing.
- Avoids allergic reactions from adhesive tapes.
- More economical and comfortable for the patient.
Disadvantages of Non-Dressing Method
- Exposure of large wounds may cause anxiety for some patients.
- Increased risk of contamination in an unclean environment.
Qualities of a Good Dressing
- Sterile – Free from microorganisms.
- Lightweight – Comfortable and non-bulky.
- Porous – Allows air circulation to prevent moisture buildup.
Types of Dressings
Dry Dressing
- Used for clean wounds.
- Typically made of 4 to 8 layers of gauze, applied after antiseptic treatment.
Wet Dressing
- Used for infected wounds with pus, softening discharge and promoting drainage.
- Made of moistened antiseptic gauze with multiple layers.
Pressure Dressing
- Applied with firm bandages to control bleeding and reduce oozing.
- Commonly used for trauma or post-surgical wounds.
General Rules for Wound Dressing
Wound infections occur when microorganisms contaminate the wound, often originating from the ward environment. The primary sources of contamination include:
Sources of Wound Infection in the Ward
- Airborne Contaminants – Dust particles or infected droplets from the nose and mouth of patients, visitors, and medical staff.
- Hands of Healthcare Providers – Bacteria and pathogens from nurses, doctors, and other staff may transfer to wounds if proper hand hygiene is not followed.
- Improper Dressing Techniques – Inadequate sterilization and incorrect handling of wounds can introduce infections.
- Use of Unsterile Instruments – Dressing materials and instruments that are not properly sterilized can be a source of infection.
To prevent these risks and minimize wound infections, the following essential rules must be followed:
General Rules for Wound Dressing
No. | Rules | Rationale |
1. | All bed making, mopping of the floor and dusting must be finished at least one hour before the dressing round is started. | To prevent spread of infections. |
2. | Before the dressing round, wash the trolley with soap and water and dry it. | |
3. | Before each dressing, wipe the trolley shelves with a disinfectant using a mopper. | |
4. | Sterile articles are placed on the top shelf, un-sterile articles on the bottom shelf. | |
5. | Clean wounds are always dressed first | |
6. | Limit movements in the ward and windows near to the patient being dressed must be closed. | To prevent cross infection. |
7. | Do not carry out dressing when having a focal wound or droplet infection. | |
8. | If possible 2 nurses should be available to carry out dressing. | To prevent contamination and save time. |
9. | Apply universal infection prevention and control before and after each procedure. | To prevent spread of infections. |
10. | Nails must be short, watches and rings should be removed. | |
11. | Masks are worn if required and once in position they must not be handled. • When removing the mask, handle only the tapes and dispose off immediately. • Never put a used mask in the uniform pocket. | To prevent spread of infections |
12. | Lotions: The dressing assistant should pour only enough lotion for one dressing. Unused lotion must be disposed off when clearing the trolley. | To avoid wastage and cross infection. |
13. | The trolley is reset for each dressing. | |
14. | All used equipment must be decontaminated, washed with soap water, brushed, dried and sterilisation. | To be ready for next dressing |
15. | The trolley is cleaned with disinfectant. |
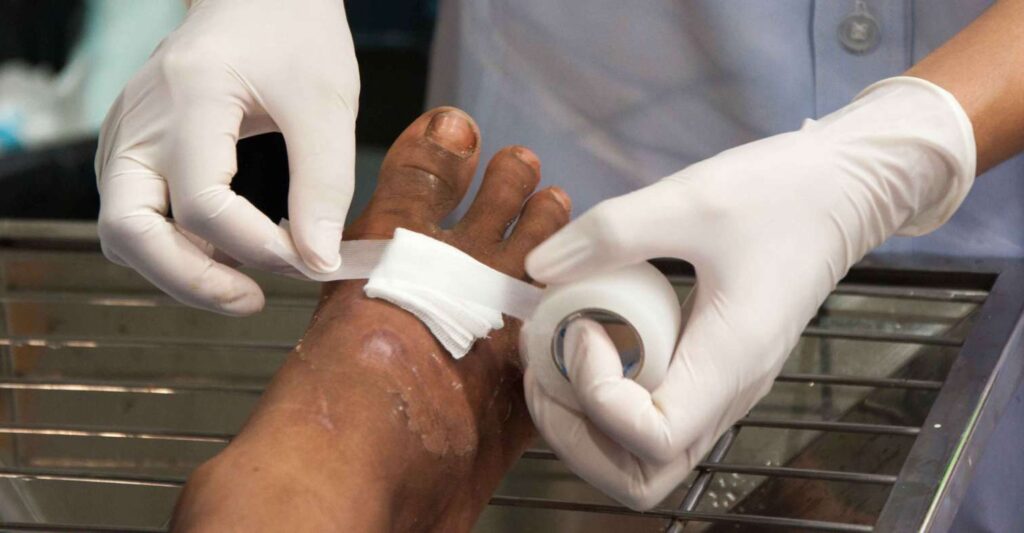
Wound Dressing Procedures
Dressing a Clean Wound
A clean wound is a superficial wound caused by uncontaminated sharp objects.
It may occur electively (e.g., surgical incision) or accidentally (e.g., cuts from broken glass or sharp metal).
Purpose of Dressing a Clean Wound
- To keep the wound clean and free from infection.
- To prevent the wound from further injury and contamination.
- To hold medications applied locally in place.
- To immobilize the wound edges, promoting faster healing.
- To apply pressure, minimizing bleeding and swelling.
Requirements for Clean Wounds
Top Shelf | Bottom Shelf | Bed Side |
Sterile dressing pack containing: – 2 dressing towels – 2 non-toothed dissecting forceps – 2 dressing forceps – 3 gallipots – 1 for swabs – 1 for the lotion – 1 for gauze dressing – A pair of stitch scissor or a clip remover if required | – A dressing mackintosh and towel – Receiver for soiled dressing – Receiver for used instruments – A bottle of antiseptic lotions – A drum for dressing – A drum for swabs – A tray with bandages, scissors, safety pins, strapping – A container of Cheatle forceps – A pair of gloves and a pair of clean glove – A bowl | – Hand washing equipment |
Extra Requirements For Dirty Wound | ||
– Probe – Sinus forceps | – Hydrogen peroxide – Pus swab – Laboratory form – Hypotonic saline | – Pedal bin |
Bed-Side Requirements
- Hand washing equipment
- Screen for patient privacy
- Safety box for disposal of sharps
- A good source of ligh
Procedure
Steps | Action | Rationale |
1. | Refer to general rules. | – |
2. | Dressing assistant positions the patient. | To maintain sterility. |
3. | Place a mackintosh and towel under the part to be dressed. | Provides comfort and prevents soiling of bed linen. |
4. | Dressing assistant puts on clean gloves, removes the bandage, and loosens the strapping. | For easy removal of the old dressing. |
5. | Dressing assistant removes gloves, washes hands, opens the dressing pack, and adds any additional sterile equipment using Cheatle forceps. | To arrange materials for easy use and maintain sterility. |
6. | Adds sterile cleaning solution required. | To prevent the spread of infections. |
7. | Dressing assistant puts on clean gloves, removes the dressing, and discards it in the receiver. | To prevent the spread of infections. |
8. | Dressing nurse washes hands thoroughly with soap and water and dries with a sterile towel. | To reduce the spread of infections. |
9. | Puts on sterile gloves. | To maintain surgical asepsis. |
10. | Drapes the wound with a dressing towel. | To provide a sterile environment. |
11. | Using forceps, swabs the wound, discarding each swab after use (first the center, then each side of the wound, working from the middle outwards). | To minimize the spread of infection. |
12. | For a dirty wound, perform necessary toileting as prescribed, which may involve the removal of stitches or clips, probing the wound, or packing the wound. | To promote healing. |
13. | Applies dressing to cover the wound and puts additional dressing if oozing or discharge is anticipated. | To protect the wound and prevent soiling of the linen. |
14. | Places used instruments in a receiver. | To avoid cross infections. |
15. | Removes gloves, applies strapping or a bandage on the wound as required. | – |
16. | Washes hands, clears away, and leaves the patient comfortable. | To maintain hygiene and sterility. |
17. | Documents the procedure and reports accordingly. | For continuity of care and follow-up. |

Dressing of Septic Wound
Septic wound is characterized by the presence of pus, dead skin and offensive odour in the wound.
Purpose of Dressing a Septic Wound
- To absorb discharge from the wound.
- To apply pressure and prevent excessive fluid buildup.
- To apply local medications for infection control.
- To reduce pain, swelling, and further tissue injury.
Need irrigation: As for clean wounds and dirty wounds which may not need irrigation, however with addition of the following, on the top shelf.
Additional Items (Top Shelf) |
Bowl containing irrigation lotion (e.g., hydrogen peroxide) |
Saline 0.9% solution |
Receiver containing large syringe and fine catheter |
Receiver for used lotion |
Procedure
Step | Action | Rationale |
1 | Explain procedure to the patient | To gain patient cooperation and reduce anxiety. |
2 | Clean trolley or tray and assemble sterile equipment on one side and surgically clean items on the other side. Make sure the tray or trolley is covered. | To maintain asepsis and prevent contamination of sterile supplies. |
3 | Drape patient and position comfortably. | To provide privacy and comfort for the patient during the procedure. |
4 | Place the rubber sheet and its cover under the affected part. | To protect the bed linen from becoming soiled. |
5 | First remove the outer layer of the dressing. | To expose the inner dressing and wound site. |
6 | Wear gloves if necessary. Use forceps to remove the inner layer of the dressing smoothly and discard therefore caps. | To prevent contamination of the wound and protect healthcare worker from exposure to infectious materials. |
7 | Observe the wound and check if there is drainage rubber or tube. | To assess the wound’s condition and identify any complications. |
8 | Take specimens for culture or slide if ordered (Do not cleanse wounds with antiseptic before you obtain the specimen.) | To accurately identify any infectious organisms present in the wound. |
9 | Start cleaning the wound from the cleanest part of the wound to the most contaminated part using antiseptic solution. (Hydrogen peroxide 3%) is commonly used for septic wounds). Discard the cotton ball used for cleaning after each stroke over the wound. | To prevent the spread of contamination from the dirtier areas to the cleaner areas. |
10 | Cleanse the skin around the wound to remove the plaster gum with benzene or ether. | To ensure proper adhesion of the new dressing. |
11 | Use cotton balls for drying the skin around the wound properly. | To create a clean, dry surface for the new dressing. |
12 | Dress the wound and make sure that the wound is covered completely. | To protect the wound from infection and promote healing. |
13 | Fix dressing in place with adhesive tape or bandages. | To secure the dressing and prevent it from dislodging. |
14 | Leave the patient comfortable and tidy. | To promote patient well-being and satisfaction. |
15 | Cleanse and return equipment to its proper places. | To maintain a clean and organized work environment. |
16 | Discard soiled dressings properly to prevent cross infection in the ward. | To prevent the spread of infection to other patients and healthcare workers. |
NB:
| ||

Wound Irrigation
Wound irrigation is the process of removing foreign materials, reducing bacterial contamination, and clearing cellular debris or exudate from the wound surface.
It is a critical step in wound management, helping to maintain a clean environment that promotes optimal healing.
The procedure must be vigorous enough to achieve effective cleansing but gentle enough to prevent additional tissue trauma or the unintentional spread of bacteria and foreign particles deeper into the wound.
Since wound irrigation involves bodily fluids, splashing and spraying can occur due to the use of pressure. To ensure the safety of healthcare providers, proper personal protective equipment (PPE) such as gloves, masks, eye protection, and gowns must be worn.
Essential Steps of Wound Irrigation
- Assessing the Wound – Evaluate the wound’s size, depth, level of contamination, and presence of infection.
- Wound Anesthesia – If necessary, provide local anesthesia to minimize patient discomfort during irrigation.
- Wound Periphery Cleansing – Clean the skin around the wound using antiseptic solutions to prevent external contamination.
- Irrigation with Solution Under Pressure – Flush the wound using an appropriate solution with controlled pressure to remove debris and bacteria effectively.
Indications for Wound Irrigation
Wound irrigation is recommended for both acute and chronic wounds, especially when:
- The wound is contaminated with debris or foreign materials.
- The wound will undergo suturing, surgical repair, or debridement.
- The wound has exudate buildup, which may delay healing.
Contraindications for Wound Irrigation
Wound irrigation may not be necessary or should be carefully performed in the following situations:
Contraindication | Reason |
Highly vascular areas (e.g., scalp wounds) | Excessive irrigation may not be required due to the scalp’s rich blood supply, which naturally aids in cleansing. |
Wounds with fistulas or sinuses of unknown depth | Irrigation could push bacteria and debris deeper into the wound or surrounding body spaces, leading to complications. |
Extensive tissue damage or fragile wounds | Excessive irrigation pressure can worsen tissue injury. |
Wound Cleansing Agents
Various wound cleansing agents are available, each with different bactericidal properties:
Cleansing Agent | Bactericidal Action | Effect on Healthy Tissue |
Povidone-Iodine Solution | Strong against both gram-positive and gram-negative bacteria | Mildly toxic to healthy cells and granulation tissues |
Chlorhexidine | Strongly bactericidal against gram-positive bacteria, less effective against gram-negative bacteria | Generally safe but may cause irritation |
Hydrogen Peroxide | Strong against gram-positive bacteria, less effective against gram-negative bacteria | Can damage healthy tissue and delay healing |
Irrigation Solutions for Wound Cleansing
Different irrigation solutions can be used based on wound type and availability:
Irrigation Solution | Properties | Usage Considerations |
Normal Saline (0.9%) | Non-toxic, similar in tonicity to body fluids | Most commonly used due to safety and effectiveness |
Sterile Water | Non-toxic but hypotonic, may cause cell lysis | Suitable when saline is unavailable but should be used cautiously |
Potable Water | Readily available, no significant difference from sterile water in infection rates | Used when sterile water or saline is unavailable |
Requirements
|
Procedure
Step | Action | Rationale |
1 | Explain the procedure to the patient and organize the needed items. | To gain patient cooperation and ensure efficiency. |
2 | Drape and position patient. | To provide privacy and comfort. |
3 | Put a rubber sheet and its cover under the part to be irrigated. | To protect the bed linen from becoming soiled. |
4 | Remove the outer layer of the dressing. | To expose the inner dressing. |
5 | Remove the inner layer of the dressing using the first sterile forceps. | To maintain sterility during dressing removal. |
6 | Put the receiver under the patient to receive the outflow. | To collect the irrigation fluid and prevent mess. |
7 | Use a syringe with the desired amount of solution fitted with the catheter. | To deliver a controlled amount of irrigation fluid. |
8 | Use forceps to direct the catheter into the wound. | To ensure the catheter reaches the desired area of the wound. |
9 | First inject the solution such as hydrogen peroxide at body temperature gently and wait for the flow. This must be followed by normal saline for rinsing. | Hydrogen peroxide helps to loosen debris, while normal saline rinses away the debris and remaining peroxide. |
10 | Make sure the wound is cleaned and dried properly. | To prepare the wound for dressing and prevent maceration. |
11 | Dress the wound and check if it is covered completely. | To protect the wound from infection. |
12 | Secure dressing in place with adhesive tape or bandage. | To keep the dressing in place. |
13 | Leave the patient comfortable and tidy. | To promote patient well-being. |
14 | Record the state of the wound. | To monitor healing progress. |
15 | Clean and return equipment to its proper place. | To maintain a clean and organized environment. |
NB: | Keep patient in a convenient position. According to the need so that solution will flow from wound down to the receiver. | |
Complications
Wound irrigation should be avoided if the wound is actively bleeding, as it can disrupt clot formation and exacerbate hemorrhage. Incomplete or inadequate wound irrigation can lead to several complications:
- Persistent Debris: Failure to thoroughly remove debris, foreign bodies, or necrotic tissue increases the risk of infection and delayed healing.
- Sinus Formation: In abscesses, inadequate irrigation can result in the persistence of purulent discharge, potentially leading to chronic sinus tract formation.
- Infection: Retained bacteria and contaminants can promote local or systemic infection.
- Cytotoxicity: While povidone-iodine is a common antiseptic, excessive use or direct instillation into deep wounds can be cytotoxic, impairing wound healing. It should be used carefully, primarily on wound edges, and avoided in large quantities within the wound.
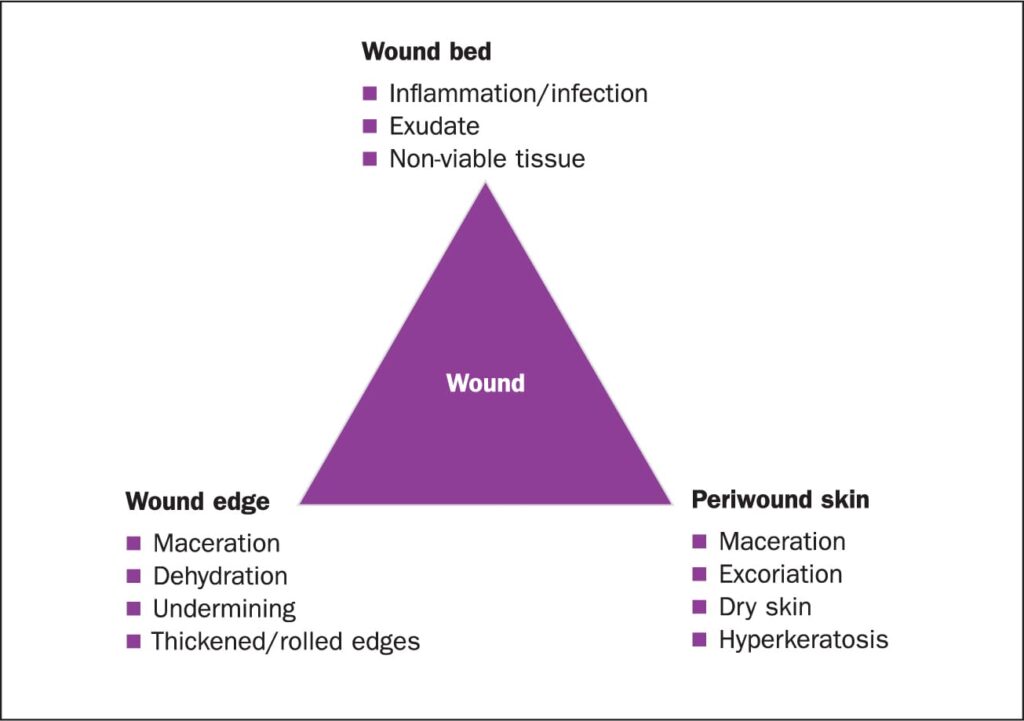
Wound Assessment
Wound assessment is a critical process in wound management that allows healthcare professionals to determine the appropriate treatment plan and monitor healing progression.
It involves evaluating the type, severity, and condition of the wound, along with assessing for signs of infection, complications, or delayed healing.
Both initial and ongoing wound assessments should be conducted systematically in collaboration with the treating team to ensure optimal patient care.
Key Factors in Wound Assessment
The following considerations are essential for a comprehensive wound assessment:
- Type of Wound – Categorized as acute or chronic based on duration and healing progression.
- Aetiology (Cause of Wound) – Includes surgical wounds, lacerations, ulcers, burns, abrasions, traumatic injuries, pressure injuries, and neoplastic wounds.
- Wound Location & Surrounding Skin – Important for understanding healing potential and the impact on mobility or function.
- Tissue Loss – Determines whether the wound is superficial, partial-thickness, or full-thickness.
- Clinical Appearance of Wound Bed – Indicates the stage of healing and tissue viability.
- Measurement & Dimensions – Includes both two-dimensional and three-dimensional wound assessments.
- Wound Edges – Assessed for color, contraction, elevation, and rolling, all of which impact healing.
- Exudate (Wound Drainage) – Evaluated for quantity, color, consistency, and odor to detect infection or complications.
- Presence of Infection – Identified by local or systemic indicators of bacterial overgrowth.
- Pain – Helps assess wound progression and potential underlying complications.
- Previous Wound Management – Important for evaluating treatment effectiveness and necessary modifications.
1. Type of Wound
Wounds can be classified based on terminology related to their cause and general healing characteristics.
Wound Type | Description |
Surgical Wound | Incision made during a medical procedure under sterile conditions. |
Burn | Caused by heat, chemicals, electricity, or radiation. |
Laceration | A deep cut or tear in the skin due to trauma. |
Ulcer | A wound caused by prolonged pressure, infection, or vascular insufficiency. |
Abrasion | Superficial wound caused by friction removing the skin’s surface. |
Traumatic Wound | Resulting from external force, such as accidents, falls, or injuries. |
Pressure Injury (Bedsore) | Skin and tissue damage due to prolonged pressure, especially in bedridden patients. |
Neoplastic Wound | Caused by malignant tumors breaking down skin tissue. |
2. Tissue Loss
The depth of a wound determines the level of tissue loss:
Tissue Loss Classification | Description |
Superficial Wound | Involves only the epidermis (outer layer of the skin). |
Partial-Thickness Wound | Affects both the epidermis and dermis. |
Full-Thickness Wound | Extends beyond the dermis into subcutaneous tissue, possibly reaching muscles, bones, or tendons. |
3. Clinical Appearance of the Wound Bed
The wound bed provides insight into the healing process. Different tissue types indicate the stage of healing and whether intervention is required.
Wound Bed Appearance | Description |
Granulating | Healthy red/pink moist tissue, indicating active healing. Contains newly formed collagen, elastin, and capillary networks. Bleeds easily. |
Epithelializing | Thin, pink or whitish layer forming over the wound. Signifies new skin formation over granulation tissue. |
Sloughy | Yellow or whitish tissue, made up of dead cells and fibrin. Must not be confused with pus. |
Necrotic | Black, dry, or grey dead tissue. Prevents healing and may require debridement. |
Hypergranulating | Excess granulation tissue, extending beyond the wound margins. Often caused by infection, irritants, or bacterial imbalance. |
4. Wound Measurement
A proper wound assessment requires accurate measurement of its size and depth.
Measurement Method | Description |
Two-Dimensional Assessment | Uses a paper tape measure to record the length and width (in mm). Commonly used for chronic wounds. |
Three-Dimensional Assessment | Depth is measured using a dampened cotton tip applicator. Helps assess cavity wounds or tracking (tunneling wounds). |
5. Wound Edges
The edges of the wound give valuable insight into healing progress.
Wound Edge Feature | Indication |
Pink edges | Indicate new tissue growth and healing. |
Dusky edges | Suggest hypoxia (lack of oxygen) in the wound. |
Erythema (redness) | May indicate inflammation or cellulitis. |
Contracting wound edges | Show wound contraction, a normal part of healing. |
Raised wound edges | Suggest hypergranulation, which may need intervention. |
Rolled edges | Edges rolling inward may delay healing and require corrective action. |
Changes in sensation | Increased pain or numbness should be investigated. |
6. Exudate (Wound Drainage)
Exudate plays a critical role in healing but requires careful monitoring.
Functions of Exudate in Healing
- Provides nutrients and growth factors for cell metabolism.
- Contains white blood cells to fight infection.
- Cleanses the wound by flushing out bacteria and debris.
- Maintains moisture balance, preventing wound desiccation.
- Promotes epithelialization, aiding tissue regeneration.
Complications Related to Exudate
- Excess exudate → Causes maceration (breakdown of surrounding skin).
- Insufficient exudate → Leads to wound dryness, slowing healing.
- Odorous, thick exudate → Indicates infection or necrosis.
7. Surrounding Skin Condition
The surrounding skin should be examined for:
- Signs of maceration (excess moisture causing soft, broken skin).
- Erythema (redness indicating inflammation or infection).
- Dryness or cracking, which may slow healing.
- Skin integrity changes, requiring protection measures.
8. Presence of Infection
A wound infection occurs when bacteria multiply beyond the body’s ability to control them.
This can lead to delayed healing, tissue destruction, or systemic illness.
Local Signs of Infection
- Redness (Erythema or Cellulitis) – Surrounding skin appears inflamed.
- Exudate Changes – Purulent (pus-like) or increased drainage.
- Foul Odor – A strong smell may indicate bacterial growth.
- Localized Pain – Increased pain in or around the wound.
- Localized Heat – Warmer than surrounding tissue.
- Swelling (Oedema) – Fluid accumulation around the wound.
Systemic Signs of Infection (Indicating worsening condition)
- Fever or chills
- Increased heart rate
- Fatigue or malaise
- Spreading redness beyond the wound area
Thanks for the matter
Thanks for the matter
God bless you