Nurses Revision

Midwifery

MINOR DISORDERS OF PREGNANCY

MINOR DISORDERS OF PREGNANCY

MINOR DISORDERS OF PREGNANCY

These are referred to as minor because they are not life threatening.
The causes can be;-

  • Hormonal changes
  • Accommodation changes
  • Metabolic changes and
  • Postural changes
DIGESTIVE SYSTEM
Nausea and vomiting (morning sickness)

This is due to hormonal changes progesterone and Oestrogen and high level of HCG, it occurs from 4-16 weeks. This decreases when the placenta fully takes over.
Management
-Light snacks
-Carbohydratesnack like cassava, a hard crackers
-Avoid sweet things
-Coming out of the bed slowly.

Heart burn

Burning sensation in the media sternal region progesterone relaxes the cardiac sphincter and allows reflux of gastric contents into esophagus most troublesome between 30-40 weeks, because of pressure on stomach from growing uterus.
Management
-Avoid bending
-Small frequent meals
-Sleeping with more pillows
-Persistent heart burn antiacids like magnesium triscilicate.

Excessive salivation (ptyalism)

From 8 weeks, hormones are thought to be the cause. It may accompany heart burn. Counseling is helpful.

Constipation

Progesterone cause relaxation of the plain muscles and decreased peristalsis of the gut.
Management
-Increased intake of water, fresh fruit, vegetables and whole meal foods in diet.
-Glass of warm water in the morning, before tea and breakfast may activate the gut.
– Exercise can be helpful especially walking.
Aperients are only considered as a last resort.

Pica

This is when a mother craves for certain foods or unnatural substances.
The cause is unknown but hormones and changes in metabolism are attributed to it.

MUSCULO SKELETAL SYSTEM

This can be due to hormones Relaxin. Discuss with woman and let her be aware, it will disappear after delivery.

Leg cramps

Cause of leg cramp in pregnancy is unknown may be due to ischemia or a result from changes in PH or electrolyte status.
Management
-Mother to dorsiflex the foot and raise foot of bed.
-Gentle leg movement before sleeping at night.
-Others-use of vit B complements and calcium.

Backache

The weight of the pregnant uterus and altered posture increase susceptibility which is exacerbated by progesterone and Relaxin causing relaxation and softening of ligaments of the pelvis.
Management
-Avoid high heeled shoes.
-Sit on a comfortable chair or support the back on a wall while seated.
-Have extra rest during the day.

CIRCULATORY SYSTEM
Fainting

In early pregnancy, it may occur due to vasodilation under the influence of progesterone before there has been a compensatory increase in the blood volume.
Management
-Avoid long standing periods.
-Quickly sit or lie down if feels slightly faint,
-Mother should avoid lying on her back except during abdominal examination.

Vericose veins

-Progesterone relaxes smooth muscles of veins and results in sluggish circulation. Varicose veins may occur in legs, anus and vulva.
Management
During pregnancy
-Support tights increase comfort eg stockings.
-Avoid constipation.
-A sanitary pad may give support.
-Use a crepe bandage on affected leg from below upwards before getting out of bed in the
morning and remove it at night.
-The affected leg should be elevated when resting.
-Advise mother to see the doctor if varicose veins appear on the vulva.
-In case of severity, book mother for hospital delivery since they can easily rapture and cause severe bleeding.
During labour
-Inform doctor.
-Take off blood for Hb, grouping and x-matching.
-Be careful when shaving the vulva and when performing an episiotomy.
-Sedatives are given to prevent premature pushing.

Hemorrhoids

These are veins of the vulva or rectum and they usually occur due to constipation. They can be painful, edematous and ulcerative.
Management
-Advise mother on diet to avoid constipation.
-Use cold compress gently on the area.
-Doctor may order analgesic like anusol.

Heart palpitations

This occurs due to increased functioning of the heart to meet the demands of the growing fetus and mother.

NERVOUS SYSTEM
Carpal tunnel syndrome

The mother complains of numbness, pins and needles in her fingers and hands.
It’s caused by fluid retention which causes oedema and pressure on the median nerve by compressing it.
Management
-Wearing a splint at night and rising hands on a pillow at night.
-If it persists, refer to doctor who will give diuretics.

Insomnia

This is failure to get sleep and may be caused by worries, anxiety and it shouldn’t be taken lightly.
Emotional instability
Hating, irritation, loving i.e. willing to stay closer to partner.

GENITAL URINARY SYSTEM
Leucorrhoea

This is increased, non- irritant, vaginal discharge.
Management
-Ensure hygiene if distressing.
-Wear cotton under pants for easy absorption.

Frequency of micturition

This occurs in early pregnancy when the growing fetus is still in the pelvic cavity and late pregnancy when the PP descends and competes for space needed by bladder.

INTEGUMENTARY SYSTEM
Itching of the skin

This can be due to Striae gravidurum, poor hygiene, heat rash and minor skin rashes.
Management
-Wear cotton clothes which are non-irritating.
-Advise on personal hygiene.
-Apply calamine lotion in case of skin rash.

Disorders which require immediate action

  • Vaginal bleeding.
  • Reduced fetal movements.
  • Frontal or recurrent headache.
  • Sudden swelling or oedema.
  • Early rapture of membranes.
  • Premature onset of contractions
  • Maternal exhaustion at whatever extent.
  • Fits.
  • Excessive nausea and vomiting.
  • Epigastric pain.

MINOR DISORDERS OF PREGNANCY Read More »

PHYSIOLOGY OF PREGNANCY

PHYSIOLOGY OF PREGNANCY

PHYSIOLOGY OF PREGNANCY

These are normal natural changes that occur in the body due to pregnancy. These result mainly from alteration of hormones and metabolism.

CHANGES IN THE ENDOCRINE SYSTEM
  1. Hormonal changes:
    The placenta produces several hormones which cause a number of physiological changes.
    Successful physiological adaptation of pregnancy is due to alterations in hormone production by the maternal endocrine system and the trophoblast.
  2.  Human chorionic gonadotrophic hormone.
    It is produced by the trophoblast. H.C.G levels increase rapidly in early pregnancy, maximum levels being attained at 8-10 weeks of gestation. The main function of HCG is to maintain the
    corpus luteum in order to ensure secretion of progesterone and Oestrogen until placental production is adequate after 10-12 weeks after which concentration of HCG gradually decreases until it has completely disappeared 2 weeks after birth.
  3.  Progesterone hormone;
    This is produced mainly in the corpus luteum. Its function is to thicken the decidua in order to receive a fertilized ovum. It helps to increase the glandular tissue, ducts of the breasts and muscle
    fibres of the uterus.
  4.  Oestrogen;
    It causes growth of the uterus and duct system of the breasts in pregnancy. It is excreted in urine and amount present indicates fetal wellbeing.
  5.  Relaxin hormone;
    During the last weeks of pregnancy, it acts on ligaments and joints producing the “give” of the pelvis. It is also produced by decidua and the trophoblast to promote myometrium relaxation and
    may play a role in cervical ripening and rapture of membranes.
  6. HPL ( human placental lactogen): It stimulates the growth of breasts and has lactogenic properties that affect a number of metabolic changes. These changes brought about by HPL ensure that glucose is readily available for body and brain growth in the developing fetus, and protects against nutritional deficiencies.
  7. Pituitary hormones: The follicle stimulating hormone and L.H are suppressed by the high levels of Oestrogen and progesterone. The adrenal gland increases only slightly in size during pregnancy due to hypertrophy and widening in glucocorticoid area which suggests increased secretion of hormones.
  8. Thyroid function: In normal pregnancy, the thyroid gland increases due to hyperplasia of glandular tissue and increased vascularity. There is normally an increased uptake of iodine during pregnancy which may be to compensate for renal clearance of iodine leading to reduced level of plasma iodine.
CHANGES IN THE REPRODUCTIVE SYSTEM
CHANGES IN THE UTERUS:

It stretches and expands to accommodate and nurture the growing fetus. This occurs in the
myometrium. The body grows to provide a nutritive and protective environment in which the fetus will develop and grow.

Uterine muscle layers;
1. Endometrium;
– Menstruation stops.
-It becomes the decidua during pregnancy.
-It becomes thick, soft, spongy and readily supplied with blood.

. Myometrium.

  • The enlargement of the body of the uterus is due to 2 factors.
    1. The actual muscle fibres enlarge increasing in length about 10 times and in width about 3 times.
    This process is called hypertrophy (increase in size).
    2. The new muscle cells make their appearance and grow alongside the original muscle cells. This process is called hyperplasia (increase in number).
    The size; as pregnancy advances, the uterus grows from its normal size. The length being 7.5cm,
    width 5cm and thickness 2.5cm. So it becomes 30cm in length, 23cm in width and 20 cm in
    thickness. The weight increases from 60g to 960g.
    The shape; Health growth of the uterus requires adequate space to accommodate the growing fetus, increasing amount of liquor and placental tissue. After conception, the uterus enlarges
    because of Oestrogen. At the beginning of pregnancy, it is pear shaped organ, at the end of 12 weeks, it is globular, from 12-38weeks its oval shaped and when lightening takes place after 38weeks, it turns back to globular.

Muscle layers of the myometrium;

  1.   Outer most longitudinal layer,
    This layer begins in the anterior wall of the upper uterine segment, passes over the fundus and down the posterior wall. It is by contraction and retraction of this muscle layer that the fetus is expelled from the uterus during labour.
  2. Middle oblique layer,
    In this case, muscles are arranged in criss cross manner; the muscle cells surround the blood vessels in the figure of 8 pattern. After separation and expulsion of the placenta, they compress the blood vessels and help to prevent PPH. They are sometimes referred to as living ligatures.
  3.   Inner circular layer,
    This is the weakest of the 3 layers, the muscle fibres pass transversely around the uterus. They are more developed around the cervix, lower uterine segment and the fallopian tubes. They help in cervical dilatation.

3. The perimetrium;
This is the layer of the peritoneum which does not totally cover the uterus, its deflexed over the bladder anteriorly to form the utero vesicle pouch and posteriorly forming pouch of Douglas. After 12 weeks, the uterus rises out of pelvis and becomes an abdominal organ. It loses its ante-version and ante flexed position and becomes erect and leans on its axis on the right.

\"walls

CLINICAL OBSERVATIONS OF THE GROWING UTERUS
  • At 12 weeks

The uterus is out of the pelvis and becomes upright; it is no longer anteverted and ante flexed. The uterus is palpable just above the symphysis pubis and is about the size of a grape fruit.

  • At 16 weeks

Between 12 and 16 weeks, the fundus becomes dome shaped. As it rises, it rotates to the right (dextrorotation) due to the recto sigmoid colon in the left side of the pelvis and exerts tension on the broad and round ligaments.
The conceptus has grown enough to put pressure on the isthmus causing it to open out so that the uterus becomes more globular in shape.

  • At 20 weeks

The fundus of the uterus may be palpated at the level of the umbilicus. The uterus becomes more rounded around the fundus.

  • At 30 weeks

The fundus may be palpated midway between the umbilicus and ximphoid sternum. Enlarging uterus displaces the intestines laterally and superiorly. Abdominal wall supports the uterus and maintains the relationship btn the long axis of the uterus and axis of the pelvic inlet.
In supine position, the uterus falls back to the vertebral column, aorta and inferior venacava.

  • At 36 weeks

By the end of 36 weeks, the enlarged uterus fills the abdominal cavity. The fundus is at the tip of the ximphoid cartilage.

  • At 38 weeks

Between 38 and 40 weeks, there is increase in smoothening and softening of the lower uterine segment. Uterus becomes more rounded with a decrease in fundal height. The reduction in fundal height is known as lightening.

Changes in blood supply: The uterine blood vessels increase in diameter and new vessels develop under the influence of Oestrogen. Blood supply to the uterine and ovarian arteries increases to about 750ml/ min at term to keep pace with its growth and meet the needs of the functioning placenta.

Changes in the fallopian tubes: On either side are more stretched out and are more vascular in pregnancy. Uterine end of the tube is usually closed and fimbriated end remains open.

Changes in the isthmus;
It softens and elongates from 7mm to23mm and forms the lower uterine segment during late pregnancy.

Changes in the ovaries:
The follicle- stimulating hormone {FSH} ceases its activity due to the increased levels of estrogen and progesterone secreted by the ovaries and corpus luteum .This prevents ovulation and menstruation. As the uterus enlarges, the ovaries are raised out of the pelvis. Also both ovaries are enlarged due to increased vascularity and become edematous particularly that containing the corpus luteum.
The corpus luteum enlarges during early pregnancy and may even form a cyst on the ovary. The corpus luteum produces progesterone to help maintain the lining of the endometrium in early pregnancy. It functions until about the 10th and 12th week of pregnancy when the placenta is capable of producing adequate amounts of progesterone and estrogen. It slowly decreases in size and function after the 10th to 12th week.

Changes in the cervix:
It remains tightly closed during pregnancy, providing protection to the fetus and resistance to pressure from above when the woman is in standing position. There is slight growth on the cervix during pregnancy, it becomes softer and this is due to increased vascularity and relaxing effects of hormones.
Under the influence of progesterone racemose glands secrete thicker and more viscous mucus which fills the cervical canal and prevents entry of infection in the uterus. The plug of mucous is called opeculum
Towards the end of pregnancy or at the onset of labour the cervix becomes part of the lower uterine segment, this is called effacement of the cervix. The external os of the cervix also admits a finger. A short softened cervix or os which admits the tip of a figure at term is referred to as ripe cervix.

Changes in the vagina:
The muscle layer hypertrophies and capacity of vagina increases and it becomes more elastic allowing it to dilate during 2 nd stage.
The epithelium becomes thicker with increased desquamation of the superficial cells which increase the amount of normal white virginal discharge known as leucorrhea. The epithelial cells have high glycogen content. The cells interact with Do-derlein’s bacillus and produce a more acidic environment providing extra degree of protection against some organism and increasing susceptibility to others such as candida albicans. The vagina is more vascular and appears violet in colour.

Changes in the vulva:
The vulva appears bluish in colour due to increased vascularity and pelvic congestion.

Breast changes:
-In early pregnancy, breasts may feel full or tingle and increase in size as pregnancy progresses.
-The nipples become more erectile.
– The areolar of the nipples darken and the diameter increases.
– The sebaceous glands become the Montgomery’s tubercles which enlarge and tend to
protrude. They secrete sebum to lubricate the breast throughout pregnancy and breast feeding.
– The surface vessels of the breast become visible due to increased circulation and turns to bluish
tint on the breasts.
-A little clear, sticky fluid(colostrum) may be expressed from the nipples after the 1 st trimester
which later becomes yellowish in colour.

Changes in the cardiovascular system

The heart
Due to increased work load, the heart hypertrophies particularly in the left ventricle. The uterus pushes the heart upwards and to the left. Heart sounds are changed and murmurs are common.
The cardiac output is increased by 40%. The heart rate increases by an average of 15 beats per minute. The stroke volume increases from 64 to about 71mls.

Effect on blood pressure
During the first trimester, blood pressure remains almost constant. BP drops in 2 nd trimester due to hormone progesterone which causes vasodilation. It reaches its lowest level at 16-20 weeks and towards term, it returns to the level of the first trimester. The decrease may lead to fainting.
Supine position should be avoided in pregnancy as it leads to supine hypotensive syndrome due to compression of the inferior venacava thus reducing venous return. Poor venous return in late pregnancy may lead to oedema in lower limbs, varicose veins and hemorrhoids.

Blood flow
Blood flow increases to uterus, kidneys, breasts and skin but not to liver and brain. Utero placental blood flow increases by 10-15% about 75mls per minute at term. Renal blood flow increases by 70-80%.

Blood volume
Increase in blood volume varies according to the size of the woman, number of pregnancies she has had, parity and whether the pregnancy is singleton or multiple.
The total blood volume increases steadily from early pregnancy to reach a maximum of 35 to 45% above the non- pregnant level. A higher circulating volume is required for the following;
-To provide extra blood flow for placental circulation.
-To supply the extra metabolic needs of the fetus.
-To provide extra perfusion of kidneys and other organs.
-To compensate for blood loss at delivery.
-To counterbalance the effects of increased venous and arterial capacity.

Plasma volume
Increases by 40% where the red cell mass decreases by 20%leading to haemodilution (physiological anaemia). These changes begin at 6-8weeks of pregnancy. The acceptable Hb level in pregnancy is 11-12g/dl.

Iron metabolism
Iron of about 1000g is needed. 500g is to increase the red cell mass, 300g to fetus and 200g for daily iron compensation. In normal pregnancy, only 20% of ingested iron is absorbed. The purpose of iron supplementation is to prevent iron deficiency anaemia not to raise Hb level.

Plasma protein
During the 1st 20 weeks of pregnancy, plasma protein concentration reduces due to increased plasma volume. This leads to lowered osmotic pressure leading to oedema of lower limbs seen in late pregnancy. In absence of disease, moderate oedema is termed as physiological oedema.

Clotting factors
Fibrinogen 7,8,9 and 10 increase leading to a change in coagulation time from 12 to 8 minutes.
The capacity of clotting is increased in preparation to prevent PPH after separation of the placenta.

White blood cells.
These are slightly increased during pregnancy, from 700mm to 10500mm during pregnancy and up to 1600mm during labour. The total count cells rises from 8 weeks and reaches a peak at 30 weeks of gestation. This is mainly because of the increase in the number of neutrophils, polymorphs, nucleus, leucocytes, monocytes and granulocytes are active and efficient phagocytes.

Erythrocytes.
They decrease during pregnancy from 4.5million to 3.7million.

HB.
HB concentration falls from 14g/dl; a falling HB is a physiological. The total iron requirements of pregnancy where as a high HB level can be assign of pathology. The total requirements of
pregnancy is averagely 1000g ,about 500gare required to increase the red cells mass and about 300g are transported to the fetus mainly in the last weeks of pregnancy . The remaining 200g are needed to compensate for insensible loss in skin, stool and urine.

RESPIRATORY SYSTEM.

The basal metabolism rate is increased and the volume of air which enters and leaves the lungs during the normal respiration becomes slightly increased. This is because of increased oxygen consumption by the fetus and the work of maternal heart and lungs.
In the late pregnancy the ribs flare out inhibiting the capacity of the thoracic cavity to expand, the enlarging uterus elevates the diaphragm up wards and compresses the lower lobes of the lungs

CHANGES IN THE URINARY SYSTEM

Renal blood flow and glomerular filtration rate increases by 50%.
There is frequency of micturition in early and late pregnancy. Ureters become elongated and kinked due to progesterone hormone and this results into urine stagnation hence increased favor to UTI in pregnancy.

CHANGES IN THE GIT

-The gums become edematous, soft and spongy and may bleed.
-Increased salivation(ptyalism) is common.
-Nausea and vomiting is common in 70% of the cases.
-Changes in taste becoming metallic.
-Craving for abnormal things like soil or plaster known as pica.
-Increased appetite in most women.
-Heart burn due to of stomach content from decreased space by growing uterus.
-There is reduced GIT motility leading to constipation.

Changes in metabolism
– There is increased metabolism to provide nutrients for the mother and fetus.
-Maternal weight, There is continuing weight increase in pregnancy which is an indication of fetal growth.

Weight gain in pregnancy is as follows;-
4kg in the 1 st 20 weeks(0.2kg/week)
8.5kg in the last 20 weeks(0.4kg/week)
12.5kg approximate total.


  Maternal Weight Gain (kg) Fetal Weight Gain (kg) Total Weight Gain (kg)
Uterus 1 1
Breasts 0.4 0.4
Fat 3.5 3.5
Blood Volume 1.5 1.5
Extracellular Fluid 1.5 1.5
Fetus 3.4 3.4
Placenta 0.6 0.6
Amniotic Fluid 0.6 0.6
Total 7.9 4.6 12.5

The following factors influence weight gain during pregnancy:

  1. Maternal oedema: Edema, or swelling, can affect weight gain as it involves the accumulation of excess fluid in the tissues of the body.

  2. Maternal metabolic rate: The metabolic rate of the mother can impact weight gain. A higher metabolic rate may result in increased energy expenditure and potentially lower weight gain.

  3. Dietary intake: The quantity and quality of the mother\’s dietary intake play a significant role in weight gain during pregnancy. Consuming a balanced and nutritious diet supports healthy weight gain.

  4. Vomiting or diarrhea: Frequent vomiting or diarrhea can lead to weight loss or inadequate weight gain during pregnancy. These conditions can affect nutrient absorption and overall caloric intake.

  5. Amount of amniotic fluid: The volume of amniotic fluid surrounding the fetus can contribute to weight gain. An increased amount of amniotic fluid may contribute to higher weight gain.

  6. Size of the fetus: The size and growth rate of the fetus can impact maternal weight gain. A larger fetus may result in increased weight gain during pregnancy.

  7. Maternal physical activity level: The level of physical activity and exercise undertaken by the mother can influence weight gain. Regular physical activity can help maintain a healthy weight during pregnancy.

  8. Maternal genetics: Genetic factors can influence an individual\’s predisposition to weight gain or weight retention during pregnancy.

CHANGES IN THE MUSCULO-SKELETAL SYSTEM

Progesterone and Relaxin lead to relaxation of pelvic ligaments, joints and muscles. The relaxation allows the pelvis to increase its capacity in readiness to accommodate the presenting part towards term and also during labour. The symphysis pubis and sacroiliac joints soften, the gait of the mother changes as the balance of the body is altered by the weight of the uterus. Allowing the pelvis to increase its capacity towards term is a process known as a give.

SKIN CHANGES

Increased activity of melanin-stimulating hormone from the pituitary causes varying degrees of pigmentation in pregnant women from the end of 2 nd month until term.The areas that are commonly affected are; areolar of the breasts, abdominal mid line, perineum and axilla. This is because of increased sensitivity of the melanocytes to the hormone or because of greater number of melanocytes in these areas.

  • -Linea nigra. This is a dark line that runs from the umbilicus to the symphysis pubis and may extend as high as the sternum. It is hormone induced pigmentation. After delivery, the line begins to fade though it may not ever completely disappear.
  • -Mask of pregnancy(Cloasma). This is the brownish hyper pigmentation of the skin over the face, fore head, nose, cheeks and neck. It gives a bronze look especially in black complexioned women.
  • -Striae gravidurum(stretch marks).
  • -Sweat glands. Activity of the sweat glands usually increases throughout the body which causes the woman to perspire more profusely during pregnancy.
  • – A rise in body temperature of 0.5 and increase in blood supply causes vasodilation and makes woman feel hotter.

PHYSIOLOGY OF PREGNANCY Read More »

NORMAL PREGNANCY

NORMAL PREGNANCY

NORMAL PREGNANCY

Normal Pregnancy refers to growth and development of a fertilized ovum and begins from when the ovum is fertilized until the fetus is expelled from the uterus.

Normally the fetus is expelled at term or 9 months or 40 weeks or 280 days.
If the fetus is expelled before 28 weeks, it is called an abortion and if fetus is expelled after 28 weeks but before 37weeks it’s called premature labour and if born after 42 weeks, the post- mature is used.

Pregnancy is said to be normal when;

  • The fertilized ovum is growing in the cavity of the uterus.
  •  One fetus is forming, one placenta and two membranes.
  •  There is about 1000-1500ml of liquor amnii.
  •  There is vertex presentation.
  •  There is no bleeding until show in first stage of labour.
  •  The mother should remain healthy with no serious disorders of pregnancy.

\"normal

SIGNS AND SYMPTOMS OF PREGNANCY

When a woman misses one or two menstrual periods, she may begin to suspect that she is pregnant, and in most cases, her intuition is correct with an accuracy of about 98%, especially if she has been experiencing regular menstruation.

The signs of pregnancy can be classified into three groups:

  1. Presumptive
  2. Probable
  3. Positive.
Presumptive signs:
  1. Amenorrhea: This refers to the absence of menstruation. A woman may report missing one or two periods, which can be a strong indicator of pregnancy. However, amenorrhea can also be caused by factors such as contraceptive use, changes in environment, prolonged illness, or emotional disturbances.

  2. Breast changes: Many women experience tingling and prickling sensations, as well as breast enlargement and tenderness. These changes are commonly associated with pregnancy.

  3. Morning sickness (nausea and vomiting): Approximately 30-50% of pregnant women experience morning sickness, which typically occurs between the 4th and 14th weeks of pregnancy. While other conditions can also cause nausea and vomiting, the combination of these symptoms with amenorrhea strongly suggests pregnancy. Morning sickness often subsides by the end of the first trimester.

  4. Increased frequency of urination: The growing uterus puts pressure on the bladder, leading to more frequent trips to the bathroom. This symptom is usually experienced before 12 weeks of pregnancy and tends to decrease once the uterus rises out of the pelvis at around 12 weeks.

  5. Skin changes:

    • Striae gravidarum: These stretch marks appear around the 16th week of pregnancy on the abdomen, thighs, and breasts.
    • Chloasma (mask of pregnancy): Some women develop patches of darkened skin on the face.
    • Linea nigra: A dark line may darken and appear both above and below the umbilicus.
    • Darkening of areolas: The primary areolas become darker, and secondary areolas may form. The hormone responsible for these pigmentation changes is called melanin hormone and is produced by the anterior pituitary gland.
  6. Quickening: This refers to the first fetal movements felt by the mother, usually occurring around 18-20 weeks of pregnancy for primigravida (first-time pregnancies) and 16-18 weeks for multigravida (women who have been pregnant before). Quickening can assist a midwife or healthcare provider in estimating the gestational age of a mother who is unsure of her dates.

  7. Fatigue: Pregnant women often experience fatigue due to increased blood production, lower blood sugar levels, and decreased blood pressure influenced by progesterone. Sleep disturbances and nausea can also contribute to feelings of tiredness.

  8. Mood changes: Physical stress, metabolic changes, fatigue, and hormonal fluctuations, particularly progesterone and estrogen, can lead to mood swings in pregnant women.

Probable signs:
  1. Hagar\’s sign: This sign can be detected between the 6th and 12th week of pregnancy. It involves performing a vaginal examination where two fingers are inserted into the anterior fornix of the vagina while the other hand presses the uterus abdominally. When the fingers from both hands meet, a softening of the isthmus can be felt, indicating pregnancy.

  2. Jacquemier\’s sign: This sign refers to the bluish discoloration of the vaginal walls, which becomes noticeable from the 8th week onwards. It is caused by pelvic congestion, a common indication of pregnancy.

  3. Osiander\’s sign: Increased pulsation felt on the lateral vaginal fornices is known as Osiander\’s sign. This sign can be detected from the 8th week onwards and is a result of increased vascularity in the area.

  4. Softening of the cervix (Goodell\’s sign): Starting from the 8th week of pregnancy, the cervix of a pregnant woman becomes noticeably softer. It can be compared to the texture of the lower lip, whereas in a non-pregnant state, it is as firm as the tip of the nose.

  5. Uterine soufflé: This refers to a soft blowing sound heard on auscultation of the abdomen. It typically occurs from the 16th week of pregnancy due to increased vascularity in the uterus.

  6. Abdominal enlargement: The uterus undergoes rapid and progressive enlargement from the 16th week onwards. This enlargement can be observed and felt during abdominal palpation, helping to differentiate it from other causes such as gaseous distension, a full bladder, fibroids, or ascites.

  7. Braxton Hicks contractions: These are painless contractions that usually begin from the 16th week of pregnancy. They can be felt during abdominal palpation and occur approximately every 15 minutes.

  8. Internal ballottement: This technique involves giving the uterus a sharp tap just above the cervix, causing the fetus to float upward in the amniotic fluid. When the fetus sinks back down, the movement can be felt by fixed fingers within the vagina. Internal ballottement can be detected between the 16th and 28th weeks of pregnancy.

  9. Presence of hCG (Human chorionic gonadotropin): The hormone hCG can be detected in the blood as early as 9 days after conception and in urine approximately 14 days after conception. The presence of hCG is a reliable indicator of pregnancy and can also be detected in conditions like hydatidiform mole.

Positive signs:

Positive signs are those that definitively confirm the presence of pregnancy. These signs include:

  1. Fetal heart sounds: The fetal heart begins beating around the 24th week after conception. It can be heard using a Doppler device as early as 10 weeks and with a fetoscope by 24 weeks. It is important to distinguish the fetal heart sounds from the uterine soufflé caused by pulsating maternal arteries. The normal fetal heart rate ranges between 120 and 160 beats per minute.

  2. Ultrasound scanning of the fetus: Using ultrasound technology, the gestation sac can be visualized and photographed. As early as the 4th week, an embryo can be identified, and by the 10th week of gestation, fetal body parts begin to appear on the ultrasound images.

  3. Palpation of the entire fetus: A trained examiner can palpate and feel the various parts of the fetus, including the head, back, and upper and lower body parts. This allows for a comprehensive assessment of the baby\’s position and size.

  4. Palpation of fetal movement: Skilled healthcare providers can feel and detect fetal movements through palpation after the 24th week of gestation. This involves perceiving the baby\’s kicks, rolls, and other movements by gently applying pressure on the mother\’s abdomen.

  5. X-ray: While an X-ray can identify the complete fetal skeleton as early as the 12th week, it is not a recommended method for confirming pregnancy due to the potential risks associated with radiation exposure. Total body radiation from X-rays in utero can have harmful effects on the developing fetus, leading to genetic or gonadal alterations. Therefore, other non-invasive methods, such as ultrasound, are preferred for assessing pregnancy.

  6. Actual delivery of the baby: The ultimate confirmation of pregnancy occurs when the woman delivers the baby. The delivery of a live newborn is the conclusive evidence of pregnancy.

Differential Diagnosis:

Abdominal enlargement can be caused by conditions other than pregnancy, and it is important to consider these possibilities. Some of the potential differential diagnoses include:

  1. Ovarian cysts: Enlargement of the abdomen can occur due to the presence of ovarian cysts. When palpated, the swelling caused by ovarian cysts can be distinguished from the uterus, and pregnancy tests will yield negative results.

  2. Fibroids: Fibroids are noncancerous growths that can develop in the uterus. They can sometimes be mistaken for pregnancy, as they can cause a hard mass to be felt in the abdomen. However, pregnancy tests will be negative in the case of fibroids.

  3. Distended urinary bladder: Abdominal enlargement can also result from a distended urinary bladder due to urine retention. In such cases, a catheter can be inserted to relieve the urine retention, and there will be no other signs indicating pregnancy.

  4. Pseudocyesis: Pseudocyesis, also known as false pregnancy or phantom pregnancy, is a condition in which a woman experiences symptoms that mimic pregnancy, including amenorrhea (absence of menstruation) and other signs suggestive of pregnancy. However, upon examination, the typical signs of pregnancy are absent, and pregnancy tests will be negative. Pseudocyesis often occurs in women who have a strong desire to conceive or who experience high levels of anxiety related to pregnancy.

Multiple Choice Questions:

  1. Which of the following is a presumptive sign of pregnancy?
    a) Fetal heart sounds
    b) Softening of the cervix
    c) Palpation of fetal movement
    d) Morning sickness
  2. Hagar\’s sign is detected by:
    a) Auscultation of fetal heart sounds
    b) Palpation of fetal movement
    c) Vaginal examination
    d) Ultrasound scanning
  3. Which sign is a probable sign of pregnancy?
    a) Fetal heart sounds
    b) Ovarian cysts
    c) Presence of HCG
    d) Pseudocyesis
  4. What is the normal fetal heart rate?
    a) 60-80 beats per minute
    b) 90-120 beats per minute
    c) 120-160 beats per minute
    d) 180-200 beats per minute
  5. Which sign can help in determining the gestational age if the mother is unsure of her dates?
    a) Quickening
    b) Internal ballottement
    c) Jacquemier\’s sign
    d) Amenorrhea
  6. Which diagnostic tool can visualize the gestation sac and fetal parts?
    a) X-ray
    b) Ultrasound scanning
    c) Fetal palpation
    d) HCG test
  7. What is the most accurate method to confirm pregnancy?
    a) Palpation of fetal movement
    b) X-ray
    c) Actual delivery of the baby
    d) Ultrasonography
  8. Which condition can cause abdominal enlargement and yield negative pregnancy test results?
    a) Fibroids
    b) Ovarian cysts
    c) Pseudocyesis
    d) Morning sickness
  9. Osiander\’s sign is characterized by:
    a) Softening of the cervix
    b) Increased pulsation in the vaginal fornices
    c) Bluish discoloration of the vaginal walls
    d) Enlargement of the breasts
  10. Which sign can be detected by both Doppler and fetoscope?
    a) Fetal heart sounds
    b) Uterine soufflé
    c) Internal ballottement
    d) Quickening
  11. What differentiates fibroids from pregnancy?
    a) Positive pregnancy test results
    b) Palpable fetal movements
    c) Presence of uterine soufflé
    d) Hard mass felt on palpation
  12. What is the purpose of X-ray in pregnancy?
    a) To visualize the fetal heart rate
    b) To determine the gestational age
    c) To confirm pregnancy definitively
    d) It is not recommended due to radiation risks
  13. What differentiates pseudocyesis from a true pregnancy?
    a) Amenorrhea
    b) Fetal heart sounds
    c) Palpation of fetal movement
    d) Negative pregnancy test results
  14. What is the primary cause of morning sickness during pregnancy?
    a) Increased blood production
    b) Hormonal changes
    c) Bladder pressure
    d) Emotional upsets
  15. Which sign is considered a positive sign of pregnancy?
    a) Morning sickness
    b) Softening of the cervix
    c) Distended urinary bladder
    d) Palpation of fetal movement

Fill in the Blanks:

  1. ________ is the absence of menstruation and a presumptive sign of pregnancy.
  2. ________ can be detected by performing a vaginal examination and palpating the isthmus.
  3. Increased pulsation in the lateral vaginal fornices is known as ________.
  4. ________ is a condition in which a woman experiences symptoms resembling pregnancy, but pregnancy tests are negative.
  5. Fetal heart sounds can be detected by a ________ or a fetoscope.
  6. The normal fetal heart rate ranges between ________ beats per minute.
  7. Ultrasound scanning can visualize the ________ and identify the fetal parts.
  8. Palpation of ________ is necessary to assess the position and size of the fetus.
  9. X-ray is not recommended for pregnancy confirmation due to potential ________ risks.
  10. The delivery of a live newborn is the ________ evidence of pregnancy.

Multiple Choice Questions:

  1. Answer: d) Morning sickness
  2. Answer: c) Vaginal examination
  3. Answer: b) Ovarian cysts
  4. Answer: c) 120-160 beats per minute
  5. Answer: b) Internal ballottement
  6. Answer: b) Ultrasound scanning
  7. Answer: c) Actual delivery of the baby
  8. Answer: a) Fibroids
  9. Answer: b) Increased pulsation in the vaginal fornices
  10. Answer: a) Fetal heart sounds
  11. Answer: d) Hard mass felt on palpation
  12. Answer: d) It is not recommended due to radiation risks
  13. Answer: d) Negative pregnancy test results
  14. Answer: b) Hormonal changes
  15. Answer: d) Palpation of fetal movement

Fill in the Blanks:

  1. Amenorrhea is the absence of menstruation and a presumptive sign of pregnancy.
  2. Hagar\’s sign can be detected by performing a vaginal examination and palpating the isthmus.
  3. Increased pulsation in the lateral vaginal fornices is known as Osiander\’s sign.
  4. Pseudocyesis is a condition in which a woman experiences symptoms resembling pregnancy, but pregnancy tests are negative.
  5. Fetal heart sounds can be detected by a Doppler or a fetoscope.
  6. The normal fetal heart rate ranges between ________ beats per minute.
  7. Ultrasound scanning can visualize the gestation sac and identify the fetal parts.
  8. Palpation of the entire fetus is necessary to assess the position and size of the fetus.
  9. X-ray is not recommended for pregnancy confirmation due to potential radiation risks.
  10. The delivery of a live newborn is the ultimate evidence of pregnancy.

NORMAL PREGNANCY Read More »

Terminologies

Terminologies

Terminologies

TERMS USED IN MIDWIFERY

Midwifery: It is the profession of providing assistance and medical care to women undergoing labor and childbirth during the antenatal, prenatal, and postnatal periods.

Obstetrics: This is a branch of medicine dealing with pregnancy, labor, and the postpartum period.

Caesarian section: It is an incision made on the uterus through the anterior abdominal wall to remove products of gestation after 28 weeks of gestation.

Cephalic: Refers to the head.

Cervix: It is the neck of the uterus.

Colostrum: This is a fluid found in the breasts from the 16th week of pregnancy up to the 2nd and 3rd day after delivery.

Crowning: This is when the largest transverse diameter of the fetal skull emerges under the subpubic arch and does not recede back between contractions.

Gestation: Pregnancy or the maternal condition of having a developing fetus in the body.

Fetus: Refers to the human conceptus from the 9th week to delivery.

Viability: The capability of the fetus to live outside the womb, usually accepted between 24 and 28 weeks, although survival is rare.

Gravida: A woman who is or has been pregnant, regardless of pregnancy outcome.

Primigravida: A woman pregnant for the first time.

Multigravida: A woman who has been pregnant more than once.

Nullipara: A woman who is not currently pregnant and has never been pregnant.

Parity: The number of children born alive or dead after 28 weeks of gestation.

Vernix caseosa: A greasy substance that covers the baby\’s skin at birth.

Meconium: This is the stool of the neonate that is present in the lower bowel at 16 weeks of gestation and is passed within 3 days following birth. It is greenish-black in color.

Lightening: This refers to the descent of the baby into the pelvis, resulting in a drop in fundal height.

Show: The bloody stained mucoid discharge seen at the onset of labor.

Additional Midwifery Terms 

  1. Lochia: The vaginal discharge that occurs after childbirth, consisting of blood, mucus, and uterine tissue.

  2. Antenatal care: Medical care and monitoring provided to pregnant women before childbirth.

  3. Postpartum: The period following childbirth, typically lasting six weeks, during which the mother\’s body undergoes physical and hormonal changes.

  4. Perineum: The area between the vagina and anus in females, which may stretch or tear during childbirth.

  5. Amniotic fluid: The fluid surrounding the fetus within the amniotic sac, providing protection and cushioning.

  6. Placenta: A temporary organ that develops during pregnancy, providing oxygen and nutrients to the fetus and removing waste products.

  7. Episiotomy: A surgical incision made in the perineum during childbirth to enlarge the vaginal opening and facilitate delivery.

  8. Postpartum depression: A mood disorder characterized by feelings of sadness, anxiety, and exhaustion experienced by some women after giving birth.

  9. Lactation: The production and secretion of breast milk.

  10. Umbilical cord: The flexible cord connecting the fetus to the placenta, through which nutrients and oxygen are transferred.

  11. Neonate: A newborn baby, typically in the first 28 days after birth.

  12. Preterm birth: Delivery of a baby before completing 37 weeks of gestation.

  13. Ectopic pregnancy: A pregnancy that occurs outside the uterus, usually in the fallopian tube.

  14. Intrauterine growth restriction: A condition in which the fetus fails to grow at the expected rate inside the uterus.

  15. Preeclampsia: A pregnancy complication characterized by high blood pressure and damage to organs, usually occurring after 20 weeks of gestation.

  16. Fetal distress: A condition in which the fetus is not receiving adequate oxygen, typically detected through abnormal heart rate patterns.

  17. Postpartum hemorrhage: Excessive bleeding after childbirth, often caused by the uterus not contracting properly.

  18. Neonatal intensive care unit (NICU): A specialized medical unit providing care for newborns with serious health conditions or premature babies.

  19. Midwifery-led care: A model of care in which midwives are the primary providers for pregnant women, providing continuity of care throughout pregnancy, labor, and postpartum.

  20. Birth plan: A written document created by the pregnant woman outlining her preferences and expectations for labor, delivery, and postpartum care.

Terminologies Read More »

nursing exam Nursing Management nursing exam

Nursing Exam Question Approach

Nursing Exam Question Approach

A comprehensive guide on how to interpret and answer UNMEB question types: EXPLAIN, OUTLINE, DESCRIBE, MENTION, IDENTIFY, STATE, LIST, WHAT, and GIVE.

This guide explores specific nursing interventions, considerations, concerns, and issues frequently tested in professional medical exams.
EX

The EXPLAIN Approach

In Simple Terms: "Explain" means to give details and reasons. You need to show *how* or *why* something happens, not just what it is.
1
Understand the question: Carefully read and identify the main concept. Pay attention to specific instructions.
2
Organize your response: Create a mental map. Start with a concise introduction, context, and clear thesis.
3
Provide thorough explanation: Elaborate using clear language. Use nursing terminology and case studies.

Simulated Examination Sheet

Qn: Explain the pathophysiology of diabetes mellitus and its effects on the body.

Diabetes mellitus is a chronic metabolic disorder characterized by high blood glucose levels due to impaired insulin secretion, insulin action, or both. The pathophysiology of diabetes involves multiple factors that contribute to the development and progression of the disease. Firstly, in type 1 diabetes, an autoimmune process leads to the destruction of insulin-producing beta cells in the pancreas. This results in a deficiency of insulin and requires external insulin administration. On the other hand, type 2 diabetes is primarily characterized by insulin resistance, where the body’s cells become less responsive to insulin. Insulin is a hormone produced by the beta cells of the pancreas, and its main function is to regulate glucose metabolism. In diabetes, the lack of insulin or the body’s inability to use it effectively leads to hyperglycemia. Persistently high blood glucose levels can have detrimental effects on various organs and systems in the body. The effects of diabetes on the body are many. It can lead to macrovascular complications, such as cardiovascular disease, stroke, and peripheral vascular disease. Also, microvascular complications may arise, affecting small blood vessels in the eyes, kidneys, and nerves. Diabetes can also increase the risk of infections, slow wound healing, and cause diabetic neuropathy and nephropathy
OU

The OUTLINE Approach

In Simple Terms: "Outline" means to create a structured summary. Use main headings and sub-points to show parts in an organized way.
1
Analyze the question: Identify main components that need to be outlined.
2
Organize your response: Identify main headings and arrange them in a coherent order.
3
Provide detailed information: Use concise and informative language under each heading. JUMP A LINE, UHPAB HAS VERY MANY BOOKLETS

Simulated Examination Sheet

Qn: Outline the steps involved in the nursing process.

1. Assessment: Gather relevant patient data, including physical, psychological, social, and cultural aspects. Perform a comprehensive health history and physical examination. Utilize assessment tools and techniques to collect objective and subjective data. Document and organize the collected data systematically.

2. Diagnosis: Analyze the assessment data to identify health problems, risks, or potential complications. Formulate nursing diagnoses based on the identified issues. Ensure that the diagnoses are accurate, concise, and specific.

Collaborate with other healthcare professionals when necessary. 3. Planning: Establish patient-centered goals and outcomes in collaboration with the patient.

Develop a nursing care plan that includes evidence-based interventions and strategies. Prioritize nursing actions based on the urgency and importance of each goal. Ensure that the care plan is feasible, realistic, and adaptable. 4. Implementation: Execute the planned nursing interventions effectively and efficiently.

Provide safe and compassionate care while considering the patient's preferences. Document the implementation process and any modifications made. Collaborate with the interdisciplinary healthcare team to deliver comprehensive care.

5. Evaluation: Assess the patient's response to the nursing interventions and the achievement of goals. Compare the actual outcomes with the expected outcomes. Modify the care plan if needed based on the evaluation findings. Document the evaluation results and communicate them to the healthcare team.
DE

The DESCRIBE Approach

In Simple Terms: "Describe" means to paint a picture with words. Give a detailed account of characteristics or features. Describe usually likes STEPS in order, even using IMAGES where applicable!
1
Understand the question: Identify the main topic that needs characterization.
2
Provide comprehensive description: Offer thorough details, features, or components.
3
Use terminology: Accurately describe concepts to demonstrate knowledge.

Simulated Examination Sheet

Qn: Describe the stages of wound healing.

1. Hemostasis: This initial stage begins immediately after the injury occurs. Blood vessels constrict to reduce blood flow and prevent excessive bleeding. Platelets aggregate to form a temporary clot. The clotting process releases various growth factors and cytokines, initiating the subsequent stages of healing.

2. Inflammatory phase: This phase typically lasts for 2-3 days. Inflammation occurs as a response to tissue injury. Vasodilation and increased vascular permeability allow immune cells to migrate to the wound site. Neutrophils arrive first to eliminate debris and prevent infection. Macrophages then remove dead tissue and release additional growth factors to stimulate healing.

3. Proliferative phase: This phase generally occurs between days 3 and 20. New blood vessels form to supply oxygen and nutrients to the wound. Fibroblasts produce collagen, which provides structural support for wound healing. Epithelial cells migrate from the wound edges to resurface the wound. Granulation tissue forms, consisting of new blood vessels, fibroblasts, and extracellular matrix.

4. Maturation phase: This final phase can last for several months to years. Collagen fibers reorganize and remodel, increasing the wound's tensile strength. Scar tissue forms, but it may not possess the same strength and flexibility as the original tissue. The scar gradually becomes more refined and fades over time.
ST

MENTION / IDENTIFY / STATE

In Simple Terms: These words mean "give a short, direct answer." Just name the facts without extra explanation.
1
Identify facts: Read and identify the specific information required.
2
Direct response: Offer a concise response. Avoid unnecessary elaboration.

Simulated Examination Sheet

Qn: State the types of delusions.

  • Grandiose delusions; the patient believes s/he is somebody great /important ,knowledgeable or powerful contrary to the social cultural ,religious background and experiences.

  • Delusion of guilty and worthlessness; the patient believes s/he is not worth to live even though there’s nothing to justify this belief.

  • Delusions of jealousy; the patient believes that spouse/partner is being unfaithful even when there is no evidence to suggest so.

  • Delusion of persecution: the patient believes they’re being deliberately wronged, conspired or harmed by another person or agency even when there’s no evidence to suggest so.

  • Religious delusions; the individual believes he or she has a special link with God that is out keeping with people of the same religious belief.

  • Delusions of control, influence or phenomenon; these are three types; belief that the person performs activities as a result of an extreme force.
  • LI

    The LIST Approach

    In Simple Terms: "List" means to present points one after another, usually with a short description for each.
    1
    Identify factors: Carefully identify the elements that need to be listed.
    2
    Organize: Present items in a logical order using bullet points.

    Simulated Examination Sheet

    Qn: List the risk factors for cardiovascular disease.

    - Hypertension: increases strain on heart.
    - Smoking: damages blood vessels.
    - Obesity: increases risk of diabetes.
    - Sedentary lifestyle: contributes to obesity.
    WH

    The WHAT Approach

    In Simple Terms: "What" asks for a definition. Give a clear, simple explanation of the term or concept.
    1
    Identify term: Pinpoint the specific procedure or concept to define.
    2
    Clear explanation: Offer a concise definition using simple language.

    Simulated Examination Sheet

    Qn: What is sepsis?

    Sepsis is a potentially life-threatening condition that occurs when the body’s response to an infection becomes unregulated, leading to widespread inflammation and organ dysfunction.

    Nursing Exam Question Approach Read More »

    midwives revision in exams question approach for nursing and midwifery exams uganda

    Question Approach

    Guide to the Question Approach for Midwifery Exams

    It is important for midwives preparing for the exam to be able to answer questions effectively.

    This approach allows you to tackle questions in a systematic manner, ensuring that you cover all important points and provide concise and accurate answers. By following this structured approach, you will be able to effectively demonstrate your knowledge, critical thinking and analytical skills, leading to higher scores and overall success on your midwifery exams.

    Whether you are facing questions that require you to EXPLAIN, OUTLINE, DESCRIBE, MENTION, IDENTIFY, STATE, LIST, WHAT and GIVE, this article is all you need!

    Explaining Questions: Breaking Down Complex Concepts

    When questions require explanations, it is essential to break down complex concepts into understandable parts. Start by introducing the topic  you\’re discussing and providing a concise definition if necessary. Then, proceed to explain on the key components or factors related to the topic. Use clear and simple language to ensure your explanation is easily understandable.

    Example Question: Explain how you would admit a mother who has reported in active phase of first stage?

    In response to this question, you can follow the question approach by giving the key points step by step:

    • Reception: the mother and the relatives are welcomed; mother is taken to the admission room while the relatives are offered seats. Rapport between the mother, attendants and the midwives is created.
    • History taking: if the mother has been attending ANC, her ANC record is obtained; to get the history and any risk factors like multiple pregnancies. If she has not been attending ANC, a full antenatal history is taken, which involves the mother‘s name, address, tribe, religion, husband‘s name and address, her gravida and parity, obstetrical, surgical, social, and medical history, the time and date of admission are entered in the admission forms of the mother.

    Then, history of labour under the following headings is recorded:

    • Show: the mother is asked if she has seen any blood and mucus, her undergarments examined for any stain, vulva examined for the drainage of show which may appear a few hours before or after beginning of labour.
    • Uterine contractions: mother is asked when the regular pains began, how often and if she has backache. Her statement about the length, severity, or expulsive character of the contraction should be confirmed by observation and evaluation then
    • Membranes: She is asked whether her water (amniotic fluid) have ruptured or not; if she has noticed a gush or tickling of water → the amount and time are recorded. If in doubt of whether its liquor or urine, litmus paper is dipped into the draining fluid obtained from the vulva to confirm alkalinity or
    • Vaginal discharge or bleeding: the mother is also asked if she had any vaginal bleeding/ discharge which should be excluded
    • General examination of the mother: her general appearance is noted, that is healthy or ill, colour, any deformities like lame, presence of oedema, infections, varicose veins or enlarged neck veins. Breast examination is carried out to identify their sustainability for breast feeding
    • Observations; Vital signs are monitored like temperature, pulse, respiration and blood pressure to rule out eclampsia in She is also asked for bowel action, sleep and rest
    • Abdominal Examination: first, the bladder should be empty and this is carried out with the mother lying on the couch on supine position with a pillow under her head and This examination is carried out as follows:
      • On inspection: the shape of the abdomen is noted whether round or oval, the size should be correspond with the weeks of gestation, the foetal movements, skin changes like stria gravidarum and linea nigra and any scar are
      • On palpation: this can be superficial, fundal, lateral, pelvic, height of the fundus and hypochondriac. They are carried out to note the lie whether its longitudinal, transverse, or oblique; the position of the fetus which can be ROA, LOA, ROP, LOP; and engagement plus enlargement of the spleen and the liver.
    • On auscultation: the fetal heart is listened, if its heard and regular
    • Vulva shave, toilet and examination: the shave is done on women whose cultures allow keeping the vulval area with pubic hair. Any abnormal discharges, oedema, or paleness are noted if present
    • Vaginal examination: this is done to mothers who have no history of APH with the current pregnancy under strict asepsis. It‘s done to confirm the onset of labour, the presentation, position, engagement, station of the presenting part, to confirm whether membranes ruptured or intact, exclude cord prolapsed, assess the pelvis if adequate or inadequate and also progress of labour and it‘s the one that determines the admission of a mother on the partograph
    • Investigations: routine samples are obtained for example:
      • Blood: for routine counseling and testing (RCT), rapid polymerase reaction (RPR), HBsAg, haemoglobin estimation, Grouping and cross matching → rational to confirm presence of any disease so as to prevent mother to child transmission (MTCT) and for blood transfusion (BT) in case of anaemia
      • Urine: for analysis to test for albumin, sugar, acetone that might complicate labour
    • Personal hygiene: a shower is both hygienic and pleasant. If the mother‘s membrane have ruptured or in advanced first stage of labour, she is sponged down on a couch and given a clean

    Admission: the mother is then admitted on a partograph, all the necessary information recorded and the continuous observation of the mother takes place accordingly

    Outlining Questions: Structuring Information

    When faced with outlining questions, it is important to structure your response in a logical and organized manner. Begin by providing an  the main points or components related to the topic. Use  subheadings to break down the information further, making it easier for the examiner to follow your answer.

    Example Question: Outline the changes that take place in the uterus during the first stage of labour?

    Before answering the proposed question above, it‘s vital to first define the following terms:

    • Labour: is the process by which the foetus, placenta and the membranes are expelled out of the birth canal after 28th weeks of gestation
    • First stage of labour: is the period of dilatation of the cervix lasting from the onset of true labor till full dilatation.

    During the first stage of labour the following occurs:

    1. Effacement or take up of the cervix: this is made possible by the work of muscle fibres surrounding the internal OS which are drawn upward by the retracted upper segment.
    2. Pacemaker / Fundal dominance: each contraction begins from the pace maker situated at the cornua of the uterus. From the fundal region it spreads downwards being stronger and persisting longer in the upper region on reaching the lower region, the wave of contraction weakens and allows the cervix to dilate.
    3. Dilatation of the cervix: this is the opening of the external OS to allow the passage of the fetal head; it occurs as a result of uterine action and the pressure from fore bag of waters and the well fitting presenting part
    4. Contraction and Retraction: is the special ability of the uterine muscle where the contraction does not pass off completely and the muscle fibres, retaining some of the contractions, do not become completely relaxed, instead they become gradually shorter and thicker.
    5. Polarity: is the term used to define the coordination between two poles of uterus throughout labour.
    6. Development of upper and lower segment: the upper uterine segment is the thicker muscular contractile part. The lower part segment is the firm distensible are of 7.5cm – 10cm in length developed from isthmus to the uterus.
    7. Development of retraction ring: is the ridge formed between the upper and the lower uterine segment. It‘s present in labour and normal as long as it‘s not marked enough to be visible above the symphysis pubis. NB: It is called bandl‘s ring in obstructed labour
    8. Show: is the blood stained mucoid discharge seen a few hours within or a few hours after when labour has started.
    9. General fluid pressure: while the membranes remain intact, the pressure of the uterine contraction is exerted on the fluid as the fluid is not compressible the pressure is equalized throughout the uterus.
    10. Rupture of membranes: rupture of membranes may be early or later during the second stage of labour due to the malpresentation and pressure from the presenting part.
    11. Fetal axis pressure: this is when the force of contractions from the uterus is transmitted via the long axis of the canal; this becomes more significant after the rupture of membranes and during second stage.

    Describing Questions: Providing Detailed Information

    Describing questions require you to provide detailed information about a specific topic or concept. When answering these questions, you have to offer a comprehensive and thorough response, including relevant facts, characteristics, and examples. Use clear language and provide specific details to enhance the depth of your description.

    Example Question: Describe the vagina.

    Definition: Vagina is a muscular fibrous canal which forms the part of the internal female reproductive organs.

    Situation: It is a canal which extends from the vestibule below to the cervix above running in an upward and backward direction between the planes of the pelvic brim.

    Shape: It is a potential tube which runs upwards and backwards with its walls in close contact but can be separated during coitus, menstruation, vaginal examination and child birth.

    Size: The anterior wall measures 7.5cm. The posterior wall is longer and it measures 10cm.This is because the uterus enters the vagina at an angle of 90 degrees and bends forwards towards the anterior wall hence it encroaches on it

    Structure 

    Gross structure

    Superiorly; the upper end of the vagina is known as the vault, where the cervix protrudes into the vault it forms circular recess known as fournices.

    The vagina is made up of four fournices that is to say;

    •  The anterior fornix which is smaller and fairly deep The 2 lateral fournices which are shallow
    • The posterior fornix which is the longest and deepest
    • The lower end of the vagina is narrow and inferiorly we find the vulva, hymen enclosing the vaginal opening only present in virgins. If hymen is ruptured it leaves tags of membranes referred to as carunculae mytiformes. Vaginal orifice is also called introitus.

    Microscopic structure

    It is made up of four layers;

    1. Squamous epithelium arranged in folds known as rugae and makes the inner most layer of the vagina, the rugae increase the surface area and offer the vagina ability to stretch when need be for example during coitus and child bearing.
    2. Vascular connective tissue layer which is rich in blood vessels, nerves and lymphatics and is found just beneath the epithelium.
    3. Muscular layer. This is thin but a strong layer which is divided into two; the weak inner circular and strong outer longitudinal fibres.
    4. The pelvic fascial which is made up of loose connective It forms the outer protective coat and is continuous with the pelvic fascia.

    Blood supply (arterial): The vagina is supplied by the branches of internal iliac artery which include vaginal artery and uterine artery.

    Venous drainage: By the corresponding veins i.e branches of internal iliac veins which include vaginal veins and uterine veins.

    Lymphatic drainage: Into the inguinal, the iliac and the sacro glands

    Nerve supply: By the sympathetic and parasympathetic nerves which are branches from the lee Franken lanser plexus

    Contents of the vagina

    • It doesn‘t contain any glands but its kept moist by cervical mucus and a transudation from the underlying blood vessels through the epithelium.
    • Its media is acidic (PH 3.8 to 4.5) and this is made possible by presence of lactic acid after action of doderleins bacilli on glycogen.

    Relationships of the vagina

    Anteriorly: Below, the base of the bladder rests on the upper ½ of the vagina and the urethra is embedded in the lower ½.

    Posteriorly: Pouch of Douglas above, the rectum medial and perineal body below. 

    Laterally: Pubococcygeous muscles below and pubic fascial containing the uterus above.

    Inferiorly: The structure of the vulva.

    Superiorly: The cervix and the fournices.

    Functions of the vagina

    1. Exit from menstrual flow.
    2. Entrance for spermatozoa.
    3. Exit for products of conception.
    4. Supports the uterus.
    5. Prevents ascending infection due to acidic PH.
    6. For assessing the pelvis.
    7. Drug administration.

    Mentioning, Identifying, and Stating Questions: Being Clear and Concise

    When faced with questions that require you to mention, identify, or state specific information, it is essential to be clear, concise, and accurate in your response. Avoid unnecessary elaboration and focus on providing the requested information directly.

    Example Question: State the major components of a comprehensive birth plan?

    To answer this question effectively, you can provide a concise statement listing the major components of a birth plan:

    A comprehensive birth plan typically includes the following components:

    1. Preferred birth environment (hospital, birthing center, home birth)
    2. Pain management preferences (medication, natural methods, water birth)
    3. Support people and their roles during labor and delivery(husband, mother)
    4. Positioning preferences for labor and birth(lithotomy)
    5. Preferences for fetal monitoring during labor
    6. Neonatal interventions and care preferences immediately after birth
    7. Feeding preferences (breastfeeding, formula feeding)
    8. Cultural or religious considerations
    9. Preferences for postpartum care and rooming-in with the baby
    10. Contingency plans for unexpected situations or interventions

    By providing a clear and concise statement of the major components, you address the question directly and effectively.

    Listing and Giving Questions: Providing Comprehensive Information

    When asked to list or give information, it is important to provide a  response that covers all the relevant points. Ensure that you include all necessary information without leaving out any key details.

    Example Question: List and give examples of common obstetric emergencies that midwives may encounter?

    In response to this question, here is a comprehensive list of common obstetric emergencies along with examples:

    1. Postpartum Hemorrhage (PPH): This is excessive bleeding following childbirth. Examples include uterine atony (lack of uterine contractions), retained placenta, or trauma to the birth canal.
    2. Shoulder Dystocia: It occurs when the baby\’s shoulders become stuck behind the mother\’s pubic bone during delivery. This can lead to complications such as brachial plexus injury or fetal hypoxia.
    3. Umbilical Cord Prolapse: The umbilical cord slips through the cervix ahead of the baby, potentially cutting off the baby\’s oxygen supply. This requires immediate action to relieve pressure on the cord.
    4. Amniotic Fluid Embolism: This is a rare but life-threatening condition where amniotic fluid enters the mother\’s bloodstream, triggering an allergic reaction. It can result in cardiac arrest, respiratory failure, or disseminated intravascular coagulation (DIC).
    5. Pre-eclampsia/Eclampsia: Pre-eclampsia is characterized by high blood pressure and organ damage during pregnancy, while eclampsia is the development of seizures in a woman with pre-eclampsia. 
    6. Placental Abruption: This occurs when the placenta separates from the uterine wall before delivery. It can cause severe bleeding and compromise fetal oxygen supply, necessitating emergency delivery.
    7. Fetal Distress: This refers to a compromised fetal condition during labor, usually due to inadequate oxygen supply. It may require interventions such as changing maternal positions, administering oxygen, or performing an emergency cesarean section.
    8. Cord Compression: The umbilical cord becomes compressed during labor, restricting blood flow to the baby. This can occur due to cord entanglement, excessive cord length, or abnormal positioning.
    9. Maternal Infections: Infections such as chorioamnionitis (infection of the placental membranes), sepsis, or genital tract infections can pose risks to both the mother and the baby. 
    10. Maternal Hypertensive Disorders: These include gestational hypertension, chronic hypertension, and HELLP syndrome. 

    Write Short Notes: Concise and Informative Summaries

    When encountering \”Write Short Notes\” questions, the aim is to provide concise yet informative summaries of the given topic. These questions require you to summarize the key points and present them in a clear and organized manner. Avoid excessive details and focus on providing a brief but comprehensive overview.

    Example Question: Write short notes on the following

    (a) Causes of pain in labour.

    (b) Factors that affect pain perception during labour.

    (a)CAUSES OF PAIN

    There are two major causes of pain

    • Hormonal factors
    • Mechanical factors

    Hormonal factors These include;

    Oxytocin stimulation. This increases the strength, intensity, duration and frequency of the contractions leading to pain.

    Progesterone withdrawal. The reduced levels of progesterone lead to an increase in estrogen levels which stimulates the muscles of the deciduae muscles of the uterus to produce prostaglandin which stimulates the smooth muscles of the uterus to contract.

    Mechanical factors These include;

    Strength and frequency of Braxton hick‘s contractions occurring in late pregnancy which leads to over stretching of the uterus which irritates the uterine muscles to contract leading to pain.

    Pressure of the presenting part on the sacro-nerves and lumbar nerves which has pain receptor.

    Pressure of the presenting part on the cervix. The presenting part exerts pressure on the cervix muscles hence leading to pain.

    Displacement of the pelvic floor muscles. The advancing presenting part distends the vagina and displaces the pelvic floor muscles which are over stretched and the nerves are compressed leading to pain.

    (b) PERCEPTION.

    Is the process of becoming aware of the environment through the five senses.

    Factors that affect pain perception during labour

    These factors are emotional experience involving physical and psychological mechanism and can be contributed by the mother, fetus, health workers and structural environment.

    Mother

    • Maternal medical; conditions like pre-clampsia and eclampsia, cardiac conditions which can affect pain perception.
    • Compromised immunity due to chronic conditions like HIV and cancer which can affect pain perception.
    • Size of the pelvis. Any pelvic deviation from normal leading to cephalous pelvic disproportion which can affect pain perception.
    • Age. Young prime gravidae below 18years their pelvic bones are not fully developed and the mother above 35years their pelvic bones are contracted and this hinders normal progress of labour and affects pain.
    • Parity. Prime gravidae‘s their muscles are still intact and sensitive to pain which leads to strong contractions. The multipara mothers their muscles are laced which leads to uterine itial.
    • Past obstetrical history like caesarian section which increases the risks of uterine rapture and affects normal labour
    • Social economic factors for example lack of support which can affect pain perception.
    • Cultural factors like use of native drugs can affect pain perception.
    • Past experience can also affect pain perception
    • Level of education, occupation, religion can also affect pain perception.

    Fetus

    • Fetal abnormalities like hydrocephalous, macrosomic babies can lead to cephalopelvic disproportion hence affecting pain.
    • Lie, position and presenting pain can affect pain perception during labour
    • Size of the fetus that is to say big babies which cannot pass through the pelvis hence affecting pain perception
    • Gestation age. In past maturity the sutures and the fontanels are closing and molding can hot take place hence affecting pain perception.

    Health workers

    • Poor screening of mothers during antenatal Poor management during labour
    • Poor attitude towards the mother

    Structural environment

    • Hospital setting where there is no privacy for mothers, all stages of labour in one room which can affect pain perception.
    • Lack of recreation in labour rooms like newspapers, television to occupy the mothers.

    What Questions: Providing Clear Definitions and Explanations

    \”What\” questions typically require you to provide clear definitions, explanations, or descriptions of a specific concept, procedure, or pathophysiology These questions aim to test your understanding and knowledge of the subject matter. When answering \”What\” questions, it is important to be precise and concise in your response, while still providing sufficient information to address the question accurately.

    Example Question: What is the role of the midwife in the immediate postpartum period?

    To answer this question effectively, you can provide a concise definition and description of the midwife\’s role during the immediate postpartum period:

    1. Monitoring maternal and neonatal vital signs: Midwives closely monitor the mother\’s blood pressure, heart rate, and bleeding. They also assess the baby\’s breathing, heart rate, and overall well-being.
    2. Assisting with breastfeeding initiation: Midwives provide support and guidance to initiate breastfeeding, ensuring proper  positioning. They offer education on breastfeeding techniques, addressing any concerns or difficulties that may arise.
    3. Providing emotional support: Midwives offer emotional support to new mothers, addressing any anxieties, fears, or questions they may have. They create a nurturing and supportive environment for the mother and her newborn.
    4. Assessing postpartum recovery: Midwives conduct physical examinations to assess the mother\’s postpartum recovery, including uterine involution, healing of perineal tissues, and overall well-being. They provide guidance on self-care practices and postpartum contraception options.
    5. Identifying and managing postpartum complications: Midwives are  identify and manage any postpartum complications that may arise, such as postpartum hemorrhage, infection, or breastfeeding difficulties. They collaborate with healthcare providers if further interventions are required.

    By  explaining the midwife\’s role in the immediate postpartum period, you address the \”What\” question while providing a clear understanding of the topic.

    What information must you note on vaginal examination?

    On inspection

    State of the vulva, note any abnormal discharges like pus, blood, abnormal growths like warts,  oedema and scars.

    On examination

    • Note condition of the vagina. Normally the vaginal walls feel warm and moist and dilatable. If dry may be a sign of infection or obstruction.
    • State of the cervix. If thin, thick, whether soft or rigid and whether its well applied to the presenting part. Note dilatation and cervical effacement.
    • State of the membranes. Whether intact or ruptured. If ruptured check colour and smell of liquor
    • Presentation and presenting part. Note level of presenting part in the pelvis. Confirm position by finding or palpating sutures and fontanelles and relate them to the maternal pelvis. Note moulding.
    • Do internal pelvic assessment and note
    1. -sacro promontary if protruding
    2. -hollow of the sacrum if well curved
    3. -sciatic notches if well rounded
    4. -ischial spines if prominent
    5. -sub pubic arch-if it accommodates 2 ½ to 3 fingers
    6. -inter tuberous diameter if it accommodates 4 knuckles

    Tips for Success:

    a. Understand the instructions: Carefully read and follow the instructions.

    b. Plan your response: Take a moment to brainstorm and outline your ideas before starting to write. This will help you organize your thoughts and ensure a great structured response.

    c. Provide relevant examples: Whenever possible, support your answers with real-life examples, or evidence-based practices to demonstrate your understanding and application of midwifery knowledge.

    d. Use clear and simple language: Write in a clear and simple manner, avoiding unnecessary elaboration. Focus on delivering information effectively while maintaining clarity.

    e. Practice time management: Allocate time for each question based on its difficulty. This will help you ensure that you have enough time to answer all questions within the given time.

    f. Review your answers: Before submitting your answer sheet, review your answers to check for any errors, omissions, or areas that need further clarification or elaboration. Don\’t forget to write your NSIN Number!

    Question Approach Read More »

    midwifery pregnancy

    Normal Midwifery Questions and answers

    Normal Midwifery

    Abdominal examination; do systematically from the head to toes to find out the lie, presentation, position, level of descent, nature of contractions and fetal heart moulding if any.

      1. Hygiene given; bath and a clean gown provided.
      2. Records: All the information about the mother is charted on the record sheet.
      3. Position: Mother is allowed to adopt any comfortable position especially sitting up position.
      4. Ambulation: In early 1st SOL mother is allowed to move about where the midwife can observe her.
      5. Nutrition: Mother is allowed to eat alight diet like porridge, but later in established 1st SOL she is given hot sweetened tea.
      6. Care of the bladder: Mother is encouraged to empty the bladder after every 2hours and urine should be tested for any abnormality.
      7. Rest and sleep: assist the mother by dimming off lights and control noise and visitors.
      8. Prevention of infections: Ensure aseptic techniques and proper hygiene of the ward to prevent infections.
      9. Bowel actions: Mother is encouraged to empty the bowel, move frequently and clean the bed pan if offered.
    1.  

    Write short notes on the following

      1. Causes of pain in labour.
      2. Factors that affect pain perception during
      3. Observation done during fourth stage of Labour indicating importance of each.
      4. List indications of ultra sound scan during

    SOLUTIONS

    LABOUR

    Is the physiological process by which the fetus, placenta and membranes are expelled through the birth canal by the help of the mother‘s effort after 28 weeks of gestation and there are four stages of labour that is to say; first, second, third and fourth stage and there are two types of labour and that is normal and abnormal labour.

    PAIN

    Is a sensory /emotional experience of what the patient feels and there are two types of pain; somatic and visceral pain.

    CAUSES OF PAIN

    There are two major causes of pain;

    • Hormonal factors
    • Mechanical factors

    Hormonal factors

    These include;

    • Oxytocin stimulation. This increases the strength, intensity, duration and frequency of the contractions leading to pain.
    • Progesterone withdrawal. The reduced levels of progesterone lead to an increase in estrogen levels which stimulates the muscles of the deciduae muscles of the uterus to produce prostaglandin which stimulates the smooth muscles of the uterus to contract.

    Mechanical factors

    These include;

    • Strength and frequency of Braxton hick‘s contractions occurring in late pregnancy which leads to over stretching of the uterus which irritates the uterine muscles to contract leading to pain.
    • Pressure of the presenting part on the sacra-nerves and lumbar nerves which has pain receptor.
    • Pressure of the presenting part on the cervix. The presenting part exerts pressure on the cervix muscles hence leading to pain.
    • Displacement of the pelvic floor muscles. The advancing presenting part distends the vagina and displaces the pelvic floor muscles which are over stretched and the nerves are compressed leading to pain.

    PART (B)

    PERCEPTION.

    Is the process of becoming aware of the environment through the five senses.

    Factors that affect pain perception during labour

    These factors are emotional experience involving physical and psychological mechanism and can be contributed by the mother, fetus, health workers and structural environment.

    Mother

    • Maternal medical; conditions like pre-eclampsia and eclampsia, cardiac conditions which can affect pain perception.
    • Compromised immunity due to chronic conditions like HIV and cancer which can affect pain perception.
    • Size of the pelvis. Any pelvic deviation from normal leading to cephalous pelvic disproportion which can affect pain perception.
    • Age. Young prime gravidae below 18years their pelvic bones are not fully developed and the mother above 35years their pelvic bones are contracted and this hinders normal progress of labour and affects pain.
    • Parity. Prime gravidae‘s their muscles are still intact and sensitive to pain which leads to strong contractions. The multipara mothers their muscles are laced which leads to uterine itial.
    • Past obstetrical history like caesarian section which increases the risks of uterine rapture and affects normal labour
    • Social economic factors for example lack of support which can affect pain perception.
    • Cultural factors like use of native drugs can affect pain perception.
    • Past experience can also affect pain perception
    • Level of education, occupation, religion can also affect pain perception.

    Fetus

    • Fetal abnormalities like hydrocephalous, macrosomic babies can lead to cephalopelvic disproportion hence affecting pain.
    • Lie, position and presenting pain can affect pain perception during labour
    • Size of the fetus that is to say big babies which cannot pass through the pelvis hence affecting pain perception
    • Gestation age. In past maturity the sutures and the fontanels are closing and molding can hot take place hence affecting pain perception.

    Health workers

    1. Poor screening of mothers during antenatal Poor management during labour
    2. Poor attitude towards the mother

    Structural environment

    • Hospital setting where there is no privacy for mothers, all stages of labour in one room which can affect pain perception.
    • Lack of recreation in labour rooms like newspapers, television to occupy the mothers.

    PART (C)

    Forth stage of labour

    Is the 1-2 hours following third stage of labour. Observations done during the fourth stage of labour

    To the mother

    • Per vagina

    Perineum to inspect for perineal tears, episiotomy and other injuries Bleeding to rule out anemia and post partner hemorrhage

    • Per abdominal

    Fundal height estimation to rule out the retained products of conception State of the uterus whether it has contracted

    Bladder encourages the mother to pass urine to prevent PPH

    • Vital observations like blood pressure, temperature, pulse, and respiration for consciousness of the mother to rule out pre –eclampsia and eclampsia, dehydration and
    • Breast examination – to rule out abnormalities of the nipple which can hinder breast feeding like inverted nipples.
    • Observe the bowel action if the bowel movements are present and able to pass out stool
    • Observe the legs for varicose veins

    To the baby

    • Assessment of the baby after five minutes for example APGAR scoring the baby General examination of the baby to rule out abnormalities
    • Observation of the cord for bleeding and well ligatured
    • Bowel for passage of meconium to rule out anal impaction
    • Observe if the baby is breast feeding for the presence of the sucking reflex.

    PART (D)

    Ultra- sound scan

    Is a tool used in pregnancy and obstetrics generally for diagnosis. The system uses waves of sound that create images by bounding off and td safe to the developing fetus.

    Methods

    • Trans abdominal
    • Trans vaginal

    INDICATIONS

    • To determine the gestation age
    • To detect the sex of the baby
    • To detect the fetal abnormalities
    • To know the site of the placenta
    • To determine the maturity where the dates are not accurate
    • To rule out intra- uterine fetal death
    • To rule out intra- fetal growth retardation
    • To confirm pregnancy
    • To asses amniotic fluid amount an order to rule out polyhydrominous and oligohydrominous
    • To determine the causes of bleeding in pregnancy
    • For detection of multiple pregnancies
    • To determine the size of the baby
    • For diagnostic purposes
    • Improves the woman‘s pregnancy experience

    For pelvic assessment.

        • Vital observations. Vital observations like blood pressure is taken to rule out conditions like pre-eclampsia that will necessitate referral.

        • Physical examination. This is done to exclude conditions like anaemia, jundice, dehydration, oedema, malnutrition.
        • External pelvic assessment. This is done especially from 36 weeks of gestation those mothers who have not delivered vaginally and prime gravidas by considering gait, stature, height and weight.

        • Blood tests. Blood test like complete blood count(CBC),blood grouping and rhesus factor, venereal disease research laboratory test(VDRL),Random blood sugar (RBS),Routine counseling and testing(RCT) to rule out conditions like anaemia, rhesus incompatibility, syphilis, diabetes, HIV &Aids respectively that will necessitate referral.
        • Urine test. Urinalysis is done at every visit to exclude the presence of glucose, protein and ketones in the urine which indicates conditions like diabetes, hypertensive disorders, urinary tract infection and unmet fetal demand respectively which necessitate referral.

          • Breast examination. It is done to exclude conditions like breast abscess ,breast cancer and any abnormality of the breast that will necessitate referral.

        Abdominal examination

        On inspection. Observe the size and shape of the abdomen and previous scars that indicates condition like polyhydrominous and oligohydrominous and fresh previous scars that will necessitate referral.

        On palpation. It is done to ascertain any abnormality like; Height of fundus not corresponding with gestational weeks, oblique and transverse lie, breech presentation at term especially prime gravidas and absence of fetal movement that will necessitate referral.

        Auscultation. This is to exclude abnormal fetal heart tone, regularity, rhythm and absence of fetal heart that will necessitate referral.

          1. Define a partograph.
          2. What information is recorded on the partograph?
          3. List the observations/ nursing care that can be done for a woman in first stage of labour but cannot be plotted on the partograph.

          1.  

          1.  

          SOLUTIONS

          A partograph is a tool used to monitor the progress of labour, condition of the fetus and the mother.

          OR

          Is the chart used to record all information and observations of a woman in labour/its a partogram before plotting and becomes a partograph after plotting.

           A PARTOGRAPH IS STARTED

              • When a woman is in active phase of labour that is 4cm or more of cervical opening.

              • When the pregnancy of at least 30 completed weeks.

              • When the presenting part is cephalic or breech.

              • When there is no complication that needs immediate action.

            THE INFORMATION RECORDED ON A PARTOGRAPH.

            The following information is recorded on a partograph;

              • Mothers demographic data.
              • Fetal conditions
              • Labour progress.
              • Maternal condition.
              • Outcome of labour.

              MOTHERS DEMOGRAPHIC DATA

              This is the first information entered on a partograph, this is essential as it helps a midwife to easily identify the mother she is following to know the weeks of Amenorrhoea and any risk factor etc. It includes name of the health facility, in patient‘s number, name, and data of admission on the partograph, time of admission of the partograph, LNMP, EDD, WOA risk factors and time of rapture of membranes.

              FETAL CONDITION.

              This part of the graph is used to monitor and assess fetal condition.

              It consists of the following; fetal heart, membranes, liquor, molding and caporal.

              • Fetal heart; Listening to and recording feta heart is safe and reliable away of knowing that the fetus is well. It‘s recorded after every 30 minutes when a mother is active phase of labour .The normal range is between 120b/m to 160b/m.

              • Membranes; Liquor can assist in assessing the fetal condition.

                • If membranes are intact record 1 on the partograph.

                • If ruptured record R.

              • Liquor; The following are recorded about the color of liquor when membranes have ruptured;

                • If membranes rapture and liquor is clear: C
                • If membranes rupture and liquor is blood stained: B
                • If membranes rupture and liquor is Meconium stained: M
                • If membranes rupture and; liquor is absent: A
                • If membranes rupture and liquor is brown: B

                • Moulding; This indicates how well the cervix will accommodate the fetal head.

                    • Bones separatable, sutures can be felt easily. O
                    • Bones are flit fast touching each other. +
                    • Bones are overlapping but can be easily separated with pressure from your fingers ++
                    • Bones are overlapping but can not be separated easily with pressure from your fingers +++
                    • In ++ and +++ refer a mother if in a maternity centre or lower health facility in a hospital inform a Doctor.

                  •  

                  •  

                  •  

                  The labour progress.

                  Cervical dilation;

                  First stage of labour is divided into two; latent phase and active phase;-

                      1. Latent phase; This is a slow period of cervical dilation 0.3cm with gradual shortening of the cervix. It should not exceed 8hours.

                      1. Active phase; This is the faster period of cervical dilation from 4-10cm.

                    The cervix dilates at a rate of at least 1cm/hr.

                    Cervical dilation is plotted with letter X and vaginal examination is done every 4 hours from 4cm to 6cm.Then from 7cm after 3 hours, 8cm after 2hours, 9cm hourly.

                    If the progress of labour is satisfactory plotting of cervical dilation will remain on the left of the alertline. It should not cross the right of the action line. If cervical dilation is going towards or is on action line the mother is referred from the health centre, in the hospital and Dr is informed.

                    Desent of the head;

                    For labour to progress well, dilation of the cervix should be accompanied by desent of the head. For desent to occur at an expected rate the head should be well flexed. This is assessed abdominally.

                    Desent is plotted with O on the partograph.

                    Uterine contractions;

                    Good uterine contractions are necessary for progress of labour; normally contractions become more frequent and last longer as labour progresses and contraction are observed after every 30mins for frequency, strength and duration.

                    Maternal conditions;

                    All observations for a mother‘s condition are recorded at the bottom of the partograph e.g. temperature 4hours, pulse ½ hourly. B.P 2hourly, urine output 2hourly.

                    Drug, rehydration fluids, Oxytocin, if labour is augmented and analysis of proteins, sugar and acetones are cleared.

                    Out comes of labour;

                    This information is entered in a partograph after the mother has delivered e.g. Date of delivery, type of delivery, duration of 1st SOL and 2nd SOL, post delivery vitals, time of delivery of the placenta and membranes Oxytocin given, amount of blood loss, state of the

                    perineum whether intact has sustained a tear or episiotomy was made immediate post, partum care and treatment.

                    Only the baby;

                    Involves weight, sex, time of delivery, APGAR score, treatment given at birth, any physical abnormality and immediate care.

                    Observation / Nursing care;

                    Observation while the mother is coming; the gait whether normal stature, short indicates risk mothers.

                    General examination from head to toe to examine Anaemia, jaundice and oedema.

                    Abdominal examination; do systematically from the head to toes to find out the lie, presentation, position, level of descent, nature of contractions and fetal heart moulding if any.

                      1. Hygiene given; bath and a clean gown provided.
                      2. Records: All the information about the mother is charted on the record sheet.
                      3. Position: Mother is allowed to adopt any comfortable position especially sitting up position.
                      4. Ambulation: In early 1st SOL mother is allowed to move about where the midwife can observe her.
                      5. Nutrition: Mother is allowed to eat alight diet like porridge, but later in established 1st SOL she is given hot sweetened tea.
                      6. Care of the bladder: Mother is encouraged to empty the bladder after every 2hours and urine should be tested for any abnormality.
                      7. Rest and sleep: assist the mother by dimming off lights and control noise and visitors.
                      8. Prevention of infections: Ensure aseptic techniques and proper hygiene of the ward to prevent infections.
                      9. Bowel actions: Mother is encouraged to empty the bowel, move frequently and clean the bed pan if offered.
                    1.  

                    Write short notes on the following

                      1. Causes of pain in labour.
                      2. Factors that affect pain perception during
                      3. Observation done during fourth stage of Labour indicating importance of each.
                      4. List indications of ultra sound scan during

                    SOLUTIONS

                    LABOUR

                    Is the physiological process by which the fetus, placenta and membranes are expelled through the birth canal by the help of the mother‘s effort after 28 weeks of gestation and there are four stages of labour that is to say; first, second, third and fourth stage and there are two types of labour and that is normal and abnormal labour.

                    PAIN

                    Is a sensory /emotional experience of what the patient feels and there are two types of pain; somatic and visceral pain.

                    CAUSES OF PAIN

                    There are two major causes of pain;

                    • Hormonal factors
                    • Mechanical factors

                    Hormonal factors

                    These include;

                    • Oxytocin stimulation. This increases the strength, intensity, duration and frequency of the contractions leading to pain.
                    • Progesterone withdrawal. The reduced levels of progesterone lead to an increase in estrogen levels which stimulates the muscles of the deciduae muscles of the uterus to produce prostaglandin which stimulates the smooth muscles of the uterus to contract.

                    Mechanical factors

                    These include;

                    • Strength and frequency of Braxton hick‘s contractions occurring in late pregnancy which leads to over stretching of the uterus which irritates the uterine muscles to contract leading to pain.
                    • Pressure of the presenting part on the sacra-nerves and lumbar nerves which has pain receptor.
                    • Pressure of the presenting part on the cervix. The presenting part exerts pressure on the cervix muscles hence leading to pain.
                    • Displacement of the pelvic floor muscles. The advancing presenting part distends the vagina and displaces the pelvic floor muscles which are over stretched and the nerves are compressed leading to pain.

                    PART (B)

                    PERCEPTION.

                    Is the process of becoming aware of the environment through the five senses.

                    Factors that affect pain perception during labour

                    These factors are emotional experience involving physical and psychological mechanism and can be contributed by the mother, fetus, health workers and structural environment.

                    Mother

                    • Maternal medical; conditions like pre-eclampsia and eclampsia, cardiac conditions which can affect pain perception.
                    • Compromised immunity due to chronic conditions like HIV and cancer which can affect pain perception.
                    • Size of the pelvis. Any pelvic deviation from normal leading to cephalous pelvic disproportion which can affect pain perception.
                    • Age. Young prime gravidae below 18years their pelvic bones are not fully developed and the mother above 35years their pelvic bones are contracted and this hinders normal progress of labour and affects pain.
                    • Parity. Prime gravidae‘s their muscles are still intact and sensitive to pain which leads to strong contractions. The multipara mothers their muscles are laced which leads to uterine itial.
                    • Past obstetrical history like caesarian section which increases the risks of uterine rapture and affects normal labour
                    • Social economic factors for example lack of support which can affect pain perception.
                    • Cultural factors like use of native drugs can affect pain perception.
                    • Past experience can also affect pain perception
                    • Level of education, occupation, religion can also affect pain perception.

                    Fetus

                    • Fetal abnormalities like hydrocephalous, macrosomic babies can lead to cephalopelvic disproportion hence affecting pain.
                    • Lie, position and presenting pain can affect pain perception during labour
                    • Size of the fetus that is to say big babies which cannot pass through the pelvis hence affecting pain perception
                    • Gestation age. In past maturity the sutures and the fontanels are closing and molding can hot take place hence affecting pain perception.

                    Health workers

                    1. Poor screening of mothers during antenatal Poor management during labour
                    2. Poor attitude towards the mother

                    Structural environment

                    • Hospital setting where there is no privacy for mothers, all stages of labour in one room which can affect pain perception.
                    • Lack of recreation in labour rooms like newspapers, television to occupy the mothers.

                    PART (C)

                    Forth stage of labour

                    Is the 1-2 hours following third stage of labour. Observations done during the fourth stage of labour

                    To the mother

                    • Per vagina

                    Perineum to inspect for perineal tears, episiotomy and other injuries Bleeding to rule out anemia and post partner hemorrhage

                    • Per abdominal

                    Fundal height estimation to rule out the retained products of conception State of the uterus whether it has contracted

                    Bladder encourages the mother to pass urine to prevent PPH

                    • Vital observations like blood pressure, temperature, pulse, and respiration for consciousness of the mother to rule out pre –eclampsia and eclampsia, dehydration and
                    • Breast examination – to rule out abnormalities of the nipple which can hinder breast feeding like inverted nipples.
                    • Observe the bowel action if the bowel movements are present and able to pass out stool
                    • Observe the legs for varicose veins

                    To the baby

                    • Assessment of the baby after five minutes for example APGAR scoring the baby General examination of the baby to rule out abnormalities
                    • Observation of the cord for bleeding and well ligatured
                    • Bowel for passage of meconium to rule out anal impaction
                    • Observe if the baby is breast feeding for the presence of the sucking reflex.

                    PART (D)

                    Ultra- sound scan

                    Is a tool used in pregnancy and obstetrics generally for diagnosis. The system uses waves of sound that create images by bounding off and td safe to the developing fetus.

                    Methods

                    • Trans abdominal
                    • Trans vaginal

                    INDICATIONS

                    • To determine the gestation age
                    • To detect the sex of the baby
                    • To detect the fetal abnormalities
                    • To know the site of the placenta
                    • To determine the maturity where the dates are not accurate
                    • To rule out intra- uterine fetal death
                    • To rule out intra- fetal growth retardation
                    • To confirm pregnancy
                    • To asses amniotic fluid amount an order to rule out polyhydrominous and oligohydrominous
                    • To determine the causes of bleeding in pregnancy
                    • For detection of multiple pregnancies
                    • To determine the size of the baby
                    • For diagnostic purposes
                    • Improves the woman‘s pregnancy experience

                    For pelvic assessment.

                      • Plasma volume increase by 30% this results into hydraemia.
                      • Increased blood flow to the uterus to aid placental circulation by 10-15% or about 750mls per minute, kidneys for excretion of extra waste product of metabolism.

                      Identification of abnormalities that necessitate referral.

                        • History taking. A comprehensive history is taken on medical, surgical, past and present obstetrical, social and family history that may complicate or be complicated by pregnancy, labour and pueperium like diabetes, hypertension, epilepsy, sickle cell disease and accident involving the spine, pelvis and the lower limbs that will necessitate referral.

                        • Vital observations. Vital observations like blood pressure is taken to rule out conditions like pre-eclampsia that will necessitate referral.

                        • Physical examination. This is done to exclude conditions like anaemia, jundice, dehydration, oedema, malnutrition.
                        • External pelvic assessment. This is done especially from 36 weeks of gestation those mothers who have not delivered vaginally and prime gravidas by considering gait, stature, height and weight.

                        • Blood tests. Blood test like complete blood count(CBC),blood grouping and rhesus factor, venereal disease research laboratory test(VDRL),Random blood sugar (RBS),Routine counseling and testing(RCT) to rule out conditions like anaemia, rhesus incompatibility, syphilis, diabetes, HIV &Aids respectively that will necessitate referral.
                        • Urine test. Urinalysis is done at every visit to exclude the presence of glucose, protein and ketones in the urine which indicates conditions like diabetes, hypertensive disorders, urinary tract infection and unmet fetal demand respectively which necessitate referral.

                        • Breast examination. It is done to exclude conditions like breast abscess ,breast cancer and any abnormality of the breast that will necessitate referral.

                      Abdominal examination

                      On inspection. Observe the size and shape of the abdomen and previous scars that indicates condition like polyhydrominous and oligohydrominous and fresh previous scars that will necessitate referral.

                      On palpation. It is done to ascertain any abnormality like; Height of fundus not corresponding with gestational weeks, oblique and transverse lie, breech presentation at term especially prime gravidas and absence of fetal movement that will necessitate referral.

                      Auscultation. This is to exclude abnormal fetal heart tone, regularity, rhythm and absence of fetal heart that will necessitate referral.

                      1. Define a partograph.
                      2. What information is recorded on the partograph?
                      3. List the observations/ nursing care that can be done for a woman in first stage of labour but cannot be plotted on the partograph.

                      1.  

                      1.  

                      SOLUTIONS

                      A partograph is a tool used to monitor the progress of labour, condition of the fetus and the mother.

                      OR

                      Is the chart used to record all information and observations of a woman in labour/its a partogram before plotting and becomes a partograph after plotting.

                       A PARTOGRAPH IS STARTED

                        • When a woman is in active phase of labour that is 4cm or more of cervical opening.

                        • When the pregnancy of at least 30 completed weeks.

                        • When the presenting part is cephalic or breech.

                        • When there is no complication that needs immediate action.

                      THE INFORMATION RECORDED ON A PARTOGRAPH.

                      The following information is recorded on a partograph;

                      • Mothers demographic data.
                      • Fetal conditions
                      • Labour progress.
                      • Maternal condition.
                      • Outcome of labour.

                      MOTHERS DEMOGRAPHIC DATA

                      This is the first information entered on a partograph, this is essential as it helps a midwife to easily identify the mother she is following to know the weeks of Amenorrhoea and any risk factor etc. It includes name of the health facility, in patient‘s number, name, and data of admission on the partograph, time of admission of the partograph, LNMP, EDD, WOA risk factors and time of rapture of membranes.

                      FETAL CONDITION.

                      This part of the graph is used to monitor and assess fetal condition.

                      It consists of the following; fetal heart, membranes, liquor, molding and caporal.

                      • Fetal heart; Listening to and recording feta heart is safe and reliable away of knowing that the fetus is well. It‘s recorded after every 30 minutes when a mother is active phase of labour .The normal range is between 120b/m to 160b/m.

                      • Membranes; Liquor can assist in assessing the fetal condition.

                        • If membranes are intact record 1 on the partograph.

                        • If ruptured record R.

                      • Liquor; The following are recorded about the color of liquor when membranes have ruptured;

                      • If membranes rapture and liquor is clear: C
                      • If membranes rupture and liquor is blood stained: B
                      • If membranes rupture and liquor is Meconium stained: M
                      • If membranes rupture and; liquor is absent: A
                      • If membranes rupture and liquor is brown: B

                      • Moulding; This indicates how well the cervix will accommodate the fetal head.

                        • Bones separatable, sutures can be felt easily. O
                        • Bones are flit fast touching each other. +
                        • Bones are overlapping but can be easily separated with pressure from your fingers ++
                        • Bones are overlapping but can not be separated easily with pressure from your fingers +++
                        • In ++ and +++ refer a mother if in a maternity centre or lower health facility in a hospital inform a Doctor.

                      •  

                      •  

                      •  

                      The labour progress.

                      Cervical dilation;

                      First stage of labour is divided into two; latent phase and active phase;-

                        1. Latent phase; This is a slow period of cervical dilation 0.3cm with gradual shortening of the cervix. It should not exceed 8hours.

                        1. Active phase; This is the faster period of cervical dilation from 4-10cm.

                      The cervix dilates at a rate of at least 1cm/hr.

                      Cervical dilation is plotted with letter X and vaginal examination is done every 4 hours from 4cm to 6cm.Then from 7cm after 3 hours, 8cm after 2hours, 9cm hourly.

                      If the progress of labour is satisfactory plotting of cervical dilation will remain on the left of the alertline. It should not cross the right of the action line. If cervical dilation is going towards or is on action line the mother is referred from the health centre, in the hospital and Dr is informed.

                      Desent of the head;

                      For labour to progress well, dilation of the cervix should be accompanied by desent of the head. For desent to occur at an expected rate the head should be well flexed. This is assessed abdominally.

                      Desent is plotted with O on the partograph.

                      Uterine contractions;

                      Good uterine contractions are necessary for progress of labour; normally contractions become more frequent and last longer as labour progresses and contraction are observed after every 30mins for frequency, strength and duration.

                      Maternal conditions;

                      All observations for a mother‘s condition are recorded at the bottom of the partograph e.g. temperature 4hours, pulse ½ hourly. B.P 2hourly, urine output 2hourly.

                      Drug, rehydration fluids, Oxytocin, if labour is augmented and analysis of proteins, sugar and acetones are cleared.

                      Out comes of labour;

                      This information is entered in a partograph after the mother has delivered e.g. Date of delivery, type of delivery, duration of 1st SOL and 2nd SOL, post delivery vitals, time of delivery of the placenta and membranes Oxytocin given, amount of blood loss, state of the

                      perineum whether intact has sustained a tear or episiotomy was made immediate post, partum care and treatment.

                      Only the baby;

                      Involves weight, sex, time of delivery, APGAR score, treatment given at birth, any physical abnormality and immediate care.

                      Observation / Nursing care;

                      Observation while the mother is coming; the gait whether normal stature, short indicates risk mothers.

                      General examination from head to toe to examine Anaemia, jaundice and oedema.

                      Abdominal examination; do systematically from the head to toes to find out the lie, presentation, position, level of descent, nature of contractions and fetal heart moulding if any.

                        1. Hygiene given; bath and a clean gown provided.
                        2. Records: All the information about the mother is charted on the record sheet.
                        3. Position: Mother is allowed to adopt any comfortable position especially sitting up position.
                        4. Ambulation: In early 1st SOL mother is allowed to move about where the midwife can observe her.
                        5. Nutrition: Mother is allowed to eat alight diet like porridge, but later in established 1st SOL she is given hot sweetened tea.
                        6. Care of the bladder: Mother is encouraged to empty the bladder after every 2hours and urine should be tested for any abnormality.
                        7. Rest and sleep: assist the mother by dimming off lights and control noise and visitors.
                        8. Prevention of infections: Ensure aseptic techniques and proper hygiene of the ward to prevent infections.
                        9. Bowel actions: Mother is encouraged to empty the bowel, move frequently and clean the bed pan if offered.
                      1.  

                      Write short notes on the following

                        1. Causes of pain in labour.
                        2. Factors that affect pain perception during
                        3. Observation done during fourth stage of Labour indicating importance of each.
                        4. List indications of ultra sound scan during

                      SOLUTIONS

                      LABOUR

                      Is the physiological process by which the fetus, placenta and membranes are expelled through the birth canal by the help of the mother‘s effort after 28 weeks of gestation and there are four stages of labour that is to say; first, second, third and fourth stage and there are two types of labour and that is normal and abnormal labour.

                      PAIN

                      Is a sensory /emotional experience of what the patient feels and there are two types of pain; somatic and visceral pain.

                      CAUSES OF PAIN

                      There are two major causes of pain;

                      • Hormonal factors
                      • Mechanical factors

                      Hormonal factors

                      These include;

                      • Oxytocin stimulation. This increases the strength, intensity, duration and frequency of the contractions leading to pain.
                      • Progesterone withdrawal. The reduced levels of progesterone lead to an increase in estrogen levels which stimulates the muscles of the deciduae muscles of the uterus to produce prostaglandin which stimulates the smooth muscles of the uterus to contract.

                      Mechanical factors

                      These include;

                      • Strength and frequency of Braxton hick‘s contractions occurring in late pregnancy which leads to over stretching of the uterus which irritates the uterine muscles to contract leading to pain.
                      • Pressure of the presenting part on the sacra-nerves and lumbar nerves which has pain receptor.
                      • Pressure of the presenting part on the cervix. The presenting part exerts pressure on the cervix muscles hence leading to pain.
                      • Displacement of the pelvic floor muscles. The advancing presenting part distends the vagina and displaces the pelvic floor muscles which are over stretched and the nerves are compressed leading to pain.

                      PART (B)

                      PERCEPTION.

                      Is the process of becoming aware of the environment through the five senses.

                      Factors that affect pain perception during labour

                      These factors are emotional experience involving physical and psychological mechanism and can be contributed by the mother, fetus, health workers and structural environment.

                      Mother

                      • Maternal medical; conditions like pre-eclampsia and eclampsia, cardiac conditions which can affect pain perception.
                      • Compromised immunity due to chronic conditions like HIV and cancer which can affect pain perception.
                      • Size of the pelvis. Any pelvic deviation from normal leading to cephalous pelvic disproportion which can affect pain perception.
                      • Age. Young prime gravidae below 18years their pelvic bones are not fully developed and the mother above 35years their pelvic bones are contracted and this hinders normal progress of labour and affects pain.
                      • Parity. Prime gravidae‘s their muscles are still intact and sensitive to pain which leads to strong contractions. The multipara mothers their muscles are laced which leads to uterine itial.
                      • Past obstetrical history like caesarian section which increases the risks of uterine rapture and affects normal labour
                      • Social economic factors for example lack of support which can affect pain perception.
                      • Cultural factors like use of native drugs can affect pain perception.
                      • Past experience can also affect pain perception
                      • Level of education, occupation, religion can also affect pain perception.

                      Fetus

                      • Fetal abnormalities like hydrocephalous, macrosomic babies can lead to cephalopelvic disproportion hence affecting pain.
                      • Lie, position and presenting pain can affect pain perception during labour
                      • Size of the fetus that is to say big babies which cannot pass through the pelvis hence affecting pain perception
                      • Gestation age. In past maturity the sutures and the fontanels are closing and molding can hot take place hence affecting pain perception.

                      Health workers

                      1. Poor screening of mothers during antenatal Poor management during labour
                      2. Poor attitude towards the mother

                      Structural environment

                      • Hospital setting where there is no privacy for mothers, all stages of labour in one room which can affect pain perception.
                      • Lack of recreation in labour rooms like newspapers, television to occupy the mothers.

                      PART (C)

                      Forth stage of labour

                      Is the 1-2 hours following third stage of labour. Observations done during the fourth stage of labour

                      To the mother

                      • Per vagina

                      Perineum to inspect for perineal tears, episiotomy and other injuries Bleeding to rule out anemia and post partner hemorrhage

                      • Per abdominal

                      Fundal height estimation to rule out the retained products of conception State of the uterus whether it has contracted

                      Bladder encourages the mother to pass urine to prevent PPH

                      • Vital observations like blood pressure, temperature, pulse, and respiration for consciousness of the mother to rule out pre –eclampsia and eclampsia, dehydration and
                      • Breast examination – to rule out abnormalities of the nipple which can hinder breast feeding like inverted nipples.
                      • Observe the bowel action if the bowel movements are present and able to pass out stool
                      • Observe the legs for varicose veins

                      To the baby

                      • Assessment of the baby after five minutes for example APGAR scoring the baby General examination of the baby to rule out abnormalities
                      • Observation of the cord for bleeding and well ligatured
                      • Bowel for passage of meconium to rule out anal impaction
                      • Observe if the baby is breast feeding for the presence of the sucking reflex.

                      PART (D)

                      Ultra- sound scan

                      Is a tool used in pregnancy and obstetrics generally for diagnosis. The system uses waves of sound that create images by bounding off and td safe to the developing fetus.

                      Methods

                      • Trans abdominal
                      • Trans vaginal

                      INDICATIONS

                      • To determine the gestation age
                      • To detect the sex of the baby
                      • To detect the fetal abnormalities
                      • To know the site of the placenta
                      • To determine the maturity where the dates are not accurate
                      • To rule out intra- uterine fetal death
                      • To rule out intra- fetal growth retardation
                      • To confirm pregnancy
                      • To asses amniotic fluid amount an order to rule out polyhydrominous and oligohydrominous
                      • To determine the causes of bleeding in pregnancy
                      • For detection of multiple pregnancies
                      • To determine the size of the baby
                      • For diagnostic purposes
                      • Improves the woman‘s pregnancy experience

                      For pelvic assessment.

                      Identification of abnormalities that necessitate referral.

                      Abdominal examination

                      On inspection. Observe the size and shape of the abdomen and previous scars that indicates condition like polyhydrominous and oligohydrominous and fresh previous scars that will necessitate referral.

                      On palpation. It is done to ascertain any abnormality like; Height of fundus not corresponding with gestational weeks, oblique and transverse lie, breech presentation at term especially prime gravidas and absence of fetal movement that will necessitate referral.

                      Auscultation. This is to exclude abnormal fetal heart tone, regularity, rhythm and absence of fetal heart that will necessitate referral.

                      1. Define a partograph.
                      2. What information is recorded on the partograph?
                      3. List the observations/ nursing care that can be done for a woman in first stage of labour but cannot be plotted on the partograph.

                      1.  

                      1.  

                      SOLUTIONS

                      A partograph is a tool used to monitor the progress of labour, condition of the fetus and the mother.

                      OR

                      Is the chart used to record all information and observations of a woman in labour/its a partogram before plotting and becomes a partograph after plotting.

                       A PARTOGRAPH IS STARTED

                        • When a woman is in active phase of labour that is 4cm or more of cervical opening.

                        • When the pregnancy of at least 30 completed weeks.

                        • When the presenting part is cephalic or breech.

                        • When there is no complication that needs immediate action.

                      THE INFORMATION RECORDED ON A PARTOGRAPH.

                      The following information is recorded on a partograph;

                      • Mothers demographic data.
                      • Fetal conditions
                      • Labour progress.
                      • Maternal condition.
                      • Outcome of labour.

                      MOTHERS DEMOGRAPHIC DATA

                      This is the first information entered on a partograph, this is essential as it helps a midwife to easily identify the mother she is following to know the weeks of Amenorrhoea and any risk factor etc. It includes name of the health facility, in patient‘s number, name, and data of admission on the partograph, time of admission of the partograph, LNMP, EDD, WOA risk factors and time of rapture of membranes.

                      FETAL CONDITION.

                      This part of the graph is used to monitor and assess fetal condition.

                      It consists of the following; fetal heart, membranes, liquor, molding and caporal.

                      • Fetal heart; Listening to and recording feta heart is safe and reliable away of knowing that the fetus is well. It‘s recorded after every 30 minutes when a mother is active phase of labour .The normal range is between 120b/m to 160b/m.

                      • Membranes; Liquor can assist in assessing the fetal condition.

                        • If membranes are intact record 1 on the partograph.

                        • If ruptured record R.

                      • Liquor; The following are recorded about the color of liquor when membranes have ruptured;

                      • If membranes rapture and liquor is clear: C
                      • If membranes rupture and liquor is blood stained: B
                      • If membranes rupture and liquor is Meconium stained: M
                      • If membranes rupture and; liquor is absent: A
                      • If membranes rupture and liquor is brown: B

                      • Moulding; This indicates how well the cervix will accommodate the fetal head.

                        • Bones separatable, sutures can be felt easily. O
                        • Bones are flit fast touching each other. +
                        • Bones are overlapping but can be easily separated with pressure from your fingers ++
                        • Bones are overlapping but can not be separated easily with pressure from your fingers +++
                        • In ++ and +++ refer a mother if in a maternity centre or lower health facility in a hospital inform a Doctor.

                      •  

                      •  

                      •  

                      The labour progress.

                      Cervical dilation;

                      First stage of labour is divided into two; latent phase and active phase;-

                        1. Latent phase; This is a slow period of cervical dilation 0.3cm with gradual shortening of the cervix. It should not exceed 8hours.

                        1. Active phase; This is the faster period of cervical dilation from 4-10cm.

                      The cervix dilates at a rate of at least 1cm/hr.

                      Cervical dilation is plotted with letter X and vaginal examination is done every 4 hours from 4cm to 6cm.Then from 7cm after 3 hours, 8cm after 2hours, 9cm hourly.

                      If the progress of labour is satisfactory plotting of cervical dilation will remain on the left of the alertline. It should not cross the right of the action line. If cervical dilation is going towards or is on action line the mother is referred from the health centre, in the hospital and Dr is informed.

                      Desent of the head;

                      For labour to progress well, dilation of the cervix should be accompanied by desent of the head. For desent to occur at an expected rate the head should be well flexed. This is assessed abdominally.

                      Desent is plotted with O on the partograph.

                      Uterine contractions;

                      Good uterine contractions are necessary for progress of labour; normally contractions become more frequent and last longer as labour progresses and contraction are observed after every 30mins for frequency, strength and duration.

                      Maternal conditions;

                      All observations for a mother‘s condition are recorded at the bottom of the partograph e.g. temperature 4hours, pulse ½ hourly. B.P 2hourly, urine output 2hourly.

                      Drug, rehydration fluids, Oxytocin, if labour is augmented and analysis of proteins, sugar and acetones are cleared.

                      Out comes of labour;

                      This information is entered in a partograph after the mother has delivered e.g. Date of delivery, type of delivery, duration of 1st SOL and 2nd SOL, post delivery vitals, time of delivery of the placenta and membranes Oxytocin given, amount of blood loss, state of the

                      perineum whether intact has sustained a tear or episiotomy was made immediate post, partum care and treatment.

                      Only the baby;

                      Involves weight, sex, time of delivery, APGAR score, treatment given at birth, any physical abnormality and immediate care.

                      Observation / Nursing care;

                      Observation while the mother is coming; the gait whether normal stature, short indicates risk mothers.

                      General examination from head to toe to examine Anaemia, jaundice and oedema.

                      Abdominal examination; do systematically from the head to toes to find out the lie, presentation, position, level of descent, nature of contractions and fetal heart moulding if any.

                        1. Hygiene given; bath and a clean gown provided.
                        2. Records: All the information about the mother is charted on the record sheet.
                        3. Position: Mother is allowed to adopt any comfortable position especially sitting up position.
                        4. Ambulation: In early 1st SOL mother is allowed to move about where the midwife can observe her.
                        5. Nutrition: Mother is allowed to eat alight diet like porridge, but later in established 1st SOL she is given hot sweetened tea.
                        6. Care of the bladder: Mother is encouraged to empty the bladder after every 2hours and urine should be tested for any abnormality.
                        7. Rest and sleep: assist the mother by dimming off lights and control noise and visitors.
                        8. Prevention of infections: Ensure aseptic techniques and proper hygiene of the ward to prevent infections.
                        9. Bowel actions: Mother is encouraged to empty the bowel, move frequently and clean the bed pan if offered.
                      1.  

                      Write short notes on the following

                        1. Causes of pain in labour.
                        2. Factors that affect pain perception during
                        3. Observation done during fourth stage of Labour indicating importance of each.
                        4. List indications of ultra sound scan during

                      SOLUTIONS

                      LABOUR

                      Is the physiological process by which the fetus, placenta and membranes are expelled through the birth canal by the help of the mother‘s effort after 28 weeks of gestation and there are four stages of labour that is to say; first, second, third and fourth stage and there are two types of labour and that is normal and abnormal labour.

                      PAIN

                      Is a sensory /emotional experience of what the patient feels and there are two types of pain; somatic and visceral pain.

                      CAUSES OF PAIN

                      There are two major causes of pain;

                      • Hormonal factors
                      • Mechanical factors

                      Hormonal factors

                      These include;

                      • Oxytocin stimulation. This increases the strength, intensity, duration and frequency of the contractions leading to pain.
                      • Progesterone withdrawal. The reduced levels of progesterone lead to an increase in estrogen levels which stimulates the muscles of the deciduae muscles of the uterus to produce prostaglandin which stimulates the smooth muscles of the uterus to contract.

                      Mechanical factors

                      These include;

                      • Strength and frequency of Braxton hick‘s contractions occurring in late pregnancy which leads to over stretching of the uterus which irritates the uterine muscles to contract leading to pain.
                      • Pressure of the presenting part on the sacra-nerves and lumbar nerves which has pain receptor.
                      • Pressure of the presenting part on the cervix. The presenting part exerts pressure on the cervix muscles hence leading to pain.
                      • Displacement of the pelvic floor muscles. The advancing presenting part distends the vagina and displaces the pelvic floor muscles which are over stretched and the nerves are compressed leading to pain.

                      PART (B)

                      PERCEPTION.

                      Is the process of becoming aware of the environment through the five senses.

                      Factors that affect pain perception during labour

                      These factors are emotional experience involving physical and psychological mechanism and can be contributed by the mother, fetus, health workers and structural environment.

                      Mother

                      • Maternal medical; conditions like pre-eclampsia and eclampsia, cardiac conditions which can affect pain perception.
                      • Compromised immunity due to chronic conditions like HIV and cancer which can affect pain perception.
                      • Size of the pelvis. Any pelvic deviation from normal leading to cephalous pelvic disproportion which can affect pain perception.
                      • Age. Young prime gravidae below 18years their pelvic bones are not fully developed and the mother above 35years their pelvic bones are contracted and this hinders normal progress of labour and affects pain.
                      • Parity. Prime gravidae‘s their muscles are still intact and sensitive to pain which leads to strong contractions. The multipara mothers their muscles are laced which leads to uterine itial.
                      • Past obstetrical history like caesarian section which increases the risks of uterine rapture and affects normal labour
                      • Social economic factors for example lack of support which can affect pain perception.
                      • Cultural factors like use of native drugs can affect pain perception.
                      • Past experience can also affect pain perception
                      • Level of education, occupation, religion can also affect pain perception.

                      Fetus

                      • Fetal abnormalities like hydrocephalous, macrosomic babies can lead to cephalopelvic disproportion hence affecting pain.
                      • Lie, position and presenting pain can affect pain perception during labour
                      • Size of the fetus that is to say big babies which cannot pass through the pelvis hence affecting pain perception
                      • Gestation age. In past maturity the sutures and the fontanels are closing and molding can hot take place hence affecting pain perception.

                      Health workers

                      1. Poor screening of mothers during antenatal Poor management during labour
                      2. Poor attitude towards the mother

                      Structural environment

                      • Hospital setting where there is no privacy for mothers, all stages of labour in one room which can affect pain perception.
                      • Lack of recreation in labour rooms like newspapers, television to occupy the mothers.

                      PART (C)

                      Forth stage of labour

                      Is the 1-2 hours following third stage of labour. Observations done during the fourth stage of labour

                      To the mother

                      • Per vagina

                      Perineum to inspect for perineal tears, episiotomy and other injuries Bleeding to rule out anemia and post partner hemorrhage

                      • Per abdominal

                      Fundal height estimation to rule out the retained products of conception State of the uterus whether it has contracted

                      Bladder encourages the mother to pass urine to prevent PPH

                      • Vital observations like blood pressure, temperature, pulse, and respiration for consciousness of the mother to rule out pre –eclampsia and eclampsia, dehydration and
                      • Breast examination – to rule out abnormalities of the nipple which can hinder breast feeding like inverted nipples.
                      • Observe the bowel action if the bowel movements are present and able to pass out stool
                      • Observe the legs for varicose veins

                      To the baby

                      • Assessment of the baby after five minutes for example APGAR scoring the baby General examination of the baby to rule out abnormalities
                      • Observation of the cord for bleeding and well ligatured
                      • Bowel for passage of meconium to rule out anal impaction
                      • Observe if the baby is breast feeding for the presence of the sucking reflex.

                      PART (D)

                      Ultra- sound scan

                      Is a tool used in pregnancy and obstetrics generally for diagnosis. The system uses waves of sound that create images by bounding off and td safe to the developing fetus.

                      Methods

                      • Trans abdominal
                      • Trans vaginal

                      INDICATIONS

                      • To determine the gestation age
                      • To detect the sex of the baby
                      • To detect the fetal abnormalities
                      • To know the site of the placenta
                      • To determine the maturity where the dates are not accurate
                      • To rule out intra- uterine fetal death
                      • To rule out intra- fetal growth retardation
                      • To confirm pregnancy
                      • To asses amniotic fluid amount an order to rule out polyhydrominous and oligohydrominous
                      • To determine the causes of bleeding in pregnancy
                      • For detection of multiple pregnancies
                      • To determine the size of the baby
                      • For diagnostic purposes
                      • Improves the woman‘s pregnancy experience

                      For pelvic assessment.

                        1.  

                        Normal pregnancy

                        Is the growth and development of the fetus into the uterine cavity without any complication.

                        Pregnancy: Refers to growth and development of the fetus into the body.

                        Circulatory system: Is the transport system that deals with movement of nutrients, hormones, gases and waste products of metabolism into and out of the body cells and tissues.

                        Referral: This is the process of transferring or forwarding clients or patients from a lower health unit to a higher unit for further management.

                        Characteristics of normal pregnancy

                        Changes that takes place in the circulatory system during pregnancy.

                        Heart

                        Blood vessels

                        Blood

                        Identification of abnormalities that necessitate referral.

                        Abdominal examination

                        On inspection. Observe the size and shape of the abdomen and previous scars that indicates condition like polyhydrominous and oligohydrominous and fresh previous scars that will necessitate referral.

                        On palpation. It is done to ascertain any abnormality like; Height of fundus not corresponding with gestational weeks, oblique and transverse lie, breech presentation at term especially prime gravidas and absence of fetal movement that will necessitate referral.

                        Auscultation. This is to exclude abnormal fetal heart tone, regularity, rhythm and absence of fetal heart that will necessitate referral.

                        1. Define a partograph.
                        2. What information is recorded on the partograph?
                        3. List the observations/ nursing care that can be done for a woman in first stage of labour but cannot be plotted on the partograph.

                        1.  

                        1.  

                        SOLUTIONS

                        A partograph is a tool used to monitor the progress of labour, condition of the fetus and the mother.

                        OR

                        Is the chart used to record all information and observations of a woman in labour/its a partogram before plotting and becomes a partograph after plotting.

                         A PARTOGRAPH IS STARTED

                          • When a woman is in active phase of labour that is 4cm or more of cervical opening.

                          • When the pregnancy of at least 30 completed weeks.

                          • When the presenting part is cephalic or breech.

                          • When there is no complication that needs immediate action.

                        THE INFORMATION RECORDED ON A PARTOGRAPH.

                        The following information is recorded on a partograph;

                        • Mothers demographic data.
                        • Fetal conditions
                        • Labour progress.
                        • Maternal condition.
                        • Outcome of labour.

                        MOTHERS DEMOGRAPHIC DATA

                        This is the first information entered on a partograph, this is essential as it helps a midwife to easily identify the mother she is following to know the weeks of Amenorrhoea and any risk factor etc. It includes name of the health facility, in patient‘s number, name, and data of admission on the partograph, time of admission of the partograph, LNMP, EDD, WOA risk factors and time of rapture of membranes.

                        FETAL CONDITION.

                        This part of the graph is used to monitor and assess fetal condition.

                        It consists of the following; fetal heart, membranes, liquor, molding and caporal.

                        • Fetal heart; Listening to and recording feta heart is safe and reliable away of knowing that the fetus is well. It‘s recorded after every 30 minutes when a mother is active phase of labour .The normal range is between 120b/m to 160b/m.

                        • Membranes; Liquor can assist in assessing the fetal condition.

                          • If membranes are intact record 1 on the partograph.

                          • If ruptured record R.

                        • Liquor; The following are recorded about the color of liquor when membranes have ruptured;

                        • If membranes rapture and liquor is clear: C
                        • If membranes rupture and liquor is blood stained: B
                        • If membranes rupture and liquor is Meconium stained: M
                        • If membranes rupture and; liquor is absent: A
                        • If membranes rupture and liquor is brown: B

                        • Moulding; This indicates how well the cervix will accommodate the fetal head.

                          • Bones separatable, sutures can be felt easily. O
                          • Bones are flit fast touching each other. +
                          • Bones are overlapping but can be easily separated with pressure from your fingers ++
                          • Bones are overlapping but can not be separated easily with pressure from your fingers +++
                          • In ++ and +++ refer a mother if in a maternity centre or lower health facility in a hospital inform a Doctor.

                        •  

                        •  

                        •  

                        The labour progress.

                        Cervical dilation;

                        First stage of labour is divided into two; latent phase and active phase;-

                          1. Latent phase; This is a slow period of cervical dilation 0.3cm with gradual shortening of the cervix. It should not exceed 8hours.

                          1. Active phase; This is the faster period of cervical dilation from 4-10cm.

                        The cervix dilates at a rate of at least 1cm/hr.

                        Cervical dilation is plotted with letter X and vaginal examination is done every 4 hours from 4cm to 6cm.Then from 7cm after 3 hours, 8cm after 2hours, 9cm hourly.

                        If the progress of labour is satisfactory plotting of cervical dilation will remain on the left of the alertline. It should not cross the right of the action line. If cervical dilation is going towards or is on action line the mother is referred from the health centre, in the hospital and Dr is informed.

                        Desent of the head;

                        For labour to progress well, dilation of the cervix should be accompanied by desent of the head. For desent to occur at an expected rate the head should be well flexed. This is assessed abdominally.

                        Desent is plotted with O on the partograph.

                        Uterine contractions;

                        Good uterine contractions are necessary for progress of labour; normally contractions become more frequent and last longer as labour progresses and contraction are observed after every 30mins for frequency, strength and duration.

                        Maternal conditions;

                        All observations for a mother‘s condition are recorded at the bottom of the partograph e.g. temperature 4hours, pulse ½ hourly. B.P 2hourly, urine output 2hourly.

                        Drug, rehydration fluids, Oxytocin, if labour is augmented and analysis of proteins, sugar and acetones are cleared.

                        Out comes of labour;

                        This information is entered in a partograph after the mother has delivered e.g. Date of delivery, type of delivery, duration of 1st SOL and 2nd SOL, post delivery vitals, time of delivery of the placenta and membranes Oxytocin given, amount of blood loss, state of the

                        perineum whether intact has sustained a tear or episiotomy was made immediate post, partum care and treatment.

                        Only the baby;

                        Involves weight, sex, time of delivery, APGAR score, treatment given at birth, any physical abnormality and immediate care.

                        Observation / Nursing care;

                        Observation while the mother is coming; the gait whether normal stature, short indicates risk mothers.

                        General examination from head to toe to examine Anaemia, jaundice and oedema.

                        Abdominal examination; do systematically from the head to toes to find out the lie, presentation, position, level of descent, nature of contractions and fetal heart moulding if any.

                          1. Hygiene given; bath and a clean gown provided.
                          2. Records: All the information about the mother is charted on the record sheet.
                          3. Position: Mother is allowed to adopt any comfortable position especially sitting up position.
                          4. Ambulation: In early 1st SOL mother is allowed to move about where the midwife can observe her.
                          5. Nutrition: Mother is allowed to eat alight diet like porridge, but later in established 1st SOL she is given hot sweetened tea.
                          6. Care of the bladder: Mother is encouraged to empty the bladder after every 2hours and urine should be tested for any abnormality.
                          7. Rest and sleep: assist the mother by dimming off lights and control noise and visitors.
                          8. Prevention of infections: Ensure aseptic techniques and proper hygiene of the ward to prevent infections.
                          9. Bowel actions: Mother is encouraged to empty the bowel, move frequently and clean the bed pan if offered.
                        1.  

                        Write short notes on the following

                          1. Causes of pain in labour.
                          2. Factors that affect pain perception during
                          3. Observation done during fourth stage of Labour indicating importance of each.
                          4. List indications of ultra sound scan during

                        SOLUTIONS

                        LABOUR

                        Is the physiological process by which the fetus, placenta and membranes are expelled through the birth canal by the help of the mother‘s effort after 28 weeks of gestation and there are four stages of labour that is to say; first, second, third and fourth stage and there are two types of labour and that is normal and abnormal labour.

                        PAIN

                        Is a sensory /emotional experience of what the patient feels and there are two types of pain; somatic and visceral pain.

                        CAUSES OF PAIN

                        There are two major causes of pain;

                        • Hormonal factors
                        • Mechanical factors

                        Hormonal factors

                        These include;

                        • Oxytocin stimulation. This increases the strength, intensity, duration and frequency of the contractions leading to pain.
                        • Progesterone withdrawal. The reduced levels of progesterone lead to an increase in estrogen levels which stimulates the muscles of the deciduae muscles of the uterus to produce prostaglandin which stimulates the smooth muscles of the uterus to contract.

                        Mechanical factors

                        These include;

                        • Strength and frequency of Braxton hick‘s contractions occurring in late pregnancy which leads to over stretching of the uterus which irritates the uterine muscles to contract leading to pain.
                        • Pressure of the presenting part on the sacra-nerves and lumbar nerves which has pain receptor.
                        • Pressure of the presenting part on the cervix. The presenting part exerts pressure on the cervix muscles hence leading to pain.
                        • Displacement of the pelvic floor muscles. The advancing presenting part distends the vagina and displaces the pelvic floor muscles which are over stretched and the nerves are compressed leading to pain.

                        PART (B)

                        PERCEPTION.

                        Is the process of becoming aware of the environment through the five senses.

                        Factors that affect pain perception during labour

                        These factors are emotional experience involving physical and psychological mechanism and can be contributed by the mother, fetus, health workers and structural environment.

                        Mother

                        • Maternal medical; conditions like pre-eclampsia and eclampsia, cardiac conditions which can affect pain perception.
                        • Compromised immunity due to chronic conditions like HIV and cancer which can affect pain perception.
                        • Size of the pelvis. Any pelvic deviation from normal leading to cephalous pelvic disproportion which can affect pain perception.
                        • Age. Young prime gravidae below 18years their pelvic bones are not fully developed and the mother above 35years their pelvic bones are contracted and this hinders normal progress of labour and affects pain.
                        • Parity. Prime gravidae‘s their muscles are still intact and sensitive to pain which leads to strong contractions. The multipara mothers their muscles are laced which leads to uterine itial.
                        • Past obstetrical history like caesarian section which increases the risks of uterine rapture and affects normal labour
                        • Social economic factors for example lack of support which can affect pain perception.
                        • Cultural factors like use of native drugs can affect pain perception.
                        • Past experience can also affect pain perception
                        • Level of education, occupation, religion can also affect pain perception.

                        Fetus

                        • Fetal abnormalities like hydrocephalous, macrosomic babies can lead to cephalopelvic disproportion hence affecting pain.
                        • Lie, position and presenting pain can affect pain perception during labour
                        • Size of the fetus that is to say big babies which cannot pass through the pelvis hence affecting pain perception
                        • Gestation age. In past maturity the sutures and the fontanels are closing and molding can hot take place hence affecting pain perception.

                        Health workers

                        1. Poor screening of mothers during antenatal Poor management during labour
                        2. Poor attitude towards the mother

                        Structural environment

                        • Hospital setting where there is no privacy for mothers, all stages of labour in one room which can affect pain perception.
                        • Lack of recreation in labour rooms like newspapers, television to occupy the mothers.

                        PART (C)

                        Forth stage of labour

                        Is the 1-2 hours following third stage of labour. Observations done during the fourth stage of labour

                        To the mother

                        • Per vagina

                        Perineum to inspect for perineal tears, episiotomy and other injuries Bleeding to rule out anemia and post partner hemorrhage

                        • Per abdominal

                        Fundal height estimation to rule out the retained products of conception State of the uterus whether it has contracted

                        Bladder encourages the mother to pass urine to prevent PPH

                        • Vital observations like blood pressure, temperature, pulse, and respiration for consciousness of the mother to rule out pre –eclampsia and eclampsia, dehydration and
                        • Breast examination – to rule out abnormalities of the nipple which can hinder breast feeding like inverted nipples.
                        • Observe the bowel action if the bowel movements are present and able to pass out stool
                        • Observe the legs for varicose veins

                        To the baby

                        • Assessment of the baby after five minutes for example APGAR scoring the baby General examination of the baby to rule out abnormalities
                        • Observation of the cord for bleeding and well ligatured
                        • Bowel for passage of meconium to rule out anal impaction
                        • Observe if the baby is breast feeding for the presence of the sucking reflex.

                        PART (D)

                        Ultra- sound scan

                        Is a tool used in pregnancy and obstetrics generally for diagnosis. The system uses waves of sound that create images by bounding off and td safe to the developing fetus.

                        Methods

                        • Trans abdominal
                        • Trans vaginal

                        INDICATIONS

                        • To determine the gestation age
                        • To detect the sex of the baby
                        • To detect the fetal abnormalities
                        • To know the site of the placenta
                        • To determine the maturity where the dates are not accurate
                        • To rule out intra- uterine fetal death
                        • To rule out intra- fetal growth retardation
                        • To confirm pregnancy
                        • To asses amniotic fluid amount an order to rule out polyhydrominous and oligohydrominous
                        • To determine the causes of bleeding in pregnancy
                        • For detection of multiple pregnancies
                        • To determine the size of the baby
                        • For diagnostic purposes
                        • Improves the woman‘s pregnancy experience

                        For pelvic assessment.

                          1. What may make you refer this mother to hospital during first stage of labour? 
                          2. Outline the changes that take place in the uterus during the first stage of labour.
                          3. Explain how you would admit a mother who has reported in active phase of first stage.

                            SOLUTIONS

                            During the first stage of labour the following occurs:

                                1. Effacement or take up of the cervix: this is made possible by the work of muscle fibres surrounding the internal OS which are drawn upward by the retracted upper segment.
                                2. Pacemaker / Fundal dominance: each contraction begins from the pace maker situated at the cornua of the uterus. From the fundal region it spreads downwards being stronger and persisting longer in the upper region on reaching the lower region, the wave of contraction weakens and allows the cervix to dilate.
                                3. Dilatation of the cervix: this is the opening of the external OS to allow the passage of the fetal head; it occurs as a result of uterine action and the pressure from fore bag of waters and the well fitting presenting part
                                4. Contraction and Retraction: is the special ability of the uterine muscle where the contraction does not pass off completely and the muscle fibres retaining some of the contractions do not become completely relaxed instead they become gradually shorter and thicker.
                                5. Polarity: is the term used to define the coordination between two poles of uterus throughout labour
                                6. Development of upper and lower segment: the upper uterine segment is the thicker muscular contractile part. The lower part segment is the firm distensible are of 7.5cm – 10cm in length developed from isthmus to the uterus.
                                7. Development of retraction ring: is the ridge formed between the upper and the lower uterine segment. It‘s present in labour and normal as long as it‘s not marked enough to be visible above the symphysis pubis.   NB: It is called bandl‘s ring in obstructed labour
                                8. Show: is the blood stained mucoid discharge seen a few hours within or a few hours after when labour has started
                                9. General fluid pressure: while the membranes remain intact, the pressure of the uterine contraction is exerted on the fluid as the fluid is not compressible the pressure is equalized throughout the uterus.
                                10. Rupture of membranes: rupture of membranes may be early or later during the second stage of labour due to the malpresentation and pressure from the presenting part.
                                11. Fetal axis pressure: this is when the force of contractions from the uterus is transmitted via the long axis of the canal; this becomes more significant after the rupture of membranes and during second stage.
                              1.  
                              2. B. Explain how you would admit a mother who has reported in active phase of first stage

                              If she has not been attending ANC, a full antenatal history is taken, which involves the mother‘s name, address, tribe, religion, husband‘s name and address, her gravida and parity, obstetrical, surgical, social, and medical history, the time and date of admission are entered in the admission forms of the mother.

                              Then, history of labour under the following headings is recorded:

                              C. What will make you refer this mother to hospital during first stage of labour?


                              1. What are the characteristics of normal pregnancy?
                              2. Outline changes that take place in the circulatory system during pregnancy.
                              3. How can a midwife identify abnormalities that will necessitate referral during pregnancy?

                              1.  

                              SOLUTIONS

                              1.  

                              Normal pregnancy

                              Is the growth and development of the fetus into the uterine cavity without any complication.

                              Pregnancy: Refers to growth and development of the fetus into the body.

                              Circulatory system: Is the transport system that deals with movement of nutrients, hormones, gases and waste products of metabolism into and out of the body cells and tissues.

                              Referral: This is the process of transferring or forwarding clients or patients from a lower health unit to a higher unit for further management.

                              Characteristics of normal pregnancy

                              • It takes 40 weeks or 280 days.

                              • There is a single fetus growing in the uterine cavity.
                              • Amount of liquor amnii should be 500-1500ml.
                              • The lie is longitudinal.
                              • The fetus present by vertex.
                              • The height of fundus corresponds to the weeks of gestation.
                              • Maternal weight gain is by 12kg .
                              • Mother is healthy with no complications.

                              Changes that takes place in the circulatory system during pregnancy.

                              Heart

                                • Enlargement of the heart due to increased workload as a result of hypertrophy of the muscles especially the left ventricle .

                                • The growing uterus pushes the heart upwards and to the left.

                                • Cardiac output is increased by 40% due to increased blood volume and oxygen requirement.

                                • There is no physiological rise in blood pressure because of the relaxing effects of progesterone on the smooth muscles, but the diastolic pressure drops slightly due to peripheral vasodilation hence lower blood pressure during pregnancy

                                • Increased in pulse rate by 15 beats per minutes.

                              Blood vessels

                                • Relaxation of the plain muscles due to effects of progesterone hence vasodilation of the blood vessels.

                                • Poor venous return in late pregnancy results into varicose vein, hemorrhoids and Oedema.

                              Blood

                                • Increase in red cell volume by 20-30% due to increased oxygen requirements for the fetus and the mother.

                                • Slight increase in the level of white cell count to about 10-15,000mls but with low immunity due to the presents of human chorionic gonadotrophin(HCG).

                                • Platelet levels remains unchanged but clotting and fibrinolytic system undergo alteration to arrest bleeding during delivery.

                                • Plasma volume increase by 30% this results into hydraemia.
                                • Increased blood flow to the uterus to aid placental circulation by 10-15% or about 750mls per minute, kidneys for excretion of extra waste product of metabolism.

                              Identification of abnormalities that necessitate referral.

                                • History taking. A comprehensive history is taken on medical, surgical, past and present obstetrical, social and family history that may complicate or be complicated by pregnancy, labour and pueperium like diabetes, hypertension, epilepsy, sickle cell disease and accident involving the spine, pelvis and the lower limbs that will necessitate referral.

                                • Vital observations. Vital observations like blood pressure is taken to rule out conditions like pre-eclampsia that will necessitate referral.

                                • Physical examination. This is done to exclude conditions like anaemia, jundice, dehydration, oedema, malnutrition.
                                • External pelvic assessment. This is done especially from 36 weeks of gestation those mothers who have not delivered vaginally and prime gravidas by considering gait, stature, height and weight.

                                • Blood tests. Blood test like complete blood count(CBC),blood grouping and rhesus factor, venereal disease research laboratory test(VDRL),Random blood sugar (RBS),Routine counseling and testing(RCT) to rule out conditions like anaemia, rhesus incompatibility, syphilis, diabetes, HIV &Aids respectively that will necessitate referral.
                                • Urine test. Urinalysis is done at every visit to exclude the presence of glucose, protein and ketones in the urine which indicates conditions like diabetes, hypertensive disorders, urinary tract infection and unmet fetal demand respectively which necessitate referral.

                                • Breast examination. It is done to exclude conditions like breast abscess ,breast cancer and any abnormality of the breast that will necessitate referral.

                              Abdominal examination

                              On inspection. Observe the size and shape of the abdomen and previous scars that indicates condition like polyhydrominous and oligohydrominous and fresh previous scars that will necessitate referral.

                              On palpation. It is done to ascertain any abnormality like; Height of fundus not corresponding with gestational weeks, oblique and transverse lie, breech presentation at term especially prime gravidas and absence of fetal movement that will necessitate referral.

                              Auscultation. This is to exclude abnormal fetal heart tone, regularity, rhythm and absence of fetal heart that will necessitate referral.

                              1. Define a partograph.
                              2. What information is recorded on the partograph?
                              3. List the observations/ nursing care that can be done for a woman in first stage of labour but cannot be plotted on the partograph.

                              1.  

                              1.  

                              SOLUTIONS

                              A partograph is a tool used to monitor the progress of labour, condition of the fetus and the mother.

                              OR

                              Is the chart used to record all information and observations of a woman in labour/its a partogram before plotting and becomes a partograph after plotting.

                               A PARTOGRAPH IS STARTED

                                • When a woman is in active phase of labour that is 4cm or more of cervical opening.

                                • When the pregnancy of at least 30 completed weeks.

                                • When the presenting part is cephalic or breech.

                                • When there is no complication that needs immediate action.

                              THE INFORMATION RECORDED ON A PARTOGRAPH.

                              The following information is recorded on a partograph;

                              • Mothers demographic data.
                              • Fetal conditions
                              • Labour progress.
                              • Maternal condition.
                              • Outcome of labour.

                              MOTHERS DEMOGRAPHIC DATA

                              This is the first information entered on a partograph, this is essential as it helps a midwife to easily identify the mother she is following to know the weeks of Amenorrhoea and any risk factor etc. It includes name of the health facility, in patient‘s number, name, and data of admission on the partograph, time of admission of the partograph, LNMP, EDD, WOA risk factors and time of rapture of membranes.

                              FETAL CONDITION.

                              This part of the graph is used to monitor and assess fetal condition.

                              It consists of the following; fetal heart, membranes, liquor, molding and caporal.

                              • Fetal heart; Listening to and recording feta heart is safe and reliable away of knowing that the fetus is well. It‘s recorded after every 30 minutes when a mother is active phase of labour .The normal range is between 120b/m to 160b/m.

                              • Membranes; Liquor can assist in assessing the fetal condition.

                                • If membranes are intact record 1 on the partograph.

                                • If ruptured record R.

                              • Liquor; The following are recorded about the color of liquor when membranes have ruptured;

                              • If membranes rapture and liquor is clear: C
                              • If membranes rupture and liquor is blood stained: B
                              • If membranes rupture and liquor is Meconium stained: M
                              • If membranes rupture and; liquor is absent: A
                              • If membranes rupture and liquor is brown: B

                              • Moulding; This indicates how well the cervix will accommodate the fetal head.

                                • Bones separatable, sutures can be felt easily. O
                                • Bones are flit fast touching each other. +
                                • Bones are overlapping but can be easily separated with pressure from your fingers ++
                                • Bones are overlapping but can not be separated easily with pressure from your fingers +++
                                • In ++ and +++ refer a mother if in a maternity centre or lower health facility in a hospital inform a Doctor.

                              •  

                              •  

                              •  

                              The labour progress.

                              Cervical dilation;

                              First stage of labour is divided into two; latent phase and active phase;-

                                1. Latent phase; This is a slow period of cervical dilation 0.3cm with gradual shortening of the cervix. It should not exceed 8hours.

                                1. Active phase; This is the faster period of cervical dilation from 4-10cm.

                              The cervix dilates at a rate of at least 1cm/hr.

                              Cervical dilation is plotted with letter X and vaginal examination is done every 4 hours from 4cm to 6cm.Then from 7cm after 3 hours, 8cm after 2hours, 9cm hourly.

                              If the progress of labour is satisfactory plotting of cervical dilation will remain on the left of the alertline. It should not cross the right of the action line. If cervical dilation is going towards or is on action line the mother is referred from the health centre, in the hospital and Dr is informed.

                              Desent of the head;

                              For labour to progress well, dilation of the cervix should be accompanied by desent of the head. For desent to occur at an expected rate the head should be well flexed. This is assessed abdominally.

                              Desent is plotted with O on the partograph.

                              Uterine contractions;

                              Good uterine contractions are necessary for progress of labour; normally contractions become more frequent and last longer as labour progresses and contraction are observed after every 30mins for frequency, strength and duration.

                              Maternal conditions;

                              All observations for a mother‘s condition are recorded at the bottom of the partograph e.g. temperature 4hours, pulse ½ hourly. B.P 2hourly, urine output 2hourly.

                              Drug, rehydration fluids, Oxytocin, if labour is augmented and analysis of proteins, sugar and acetones are cleared.

                              Out comes of labour;

                              This information is entered in a partograph after the mother has delivered e.g. Date of delivery, type of delivery, duration of 1st SOL and 2nd SOL, post delivery vitals, time of delivery of the placenta and membranes Oxytocin given, amount of blood loss, state of the

                              perineum whether intact has sustained a tear or episiotomy was made immediate post, partum care and treatment.

                              Only the baby;

                              Involves weight, sex, time of delivery, APGAR score, treatment given at birth, any physical abnormality and immediate care.

                              Observation / Nursing care;

                              Observation while the mother is coming; the gait whether normal stature, short indicates risk mothers.

                              General examination from head to toe to examine Anaemia, jaundice and oedema.

                              Abdominal examination; do systematically from the head to toes to find out the lie, presentation, position, level of descent, nature of contractions and fetal heart moulding if any.

                                1. Hygiene given; bath and a clean gown provided.
                                2. Records: All the information about the mother is charted on the record sheet.
                                3. Position: Mother is allowed to adopt any comfortable position especially sitting up position.
                                4. Ambulation: In early 1st SOL mother is allowed to move about where the midwife can observe her.
                                5. Nutrition: Mother is allowed to eat alight diet like porridge, but later in established 1st SOL she is given hot sweetened tea.
                                6. Care of the bladder: Mother is encouraged to empty the bladder after every 2hours and urine should be tested for any abnormality.
                                7. Rest and sleep: assist the mother by dimming off lights and control noise and visitors.
                                8. Prevention of infections: Ensure aseptic techniques and proper hygiene of the ward to prevent infections.
                                9. Bowel actions: Mother is encouraged to empty the bowel, move frequently and clean the bed pan if offered.
                              1.  

                              Write short notes on the following

                                1. Causes of pain in labour.
                                2. Factors that affect pain perception during
                                3. Observation done during fourth stage of Labour indicating importance of each.
                                4. List indications of ultra sound scan during

                              SOLUTIONS

                              LABOUR

                              Is the physiological process by which the fetus, placenta and membranes are expelled through the birth canal by the help of the mother‘s effort after 28 weeks of gestation and there are four stages of labour that is to say; first, second, third and fourth stage and there are two types of labour and that is normal and abnormal labour.

                              PAIN

                              Is a sensory /emotional experience of what the patient feels and there are two types of pain; somatic and visceral pain.

                              CAUSES OF PAIN

                              There are two major causes of pain;

                              • Hormonal factors
                              • Mechanical factors

                              Hormonal factors

                              These include;

                              • Oxytocin stimulation. This increases the strength, intensity, duration and frequency of the contractions leading to pain.
                              • Progesterone withdrawal. The reduced levels of progesterone lead to an increase in estrogen levels which stimulates the muscles of the deciduae muscles of the uterus to produce prostaglandin which stimulates the smooth muscles of the uterus to contract.

                              Mechanical factors

                              These include;

                              • Strength and frequency of Braxton hick‘s contractions occurring in late pregnancy which leads to over stretching of the uterus which irritates the uterine muscles to contract leading to pain.
                              • Pressure of the presenting part on the sacra-nerves and lumbar nerves which has pain receptor.
                              • Pressure of the presenting part on the cervix. The presenting part exerts pressure on the cervix muscles hence leading to pain.
                              • Displacement of the pelvic floor muscles. The advancing presenting part distends the vagina and displaces the pelvic floor muscles which are over stretched and the nerves are compressed leading to pain.

                              PART (B)

                              PERCEPTION.

                              Is the process of becoming aware of the environment through the five senses.

                              Factors that affect pain perception during labour

                              These factors are emotional experience involving physical and psychological mechanism and can be contributed by the mother, fetus, health workers and structural environment.

                              Mother

                              • Maternal medical; conditions like pre-eclampsia and eclampsia, cardiac conditions which can affect pain perception.
                              • Compromised immunity due to chronic conditions like HIV and cancer which can affect pain perception.
                              • Size of the pelvis. Any pelvic deviation from normal leading to cephalous pelvic disproportion which can affect pain perception.
                              • Age. Young prime gravidae below 18years their pelvic bones are not fully developed and the mother above 35years their pelvic bones are contracted and this hinders normal progress of labour and affects pain.
                              • Parity. Prime gravidae‘s their muscles are still intact and sensitive to pain which leads to strong contractions. The multipara mothers their muscles are laced which leads to uterine itial.
                              • Past obstetrical history like caesarian section which increases the risks of uterine rapture and affects normal labour
                              • Social economic factors for example lack of support which can affect pain perception.
                              • Cultural factors like use of native drugs can affect pain perception.
                              • Past experience can also affect pain perception
                              • Level of education, occupation, religion can also affect pain perception.

                              Fetus

                              • Fetal abnormalities like hydrocephalous, macrosomic babies can lead to cephalopelvic disproportion hence affecting pain.
                              • Lie, position and presenting pain can affect pain perception during labour
                              • Size of the fetus that is to say big babies which cannot pass through the pelvis hence affecting pain perception
                              • Gestation age. In past maturity the sutures and the fontanels are closing and molding can hot take place hence affecting pain perception.

                              Health workers

                              1. Poor screening of mothers during antenatal Poor management during labour
                              2. Poor attitude towards the mother

                              Structural environment

                              • Hospital setting where there is no privacy for mothers, all stages of labour in one room which can affect pain perception.
                              • Lack of recreation in labour rooms like newspapers, television to occupy the mothers.

                              PART (C)

                              Forth stage of labour

                              Is the 1-2 hours following third stage of labour. Observations done during the fourth stage of labour

                              To the mother

                              • Per vagina

                              Perineum to inspect for perineal tears, episiotomy and other injuries Bleeding to rule out anemia and post partner hemorrhage

                              • Per abdominal

                              Fundal height estimation to rule out the retained products of conception State of the uterus whether it has contracted

                              Bladder encourages the mother to pass urine to prevent PPH

                              • Vital observations like blood pressure, temperature, pulse, and respiration for consciousness of the mother to rule out pre –eclampsia and eclampsia, dehydration and
                              • Breast examination – to rule out abnormalities of the nipple which can hinder breast feeding like inverted nipples.
                              • Observe the bowel action if the bowel movements are present and able to pass out stool
                              • Observe the legs for varicose veins

                              To the baby

                              • Assessment of the baby after five minutes for example APGAR scoring the baby General examination of the baby to rule out abnormalities
                              • Observation of the cord for bleeding and well ligatured
                              • Bowel for passage of meconium to rule out anal impaction
                              • Observe if the baby is breast feeding for the presence of the sucking reflex.

                              PART (D)

                              Ultra- sound scan

                              Is a tool used in pregnancy and obstetrics generally for diagnosis. The system uses waves of sound that create images by bounding off and td safe to the developing fetus.

                              Methods

                              • Trans abdominal
                              • Trans vaginal

                              INDICATIONS

                              • To determine the gestation age
                              • To detect the sex of the baby
                              • To detect the fetal abnormalities
                              • To know the site of the placenta
                              • To determine the maturity where the dates are not accurate
                              • To rule out intra- uterine fetal death
                              • To rule out intra- fetal growth retardation
                              • To confirm pregnancy
                              • To asses amniotic fluid amount an order to rule out polyhydrominous and oligohydrominous
                              • To determine the causes of bleeding in pregnancy
                              • For detection of multiple pregnancies
                              • To determine the size of the baby
                              • For diagnostic purposes
                              • Improves the woman‘s pregnancy experience

                              For pelvic assessment.

                              1. What may make you refer this mother to hospital during first stage of labour? 
                              2. Outline the changes that take place in the uterus during the first stage of labour.
                              3. Explain how you would admit a mother who has reported in active phase of first stage.

                              SOLUTIONS

                              During the first stage of labour the following occurs:

                                1. Effacement or take up of the cervix: this is made possible by the work of muscle fibres surrounding the internal OS which are drawn upward by the retracted upper segment.
                                2. Pacemaker / Fundal dominance: each contraction begins from the pace maker situated at the cornua of the uterus. From the fundal region it spreads downwards being stronger and persisting longer in the upper region on reaching the lower region, the wave of contraction weakens and allows the cervix to dilate.
                                3. Dilatation of the cervix: this is the opening of the external OS to allow the passage of the fetal head; it occurs as a result of uterine action and the pressure from fore bag of waters and the well fitting presenting part
                                4. Contraction and Retraction: is the special ability of the uterine muscle where the contraction does not pass off completely and the muscle fibres retaining some of the contractions do not become completely relaxed instead they become gradually shorter and thicker.
                                5. Polarity: is the term used to define the coordination between two poles of uterus throughout labour
                                6. Development of upper and lower segment: the upper uterine segment is the thicker muscular contractile part. The lower part segment is the firm distensible are of 7.5cm – 10cm in length developed from isthmus to the uterus.
                                7. Development of retraction ring: is the ridge formed between the upper and the lower uterine segment. It‘s present in labour and normal as long as it‘s not marked enough to be visible above the symphysis pubis.   NB: It is called bandl‘s ring in obstructed labour
                                8. Show: is the blood stained mucoid discharge seen a few hours within or a few hours after when labour has started
                                9. General fluid pressure: while the membranes remain intact, the pressure of the uterine contraction is exerted on the fluid as the fluid is not compressible the pressure is equalized throughout the uterus.
                                10. Rupture of membranes: rupture of membranes may be early or later during the second stage of labour due to the malpresentation and pressure from the presenting part.
                                11. Fetal axis pressure: this is when the force of contractions from the uterus is transmitted via the long axis of the canal; this becomes more significant after the rupture of membranes and during second stage.
                              1.  
                              2. B. Explain how you would admit a mother who has reported in active phase of first stage

                              If she has not been attending ANC, a full antenatal history is taken, which involves the mother‘s name, address, tribe, religion, husband‘s name and address, her gravida and parity, obstetrical, surgical, social, and medical history, the time and date of admission are entered in the admission forms of the mother.

                              Then, history of labour under the following headings is recorded:

                              C. What will make you refer this mother to hospital during first stage of labour?


                              1. What are the characteristics of normal pregnancy?
                              2. Outline changes that take place in the circulatory system during pregnancy.
                              3. How can a midwife identify abnormalities that will necessitate referral during pregnancy?

                              1.  

                              SOLUTIONS

                              1.  

                              Normal pregnancy

                              Is the growth and development of the fetus into the uterine cavity without any complication.

                              Pregnancy: Refers to growth and development of the fetus into the body.

                              Circulatory system: Is the transport system that deals with movement of nutrients, hormones, gases and waste products of metabolism into and out of the body cells and tissues.

                              Referral: This is the process of transferring or forwarding clients or patients from a lower health unit to a higher unit for further management.

                              Characteristics of normal pregnancy

                              • It takes 40 weeks or 280 days.

                              • There is a single fetus growing in the uterine cavity.
                              • Amount of liquor amnii should be 500-1500ml.
                              • The lie is longitudinal.
                              • The fetus present by vertex.
                              • The height of fundus corresponds to the weeks of gestation.
                              • Maternal weight gain is by 12kg .
                              • Mother is healthy with no complications.

                              Changes that takes place in the circulatory system during pregnancy.

                              Heart

                                • Enlargement of the heart due to increased workload as a result of hypertrophy of the muscles especially the left ventricle .

                                • The growing uterus pushes the heart upwards and to the left.

                                • Cardiac output is increased by 40% due to increased blood volume and oxygen requirement.

                                • There is no physiological rise in blood pressure because of the relaxing effects of progesterone on the smooth muscles, but the diastolic pressure drops slightly due to peripheral vasodilation hence lower blood pressure during pregnancy

                                • Increased in pulse rate by 15 beats per minutes.

                              Blood vessels

                                • Relaxation of the plain muscles due to effects of progesterone hence vasodilation of the blood vessels.

                                • Poor venous return in late pregnancy results into varicose vein, hemorrhoids and Oedema.

                              Blood

                                • Increase in red cell volume by 20-30% due to increased oxygen requirements for the fetus and the mother.

                                • Slight increase in the level of white cell count to about 10-15,000mls but with low immunity due to the presents of human chorionic gonadotrophin(HCG).

                                • Platelet levels remains unchanged but clotting and fibrinolytic system undergo alteration to arrest bleeding during delivery.

                                • Plasma volume increase by 30% this results into hydraemia.
                                • Increased blood flow to the uterus to aid placental circulation by 10-15% or about 750mls per minute, kidneys for excretion of extra waste product of metabolism.

                              Identification of abnormalities that necessitate referral.

                                • History taking. A comprehensive history is taken on medical, surgical, past and present obstetrical, social and family history that may complicate or be complicated by pregnancy, labour and pueperium like diabetes, hypertension, epilepsy, sickle cell disease and accident involving the spine, pelvis and the lower limbs that will necessitate referral.

                                • Vital observations. Vital observations like blood pressure is taken to rule out conditions like pre-eclampsia that will necessitate referral.

                                • Physical examination. This is done to exclude conditions like anaemia, jundice, dehydration, oedema, malnutrition.
                                • External pelvic assessment. This is done especially from 36 weeks of gestation those mothers who have not delivered vaginally and prime gravidas by considering gait, stature, height and weight.

                                • Blood tests. Blood test like complete blood count(CBC),blood grouping and rhesus factor, venereal disease research laboratory test(VDRL),Random blood sugar (RBS),Routine counseling and testing(RCT) to rule out conditions like anaemia, rhesus incompatibility, syphilis, diabetes, HIV &Aids respectively that will necessitate referral.
                                • Urine test. Urinalysis is done at every visit to exclude the presence of glucose, protein and ketones in the urine which indicates conditions like diabetes, hypertensive disorders, urinary tract infection and unmet fetal demand respectively which necessitate referral.

                                • Breast examination. It is done to exclude conditions like breast abscess ,breast cancer and any abnormality of the breast that will necessitate referral.

                              Abdominal examination

                              On inspection. Observe the size and shape of the abdomen and previous scars that indicates condition like polyhydrominous and oligohydrominous and fresh previous scars that will necessitate referral.

                              On palpation. It is done to ascertain any abnormality like; Height of fundus not corresponding with gestational weeks, oblique and transverse lie, breech presentation at term especially prime gravidas and absence of fetal movement that will necessitate referral.

                              Auscultation. This is to exclude abnormal fetal heart tone, regularity, rhythm and absence of fetal heart that will necessitate referral.

                              1. Define a partograph.
                              2. What information is recorded on the partograph?
                              3. List the observations/ nursing care that can be done for a woman in first stage of labour but cannot be plotted on the partograph.

                              1.  

                              1.  

                              SOLUTIONS

                              A partograph is a tool used to monitor the progress of labour, condition of the fetus and the mother.

                              OR

                              Is the chart used to record all information and observations of a woman in labour/its a partogram before plotting and becomes a partograph after plotting.

                               A PARTOGRAPH IS STARTED

                                • When a woman is in active phase of labour that is 4cm or more of cervical opening.

                                • When the pregnancy of at least 30 completed weeks.

                                • When the presenting part is cephalic or breech.

                                • When there is no complication that needs immediate action.

                              THE INFORMATION RECORDED ON A PARTOGRAPH.

                              The following information is recorded on a partograph;

                              • Mothers demographic data.
                              • Fetal conditions
                              • Labour progress.
                              • Maternal condition.
                              • Outcome of labour.

                              MOTHERS DEMOGRAPHIC DATA

                              This is the first information entered on a partograph, this is essential as it helps a midwife to easily identify the mother she is following to know the weeks of Amenorrhoea and any risk factor etc. It includes name of the health facility, in patient‘s number, name, and data of admission on the partograph, time of admission of the partograph, LNMP, EDD, WOA risk factors and time of rapture of membranes.

                              FETAL CONDITION.

                              This part of the graph is used to monitor and assess fetal condition.

                              It consists of the following; fetal heart, membranes, liquor, molding and caporal.

                              • Fetal heart; Listening to and recording feta heart is safe and reliable away of knowing that the fetus is well. It‘s recorded after every 30 minutes when a mother is active phase of labour .The normal range is between 120b/m to 160b/m.

                              • Membranes; Liquor can assist in assessing the fetal condition.

                                • If membranes are intact record 1 on the partograph.

                                • If ruptured record R.

                              • Liquor; The following are recorded about the color of liquor when membranes have ruptured;

                              • If membranes rapture and liquor is clear: C
                              • If membranes rupture and liquor is blood stained: B
                              • If membranes rupture and liquor is Meconium stained: M
                              • If membranes rupture and; liquor is absent: A
                              • If membranes rupture and liquor is brown: B

                              • Moulding; This indicates how well the cervix will accommodate the fetal head.

                                • Bones separatable, sutures can be felt easily. O
                                • Bones are flit fast touching each other. +
                                • Bones are overlapping but can be easily separated with pressure from your fingers ++
                                • Bones are overlapping but can not be separated easily with pressure from your fingers +++
                                • In ++ and +++ refer a mother if in a maternity centre or lower health facility in a hospital inform a Doctor.

                              •  

                              •  

                              •  

                              The labour progress.

                              Cervical dilation;

                              First stage of labour is divided into two; latent phase and active phase;-

                                1. Latent phase; This is a slow period of cervical dilation 0.3cm with gradual shortening of the cervix. It should not exceed 8hours.

                                1. Active phase; This is the faster period of cervical dilation from 4-10cm.

                              The cervix dilates at a rate of at least 1cm/hr.

                              Cervical dilation is plotted with letter X and vaginal examination is done every 4 hours from 4cm to 6cm.Then from 7cm after 3 hours, 8cm after 2hours, 9cm hourly.

                              If the progress of labour is satisfactory plotting of cervical dilation will remain on the left of the alertline. It should not cross the right of the action line. If cervical dilation is going towards or is on action line the mother is referred from the health centre, in the hospital and Dr is informed.

                              Desent of the head;

                              For labour to progress well, dilation of the cervix should be accompanied by desent of the head. For desent to occur at an expected rate the head should be well flexed. This is assessed abdominally.

                              Desent is plotted with O on the partograph.

                              Uterine contractions;

                              Good uterine contractions are necessary for progress of labour; normally contractions become more frequent and last longer as labour progresses and contraction are observed after every 30mins for frequency, strength and duration.

                              Maternal conditions;

                              All observations for a mother‘s condition are recorded at the bottom of the partograph e.g. temperature 4hours, pulse ½ hourly. B.P 2hourly, urine output 2hourly.

                              Drug, rehydration fluids, Oxytocin, if labour is augmented and analysis of proteins, sugar and acetones are cleared.

                              Out comes of labour;

                              This information is entered in a partograph after the mother has delivered e.g. Date of delivery, type of delivery, duration of 1st SOL and 2nd SOL, post delivery vitals, time of delivery of the placenta and membranes Oxytocin given, amount of blood loss, state of the

                              perineum whether intact has sustained a tear or episiotomy was made immediate post, partum care and treatment.

                              Only the baby;

                              Involves weight, sex, time of delivery, APGAR score, treatment given at birth, any physical abnormality and immediate care.

                              Observation / Nursing care;

                              Observation while the mother is coming; the gait whether normal stature, short indicates risk mothers.

                              General examination from head to toe to examine Anaemia, jaundice and oedema.

                              Abdominal examination; do systematically from the head to toes to find out the lie, presentation, position, level of descent, nature of contractions and fetal heart moulding if any.

                                1. Hygiene given; bath and a clean gown provided.
                                2. Records: All the information about the mother is charted on the record sheet.
                                3. Position: Mother is allowed to adopt any comfortable position especially sitting up position.
                                4. Ambulation: In early 1st SOL mother is allowed to move about where the midwife can observe her.
                                5. Nutrition: Mother is allowed to eat alight diet like porridge, but later in established 1st SOL she is given hot sweetened tea.
                                6. Care of the bladder: Mother is encouraged to empty the bladder after every 2hours and urine should be tested for any abnormality.
                                7. Rest and sleep: assist the mother by dimming off lights and control noise and visitors.
                                8. Prevention of infections: Ensure aseptic techniques and proper hygiene of the ward to prevent infections.
                                9. Bowel actions: Mother is encouraged to empty the bowel, move frequently and clean the bed pan if offered.
                              1.  

                              Write short notes on the following

                                1. Causes of pain in labour.
                                2. Factors that affect pain perception during
                                3. Observation done during fourth stage of Labour indicating importance of each.
                                4. List indications of ultra sound scan during

                              SOLUTIONS

                              LABOUR

                              Is the physiological process by which the fetus, placenta and membranes are expelled through the birth canal by the help of the mother‘s effort after 28 weeks of gestation and there are four stages of labour that is to say; first, second, third and fourth stage and there are two types of labour and that is normal and abnormal labour.

                              PAIN

                              Is a sensory /emotional experience of what the patient feels and there are two types of pain; somatic and visceral pain.

                              CAUSES OF PAIN

                              There are two major causes of pain;

                              • Hormonal factors
                              • Mechanical factors

                              Hormonal factors

                              These include;

                              • Oxytocin stimulation. This increases the strength, intensity, duration and frequency of the contractions leading to pain.
                              • Progesterone withdrawal. The reduced levels of progesterone lead to an increase in estrogen levels which stimulates the muscles of the deciduae muscles of the uterus to produce prostaglandin which stimulates the smooth muscles of the uterus to contract.

                              Mechanical factors

                              These include;

                              • Strength and frequency of Braxton hick‘s contractions occurring in late pregnancy which leads to over stretching of the uterus which irritates the uterine muscles to contract leading to pain.
                              • Pressure of the presenting part on the sacra-nerves and lumbar nerves which has pain receptor.
                              • Pressure of the presenting part on the cervix. The presenting part exerts pressure on the cervix muscles hence leading to pain.
                              • Displacement of the pelvic floor muscles. The advancing presenting part distends the vagina and displaces the pelvic floor muscles which are over stretched and the nerves are compressed leading to pain.

                              PART (B)

                              PERCEPTION.

                              Is the process of becoming aware of the environment through the five senses.

                              Factors that affect pain perception during labour

                              These factors are emotional experience involving physical and psychological mechanism and can be contributed by the mother, fetus, health workers and structural environment.

                              Mother

                              • Maternal medical; conditions like pre-eclampsia and eclampsia, cardiac conditions which can affect pain perception.
                              • Compromised immunity due to chronic conditions like HIV and cancer which can affect pain perception.
                              • Size of the pelvis. Any pelvic deviation from normal leading to cephalous pelvic disproportion which can affect pain perception.
                              • Age. Young prime gravidae below 18years their pelvic bones are not fully developed and the mother above 35years their pelvic bones are contracted and this hinders normal progress of labour and affects pain.
                              • Parity. Prime gravidae‘s their muscles are still intact and sensitive to pain which leads to strong contractions. The multipara mothers their muscles are laced which leads to uterine itial.
                              • Past obstetrical history like caesarian section which increases the risks of uterine rapture and affects normal labour
                              • Social economic factors for example lack of support which can affect pain perception.
                              • Cultural factors like use of native drugs can affect pain perception.
                              • Past experience can also affect pain perception
                              • Level of education, occupation, religion can also affect pain perception.

                              Fetus

                              • Fetal abnormalities like hydrocephalous, macrosomic babies can lead to cephalopelvic disproportion hence affecting pain.
                              • Lie, position and presenting pain can affect pain perception during labour
                              • Size of the fetus that is to say big babies which cannot pass through the pelvis hence affecting pain perception
                              • Gestation age. In past maturity the sutures and the fontanels are closing and molding can hot take place hence affecting pain perception.

                              Health workers

                              1. Poor screening of mothers during antenatal Poor management during labour
                              2. Poor attitude towards the mother

                              Structural environment

                              • Hospital setting where there is no privacy for mothers, all stages of labour in one room which can affect pain perception.
                              • Lack of recreation in labour rooms like newspapers, television to occupy the mothers.

                              PART (C)

                              Forth stage of labour

                              Is the 1-2 hours following third stage of labour. Observations done during the fourth stage of labour

                              To the mother

                              • Per vagina

                              Perineum to inspect for perineal tears, episiotomy and other injuries Bleeding to rule out anemia and post partner hemorrhage

                              • Per abdominal

                              Fundal height estimation to rule out the retained products of conception State of the uterus whether it has contracted

                              Bladder encourages the mother to pass urine to prevent PPH

                              • Vital observations like blood pressure, temperature, pulse, and respiration for consciousness of the mother to rule out pre –eclampsia and eclampsia, dehydration and
                              • Breast examination – to rule out abnormalities of the nipple which can hinder breast feeding like inverted nipples.
                              • Observe the bowel action if the bowel movements are present and able to pass out stool
                              • Observe the legs for varicose veins

                              To the baby

                              • Assessment of the baby after five minutes for example APGAR scoring the baby General examination of the baby to rule out abnormalities
                              • Observation of the cord for bleeding and well ligatured
                              • Bowel for passage of meconium to rule out anal impaction
                              • Observe if the baby is breast feeding for the presence of the sucking reflex.

                              PART (D)

                              Ultra- sound scan

                              Is a tool used in pregnancy and obstetrics generally for diagnosis. The system uses waves of sound that create images by bounding off and td safe to the developing fetus.

                              Methods

                              • Trans abdominal
                              • Trans vaginal

                              INDICATIONS

                              • To determine the gestation age
                              • To detect the sex of the baby
                              • To detect the fetal abnormalities
                              • To know the site of the placenta
                              • To determine the maturity where the dates are not accurate
                              • To rule out intra- uterine fetal death
                              • To rule out intra- fetal growth retardation
                              • To confirm pregnancy
                              • To asses amniotic fluid amount an order to rule out polyhydrominous and oligohydrominous
                              • To determine the causes of bleeding in pregnancy
                              • For detection of multiple pregnancies
                              • To determine the size of the baby
                              • For diagnostic purposes
                              • Improves the woman‘s pregnancy experience

                              For pelvic assessment.

                              Normal Midwifery Questions and answers Read More »

                              Self study questions for nurses and midwives

                              Self Study Question For Nurses and Midwives

                              PREPARATORY QUESTIONS FOR END OF SEMESTER EXAMINATIONS

                              SURGERY

                              1a) define the term epistaxis

                              b) What are the causes of epistaxis?

                              c) Write down the management of a patient presenting with epistaxis

                              2a) define a sty

                              b) What are the causes of a sty?

                              c) Outline the signs and symptoms of a sty

                              3 An adult has been admitted to a surgical ward with difficulty in breathing, he requires urgent tracheostomy.

                              a) List the indications of tracheostomy

                              b) Describe the post-operative management of this patient till discharge

                              c) Outline the complications that are likely to occur

                              d) Formulate five actual nursing diagnoses and four potential diagnoses from this patient with tracheostomy

                              4. Mrs Akello 38years old has presented with nasal polyps and she is to undergo polypectomy

                              a) List the causes of nasal polyps

                              b) Outline the signs and symptoms of nasal polyps

                              c) Give the specific pre and post-operative management of this patient

                              d) List four complications of nasal polyps

                              5. a) Define tonsillitis

                              b) List 6 symptoms and signs of a patient with tonsillitis

                              c) Give the specific post-operative management for a patient who has undergone tonsillectomy

                              6. Mrs Nabukeera was admitted on a surgical with a diagnosis of adenitis .She is to undergo adenoidectomy

                              a) Define adenitis

                              b) List the signs and symptoms of adenitis

                              c) Describe the specific post-operative management you would give to her till discharge

                              7. a) Define burns

                              b) What are the causes of burns?

                              c) How can burns be classified

                              d )Mr. KK has sustained burns on the neck and chest

                              >calculate the percentage of the area burnt

                              >what specific management do you give to Mr. KK in the first 72hrs of admission

                              >give five actual nursing diagnoses Mr KK will have due to the burns

                              8a) Define the term electrolyte imbalance

                              b) Give the causes of electrolyte imbalance

                              c) List the signs and symptoms of electrolyte imbalance

                              d) Mention the types of electrolyte imbalance in the body

                              e) How can you manage patient with electrolyte imbalance

                              9a) Define the term gangrene

                              b) What are the causes of gangrene?

                              c) Write down the types of gangrene

                              d) Mention the signs and symptoms of different types of gangrene

                              e) Describe the specific management which is given to this patient with gas gangrene

                              10a) Define the term shock

                              b) Write down the types/classification of shock

                              c) State the clinical features of shock

                              d) Write down all possible complications of shock

                              e) How can a health worker prevent surgical shock?

                              11a) Outline the classifications of wounds

                              b) Give the factors that delay wound healing

                              c) State five complications of wounds

                              d) What advice do you give to a patient about wound care at home who is due for discharge?

                              e) Explain the process of wound healing

                              12a) Define the term a fracture

                              b) Mention the different types of fracture

                              c) Describe the management of a closed fracture of a femur

                              d) List any 6 complications of a fracture

                              13a) Define the term inflammation

                              b) List the signs and symptoms of inflammation

                              c) Describe the process of inflammation

                              d) Explain the specific management of a 12yr old patient with inflammation on the lower limb

                              13A 28year old male was admitted on a surgical ward with a diagnosis of tetanus

                              a) List five cardinal signs and symptoms this patient would present with

                              b) Explain the specific nursing management you would give to this from admission to discharge

                              c) Formulate four actual and two potential nursing diagnoses from this patient’s condition

                              14a) Define the term immunity

                              b)Classify immunity

                              c) Explain the factors that affect an individual’s immune system

                              15a) Define hemorrhage

                              b) Explain the different types of hemorrhage

                              c) Explain the mechanism of hemostasis

                              d) Outline the specific management of a patient with severe bleeding on the left lower leg

                              16a)What is blood transfusion?

                              b) Describe five complications that may occur due to blood transfusion

                              c) What would cause failure of of a blood drip to run during blood transfusion

                              d) Explain the nurse’s responsibility before , during, and after blood transfusion

                              17a) Define a cataract

                              b) outline the cardinal signs of a cataract

                              c)Describe the management of Mr Moses a 40yr old presented to your OPD department with a cataract using a nursing process

                              d)list the likely complications of a cataract

                              MENTAL HEALTH

                              18. Define the following terms

                              a)suicide

                              b) Suicidal ideation

                              c) Attempted suicide

                              d) par suicide

                              e) paradoxical suicide

                              19a) outline the common psychiatric conditions associated with suicidal ideation

                              b) Explain the common factors contributing to suicide in the community

                              c) Mention the impact of suicide to the family and the community

                              d) Describe the management of a patient who intends to commit suicide

                              e) Explain the assessment you would carry out on a patient with suicidal ideation

                              20a) Define PTSD

                              b) Outline four signs and symptoms of a patient with PTSD

                              c) Manage an 11yr old girl who presented with PTSD after rape

                              21a) Define the term delirium tremens

                              b) Identify the causes of delirium tremens

                              C) How can you manage the patient with delirium tremens?

                              d) Formulate 5 potential nursing diagnoses for a patient with delirium tremens

                              22. Madam EKEB a 26yr old is very aggressive on the ward that she cares away fellow patients

                              a) Differentiate between aggression and violence

                              b) What management do you give to madam EKEB who presents with severe aggression on the ward?

                              23a) what is a psychiatric emergency?

                              b) List 10 common psychiatric emergencies

                              c) Which admission procedure would you follow when admitting a patient presenting with any of the psychiatric emergencies

                              23a) Explain standards of care in psychiatry

                              b) Who is a class B criminal lunatic?

                              c) Mention all the orders used to admit mentally ill patient

                              d) Write down and explain all the sections used in discharging a mentally ill patient

                              e) Outline the rights of a mentally ill patient

                              24. A 30yr old patient has presented in a psychiatric ward with status epilepticus

                              a) Define status epilepticus

                              b) Manage the patient who presents with status epilepticus on a ward

                              c) Formulate four potential and 2actual nursing diagnoses for a patient with status epilepticus

                              25aDefine mental retardation

                              b) Classify mental retardation

                              c) Explain 8 causes of mental retardation

                              d) What advice do you give to a family with a mentally retarded child?

                              26. ADHD is one of the common psychiatric conditions in children

                              a) Outline 6 signs and symptoms of ADHD

                              b) Manage an 11yr old boy with ADHD

                              c) What specific advice do you give to a family with a child having ADHD?

                              27a) Define autism

                              b) Explain the common features of autism

                              c) Describe the management of the above condition

                              28. Depression is one of the common psychiatric conditions

                              a) Define depression

                              b) Outline the specific management of a patient with severe depression on a psychiatric ward

                              c) Make 4 priority nursing diagnoses for a patient with severe depression

                              COMMUNITY HEALTH

                              29. a) Define PHC

                              b) Mention the principles of PHC

                              c) Outline components /elements of PHC

                              d) What strategies are used to achieve PHC activities in a given community?

                              30a) What is community assessment?

                              b) Explain how you would identify any health problems in a given community

                              c) Outline 9 important information you would find out in a given home during assessment

                              31a) Define a home visit

                              b) Explain how you apply a nursing process during a home visit

                              c) Outline the merits and demerits of a home visit

                              32a) Define vital statistics in health

                              b) Explain the importance of vital statistics in health

                              c) Outline 6 key vital statistics used to determine the health status of a community or country

                              33a) Explain the relationship between PHC and CBHC

                              b) Explain the role of a community nurse/midwife in implementation and achievement of any 4 of the PHC principles

                              c) Outline the advantages of PHC over other specialized medical services

                              34a) Define community mobilization

                              b) Describe how you would mobilize a community towards implementation of a health education program

                              35a) Define school health

                              b) Explain the importance of a school health program

                              c) Explain the role of a nurse in the provision of a school health program

                              d) Outline the components of school health services

                              36a) Explain the role of a community in PHC services

                              b) Give 8 advantages of community participation in PHC services

                              c) Explain the obstacles to effective community participation in PHC programs

                              37a) Define community diagnosis

                              b) Discuss why community diagnosis is important

                              c) Explain the steps in conducting community diagnosis

                              38Health promotion are actions related to lifestyles and choices that maintain/enhance population health

                              a) Outline any 5 health promotion interventions you would implement in a given a community

                              b) Explain 5major steps in community mobilization

                              39. Describe the different levels of disease prevention

                              40. Appropriate technology is one of the elements of PHC

                              a) How is appropriate technology expressed in implementation of PHC services?

                              b) Explain the advantages and disadvantages of appropriate technology as an element

                              41. a) Define the term epidemics

                              b) Explain the factors that contribute to the causes of epidemics

                              c) What is the role of a nurse in the management of an epidemic in the community?

                              42a) Define community health and community based health care

                              b) State the characteristics of CBHC

                              c) Describe how you would enter a village in Mityana to implement a community health activity

                              TROPICAL MEDICINE

                              43a) Define schistomiasis

                              b) Explain the different types of schistosomiasis

                              c )Give the clinical manifestations of schistosoma mansoni

                              d) Describe the lifecycle of schistosomiasis haematobium using a well labelled diagram

                              e) Outline the preventive measures of all types of schistosomiasis

                              44The current disease burden in Uganda is attributed to communicable diseases

                              a) Describe the modes of transmission of communicable diseases in general

                              b) Describe the methods/approaches used to prevent and control communicable diseases in the community

                              c) Explain the types of water diseases and their examples

                              45a) Define diarrhoea

                              b) Outline the causes of diarrhoea in Uganda

                              c) Discuss the drugs used in the management of diarrhoea in children

                              d) Formulate 5 priority nursing diagnoses of this patient

                              46a) Define measles

                              b) Outline the signs and symptoms of measles basing on the stages

                              c) Describe the management of a12yr old child presenting with measles from admission to discharge

                              d) List the likely complications of measles

                              47. Malaria is one of the communicable diseases affecting most communities of Uganda

                              a) Classify malaria

                              b) Outline the cardinal signs of complicated malaria

                              c) Describe the lifecycle of malaria in both man and the mosquito with the aid of diagrams

                              d) How can different communities prevent the spread of malaria?

                              e) Make 5 actual and 3 potential diagnoses of malaria

                              48a) Describe the life cycle of ackylostomiasis with the aid of diagrams

                              b) Explain the preventive measures of hook worm infestation

                              c) List the likely complications of neglected worms

                              49a) Ebola is one of the hemorrhagic fevers devastating some communities and countries due to known and unknown reasons

                              a) Define hemorrhagic fevers

                              b) List the different hemorrhagic fevers

                              c) Outline the different causes and predisposing factors to hemorrhagic fevers

                              d) Describe the management of Mr. X presented to your hospital suspected to be an Ebola patient

                              50a) Define rabies

                              b) Describe the management of rabbis both at home and in the hospital

                              c) Explain the complications of rabies

                              51a) Define bacilliary dysentery

                              b) State the differences between bacilliary dysentery and amoebic dysentery

                              c) Describe the specific management of a 3yr old child with bacilliary dysentery from admission to discharge

                              52a) Define typhoid fever

                              b) Explain the cardinal signs and symptoms of typhoid fever

                              c) Describe the important information you would give to the community concerning prevention of typhoid fever

                              53a) Define trachoma

                              b) Outline the signs and symptoms of trachoma

                              c) Explain the management of 23yr female presenting with trachoma

                              d) List the complication

                              54. Samuel a 30yr old peasant has been presented to the OPD with all the features of tetanus

                              a) Outline the clinical features of tetanus

                              b) Describe the management from admission to discharge

                              c) List the complications of tetanus

                              MIDWIFERY 1 AND 2 AND OBSTETRIC ANATOMY

                              55. List the 5 medications used in antenatal and discuss them under

                              a) Dose

                              b) Indication

                              c) Side effects

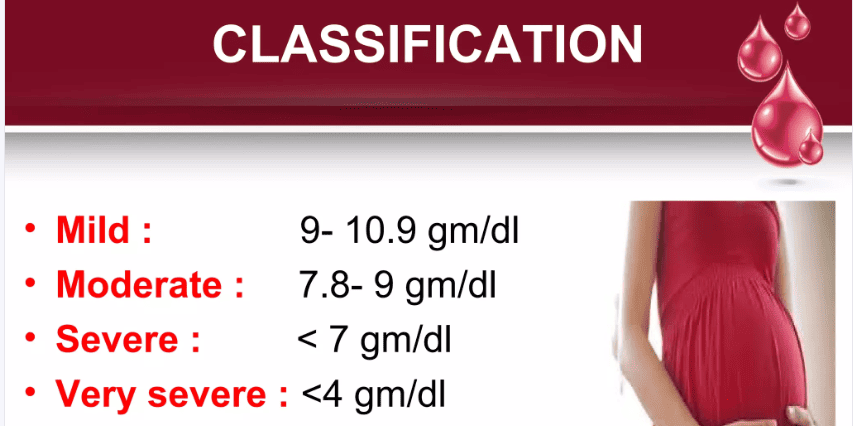
                              56a) Outline the obstetrical causes of anemia in pregnancy

                              b) List the five causes of hemolytic anemia

                              c) Describe the management of Mrs. mucosal who presents at 36weeks with severe anemia

                              57a) Define a cervix

                              b) With the aid of a diagram, describe the structure of the cervix

                              c) Outline the 6 functions of the cervix

                              58a) Define the term good antenatal care

                              b) Give the indications of referring a mother to a doctor during this period

                              c) How would you manage a mother who comes with lower back pain in antenatal at 32weeks?

                              59a) Define normal puerperium

                              b) Describe the management of a mother who has had normal delivery up to discharge

                              c) List the complication that may occur during this period

                              60a) Outline the symptoms of pregnancy

                              61a) Explain the characteristics of normal uterine action during first stage of Labour

                              b) What is the management of a gravid 3 para 2 mother at term who presents to hospital with history of precipitate Labour on the previous pregnancies?

                              62a) Describe a vagina

                              b) What information is got on vaginal examination during labor?

                              c) Mention four contractions of vaginal examination giving reasons for each

                              d) List the complications of vaginal examination

                              63a) Define intrauterine fetal death

                              b) Outline the causes of IUFD

                              c) How is the diagnosis of IUFD made?

                              d) What is the management of IUFD in the hospital?

                              64a) Describe the pelvic floor

                              b) Outline injuries that can occur to the pelvic floor during Labour

                              c) Explain how the knowledge of fetal skull can help you as a midwife prevent perineal tears

                              65a) Describe the fetal skull

                              b) How is fetal wellbeing monitored during pregnancy?

                              C) List the indications of ultrasound scan in late pregnancy

                              66a) Describe a non-pregnant uterus

                              b) Describe the changes that take place in this organ during pueperium

                              c) List the likely complication in the first stage of labor

                              67a) what is the effect of DM on pregnancy?

                              68a) how does pregnancy affect DM?

                              b) How would you care for a diabetic mother who has had a caesarean section in the first 48hours of the operation

                              69a) Describe the umbilical cord

                              b) Describe the different abnormalities of the cord

                              70. Malaria is of the conditions contributing affecting pregnancy and contributing factor to increased maternal mortality and morbidity

                              a) Explain why pregnant women are more susceptible to malaria

                              b)Describe the a primigravida who presents to your maternity center at 34 weeks with severe malaria

                              c) Outline the likely complications of malaria on pregnancy

                              71. Essential hypertension is one of the hypertensive disorders experienced by pregnant women

                              a) Define essential hypertension

                              b) Classify hypertensive disorders in pregnancy

                              c) Describe the management of Mrs Nangobi a G4P2+1 presenting in antenatal clinic at 32weeks with a diagnosis of essential hypertension

                              d) How does hypertension affect pregnancy?

                              72a) outline the signs and symptoms of first stage of Labour

                              b) Describe the management of a young primigravida in first stage of Labour

                              c) List the complications likely to occur during this stage of Labour

                              73a) Define hyperemesis gravidarum

                              b) Outline the causes of hyperemesis gravidarum

                              c) Describe the management of G2P1+0 presenting to your maternity center with hyperemesis gravidarum at 28 weeks of gestation

                              d) Explain the likely complications of this condition

                              74a) what is preeclampsia

                              b) Outline the signs and symptoms of preeclampsia

                              c) What are the predisposing factors of this condition?

                              d) Outline the nursing of a mother with severe preeclampsia

                              e) List the complication of severe preeclampsia

                              75a) Describe the placenta at term

                              b)Explain the functions of the placenta

                              c) Outline the abnormalities that may be found on the placenta

                              76a) With the aid of a diagram, describe the structure of the female breast

                              b) Explain the physiology of lactation

                              c) Explain the factors that promote successful lactation

                              77a) Define labor

                              b) Explain the physiology of the first stage of Labour

                              c) Describe the management of a mother in the second stage of Labour admitted in the hospital

                              78a) Outline the changes in the cervix during the first stage of labor

                              b) What information is found on the partograph?

                              c) A G2P1+0 mother came to a health center in normal labor , what may make you refer?

                              79. Most women find it helpful to get further information and support in their own homes.

                              a) Give 5 advantages of following up post-partum mothers

                              b) Explain postpartum maternal assessment you would carry out during domiciliary care

                              c) List the problems that you would identify during domiciliary care

                              80a) Describe 6 factors that influence the length of second stage of labor

                              b) Explain 3 phases used in conducting 2nd stage of labor

                              c) Give immediate assessment of the baby after 2nd stage of labor

                              81a) Mention factors that aid in involution of the uterus

                              b) Explain how you assess and document uterine involution immediately after delivery to 10days postpartum

                              c) Give five complications of sub involution of the uterus

                              82a) Explain the antenatal appointment schedules

                              b) Give 6 barriers to adherence to goal oriented antenatal visits

                              c) Identify 5 complications a pregnant woman is likely to get if no antenatal is attended

                              83a) Describe the structure of the ovary

                              b) List the functions of the ovary

                              c) Describe the menstrual cycle

                              MEDICINE I AND 111

                              84. Mr. KIBULA known hypertensive has been brought to hospital with suggestive features of hypertensive crisis.

                              a) Mention 8 clinical features of hypertension

                              b) List 4 causes of HTN and predisposing factors

                              c) Explain the specific Nursing Care you will give to Mr. KIBULA from the time of admission to discharge.

                              85. Write short notes on the following (definition, causes, signs and symptoms and complications).

                              a) Hydrocele

                              b) Hodgkin’s disease

                              c) Ankylosing spondylitis

                              86 a) Define Paget’s disease/Osteitus, deformans?

                              b) Explain the pathophysiology and etiology of Paget’s disease

                              c) Describe the specific nursing care you would give to Mr. Muwonge with Paget’s disease

                              87. Hepatitis B morbidity and mortality is much higher today than before.

                              a) What are the factors, contributing to the high prevalence of hepatitis B in the communities

                              b) How does a patient with hep.B present?

                              c) Give five priority nursing diagnoses for a patient with Hep B infection.

                              d) Describe the specific nursing management you would give to a patient with hep B.

                              e) Mention the complications of hep B.

                              f) Suggest ways how we can prevent hep B infection in the community

                              88. Define myocardial infarction. List the clinical features of myocardial infarction.

                              Explain the specific Nursing care given to a patient with myocardial infarction within the first 24Hrs of admission.

                              89. An adult male patient has presented to OPD with features of pulmonary tuberculosis

                              a) Outline five cardinal signs and symptoms of pulmonary tuberculosis.

                              b) List five specific investigations that can be done to confirm pulmonary tuberculosis.

                              c) Explain the specific nursing care given to this patient from the time of admission until discharge.

                              90. Mrs. A, a female patient has been admitted on a medical ward with suspected bronchial pneumonia,

                              a) Outline the clinical features of bronchial pneumonia

                              b) Describe the specific nursing management you would give to Mrs. X with in the first 72HRS of admission.

                              c) Explain five likely complications Mrs. X is likely to get following this condition.

                              91. Mr. Lusoke, a 62 yrs. old male is presented at the OPD with features of congestive cardiac failure

                              a) Outline the signs and symptoms of congestive cardiac failure.

                              b) Mention the causes of congestive cardiac failure.

                              c) Describe the specific nursing care / management you will give to Mr. Lusoke from time of admission to discharge.

                              92. Outline the signs and symptoms of Parkinson’s disease.

                              b) Mention the causes and predisposing factors to Parkinson’s disease.

                              c) Describe the specific Nursing management given to a patient with Parkinson’s disease.

                              93. Mr. Okello a 28yrs old male presents at OPD with clinical features of urinary tract infection and was admitted.

                              a) List 5 causes and 6 signs and symptoms of urinary tract infection.

                              b) Describe the specific nursing care you would give to Mr.Okello within the first 48 hours of admission.

                              c) Give the measures that can be taken to prevent urinary tract infections.

                              94 Define Addison’s disease?

                              b) Outline the causes and risk factions that leads to Addison’s disease.

                              c) Using the Nursing process, describe the management of a patient with Addison’s disease.

                              PEDIATRICS 1 AND 11

                              95. Define the term Apgar score

                              a) Outline 10 characteristics of a normal new born baby

                              b) Describe the care given to the normal new born baby within 72 hours after delivery of the head.

                              96. Differentiate between SAM and MAM

                              b) Explain the causes of malnutrition in children under 5 years.

                              c) Explain the importance of breastfeeding in babies’ up to 2years of age.

                              97. Define the term congenital abnormalities

                              a) Classify the congenital abnormalities of the heart

                              b) Explain ways of preventing congenital abnormalities.

                              98. Mention the factors that predispose to neonatal infections in new born babies.

                              b) List 8 clinical features of a child with neonatal tetanus.

                              c) Describe the specific management of a 3 month old child with tetanus.

                              99. Outline the factors that predispose to birth injuries

                              Differentiate between a caput succedaneum and a cephalo hematoma.

                              c) Describe the specific management you would give to a new born baby who presents with a caput succedaneum.

                              100. Brandon a five weeks old neonate is admitted on ward with a history of fast breathing, chest in drawing and stridor.

                              b) Explain the specific nursing care you would offer to Brandon in a hospital within the first eight hours of admission.

                              101. A five year old child has been bought to OPD in a painful sickle cell crisis.

                              a) Outline 5 possible causes of sick cell crisis.

                              b. List 4 diagnostic signs and symptoms of sick cell disease in children.

                              c) Explain the specific management of this child from admission to discharge.

                              102. A 4 months old baby has been admitted on a pediatric ward and diagnosed with pneumonia.

                              a) Outline the clinical presentation of this child.

                              b) Explain the specific management given to the child with in the first 72 hours.

                              103. Define the following terms.

                              1) Fracture

                              ii)Osteopenia of prematurity

                              osteogenesis imperfecta

                              Osteomyelitis

                              b) Mention 5 signs and symptom of osteomyelitis in children.

                              c) Describe the nursing management of 3 years old child with osteomyelitis.

                              104. A 8 month old child has been diagnosed with nephrotic syndrome.

                              a) List 6 signs and symptoms of nephrotic syndrome in children.

                              b) Describe the specific nursing management you world give to this child within the first 72 hours of admission on a pediatric ward.

                              c) Outline five complications of nephrotic syndrome.

                              105. What are the advantages of breast feeding?

                              Compare human milk and cow’s milk

                              Outline problems that are faced by mothers during breastfeeding.

                              106. List five congenital abnormalities of the G’T and 5 musculoskeletal system

                              Outline the causes of congenital abnormalities.

                              How do you cause a mother who has delivered a baby with spinal bifida?

                              107. List the factors that promote good nutrition in the under-five.

                              List five pieces of advice you would give to a prime para with a two year old baby suffering from protein calorie malnutrition.

                              List five problems of birth injuries in Uganda.

                              Outline the roles of a nurse in prevention of birth injuries in Uganda.

                              PHARMACOLOGY 1 AND 111

                              108. Define rational drug use

                              Outline the medical classification of drugs giving examples of each

                              Mention the legal classes of drugs with examples of each.

                              109. Define infertility.

                              State the common cause of infertility in women

                              c) State the indications, side effects and contraindications of clomiphene and Bromocriptine.

                              110. Describe the mechanism of action of non-opioid analgesics.

                              b) Write briefly about the handling of the class of drugs in a hospital

                              c) Define the following:-

                              Chemotherapy

                              Anti tussive

                              111. Mention 4 Four sources of drugs

                              b) Write down all routes which can be used for drug administration giving advantages and disadvantages of each.

                              c) Write down the factors that affects drugs absorption.

                              d) What factors affect drug dosage and action?

                              112. State the clinical uses of oxytocin and mention 6 adverse side effects of the drug.

                              b) Outline 5(five) contraindications of oxytocin

                              c) Describe 10 (ten) Nursing considerations while administering oxytocin.

                              113. Define Narcotic drugs and state the types of narcotics.

                              b) List down 7 nursing considerations before during and after administrating narcotics on ward.

                              c) What are the legal implications of Narcotics according to the Uganda narcotic drugs and psychotropic substance control ACT?

                              114. Define immunity and explain the two major types of immunity.

                              State the specific side effects, indication and the dosage following drugs:-

                              1. Anti D (RHO) Immunoglobulin
                              2. B) Rabies vaccine
                              3. Pneumococcal Vaccine.

                              115. Describe the physiology of erection in males

                              b) State the causes of erectile dysfunction

                              b) Mention the class, indication, Dosage and side effects of the following drugs.

                              i) Sildenafil.

                              ii) Tadalafil

                              iii) Finesteride.

                              GYNAECOLOGY

                              1. a) Outline signs of breast cancer.

                              b) Explain post operative care after mastectomy.

                              c) List possible complications of mastectomy.

                              1. . a) Draw a diagram showing possible sites of vaginal fistula.

                              b) Outline the 5 major causes of vaginal fistula.

                              c) Explain specific nursing care of a woman after VVF repair.

                              118. a) Define the different types of Abortion.

                              b) Outline causes of missed Abortion.

                              c) Explain different methods used in the management of missed abortion.

                              d) Outline the 5 elements of PAC.

                              1. a) Define ectopic pregnancy.

                              b) Outline signs and symptoms of tubal pregnancy.

                              c) A mother presents to the medical facility with a tubal pregnancy, describe her management till discharge.

                              119. a) List the disorders of menstruation.

                              b) Explain the advice and treatment given to a 17 year old girl with dysmenorrhea.

                              120 a) Define Hydatidiform mole.

                              b) Outline signs and symptoms of hydatidiform mole.

                              c) Describe the methods of managing the above condition and list complications that may follow.

                              121. Describe pelvic inflammatory disease.

                              b) What are the predisposing factors of this condition?

                              c) Describe management of PID in the hospital.

                              1. a) What is infertility?

                              b) Outline causes of infertility.

                              c) Explain the different methods that can be used to manage infertility.

                              1. a) Draw a diagram of a uterus indicating sites of fibroids.

                              b) Differentiate between benign and malignant tumor.

                              c) Give the management of the mother after myomectomy within the first 48 hours.

                              d) What specific advice would you give this mother on discharge.

                              REPRODUCTIVE HEALTH

                              1. a) Define STDs?

                              b) Explain ten preventive measures against sexually transmitted infections.

                              c) Describe the syndromic management of STDs.

                              1. a) List 7 components of reproductive health.

                              b) Outline the advantages and disadvantages of intergrating reproductive health.

                              c) Outline 10 factors that affect women’s reproductive health.

                              1. a) Define sexual abuse?

                              b) Explain factors that expose adolescent girls to sexual abuse or vulnerability.

                              c) Outline 5 clinical features of sexual abuse in an adolescent.

                              1. a) Define i) Post Abortion Care

                              ii) Comprehensive abortion care.

                              b) Explain the Rational for PAC.

                              1. a) Who is an adolescent?

                              b) Describe Tanner’s stage of development in an adolescent.

                              c) List common health problems faced by adolescents.

                              1. a) What is safe motherhood?

                              b) Outline the 3 delays that can increase maternal mortality.

                              c) What is your role as a midwife in reduction of maternal mortality in your community?

                              1. Describe syndromic approach of managing STIs.
                              2. a) Define domestic violence.

                              b) What are the factors that make you suspect that one is a victim of domestic violence?

                              c) How would you prevent domestic violence?

                              1. Describe manual vacuum aspiration.

                              FOUNDATIONS OF NURSING.

                              1. a) Define wounds.

                              b) Give 5 types of wounds.

                              c) Outline the factors that delay wound healing.

                              d) Give the specific management for a patient with specific wound.

                              e) What specific advice do you give to a patient with a wound prior to discharge.

                              f) Describe the process of wound healing.

                              1. a) Outline the indications for oxygen administration.

                              b) Give the rules to follow before, during and after administration of oxygen.

                              c) Define blood transfusion.

                              d) Outline the indications of blood transfusion.

                              e) Outline the appropriate care of the patient before, during and after blood transfusion.

                              f) Give the complications of blood transfusion.

                              1. a) Define drug administration.

                              b) Outline the different routes of drug administration.

                              c) Mention the principles of drug administration including the dos and don’ts in drug administration.

                              1. a) Define infection prevention and control.

                              b) Define nosocomial infection.

                              c) Outline the steps taken to prevent infections of the wound.

                              d) What are the advantages of oral route drug administration over the parental route.

                              1. a) Outline the indications of Tracheostomy.

                              b) Give the specific pre and post operative nursing care for the patient with tracheostomy.

                              c) Mention the complications of tracheostomy.

                              d) Formulate 4 actual nursing diagnoses for a patient with colostomy.

                              1. a) Define lumber puncture.

                              b) Outline the indications of lumber puncture.

                              c) Explain the specific nursing care given to the patient prior to after the procedure of lumber puncture.

                              d) List the complications of lumber puncture.

                              1. a) Define abdominal paracentesis.

                              b) Outline the indications of paracentesis.

                              c) Give the specific care given to the patient before and after abdominal paracentesis.

                              d) Mention the complications of abdominal paracentesis.

                              1. a) Define tractions.

                              b) Explain the different types of tractions.

                              c) Outline the specific nursing care given to a patient with tractions.

                              d) Formulate 5 actual nursing diagnoses for a patient with tractions.

                              e) Outline the likely complications of the patient on traction.

                              1. a) Outline the indications of underwater seal drainage.

                              b) Give the specific nursing care for a patient on underwater seal drainage.

                              c) Formulate four nursing diagnoses for a patient on underwater seal drainage.

                              d) List the complications of underwater seal drainage.

                              1. a) Outline 6 indications of gastric lavage.

                              b) Define colostomy.

                              c) Formulate 4 actual nursing diagnoses and 4 potential nursing diagnoses for a patient with colostomy.

                              d) Give the specific nursing care to the patient with colostomy.

                              1. a) List the indications of Glasgow coma scale.

                              b) Describe the Glasgow coma scale.

                              ANATOMY AND PHYSIOLOGY II

                              1. a) With illustration, describe the formation of flow of CSF.

                              b) List the functions of CSF.

                              c) Describe the meninges covering the brain and spinal cord.

                              1. a) Describe the position and gross structure of the parathyroid glands. Outline the functions of parathyroid hormone and calcitonin.

                              b) Explain the disorders of the thyroid gland.

                              1. a) Describe the structure of a nephron.

                              b) Explain the processes involved in the formation of urine.

                              c) Describe how body water and electrolyte balance is maintained.

                              1. a) Describe the structure of the ear.

                              b) Explain the physiology of hearing.

                              c) Explain the functions of the accessory organs of the eye.

                              1. a) Explain the role of lymphatic vessels in the spread of infections and malignant disease.
                              2. a) Describe the location of the pharynx and relate it’s structure to it’s function.

                              b) List the functions of the trachea in respiration.

                              c) Explain the main mechanisms by which respiration is controlled.

                              d) Describe the common inflammatory and infectious disorders of the upper respiratory tract.

                              1. a) Define a neuron.

                              b) Outline the 12 cranial nerves of the nervous system.

                              c) Describe the transmission of an impulse across a synapse.

                              PALLIATIVE CARE NURSING

                              150 a) Define palliative care

                              b) Explain the principles of palliative care

                              c) Give the challenges faced in implementing in palliative care services in Uganda

                              151.a) Define pain according to WHO

                              b) Explain different types of pain in palliative care

                              c) Describe the principles of pain management in palliative care

                              d) Describe the steps of breaking bad news

                              152.a) Explain 6 roles of palliative care in Uganda

                              b) Outline 6 symptoms commonly experienced by terminary ill patients

                              153.a) What is grief?

                              b) Explain 5 stages of grief experienced by palliative care patients

                              c) Explain the HOPE approach to spiritual pain management

                              d) Outline the spiritual problems experienced by palliative care patients

                              Self Study Question For Nurses and Midwives Read More »

                              practical guide

                              OSPE/OSCE PRACTICAL GUIDE

                              PRACTICAL GUIDE FOR NURSES AND MIDWIVES

                              Nurses and midwives have a professional responsibility to know and understand practical knowledge since it is the backbone of nursing and it highly impacts the clinical practice.

                              SCENARIO: TAKING OBSERVATIONS

                              At this station, there is patient on four (4) hourly observations.

                              INSTRUCTIONS:

                              1. Prepare the tray.
                              2. Take the temperature, pulse, respiration and blood pressure.
                              3. Record the findings on the observation chart.
                              4. Move to the next station when the bell rings.

                              OSPE/OSCE PRACTICAL GUIDE

                              STATION: CHECKLIST FOR TAKING VITAL OBSERVATIONS

                              STUDENT’S NSIN…………………………………………………………………………….

                              EXAMINER…………………………DATE………………………………….

                              S/No

                              AREAS TO BE ASSESSED

                              SCORE

                              DONE

                              PARTLY

                              DONE

                              NOT DONE

                              TOTAL


                              Explain the procedure

                              1


                              Inspect the axilla and dry with a swab

                              2


                              Remove the thermometer, dry and shake with a flick of the wrist until the mercury falls below 35oC, inspect it for cracks

                              2


                              Position the thermometer in the axilla with the tip pointing towards the patient’s head for 3 minutes

                              2


                              Ask the patient to place the hand over the chest, while using the wrist of the same hand to take the pulse, continue taking the respirations when hand is still on the wrist.

                              4


                              After three minutes, remove the thermometer read, wipe.

                              2


                              Record your findings on the chart

                              2


                              Take the blood pressure and record

                              5


                              TOTAL

                              20


                              COMMENTS

                              ………………………………………………………………………………………………………………………………………………………………………………………………………………

                              OSPE/OSCE PRACTICAL GUIDE

                              SCENARIO: IDENTIFICATION OF INSTRUMENTS

                              At this station, there are instruments prepared on a tray.

                              INSTRUCTIONS:

                              1. Name the instruments one by one.
                              2. State their use.
                              3. Speak loudly for the examiner to hear you.
                              4. Move to the next station when the bell rings.

                              OSPE/OSCE PRACTICAL GUIDE

                              STATION : CHECKLIST FOR IDENTIFICATION OF INSTRUMENTS

                              STUDENT’S NSIN…………………………………………………………………………….

                              EXAMINER…………………………DATE………………………………….

                              S/No

                              AREAS TO BE ASSESSED

                              SCORE

                              DONE

                              PARTLY

                              DONE

                              NOT DONE

                              TOTAL


                              Wash hands

                              2


                              Identify each instrument by naming

                                   
                              • Cusco’s vaginal speculum

                              1

                                  
                              • Dressing forceps

                              1

                                  
                              • Sponge holing forceps

                              1

                                  
                              • Uterine sound

                              1

                                  
                              • Mouth gag

                              1

                                  
                              • Airway piece

                              1

                                  
                              • Cord scissor

                              1

                                  
                              • Straight artery forceps

                              1


                              Explain the use of each of the instruments

                                   
                              • Used during vaginal examination to view the cervix and walls of the vagina

                              1

                                  
                              • Used for dressing wounds

                              1

                                  
                              • Holding sponge/cotton swabs during mopping of blood

                              1

                                  
                              • Measure the length of the uterus

                              1

                                  
                              • Open mouth wide during oral care

                              1

                                  
                              • Keep airway open

                              1

                                  
                              • Cutting the umbilical cord

                              1

                                  
                              • Arresting haemorrhage

                              1


                              Wash hands

                              2


                              TOTAL

                              20


                              COMMENTS

                              ………………………………………………………………………………………………………

                              OSPE/OSCE PRACTICAL GUIDE

                              SCENARIO: MAKING ADMISSION BED

                              At this station, there is a need to make an admission bed.

                              INSTRUCTIONS

                              1. The trolley is already set
                              2. Make an admission bed.
                              3. Move to the next station when the bell rings.

                              OSPE/OSCE PRACTICAL GUIDE

                              STATION: MAKING ADMISSION BED

                              STUDENT’S NSIN…………………………………………………………………………….

                              EXAMINER…………………………DATE………………………………….

                              S/No

                              AREAS TO BE ASSESSED

                              SCORE

                              DONE

                              PARTLY

                              DONE

                              NOT DONE

                              TOTAL


                              Places 2 chairs at the foot of the bed and arranges linen on the chairs.

                              ½


                              Checks the springs

                              ½


                              Turns the mattress systematically

                              ½


                              Puts on long mackintosh

                              1


                              Puts on bottom sheet and metres corners

                              1


                              Puts draw mackintosh and draw sheet

                              1


                              Places admission sheet over draw sheet


                              Another admission sheet is put before the top sheet


                              Puts the top sheet, metres corners at the bottom and folds the top.

                              1


                              Puts the blanket, metres cornes and bed cover, tucks the bottom, metres corners but does not tuck in the sides

                              1


                              Clears away

                              ½


                              TOTAL

                              10


                              COMMENTS

                              ………………………………………………………………………………………

                              ………………………………………………………………………………………

                              OSPE/OSCE PRACTICAL GUIDE

                              SCENARIO: MAKING POST OPERATIVE BED

                              At this station you are to prepare a trolley for making post operative bed, and make the bed.

                              INSTRUCTIONS:

                              1. Prepare a trolley for post operative bed.
                              2. Make the post operative bed.
                              3. Move to the next station when the bell rings.

                              OSPE/OSCE PRACTICAL GUIDE

                              STATION: CHECKLIST FOR MAKING A POST OPERATIVE BED

                              CANDIDATES NUMBER………………………………………………………………….

                              EXAMINER……………………………………..DATE………………………………….

                              S/No

                              AREAS TO BE ASSESSED

                              SCORE

                              DONE

                              PARTLY

                              DONE

                              NOT DONE

                              TOTAL


                              Wash hands

                              1


                              Put chairs at the foot of the bed with the back of chairs opposite to each other

                              1


                              Move locker from the bed

                              1


                              Pull the bed away from the wall

                              1


                              Turn the mattress, check the springs

                              1


                              Straighten the mattress cover

                              1


                              Place the long mackintosh

                              1


                              Place the bottom sheet

                              1


                              Tack the sheet well

                              1


                              Put on the draw mackintosh and the draw sheet

                              2


                              Put on top sheet

                              1


                              Put on blankets and bed covers

                              2


                              Fold both sides of the bed linen into a neat pack which can easily be removed when lifting the patient on to the bed

                              4


                              Place a small mackintosh and draw sheet across the top of the bed and tack it in

                              1


                              Clear away

                              1


                              TOTAL

                              20


                              COMMENTS

                              ………………………………………………………………………………………………………

                              OSPE/OSCE PRACTICAL GUIDE

                              SCENARIO: GIVING A BED PAN

                              At this station, there is abed ridden patient who needs to empty the bowel.

                              INSTRUCTIONS

                              1. Give a bed pan.
                              2. Move to the next station when the bell rings.

                              OSPE/OSCE PRACTICAL GUIDE

                              STATION: GIVING A BED PAN

                              STUDENT’S NSIN…………………………………………………………………………….

                              EXAMINER…………………………DATE………………………………….

                              S/No

                              AREAS TO BE ASSESSED

                              SCORE

                              DONE

                              PARTLY

                              DONE

                              NOT DONE

                              TOTAL


                              Explains the procedure to the patient

                              1


                              Screens the bed

                              1


                              Warms the bed pan using warm water

                              ½


                              Gently slips the bed pan under the patient’s buttocks while the second nurse helps lift the patient

                              2


                              Give a toilet paper to the patient to clean herself if she can or helps the patient to clean


                              Carefully remove the bed pan and cover it


                              Offer the patient water to wash hands

                              1


                              Leave the patient comfortable

                              ½


                              Clear the trolley and sluice the bed pan

                              1


                              TOTAL

                              10


                              COMMENTS

                              ………………………………………………………………………………………

                              ………………………………………………………………………………………

                              OSPE/OSCE PRACTICAL GUIDE

                              SCENARIO: PREPARATION OF A TROLLEY FOR BED BATH

                              At this station, there is abed ridden patient who needs to bed bathed.

                              INSTRUCTIONS

                              1. Prepare the trolley and present it to the examiner.
                              2. Move to the next station when the bell rings.

                              OSPE/OSCE PRACTICAL GUIDE

                              STATION: PREPARATION OF A TROLLEY FOR BED BATH

                              STUDENT’S NSIN…………………………………………………………………………….

                              EXAMINER…………………………DATE………………………………….

                              S/No

                              AREAS TO BE ASSESSED

                              SCORE

                              DONE

                              PARTLY

                              DONE

                              NOT DONE

                              TOTAL


                              Washes hands and cleans the trolley

                              ½


                              Top shelf

                              • Bath basin
                              • Jug with hot water
                              • Jug with cold water
                              • 2 flannel

                              Tray containing

                              • Soap in a soap dish
                              • Nail brush and nail cutter
                              • Tooth brush and paste
                              • Comb
                              • Roll of toilet paper
                              • Glove

                              ½

                              ½

                              ½

                              ½

                              ½

                              ½

                              ½

                              ½

                              ½

                              ½


                              Bottom shelf

                              • 2 bath towels
                              • 1 pair of sheet
                              • 1 bucket for used water
                              • 1 receiver

                              ½

                              ½

                              ½

                              ½


                              Bed side

                              • Dirty linen container
                              • Screen
                              • Two chairs
                              • Hand washing equipment
                              • Bed pan and urinal

                              ½

                              ½

                              ½

                              ½

                              ½


                              TOTAL

                              10


                              COMMENTS

                              ………………………………………………………………………………………

                              ………………………………………………………………………………………

                              OSPE/OSCE PRACTICAL GUIDE

                              STATION:

                              SCENARIO: BED BATH

                              At this station, there is a dependent patient in bed and needs to be bed bathed.

                              INSTRUCTIONS:

                              1. The equipments are ready prepared.
                              2. Carry out bed bath as the examiner observes and scores you.
                              3. Move to the next station when the bell rings.

                              OSPE/OSCE PRACTICAL GUIDE

                              STATION: CHECKLIST FOR BED BATH

                              EXAMINER:……………………………………DATE:……………………….

                              CANDIDATE NUMBER: …………………………………………………………………………….

                              S/No

                              KEY AREAS TO ASSESS

                              SCORE

                              DONE

                              PARTLY

                              DONE

                              NOT DONE

                              TOTAL


                              Explain the procedure to the patient and provide privacy

                              1


                              Offer a bed pan or urinal if required

                              1


                              Strip the bed to the top sheet and remove the patient’s gown

                              1


                              Wash and dry each part of the body separately uncovering only the part to be washed in the order of face, neck, arm, chest and abdomen and change water whenever necessary.

                              4


                              Wash each leg separately and wash the feet with water over the basin, dry them and cut the nails.

                              2


                              Turn the patient to the sides and wash the back starting from the neck to the buttocks and dry, paying special attention in between the folds.

                              2


                              Treat pressure areas

                              2


                              Turn the patient on the back, change the water and wash genitalia with another flannel.

                              2


                              Make up the bed with a clean linen

                              1


                              Dress up the patient

                              1


                              Clean the patient’s mouth

                              1


                              Comb the hair and make the patient comfortable

                              1


                              Clear away the equipments and report any abnormality observed

                              1


                              TOTAL

                              20


                              COMMENTS

                              ………………………………………………………………………………………

                              ………………………………………………………………………………………

                              OSPE/OSCE PRACTICAL GUIDE

                              SCENARIO: PREPARATION OF A TRAY FOR ORAL CARE

                              At this station, there is a patient who is on routine oral care.

                              INSTRUCTIONS

                              1. Prepare the tray for oral care and present it to the examiner.
                              2. Speak loudly for the examiner to hear you.
                              3. Move to the next station when the bell rings.

                              OSPE/OSCE PRACTICAL GUIDE

                              STATION: PREPARATION OF A TRAY FOR ORAL CARE

                              STUDENT’S NSIN…………………………………………………………………………….

                              EXAMINER…………………………DATE………………………………….

                              S/No

                              AREAS TO BE ASSESSED

                              SCORE

                              DONE

                              PARTLY

                              DONE

                              NOT DONE

                              TOTAL


                              Washes hands and cleans the tray

                              1


                              Prepares the equipment necessary onto the tray

                              • Small/cap mackintosh and face towel-to protect the patient’s clothes
                              • A pair of artery forceps-for holding the swab while cleaning
                              • A pair of dissecting forceps-to pick swabs and squeeze of excess solution
                              • A mouth gag-for opening the mouth incase of unconscious patients
                              • Tongue depressor-to prevent tongue from falling backward
                              • Tongue clip-to hold the tongue from falling backward
                              • Solution of sodium bicarbonate-for cleaning the mouth
                              • A gallipot of gauze rolled swabs-for cleaning
                              • 2 kidney dishes,-1 for used instruments and 1 for used swabs
                              • Glycerine borax or vassiline-for lubricating the lips

                              1

                              1

                              1

                              1

                              1

                              1

                              1

                              1

                              1

                              1


                              TOTAL

                              10


                              COMMENTS

                              ………………………………………………………………………………………

                              ………………………………………………………………………………………

                              OSPE/OSCE PRACTICAL GUIDE

                              SCENARIO: ORAL CARE OF AN UNCONSCIOUS PATIENT

                              At this station, there is an unconscious patient for oral or mouth care

                              INSTRUCTIONS

                              1. Prepare a tray for mouth care.
                              2. Carry out the procedure of mouth wash on the patient.
                              3. Move to the next station when the bell rings.

                              OSPE/OSCE PRACTICAL GUIDE

                              STATION: CHECKLIST FOR ORAL CARE AN UNCONSCIOUS PATIENT

                              STUDENT’S NSIN…………………………………………………………………………….

                              EXAMINER…………………………DATE………………………………….

                              S/No

                              AREAS TO BE ASSESSED

                              SCORE

                              DONE

                              PARTLY

                              DONE

                              NOT DONE

                              TOTAL


                              Prepare a tray for mouth care

                              2


                              Screen the bed and wash hands

                              1


                              Position the patient in a lateral position and protect the clothes with towel

                              1


                              Remove the dentures if he/she has them

                              1


                              Insert the mouth gag, leave in position to keep mouth open

                              2


                              Inspect the mouth, note and report any abnormality

                              2


                              Grip a swab firmly with artery forceps, dip in cleaning solution, press against the gallipot to prevent dripping

                              2


                              Clean inner and outer surface of the teeth from the root to the crown. Clean the gums, inside the cheeks and tongue. Change swabs as often as needed. Avoid touching the soft palate.

                              4


                              Rinse the mouth with mouth wash

                              2


                              Wipe the lips with dabbing movement and apply lubricant

                              2


                              Leave the patient comfortable

                              1


                              TOTAL

                              20


                              COMMENTS

                              ………………………………………………………………………………………

                              ………………………………………………………………………………………

                              OSPE/OSCE PRACTICAL GUIDE

                              SCENARIO: TREATING PRESSURE AREAS

                              At this station, there is a bed ridden patient awaiting treatment of pressure areas.

                              INSTRUCTIONS:

                              1. Prepare the requirements.
                              2. Treat all the pressure areas.
                              3. Move to the next station when the bell rings.

                              OSPE/OSCE PRACTICAL GUIDE

                              STATION: CHECKLIST FOR TREATMENT OF PRESSURE AREAS

                              STUDENT’S NSIN…………………………………………………………………………….

                              EXAMINER…………………………DATE………………………………….

                              S/No

                              AREAS TO BE ASSESSED

                              SCORE

                              DONE

                              PARTLY

                              DONE

                              NOT DONE

                              TOTAL


                              Explain the procedure to the patient

                              2


                              Screen the bed

                              1


                              Pour warm water in the basin

                              1


                              Protect the bed linen from soiling with mackintosh and towel

                              1


                              Carefully assess the condition of the skin. If it is not broken wash it with soap and water using a flannel

                              4


                              Massage the area with soapy hand

                              2


                              Using flannel, rinse each and pant it dry

                              2


                              Apply a little Vaseline and massage onto the skin

                              2


                              Change or straighten the bed linen and live the patient comfortable

                              2


                              Thank the patient and clear away

                              1


                              Record the procedure and observation in patient’s chart

                              2


                              TOTAL

                              20


                              COMMENTS

                              ………………………………………………………………………………………………………

                              ………………………………………………………………………………………………………

                              SCENARIO: TEPID SPONGING

                              At this station, there is a patient in bed with hyperpyrexia, and needs tepid sponging.

                              INSTRUCTIONS:

                              1. The equipments are ready prepared.
                              2. Carry out tepid sponging as the examiner observes and scores you.
                              3. Move to the next station when the bell rings.

                              STATION: CHECKLIST FOR TEPID SPONGING

                              EXAMINER:……………………………………DATE:……………………….

                              CANDIDATE NUMBER: …………………………………………………………………………….

                              S/No

                              KEY AREAS TO ASSESS

                              SCORE

                              DONE

                              PARTLY

                              DONE

                              NOT DONE

                              TOTAL


                              Follow the general rules

                              1


                              Take the temperature and chart

                              1


                              Strip the bed to the top sheet

                              1


                              Sponge the face and dry. Apply cold compress on the forehead

                              1


                              Place the face flannel wrung out in cold water in the axilla, and the groin and change when necessary

                              2


                              Expose the arms and sponge, using long slow sweeping movements, pour water over the hands and change compress over the forehead.

                              3


                              Expose the chest and abdomen, and with a face flannel in each hand sponge the chest and abdomen together using long slow sweeping movements. Cover the patient before starting the next part.

                              3


                              Change the water in the bowl, sponge the legs and pour water over the feet

                              2


                              Remove the compress from the forehead and face flannels from the axilla and groins

                              1


                              Turn the patient gently the side, sponge the back using face flannels, long sweeping movements and then dry.

                              2


                              Remake the bed using clean linen and leave the patient comfortable

                              1


                              Give the patient a cold drink

                              1


                              Clear away the equipments

                              1


                              TOTAL

                              20


                              COMMENTS

                              ………………………………………………………………………………………

                              ………………………………………………………………………………………

                              OSPE/OSCE PRACTICAL GUIDE

                              SCENARIO: MANAGEMENT OF SECOND STAGE OF LABOUR

                              At this station there is a model representing a mother in 2nd stage of labour.

                              Requirements are already prepared.

                              INSTRUCTIONS:

                              1. Prepare yourself for the delivery
                              2. Conduct the delivery of the baby
                              3. Move to the next station when the bell rings.

                              OSPE/OSCE PRACTICAL GUIDE

                              STATION: CHECKLIST FOR MANAGEMENT OF SECOND STAGE OF LABOUR

                              STUDENT’S NSIN……………………………………….EXAMINER…………………………DATE………….

                              S/No

                              AREAS TO BE ASSESSED

                              SCORE

                              DONE

                              PARTLY

                              DONE

                              NOT DONE

                              TOTAL


                              Ensure privacy and explain to the mother that she is ready to push

                              1


                              Empty the bladder

                              1


                              Position the mother in a dorsal position with legs flexed and confirm second (2nd) stage

                              1


                              Check fetal heart every after contraction

                              1


                              Wash hands and put on sterile gloves

                              1


                              Drape the mother

                              1


                              Encourage mother to push with every contraction

                              1


                              Maintain flexion of the head

                              1


                              At crowning perform a episiotomy

                              1


                              Deliver the head by aiding extension

                              1


                              Clear the airway by use of bulb syringe

                              1


                              Feel for the cord around the neck. If loose slip it over the head, if tight clamp and cut it

                              1


                              Deliver the anterior shoulder by downward traction

                              1


                              Deliver the posterior shoulder by upward traction

                              1


                              Deliver the body by lateral flexion towards mother’s abdomen

                              1


                              Note time, score the baby, clamp and cut the cord, congratulate the mother

                              1


                              Show the baby’s face and sex to the mother

                              1


                              Wrap the baby in sterile towel, put on mother’s breast if condition is good and no contraindication

                              1


                              Put an identification band on the baby’s hand

                              1


                              Put end of cord in a receiver between mother’s legs

                              1


                              TOTAL

                              20


                              COMMENTS

                              ………………………………………………………………………………………………………………………

                              OSPE/OSCE PRACTICAL GUIDE

                              SCENARIO: ADMINSTRATION OF ORAL MEDICINE

                              At this station there is a mentally sick patient who is to receive Haloperidol tablet 5mgs three times a day.

                              INSTRUCTIONS:

                              1. Prepare a tray for drug administration.
                              2. Administer the prescribed medicine to the patient.
                              3. Move to the next station when the bell rings.

                              OSPE/OSCE PRACTICAL GUIDE

                              STATION: CHECKLIST FOR ADMINISTRATION OF ORAL MEDICINE

                              CANDIDATES NUMBER………………………………………………………………….

                              EXAMINER……………………………………..DATE………………………………….

                              S/No

                              AREAS TO BE ASSESSED

                              SCORE

                              DONE

                              PARTLY

                              DONE

                              NOT DONE

                              TOTAL


                              Explain the procedure to the patient

                              2


                              Wash hands and dry

                              1


                              Verify the order from the patients chart

                              2


                              Confirm the identity of the patient by calling the patients name

                              2


                              Check the room or bed number before giving the drug

                              2


                              Assess the patient’s condition including the level of consciousness

                              2


                              Check the label, expiry date on the bottle/container

                              2


                              Check the dose on the prescription, get the dose on a spoon, and administer with water or milk to aid swallowing. Confirm that the drug has been swallowed

                              4


                              Sign the medicine list and leave the patient comfortable

                              2


                              Wash the medicine cups and return to their proper place

                              1


                              TOTAL

                              20


                              COMMENTS

                              ………………………………………………………………………………………

                              ………………………………………………………………………………………

                              OSPE/OSCE PRACTICAL GUIDE

                              SCENARIO: ADMINISTRATION OF A DRUG BY I.M

                              At this station, there is a patient in bed on P.P.F 0.8mg o.d.

                              INSTRUCTIONS:

                              1. The tray is already set.
                              2. Administer the injection.
                              3. Move to the next station when the bell rings.

                              OSPE/OSCE PRACTICAL GUIDE

                              STATION: CHECKLIST FOR ADMINISTRATION OF A DRUG BY I.M

                              EXAMINER:……………………………………DATE:……………………….

                              CANDIDATE NUMBER: …………………………………………………………………………….

                              S/No

                              KEY AREAS TO ASSESS

                              SCORE

                              DONE

                              PARTLY

                              DONE

                              NOT DONE

                              TOTAL


                              Follow the general rules

                              1


                              Wash hands

                              1


                              Read the prescription carefully and check the drug with the other Nurse including the amount to be given.

                              1


                              Assemble syringe and needle

                              1


                              Check the drug for label and expiry date

                              1


                              Break open or remove the top of the rubber cup

                              1


                              Reconstitute powdered drug according to the instructions on the bottle.

                              2


                              Draw up the prescribed dose of the drug

                              2


                              Expel the air

                              1


                              Choose the site for injection, clean the skin and draw it tightly and introduce the needle at an angle of 90o.

                              2


                              Withdraw the piston to make sure that the needle is not in the blood vessel

                              2


                              If no blood is seen in the syringe, continue to give the injection.

                              2


                              Withdraw the needle while pressing firmly round it with a swab.

                              1


                              Thank the patient and leave him/her comfortable

                              1


                              Record the drug and clear away.

                              1


                              TOTAL

                              20


                              COMMENTS

                              ………………………………………………………………………………………

                              ………………………………………………………………………………………

                              OSPE/OSCE PRACTICAL GUIDE

                              SCENARIO: URINE TESTING

                              At this station there is urine sample for testing.

                              Requirements needed are prepared.

                              INSTRUCTIONS:

                              1. Test the urine for colour, deposits, smell, specific gravity, glucose and proteins.
                              2. Record your findings on the piece of paper provided.
                              3. Move to the next station when the bell rings.

                              OSPE/OSCE PRACTICAL GUIDE

                              STATION: CHECKLIST FOR URINE TESTING

                              CANDIDATES NUMBER………………………………………………………………….

                              EXAMINER……………………………………..DATE………………………………….

                              S/No

                              AREAS TO BE ASSESSED

                              SCORE

                              DONE

                              PARTLY

                              DONE

                              NOT DONE

                              TOTAL


                              Note the appearance

                              2


                              Note the amount

                              1


                              Note the colour

                              1


                              Put enough urine in the glass container

                              2


                              Float the urinometer in the urine in the glass container

                              4


                              Dip the uristix in the urine compare the colour change with the one on the scale on the container

                              6


                              Record your findings on the paper

                              2


                              Wash hands

                              2


                              TOTAL

                              20


                              COMMENTS

                              ………………………………………………………………………………………

                              ………………………………………………………………………………………

                              OSPE/OSCE PRACTICAL GUIDE

                              SCENARIO: DRESSING A CLEAN WOUND

                              At this station, there is a patient with a clean wound which has to be dressed.

                              INSTRUCTIONS:

                              1. The requirements are already prepared.
                              2. Dress the wound.
                              3. Move to the next station when the bell rings.

                              OSPE/OSCE PRACTICAL GUIDE

                              STATION: CHECKLIST FOR DRESSING A CLEAN WOUND

                              STUDENT’S NSIN…………………………………………………………………………….

                              EXAMINER…………………………DATE………………………………….

                              S/No

                              AREAS TO BE ASSESSED

                              SCORE

                              DONE

                              PARTLY

                              DONE

                              NOT DONE

                              TOTAL


                              Explain the procedure to the patient

                              1


                              Position the part, put on dressing mackintosh and towel

                              1


                              Loosen the strapping

                              ½


                              Wash hands

                              ½


                              Open the dressing pack and arrange the instruments

                              1


                              Pour the lotion and add other missing requirements like swabs

                              1


                              Using clean gloves and dissecting forceps remove the loosened dressing and discard the gloves in a receiver and put used instruments in a receiver

                              4


                              Wash hands with soap and water and dry them using sterile hand towel

                              1


                              Put on sterile gloves and spread the dressing towel

                              1


                              Using dressing forceps, clean the wound from inside out, until clean

                              4


                              Place used instruments in a receiver

                              ½


                              Apply the dressing

                              11/2


                              Apply strapping or bandage

                              1


                              Make patient comfortable, clear away and wash hands

                              2


                              TOTAL

                              20


                              COMMENTS

                              ……………………………………………………………………………………………………………………………………………………………………………………………………………………………………

                              OSPE/OSCE PRACTICAL GUIDE

                              SCENARIO: HEALTH EDUCATION

                              At this station, there is a group of mothers who have come to ante natal clinic.

                              INSTRUCTIONS:

                              1. Give a health education talk about prevention of HIV/AIDS.
                              2. Talk loudly for examiner to hear and score you.
                              3. Move to the next station when the bell rings.

                              OSPE/OSCE PRACTICAL GUIDE

                              STATION: CHECKLIST FOR HEALTH EDUCATION ON PREVENTION ON HIV/AIDS

                              STUDENT’S NSIN…………………………………………………………………………….

                              EXAMINER…………………………DATE………………………………….

                              S/No

                              AREAS TO BE ASSESSED

                              SCORE

                              DONE

                              PARTLY

                              DONE

                              NOT DONE

                              TOTAL


                              Great the client

                              1


                              Introduce your self

                              1


                              Introduce the topic

                              2


                              Checks participants’ knowledge about the topic

                              2


                              Give the health education on the topic

                              4


                              Ask the client to ask question

                              2


                              Answer the question

                              2


                              Ask question to evaluate the understanding of the clients

                              2


                              Give summary of the talk

                              2


                              Give the topic for the next health education, time and venue

                              2


                              TOTAL

                              20


                              COMMENTS

                              ………………………………………………………………………………………

                              ………………………………………………………………………………………

                              OSPE/OSCE PRACTICAL GUIDE

                              SCENARIO: ASSESSING FOR DEHYDRATION

                              At this station, there is a one year old child in the bed with diarrhea and severe vomiting.

                              INSTRUCTIONS:

                              1. Assess the child for signs of dehydration, and speak loudly for the examiner to score you.
                              2. Move to the next station when the bell rings.

                              OSPE/OSCE PRACTICAL GUIDE

                              STATION: ASSESSING A ONE YEAR OLD CHILD FOR DEHYDRATION

                              EXAMINER:……………………………………DATE:……………………….

                              CANDIDATE NUMBER: …………………………………………………………………………….

                              S/No

                              KEY AREAS TO ASSESS

                              SCORE

                              DONE

                              PARTLY

                              DONE

                              NOT DONE

                              TOTAL


                              Create a rapport

                              1


                              Explain the procedure to the mother

                              1


                              Wash and dry hands

                              2


                              Examine the child looking for signs of dehydration:-

                              • The eyes- if sunken
                              • Mouth- lips if dry
                              • Tongue if dry and coated white
                              • Fontanelle- if sunken
                              • Skin- skin pinch if it goes back very slowly (>2s) or slowly (<2s) or immediately

                              2

                              2

                              2

                              2

                              2


                              General condition

                              • Lithergic/Unconscious
                              • Restless and irritable
                              • Eagerness to drink i.e does not drink or drinks poorly or drinks eagerly and thirsty

                              2

                              2


                              Give feed back to the mother and reassure and advise her

                              2


                              TOTAL

                              20


                              COMMENTS

                              ………………………………………………………………………………………

                              ………………………………………………………………………………………

                              OSPE/OSCE PRACTICAL GUIDE

                              SCENARIO: EXAMINATION OF A PREGNANT ABDOMEN

                              At this station, a pregnant mother has come for Ante natal clinic (ANC).

                              INSTRUCTIONS:

                              1. Examine the abdomen.
                              2. Talk loudly for the examiner to hear and score you.
                              3. Move to the next station when the bell rings.

                              OSPE/OSCE PRACTICAL GUIDE

                              STATION: CHECKLIST FOR EXAMINATION OF A PREGNANT ABDOMEN

                              EXAMINER:……………………………………………………DATE:……………………….

                              CANDIDATE NUMBER: ………………………………………………………………………………………………

                              S/No

                              KEY AREAS TO ASSESS

                              SCORE

                              DONE

                              PARTLY

                              DONE

                              NOT DONE

                              TOTAL


                              Follow the general rules

                              1


                              Put the mother in a recumbent position

                              1


                              Expose the abdomen from the sternum to the level of symphysis pubis

                              2


                              Take position at the foot of the bed and observe for signs of pregnancy:-

                              • Size and shape of abdomen
                              • Enlargement of the abdomen
                              • Striae gravidarum, fetal movements
                              • Linea nigra
                              • Hyper pigmentation

                              2


                              Palpation of the abdomen

                              • Light palpation for tenderness
                              • Deep palpation for organomegally

                              2


                              Fundal height estimation

                              2


                              Deep pelvic palpation

                              • Turn and face the foot of the mother. Palpate the lower pole to determine presentation, size of the presenting part and attitude

                              2


                              Fundal palpation

                              • Turn and face the mother’s face, palpate the abdomen what is in the fundus and the lie

                              2


                              Lateral palpation

                              • Support the right hand side of the abdomen with the left hand.
                              • Palpate left side of the abdomen from the lower pole towards the upper pole to determine what is on the side of the abdomen
                              • Palpate the right side of the abdomen in the same way

                              2


                              Note the irregular nodules which indicate the fetal limbs, and the long continuous curved mass which indicates the fetal back

                              2


                              Auscultation – listen

                              1


                              Share the findings with the mother

                              1


                              TOTAL

                              20


                              COMMENTS……………………………………………………………………………

                              OSPE/OSCE PRACTICAL GUIDE

                              SCENARIO: HEALTH EDUCATION ON DANGERS OF DRUG ABUSE

                              At this station, a group of community members have gathered for Health Education.

                              INSTRUCTIONS:

                              1. Give Health Education on the dangers of drug abuse.
                              2. Talk loudly for the examiner to hear and score you.
                              3. Move to the next station when the bell rings.

                              OSPE/OSCE PRACTICAL GUIDE

                              STATION: CHECKLIST FOR HEALTH EDUCATION ON DANGERS OF DRUG ABUSE

                              EXAMINER:……………………………………DATE:……………………….

                              CANDIDATE NUMBER: …………………………………………………………………………….

                              S/No

                              KEY AREAS TO ASSESS

                              SCORE

                              DONE

                              PARTLY

                              DONE

                              NOT DONE

                              TOTAL


                              Follow the general rules

                              1


                              Introduce yourself to the community members

                              2


                              Introduce the topic and asses clients knowledge

                              2


                              Define drug abuse

                              1


                              State the dangers of drug abuse

                              • Loss of respect
                              • Loss of job
                              • theft
                              • suicidal tendency
                              • crime etc

                              4


                              Ask the community members to ask questions.

                              2


                              Answer the question.

                              2


                              Ask the members questions to evaluate the understanding of the community members

                              2


                              Summary of the talk

                              2


                              Thank the community members, give the date of the next Health Education talk

                              2


                              TOTAL

                              20


                              COMMENTS

                              ………………………………………………………………………………………

                              ………………………………………………………………………………………

                              OSPE/OSCE PRACTICAL GUIDE

                              SCENARIO: HEALTH EDUCATION ABOUT PREVENTIVE MEASURES OF HIV

                              At this station, there are mother who have come for antenatal care and needs to be health educated about preventive measures for HIV infection.

                              INSTRUCTIONS

                              1. Health educate the mothers and talk loudly as the examiner scores you.
                              2. Move to the next station when the bell rings.

                              OSPE/OSCE PRACTICAL GUIDE

                              STATION: HEALTH EDUCATION ABOUT PREVENTIVE

                              MEASURES FOR HIV INFECTION

                              STUDENT’S NSIN…………………………………………………………………………….

                              EXAMINER…………………………DATE………………………………….

                              S/No

                              AREAS TO BE ASSESSED

                              SCORE

                              DONE

                              PARTLY

                              DONE

                              NOT DONE

                              TOTAL


                              Arranges room and teaching charts

                              ½


                              Introduces self

                              ½


                              Introduces topic correctly

                              ½


                              Asks mother what they know about HIV/AIDs and preventive measures

                              ½


                              Explains content to mothers correctly e.g:-

                              • Definition
                              • Causes
                              • Information about voluntary HIV testing
                              • Preventive measures
                              • Do not share sharp instruments
                              • Abstinence
                              • Faithfulness
                              • Avoid unscreened blood transfusion
                              • For infected mothers, use of the PMTCT

                              ½

                              ½

                              1

                              1

                              ½

                              ½

                              ½

                              ½

                              ½


                              Ask mothers for any question

                              ½


                              Checks understanding by asking mothers questions about the topic

                              ½


                              Summarizes the topic

                              ½


                              Thanks mothers for attending and makes another appointment day and a topic

                              ½


                              TOTAL

                              10


                              COMMENTS

                              ………………………………………………………………………………………

                              ………………………………………………………………………………………

                              OSPE/OSCE PRACTICAL GUIDE

                              SCENARIO: COLOSTOMY CARE

                              At this station, there is a patient in bed.

                              INSTRUCTIONS:

                              1. The equipments are ready prepared.
                              2. Carry out colostomy care as the examiner observes and scores you.
                              3. Move to the next station when the bell rings.

                              OSPE/OSCE PRACTICAL GUIDE

                              STATION: CHECKLIST FOR COLOSTOMY CARE

                              EXAMINER:……………………………………DATE:……………………….

                              CANDIDATE NUMBER: …………………………………………………………………………….

                              S/No

                              KEY AREAS TO ASSESS

                              SCORE

                              DONE

                              PARTLY

                              DONE

                              NOT DONE

                              TOTAL


                              Explain the procedure to the patient

                              1


                              Provide privacy

                              1


                              Position the patient and turn down the bed clothes to expose the stoma

                              2


                              Wash hands and put on gloves

                              1


                              Remove the soiled bag gently taking care not to pull the skin

                              3


                              Wash the area around the stoma with soapy water and dry well

                              3


                              Apply a barrier cream

                              1


                              Re measure the stoma to make sure that the bag fits correctly and cut the correct size of circle in the stoma adhesive, using measuring guide.

                              3


                              Apply a clean bag as instructed

                              3


                              Clear away and leave the patient comfortable

                              1


                              Wash and dry hands

                              1


                              TOTAL

                              20


                              COMMENTS

                              ………………………………………………………………………………………

                              ………………………………………………………………………………………

                              OSPE/OSCE PRACTICAL GUIDE

                              SCENARIO: VULVA SWABBING/TOILET

                              At this station, there is a patient in bed who needs vulva swabbing.

                              INSTRUCTIONS:

                              1. The equipments are ready prepared.
                              2. Carry out vulva swabbing as the examiner observes and scores you.
                              3. Move to the next station when the bell rings.

                              OSPE/OSCE PRACTICAL GUIDE

                              STATION: CHECKLIST FOR VULVA SWABBING/TOILET

                              EXAMINER:……………………………………DATE:……………………….

                              CANDIDATE NUMBER: …………………………………………………………………………….

                              S/No

                              KEY AREAS TO ASSESS

                              SCORE

                              DONE

                              PARTLY

                              DONE

                              NOT DONE

                              TOTAL


                              Explain the procedure and provide privacy

                              1


                              Strip the bed to the top sheet

                              1


                              Place the draw mackintosh and towel under the patient’s buttocks

                              1


                              Place the patient in a dorsal position with the knees flexed and then abducted apart and fold back the top sheet

                              2


                              Wash, dry hands and put on sterile gloves

                              1


                              Drape the patient to protect the abdomen and thighs

                              2


                              Using the left hand, swab the vulva using a fresh swab for each part in the following order:-

                              • Left labia majora
                              • Right labia majora
                              • Left labia minora
                              • Right labia minora
                              • Vagina introitius using right hand

                              1

                              1

                              1

                              1

                              2


                              Dry the vulva, put in position vulva pad if required

                              2


                              Turn the patient on the side, swab and dry the perineum

                              2


                              Clear away and leave the patient comfortable

                              1


                              Thank the patient and report any abnormality

                              1


                              TOTAL

                              20


                              COMMENTS

                              ………………………………………………………………………………………

                              ………………………………………………………………………………………

                              OSPE/OSCE PRACTICAL GUIDE

                              SCENARIO: EXAMINATION OF ANAEMIA

                              At this station, there is a patient in bed who needs to be assessed for anaemia

                              INSTRUCTIONS:

                              1. Examine the patient for anaemia, speak loudly as the examiner scores you.
                              2. Move to the next station when the bell rings.

                              OSPE/OSCE PRACTICAL GUIDE

                              STATION: CHECKLIST FOR EXAMINATION OF ANAEMIA

                              EXAMINER:……………………………………DATE:……………………….

                              CANDIDATE NUMBER: …………………………………………………………………………….

                              S/No

                              KEY AREAS TO ASSESS

                              SCORE

                              DONE

                              PARTLY

                              DONE

                              NOT DONE

                              TOTAL


                              Explain the procedure and provide privacy

                              1


                              Position the patient

                              1


                              Wash hands

                              1


                              Ask the patient to look up, open the lower eyelid and check for the:-

                              • Paleness of the conjunctiva

                              2


                              Ask the patient to open the mouth and check for the paleness of the:-

                              • Tongue
                              • Gums

                              2

                              2


                              Straighten the arms and check for:-

                              • Palmer paller
                              • Capillary refill time (>3s is very slow) of the finger nails

                              1

                              2


                              on the lower limbs, check for

                              • Paleness of the sole
                              • Capillary refill time of the toes at the nail bed

                              1

                              2


                              Check the mucus membranes of the vagina (if female)

                              2


                              Give appropriate feedback and share the finding with the patient.

                              1


                              Advise the patient appropriately

                              1


                              Documents and thank the patient

                              1


                              TOTAL

                              20


                              COMMENTS

                              ………………………………………………………………………………………

                              ………………………………………………………………………………………

                              OSPE/OSCE PRACTICAL GUIDE

                              SCENARIO: CARE OF THE CORD

                              At this station, there is a newly born baby (doll) whose cord requires to be cared for.

                              INSTRUCTIONS

                              1. Carry out the care of the cord while examiner scores you.
                              2. Move to the next station when the bell rings.

                              OSPE/OSCE PRACTICAL GUIDE

                              STATION: CARE OF THE CORD

                              STUDENT’S NSIN…………………………………………………………………………….

                              EXAMINER…………………………DATE………………………………….

                              S/No

                              AREAS TO BE ASSESSED

                              SCORE

                              DONE

                              PARTLY

                              DONE

                              NOT DONE

                              TOTAL


                              Explain the procedure to the mother

                              ½


                              Position the baby (lying flat on the back)

                              ½


                              puts on sterile gloves

                              ½


                              Inspects the cord for any sign of infection or bleeding

                              1


                              Holds the cord with the swabs and clean the base of the cord in a single circular movement using the once and discard


                              Cleans the cord from the base upward with swab, discard and leave the cord to dry

                              1


                              Leave the baby comfortable and show the mother how to care for the cord.

                              1


                              Gives the baby to the mother and thank her

                              ½


                              Clears away and record the findings and any abnormalities

                              1


                              TOTAL

                              10


                              COMMENTS

                              ………………………………………………………………………………………

                              ………………………………………………………………………………………

                              OSPE/OSCE PRACTICAL GUIDE

                              SCENARIO: BANDAGING THE RIGHT EYE

                              At this station, there is a patient with an injury on the right eye and needs bandaging. The tray is ready.

                              INSTRUCTIONS

                              1. Bandage the right eye
                              2. Move to the next station when the bell rings.

                              OSPE/OSCE PRACTICAL GUIDE

                              STATION: BANDAGING THE RIGHT EYE

                              STUDENT’S NSIN…………………………………………………………………………….

                              EXAMINER…………………………DATE………………………………….

                              S/No

                              AREAS TO BE ASSESSED

                              SCORE

                              DONE

                              PARTLY

                              DONE

                              NOT DONE

                              TOTAL


                              Explains the procedure to the patient and ensure privacy

                              1


                              Stands facing the patient who has asked to hold the eye pad in place till it is bandaged

                              1


                              Begins from the right side to the normal across the forehead and around the head in a fixing turn

                              2


                              From the back of the head the bandage comes under the ear, across the eye, covering the nasal side of the pad and straight over the lead and down the back.

                              2


                              The next turn comes under the ear, overlaps as it crosses the head and comes round to the front.

                              1


                              The pin should be in the centre of the forehead

                              1


                              Thanks, then leaves the patient comfortable and records the procedure.

                              1


                              Another admission sheet is put before the top sheet


                              TOTAL

                              10


                              COMMENTS

                              ………………………………………………………………………………………

                              ………………………………………………………………………………………

                              OSPE/OSCE PRACTICAL GUIDE

                              SCENARIO: ADMINISTRATION OF ORAL DRUG

                              At this station, there is a patient suffering from schizophrenic illness, put on tablet Trifluoperazine 15mg b.d.

                              INSTRUCTIONS

                              1. Give the drug as prescribed.
                              2. Speak loudly for the examiner to hear you.
                              3. Move to the next station when the bell rings.

                              OSPE/OSCE PRACTICAL GUIDE

                              STATION: ADMINISTRATION OF A DRUG ORALLY

                              STUDENT’S NSIN…………………………………………………………………………….

                              EXAMINER…………………………DATE………………………………….

                              S/No

                              AREAS TO BE ASSESSED

                              SCORE

                              DONE

                              PARTLY

                              DONE

                              NOT DONE

                              TOTAL


                              Greet s the patient and explains the procedure

                              ½


                              Washes hands and brings medicine tray at the patient’s bedside

                              ½


                              Reads the prescription and checks with the label on the medicine bottle

                              1


                              Reads the label again to check name of the drug, strength and expiry date.

                              1


                              Uses spoon to pick the required dose and put them into a medicine cup

                              1


                              Re-reads the label before placing the bottle back to the trolley/tray and covers it

                              1


                              Asks for the patient’s name again, checks with prescription and assess the general condition before giving the drug.

                              2


                              Stays with the patient until patient swallows the drug and notes any immediate reactions.

                              1


                              Thank the patient

                              1


                              Document

                              1


                              TOTAL

                              10


                              COMMENTS

                              ………………………………………………………………………………………

                              ………………………………………………………………………………………

                              OSPE/OSCE PRACTICAL GUIDE

                              SCENARIO: PREPARATION OF A TRAY FOR PASSING A NASOGASTRIC TUBE

                              At this station, there is a patient who needs a Nasogastric tube for feeding.

                              INSTRUCTIONS

                              1. Prepare the tray for passing a nasogastric tube and present it to the examiner.
                              2. Move to the next station when the bell rings.

                              OSPE/OSCE PRACTICAL GUIDE

                              STATION: PREPARATION OF A TRAY FOR PASSING A NG TUBE

                              STUDENT’S NSIN…………………………………………………………………………….

                              EXAMINER…………………………DATE………………………………….

                              S/No

                              AREAS TO BE ASSESSED

                              SCORE

                              DONE

                              PARTLY

                              DONE

                              NOT DONE

                              TOTAL


                              Washes hands and cleans the tray

                              1


                              Prepares the equipment necessary onto the tray

                                   
                              • Ryles tube (Nasogastric tube) in a bowl with spigot

                              1

                                  
                              • 2 kidney dishes

                              1

                                  
                              • Lubricant

                              1

                                  
                              • Gauze pieces or cotton in a gallipot

                              1

                                  
                              • Adhensive plaster and scissors

                              1

                                  
                              • 10-20ml syringe and 5ml syringe

                              1

                                  
                              • Gallipot with clean water (warm)

                              ½

                                  
                              • Glass of water and a jar of feed

                              1

                                  
                              • Mackintosh cap and towel

                              1

                                  
                              • Pair of disposable gloves

                              ½


                              TOTAL

                              10


                              COMMENTS

                              ………………………………………………………………………………………

                              ………………………………………………………………………………………

                              OSPE/OSCE PRACTICAL GUIDE

                              SCENARIO: TAKING PATIENT’S PARTICULARS

                              At this station, there is an out-patient whose particulars are to be taken.

                              INSTRUCTIONS

                              1. Take the patient’s particulars
                              2. Speak loudly as the examiner scores you
                              3. Move to the next station when the bell rings.

                              OSPE/OSCE PRACTICAL GUIDE

                              STATION: TAKING PATIENT’S PARTICULARS

                              STUDENT’S NSIN…………………………………………………………………………….

                              EXAMINER…………………………DATE………………………………….

                              S/No

                              AREAS TO BE ASSESSED

                              SCORE

                              DONE

                              PARTLY

                              DONE

                              NOT DONE

                              TOTAL


                              Creates a rapport

                              ½


                              Explains the procedure to the patient

                              ½


                              Makes the patient comfortable

                              ½


                              Asks for:

                                   
                              • Name

                              ½

                                  
                              • Age

                              ½

                                  
                              • Address

                              ½

                                  
                              • Tribe

                              ½

                                  
                              • Religion

                              ½

                                  
                              • Occupation

                              ½

                                  
                              • Next of kin

                              1

                                  
                              • Relation with next of kin

                              1

                                  
                              • Marital status

                              ½

                                  
                              • Presenting complaints

                              1


                              Records the above information

                              ½


                              Thanks the patient

                              ½


                              Directs the patient where to go

                              1


                              TOTAL

                              10


                              COMMENTS

                              ………………………………………………………………………………………

                              ………………………………………………………………………………………

                              OSPE/OSCE PRACTICAL GUIDE

                              SCENARIO: APPLICATION OF TETRACYCLINE EYE OINTMENT

                              At this station, there is an out-patient seated on a chair with an eye problem, apply tetracycline eye ointment.

                              INSTRUCTIONS

                              1. Apply tetracycline eye ointment
                              2. Move to the next station when the bell rings.

                              OSPE/OSCE PRACTICAL GUIDE

                              STATION: APPLICATION OF TETRACYCLINE EYE OITMENT

                              STUDENT’S NSIN…………………………………………………………………………….

                              EXAMINER…………………………DATE………………………………….

                              S/No

                              AREAS TO BE ASSESSED

                              SCORE

                              DONE

                              PARTLY

                              DONE

                              NOT DONE

                              TOTAL


                              Explains the procedure to the patient and provides privacy

                              1


                              Prepares the tray and brings it to the bed side

                              1


                              Position the patient in a sitting up position

                              1


                              Washes hands and puts on glove

                              1


                              Places a folded swab on the lower lid

                              1


                              Draws up the upper lid

                              1


                              Places the nosal of the eye ointment 1cm away from the lower lid

                              1


                              Presses eye ointment horizontally from within outward on a lower lid

                              1


                              Wipes off any surplus ointment gently using a sterile swab

                              ½


                              Thanks the patient and clear away

                              ½


                              Records the findings

                              1


                              TOTAL

                              10


                              COMMENTS

                              ………………………………………………………………………………………

                              ………………………………………………………………………………………

                              OSPE/OSCE PRACTICAL GUIDE

                              SCENARIO: CHANGING BOTTOM SHEET FROM SIDE TO SIDE

                              At this station, there is a patient in the bed with a soiled bottom sheet which needs to be changed.

                              INSTRUCTIONS

                              1. Change the bottom sheet from side to side.
                              2. Move to the next station when the bell rings.

                              OSPE/OSCE PRACTICAL GUIDE

                              STATION: CHANGING BOTTOM SHEET FROM SIDE TO SIDE

                              STUDENT’S NSIN…………………………………………………………………………….

                              EXAMINER…………………………DATE………………………………….

                              S/No

                              AREAS TO BE ASSESSED

                              SCORE

                              DONE

                              PARTLY

                              DONE

                              NOT DONE

                              TOTAL


                              Creates a Rapport and explains the procedure

                              ½


                              Provides privacy

                              ½


                              Places two chairs at the foot of the bed

                              ½


                              Gently loosens the beddings off the patient’s bed with the help of the assistant

                              ½


                              Removes the bed cover and blanket and places them on the chairs at the foot of the bed

                              1


                              Removes the pillows and places them on the chairs

                              1


                              Gently positions the patient for turning

                              • Places one hand over the chest
                              • Places one leg over the other

                              ½

                              ½


                              Gently rolls the patient to the side

                              1


                              Rolls the dirty linen towards the patient

                              ½


                              Rolls the clean linen (sheet, draw mackintosh and sheet) from one side to the other i.e towards the patient and completely makes that side


                              Turns back the patient to the other side and gently removes the dirty lines

                              1


                              Straighten and remakes the bed, leaves the patient comfortable and thanks the patient

                              1


                              TOTAL

                              10


                              COMMENTS

                              ………………………………………………………………………………………

                              ………………………………………………………………………………………

                              OSPE/OSCE PRACTICAL GUIDE

                              Scenario: COUNSELLING AND INITIATING THE HIV POSTIVE PREGNANT MOTHER ON ARVS

                              Examiner’s name ………………..…date………

                              School code……………………………………………………candidate’s No…………………

                              NO.

                              AREAS TOBE ASSESSED

                              SCORE

                              DONE

                              PARTIALLY DONE

                              NOT DONE

                              TOTAL

                              1

                              Creates rapport with the mother

                              ½


                              2

                              Ensures mother’s confidentiality

                              1


                              3

                              Reassures the mother that she is not the first or last.

                              ½


                              4

                              Asks the mother if she has the married, the husband should have a test with other family member.

                              ½


                              5

                              Informs the mother that there is an ART clinic within the hospital.

                              1


                              6

                              Counsels the mother to start treatment.

                              1


                              7

                              When she agrees, starts her on TDF+3TC+EFV as preferred first line treatment regimen.

                              1


                              8

                              Tells her to select time for taking for taking at least 7pm or 8pm without failing

                              1


                              9

                              Informs her to move with her ARVS even if she is going for a visit to maintain adherence.

                              ½


                              10

                              Tells her about the importance of disclosure

                              1


                              11

                              Tells her to have positive living.

                              ½


                              12

                              Tells her to reduce on heavy work

                              ½


                              13

                              Tells her to have good nutrition and exercise

                              ½


                              15

                              Follow the appointment days given in the clinic.

                              ½


                              TOTAL

                              10


                              Examiner’s comments……………………………………………………………………………………………………………………………………………

                              OSPE/OSCE PRACTICAL GUIDE

                              SCENARIO: COUNSELING AND INITIATING HIV POSTIVE PREGNANT MOTHER ON ARVS.

                              At this station a pregnant mother has reported to ANC in Apac main hospital for her first visit, HIV test reveals TRR.

                              Instructions:

                              1. Counsel the client.
                              2. Start her on treatment of ARVS.
                              3. Speak loud for examiner to hear.
                              4. Move to the next station when the bell rings.

                              OSPE/OSCE PRACTICAL GUIDE

                              EXAMINER’S CHECKLIST.

                              Station:

                              Scenario: IDENTIFICATION OF INSTRUMENTS

                              Examiner’s name ………………………………..…date………………………………..

                              School code……………………………………candidate’s No…………

                              NO.

                              AREAS TOBE ASSESSED

                              SCORE

                              DONE

                              PARTIALLY DONE

                              NOT DONE

                              TOTAL

                              1.

                              Episiotomy scissor- performing episiotomy

                              1


                              2.

                              Straight long artery forcep or cord clamp- clamping the cord

                              1


                              3.

                              Cord scissor- cutting the cord.

                              1


                              4.

                              Uterine sound-for measuring the length of the uterus.

                              1


                              5.

                              Sponge holding forcep- holding the swabs

                              1


                              6.

                              Protoscope-for examining the rectum

                              1


                              7.

                              Suture- for stitching

                              1


                              8.

                              Skin retractor- retracting the skin during operation

                              1


                              9.

                              Cervical dilator- dilating the cervix

                              1


                              10.

                              Uterine curette- used during evacuation

                              1


                              TOTAL

                              1O


                              Examiner’s comments……………………………………………………………………………………………………………………………………………

                              OSPE/OSCE PRACTICAL GUIDE

                              SCENARIO: IDENTIFICATION OF INSTRUMENTS

                              INSTRUCTIONS:

                              1. Identify the instruments with their uses.
                              2. Speak loud for the examiner to hear.
                              3. Move to the next station when the bell rings.

                              OSPE/OSCE PRACTICAL GUIDE

                              EXAMINER’S CHECKLIST.

                              Scenario: ACTIVE MANAGEMENT OF THIRD STAGE OF LABOUR

                              Examiner’s name …………………………………………………………………..…date………

                              School code……………………………………………………candidate’s No…

                              NO.

                              AREAS TOBE ASSESSED

                              SCORE

                              DONE

                              PARTIALLY DONE

                              NOT DONE

                              TOTAL

                              1

                              Defines third stage of labour correctly

                              ½


                              2

                              Palpates the abdomen to exclude second twin

                              ½


                              3

                              Gives Oxytocin 10 IU intramuscularly.

                              ½


                              4

                              Extends the cord clamp to the vulva for easy holding.

                              ½


                              5

                              Changes the gloves or rinses in the lotion

                              1


                              6

                              Puts the left hand on the funds of the uterus.

                              ½


                              7

                              With the first contraction, turns the palm of the left hand facing the fundus applying counter traction over the pubic bone.

                              1


                              8

                              Right hand grasps the cord clamp,then applies a steady downward and outward traction until the placenta is seen at the vulva, then applies upward traction to receive the placenta in cupped hands.

                              1


                              9

                              Rolls the membranes, prevent from breaking then deliver the membranes using up ward and down ward movement.

                              ½


                              Notes the time of delivery of the placenta

                              ½


                              10

                              Rub the fundus to promote contraction of the uterus.

                              ½


                              11

                              Carry out quick look for completeness of the membranes and puts in the receiver.

                              ½


                              12

                              Cleans the vulva at the same time inspecting for tears, lacerations or extension of episiotomy, cervix and vaginal as well.

                              1


                              13

                              Puts a sterile pad in position, leaves the mother comfortable.

                              ½


                              14

                              Clears away and documents the findings

                              1


                              TOTAL

                              10


                              Examiner’s comments………………………………………………………………………………………………

                              OSPE/OSCE PRACTICAL GUIDE

                              SCENARIO: MANAGEMENT OF THIRD STAGE OF LABOUR USING CONTROLLED CORT TRACTION.

                              At this station there is a model representing a mother who has just delivered the baby, assist to deliver the placenta.

                              Instructions:

                              1. Carry out delivery of the placenta, all requirements are already set.
                              2. Speak loud for examiner to hear
                              3. Move to the next station when the bell rings.

                              OSPE/OSCE PRACTICAL GUIDE

                              EXAMINER’S CHECKLIST.

                              Station:

                              Scenario: FEMALE CATHETERISATION.

                              Examiner’s name ………………………………………..…date………………………………..

                              School code……………………………………………………candidate’s No……………………………

                              NO.

                              AREAS TOBE ASSESSED

                              SCORE

                              DONE

                              PARTIALLY DONE

                              NOT DONE

                              TOTAL

                              1

                              Creates rapport with the patient.

                              ½


                              2

                              Explains the procedure

                              ½


                              3

                              Screens the bed and extends the trolley to the bed side.

                              ½


                              4

                              Puts the small mackintosh and towel to protect the linens

                              ½


                              5

                              Washes hands methodically and puts on surgical gloves.

                              1


                              6

                              Inspects and cleans the vulva in a methodical way.

                              1


                              7

                              Drapes the mother

                              ½


                              8

                              Selects the appropriate catheter and lubricates the tip with k.y jelly.

                              ½


                              9

                              Place the receiver in between the thighs and puts the catheter, inserts slowly until urine is seen emptying into the receiver

                              1


                              10

                              Injects into the catheter to balloon it and aid it remain in situ.

                              1


                              11

                              Connects the catheter to the urinary bag and Fastens it on the thigh

                              1


                              12

                              Removes the receiver, drape, and small mackintosh.

                              ½


                              13

                              Measures the urine collected and records in the fluid balance chart.

                              ½


                              14

                              Clears away, leaves the mother comfortable and thanks her.

                              ½


                              15

                              Washes hands and documents the findings.

                              ½


                              TOTAL

                              10


                              Examiner’s comments………………………………………………………………………………………………………

                              OSPE/OSCE PRACTICAL GUIDE

                              SCENARIO: SETTING REQUIREMENTS FOR VULVA SWABBING

                              At this station there is a mother who is in first stage of labour, you are asked to set all the requirements needed for vulva swabbing and present to the examiner.

                              Instructions:

                              1. Perform the task
                              2. Speak loud for the examiner to hear
                              3. When the bell rings move to the next station.

                              Examiner’s name …………………………………………………………………..…date………………………………..

                              School code……………………………………………………candidate’s No…………………………………………..

                              NO.

                              AREAS TOBE ASSESSED

                              SCORE

                              DONE

                              PARTIALLY DONE

                              NOT DONE

                              TOTAL

                              1.

                              Disinfects the trolley and puts a sterile towel.

                              1


                              2

                              TOP SHELF


                              • Sterile swabs in a Gallipot- for vulva swabbing
                              • Sterile pad- to be put after the procedure
                              • Antiseptic lotion in a Gallipot- for vulva swabbing
                              • A pair of sterile gloves- for protection
                              • Sterile drape and towel-for providing sterile surface
                              • Receiver for used swabs
                              • Sterile hand towel- for drying hands

                              1

                              1

                              ½

                              1

                              1

                              1

                              ½


                              3

                              BOTTOM SHELF


                              • Small mackintosh and towel- for protecting the linens

                              1


                              • Antiseptic lotion in a bottle- for vulva swabbing.

                              ½


                              • Apron – for protection

                              ½


                              4

                              BED SIDE


                              • Hand washing facilities

                              ½


                              • Screen for privacy

                              ½


                              TOTAL

                              10


                              Examiner’s comments…………………………………………………………………………………………………………………………

                              OSPE/OSCE PRACTICAL GUIDE

                              Scenario: CORD CARE

                              Examiner’s name …………………………………………………..…date………………………………..

                              School code……………………………………………………candidate’s No………………………………

                              NO.

                              AREAS TOBE ASSESSED

                              SCORE

                              DONE

                              PARTIALLY DONE

                              NOT DONE

                              TOTAL

                              1

                              Creates rapport with the mother

                              ½


                              2

                              Explains the procedure to the mother and reason for doing it.

                              1


                              3

                              Positions the baby

                              ½


                              4

                              Washes hands and puts on surgical gloves

                              1


                              5

                              Inspects the cord for any bleeding or signs of infection.

                              1


                              6

                              Holds the cord with the swab and cleans the base using a single circular motion and single swab and discards it.

                              1


                              7

                              Cleans the cord from base upward with a swab once until the cord is clean.

                              1


                              8

                              Leaves the cord dry.

                              1


                              9

                              Gives the baby back to the mother.

                              ½


                              10

                              Thanks the mother and educates her on the cord care.

                              1


                              11

                              Documents the findings

                              ½


                              12

                              Clears away and washes hands.

                              1


                              TOTAL

                              10


                              Examiner’s comments…………………………………………………………………………………………………………………………

                              OSPE/OSCE PRACTICAL GUIDE

                              SCENARIO: CORD CARE.

                              At this station mother Irene is a zero day after delivery of her first born baby boy, demonstrate to her how to clean the cord.

                              Instructions:

                              1. Prepare a tray and present to the examiner.
                              2. Speak loud for examiner to hear.
                              3. Move to the next station when the bell rings.

                              OSPE/OSCE PRACTICAL GUIDE

                              EXAMINER’S CHECKLIST.

                              Scenario: IDNTIFYING BOUNDARIES OF THE PELVIC BRIM AND DIAMETERS OF THE BRIM.

                              Examiner’s name …………………………………………..…date………………………………..

                              School code……………………………………………………candidate’s No……………………………

                              NO.

                              AREAS TOBE ASSESSED

                              SCORE

                              DONE

                              PARTIALLY DONE

                              NOT DONE

                              TOTAL

                              1

                              Washes the hands

                              ½


                              2

                              Defines the pelvis correctly

                              ½


                              3

                              BOUNDARIES OF THE BRIM IN ORDER :


                              1. Sacral promontory

                              1


                              1. Ala/ wing of the sacrum

                              ½


                              1. Sacral iliac joint

                              ½


                              1. Iliopectineal line

                              ½


                              1. Iliopectineal eminence

                              ½


                              1. Superior ramus of the pubic bone

                              1


                              1. Upper inner border of the body of the pubic bone

                              1


                              1. Upper inner border of the symphysis pubis

                              1


                              4

                              DIAMETERS OF THE BRIM:


                              • Transverse diameter extends across the greater width of the brim. Average measurers 13 cm

                              1


                              • Oblique diameter extends from Iliopectineal eminence of one side to the sacral iliac joint of the opposite side. Average measurers 12 cm

                              1


                              • Anteroposterior / conjugate diameter extends from the sacral promontory to the symphysis pubis average measures 11 cm (obstetrical conjugate).

                              1


                              TOTAL

                              10


                              Examiner’s comments…………………………………………………………………………………………………………………………

                              OSPE/OSCE PRACTICAL GUIDE

                              SCENARIO: IDENTIFICATION OF THE BOUNDARIES OF THE PELVIC BRIM AND DIAMETERS OF THE BRIM.

                              Instructions:

                              1. Identify the boundaries of the pelvic brim in order and the diameters of the brim with their measurements.
                              2. speak loud for the examiner to hear
                              3. move to the next station when the bell rings

                              OSPE/OSCE PRACTICAL GUIDE

                              EXAMINER’S CHECKLIST.

                              Scenario: VAGINAL EXAMINATION.

                              Examiner’s name ……………………………..…date………………………………..

                              School code………………candidate’s No…………………………………………..

                              NO.

                              AREAS TOBE ASSESSED

                              SCORE

                              DONE

                              PARTIALLY DONE

                              NOT DONE

                              TOTAL

                              1.

                              Creates rapport and explains the procedure to the mother

                              ½


                              2.

                              Asks the mother to empty the bladder if full.

                              ½


                              3.

                              Provides privacy

                              ½


                              4.

                              Brings the requirements near the bed side

                              ½


                              5.

                              Washes hands and puts on sterile gloves.

                              ½


                              6.

                              Carries out vulva swabbing in the following order using each swab at a time.


                              • Labia majora left and right
                              • Labia minora left and right
                              • Vestibules

                              ½

                              ½

                              ½


                              7.

                              Inspects the vulva and reports about;

                              • Presence of any discharge
                              • Any previous scar
                              • Oedema
                              • Varicose veins
                              • Sores or warts

                              ½

                              ½

                              ½

                              ½

                              ½


                              8.

                              Inserts two fingers and examines the vagina and reports about:

                              • Nature of the vagina whether hot and moist /dry .
                              • Nature of the cervix whether thin or soft.
                              • Dilatation of the cervix
                              • Nature of the membranes if rupture or intact
                              • Moulding and caput formation if present

                              ½

                              ½

                              ½

                              ½

                              ½


                              9.

                              Gives feedback to the mother and thanks her.

                              ½


                              10.

                              Records down the findings.

                              ½


                              TOTAL

                              10


                              EXAMINER’S COMMENTS………………………………………………………………………………………………………………………………………….

                              OSPE/OSCE PRACTICAL GUIDE

                              SCENARIO: VAGINAL EXAMINATION.

                              At this station there is a mother admitted in maternity ward in first stage of labour ward and senior midwife has ordered you to carry out vaginal examination to confirm the cervical dilatation.

                              Instructions:

                              1. Carry out vaginal examination, the requirements are already set.
                              2. Speak loud for examiner to hear.
                              3. Move to the next station when the bell rings

                              OSPE/OSCE PRACTICAL GUIDE

                              EXAMINER’S CHECKLIST.

                              Scenario: ANTENANTAL HISTORY TAKING

                              Examiner’s name……………………..…date………………………………..

                              School code…………………………………candidate’s No…….

                              NO.

                              AREAS TOBE ASSESSED

                              SCORE

                              DONE

                              PARTIALLY DONE

                              NOT DONE

                              TOTAL

                              1

                              Creates rapport

                              ½


                              2

                              Offers sits to the mother

                              ½


                              3

                              Takes the following histories:


                              • Demographic data

                              1


                              • Family history

                              1


                              • Medical history

                              1


                              • Past obstetric history

                              1


                              • Present obstetric history

                              1


                              4

                              Calculates the EDD using LNMP as 15/Feb./2016 and reporting day as

                              7/June /2016

                              1 ½


                              5

                              Calculates the weeks of amenorrhea

                              2


                              6

                              Gives feedback to the mother

                              ½


                              TOTAL

                              10


                              Examiner’s comments…………………………………………………………………………………………………………………………

                              OSPE/OSCE PRACTICAL GUIDE

                              SCENARIO: ANTENANTAL HISTORY TAKING AT THE FIRST VISIT.

                              At this station, the mother has reported to antenatal clinic on 7th / June/ 2016 for her first visit with LNMP 15th / FEB/ 2016

                              Instructions:

                              1. Take all the histories required and calculate the EDD and weeks of amenorrhea (WOA)
                              2. Speak loud for examiner to hear.
                              3. Move to the next station when the bell rings.

                              OSPE/OSCE PRACTICAL GUIDE.

                              Scenario: URINE TESTING FOR GLUCOSE AND PROTEINS

                              Examiner’s name ………………………..…date………………………………..

                              School code…………………………candidate’s No………………..

                              NO.

                              AREAS TOBE ASSESSED

                              SCORE

                              DONE

                              PARTIALLY DONE

                              NOT DONE

                              TOTAL

                              1

                              Washes hands

                              ½


                              2

                              Puts on clean gloves

                              ½


                              3

                              Identifies the specimen A as savlon / chlorhexidine disinfectant and specimen B as urine

                              ½


                              4

                              Examines the urine and reports the about the following:

                              • Colour as yellow or amber
                              • Amount normal is between 1000 to 1500mls in a day
                              • Specific gravity using urinometer normal one is between 1010 to 1025
                              • Deposits
                              • Odour or smell normal presents with smell of ammonia
                              • Reaction by using the litmus paper whether acidic or alkaline

                              ½

                              ½

                              ½

                              ½

                              ½

                              ½


                              5

                              Pours some urine in the test tube and tests for glucose using the uristix

                              ½


                              6

                              Holds the uristix without touching its top part and inserts in the test tube of urine.

                              1


                              7

                              Removes the uristix and allows excess urine to flow off then puts if against the colour codlings correctly.

                              1


                              8

                              Reports the presence of glucose and proteins in the urine.

                              2


                              9

                              Documents the findings and reports to the examiner.

                              ½


                              TOTAL

                              10


                              Examiner’s comments…………………………………………………………………………………………………………………………

                              OSPE/OSCE PRACTICAL GUIDE

                              SCENARIO: URINE TESTING FOR GLUCOSE AND ALBUMINS.

                              At this station there are two specimens labeled as specimen A and specimen B.

                              Instructions:

                              1. Identify the specimens A and B
                              2. Test specimen B for the presence of glucose and albumins.
                              3. Speak loud for examiner to hear.
                              4. Move to the next station when the bell rings

                              OSPE/OSCE PRACTICAL GUIDE

                              EXAMINER’S CHECKLIST.

                              Scenario: ASSESSMENT FOR ANAEMIA.

                              Examiner’s name ……………………………..…date………………………………..

                              School code………………………candidate’s No…………………………………………..

                              NO.

                              AREAS TOBE ASSESSED

                              SCORE

                              DONE

                              PARTIALLY DONE

                              NOT DONE

                              TOTAL

                              1

                              creates rapport with the patient

                              ½


                              2

                              Explains the procedure to the patient and washes hands

                              1


                              3

                              Screens for privacy and positions the patient in a sitting up position

                              ½


                              4

                              Examines the patient from head to toe systematically

                              ½


                              5

                              Reports about the following:


                              • Conjunctiva and the mucus membranes of the eyes whether pink or pale

                              1


                              • Instructs the patient to open the mouth and reports about the lips, the gum and the tongue whether pink or pale

                              1


                              • Checks the patients palms for paleness

                              1


                              • Checks for venous return whether slow or fast by pressing the nail bed of the thumb.

                              1


                              • Mentions about the vulva

                              ½


                              • Checks the soles of the feet for paleness and also finds out the venous return by pressing the nail beds of the toes

                              1


                              6

                              Gives findings to the patient and advice accordingly and thanks the patient

                              1


                              7

                              Documents the findings and washes hands.

                              1


                              TOTAL

                              10


                              Examiner’s comments…………………………………………………………………………………………………………………………

                              OSPE/OSCE PRACTICAL GUIDE

                              SCENARIO: ASSESSMENT FOR ANAEMIA.

                              At this station there is a mother admitted with history of per vaginal bleeding following incomplete abortion.

                              Instructions:

                              1. Carry out assessment for anaemia.
                              2. Speak loud for examiner to hear.
                              3. Move to the next station when the bell rings

                              OSPE/OSCE PRACTICAL GUIDE

                              EXAMINER’S CHECKLIST.

                              Scenario: HEALTH EDUCATION TALK ON REPORT WRITING

                              Examiner’s name …………………………………………………………………..…date………………………………..

                              School code……………………………………………………candidate’s No…………………………………………..

                              NO.

                              AREAS TOBE ASSESSED

                              SCORE

                              DONE

                              PARTIALLY DONE

                              NOT DONE

                              TOTAL

                              1.

                              Total number of patients and new admissions, escapees etc

                              2


                              2.

                              Post operative patients and their conditions and treatments

                              2


                              3.

                              Very ill patients and doctors prescription individually

                              2


                              4.

                              Pre- operative patients and time of operation

                              2


                              5.

                              Number of death and report individually on each if more than one.

                              2


                              TOTAL

                              10


                              comments………………………………………………………………………………………………………………………………………………………………………………………………………………………………………………………………………………………………………….

                              OSPE/OSCE PRACTICAL GUIDE

                              SCENARIO: HEALTH EDUCATION ON REPORT WRITING

                              At this station there is a group of junior students allocated on the surgical ward.

                              INSTRUCTIONS:

                              1. Health educate the junior students on the ward about report writing.
                              2. Speak Loud As The Examiner Scores You
                              3. Move To The Next Station When The Bell Ring.

                              OSPE/OSCE PRACTICAL GUIDE

                              Scenario: HAEMORRHAGE ARRESTING.

                              Examiner’s name …………………………………………………………………..…date………………………………..

                              School code……………………………………………………candidate’s No…………………………………………..

                              NO.

                              AREAS TOBE ASSESSED

                              SCORE

                              DONE

                              PARTIALLY DONE

                              NOT DONE

                              TOTAL

                              1.

                              Prepare a tray containing tourniquet, gauze pads and bandage.

                              3


                              2.

                              Re assure the patient and position the affected limb

                              1


                              3.

                              Apply pressure with a thumb just above the site.

                              1


                              4.

                              Apply a tourniquet for seconds and realse

                              1


                              5.

                              Apply a gauze pad and bandage it

                              1


                              6.

                              Elevates the limb using a pillow

                              1


                              7.

                              Ensure that the patient is comfortable and ask whether the bandage is tight

                              1


                              8.

                              Thanks the patient

                              ½


                              10.

                              Documents the procedure done.

                              ½


                              TOTAL

                              10


                              comments………………………………………………………………………………………………………………………………………………………………………………………………………………………………………………………………………………………………………….

                              OSPE/OSCE PRACTICAL GUIDE

                              SCENARIO: ARRESTING BLEEDING.

                              At this station there is a patient presented in the health center two with severe bleeding on the left lower limb after having a serious cut during a fight.

                              Instructions:

                              1. Prepare and arrest the bleeding.
                              2. Move to the next station when the bell rings.

                              OSPE/OSCE PRACTICAL GUIDE

                              Scenario: ASSESSMENT OF DEHYDRATION

                              Examiner’s name …………………………………………………………………..…date………………………………..

                              School code……………………………………………………candidate’s No…………………………………………..

                              NO.

                              AREAS TOBE ASSESSED

                              SCORE

                              DONE

                              PARTIALLY DONE

                              NOT DONE

                              TOTAL

                              1.

                              Creates rapport and explains the procedure

                              1


                              2.

                              Requests the mother and inspects the child’s general condition

                              ½


                              3.

                              Assess for the following signs from head to toe:-

                              • Depressed fontanelles
                              • Sunken eyes and absence of ears on crying
                              • Irritability.
                              • Dry lips and mucus membrane
                              • Dry skin
                              • Slow return of the skin on pinching
                              • Thirsty as the child wants to crasp the cup and also drinks eagerly.

                              ½

                              ½


                              ½

                              ½

                              ½

                              ½

                              ½


                              4.

                              Gives feedback to the mother

                              1


                              5.

                              Advices the mother appropriately

                              2


                              6.

                              Documents the findings

                              1


                              7.

                              Refer the child for better management.

                              1


                              TOTAL

                              10


                              comments………………………………………………………………………………………………………………………………………………………………………………………………………………………………………………………………………………………………………….

                              OSPE/OSCE PRACTICAL GUIDE

                              SCENARIO: ASSESSMENT OF DEHYDRATION.

                              At this station there is a mother with a one year old child who has reported in health center two with history of severe diarrhorea and vomiting for two days.

                              Instructions:

                              1. As an in charge of health center two assess this child for signs of dehydration and report to the examiner your findings.
                              2. Move to the next station when the bell rings.

                              OSPE/OSCE PRACTICAL GUIDE

                              Scenario: PREPARING A COMPLETE TROLLEY FOR WOUND DRESSING.

                              Examiner’s name …………………………………………………………………..…date………………………………..

                              School code……………………………………………………candidate’s No…………………………………………..

                              NO.

                              AREAS TOBE ASSESSED

                              SCORE

                              DONE

                              PARTIALLY DONE

                              NOT DONE

                              TOTAL

                              1.

                              Disinfects the trolley and lays a sterile towel

                              1


                              2.

                              Picks sterile instruments methodically and puts on the top shelf.

                              ½


                              3.

                              TOP SHELF


                              4.

                              • Gallipot of sterile cotton swabs
                              • Gallipot of sterile gauze swabs
                              • Gallipot containing a dressing lotion
                              • Dressing towels
                              • Sterile drape
                              • Sterile hand towels
                              • Receiver containing 2 dissecting forceps, 1 dressing forcep, sinus, forcep, probe and 1 artery forcep.
                              • Receiver for used swabs and for instruments.

                              ½

                              ½

                              ½

                              ½

                              ½

                              ½

                              1 ½

                              ½


                              5.

                              BOTTOM SHELF


                              6.

                              • Pair of sterile gloves
                              • Apron
                              • Small mackintosh and towel
                              • Pair of scissor and strapping.
                              • Pair of clean gloves.

                              ½

                              ½

                              ½

                              ½

                              ½


                              7.

                              BED SIDE.


                              • Screen
                              • Hand washing towel

                              ½

                              ½


                              3.

                              TOTAL

                              10


                              comments………………………………………………………………………………………………………………………………………………………………………………………………………………………………………………………………………………………………………….

                              OSPE/OSCE PRACTICAL GUIDE

                              SCENARIO: PREPAPARTION OF ATROLLEY FOR WOUND DRESSING.

                              At this station, doctor has ordered a trolley to be set for dressing a deep cut wound.

                              Instructions:

                              1. Prepare a complete sterile trolley for carrying out sterile wound dressing and present to the examiner.
                              2. Speak loud for the examiner to hear.
                              3. Move to the next station when the bell rings.

                              OSPE/OSCE PRACTICAL GUIDE

                              Scenario: GIVING INTRAMUSCULAR INJECTION.

                              Examiner’s name ………………………………………………date………………………………..

                              School code…………………………candidate’s No…………………………………………..

                              NO.

                              AREAS TOBE ASSESSED

                              SCORE

                              DONE

                              PARTIALLY DONE

                              NOT DONE

                              TOTAL

                              1.

                              Creates rapport and explains the procedure

                              ½


                              Requests for medical form to confirm the patient’s identity and prescribed medication.

                              ½


                              2.

                              Washes hands and prepares the medication to be given

                              ½


                              3.

                              Picks correct medication and checks for correct name, expiry date and check for the prescribed dosage

                              1


                              4.

                              Assemble the medication tray near the patient and explains to the patient

                              ½


                              5.

                              Screens the bed and washes hands

                              ½


                              6.

                              Opens the ampoule methodically and reconstitute the medication without touching the top of the vial.

                              ½


                              7.

                              Positions the patients and exposes the site to be injected.

                              ½


                              8.

                              Puts on the gloves.

                              ½


                              9.

                              Withdraws the medication and expels the air while handling the needle in aseptic technique.

                              1


                              10.

                              Cleans the selected site using one swab at a time and discards.

                              ½


                              11.

                              Holds the muscle and injects the medication while handling the needle at an angle of 90o

                              ½


                              12.

                              Withdraws the needle and applies the swab at the injected site without massaging.

                              ½


                              13.

                              Records down the medication given and explains to the patient the time of next treatment.

                              1


                              14.

                              Clears away and confirms the medication being given to the patient when returning back to the shelf.

                              1


                              15.

                              Thanks the patient and washes the hands.

                              ½


                              TOTAL

                              10


                              EXAMINER’S COMMENTS……………………………………………………………………………………………………………

                              OSPE/OSCE PRACTICAL GUIDE

                              SCENARIO: GIVING AN INTRAMUSCULAR INJECTION.

                              At this station there is a patient with a diagnosis of pneumonia and doctor has ordered intramuscular injection of benzyl penicillin 1 MU to be given.

                              Instructions:

                              1. Prepare the medication and give to the patient.
                              2. Move to the next station when the bell rings

                              OSPE/OSCE PRACTICAL GUIDE

                              Scenario: NAMING PARTS OF AN OXYGEN CYLINDER

                              Examiner’s name …………………………………………………………………..…date………………………………..

                              School code……………………………………………………candidate’s No…………………………………………..

                              NO.

                              AREAS TOBE ASSESSED

                              SCORE

                              DONE

                              PARTIALLY DONE

                              NOT DONE

                              TOTAL


                              Washes the hands


                              1

                              Identifies the following parts with their functions.


                              2

                              Main tap/ valve for allowing air flow out.

                              2


                              3

                              Flow meter for measuring the amount of oxygen to be given.

                              2


                              4

                              Regulator for regulating the required amount prescribed

                              1


                              5

                              Wolfe’s bottle for moistening and cleaning the air before reaching the patient.

                              2


                              6

                              Pressure gauge for indicating the amount of oxygen present in the cylinder

                              2


                              7

                              Oxygen catheter for administering oxygen to the patient.

                              1


                              TOTAL


                              EXAMINER’S COMMENTS………………………………………………………………………………………………………………………………………….

                              OSPE/OSCE PRACTICAL GUIDE

                              SCENARIO: IDENFICATION OF PARTS OF OXYGEN CYLINDER WITH THEIR FUNCTIONS.

                              INSTRUCTIONS:

                              1. At this station there is an oxygen cylinder, identify all its part with their functions.
                              2. Speak loud for examiner to hear
                              3. Move to the next station when the bell rings

                              OSPE/OSCE PRACTICAL GUIDE

                              Scenario: BABY WEIGHING.

                              Examiner’s name …………………………………………………………………..…date………………………………..

                              School code……………………………………………………candidate’s No…………………………………………..

                              NO.

                              AREAS TOBE ASSESSED

                              SCORE

                              DONE

                              PARTIALLY DONE

                              NOT DONE

                              TOTAL

                              1.

                              Creates rapport and explains the procedure to the mother.

                              1


                              2.

                              Washes hands

                              ½


                              3.

                              Prepares and checks the weighing scale to see that its in good working conditions

                              ½


                              4.

                              Records the initial values of the weighing pan.

                              1


                              5.

                              Requests the mother and together they undress the baby and puts the baby’s clothes on the mother’s shoulder.

                              1


                              6.

                              Dresses the baby in a weighing pan correctly.

                              ½


                              7.

                              holds the baby gently and puts up on the weighing scale.

                              1


                              8.

                              Notes the reading on scale.

                              ½


                              9.

                              Removes the baby from the weighing and requests the mother to dress back the baby

                              1


                              10.

                              Plots the weight correctly in the child growth monitoring chart by subtracting the weight of the weighing pan from the final readings

                              1 ½


                              11.

                              Gives feed back to the mother and advices her accordingly

                              1


                              12.

                              Thanks the mother and washes the hands.

                              ½


                              TOTAL


                              EXAMINER’S COMMENTS………………………………………………………………………………………………………………………………………….

                              OSPE/OSCE PRACTICAL GUIDE

                              SCENARIO: GROWTH MONITORING

                              At this station there is a mother with a six (6) month year old baby boy who haS reported in the young child clinic (Y C C) for check up.

                              INSTRUCTIONS:

                              1. Carry out baby weighing, the requirements are already set.
                              2. Speak loud for examiner to hear.
                              3. Move to the next station when the bell rings.

                              OSPE/OSCE PRACTICAL GUIDE

                              Scenario: IDENTIFICATION OF INSTRUMENTS.

                              Examiner’s name …………………………………………………………………..…date………………………………..

                              School code……………………………………………………candidate’s No…………………………………………..

                              NO.

                              AREAS TOBE ASSESSED

                              SCORE

                              DONE

                              PARTIALLY DONE

                              NOT DONE

                              TOTAL

                              1.

                              Washes hands


                              2.

                              Non retained abdominal retractor/ doyen’s retractor- for opening the abdomen during operation.

                              1


                              3.

                              Sinus forcep – for packing swabs in the orifices and dressing deep wounds

                              1


                              4.

                              Plastic air way tube- for opening the airway and keeping it patent.

                              1


                              5.

                              3 way urethral catheter- for irrigation of the bladder

                              1


                              6.

                              Otoscope- for examining the air.

                              1


                              7.

                              Blade holder for holding surgical blades.

                              1


                              8.

                              Towel clip for fastening dressing towels during the procedure./ clamping towels on the trolley when setting for sterile procedure.

                              1


                              9.

                              Auvard’s vaginal speculum- for evacuation

                              1


                              10.

                              Uterine tenaculum- for holding the uterus in place.

                              1


                              11.

                              Alice tissue forcep- for holding tissues during operation.

                              1


                              TOTAL

                              10


                              EXAMINER’S COMMENTS………………………………………………………………………………………………………………………………………….

                              OSPE/OSCE PRACTICAL GUIDE

                              SCENARIO: IDENTIFICATION OF INSTRUMENTS WITH THEIR USES.

                              Instructions

                              1. Identify the instruments with their uses
                              2. Speak loud for examiner to hear.
                              3. Move to the next station when the bell rings.

                              OSPE/OSCE PRACTICAL GUIDE

                              Scenario: IDENTIFYING DIAMETERS OF THE FETAL SKULL

                              Examiner’s name …………………………………………………………………..…date………………………………..

                              School code……………………………………………………candidate’s No…………………………………………..

                              NO.

                              AREAS TOBE ASSESSED

                              SCORE

                              DONE

                              PARTIALLY DONE

                              NOT DONE

                              TOTAL

                              1

                              Washes hands

                              1


                              2

                              Defines fetal skull

                              1


                              Identifies the diameters correctly as:


                              3

                              2 TRANSVERSE DIAMETER:


                              Bi parietal diameter 9.5 cm

                              1


                              Bi temporal diameter 8.2 cm

                              1


                              4

                              6 LONGITUDINAL DIAMETERS


                              Sub-occipito bregmatic 9.5cm

                              1


                              Sub occipito frontal 11.5 cm

                              1


                              Occipital frontal 10 cm

                              1


                              Sub mentol vertex 11.5 cm

                              1


                              Sub mentol bregmatic 9.5 cm

                              1


                              Mental vertex 13 cm

                              1


                              TOTAL

                              10


                              EXAMINER’S COMMENTS………………………………………………………………………………………………………………………………………….

                              OSPE/OSCE PRACTICAL GUIDE

                              SCENARIO: IDENTIFICATION OF THE DIAMETERS OF THE FETAL SKULL

                              Instructions:

                              1. Identify the diameters of the fetal skull correctly.

                              2. Speak loud for the examiner to hear.

                              3. Move to the next station when the bell ring

                              OSPE/OSCE PRACTICAL GUIDE

                              Scenario: IDENTIFICATION OF INSTRUMENTS

                              Examiner’s name …………………………………………………………………..…date………………………………..

                              School code……………………………………………………candidate’s No…………………………………………..

                              NO.

                              AREAS TOBE ASSESSED

                              SCORE

                              DONE

                              PARTIALLY DONE

                              NOT DONE

                              TOTAL

                              1

                              Non toothed dissecting forcep- for holding swabs and tissues a during the procedure

                              1


                              2

                              Mouth gag- for opening the mouth of unconscious patient during oral care.

                              1


                              3

                              Male urinal- for male to pass urine

                              1


                              4

                              Cheatle forcep- for picking sterile instruments from drums

                              1


                              5

                              Sponge holding forcep- for holding swabs

                              1


                              6

                              Laryngoscope- for opening the larynx during examination

                              1


                              7

                              Plastic airway tube- for opening the airway in an unconscious patient.

                              1


                              8

                              Long straight artery forcep- for clamping arteries, umbilical cord to reduce bleeding.

                              1


                              9

                              Sputum mug- for receiving the sputum

                              1


                              10

                              Cusco’s vaginal speculum- for opening the vaginal during examination or other gynecological procedures

                              1


                              TOTAL

                              10


                              Examiner’s comments………………………………………………………………………………………………………………………………………………………………………………………………………………………………………………………………………………………………………….

                              OSPE/OSCE PRACTICAL GUIDE

                              Scenario: IDENTIFICATION OF INSTRUMENTS WITH THEIR USES.

                              Instructions:

                              1. Identify the instruments correctly with their functions
                              2. Speak loud for examiner to hear
                              3. Move to the next station

                              OSPE/OSCE PRACTICAL GUIDE

                              Scenario: MAKING A HOSPITAL BED

                              Examiner’s name …………………….…date………………………………..

                              School code………………candidate’s No…………………………………………..

                              NO.

                              AREAS TOBE ASSESSED

                              SCORE

                              DONE

                              PARTIALLY DONE

                              NOT DONE

                              TOTAL

                              1

                              Washes hands and requests for an assistant.

                              ½


                              2

                              Brings the trolley near the bed side and puts two chairs at the bottom of the bed.

                              ½


                              3

                              Screens and extend the bed away from the wall

                              ½


                              4

                              Turns the mattress to check for firmness of the spring and straightens the mattress cover working from top to bottom of the bed.

                              ½


                              5

                              Puts the long mackintosh and meters the corners to make an envelope then tucks in from top to bottom

                              1


                              6

                              Puts the bottom bed sheet and meters the corners to make an envelope then tucks in from top to bottom

                              1


                              7

                              Puts a draw mackintosh across the bed at the level of the buttocks and tucks on both sides

                              ½


                              8

                              Puts a draw sheet on the draw mackintosh and also tucks in on both sides.

                              ½


                              9

                              Puts the top bed sheet and meters the corners of the bottom to make an envelope then tucks in

                              1


                              10

                              Puts the blanket and meters the corners of the bottom to make an envelope then tucks in from top to bottom

                              1


                              11

                              Puts the counter pane and meters the bottom, the folds together with the blanket and top sheet up to the middle way and tucks in on both sides

                              1


                              12

                              Puts a pillow in a pillow case and places at the top ensuring that the open part doesn’t face the door.

                              1


                              13

                              Takes the bed back to the wall, clears away and washes hands.

                              1


                              TOTAL

                              10


                              Examiner’s comments……………………………………………

                              OSPE/OSCE PRACTICAL GUIDE

                              SCENARIO: MAKING A HOSPITAL BED

                              At this station, all the requirements for bed making are already set for you. Make an un occupied bed (hospital bed) while observing the rules of bed making.

                              Instructions:

                              1. Perform the task.
                              2. Move to the next station when the bell rings.

                              OSPE/OSCE PRACTICAL GUIDE

                              Scenario: DUMP DUSTING

                              Examiner’s name ……………………………..…date………………………………..

                              School code…………candidate’s No…………………………………………..

                              NO.

                              AREAS TOBE ASSESSED

                              SCORE

                              DONE

                              PARTIALLY DONE

                              NOT DONE

                              TOTAL

                              1

                              Puts on an apron and Washes hands and

                              1


                              2

                              Puts on clean gloves

                              1


                              3

                              Pours water in one basin and mix with soap to make soapy water and another basin with clean water.

                              1


                              4

                              Using a flannel ,dumps it in soapy water and dusts the top surface of the locker from far to nearby side

                              1


                              5

                              Rinses the towel and again dusts using clean water and dries up using a dry flannel.

                              1


                              6

                              Moves to the inner part following the same steps like in 2 and 3 above

                              1


                              7

                              Move to the lower parts and follow the same steps like in 2 and 3 above

                              1


                              8

                              Changes water whenever dirty

                              1


                              10

                              Clears away and washes hands

                              1


                              TOTAL

                              10


                              Examiner’s comments…………………………………………………………

                              OSPE/OSCE PRACTICAL GUIDE

                              SCENARIO: DUMP DUSTING A LOCKER

                              At this station, all the requirements for dump dusting are already set for you.

                              Instructions:

                              1. Carry out dump dusting.
                              2. Speak loud for examiner to hear
                              3. Move to the next station when the bell rings.

                              OSPE/OSCE PRACTICAL GUIDE

                              Scenario: SURGICAL HAND WASHING

                              Examiner’s name …………………………………..…date………………………………..

                              School code………………………candidate’s No…………………………………………..

                              NO.

                              AREAS TOBE ASSESSED

                              SCORE

                              DONE

                              PARTIALLY DONE

                              NOT DONE

                              TOTAL

                              1

                              Wets the hands and applies soap thoroughly to form foam.

                              1


                              2

                              Scrubs the left palm over the right palm down- up movement at least five times.

                              1


                              3

                              Scrubs the left dorsum over the right palm in the same manner like in 2 above and vice versa

                              1


                              4

                              Scrubs the left dorsum over the right palm with fingers interlocked and vice versa

                              1


                              5

                              Scrubs the left palm over the right with the fingers interlaced

                              1


                              6

                              Does the rotational rubbing of the left thumb and vice versa.

                              1


                              7

                              Scrubs the tips of the left fingers over the right palm and vice versa.

                              1


                              8

                              Rinses the hands thoroughly up to the point below the elbow joint methodically

                              1


                              9

                              Turns off the tap using the elbow but not the hand

                              1


                              10

                              Using a sterile hand towel, dries the hands methodically and discards it in a right place then remains with the hands up.

                              1


                              TOTAL

                              10


                              Examiner’s comments………………………………………………………………………………………………………………………………………………………………………………………………………………………………………………………………………………………………………….

                              OSPE/OSCE PRACTICAL GUIDE

                              SCENARIO: SURGICAL HAND WASHING

                              At this station, all the requirements for hand washing are already set for you.

                              Instructions:

                              1. Carry out surgical hand washing methodically.
                              2. Move to the next station when the bell rings.

                              OSPE/OSCE PRACTICAL GUIDE

                              Scenario: IDENTIFICATION OF BED APPLIANCES WITH THEIR USES

                              Examiner’s name ……………………………..…date………………………………..

                              School……………………candidate’s No…………………………………………..

                              NO.

                              AREAS TOBE ASSESSED

                              SCORE

                              DONE

                              PARTIALLY DONE

                              NOT DONE

                              TOTAL

                              1

                              Long mackintosh- for protecting the mattress.

                              1


                              2

                              Bed cradle- for lifting off the linens over the wound.

                              1


                              3

                              Cardiac table- for the patient to lean forward and feeding purposes in patients with difficulties in breathing

                              1


                              4

                              Back rest- to support the patient in sitting up position

                              1


                              5

                              Foot rest- to prevent foot drop

                              1


                              6

                              Fracture board- to provide firm support of the mattress.

                              1


                              7

                              Bed blocks/elevator- to elevate the top or bottom of the bed.

                              1


                              8

                              An air ring- to reduce pressure to the sacrum and coccyx

                              1


                              9

                              Hot water bottle- for providing additional warmth to the patient.

                              1


                              10

                              Sand bags- to prevent movement of the lower limbs when the patient is in bed

                              1


                              TOTAL

                              10


                              Examiner’s comments………………………………………………………………………………………………………………………………………………………………………………………………………………………………………………………………………………………………………….

                              OSPE/OSCE PRACTICAL GUIDE

                              SCENARIO: IDENTIFICATION OF BED APPLIANCES WITH THEIR USES

                              At this station you are provided with some of the bed appliances necessary for providing patient’s comfort.

                              Instructions:

                              1. Identify the appliances with their uses.
                              2. Speak loud for examiner to hear.
                              3. Move to the next station when the bell rings.

                              OSPE/OSCE PRACTICAL GUIDE

                              Scenario: NAMING PELVIC BONES AND JOINTS

                              Examiner’s name …………………………..…date………………………………..

                              School co………………candidate’s No…………………………………………..

                              NO.

                              AREAS TOBE ASSESSED

                              SCORE

                              DONE

                              PARTIALLY DONE

                              NOT DONE

                              TOTAL

                              1

                              Moves the trolley near the examiner and washes hands.

                              1


                              2

                              Holds the pelvis properly and defines it.

                              1


                              3

                              Identifies two innominate bones as right and left.

                              Each innominate bone consists of the Ilium, ischium and the pubic bone

                              2


                              4

                              Identifies sacrum made of five fused bones

                              1


                              5

                              Identifies the coccyx made up of four fused bones.

                              1


                              6

                              Mentions the pelvic joints as:

                              2 sacro iliac joints left and right.

                              1 sacro coccygeal joint joining the sacrum and coccyx

                              Symphysis pubis joining two pubic bones.

                              1

                              1

                              1


                              7

                              Washes the hands

                              1


                              TOTAL

                              10


                              Examiner’s comments………………………………………………………………………………………………………………………………………………………………………………………………………………………………………………………………………………………………………….

                              OSPE/OSCE PRACTICAL GUIDE

                              SCENARIO: NAMING THE PELVIC BONES AND JOINTS.

                              At this station you are provided with a model of the pelvis.

                              Instructions:

                              1. Name all its bones and joints correctly.
                              2. Speak loud for examiner to hear.
                              3. Move to the next station when the bell rings.

                              OSPE/OSCE PRACTICAL GUIDE

                              Scenario: PUTTING ON SURGICAL GLOVES.

                              Examiner’s name …………………………………………………………………..…date………………………………..

                              School code……………………………………………………candidate’s No…………………………………………..

                              NO.

                              AREAS TOBE ASSESSED

                              SCORE

                              DONE

                              PARTIALLY DONE

                              NOT DONE

                              TOTAL

                              1

                              Washes hands and

                              ½


                              2

                              Identifies the correct size of the gloves and opens it on a sterile surface.

                              1


                              3

                              Carries out surgical hand washing methodically.

                              2


                              4

                              Opens the inner pack of the gloves, using the left hand picks the inner surface of the glove to dress the right hand without touching the sterile surface.

                              2


                              5

                              Using the dressed hand now, dresses the left hand while touching the sterile surface only.

                              2


                              6

                              Fixes the gloves correctly to fit the fingers

                              ½


                              7

                              Keeps the hand above the level of the waist.

                              ½


                              8

                              Removes the gloves methodically and discards them in a right place.

                              1


                              9

                              Washes hands

                              ½


                              TOTAL

                              10


                              Examiner’s comments………………………………………………………………………………………………………………………………………………………………………………………………………………………………………………………………………………………………………….

                              OSPE/OSCE PRACTICAL GUIDE

                              SCENARIO: PUTTING ON STERILE GLOVES

                              At this station you are provided with the requirements for surgical gloving.

                              Instructions:

                              1. Put on the gloves while observing sterility.
                              2. Move to the next station when the bell rings.

                              OSPE/OSCE PRACTICAL GUIDE

                              Scenario: TEMPERATURE TAKING.

                              Examiner’s name …………………………………………………………………..…date………………………………..

                              School code……………………………………………………candidate’s No…………………………………………..

                              NO.

                              AREAS TOBE ASSESSED

                              SCORE

                              DONE

                              PARTIALLY DONE

                              NOT DONE

                              TOTAL

                              1

                              Creates rapport and explains the procedure to the patient

                              1


                              2

                              Washes hands and sets the following:

                              • Thermometer in its jar of lotion
                              • Gallipot of cotton swabs
                              • Receiver for used swabs
                              • Watch with ticker timer
                              • Temperature chart and a pencil/ a pen.

                              3


                              3

                              Screens the bed for privacy.

                              1


                              4

                              Inspects the thermometer for cracks, and cleans it with a swab.

                              1


                              5

                              Cleans the axilla with a dry swab and inserts the thermometer, correctly.

                              1


                              6

                              Removes the thermometer, after three minutes and takes the readings at an eye level.

                              1


                              7

                              Gives the findings to the patient

                              1


                              8

                              Records the findings and clears away.

                              1


                              TOTAL

                              1O


                              Examiner’s comments………………………………………………………………………………………………………………………………………………………………………………………………………………………………………………………………………………………………………….

                              OSPE/OSCE PRACTICAL GUIDE

                              SCENARIO: TAKING TEMPERATURE.

                              At this station, there is a patient admitted in bed, you are asked to take his temperature.

                              Instructions:

                              1. Set and carry out temperature.
                              2. Move to the next station when the bell rings.

                              OSPE/OSCE PRACTICAL GUIDE

                              Scenario: PRONE POSITION .

                              Examiner’s name …………………………………………………………………..…date………………………………..

                              School code……………………………………………………candidate’s No…………………………………………..

                              NO.

                              AREAS TOBE ASSESSED

                              SCORE

                              DONE

                              PARTIALLY DONE

                              NOT DONE

                              TOTAL

                              1

                              Creates rapport with the patient

                              1


                              2

                              Explains the procedure to the patient

                              Asks for the an assistant

                              1


                              3

                              Washes the hands together with the assistant

                              1


                              4

                              Moves trolley at the bed side

                              1


                              5

                              Asks the patient to allow to be positioned

                              1


                              6

                              Patient lies on the abdomen with the head on a pillow turned one side

                              1


                              7

                              Small soft pillow placed under the abdomen

                              1


                              8

                              Pelvis and the lower legs are supported on a pillow under the ankles to prevent discomfort of toes pressing the bed.

                              1


                              9

                              Thanks the patient and laves him comfortable

                              1


                              10

                              Washes hands

                              1


                              TOTAL

                              10


                              Examiner’s comments………………………………………………………………………………………………………………………………………………………………………………………………………………………………………………………………………………………………………….

                              OSPE/OSCE PRACTICAL GUIDE

                              SCENARIO: POSITIONING A PATIENT IN PRONE POSITION.

                              At this station, there is a patient admitted in bed, you are asked to position him in a prone position.

                              Instructions:

                              1. Set and position the patient.
                              2. Speak loud for examiner to hear.
                              3. Move to the next station when the bell rings.

                              OSPE/OSCE PRACTICAL GUIDE

                              Scenario: HEALTH EDUCATION ON PATIENTS RIGHTS.

                              Examiner’s name …………………………..…date………………………………..

                              School …………………candidate’s No…………………………………………..

                              NO.

                              AREAS TOBE ASSESSED

                              SCORE

                              DONE

                              PARTIALLY DONE

                              NOT DONE

                              TOTAL

                              1

                              Requests for attention and introduces self.

                              ½


                              2

                              Introduces the topic

                              ½


                              3

                              Assess their understanding on the topic

                              ½


                              4

                              Defines the topic and gives the rights of patient as:

                              • Right to participation in treatment decision
                              • Right to respect and non discrimination
                              • Right to choice of providers and plans
                              • Right to complains and appeals
                              • Right to hospital policy
                              • Right to information disclosure
                              • Right to confidentiality of health information

                              1

                              1

                              1

                              1

                              1

                              1


                              5

                              Acknowledges patient’s understanding about the topic

                              ½


                              6

                              Allows them to ask questions and answers them correctly

                              ½


                              7

                              Summarizes the topic

                              ½


                              8

                              Enquires about the next topic, time and place

                              ½


                              9

                              Thanks the patients

                              ½


                              TOTAL

                              10


                              Examiner’s comments………………………………………………………………………………………………………………………………………………………………………………………………………………………………………………………………………………………………………….

                              OSPE/OSCE PRACTICAL GUIDE

                              SCENARIO: HEALTH EDUCATION ON PATIENT’S RIGHTS

                              At this station, there is a group of patients who have reported in the OPD, health educate them on the patient’s rights

                              Instructions:

                              1. Conduct health education.
                              2. Speak loud for examiner to hear.
                              3. Move to the next station when the bell rings.

                              OSPE/OSCE PRACTICAL GUIDE Read More »

                              Anaemia

                              Anaemia in Pregnancy

                              ANAEMIA IN PREGNANCY

                              Anaemia during pregnancy refers to a condition where the red blood cell count or haemoglobin  level in the mother’s blood is lower than normal. Anaemia in pregnancy is defined as haemoglobin (Hb) concentration is less than 11 g/dl.

                              Anaemia means a reduction in oxygen carrying capacity or in quantity of red blood cells. Red blood cells carry oxygen throughout the body, and low levels can lead to oxygen deprivation for both the mother and developing fetus.

                              This may be due to:

                              • A reduction in the number of red blood cells.
                              • A low concentration haemoglobin .
                              • A combination of both
                              Classification or degree of anaemia (1)

                              Classifications/Degrees of Anaemia

                              • Mild anaemia: haemoglobin  levels between 9.0 and 10.9 g/dL.
                              • Moderate anaemia: haemoglobin  levels between 7.8 and 9.0 g/dL.
                              • Severe anaemia: haemoglobin  levels below 7.0 g/dL.
                              • Very Severe anaemia: haemoglobin  levels below 4.0 g/dL.
                              Causes of anaemia in Pregnancy

                              Causes of anaemia in Pregnancy

                              1. Social and Economic Factors:

                              • Ignorance about utilizing food: Lack of knowledge about nutritious food sources and dietary practices, especially for iron-rich foods.
                              • Poverty: Inability to afford a balanced diet rich in protein, iron, and other essential nutrients.
                              • Unstable country / Insecurity: Conflict, displacement, and lack of access to healthcare resources can contribute to malnutrition and anaemia.
                              • Beliefs and Cultural Superstitions: Certain cultural beliefs or practices might restrict the consumption of essential foods like chicken, eggs, or other iron-rich sources.

                              2. Obstetrical Causes:

                              • Frequent childbearing: Closely spaced pregnancies can deplete iron stores, making anaemia more likely.
                              • Repeated Hemodilution: The blood volume expands significantly during pregnancy to accommodate the needs of the growing fetus. This expansion can dilute the existing red blood cells, leading to lower haemoglobin  levels even if the body is producing enough red blood cells.
                              • Multiple Pregnancy: The fetus requires iron for growth and development. The mother also needs extra iron to support the increased blood volume and oxygen delivery. This increased demand can deplete iron stores, leading to iron-deficiency anaemia.
                              • Hyperemesis Gravidarum: Severe morning sickness can lead to poor absorption of nutrients, including vitamin B12, which is crucial for red blood cell production.
                              • Abortions, Ruptured Ectopic Pregnancies, Postpartum Hemorrhage (PPH), Antepartum Hemorrhage (APH), and Heavy Periods: These conditions can lead to blood loss and iron deficiency.

                              3. Medical Causes:

                              • Frequent Attacks of Malaria: Malaria infection destroys red blood cells, contributing to anaemia.
                              • Hookworm Infestation: Hookworms can cause blood loss from the intestines, leading to iron deficiency anaemia.
                              • Infections: Infections like septicemia (blood poisoning) and tuberculosis (TB) can impair red blood cell production.
                              • Sickle Cell anaemia: A genetic blood disorder characterized by abnormal red blood cells, leading to chronic anaemia.
                              • Drugs: Certain medications like chloramphenicol can interfere with red blood cell production and contribute to anaemia.

                              Other Factors

                              • Dietary Deficiencies: Inadequate intake of iron, folate, and vitamin B12 are common contributing factors to anaemia.
                              • Underlying Medical Conditions: Conditions like celiac disease, chronic kidney disease, or certain types of cancer can impair the body’s ability to produce red blood cells.
                              • Previous anaemia: Women with a history of anaemia before pregnancy are more likely to experience it again.

                              Types of Anaemia

                              1. Physiological anaemia.
                              2. Nutritional anaemia.
                              3. Aplastic anaemia.
                              4. Haemorrhagic anaemia.
                              5. Haemolytic anaemia.
                              6. Pernicious anaemia.

                              1.  Physiological Anaemia: A temporary, physiological decrease in haemoglobin levels, often during pregnancy. This type of anaemia is considered “normal” during pregnancy and is primarily due to hemodilution. As the blood volume increases by 25-30% during pregnancy to accommodate the growing fetus, the concentration of red blood cells (and haemoglobin) appears to decrease, leading to a diluted blood picture.

                              • Hemodilution: During pregnancy, blood volume increases significantly, diluting the haemoglobin concentration. This is a normal adaptation to support the growing fetus and placenta.
                              • Increased Iron Demand: The growing fetus requires a substantial amount of iron for development, potentially leading to a temporary iron deficiency.
                              • Physiological anaemia is usually mild and resolves itself after childbirth. 

                              2. Nutritional Anaemia: Anaemia caused by dietary deficiencies of essential nutrients required for RBC production. Nutritional anaemia can present as;

                              • Iron Deficiency Anaemia: The most common type, caused by insufficient iron intake or absorption. Iron is essential for haemoglobin synthesis. Inadequate iron leads to smaller, paler RBCs (hypochromic microcytic anaemia). The increased fetal demand for iron, especially from the 28th week onwards, exacerbates this issue. Excessive morning sickness can also contribute by reducing iron absorption.
                              • Folate Deficiency Anaemia (Megaloblastic Anaemia): A lack of folate (vitamin B9) disrupts DNA synthesis, leading to the formation of large, immature RBCs (megaloblasts). These cells are less effective at carrying oxygen.
                              • Vitamin B12 Deficiency Anaemia (Pernicious Anaemia): A deficiency in vitamin B12, important for DNA synthesis and maturation of RBCs, results in megaloblastic anaemia. A lack of protein can also contribute to this type.
                              • Vitamin C Deficiency: Vitamin C is important for iron absorption. Its deficiency can worsen iron deficiency anaemia.
                              • Impact: Nutritional anaemia is preventable and treatable with dietary modifications and supplementation.

                              3. Aplastic Anaemia: A rare and serious condition characterized by the suppression of bone marrow activity, resulting in reduced production of all blood cell types, including RBCs. The most common cause being Bone Marrow Failure, The bone marrow, responsible for blood cell production, becomes unable to generate enough RBCs. This can be caused by various factors, including:

                              • Drug-induced: Prolonged use of certain medications like chloramphenicol can suppress bone marrow function.
                              • Radiation Exposure: Exposure to ionizing radiation can suppress bone marrow function, since they can damage bone marrow cells.
                              • Diseases: Conditions like leukemia, cancer, and autoimmune diseases can affect bone marrow activity.
                              • Toxins: Exposure to toxic chemicals can damage bone marrow cells.
                              • Aplastic anaemia can be life-threatening. It requires immediate medical attention and may necessitate bone marrow transplantation or other intensive treatments.

                              4. Hemorrhagic anaemia: Anaemia resulting from excessive blood loss, leading to a reduction in circulating RBCs. This type results from excessive blood loss, which can occur due to a variety of reasons:

                              • Frequent Childbearing: Closely spaced pregnancies can deplete iron stores and increase the risk of blood loss during delivery.
                              • Worm Infestations: Hookworm infestation can lead to chronic blood loss from the intestines.
                              • Abortions, PPH, and APH: These conditions can lead to significant blood loss.
                              • Ruptured Ectopic Pregnancy: A ruptured ectopic pregnancy can cause internal bleeding.
                              • Trauma and Accidents: Trauma or accidents can cause severe blood loss.
                              • Gastrointestinal Bleeding: Conditions like ulcers, gastritis, and esophageal varices can cause internal bleeding.
                              • Acute Blood Loss: Sudden and significant blood loss, often due to trauma, surgery, or internal bleeding, causes a rapid decrease in RBCs.
                              • Chronic Blood Loss: Persistent, slow blood loss, often from gastrointestinal bleeding or heavy menstrual periods, gradually depletes the body’s iron stores and reduces RBC production.
                              • Hemorrhagic anaemia can be severe, particularly in cases of acute blood loss. Treatment focuses on stopping the bleeding and replacing lost blood.

                              5. Hemolytic anaemia: Anaemia caused by the premature destruction of RBCs (hemolysis), leading to a shortage of healthy RBCs in circulation. This may be due to,

                              Intrinsic Defects: Hemolysis can be caused by abnormalities within the RBCs themselves, such as:

                              • Sickle Cell Disease: This genetic disorder leads to the production of abnormal red blood cells that are easily destroyed. An inherited disorder where RBCs adopt a sickle shape, making them fragile and prone to destruction.
                              • Thalassemia: Genetic disorders that impair haemoglobin production, leading to weakened RBCs.

                              Extrinsic Factors: Factors outside the RBC can also trigger hemolysis:

                              • Infections: Infections like septicemia, pyelonephritis, and bacterial streptococcal infections can destroy red blood cells.
                              • Diseases: Malaria is a common cause of hemolytic anaemia due to its destruction of red blood cells.
                              • Mismatched Blood Transfusion: Receiving mismatched blood can lead to an immune reaction that destroys red blood cells.
                              • Immune Reactions: Antibodies against RBCs, often due to blood transfusions or autoimmune disorders, can cause hemolysis.
                              • Drugs: Certain medications like primaquine can cause hemolytic anaemia.

                              6. Pernicious anaemia: A specific type of megaloblastic anaemia caused by a deficiency in vitamin B12, usually due to a lack of intrinsic factor, a protein produced in the stomach that helps the body absorb vitamin B12. Pernicious anaemia is less common during childbearing years, but can occur due to:

                              • Autoimmune Destruction of Parietal Cells: In most cases, pernicious anaemia is caused by an autoimmune attack on the parietal cells in the stomach, leading to a deficiency of intrinsic factor.
                              • Diseases of the Stomach: Conditions like stomach cancer can interfere with intrinsic factor production.
                              • Hyperemesis Gravidarum: Severe morning sickness can lead to vitamin B12 deficiency due to poor absorption.
                              • Gastrectomy or Gastric Bypass Surgery: These procedures can reduce intrinsic factor production, impairing vitamin B12 absorption.
                              • Other Causes: Conditions like Crohn’s disease and celiac disease can also interfere with vitamin B12 absorption.
                              Anaemia in pregnancy

                              Signs and Symptoms of Anaemia in Pregnancy

                              Anaemia’s signs and symptoms can vary depending on the severity and underlying cause. 

                              On History Taking

                              • General Body Weakness: This is usually the most common symptom, resulting from the body’s reduced oxygen-carrying capacity.
                              • Dizziness and Faintness: Reduced blood flow to the brain can cause lightheadedness and a feeling of faintness.
                              • Palpitations: The heart may beat faster to compensate for the reduced oxygen supply.
                              • Loss of Appetite (Anorexia): A decrease in appetite can be associated with anaemia.
                              • Headaches: Headaches can be caused by reduced oxygen to the brain.
                              • Breathlessness: The lungs may work harder to deliver oxygen to the body’s tissues.
                              • Shortness of Breath: Increased effort for the heart to pump oxygenated blood.
                              • History of Heavy Bleeding: A history of significant blood loss, such as from trauma, surgery, or gastrointestinal bleeding, can be a contributing factor.

                              On Examination

                              • Pale Mucous Membranes and Conjunctiva: This refers to the paleness of the gums, lips, tongue, soles of the feet, and palms of the hands, which are visible indicators of reduced haemoglobin.
                              • Distention of the Jugular Veins: This can be seen in severe cases of anaemia due to a decrease in blood volume.
                              • Edema (Swelling): Swelling of the ankles, feet, or even generalized edema can occur in severe cases.
                              • Enlarged Spleen and Liver: Palpation of the abdomen might reveal an enlarged spleen and liver, indicating an increase in red blood cell destruction or storage.
                              • Jaundice: Yellowing of the skin and whites of the eyes can occur in some types of anaemia, particularly those related to red blood cell breakdown.
                              • Cold Hands and Feet: Poor blood flow can lead to cold extremities.

                              Laboratory Tests

                              • Haemoglobin Level: The most crucial test for anaemia, measuring the amount of haemoglobin in the blood. Levels below 12.5 g/dL are generally considered anaemic.
                              • Increased Susceptibility to Infections: A weakened immune system makes pregnant women more prone to infections.

                              Diagnosis

                              Anaemia diagnosis relies on a combination of factors:

                              • History: A detailed history of the patient’s symptoms, diet, medical history, medications, and potential exposures helps narrow down the possible causes.
                              • Physical Examination: Careful assessment for physical signs like pallor, edema, and enlarged organs provides further clues.
                              • Laboratory Investigations:
                              • Haemoglobin Estimation: Confirming a low haemoglobin level.
                              • Packed Cell Volume (PCV): Measures the percentage of red blood cells in the blood.
                              • Blood Film: Examining the shape, size, and maturity of red blood cells, identifying specific features like:
                              • Microcytosis and Hypochromia: Small, pale red blood cells (iron deficiency)
                              • Megaloblastic Cells: Large, immature red blood cells (vitamin B12 and folate deficiency)
                              • Sickle Cells: Abnormal, crescent-shaped red blood cells (sickle cell anaemia)
                              • Target Cells: Red blood cells with a bullseye appearance (thalassemia)
                              • Reticulocytes: Immature red blood cells (indicating red blood cell production)
                              • Blood Sugar (BS) for Malarial Parasites: To rule out malaria, a common cause of anaemia in certain regions.
                              • Sickling Test: To confirm the presence of sickle cells in cases of suspected sickle cell disease.
                              • Coombs Test: To detect antibodies against red blood cells, suggesting autoimmune hemolytic anaemia.
                              • Bone Marrow Examination: To assess the bone marrow’s ability to produce red blood cells and identify any abnormalities.
                              • Urinalysis: To check for protein, indicating kidney damage, and to examine for red blood cells or other abnormalities.
                              • Stool Examination: To identify intestinal parasites like hookworms, which can cause anaemia.
                              • Haemoglobin Electrophoresis: To confirm sickle cell disease.

                              Iron Requirements During Pregnancy

                              • Increase in Maternal Haemoglobin (400-500 mg): The mother’s blood volume expands significantly during pregnancy, requiring an increased production of red blood cells, which in turn need iron to carry oxygen.
                              • The Fetus and Placenta (300-400 mg): The growing fetus requires iron for its own red blood cell production and development. The placenta also needs iron for its own functioning and to support fetal growth.
                              • Replacement of Daily Loss (250 mg): Iron is lost daily through urine, stool, and skin. This loss needs to be replenished to maintain adequate iron stores.
                              • Replacement of Blood Lost at Delivery (200 mg): Labour and delivery can involve significant blood loss, requiring iron replenishment afterwards.

                              Total Iron Needs: These factors contribute to a total iron requirement of approximately 1,500 mg during pregnancy.

                              Other Essential Nutrients:

                              • Elemental Iron: Recommended daily intake is 30 mg to 60 mg for pregnant women.
                              • Folic Acid: Recommended daily intake is 400 µg (0.4 mg) to prevent neural tube defects in the fetus.

                              Effects of anaemia on pregnancy and labour

                              Effects on Pregnancy:

                              General Body Fatigue: Anaemia leads to decreased oxygen carrying capacity, causing widespread fatigue, breathlessness, palpitations, and headaches.

                              Placental Insufficiency: Reduced oxygen delivery to the placenta can lead to:

                              • Intra-Uterine Fetal Death (IUFD): The fetus may not receive enough oxygen to survive.
                              • Small for Dates (SFD): The fetus may not grow at the expected rate due to insufficient nutrient and oxygen supply.
                              • Neonatal Death: anaemia can increase the risk of death in the newborn.
                              • Abortion and Premature Labour: Anaemia can increase the risk of both.

                              Increased Risk of Complications:

                              • Postpartum Haemorrhage: Anaemia can impair blood clotting, making mothers more susceptible to excessive bleeding after delivery.
                              • Heart Failure: The heart works harder to compensate for lower oxygen levels, increasing the risk of heart failure.
                              • Venous Thrombosis: Anaemia can increase blood viscosity, leading to blood clots in the veins.
                              • Infections: A weakened immune system due to anaemia makes mothers more vulnerable to infections.
                              • Poor Lactation: Anaemia can impact milk production and quality.
                              Effects on Labour:
                              • Stress of Labour: Anaemic women may struggle to tolerate the stress of labour, and even minor blood loss can be life-threatening.
                              • Fetal and Maternal Distress: Low oxygen levels can lead to fetal and maternal distress, potentially necessitating an instrumental delivery (e.g., forceps or vacuum extraction).
                              • Increased Risk of Complications: Anaemia can increase the risk of complications during labor, including postpartum haemorrhage, infection, and prolonged labor.

                              Management of anaemia in Pregnancy

                              Management of anaemia in pregnancy depends on the severity of the anaemia, stage of gestation, and underlying cause.

                              Early Pregnancy with Mild or Moderate anaemia in a Maternity Center and Hospital:

                              Outpatient Management:

                              • Put the mother in bed.
                              • Take a history from the mother concerning diet, lifestyle, and surroundings to determine the cause of anaemia.
                              • Conduct a general examination to assess the degree of anaemia using a Tallquist book.
                              • The midwife can treat mild and moderate anaemia in early pregnancy.
                              • Manage the condition according to the underlying cause.
                              • Refer the mother to the hospital for further investigations if haemoglobin is found to be below 60%.

                              Active Treatment for haemoglobin  of 60% and Above:

                              • Administer three doses of Fansidar 960 mg tablets where malaria is common.
                              • Administer Mebendazole 200 mg twice daily for three days for hookworm.
                              • Provide iron therapy with ferrous sulfate (200 mg twice daily) and folic acid (5 mg once daily). Review after 2 months.

                              Note: In the maternity centre, refer moderate anaemia in late pregnancy to the hospital.

                              In the Hospital:

                              • Admit the mother to the antenatal ward.
                              • Take a history about diet, environment, and hygiene.
                              • Monitor observations: temperature, pulse, respirations, and blood pressure.
                              • Treat any underlying cause accordingly.
                              • Provide routine nursing care.
                              • Ensure proper hygiene.
                              • Provide a high-protein diet.

                              Severe anaemia in Early and Late Pregnancy:

                              In a Maternity Center:

                              • Refer to the hospital.

                              In the Hospital:

                              • Admit the mother and take a history.
                              • Conduct observations and investigations.
                              • Resuscitate immediately with:
                              • Blood transfusion or parenteral iron dextran (Inferon) infusion if blood is unavailable. Note: Total dose of Inferon is given slowly, only in severe anaemia close to delivery. After delivery, transfuse with packed cells under Lasix.
                              • Administer diuretics, e.g., Lasix 120 mg IV.
                              • Nurse the patient with severe anaemia propped up in bed and provide comprehensive care.
                              • Pay special attention to mouth care, as stomatitis and glossitis are common in anaemia patients.
                              • Provide a high-protein diet with green vegetables and fresh fruit.
                              • Maintain a strict fluid balance chart and observe for signs of impending cardiac failure, such as increasing pulse and respirations. Report breathlessness, especially if the patient has tuberculosis. 
                              • Note: IV Inferon: 5 ampoules of 250 mg each in 100 ml of dextrose 5% or normal saline 500 ml.

                              Management During Labor:

                              1st Stage:

                              • Comfortable Positioning: Ensure the mother is in a comfortable position on the bed.
                              • Light Analgesia: Consider light pain relief measures as needed.
                              • Oxygenation: Administer oxygen to increase maternal blood oxygenation and prevent fetal hypoxia.
                              • Strict Asepsis: Maintain strict sterile practices to minimize infection risk.

                              2nd Stage:

                              • Usually No Specific Issues: This stage typically proceeds without major issues related to anaemia.
                              • Methergin or Oxytocin Administration: Administer 0.2 mg of Methergin or 20 units of oxytocin in 500 ml of Ringer’s Lactate intravenously, followed by 10 units intramuscularly, to prevent postpartum haemorrhage.

                              3rd Stage:

                              • Good management of the 3rd stage of labour to prevent much blood loss.
                              • Intensive Observation: Closely monitor for postpartum haemorrhage and other complications.
                              • Blood Replacement: Replace any significant blood loss with fresh packed red blood cells.
                              • Avoid Overloading: Be cautious not to exceed the amount of blood loss replaced to avoid fluid overload.

                              Puerperium (Postpartum Period):

                              • Bed Rest: Encourage bed rest to allow for recovery.
                              • Infection Monitoring and Treatment: Monitor for signs of infection and treat promptly.
                              • Continuation of Iron Therapy: Continue iron supplementation until haemoglobin levels return to normal.
                              • Dietary Guidance: Continue to promote a healthy, iron-rich diet.
                              • Counselling: Provide education and support to the mother and family regarding baby care and household chores.

                              Prevention of anaemia:

                              • Good Antenatal Care: Detect and treat anaemia and malaria early.
                              • Health Education: Teach about diet, personal hygiene, and environmental sanitation, including proper use of latrines.
                              • Malaria Protection: Take preventive measures against malaria.
                              • Blood Loss Reduction: Manage all stages of labour to reduce blood loss in the third stage.
                              • Protein Replacement: Provide extra protein during lactation.
                              • Folic Acid Supplementation: Administer as needed.
                              • Routine Blood Examinations: Monitor haemoglobin levels regularly.
                              • Avoidance of Frequent Childbirths: Spacing pregnancies adequately allows the body time to recover iron stores.
                              • Dietary Advice: Encourage a diet rich in iron-rich foods like red meat, fish, beans, lentils, and leafy green vegetables.
                              • Supplementary Iron Therapy: Prescribe iron supplements as needed, based on individual needs and blood tests.
                              • Treatment of Underlying Illnesses: Address any underlying medical conditions that may contribute to anaemia, such as infections, parasitic infestations, or chronic diseases. Early diagnosis and treatment are crucial.

                              Advice to the Mother:

                              • Tell the mother to report immediately when they become pregnant in order to receive appropriate prophylactic treatment of  iron therapy.
                              • Explain the cause of anaemia, its dangers, and how to prevent it.
                              • Advise rest to avoid overworking.
                              • Discuss diet and types of food.
                              • Encourage taking any prescribed treatment regularly.
                              • Stress the importance of preventing mosquito bites to avoid malaria.
                              • Advise on family planning to avoid frequent childbearing.
                              • Recommend delivery in the hospital.

                              Complications of Anaemia in Pregnancy

                              Maternal Complications

                              Fetal Complications

                              Increased risk of PPH

                              Premature birth

                              Increased risk of infection

                              Low birth weight

                              Increased risk of heart failure

                              Fetal growth restriction

                              Fatigue and weakness

                              Stillbirth

                              Shortness of breath

                              Cerebral palsy

                              Increased risk of preeclampsia

                              Congenital anomalies

                              Increased risk of delayed wound healing

                              Cognitive impairment

                              Increased risk of death

                              Delayed development

                              Anaemia in Pregnancy Read More »

                              Want notes in PDF? Join our classes!!

                              Send us a message on WhatsApp
                              0726113908

                              Scroll to Top
                              Enable Notifications OK No thanks