
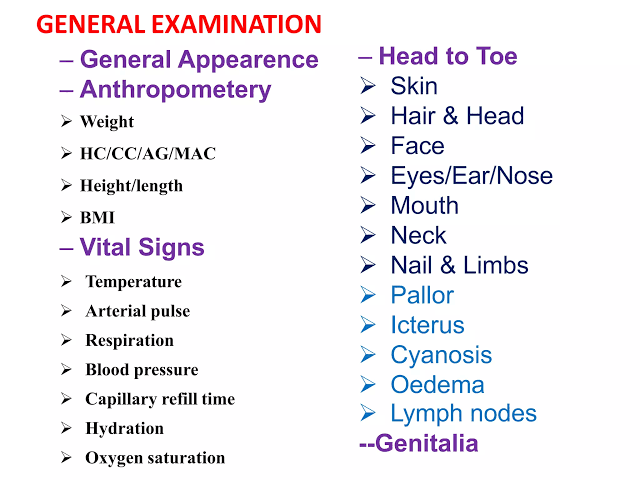
The general physical examination is the cornerstone of clinical nursing practice. It is not merely a checklist of tasks; it is a profound synthesis of observational skills, clinical reasoning, and physiological understanding. By the end of this comprehensive session, the nursing student should be able to masterfully execute the following:
- Prepare the patient, environment, and equipment safely, respectfully, and methodically before any physical contact is initiated.
- Perform a structured general survey (the "doorway assessment") before ever touching the patient, extracting maximum clinical data from simple observation.
- Assess vital signs and key general physical signs using flawless, evidence-based correct technique.
- Recognise and interpret common, critical abnormalities: pallor, jaundice, cyanosis, clubbing, dehydration, lymphadenopathy, and edema.
- Document findings clearly, objectively, and accurately, and communicate urgent abnormalities using a structured nursing framework (like SBAR) to the appropriate medical team.
Today’s Clinical Emphasis: We will focus intensely on what you can reliably see, feel, and measure directly at the bedside without relying immediately on advanced diagnostics—and most importantly, what critical thinking pathways each finding should trigger in your mind.
A general physical examination is a rapid, highly systematic assessment of the whole patient that begins the exact moment you meet them.
| LOOK (Observation) | MEASURE (Quantification) | EXAMINE (Hands-on) | INTERPRET (Clinical Reasoning) |
|---|---|---|---|
|
|
|
|
Clinical Idea: General examination is not "just looking." It is the very first clinical synthesis of the patient’s physiological state. For example, simply looking at a patient sitting in a tripod position, sweating, and breathing at 30 breaths per minute immediately synthesizes into a diagnosis of acute respiratory distress before you have even picked up your stethoscope.
Safety, informed consent, and impeccable professional behaviour must always come first. Establishing a foundation of trust is as critical as the physical exam itself.
- Introduce & Consent: Introduce yourself by name and title, confirm the patient's identity (using two identifiers like name and date of birth), explain exactly what you will do in simple terms, and obtain explicit verbal consent.
- Provide Privacy & Comfort: Close the curtains/door (privacy), ensure appropriate draping so only the area being examined is exposed, verify good lighting, and maintain a comfortable room temperature (a shivering patient can alter exam findings).
- Perform Hand Hygiene: Execute hand hygiene at the correct WHO 5 moments. Wearing gloves does NOT replace the need for hand hygiene. Wash before putting gloves on and immediately after taking them off.
- Ask About Pain: Always ask about pain before positioning the patient or starting palpation. Start examining the non-painful areas first to build trust. Stop immediately if the patient becomes distressed.
- Clean Equipment: Clean shared equipment (stethoscopes, BP cuffs) with alcohol wipes between patients, and use standard precautions based on anticipated exposure to bodily fluids.
- Watch or clock with a second hand.
- Thermometer.
- BP machine with the correct cuff size.
- Pulse oximeter.
- Penlight (for pupillary and oral exams).
- Stethoscope.
- Tape measure (for measuring lesions, edema, or abdominal girth).
- Clean gloves (when indicated by infection risk or mucosal contact).
Using the same mental map every single time prevents you from forgetting critical steps. The standard sequence is universally taught as IPPA.
- INSPECTION: Look carefully before touching. Use your eyes and your sense of smell. Observe symmetry, color, shape, and movement.
- PALPATION: Use your hands to assess texture, temperature (use the back/dorsum of the hand), moisture, organ location, size, swelling, vibration, rigidity, and tenderness.
- PERCUSSION: Tapping the person's skin with short, sharp strokes to assess underlying structures. The sound/vibration yields information about the density (air, fluid, or solid) of the underlying tissue.
- AUSCULTATION: Listening systematically to sounds produced by the body, usually using a stethoscope (e.g., heart, lungs, blood vessels).
CRITICAL SEQUENCE EXCEPTION (The Abdomen): When examining the abdomen, the sequence MUST be altered to I-A-P-P (Inspection, Auscultation, Percussion, Palpation). Why? Because percussing or deeply palpating the abdomen first can artificially stimulate bowel motility, creating false hyperactive bowel sounds during auscultation.
Do not wait for the formal "physical exam" to begin. Deep clinical observation starts at the doorway.
- Level of consciousness (LOC) and interaction: Are they awake, lethargic, or comatose? Do they maintain eye contact? Are their answers appropriate?
- Apparent age, build, and nutritional state: Do they look their stated age? (Chronic illness ages a person). Are they emaciated, well-nourished, or obese?
- Respiratory effort and obvious distress: Are they using accessory muscles to breathe? Are they clutching their chest? Are they speaking in full sentences or gasping between words?
- Pain behaviour and facial expression: Are they grimacing, guarding a body part, or perfectly relaxed?
- Posture, mobility, gait, and use of aids: Are they hunched over? Do they shuffle? Do they use a cane or a walker?
- Hygiene, grooming, and self-care: Body odor, unkempt hair, or soiled clothes can indicate neglect, severe depression, or physical inability to perform Activities of Daily Living (ADLs).
- Skin colour changes: Noticeable jaundice, severe pallor, sweating (diaphoresis), or extreme dryness.
- Clinical Environment: Note lines (IVs), surgical drains, supplemental oxygen, urinary catheters, or cardiac monitors attached to the patient.
AVPU is a rapid method to assess a patient's level of consciousness, especially in emergencies.
- A - Alert: The patient is spontaneously awake, eyes open, tracking, and interacting normally.
- V - Responds to Voice: The patient's eyes are closed, but they open and respond when you speak to them (e.g., "Mr. Smith, can you hear me?").
- P - Responds to Pain: The patient does not respond to voice, but responds to a painful or noxious stimulus (e.g., sternal rub, trapping the trapezius muscle) by withdrawing or groaning.
- U - Unresponsive: The patient shows absolutely no response to voice or painful stimuli.
Escalate Abnormal Findings: If a patient is NOT fully alert (V, P, or U), you must immediately assess Airway, Breathing, and Circulation (ABCs), check blood glucose (hypoglycemia can mimic coma), escalate urgently for medical help, and perform a formal Glasgow Coma Scale (GCS) assessment.
Vital signs represent the core physiological engines of the body. Do not just record the numbers; interpret what they mean together.
| Vital Sign | Measurement Focus & Clinical Nuance |
|---|---|
| Temperature | Assess the trend, not just a single reading. Document the site (oral, tympanic, axillary, rectal) and device. Example: A sudden spike may indicate systemic infection. |
| Pulse | Assess Rate (normal 60-100 bpm), Rhythm (regular vs. irregular), and Volume/Amplitude (bounding vs. weak/thready). A weak, thready, rapid pulse often indicates hypovolemic shock. |
| Respiratory Rate (RR) | Count for a full minute if irregular. Pro-tip: Count the RR while keeping your fingers on the radial pulse so the patient doesn't realize you are watching their breathing (which causes them to alter their normal pattern). |
| Blood Pressure (BP) | Requires the correct cuff size (too small = falsely high reading; too large = falsely low reading). Proper positioning is crucial. |
| Oxygen Saturation (SpO₂) | Interpret within clinical context. An SpO2 of 88% is a massive emergency in a healthy 20-year-old, but might be the baseline target for an 80-year-old with severe COPD. |
| Pain | The "6th Vital Sign". Rely on self-report using a pain scale (0-10) and assess the functional impact (e.g., "The pain is an 8/10 and prevents me from taking a deep breath"). |
Red Flag Principle: A severely abnormal value, rapid deterioration, or a patient who simply "looks sick" (intuition/clinical gestalt) should trigger immediate reassessment and escalation to the medical team—even before the full physical exam is complete.
- Allow the patient to rest for 5 minutes; avoid talking during measurement.
- Seat/supine comfortably with back and arm supported; legs must be uncrossed if seated (crossed legs can artificially elevate systolic BP).
- Use the correct cuff size on a bare upper arm; the midpoint of the cuff must be at heart level.
- If using manual auscultation: Locate the brachial artery, inflate the cuff 20-30 mmHg above the estimated systolic pressure, deflate slowly (2 mmHg per second), and accurately identify Korotkoff sounds (Phase I is systolic, Phase V is diastolic).
- Cuff too small (Falsely high).
- Arm unsupported or dangling below heart level (Falsely high).
- Talking or active listening during the reading (Falsely high).
- No rest period after exertion (Falsely high).
- Measurement taken over thick clothing (Inaccurate).
Pallor suggests a reduced amount of oxyhaemoglobin, indicating potential anemia or poor peripheral perfusion (shock). Clinical inspection alone is not a reliable exact measure of haemoglobin, but it is a vital screening tool.
- Sites to assess: Inspect the conjunctiva (inner eyelid), palms and palmar creases, nail beds, and oral mucosa.
- Technique: Gently pull down the lower eyelid and inspect the palpebral conjunctiva—do not press on the eyeball itself. It should be beefy red/pink; if it is pale white, suspect severe anemia.
- Considerations for Darker Skin: Look specifically at the conjunctiva and oral mucosa. Normal brown pigmentation can mask pallor on the skin surface.
Jaundice is a yellowish discoloration of the skin and mucous membranes caused by excess bilirubin in the blood (hyperbilirubinemia), typically pointing to liver disease, biliary obstruction, or excessive red blood cell destruction (hemolysis).
- Where to look: Inspect the sclera (white of the eyes) in natural or bright white light. Check the oral mucosa (hard palate) and skin.
- Correlating symptoms: Jaundice is often accompanied by dark urine (bilirubin spilling into urine), pale "clay-colored" stools (lack of bilirubin reaching the gut), severe pruritus (itching from bile salts in the skin), and abdominal pain/enlarged liver.
- Considerations for Darker Skin: Differentiate true scleral icterus from normal benign local eye discoloration (muddy brown sclera common in some ethnicities). In darker skin, the sclera and mucous membranes under the tongue are the most reliable sites.
Cyanosis is a bluish discoloration of the tissues due to an accumulation of deoxygenated haemoglobin.
- Central Cyanosis: Inspect the tongue and oral mucosa. This is an ominous sign of reduced systemic arterial oxygenation (e.g., severe heart failure, advanced COPD, massive pulmonary embolism).
- Peripheral Cyanosis: Fingers or toes may appear blue or feel cool despite a normal central colour. This usually indicates local vasoconstriction, extreme cold, or poor peripheral circulation (e.g., peripheral artery disease), not necessarily systemic hypoxia.
- Capillary Refill Time (CRT): Press firmly on the nail bed until it blanches (turns white), release, and count how long it takes for pink color to return. Normal is < 2 seconds. Delayed CRT indicates poor peripheral perfusion or dehydration.
URGENT ALERT: Central cyanosis combined with respiratory distress or altered consciousness is a medical emergency requiring immediate ABC assessment, high-flow oxygen, and urgent escalation.
Clubbing is a bulbous enlargement of the ends of one or more fingers or toes. It involves the loss of the normal nail-fold angle (which is normally 160 degrees) accompanied by an increased spongy feeling of the nail bed.
- Schamroth Test: Ask the patient to place the dorsal (back) surfaces of the terminal phalanges of similar fingers together. Normally, a small diamond-shaped window of light is visible. In clubbing, this window disappears entirely.
- Causes (The "C"s): Think Chronic pulmonary disease (lung cancer, bronchiectasis, cystic fibrosis), Cyanotic congenital heart disease, Inflammatory bowel disease (Crohn's), Liver cirrhosis, and certain malignancies.
No single bedside sign definitively proves dehydration. You must combine clues and look for a pattern of findings integrated with the clinical history.
| Assessment Area | Signs of Dehydration / Hypovolemia |
|---|---|
| History | Reports of extreme thirst, poor fluid intake, severe vomiting/diarrhoea, or markedly reduced urine output (oliguria). |
| General | Decreased alertness, profound weakness, postural symptoms (getting dizzy when standing up). |
| Mouth | Dry, cracked tongue and parched oral mucosa. |
| Eyes | Sunken appearance in the sockets, lack of tear production. |
| Circulation | Tachycardia (fast pulse), hypotension (low BP), postural blood pressure drop (orthostatic hypotension), delayed capillary refill. |
| Skin | Decreased skin turgor (tenting when pinched). Note: Less reliable in older adults due to natural loss of skin elasticity. Assess on the sternum or forehead in the elderly. |
- Observe body habitus: Is the patient severely underweight (cachectic), normal, overweight, obese, or showing obvious muscle wasting?
- Specific areas for wasting: Look for profound muscle wasting at the temples (temporalis muscle), shoulders, interosseous muscles (between the bones of the hands), and thighs.
- Measurements: Use measured height, weight, and calculate Body Mass Index (BMI). Document any recent, rapid, unintentional weight loss.
Important Note: A bedside nutrition screen is not a complete nutritional assessment. Severe edema (fluid overload) can falsely mask severe weight loss and malnutrition on the scale. Furthermore, obesity does not exclude the possibility of severe micronutrient deficiencies.
- Common regions: Cervical (neck), supraclavicular (above collarbone), axillary (armpits), and inguinal (groin).
- Technique: Use the pads of your index and middle fingers with a gentle, circular motion. Compare both sides symmetrically.
- Describe findings: Site, number, size (in cm), tenderness (tender usually means infection; painless often points to malignancy), consistency (soft, rubbery, or rock-hard), mobility (mobile vs. fixed/matted to underlying tissue), and overlying skin condition.
- Generalised lymphadenopathy: Defined as enlarged nodes in ≥2 non-contiguous regions; requires prompt clinical evaluation (often indicates systemic infection like HIV, or lymphoma).
- Where to check: Inspect ankles, shins, and dependent areas. Crucial: In bed-bound patients, fluid pools in the lowest point; you must roll them and check the sacrum for sacral edema.
- Technique: Press firmly over a bony surface (like the tibia/shin) with your thumb for 5 seconds to assess if it is "pitting" (leaves an indentation) or non-pitting.
- Interpretation:
- Bilateral edema: Strongly suggests systemic causes like congestive heart failure, kidney failure, or severe liver disease (low albumin).
- Unilateral edema: Suggests a local problem like Deep Vein Thrombosis (DVT), cellulitis, or lymphatic blockage. This requires urgent evaluation to rule out a blood clot.
This is a practical, rapid bedside flow for students to use as a screening sequence. It is not a replacement for a full, comprehensive system examination when the history indicates a specific problem.
| Time | Phase | Key Assessments |
|---|---|---|
| 0:00–0:30 | Doorway survey | Level of Consciousness • acute distress • posture • work of breathing. |
| 0:30–1:00 | Hands & Arms | Temperature • pulse • capillary refill • nails (clubbing) • tremor • skin condition. |
| 1:00–1:30 | Face & Mouth | Pallor (conjunctiva) • jaundice (sclera) • central cyanosis (lips/tongue) • oral hydration. |
| 1:30–2:00 | Neck & Nodes | Cervical lymph nodes • assess thyroid • check Jugular Venous Pressure (JVP) if indicated. |
| 2:00–2:30 | Legs & Edema | Ankles/shins for pitting edema • skin integrity • peripheral perfusion/pulses. |
| 2:30–3:00 | Vitals + Synthesis | Check and interpret numerical vitals • identify any red flags • synthesize findings and document. |
Good documentation is concise, objective, and paints a clear clinical picture for the next provider reading the chart.
- POOR Documentation: "Patient looks okay. General condition fair. No complaints." (This is entirely subjective and legally defenseless).
- EXCELLENT Documentation: "Adult patient awake, alert, and cooperative. Comfortable at rest; no respiratory distress. Well hydrated and adequately nourished. No conjunctival pallor, scleral icterus, central cyanosis, digital clubbing, or peripheral edema. No palpable cervical lymphadenopathy. Peripheral perfusion warm with capillary refill <2 seconds. Vital signs recorded separately."
When documenting an abnormality: Always describe the exact site, severity, laterality (left/right/bilateral), associated findings, and the action taken.
Example: "Bilateral 2+ pitting edema noted to mid-shin; overlying skin is intact; no calf tenderness or warmth; clinician Dr. Smith informed at 14:00."
Scenario: A 62-year-old patient is sitting upright in bed, breathing rapidly (tachypnea). They appear extremely tired, their lips look bluish (central cyanosis), their hands are cool to the touch, capillary refill is delayed (>4 seconds), and their SpO₂ is 84% on room air.
- Which findings are abnormal? Tachypnea, fatigue, central cyanosis, cool hands, delayed cap refill, severe hypoxia (SpO2 84%).
- Which are potentially life-threatening? The hypoxia (84%) combined with central cyanosis and rapid breathing indicates severe respiratory failure or acute cardiac compromise.
- What should the nurse assess immediately? The ABCs (Airway, Breathing, Circulation) must be formally reassessed. Apply supplemental oxygen immediately per standing protocols.
- What should be escalated and to whom? This is a rapid response/medical emergency. Escalate immediately to the charge nurse and the covering physician/emergency response team while staying with the patient.
- Observe first: The patient tells you an immense amount of clinical information before you even touch them.
- Be systematic: Use the exact same sequence (e.g., Head-to-Toe, or the 3-minute sequence) every time to drastically reduce clinical omissions.
- Use clusters: No single physical sign should be interpreted in isolation. Combine findings (e.g., pulse + BP + cap refill) to form a clinical picture.
- Technique matters: Bad physical examination technique (like the wrong BP cuff size) creates bad data, which leads to dangerous medical decisions.
- Document clearly: Describe objective, measurable findings and the explicit nursing actions taken.
- Escalate early: A patient who "looks sick" outranks the completion of your routine checklist. Stop, assess ABCs, and get help.
- Jarvis C, Eckhardt AL. Physical Examination and Health Assessment. 9th ed. Elsevier; 2023.
- World Health Organization. Hand hygiene implementation tools and “My 5 Moments for Hand Hygiene.” WHO; current resources.
- Muntner P, et al. Measurement of Blood Pressure in Humans: A Scientific Statement From the American Heart Association. Hypertension. 2019;73:e35–e66.
- Bickley LS, Szilagyi PG, Hoffman RM, Soriano RP. Bates’ Guide to Physical Examination and History Taking. Wolters Kluwer.
- Royal College of Physicians. National Early Warning Score (NEWS2): Standardising the assessment of acute-illness severity in the NHS. RCP; 2017.
Quick Quiz
General Physical Examination Quiz
Health Assessment
Privacy: Your details are used only for quiz tracking and certificates.
General Physical Examination Quiz
Health Assessment
Preparing questions...
Choose your answer and keep your streak alive.
Great effort.
Here is your quick performance summary.