
- Explain the purpose and principles of musculoskeletal assessment.
- Obtain a focused and comprehensive musculoskeletal history.
- Perform systematic inspection and palpation of joints and soft tissues.
- Assess range of motion (ROM), muscle strength, gait, and functional capacity.
- Perform selected special tests safely and accurately.
- Recognize and document common abnormal findings effectively.
A thorough understanding of anatomy is critical before examining a patient. The musculoskeletal system consists of interconnected structures working in harmony:
- Bones: Provide structural support, protection of internal organs, and mineral storage (e.g., calcium and phosphorus).
- Joints: The articulations between bones that permit movement and provide mechanical stability.
- Skeletal Muscles: Contractile tissues that produce voluntary movement and maintain posture.
- Tendons: Tough, fibrous connective tissues that connect muscle to bone (e.g., Achilles tendon).
- Ligaments: Strong, inelastic bands that connect bone to bone, providing crucial joint stabilization (e.g., Anterior Cruciate Ligament).
- Cartilage, Bursae, and Fascia: Structures that act as shock absorbers, reduce friction between moving parts, and support overall movement.
A focused musculoskeletal history is the foundation of an accurate diagnosis. Before touching the patient, you must understand exactly why they are seeking help and why now (Pain? Loss of function? Deformity? Preventative reasons?).
- Presenting complaint and detailed history of the presenting complaint.
- Family history (e.g., rheumatoid arthritis, osteoarthritis).
- Previous or current medical conditions (e.g., diabetes, gout).
- Medications taken (e.g., prolonged steroid use leading to osteoporosis).
- Previous operations or surgical interventions.
- History of accidents or trauma.
- General body systems review.
Always fully characterize the patient's pain and functional limitation. Use a structured approach to evaluate the characteristics of pain:
- Site / Location: Exactly where is the problem? Can they point to it with one finger?
- Onset & Duration: Was the onset sudden (e.g., acute trauma) or gradual (e.g., chronic osteoarthritis)?
- Character / Type of Pain: Is it aching, sharp, burning, or associated with stiffness?
- Severity / Intensity: Use a pain score from 0–10 (utilizing different pain scales appropriate for the patient's age and cognition).
- Timing / Pattern: Is the pain constant or intermittent? Is it worse in the morning (inflammatory) or at night/after use (mechanical)?
- Aggravating Factors: What specific movements or activities make it worse?
- Relieving Factors: Does rest, ice, or medication help?
- Associated Phenomena: Look for associated swelling, redness, severe weakness, numbness (paraesthesiae), instability, or fever.
'Red flags' are signs or symptoms which—either on their own or within the context of a case history—may indicate a serious or life-threatening pathology (e.g., malignancy, severe infection, spinal cord compression) and must be investigated immediately.
- The presence of fever or unexplained night sweats.
- Unexplained weight loss or lethargy.
- Constant pain or excruciating night pain (hallmarks of malignancy or bone infection).
- Per rectal bleeding, abnormal vaginal bleeding, haematuria, or melaena.
- Disturbed bowel or bladder function / Saddle anaesthesia (Cauda Equina Syndrome).
- Chest pain related to exertion, persistent cough, or blood-stained sputum.
- Altered sensation, special sense changes, polyuria, polydipsia, or syncope/dizziness.
- Morning stiffness lasting more than one hour (indicates severe systemic inflammation like Rheumatoid Arthritis).
- Swelling of a joint with absolutely no history of injury.
- Progressive headaches, loss of appetite, or the appearance of any unusual lumps.
Listening carefully to how the patient describes their pain can often tell you exactly which anatomical structure is damaged:
| Tissue Involved | Pain Characteristics & Clinical Presentation |
|---|---|
| Ligaments | Dull ache at rest; sharp, severe pain superimposed during movement that stretches the ligament. |
| Tendons & Para-tendons | Similar to ligaments (deep dull ache). If inflamed, sharp pain upon active movement and severe pain upon direct deep pressure. |
| Bone Lesions | Deep, boring, nagging, and constant unremitting pain. Often excruciating, especially at night. (If fractured: deep, severe, sharp, and excruciating pain upon movement). |
| Peripheral Nerve Lesions | Sharp, "electric-shock" like pain. Confined strictly to the anatomical territory of the peripheral nerve. Often associated with altered sensation or weakness. |
| Nerve Root Lesions | Sharp, electric-shock pain shooting down a limb, conforming precisely to a specific dermatome, with associated neural disturbances (radiculopathy). |
| Sympathetic Nerves | Sensation of a diffuse, intensely burning or stinging quality. |
| Capsular Pain | Movement is severely restricted in most physiological ranges. The restriction may feel soft or hard, accompanied by widespread muscle spasm protecting many different movements (e.g., Adhesive Capsulitis / Frozen Shoulder — characterized by thickening, fibrosis, shrinking, and inflammation of the joint capsule). |
- Referred Pain: Pain perceived to be occurring in a part of the body located away from its actual source. While the affected area may be identified by the patient, it is usually not defined by sharp, distinct borders.
- Somatic Pain Referral: For example, an S1 nerve root compression (from a lumbar disc herniation) refers pain in a well-defined distribution down the back of the leg and into the foot.
- Visceral Pain Referral: Pain from internal organs is referred diffusely due to shared sympathetic and somatic nerve pathways in the spinal cord. For example, a myocardial infarction (heart attack) refers diffuse pain into the left arm, neck, and jaw.
- Explain and Consent: Always explain the procedure to the patient and obtain explicit verbal consent before touching them.
- Environment: Ensure privacy, adequate exposure of the area to be examined (while maintaining dignity), and excellent lighting.
- Symmetry is Key: Always compare both sides of the body. Assess the unaffected/normal side first to establish a baseline.
- Order of Palpation: Examine from less painful areas to more painful areas. Palpate the point of maximum pain last to maintain patient trust and prevent guarding.
- Systematic Approach: Always begin with visual Inspection before Palpation. (Look, Feel, Move).
- Safety First: Avoid forceful or sudden passive movements when a fracture or severe acute injury is suspected.
- Continuous Assessment: Assess the patient's face for signs of pain before, during, and after any movement.
- Documentation: Document all objective findings clearly and professionally.
Observe the patient carefully the moment they walk into the room, before formally touching them:
- Overall posture and whole-body alignment (e.g., stooped, leaning to one side).
- Symmetry of limbs and joints at a glance.
- General muscle bulk and any glaringly obvious gross deformities.
- Ability to easily stand, walk, and transfer from a chair to the examination bed.
- The use of walking aids or assistive devices (canes, crutches, walkers).
- Facial expression (are they grimacing with every step?).
- Overall mobility and activity level.
Ask the patient to walk normally across the room and carefully observe:
- Speed and rhythm of the walk.
- Step length and symmetry of stride.
- Base of support (is it a wide, unsteady stance?).
- Arm swing (lack of arm swing can indicate Parkinsonism or shoulder pathology).
- Turning mechanics and overall balance.
- Common Abnormal Gait Patterns:
- Antalgic gait: A painful limp where the patient spends as little time as possible bearing weight on the painful leg.
- Steppage gait: High-stepping walk due to "foot drop" (weakness of ankle dorsiflexors).
- Ataxic gait: Uncoordinated, staggering, wide-based walk (often cerebellar origin).
- Spastic gait: Stiff, dragging, circumducting leg (often seen in stroke or cerebral palsy).
- Trendelenburg gait: The pelvis drops on the opposite, unsupported side during the stance phase, indicating severe weakness of the hip abductor muscles (Gluteus Medius) on the standing leg.
A complete musculoskeletal examination follows a rigid, systematic flow:
HISTORY ➔ INSPECTION ➔ PALPATION ➔ MOVEMENT ➔ MUSCLE POWER ➔ SPECIAL TESTS ➔ FUNCTION ➔ NEUROVASCULAR ASSESSMENT.
Inspect systematically from head to toe, always comparing affected and unaffected sides:
- Swelling, localized joint enlargement, or edema.
- Redness (erythema), bruising (ecchymosis), or skin changes (e.g., psoriasis plaques over joints).
- Deformity or abnormal anatomical alignment (e.g., squaring of the shoulder in anterior dislocation).
- Muscle wasting (atrophy) or hypertrophy.
- Surgical scars, traumatic wounds, or discharging sinuses (suggestive of underlying osteomyelitis).
- Limb length discrepancy and overall symmetry.
- Venous distention over the area.
Palpate gently and systematically. Evaluate joints, muscles, soft tissues, bony contours, and ligaments:
- Skin Temperature & Hydration: Use the back of your hand to feel for unnatural warmth (indicating inflammation or acute infection).
- Tenderness: Pinpoint the exact location of tenderness.
- Swelling / Effusion: Feel if the swelling is hard (bony), soft (tissue), or fluctuant (fluid inside the joint).
- Bony Contours: Palpate bony landmarks, joint margins, abnormal shapes, osteophytes (bone spurs), and step-off deformities (fractures).
- Muscles/Soft Tissues: Assess muscle tone (tonus, flaccidity, rigidity, spasticity), bulk, consistency, fasciculations (twitching), fibrosis, or calcification.
- Ligaments: Feel for scar tissue, tears, thickening, or nodules.
- Associated Structures: Palpate local lymph nodes, bursae, and arterial pulses.
- Crepitus: Feel for a grinding or crackling sensation during movement, indicating degenerative changes (osteoarthritis) or tissue/bone grinding.
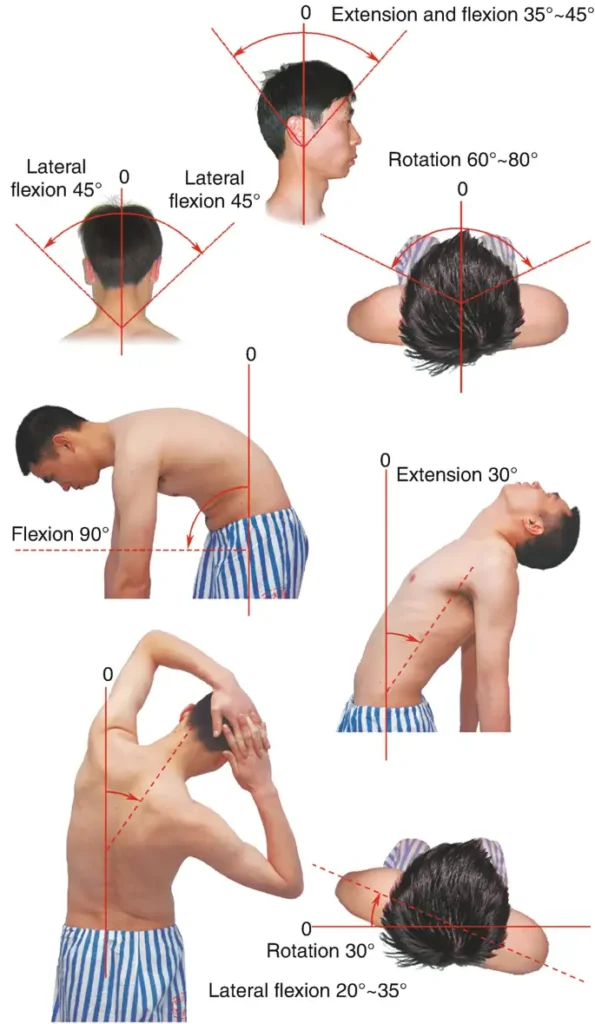
Assess movements to evaluate joint function, coordination, muscle power, and willingness to move. Avoid putting unnecessary stress through damaged tissues.
- Active ROM: The patient moves the joint completely independently. This demonstrates their true functional capacity and highlights any unwillingness to move due to pain.
- Passive ROM: The examiner gently moves the patient's relaxed joint through its range. This helps differentiate between muscle/tendon problems (which hurt mostly on active movement) and joint/capsule problems (which hurt/restrict both active and passive movement).
- Active-Resisted Movements: The patient pushes against the examiner's resistance. This specifically tests muscle and tendon strength and reproduces pain in tendinopathies.
Movements to Assess (Compare bilaterally):
- Shoulder: Flexion, extension, abduction, adduction, internal/external rotation.
- Elbow: Flexion and extension.
- Wrist: Flexion, extension, radial deviation, ulnar deviation.
- Hip: Flexion, extension, abduction, adduction, internal/external rotation.
- Knee: Flexion and extension.
- Ankle: Dorsiflexion, plantarflexion, inversion, eversion.
Evaluation during movement: Note whether movement is full, reduced, or increased (hypermobile). Note the intensity and quality of pain, stiffness, instability, crepitus, paraesthesiae, or weakness. Ensure painful movements are tested last!
- Bulk: Compare symmetry; look closely for unilateral wasting (disuse, nerve lesion) or enlargement.
- Tone: Assess the muscle's natural resistance to passive movement.
- Hypotonia: Reduced resistance, limb feels floppy (lower motor neuron lesion).
- Hypertonia: Increased resistance.
- Spasticity: Velocity-dependent increase in tone (catches when moved quickly; upper motor neuron lesion).
- Rigidity: Constant increased tone throughout the entire range of movement (lead-pipe or cogwheel, seen in Parkinson's).
Test movement against gravity and uniform resistance. Grade strength meticulously using the Medical Research Council (MRC) 0–5 scale:
| MRC Grade | Description of Muscle Strength |
|---|---|
| Grade 0 | No visible or palpable muscle contraction whatsoever (complete paralysis). |
| Grade 1 | Flicker or trace of contraction visible/palpable, but no actual joint movement occurs. |
| Grade 2 | Active movement is possible, but only if gravity is completely eliminated (e.g., sliding arm across a flat table). |
| Grade 3 | Active movement against gravity is possible, but not against any added examiner resistance. |
| Grade 4 | Active movement against gravity AND against some resistance, but it is weaker than the normal side. |
| Grade 5 | Normal, full power against maximal resistance. |
Determine exactly how the musculoskeletal problem affects the patient's activities of daily living (ADLs). Mimicking activities that cause pain is highly diagnostic. Assess:
- Turning over in bed.
- Moving from sitting to standing; standing on tip-toes; squatting.
- Walking and climbing stairs.
- Dressing, bathing, putting on shoes, fastening buttons at the back.
- Combing the hair; opening door handles; feeding and fine hand function.
- Ability to perform work and usual hobbies.
- History of recent falls and the use of assistive devices.
This is particularly critical after trauma, casting, or orthopedic surgery to rule out limb-threatening ischemia or compartment syndrome. Assess the 6 Ps:
- Pain: Especially severe, unrelenting pain that is out of proportion to the injury, or extreme pain on passive stretching of the muscles.
- Pallor: Pale, white, or mottled skin distal to the injury indicating lack of arterial blood.
- Pulselessness: Absent or diminished distal pulses (a very late, dire sign).
- Paresthesia: Numbness, tingling, or "pins and needles" indicating nerve ischemia.
- Paralysis: Inability to move the digits (another late, severe sign of nerve/muscle death).
- Poikilothermia: The limb feels unnaturally cool to the touch compared to the rest of the body.
Action: Also rigorously assess capillary refill (< 2 seconds is normal). Urgent escalation to a doctor is required immediately if acute neurovascular compromise is suspected.
Special tests are provocative maneuvers performed only when clinically indicated by the history and basic exam. They isolate specific ligaments, tendons, or cartilages. Avoid causing injury during these tests.
These assess possible cervical nerve-root irritation, spinal cord involvement, and neck muscle function.
| Test Name | How It Is Performed | Positive Finding & Clinical Meaning |
|---|---|---|
| Spurling Test | Examiner positions the neck in extension and rotation (toward affected side) and applies gentle downward axial compression on the head. | Reproduction of radiating pain down the arm suggests cervical radiculopathy (nerve root compression). Avoid if instability/acute trauma is suspected. |
| Cervical Distraction Test | Apply gentle, steady upward traction to the head and neck. | Relief of radiating arm symptoms strongly supports cervical nerve-root involvement. |
| Upper Limb Tension Test (ULTT) | Examiner actively moves the patient's shoulder, elbow, wrist, and neck through a standardized nerve-tension stretching sequence. | Reproduction of familiar neurological symptoms indicates neural mechanosensitivity (irritated nerves). |
| Lhermitte's Sign | Ask the patient to flex their neck forward. Do not force the movement. | An "electric-shock" sensation shooting down the spine or into the limbs. Indicates cervical spinal cord pathology (e.g., Multiple Sclerosis). |
| Cervical ROM Test | Ask the patient to actively flex, extend, rotate, and laterally flex the neck. | Pain or restricted movement indicates musculoskeletal dysfunction, though not diagnostic on its own. |
These assess the rotator cuff muscles, subacromial impingement, biceps tendon, shoulder instability, and the labrum.
| Test Name | How It Is Performed | Positive Finding & Clinical Meaning |
|---|---|---|
| Neer Impingement Test | Stabilize the scapula and passively, forcefully elevate the patient's internally rotated arm forward and overhead. | Shoulder pain suggests possible subacromial impingement. |
| Hawkins–Kennedy Test | Flex shoulder and elbow to 90°, then gently internally rotate the shoulder (push forearm down). | Shoulder pain suggests possible subacromial impingement. |
| Empty Can / Jobe Test | Elevate arms ~90° in the scapular plane, thumbs pointing down (like emptying a can). Apply downward resistance. | Pain or severe weakness suggests supraspinatus muscle or rotator cuff pathology. |
| Full Can Test | Similar to empty can, but thumbs point upward. Apply downward resistance. | Pain or weakness suggests supraspinatus dysfunction. |
| Drop-Arm Test | Passively abduct the arm to 90° and ask the patient to slowly and smoothly lower it to their side. | Inability to lower smoothly, or the arm suddenly dropping, suggests a significant rotator cuff tear. |
| Painful Arc Test | Ask the patient to actively abduct the arm from the side all the way overhead. | Pain catching commonly between 60° and 120° of abduction suggests subacromial pain/impingement. |
| External Rotation Resistance | Elbows tucked tightly against the sides and bent to 90°. Ask patient to externally rotate hands outward against your resistance. | Pain or weakness indicates infraspinatus or teres minor (rotator cuff) dysfunction. |
| Lift-off Test | Place the back of the patient's hand against their lower back (lumbar area) and ask them to actively lift it away backward. | Inability to lift away or severe weakness suggests subscapularis dysfunction. |
| Belly-Press Test | Patient forcefully presses their palm flat against their abdomen while keeping the elbow pointed forward. | Elbow drifting backward or wrist flexion compensation suggests subscapularis weakness. |
| Speed's Test | Shoulder flexed forward, elbow extended, forearm supinated (palm up). Resist further upward shoulder flexion. | Pain deeply in the bicipital groove suggests long-head biceps tendon pathology. |
| Yergason's Test | Elbow flexed 90°. Resist as the patient attempts to supinate the forearm and externally rotate the shoulder. | Pain over the bicipital groove suggests biceps tendon pathology. |
| Apprehension Test | With patient lying down, shoulder abducted to 90° and externally rotated, gently move the arm further into external rotation. | Extreme fear of dislocation, facial grimacing, or muscular guarding suggests anterior shoulder instability. |
| Relocation Test | Following a positive apprehension position, apply gentle posterior (downward) pressure to the front of the humeral head. | Reduced apprehension or relief of pain firmly supports anterior instability. |
| Sulcus Sign | Gently but firmly pull the relaxed arm downward at the elbow while observing the shoulder. | A visible gap/dimple appearing just below the acromion suggests inferior shoulder laxity. |
| Cross-Body Adduction Test | Move the patient's arm horizontally across their chest toward the opposite shoulder. | Pain directly localized over the top of the shoulder suggests Acromioclavicular (AC) joint pathology. |
| O'Brien Active Compression Test | Flex arm forward 90°, adduct slightly. Patient resists downward pressure with thumb down, then repeats with thumb up. | Deep shoulder pain or clicking (worse thumb down) suggests labral pathology (SLAP tear); pain localized over AC joint indicates AC pathology. |
| Test Name | How It Is Performed | Positive Finding & Clinical Meaning |
|---|---|---|
| Cozen's Test | Patient makes a fist, extends the wrist, and radially deviates against examiner resistance with the elbow flexed. | Severe pain localized over the lateral epicondyle confirms lateral epicondylalgia (Tennis Elbow). |
| Mill's Test | Examiner passively pronates the forearm, fully flexes the wrist, and extends the elbow gently. | Lateral elbow pain suggests lateral epicondylalgia. |
| Maudsley's Test | Resist active extension of the middle finger while the patient's elbow is extended. | Lateral epicondylar pain confirms extensor tendon involvement. |
| Golfer's Elbow Test | Gently extend the elbow and wrist while supinating the forearm (passive stretching), OR assess resisted wrist flexion. | Pain localized over the medial epicondyle suggests medial epicondylalgia (Golfer's Elbow). |
| Valgus Stress Test | Apply a gentle valgus (outward) force to the elbow, usually flexed around 20–30°. | Medial pain or excessive joint opening suggests Ulnar Collateral Ligament (UCL) injury. |
| Varus Stress Test | Apply a gentle varus (inward) force to the flexed elbow. | Lateral pain or excessive opening suggests Lateral Collateral Ligament (LCL) injury. |
| Tinel's Sign at the Elbow | Gently tap repeatedly over the ulnar nerve resting in the cubital tunnel (funny bone area). | Electric tingling shooting into the little finger and half of the ring finger suggests ulnar nerve irritation. |
| Hook Test | With the elbow flexed 90° and forearm supinated, examiner attempts to hook a finger under the thick distal biceps tendon in the antecubital fossa. | Inability to hook the tendon (it feels empty) raises severe concern for a complete distal biceps tendon rupture. |
| Test Name | How It Is Performed | Positive Finding & Clinical Meaning |
|---|---|---|
| Phalen's Test | Hold the wrists in maximum forced flexion, pushing the backs of the hands together, for up to 60 seconds. | Tingling or numbness in the thumb, index, middle, and radial half of the ring finger strongly suggests Carpal Tunnel Syndrome (Median nerve compression). |
| Reverse Phalen's Test | Hold the wrists in maximum extension with palms pushing together (prayer position) for 60 seconds. | Median nerve-distribution symptoms suggest Carpal Tunnel Syndrome. |
| Tinel's Sign at the Wrist | Tap gently and repeatedly over the median nerve precisely at the volar carpal tunnel. | Tingling shooting into the median nerve finger distribution suggests nerve irritation. |
| Durkan's Compression Test | Apply direct, firm pressure with your thumbs directly over the carpal tunnel for 30 seconds. | Reproduction of median nerve symptoms (highly sensitive test for Carpal Tunnel). |
| Finkelstein Test | Patient tucks their thumb inside a closed fist. Examiner gently moves the wrist downward into ulnar deviation. | Sharp pain over the radial styloid highly suggests de Quervain's tenosynovitis. (Perform gently to avoid unnecessary agony). |
| Thumb CMC Grind Test | Apply gentle axial compression to the first metacarpal bone while grinding/rotating it at the base of the thumb. | Pain or harsh crepitus indicates Carpometacarpal (CMC) joint osteoarthritis. |
| Allen Test | Compress both radial and ulnar arteries simultaneously at the wrist. Have patient pump fist until hand is pale. Release *only* the ulnar artery and observe capillary refill perfusion. | Delayed or absent return of pink hand colour (>5 secs) suggests impaired collateral blood flow. Mandatory before radial artery blood gas procedures. |
| Froment's Sign | Ask the patient to tightly hold a piece of paper between the thumb and side of the index finger while you pull it away. | If the thumb forcefully bends at the interphalangeal joint to hold the paper, it indicates ulnar nerve weakness (adductor pollicis paralysis). |
| Bunnell–Littler Test | Compare passive PIP joint flexion while the MCP joint is held extended vs. flexed. | Restricted flexion that improves when MCP is flexed = intrinsic muscle tightness. Restricted in both = joint capsule contracture. |
| Elson Test | Flex the PIP joint to 90° over a table edge. Ask the patient to extend the finger against resistance. | Weak PIP extension while the DIP joint goes rigidly straight suggests a central slip injury of the extensor mechanism (impending boutonnière deformity). |
These tests assess the critical stability provided by the cruciate ligaments (ACL/PCL), collateral ligaments (MCL/LCL), the shock-absorbing menisci, and patellar tracking.
| Test Name | How It Is Performed | Positive Finding & Clinical Meaning |
|---|---|---|
| Lachman Test | Patient supine, knee flexed approx 20–30°. Examiner heavily stabilizes the distal femur and firmly pulls the proximal tibia sharply forward. | Excessive forward tibial movement or a "mushy/soft" endpoint strongly diagnoses an Anterior Cruciate Ligament (ACL) tear. |
| Anterior Drawer Test | Patient supine, knee flexed 90°, foot stabilized flat on bed. Pull the proximal tibia forward with both hands. | Excessive anterior movement suggests ACL laxity or rupture. |
| Posterior Drawer Test | With the knee at 90° flexion, push the proximal tibia firmly backward. | Excessive posterior sagging or backward movement suggests a Posterior Cruciate Ligament (PCL) injury. |
| Valgus Stress Test | Apply an inward (valgus) force to the outside of the knee while pulling the ankle outward, opening the medial joint line. Tested at 0° and 30° flexion. | Medial joint opening, gaping, or severe pain diagnoses a Medial Collateral Ligament (MCL) tear. |
| Varus Stress Test | Apply an outward (varus) force to the inside of the knee to open the lateral joint line. | Lateral joint opening or pain suggests a Lateral Collateral Ligament (LCL) injury. |
| McMurray Test | Patient supine. Fully flex the knee, rotate the tibia internally/externally, and slowly extend the knee while applying appropriate valgus/varus stress to the joint line. | Sharp joint-line pain or a palpable/audible "clunk" or click indicates a meniscal tear. |
| Thessaly Test | Patient stands flat-footed on one leg with the knee slightly bent (20°). Patient actively twists their body and knee internally and externally 3 times. | Joint-line pain, a feeling of catching, or locking suggests meniscal injury. Avoid if weight-bearing is obviously unsafe. |
| Apley Compression Test | Patient lies prone (face down) with the knee flexed 90°. Examiner pushes down heavily through the heel (axial load) while grinding/rotating the foot. | Pain localized precisely at the joint line confirms a meniscal lesion. |
| Patellar Apprehension Test | Patient supine. Examiner gently pushes the kneecap (patella) laterally outward while the knee is slightly flexed. | Extreme fear, muscle guarding, or the patient grabbing your hand to stop you suggests severe patellar instability or previous dislocation. |
| Patellar Tap / Ballottement | With the leg completely straight, examiner milks fluid downward from the suprapatellar pouch and sharply taps down on the kneecap. | A floating, bouncing, or "clicking" patella that hits the femur beneath suggests a moderate to massive knee joint fluid effusion. |
| Sweep / Bulge Test | Sweep fluid upward from the medial side of the knee into the pouch, then press the lateral pouch and watch the medial side. | A visible ripple or distinct fluid bulge appearing on the medial side indicates a small knee effusion. |
| Clarke's Patellar Grind Test | Apply gentle downward pressure above the superior pole of the patella while the patient actively contracts their quadriceps muscle. | Retropatellar pain/grinding suggests patellofemoral irritation (Chondromalacia patellae). Note: Highly non-specific and painful. |
These help assess hip flexion contractures, intra-articular hip joint pathology, sacroiliac-region pain, and abductor muscle weakness.
| Test Name | How It Is Performed | Positive Finding & Clinical Meaning |
|---|---|---|
| Thomas Test | Patient lies supine. Ask them to pull one knee tightly to their chest (flattening the lumbar spine) while observing the opposite, relaxed leg. | The opposite thigh involuntarily lifting off the bed proves a fixed hip flexion contracture (tight iliopsoas). |
| Trendelenburg Test | Ask the patient to stand entirely on one leg while the examiner observes the horizontal alignment of the pelvis from behind. | If the pelvis drops downward on the unsupported/lifted leg side, it diagnoses severe weakness of the stance-side hip abductors (Gluteus Medius). |
| FABER / Patrick Test | Flexion, ABduction, External Rotation. Place the ankle resting above the opposite knee (Figure-4 position). Gently push the bent knee down toward the bed. | Deep anterior groin pain = hip joint pathology. Posterior pain localized over the dimples = Sacroiliac (SI) joint pathology. |
| FADIR Test | Flexion, ADduction, Internal Rotation. Flex hip and knee to 90°, adduct across midline, and internally rotate. | Groin pain or mechanical pinching suggests Femoroacetabular Impingement (FAI) or a labral tear. |
| Ober's Test | Patient lies on their side. Examiner passively abducts and extends the upper hip, then allows the heavy thigh to drop downward toward the bed. | Inability of the leg to drop smoothly (it stays "hanging" in mid-air) proves a severely tight Iliotibial (IT) band. |
| Ely's Test | Patient lies prone. Examiner rapidly flexes the patient's knee toward their buttocks. | Spontaneous hip flexion or the pelvis lifting off the table on that side indicates severe rectus femoris muscle tightness. |
| Log-Roll Test | With the patient completely supine and leg relaxed flat, place hands on mid-thigh and gently roll the entire leg inward and outward. | Severe pain, catching, or highly restricted rotation suggests intra-articular hip joint pathology or a femoral neck fracture. |
| Hip Scour Test | Flex the hip 90° and apply gentle downward axial loading while sweeping the hip in a wide circular arc (internal/external rotation). | Deep groin pain, catching, or grinding confirms intra-articular hip damage (e.g., osteoarthritis). Avoid entirely if a fracture is suspected. |
| Leg-Length Assessment | Measure carefully with a tape measure from the anterior superior iliac spine (ASIS) to the medial malleolus of the ankle. Compare both sides. | A difference > 1-2 cm indicates a true anatomical leg-length discrepancy. (Apparent discrepancy arises from pelvic tilt/scoliosis without true bone shortening). |
| Sacroiliac (SI) Joint Tests (Requires a "Cluster" of positives for diagnosis) | ||
| Gaenslen's Test | Patient lies near the edge of the bed. One hip is pulled tightly to the chest, while the other leg drops freely off the side of the bed into forced extension. | Reproduction of familiar, sharp posterior pelvic pain suggests SI-region pathology. |
| SI Joint Distraction Test | Patient supine. Apply heavy, sustained outward pressure crossed over both anterior superior iliac spines (ASIS), pushing them apart. | Familiar deep posterior pelvic pain implies anterior SI ligament sprain/inflammation. |
| SI Joint Compression Test | Patient lies on their side. Apply heavy, steady downward pressure directly over the upper iliac crest toward the bed. | Reproduction of familiar pain strongly supports SI-region inflammation. |
| Thigh Thrust Test | Patient supine, hip flexed to 90°. Examiner pushes heavily straight downward through the line of the femur to sheer the SI joint. | Sharp posterior pelvic pain suggests SI joint dysfunction. |
| Sacral Thrust Test | Patient lies prone. Apply sudden, firm, springing downward pressure directly over the center of the sacrum. | Reproduction of familiar deep pelvic pain suggests SI-region involvement. |
| Test Name | How It Is Performed | Positive Finding & Clinical Meaning |
|---|---|---|
| Anterior Drawer Test of the Ankle | Stabilize the lower leg rigidly with one hand, cup the heel with the other, and gently draw the calcaneus and talus sharply forward. | Excessive forward movement or a soft endpoint confirms a tear of the Anterior Talofibular Ligament (ATFL) (the most common ankle sprain). |
| Talar Tilt Test | Stabilize the lower leg and firmly tilt the heel inward (inversion) or outward (eversion). | Excessive tilt/gaping indicates lateral ligament (CFL) tear or medial deltoid ligament injury, depending on direction. |
| Thompson Test | Patient lies prone with feet hanging freely beyond the bed edge. Examiner violently squeezes the bulky calf muscles. | Normally the foot should plantarflex. An absent or markedly reduced plantar flexion response diagnoses a complete Achilles tendon rupture. |
| Matles Test | Patient lies prone and actively flexes both knees to 90°. Observe the natural resting posture of both feet. | If the injured foot drops into a more neutral or dorsiflexed position (rather than pointing toes naturally), it indicates an Achilles tendon rupture. |
| Squeeze Test (Syndesmosis) | Firmly compress the tibia and fibula bones together tightly at the mid-calf. | Pain referred downward near the distal tibiofibular joint confirms a "High Ankle Sprain" (syndesmotic injury). |
| External Rotation Stress Test | With the knee flexed 90° and ankle neutral, gently but forcefully externally rotate the foot outward. | Sharp pain over the distal tibiofibular area suggests severe syndesmotic injury. |
| Tinel's Sign at Tarsal Tunnel | Gently tap directly over the posterior tibial nerve curving behind the medial malleolus (inner ankle bone). | Electric tingling or shooting pain into the sole of the foot indicates Tarsal Tunnel Syndrome. |
| Windlass Test | Actively or passively forcibly extend the great toe upward, while the patient is standing or seated. | Reproduction of sharp, tearing pain under the heel or arch strongly supports Plantar Fasciitis. |
| Mulder's Click Test | Compress the metatarsal heads together tightly with one hand, while applying upward pressure between the metatarsal spaces with the thumb. | Searing pain or a palpable/audible "click" between the 3rd and 4th toes indicates Morton's Neuroma. |
| Test Name | How It Is Performed | Positive Finding & Clinical Meaning |
|---|---|---|
| Straight Leg Raise (SLR / Lasègue's) | Patient lies completely supine. Passively and slowly raise the straightened symptomatic leg upward by the heel while monitoring the face for pain. | Familiar sharp, shooting pain radiating down the back of the leg (sciatica) between 30° and 70° strongly suggests lumbosacral nerve-root compression (herniated disc). (Tight hamstring pain behind the knee is non-specific). |
| Crossed Straight Leg Raise | Perform the SLR test on the unaffected, healthy leg while observing symptoms. | Pain shooting down the affected leg while lifting the healthy leg is a highly specific sign of a massive central lumbar disc herniation. |
| Slump Test | Patient sits on edge of bed and slumps forward (curving spine). Passively extend the knee and dorsiflex the ankle; then ask them to lift their chin. | Reproduction of shooting neural symptoms that vanish when the neck is extended confirms neural mechanosensitivity (nerve tethering). |
| Femoral Nerve Stretch (Prone Knee Bend) | Patient lies prone. Passively flex the knee entirely to the buttocks and gently lift/extend the hip upward. | Sharp, burning pain radiating down the anterior thigh suggests upper lumbar (L2-L4) nerve-root compression. |
| Schober Test | Mark the L5 spinous process, and a point 10 cm directly above it. Ask the patient to bend forward touch their toes. Measure the new distance. | An increase of less than 5 cm during maximum forward flexion proves severely restricted spinal mobility (classic sign of Ankylosing Spondylitis). |
| Lumbar Extension Test | Ask the patient to stand and lean backward, extending the lumbar spine maximally. | Reproduction of central back pain suggests extension-sensitive spinal pathology (e.g., spinal stenosis, facet joint arthritis). |
| Kemp's / Quadrant Test | With the patient standing, the examiner gently guides them into maximum extension, rotation, and lateral flexion simultaneously. | Localized back pain or radiating pain implies severe facet joint disease or narrowing of the intervertebral foramen. |
| Valsalva Manoeuvre | Ask the patient to bear down firmly, as if straining during a difficult bowel movement. | Sudden reproduction of radiating pain down the leg suggests a space-occupying lesion inside the spinal canal (like a large herniated disc) reacting to increased intrathecal pressure. |
| Heel-Walking Test | Ask the patient to walk across the room balancing strictly on their heels with toes pointed up. | Foot drop or inability to maintain the toes up indicates severe weakness of the ankle dorsiflexors (L4–L5 nerve-root compression). |
| Toe-Walking Test | Ask the patient to walk across the room strictly on their tiptoes. | Inability to hold the heel off the ground indicates severe calf/plantar-flexor weakness (S1 nerve-root compression). |
- Joint Swelling: Caused by acute inflammation, trauma (haemarthrosis), or chronic synovial effusion.
- Crepitus: Grating sound/feel signifying degenerative osteoarthritis cartilage loss, or the horrific grinding of fractured bone ends.
- Deformity: Visible anatomical distortion due to fracture, joint dislocation, or chronic rheumatoid disease (e.g., swan neck deformity).
- Muscle Wasting: Loss of muscle bulk due to prolonged disuse, joint immobilization, or severe peripheral nerve lesions.
- Reduced ROM: Can result from severe pain, joint inflammation, capsular stiffness, bony blocks, or muscle contracture.
- Weakness: Caused by direct neurological impairment, muscular tears, or systemic weakness.
- Red, Hot, Very Painful Joint: A massive red flag. Always highly consider septic arthritis (medical emergency) or acute gouty inflammation.
- Suspect a fracture? Immediately immobilize the limb and strictly avoid unnecessary movement or ROM testing to prevent severing arteries.
- Severe pain? Conduct a thorough pain assessment before attempting any active or passive ROM. Do not force movement through agonizing pain.
- Recent surgery? Strictly follow the surgeon’s prescribed weight-bearing and movement restrictions (e.g., hip precautions post-arthroplasty).
- Suspected spinal injury? Maintain strict spinal precautions (log-rolling, hard collar) until cleared by X-ray/MRI.
- Acute limb ischemia or compartment syndrome? Escalate to the surgical team immediately to save the limb from amputation.
- Maintain stringent infection-prevention precautions when handling open wounds, external fixator pins, or invasive devices.
- Always formally reassess the patient after administering pain interventions to document therapeutic changes.
Document objectively, completely, and specifically avoiding vague terms. Record:
- Exact joint or site examined (Left vs Right).
- Visual inspection findings (erythema, deformity, scars).
- Palpation findings: pinpoint location of tenderness, presence of swelling, or temperature changes.
- Measurements of Active and Passive ROM (in degrees if possible).
- Muscle power documented precisely using the MRC 0-5 grade.
- Detailed description of Gait and functional ability.
- Strict neurovascular findings (pulses, sensation, capillary refill).
"Right knee visually swollen, warm to touch, and acutely tender precisely over the medial joint line. Active flexion severely limited to 60° by pain; extension lacks 10°. Patellar tap test is positive for moderate effusion. McMurray's test positive for medial click. Distal sensation intact to light touch. Dorsalis pedis and posterior tibial pulses strong and equal bilaterally. Capillary refill < 2 secs."
If tested in a clinical skills exam, follow this exact fluid sequence without deviation:
- Introduce yourself professionally and firmly confirm the patient's identity.
- Explain the musculoskeletal procedure plainly and obtain explicit verbal consent.
- Perform visible hand hygiene and ensure appropriate exposure of the joint (maintaining dignity).
- General inspection of the patient from the end of the bed.
- Assess overall posture and observe their gait as they walk.
- Inspect closely and systematically palpate the affected area (feeling for temperature, swelling, joint lines).
- Assess Active ROM, followed by Passive ROM.
- Assess specific muscle power against resistance (using MRC grading).
- Perform the relevant special tests (e.g., Anterior Drawer, Phalen's) based on the joint.
- Complete a rapid neurovascular and functional assessment.
- Thank the patient, ensure they are dressed and comfortable, wash your hands again, and systematically document your findings.
A complete musculoskeletal examination MUST be systematic:
HISTORY ➔ INSPECTION ➔ PALPATION ➔ MOVEMENT ➔ MUSCLE POWER ➔ SPECIAL TESTS ➔ GAIT/FUNCTION ➔ NEUROVASCULAR ASSESSMENT ➔ DOCUMENTATION
Always relentlessly compare sides and correlate your physical findings with the patient's history.
- Hutchison's Clinical Methods. (Latest Edition). An Integrated Approach to Clinical Practice. Elsevier.
- Macleod's Clinical Examination. (Latest Edition). Elsevier.
- Medical Research Council (MRC) Muscle Scale guidelines for strength assessment.
- Etonu Archbald (PHD, PGDME, MNS, PDHSM, BNS, DCN). Lecture Notes: Physical Examination of the Musculoskeletal System & Musculoskeletal Assessment.
Quick Quiz
Musculoskeletal System Examination Quiz
Health Assessment
Privacy: Your details are used only for quiz tracking and certificates.
Musculoskeletal System Examination Quiz
Health Assessment
Preparing questions...
Choose your answer and keep your streak alive.
Great effort.
Here is your quick performance summary.