
PHYSIOLOGY OF FIRST STAGE OF LABOUR:
UTERINE ACTION
Fundal dominance;
Each uterine contraction starts from the fundus near the cornua and spreads across and down wards.
The contraction lasts longer in the in the fundus where it is most intense but the peak is reached simultaneously over the whole uterus and the contractions fade from all parts together.
This permits the cervix to dilate and the strongly contracting fundus to expel the fetus.
Polarity
This is a neuromuscular harmony that prevails between the two poles of the uterus throughout
labour.
During a contraction, these two poles act harmoneously. The upper uterine segment contracts strongly and retracts to expel fetus and the lower pole contracts slightly and dilates to allow expulsion of the fetus. If polarity is disorganized, labour progress is inhibited.
Contraction and retraction
During labour, a contraction does not pass off entirely but muscle fibres retain some of the shortening contractions instead of becoming completely relaxed. This is termed as retraction. This is a unique property of the uterine muscles and because of this,
the upper uterine segment becomes shorter and thicker and diminishes its cavity assisting in expulsion of the fetus.

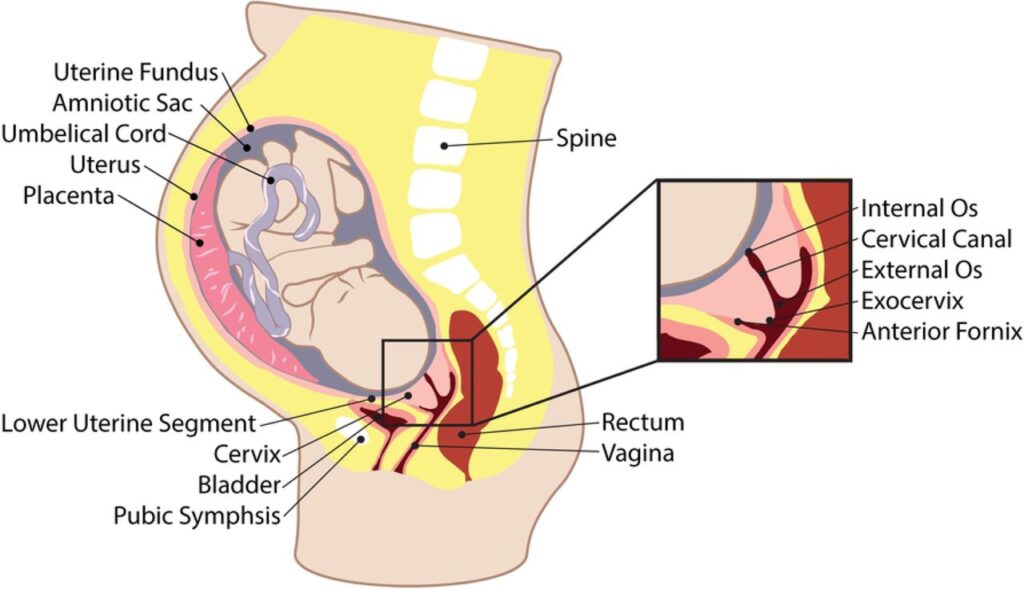
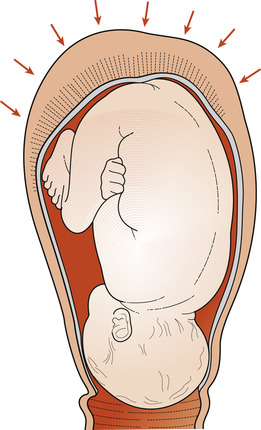
Formation of the upper and lower uterine segment
By the end of pregnancy, the body of the uterus has divided into two segments;
> The upper segment is mainly for contraction and is muscular and thicker while the lower uterine segment is for distension and dilatation and is thinner.
> The lower segment develops from the isthmus and is about 8-10cm in length.
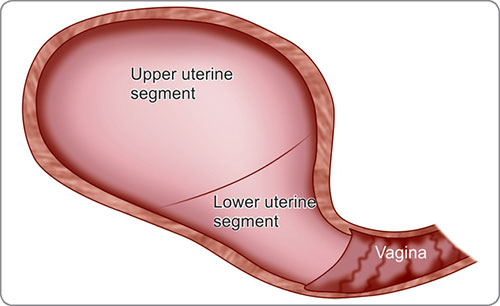
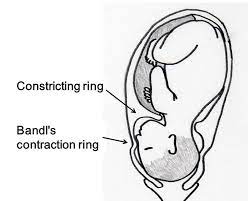
Retraction ring
This is a ridge formed between the upper and lower uterine segment.
The physiological retraction ring gradually rises when the upper uterine segment contracts and retracts and lower uterine segment thins out to accommodate the descending fetus.
This ring is not usually visible and when cervix is fully dilated and fetus can leave the uterus, it rises no further.
An exaggerated phenomenon of retraction ring in obstructed labour it becomes visible above the
symphysis pubis. This is termed as a bundle’s ring

2. CERVICAL ACTION
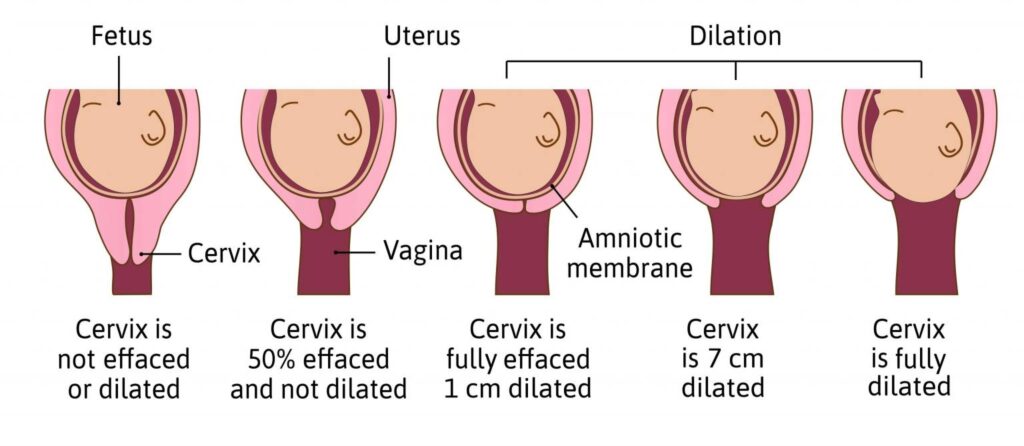
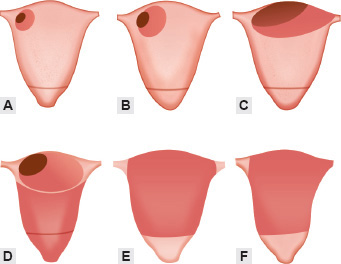
Cervical effacement
This is inclusion of the cervical canal. The muscle fibres surrounding the internal os are drawn upwards by the retracted upper uterine segment and the cervix merges into the lower uterine segment.

Cervical dilatation
This is the process of enlargement of the os from a tightly closed aperture to an opening large enough to permit passage of the fetal head.
It is measured in cm. a full dilatation at term equates to 10cm.
Pressure applied by the bag of fore waters and a well flexed fetal head closely applied to the cervix favors efficient dilatation.
Show
This is blood stained mucus which is seen before or at the onset of labour. The mucus is a thick mucoid substance which forms the cervical plug (opeculum) during pregnancy. Blood comes from raptured capillaries when the chorion has become detouched from the dilating cervix.
3. MECHANICAL FACTORS
Formation of fore waters
As the lower uterine segment stretches, the chorion becomes detouched from it and the increased intra uterine pressure causes this loosened part of the sac of fluid to bulge down wards into the dilating internal os. A well flexed head fits snugly into the cervix and cuts off the fluid in front of the head from that surrounding the body. The water in front is known as fore waters and that
behind is called hind waters.
General fluid pressure
When the membranes are intact, the pressure of the uterine contractions is exerted on the fluid and since the fluid is not compressible, the pressure is applied on the uterus and over the fetal
body. This is termed as general fluid pressure.
When membranes rapture and quantity of fluid escapes, the fetal head, placenta and umbilical cord will be compressed between the uterine wall and body of fetus during contraction resulting in reduced oxygen supply to the fetus.

Rapture of membranes
The optimum physiological moment for membranes to rapture is at the end of 1st stage of labour when the cervix becomes fully dilated and no longer supports the bag of fore water.
The uterine contractions are also applying increasing expulsive force at this time. Membranes may also rapture days before labour begins or during 1st stage of labour especially in a badly
fitting presenting part.
Occasionally, membranes do not rapture even in 2 nd stage and appear at the vulva as a bulging sac covering the fetal head as it is born. This is known as caul(CAL DE SAC)
Fetal axis pressure
During the contraction, the uterus rises forward and the force of fundal contraction is transmitted to the upper pole of the fetus down the long axis of the fetus and is applied to the cervix by the presenting part. This becomes more significant after rapture of membranes and during 2 nd stage of labour.
Descent of the presenting part.
It refers to the downward and outward movement of this part through the pelvis.
The normal well flexed head twists and turns flexes and extends to maneuver through the pelvis.
There are 3 planes or obstacles involved in the process of descent:
– Pelvic inlet/ brim.
When the presenting part is at the level of the ischial spines, a pelvic brim mark, it indicates the largest part of the head has come through the brim. The head is thus engaged.
The presenting part is now at station 0.
– Pelvic cavity.
When the presenting part has descended to the perineum, the largest part has passed the ischial
spines. The head is now at station +2.
– Pelvic outlet.
Delivery of the head brings it past the 3 rd obstacle ( pelvic outlet), which is under the pubic arch, between the ischial tuberosities and over the coccyx.
NB: station is the relationship of the lowermost part of the presenting part to an imaginary line
drawn between the ischial spines and the woman’s pelvis.
MANAGEMENT OF FIRST STAGE OF LABOUR
Aims
- To monitor labour progress.
- To prevent maternal exhaustion.
- To prevent infections.
- To give comfort to the mother and maintain patient’s moral.
- To relieve pain.
- To prevent complications.
- Admission of a mother in labour
Welcome the mother and her relatives to allay fear and anxiety, create rapport. - Obtain full history and review the antenatal card while the mother is sitting or lying on
the couch.
The histories taken include;-
-Demographic data
-Date and time of admission
-When contractions started
-Frequency and strength of contractions
-If membranes raptured - Obtain consent from the mother and sign. Make sure mother is given sufficient
information before she decides to give consent. - Vital observations;- pulse ½ hourly if >100b/m indicates pain, anxiety, infections,
ketosis, hemorrhage etc.
– Blood pressure 2 hourly
– Temperature 4 hourly
-Respiration 4 hourly (16-20r/m) - Investigations e.g.- Urinalysis to rule out acetones, glucose and proteins.- Blood for Hb estimation, grouping and cross matching can be obtained depending on mother’s condition.
- General examination The midwife examines a mother from head to toe paying more attention to general appearance (health or ill), size, any deformity, signs of anaemia, jaundice, oedema, dehydration, infections, Vericose veins and enlarged glands and veins in the neck. Examine the breasts and notice their suitability for breast feeding.
- Abdominal examination: The mother’s bladder should be empty. It’s done following 3 steps.
-Inspection:-for size, shape, scars, signs of pregnancy etc
-Palpation: – Noting tenderness, height of fundus, presentation, lie, position, descent,
contractions, frequency, length and strength.
-Auscultation: – Noting rate, regularity and volume.
Vaginal examination.
This is a sterile procedure carried out on a woman through the vagina to rule out obstetrical or
gynecological abnormalities.
Indications of VE during pregnancy
> To confirm pregnancy
> To exclude abnormalities e.g. fibroids
> For pelvic assessment
> To determine the state of the cervix
> To confirm the type of abortion
> To rule out abnormal discharges
> During labour
During First stage
> To determine cervical dilation
> To exclude cord prolapse when membranes rapture
> To confirm full dilation when mother is bearing down.
> Before induction of labour to determine state of the cervix
> In prolonged labour to rule out obstructed labour.
> To make a positive identification of the presentation.
> To determine if the presenting part is engaged.
–During Second stage
> To confirm full dilation of the cervix
> When there is no descent to determine the delay e.g. face to pubis
> After delivery of the 1st twin to determine the presentation of the 2nd twin.
-During Third stage
> In delayed 3rd stage of labour to know whether the placenta is in the birth canal where it can be
removed quickly.
> To exclude lacerations and expel clots from the birth canal.
> In emergency i.e. manual removal of placenta.
> During puerperium
To find out whether the perineum has healed after 6 weeks.
> To find out whether the reproductive organs have regained their muscle tone and position.
> To obtain a specimen for examination.
> In abnormal vaginal discharge to confirm the type of infection.
Contraindications of VE
In APH and elective caesarian section
Complications of VE
-Infections
-Early rapture of membranes.
-Trauma or lacerations to the birth canal
Requirements
Tray containing;
> Galipot for swabs with antiseptic
> 2 receivers
> Sterile gloves
> Vaginal speculum
> Sterile bowl for lotion.
> Perineal pad/ clean pads
> Sheet and mackintosh.
> Clean gloves.
> Lubricant
At the bed side
> Screen
> Hand washing equipment
> Bed pan
PROCEDURE OF VAGINAL EXAMINATION
- Welcome and explain procedure to the mother.
- Empty bladder and screen the bed.
- Assemble a VE tray.
- Ask mother to relax during examination.
- Woman’s arms should be down by her sides or across her abdomen to relax her abdominal
muscles. - Assist her into dorsal position and drape her.
- Put on clean gloves
- Place mackintosh and draw sheet under the buttocks
- Remove gloves and wash hands thoroughly and put on sterile gloves.
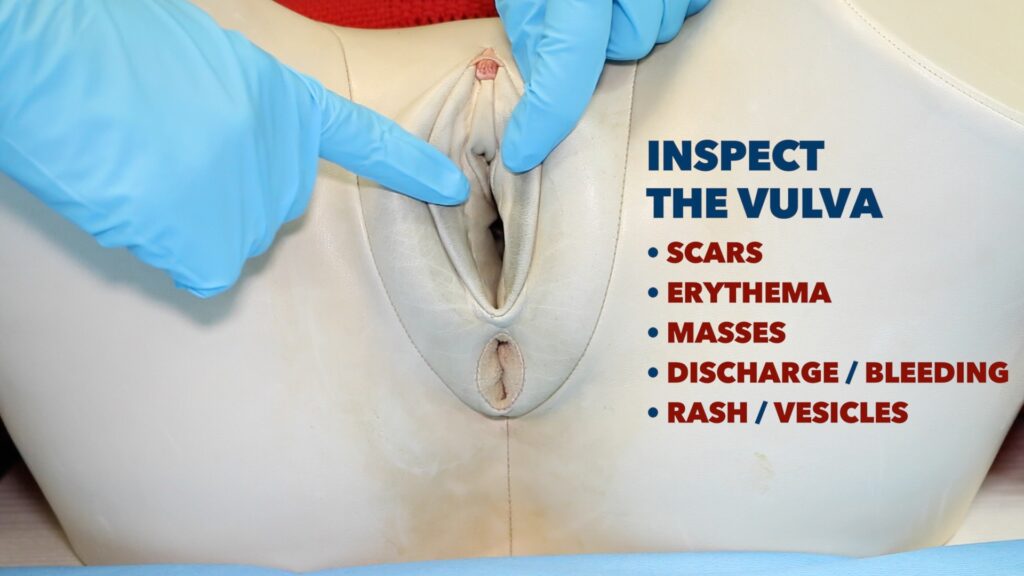
- Observe the external genitalia. Before the midwife cleans the vulva, should observe the
following;-
– Hygiene
– Labia for signs of varicosities.
– Oedema
– Vulval warts
– Sores
– If the perineum has old scars for tears, episiotomy, female circumcision.
– Any discharge from the vaginal opening i.e. blood, raptured membranes, smell of liquor
and colour.
– If liquor smells, it indicates infections. If green or meconium stained, indicates fetal
distress. - Vulva is swabbed using the left hand, swab from the front towards the rectum.
The 2 fingers of the right hand are dipped in the antiseptic cream for lubrication and gently inserted down wards and backwards into the vagina while the labia majora are held apart by the fingers of the left hand.
The fingers are directed along the anterior vaginal wall and should not be withdrawn until the
required information has been obtained. NB: The clitoris should not be touched because it causes discomfort.
Findings:
Condition of the vagina;
The vagina should feel warm and moist. A hot and dry vagina is a sign of obstructed labour and should not be found in modern obstetric care.
If a mother has a high temperature, the vagina will feel correspondingly hot but not dry.
Previous scar from Perineal wound, cystocele or rectocele.
The cervix;
The normal should feel thin and elastic and well applied to the presenting part.
A spongy feeling may show undiagnosed placenta previa.
The midwife should sweep the examining fingers from side to side to locate the os. It is usually felt in the center but sometimes in early labour, it is very posterior.
The length of the cervical canal assessed through a tightly closed cervix shows that labour has not yet started.
In a PG, the cervix can be completely taken up(effaced) but still closed and in this manner, it will be closely applied to the presenting part and it can be confused with a fully dilated cervix. If poorly applied to the presenting part, then it means there is an ill-fitting presenting part.
Assess cervix for; effacement, dilatation, consistency.
Membranes;
When membranes are intact, they can be felt through the dilating os; they feel tenser on contraction. When the fore waters are shallow, it is not easy to feel membranes.
If the presenting part does not fit well in or at the cervix, some of the fluid from the hind waters escapes into the fore waters causing the membranes to bulge or protrude through the cervix and are liable to rapture early.
Level or station of presenting part;
The presenting part is that part of the fetus that lies over the internal os during labour.
In order to assess the descent of the fetus in labour, the level of presenting part is assessed or estimated in relation to maternal ischial spines.
Position;
On feeling the features of the presenting part, the position of the fetus can be detected. The vertex is the normal presentation and the midwife must be familiar with it. Commonly the first feature to be felt even in early labour is the sagittal suture. The sagittal suture should be followed with a finger until a fontanel is reached.
If the head is well flexed, the posterior fontanel will be felt. This can be judged by feeling the amount of overlapping of the skull bones and can give additional information on position.
The parietal bones override the occipital bone to reduce the distance of the presenting diameter.
Pelvic capacity (pelvic assessment);
Although the pelvis was assessed during ANC period, the midwife should take opportunity to assure herself of its adequacy as she completes vaginal examination.
At completion of examination, withdraw fingers from the vagina and note any blood or amniotic fluid, cleans up the mother and removes gloves.
Record all findings of what was observed on admission on a partograph and observation chart.
This is so detailed, thanks Alot dear
You’re welcome
So detailed and easy to understand thanks
Well done
Any quiz for today
This has been helpful, thank you
Thank you for this tremendous work,we are helped
very easy to understand