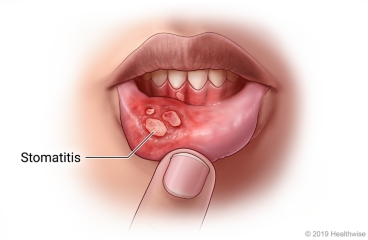
Stomatitis
Stomatitis refers to a broad range of inflammatory conditions affecting the epithelial lining of the oral mucosa, which is the moist membrane that lines the inside of the mouth. This inflammation can manifest in various ways, from mild redness and discomfort to severe ulceration and pain, significantly impacting a person's ability to eat, speak, and maintain oral hygiene. Stomatitis is not a single disease but rather a symptom or a group of symptoms that can arise from a diverse array of local (within the mouth) and systemic (affecting the entire body) factors.
Causes and Etiology of Stomatitis
The etiology of stomatitis is multifaceted, often involving an interplay of various predisposing and precipitating factors. Understanding the underlying cause is crucial for effective diagnosis and management.
Trauma:
- Mechanical Injury: This is a common cause, including accidental biting of the cheek or tongue, irritation from sharp or abrasive foods (e.g., hard crackers, bones), ill-fitting dental appliances (braces, dentures), or vigorous toothbrushing.
- Thermal Injury: Burns from hot foods or liquids.
- Chemical Injury: Exposure to irritating chemicals or highly acidic substances.
Infections: Oral mucosa is susceptible to various microbial invasions.
- Bacterial Infections: Can lead to conditions like acute necrotizing ulcerative gingivitis (ANUG), impetigo affecting the perioral region, or secondary infections of existing lesions.
- Fungal Infections:
- Candida albicans: Most commonly associated with oral thrush, presenting as creamy white patches that can be scraped off, revealing reddened, often bleeding, underlying tissue. It is particularly common in infants, immunocompromised individuals (e.g., HIV/AIDS patients, those undergoing chemotherapy), or those on long-term antibiotic or corticosteroid therapy.
- Viral Infections:
- Herpes Simplex Virus (HSV): Primarily HSV-1, causing primary herpetic gingivostomatitis (especially in children) characterized by widespread oral ulcers, fever, and malaise, or recurrent herpes labialis (cold sores) around the lips.
- Varicella-Zoster Virus (VZV): Causes chickenpox (primary infection) and shingles (reactivation), both of which can involve painful oral lesions.
- Other Viruses: Coxsackievirus (hand, foot, and mouth disease), Epstein-Barr Virus (infectious mononucleosis), and Human Papillomavirus (oral warts).
Irritants: Chronic exposure to certain substances can significantly damage the oral mucosa.
- Tobacco Use: Smoking, chewing tobacco, and snuff are major irritants, increasing the risk of leukoplakia, erythroplakia, and oral cancers, often preceded by chronic stomatitis.
- Alcohol Consumption: Heavy alcohol use is corrosive to oral tissues and is a significant risk factor for oral lesions and cancers, especially when combined with tobacco.
- Spicy Foods: Can cause temporary irritation and inflammation in sensitive individuals.
Systemic Disorders: Stomatitis can be an oral manifestation of various underlying systemic diseases, acting as an important diagnostic clue.
- Renal Disorders: Uremic stomatitis can occur in patients with severe kidney failure, characterized by a white, thick, or pseudomembranous coating on the oral mucosa, often with a metallic taste due to urea breakdown products.
- Liver Disorders: Chronic liver disease can lead to oral mucosal changes due to metabolic disturbances.
- Hematologic Disorders:
- Anemia (e.g., iron deficiency anemia, pernicious anemia): Can cause atrophic glossitis (smooth, red, painful tongue), angular cheilitis (cracking at mouth corners), and general oral soreness.
- Leukemia, Agranulocytosis: Can lead to severe gingivitis, ulcerations, and opportunistic infections due to compromised immune function.
- Autoimmune Diseases:
- Pemphigus Vulgaris, Bullous Pemphigoid: Autoimmune blistering diseases that can severely affect the oral mucosa, causing painful erosions.
- Lichen Planus: A chronic inflammatory condition that can present as white lacy patterns, red erosions, or ulcers in the mouth.
- Systemic Lupus Erythematosus (SLE): Oral lesions (ulcers, red patches) can be a feature.
- Crohn's Disease, Ulcerative Colitis (Inflammatory Bowel Diseases): Can cause oral aphthous ulcers or granulomatous lesions.
- Diabetes Mellitus: Poorly controlled diabetes can predispose individuals to candidiasis and other oral infections due to impaired immune response and higher glucose levels in saliva.
Medication Side Effects: Many pharmacological agents can induce stomatitis.
- Chemotherapeutic Drugs: Mucositis (a severe form of stomatitis) is a very common and debilitating side effect of many cancer chemotherapeutic agents (e.g., methotrexate, 5-fluorouracil) and radiation therapy to the head and neck, causing widespread painful ulcerations.
- Antibiotics: Can disrupt the normal oral flora, leading to opportunistic infections like candidiasis.
- Anticonvulsants (e.g., phenytoin): Can cause gingival hyperplasia (overgrowth of gum tissue).
- Immunosuppressants: Increase susceptibility to oral infections.
- Other Drugs: Certain antihypertensives, antidepressants, and anti-inflammatory drugs can also cause oral side effects.
Nutritional Deficiencies: Inadequate intake or absorption of specific nutrients can severely compromise oral tissue health.
- B Vitamins (especially B1, B2, B3, B6, B12, Folate): Deficiencies can lead to glossitis, angular cheilitis, and recurrent aphthous ulcers.
- Iron: Iron deficiency anemia frequently causes atrophic glossitis, oral burning, and angular cheilitis.
- Vitamin C (Ascorbic Acid): Severe deficiency (scurvy) results in swollen, bleeding gums, tooth mobility, and poor wound healing.
- Vitamin A: Important for maintaining healthy epithelial tissues; deficiency can lead to dry mouth and increased susceptibility to infection.
- Zinc: Essential for immune function and wound healing; deficiency can impact oral health.
Poor Oral Hygiene: A primary contributor to various oral pathologies.
- Allows for the accumulation of plaque and calculus, leading to gingivitis and periodontitis.
- Promotes the overgrowth of pathogenic microorganisms (bacteria, fungi), increasing the risk of infections.
Denture-Related Issues:
- Poor Denture Hygiene: Inadequate cleaning allows for biofilm formation and microbial proliferation, particularly Candida species, leading to denture stomatitis (inflammation of the mucosa under the denture).
- Ill-Fitting Dentures: Cause chronic frictional trauma and pressure points, leading to localized inflammation, sores, and hyperplastic tissue reactions.
- Continuous Night-Time Wear: Deprives the underlying mucosa of exposure to saliva and oxygen, creating an environment conducive to microbial growth and inflammation.
Other Factors:
- Hormonal Changes: Fluctuations during puberty, menstruation, pregnancy, and menopause can influence oral health and susceptibility to inflammation.
- High Intake of Sugary Foods: Promotes an acidic oral environment and provides substrate for bacterial growth, contributing to dental caries and potentially exacerbating inflammation.
- Stress: Psychological stress can weaken the immune system and has been linked to the exacerbation of conditions like recurrent aphthous stomatitis.
- Allergies: Allergic reactions to dental materials, food components, or oral hygiene products can trigger localized inflammatory responses.
- Genetic Predisposition: Some individuals may be genetically more prone to certain types of stomatitis, such as recurrent aphthous ulcers.
Clinical Manifestations of Stomatitis
The signs and symptoms of stomatitis vary depending on the cause, location, and severity of the inflammation, but commonly include:
- Changes in Salivation: Can range from excessive salivation (sialorrhea), often due to irritation or pain, to pronounced dryness of the mouth (xerostomia), which can exacerbate discomfort and increase infection risk.
- Halitosis (Bad Breath): A common symptom, resulting from bacterial overgrowth, tissue breakdown, or metabolic products associated with certain systemic diseases.
- Glossitis: Inflammation of the tongue, causing it to appear red, swollen, smooth (due to atrophy of papillae), and often exquisitely painful. This can be a sign of nutritional deficiencies (e.g., B vitamins, iron) or systemic diseases.
- Oral Ulcers: Painful, open sores that can occur on any part of the oral mucosa, including the gums, palate, buccal mucosa (inner cheeks), and lips. These can range from small aphthous ulcers to large, irregular erosions characteristic of viral infections or autoimmune conditions.
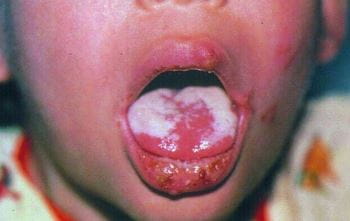
- Thrush (Oral Candidiasis): Characterized by creamy white, cottage-cheese-like patches on the tongue, inner cheeks, palate, or throat. These lesions are typically adherent but can be scraped off, revealing an erythematous (red) and sometimes bleeding base. It is a hallmark of fungal infection, especially in immunocompromised or debilitated individuals (e.g., infants, HIV/AIDS patients, those on prolonged antibiotics or corticosteroids).
- Gingivitis: Swelling, redness, and bleeding of the gums, often an early sign of periodontal disease but can also be part of a generalized stomatitis.
- Denture Stomatitis: A specific form of inflammation seen in denture wearers, presenting as reddening and sometimes swelling of the mucosa directly under the denture-bearing area, often associated with a fungal infection.
- Dysphagia and Odynophagia: Difficulty and pain during swallowing, respectively, especially if the inflammation extends to the throat or pharynx.
- Dysgeusia: Altered taste sensation.
- Pain and Discomfort: Ranging from a mild burning sensation to severe, constant pain that interferes with eating and speaking.
Investigations and Diagnosis
Diagnosing stomatitis involves a thorough clinical examination and, often, specific laboratory tests to identify the underlying cause.
Mouth Swab: A sample taken from the affected area for:
- Microscopy: Direct visualization of microorganisms (e.g., fungal hyphae in candidiasis).
- Culture and Sensitivity: To grow and identify bacterial or fungal pathogens and determine their susceptibility to various antimicrobial agents.
- PCR (Polymerase Chain Reaction) or Viral Culture: To detect viral DNA/RNA (e.g., HSV).
Blood Tests:
- Complete Blood Count (CBC): To check for signs of anemia, infection, or other hematologic abnormalities.
- Nutritional Deficiencies: Serum levels of vitamins (e.g., B12, folate) and minerals (e.g., iron, ferritin).
- Inflammatory Markers: ESR (Erythrocyte Sedimentation Rate) or CRP (C-reactive protein) if systemic inflammation is suspected.
- Rapid Plasma Reagin (RPR) or VDRL: Blood tests for syphilis, which can cause oral lesions (e.g., mucous patches, gummas).
- HIV Serology: To rule out HIV/AIDS, as these patients are highly susceptible to recurrent and severe oral infections, particularly candidiasis and herpes.
- Random Blood Sugar (RBS) or HbA1c: To screen for or monitor diabetes, as hyperglycemia can promote fungal growth and impair healing.
- Liver and Kidney Function Tests: To assess for underlying systemic diseases (e.g., uremic stomatitis).
- Autoantibody Tests: If an autoimmune condition is suspected (e.g., ANA for SLE, anti-desmoglein for pemphigus).
Biopsy: In cases of persistent, atypical, or suspicious lesions (e.g., white patches that cannot be scraped off, chronic ulcers), a tissue biopsy is essential to rule out dysplasia or malignancy.
Imaging Studies: Rarely needed for primary stomatitis, but may be used to investigate underlying systemic causes or complications.
Treatment and Management Strategies
Effective management of stomatitis is multimodal, focusing on treating the underlying cause, alleviating symptoms, and preventing recurrence.
Treat the Underlying Cause: This is the cornerstone of effective therapy.
Antimicrobial Therapy:
- Broad-spectrum Antibiotics: For identified bacterial infections (e.g., metronidazole for ANUG).
- Antifungals: For oral candidiasis, systemic antifungals (e.g., fluconazole, itraconazole) may be necessary for widespread or resistant infections, in addition to topical agents.
- Antivirals: For severe or recurrent viral infections (e.g., acyclovir, valacyclovir for HSV).
Nutritional Supplementation: Correcting identified vitamin or mineral deficiencies through dietary changes and/or supplements.
Management of Systemic Diseases: Controlling underlying conditions like diabetes, kidney disease, or autoimmune disorders.
Discontinuation or Adjustment of Medications: If a drug is identified as the cause, a physician may consider adjusting the dosage or switching to an alternative medication.
Correction of Traumatic Factors: Removing sharp food edges, adjusting or replacing ill-fitting dental appliances.
Oral Hygiene Measures: Meticulous oral hygiene is fundamental to both treatment and prevention.
- Saline Rinses: Rinsing the mouth 3-4 times a day with a warm salt solution (e.g., 1/2 teaspoon of salt in 1 cup of warm water) helps to soothe inflamed tissues, cleanse the mouth, and promote healing.
- Antiseptic Mouthwashes:
- Hydrogen Peroxide Solution (6%): Diluted (e.g., 15 ml in 200 ml of warm water) can be used as an oxygenating rinse, particularly beneficial for anaerobic infections and debridement.
- Chlorhexidine Mouthwash (0.2%): An effective broad-spectrum antiseptic, used twice daily, helps reduce bacterial load and plaque formation. Note: Can cause temporary tooth staining with prolonged use.
- Gentle Brushing: Using a soft-bristled toothbrush and non-irritating toothpaste to clean teeth and gums gently, avoiding affected areas if too painful initially.
Denture Care: Specific instructions for denture wearers are vital to prevent and treat denture stomatitis.
- Remove Dentures at Night: Allows the oral mucosa to rest and be exposed to saliva and oxygen.
- Improve Denture Hygiene: Regular cleaning by brushing the denture and soaking it daily in an appropriate denture cleanser (e.g., hypochlorite cleanser – 10 drops of household bleach in a cup of water, or commercial denture tablets). The fitting surface of the denture should also be brushed to remove accumulated plaque and fungi.
- Replace Ill-Fitting Dentures: Essential to eliminate chronic trauma and pressure points.
Dietary Modification:
- Reduce Irritants: Avoid highly acidic, spicy, salty, or very hot/cold foods and beverages that can irritate inflamed mucosa.
- Soft, Bland Diet: Encourage consumption of soft, bland, and nutrient-dense foods (e.g., mashed potatoes, soft cooked vegetables, pureed soups, yogurt) to ensure adequate nutrition without causing further discomfort.
- Reduce Sugar Intake: Especially important in cases of candidiasis, as sugar promotes fungal growth.
- Hydration: Drink plenty of fluids to maintain oral moisture and prevent dehydration.
Pharmacological Treatment (Symptomatic Relief and Specific Therapies):
- Antifungals:
- Nystatin Suspension (100,000 IU/mL): A common topical antifungal for oral thrush. Typically, the patient is instructed to "swish and swallow" 5-10 ml 4-6 times daily for 7-14 days (or at least 48 hours after symptoms resolve). The "swish and swallow" method ensures contact with the oral mucosa and allows some medication to reach the esophagus if candidiasis has extended.
- Clotrimazole Troches: Lozenges that dissolve slowly in the mouth, providing prolonged contact time with the oral mucosa.
- Topical Medications:
- Topical Anesthetics: Viscous lidocaine or benzocaine preparations can be applied directly to painful ulcers before meals to allow for easier eating.
- Corticosteroids: Topical steroids (e.g., triamcinolone acetonide in an adhesive paste) can be used for non-infectious inflammatory conditions like aphthous ulcers or lichen planus to reduce inflammation and promote healing.
- Protective Barriers: Over-the-counter gels or rinses that form a protective barrier over ulcers, shielding them from irritation.
- Analgesics (Pain Relievers):
- Systemic Analgesics: Over-the-counter pain relievers like Paracetamol (acetaminophen) (e.g., 500mg or 1g every 4-6 hours, not exceeding daily maximums) or NSAIDs (non-steroidal anti-inflammatory drugs like ibuprofen) can help manage pain and inflammation, especially in widespread or severe cases. Duration of use typically 3 to 5 days, or as directed by a healthcare professional.
- Topical Analgesics: As mentioned above, for localized pain relief.
- Sialagogues: If xerostomia is a significant issue, medications or products that stimulate saliva flow (e.g., pilocarpine) or artificial saliva substitutes may be beneficial.
Patient Education: Educating the patient on the importance of adhering to treatment, maintaining good oral hygiene, and recognizing signs of recurrence is vital for long-term management.
Complications of Stomatitis
If left untreated or improperly managed, stomatitis can lead to a range of complications that can significantly impact a patient's health and quality of life. These complications can be localized to the oral cavity or have systemic repercussions.
Severe Pain and Discomfort: Persistent and intense pain is perhaps the most immediate and debilitating complication. It can severely interfere with daily activities.
Nutritional Deficiencies and Malnutrition:
- Difficulty and pain upon eating lead to reduced food intake.
- This can result in significant weight loss, dehydration, and deficiencies in essential macro and micronutrients, particularly in children, elderly, or already debilitated individuals.
- In severe cases, it may necessitate alternative feeding methods like nasogastric tube feeding.
Dehydration: Painful swallowing and general discomfort can lead to inadequate fluid intake, increasing the risk of dehydration, especially in vulnerable populations.
Spread of Infection:
- Uncontrolled local infections (bacterial, fungal, viral) can spread beyond the oral cavity to adjacent structures (e.g., pharynx, esophagus, larynx) or even enter the bloodstream (sepsis), leading to more severe systemic infections, particularly in immunocompromised patients.
- Oral candidiasis can extend to cause esophagitis.
Speech Impairment (Dysarthria): Significant inflammation and pain can make speaking difficult and unclear.
Psychological Impact:
- Chronic pain and difficulty with eating and speaking can lead to social isolation, anxiety, and depression.
- Halitosis associated with stomatitis can also cause embarrassment and affect self-esteem.
Impaired Oral Health:
- Difficulty with brushing and flossing due to pain can lead to increased plaque accumulation, gingivitis, and progression to periodontitis (gum disease) and dental caries.
- Chronic inflammation can sometimes lead to precancerous lesions, especially if associated with irritants like tobacco and alcohol, or certain infectious agents (e.g., HPV).
Chronic Ulceration and Scarring: Persistent or recurrent ulcers can lead to chronic inflammation and, in rare cases, scarring that might affect oral function.
Impact on Underlying Systemic Conditions: In patients with chronic diseases (e.g., diabetes, autoimmune disorders), severe stomatitis can complicate the management of their primary condition and reduce their overall quality of life.
Prevention of Stomatitis
Preventing stomatitis involves addressing the predisposing factors and maintaining optimal oral and general health. A proactive approach is key.
Maintain Excellent Oral Hygiene:
- Regular Brushing: Brush teeth at least twice daily with a soft-bristled toothbrush and fluoride toothpaste.
- Flossing: Floss daily to remove plaque and food particles from between teeth and under the gum line.
- Antiseptic Mouthwashes: Use non-alcohol based mouthwashes as recommended by a dental professional, especially if prone to gum inflammation.
- Tongue Cleaning: Gently clean the tongue to remove bacteria and food debris.
Regular Dental Check-ups:
- Visit the dentist at least twice a year for professional cleaning and examination.
- Early detection and management of dental problems (e.g., cavities, gum disease) and ill-fitting restorations can prevent irritation.
Proper Denture Care:
- Remove dentures at night to allow oral tissues to rest.
- Clean dentures daily using a denture brush and appropriate cleanser.
- Ensure dentures fit well and are relined or replaced as needed to prevent trauma and pressure sores.
Balanced Nutrition:
- Consume a diet rich in fruits, vegetables, whole grains, and lean proteins to ensure adequate intake of essential vitamins and minerals, especially B vitamins, iron, zinc, and vitamin C.
- Consider nutritional supplements if dietary intake is insufficient or if specific deficiencies are identified.
Avoid Oral Irritants:
- Tobacco and Alcohol: Abstain from or significantly reduce the use of tobacco products (smoking, chewing) and limit alcohol consumption, as these are major contributors to oral inflammation and malignancy.
- Spicy and Acidic Foods: If prone to irritation, limit intake of excessively spicy, acidic, or abrasive foods.
- Avoid Very Hot Beverages: Allow hot drinks to cool slightly before consuming.
Stay Hydrated: Drink plenty of water throughout the day to maintain adequate salivary flow and keep the oral mucosa moist. This helps in cleansing and protecting the mouth.
Manage Underlying Systemic Conditions:
- Effectively manage chronic diseases such as diabetes, autoimmune disorders, and kidney disease, as good control can prevent oral manifestations.
Judicious Use of Medications:
- Be aware of potential oral side effects of medications.
- If undergoing chemotherapy or radiation to the head and neck, follow all recommended mucositis prevention protocols (e.g., cryotherapy, specific rinses).
Stress Reduction: Implement stress-reduction techniques, as stress can sometimes exacerbate conditions like recurrent aphthous stomatitis.
Address Traumatic Habits: Avoid habits like cheek biting, lip biting, or tongue thrusting that can cause chronic irritation.