Encephalitis Lecture Notes
Encephalitis Lecture Notes
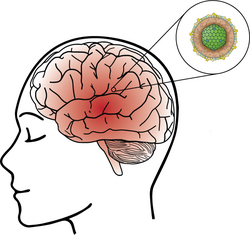
Encephalitis is an acute inflammation of the brain parenchyma (the brain tissue itself).
This inflammation directly affects the neurons and other brain cells, leading to neurological dysfunction, as opposed to inflammation primarily of the meninges (membranes surrounding the brain and spinal cord) which defines meningitis.
Key Differentiating Features from Meningitis:
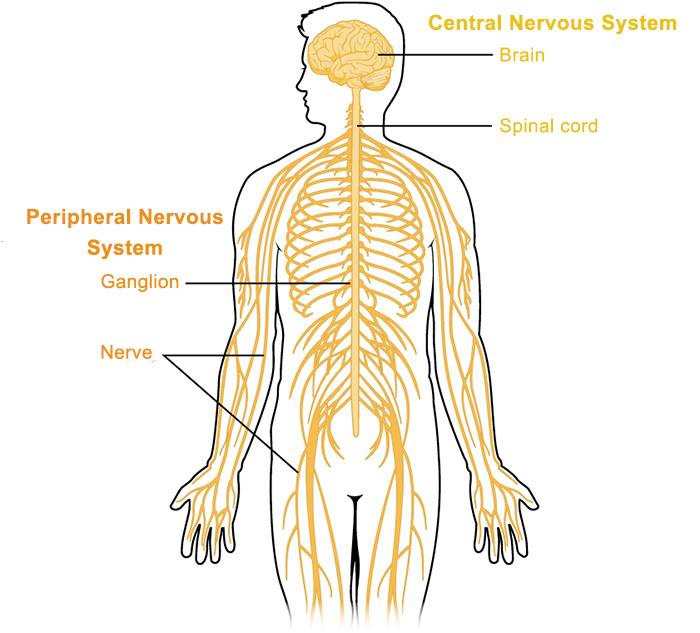
While both are inflammatory conditions of the central nervous system (CNS) and often present with fever and headache, their primary anatomical sites of inflammation and resulting clinical manifestations differ significantly.
Comparison: Meningitis vs. Encephalitis
| Feature | Meningitis | Encephalitis |
|---|---|---|
| Primary Inflammation Site | Meninges (arachnoid and pia mater). | Brain parenchyma (brain tissue). |
| Hallmark Symptoms | Fever, severe headache, nuchal rigidity (stiff neck), photophobia, phonophobia. | Profoundly altered mental status (confusion, disorientation, drowsiness, personality changes), seizures, and focal neurological deficits (e.g., hemiparesis, aphasia). |
| Consciousness / Mental Status | Typically preserved initially, though can be irritable or lethargic. Confusion is usually a late or severe sign. | Altered mental status is a defining, early feature. This is the single most important clinical differentiator. Ranges from subtle personality changes to deep coma. |
| Focal Neurological Deficits | Less common, usually indicate complications (e.g., vasculitis, stroke, abscess). | Common, due to direct inflammation of brain tissue (e.g., hemiparesis, aphasia, abnormal movements). |
| Seizures | Less frequent than in encephalitis, though still possible. | Frequent (occur in 30-70% of cases). |
Epidemiology & Etiology of Encephalitis
Epidemiology
- Incidence: Highly variable globally, influenced by geographic location, season, and prevalence of specific pathogens (e.g., arboviruses are regional). The overall incidence of encephalitis in developed countries is estimated to be around 5-10 cases per 100,000 person-years.
- Age Groups: Can affect all age groups. Certain etiologies show age predilections (e.g., enteroviral in children, HSV in all ages but often more severe in young and elderly, West Nile Virus in elderly).
- Seasonal Variation: Many viral forms, especially arboviruses (e.g., West Nile, Japanese encephalitis), show seasonal peaks corresponding to vector activity (mosquitoes, ticks).
- Endemic vs. Epidemic: Some types are endemic in certain regions (e.g., Japanese encephalitis in Asia), while others can cause epidemics.
Common Causes (Etiology)
The cause of encephalitis remains unidentified in a significant proportion of cases (up to 40-70% in some studies), even with extensive testing. However, when a cause is found, the categories are:
A. Viral Infections (Most Common Identified Cause):
- HSV-1: The most common cause of fatal sporadic encephalitis in adults and children worldwide. Characteristically affects the temporal and frontal lobes, often leading to severe memory and behavioral disturbances.
- HSV-2: More common cause of encephalitis/meningitis in neonates (acquired during birth) or immunocompromised adults.
- West Nile Virus (WNV): Most common arbovirus cause in North America.
- Eastern Equine Encephalitis (EEE): Rare but highly fatal.
- Western Equine Encephalitis (WEE) & St. Louis Encephalitis (SLE).
- Japanese Encephalitis (JE): Major cause in Asia.
- Tick-borne Encephalitis (TBE): Endemic in parts of Europe and Asia.
B. Autoimmune Encephalitis:
- Anti-NMDA Receptor Encephalitis: Often associated with ovarian teratomas (especially in young women), but can be idiopathic. Characterized by severe psychiatric symptoms, seizures, dyskinesias, and autonomic instability.
- LGI1, CASPR2, GABAA/B Receptor Encephalitis.
- Acute Disseminated Encephalomyelitis (ADEM): Often follows a viral infection or vaccination, thought to be immune-mediated.
- Hashimoto's Encephalopathy: Associated with thyroid autoimmunity.
C. Other Infectious Agents (Less Common):
D. Unknown/Idiopathic:
Risk Factors:
- Age: Very young (infants) and very old (elderly) are often more susceptible to severe disease.
- Immunocompromise: HIV, organ transplant recipients, cancer patients on chemotherapy, or those on immunosuppressive drugs are at higher risk for certain opportunistic infections (e.g., CMV, Toxoplasma).
- Geographic Exposure: Travel to areas with endemic arboviruses.
- Outdoor Activities: Increased exposure to mosquito/tick vectors.
- Lack of Vaccination: For vaccine-preventable causes (e.g., measles, mumps, JE).
- Underlying Medical Conditions: Autoimmune diseases may predispose to autoimmune encephalitis.
Types/Classifications of Encephalitis
Encephalitis can be classified in several ways, often overlapping, based on its cause, presentation, or mechanism.
1. Based on Causative Mechanism:
- Definition: The pathogen (e.g., virus) directly infects and inflames the brain parenchyma, with the brain or spinal cord being the predominant focus of the pathogen.
- Mechanism: The pathogen directly invades and replicates within CNS cells, leading to direct neuronal damage and an inflammatory response focused within the brain tissue.
- Examples: Herpes Simplex Encephalitis (HSV-E), most arboviral encephalitides (e.g., West Nile, Japanese encephalitis).
- Definition: It is caused by an infection that is spread from another part of the body, or it is an immune-mediated response following a systemic infection or vaccination, where the immune system attacks brain tissue. The brain itself is not directly infected by the pathogen.
- Mechanism:
- Post-Infectious (Demyelinating/ADEM): An infection (e.g., measles, mumps, influenza, or even vaccination) triggers an autoimmune reaction where the immune system, days or weeks after the initial infection, erroneously attacks myelin or other brain components. The virus itself is usually no longer present in the brain.
- Autoimmune (non-ADEM): Antibodies are formed against specific neuronal proteins (e.g., anti-NMDA receptor, anti-LGI1) which then cause brain inflammation and dysfunction. This can sometimes be triggered by a remote infection or tumor (paraneoplastic).
- Examples: Acute Disseminated Encephalomyelitis (ADEM), Anti-NMDA receptor encephalitis, Hashimoto's Encephalopathy.
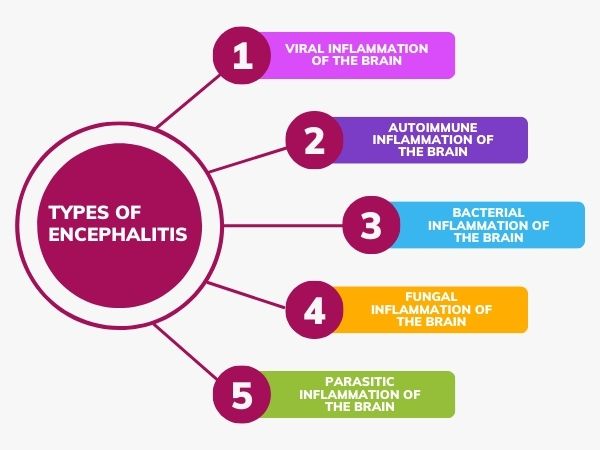
2. Based on Etiology (As discussed in Epidemiology):
- Viral Encephalitis: HSV, Arboviruses (WNV, EEE, JE), Enteroviruses, VZV, Mumps, Measles, Influenza, HIV, Rabies.
- Autoimmune Encephalitis: Anti-NMDA receptor, LGI1, CASPR2, GABAA/B, Hashimoto's, ADEM.
- Bacterial Encephalitis: Listeria (meningoencephalitis), Mycoplasma.
- Fungal Encephalitis: Cryptococcus, Candida, Aspergillus.
- Parasitic Encephalitis: Toxoplasma, Naegleria fowleri.
- Encephalitis of Unknown Etiology.
3. Based on Affected Brain Regions:
- Limbic Encephalitis: Inflammation predominantly affecting the limbic system (e.g., temporal lobes, hippocampus). Often seen in HSV-E and many autoimmune encephalitides. Characterized by prominent memory deficits, seizures, and behavioral changes.
- Brainstem Encephalitis (Rhombencephalitis): Inflammation affecting the brainstem. Can lead to cranial nerve palsies, ataxia, and autonomic dysfunction. Often associated with Listeria or some autoimmune causes.
- Cerebellitis: Inflammation primarily of the cerebellum, leading to ataxia and dysarthria. Can be viral (e.g., VZV) or post-infectious.
Pathophysiology of Encephalitis
The pathophysiology of encephalitis involves a complex interplay between the invading pathogen (or autoimmune trigger) and the host's immune response, leading to inflammation and damage within the brain parenchyma.
- Hematogenous Spread (Most Common): The pathogen (e.g., virus) enters the bloodstream, replicates, and then crosses the blood-brain barrier (BBB). This can occur through:
- Infection of endothelial cells lining the cerebral capillaries.
- Infection of choroid plexus cells.
- Via "Trojan horse" mechanism where infected leukocytes (immune cells) transport the pathogen across the BBB.
- Neuronal Retrograde Transport: Some viruses (e.g., HSV, rabies) can travel along peripheral nerves to the CNS, usually via retrograde axonal transport (e.g., from an oral lesion to the brainstem via trigeminal nerve for HSV-1).
- Direct Extension: Less common, but can occur from adjacent structures (e.g., mastoiditis, sinusitis, otitis media) leading to brain abscesses, which can then spread.
- Once inside the brain, the virus infects neurons and/or glial cells (astrocytes, oligodendrocytes, microglia).
- Replication within these cells leads to direct cell damage (cytopathic effect) and the release of viral particles, propagating the infection.
- The brain's immune cells (microglia, astrocytes) are activated, and peripheral immune cells (lymphocytes, macrophages) are recruited to the site of infection/inflammation.
- This immune response, while attempting to clear the pathogen, can inadvertently cause significant "collateral damage" to brain tissue.
- Inflammatory Mediators: Release of pro-inflammatory cytokines (e.g., TNF-α, IL-1β, IL-6), chemokines, and reactive oxygen species.
- Vasculitis: Inflammation of blood vessels can lead to vascular compromise, thrombosis, or hemorrhage.
- Blood-Brain Barrier Disruption: The inflammatory process further compromises the integrity of the BBB, leading to vasogenic edema (fluid leaking from blood vessels into the brain tissue).
- Direct Viral Cytotoxicity: Some viruses directly kill infected neurons.
- Immune-Mediated Damage: Activated immune cells release neurotoxic substances.
- Excitotoxicity: Inflammation can lead to excessive release of neurotransmitters like glutamate, which can overstimulate and damage neurons.
- Apoptosis: Programmed cell death in neurons.
- Demyelination: Damage to the myelin sheath, which insulates nerve fibers (e.g., in ADEM).
- Edema:
- Vasogenic Edema: Due to BBB disruption, fluid leaks into the extracellular space.
- Cytotoxic Edema: Due to cellular dysfunction (e.g., failure of ion pumps), cells swell.
- Brain edema leads to increased intracranial pressure (ICP).
- The combination of neuronal damage, inflammation, edema, and increased ICP leads to the characteristic clinical features of encephalitis:
- Altered mental status and cognitive deficits: Due to widespread neuronal dysfunction and damage, particularly in the cerebral cortex.
- Seizures: Result from neuronal irritability caused by inflammation, edema, and direct cellular damage.
- Focal neurological deficits: Depend on the specific brain regions most affected by inflammation and damage.
- Fever, headache, nuchal rigidity: General inflammatory response and meningeal irritation (if present).
- In autoimmune forms, the initial trigger might be an infection (molecular mimicry) or a tumor (paraneoplastic syndrome).
- The immune system produces antibodies (or T-cells) that target specific neuronal or glial proteins.
- These antibodies bind to their targets (e.g., NMDA receptors), leading to receptor dysfunction, internalization, or direct cell damage.
- The subsequent inflammatory response and neuronal damage manifest as the clinical syndrome.
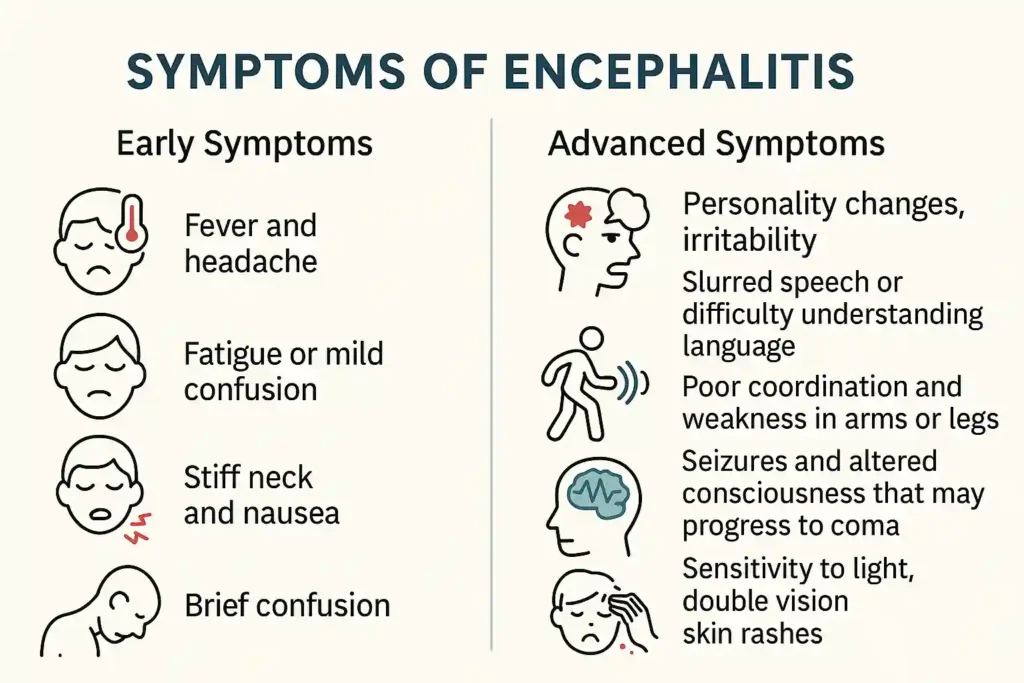
Clinical Presentation (Signs & Symptoms) of Encephalitis
The clinical presentation of encephalitis is highly variable, depending on the causative agent, the severity of inflammation, and the specific areas of the brain affected. However, there are common threads and a "classic triad" that often guide diagnosis.
Onset:
- Acute to Subacute: Symptoms typically develop rapidly, over hours to days, sometimes extending to a week or two. This rapid progression is a key indicator differentiating it from chronic neurodegenerative conditions.
- Prodromal Phase: Many patients experience a non-specific prodrome (early symptoms) lasting a few days, characterized by fever, headache, malaise, myalgia (muscle aches), and often upper respiratory or gastrointestinal symptoms, before the onset of frank neurological signs.
Classic Triad of Encephalitis:
The clinical hallmark of acute encephalitis is the triad of fever, headache, and altered mental status.
- Fever: Present in the majority of cases, reflecting systemic infection and/or inflammation.
- Headache: Usually severe, diffuse, and persistent. Often described as holocranial (whole head).
- Altered Mental Status (AMS): This is the most crucial differentiating symptom from uncomplicated meningitis. It ranges from subtle changes in personality or attention to profound confusion, disorientation, lethargy, stupor, or coma.
Neurological Manifestations
A. Mental Status Changes & Cognitive Deficits (Crucial Differentiating Feature):
- Anterograde Amnesia: Difficulty forming new memories.
- Retrograde Amnesia: Difficulty recalling past events.
- Particularly prominent with temporal lobe involvement (e.g., Herpes Simplex Encephalitis - HSV-E), where the hippocampus and amygdala are affected.
B. Motor Symptoms:
- Myoclonus: Sudden, brief, shock-like jerks of a muscle or group of muscles.
- Tremors: Can be resting or action tremors.
- Dystonia: Sustained or repetitive muscle contractions resulting in twisting and repetitive movements or abnormal fixed postures. (e.g., seen in Japanese encephalitis or some autoimmune forms).
- Chorea: Brief, irregular, abrupt, non-stereotyped movements that seem to flow randomly from one body part to another. (Less common in typical viral encephalitis, but possible with basal ganglia involvement).
- Ataxia: Unsteady, uncoordinated gait due to cerebellar involvement (cerebellitis) or general motor incoordination.
- Spastic Gait: If significant pyramidal tract involvement occurs.
C. Sensory Symptoms:
- Headache: As part of the triad, often severe and poorly responsive to standard analgesics.
- Nuchal Rigidity (Stiff Neck): Suggests meningeal irritation, indicating meningoencephalitis (inflammation of both meninges and brain). Testing for Brudzinski's and Kernig's signs may elicit pain and resistance.
- Photophobia: Sensitivity to light.
- Phonophobia: Sensitivity to sound.
- Numbness/Paresthesias: Less common as primary symptoms, but can occur if sensory pathways are directly affected.
D. Cranial Nerve Deficits:
- Pupillary Abnormalities: Unequal pupils (anisocoria), sluggish reaction to light, or fixed/dilated pupils can indicate increased ICP and impending herniation (CN III compression).
- Facial Weakness: Unilateral facial droop (CN VII).
- Dysphagia: Difficulty swallowing (CN IX, X).
- Dysarthria: Slurred or unclear speech (CN IX, X, XII or cerebellar involvement).
- Oculomotor Deficits: Impaired eye movements (CN III, IV, VI).
E. Seizures:
- Focal Seizures (Partial Seizures): Originate in one area of the brain. Can present with motor symptoms (e.g., rhythmic twitching of a limb), sensory phenomena (e.g., tingling, numbness), psychic symptoms (e.g., deja vu, fear), or automatisms (e.g., lip-smacking, fiddling with clothes). Often seen with focal inflammation, particularly in the temporal lobe (e.g., HSV-E).
- Generalized Tonic-Clonic Seizures: Involve both sides of the brain, characterized by stiffening (tonic phase) followed by rhythmic jerking (clonic phase) of the extremities, often with loss of consciousness. Can be initial presentation or secondary generalization from a focal seizure.
- Non-convulsive Status Epilepticus: Subtle and prolonged seizure activity on EEG without obvious motor manifestations, manifesting as persistent altered mental status. Requires high index of suspicion.
F. Focal Neurological Deficits:
- Hemiparesis/Hemiplegia: Weakness or paralysis on one side of the body, indicating contralateral motor cortex or pyramidal tract involvement.
- Aphasia: As described above, if dominant hemisphere language areas are affected.
- Visual Field Defects: If optic pathways or visual cortex are involved.
- Neglect: Inattention to one side of the body or visual field, often with parietal lobe lesions.
- Movement Disorders: As listed under motor symptoms, if basal ganglia or cerebellum are involved.
General/Systemic Manifestations:
A. Constitutional Symptoms:
- Fever: Often high, can be persistent or fluctuating.
- Chills: Associated with fever.
- Malaise and Fatigue: Generalized feeling of discomfort and lack of energy.
- Myalgia/Arthralgia: Muscle and joint aches.
- Anorexia: Loss of appetite.
- Rash: May precede or accompany the neurological symptoms, particularly with arboviral infections (e.g., West Nile) or VZV.
B. Psychiatric & Behavioral Changes:
- Irritability, Agitation, Restlessness: Common, especially in children and individuals with pre-existing psychiatric conditions.
- Personality Changes: Acute onset of unusual behaviors, loss of inhibition, or apathy.
- Hallucinations: Visual, auditory, or olfactory hallucinations, particularly with temporal lobe involvement (e.g., HSV-E, autoimmune encephalitis).
- Delusions: Fixed false beliefs.
- Psychosis: A severe mental disorder in which thought and emotions are so impaired that contact with external reality is lost.
- Sleep Disturbances: Insomnia, hypersomnia, or disruption of the sleep-wake cycle.
C. Autonomic Dysfunction:
- Thermoregulatory Instability: High fever is common, but in severe cases with hypothalamic involvement, poikilothermia (inability to regulate body temperature) can occur.
- Cardiovascular Instability: Tachycardia, bradycardia, hypertension, hypotension, or cardiac arrhythmias, especially with brainstem or severe diffuse cerebral involvement.
- Respiratory Irregularities: Central hypoventilation or irregular breathing patterns, particularly with brainstem compromise.
- Gastrointestinal Issues: Ileus, GI bleeding (stress ulcers).
- Urinary Retention/Incontinence: Can be seen in severe cases.
Nursing Diagnoses (NANDA 2024-2026) related to Clinical Presentation:
- Impaired cerebral tissue perfusion related to cerebral edema, inflammation, and increased intracranial pressure, as evidenced by altered mental status (confusion, lethargy), focal neurological deficits (weakness, aphasia), and changes in vital signs (e.g., Cushing's triad).
- Domain 2: Nutrition, Class 4: Metabolism (indirectly affects cerebral oxygenation)
- Domain 4: Activity/Rest, Class 2: Activity (impacts brain function)
- Domain 11: Safety/Protection, Class 2: Physical Injury (risk due to impaired cerebral function)
- Acute confusion related to neuroinflammation, fever, and metabolic disturbances, as evidenced by disorientation to person, place, or time, fluctuating level of consciousness, and impaired decision-making.
- Domain 5: Perception/Cognition, Class 4: Cognition
- Domain 4: Activity/Rest, Class 2: Activity
- Domain 4: Activity/Rest, Class 4: Cardiovascular/Pulmonary Responses
- Risk for falls related to altered mental status, seizures, focal motor deficits, or gait disturbances.
- Domain 11: Safety/Protection, Class 2: Physical Injury
- Hyperthermia related to infectious process and inflammation of the hypothalamus, as evidenced by elevated body temperature, flushed skin, tachycardia, and seizures.
- Domain 11: Safety/Protection, Class 6: Thermoregulation
- Risk for inadequate fluid balance related to decreased oral intake, hyperthermia, vomiting, and altered regulatory mechanisms.
- Domain 2: Nutrition, Class 5: Hydration
- Risk for impaired skin integrity related to altered mental status, immobility, and altered nutritional status.
- Domain 4: Activity/Rest, Class 1: Sleep/Rest (immobility related)
- Domain 11: Safety/Protection, Class 2: Physical Injury (pressure injury)
- Risk for caregiver role strain related to the severity, unpredictable course, and potential long-term neurological deficits of the patient's condition.
- Domain 7: Role Relationships, Class 2: Family Relationships
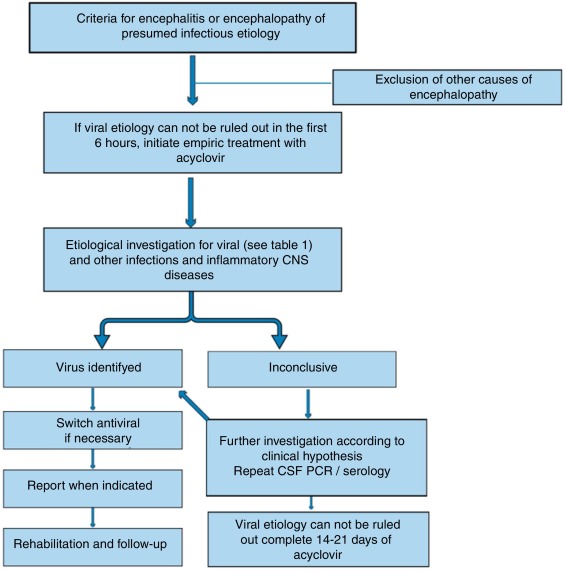
Investigations & Diagnosis of Encephalitis
The diagnostic process for encephalitis is often urgent, aiming to rapidly confirm CNS inflammation, rule out other conditions (e.g., bacterial meningitis, stroke, tumor), and identify the specific causative agent to initiate targeted therapy.
Laboratory Tests:
A. Blood Tests:
- Leukocytosis: Elevated white blood cell count, often with a neutrophil predominance, can indicate an acute infection. However, WBC count can be normal or even low in viral infections.
- Hyponatremia: Can occur due to SIADH (Syndrome of Inappropriate Antidiuretic Hormone Secretion) or cerebral salt wasting, common complications in CNS infections.
- Monitor renal function (creatinine, BUN) as some antiviral drugs are nephrotoxic.
- Abnormal LFTs can be seen in some systemic viral infections or drug-induced liver injury.
- Non-specific markers of inflammation, typically elevated in inflammatory conditions, but cannot differentiate viral from bacterial.
- Essential to rule out bacteremia and concomitant bacterial meningitis, especially if LP is delayed or contraindicated.
- Detection of IgM and IgG antibodies to various viruses (e.g., arboviruses, HSV, VZV, HIV). Acute and convalescent titers (4-6 weeks apart) may be needed to show seroconversion or a significant rise in antibody levels.
- Less sensitive than CSF PCR for CNS infections, but can sometimes detect systemic viral load.
- Anti-neuronal antibodies (e.g., anti-NMDA receptor, anti-LGI1, anti-CASPR2) from serum. These tests may take days to weeks to return, so empiric treatment is often started.
B. Cerebrospinal Fluid (CSF) Analysis via Lumbar Puncture (LP):
- Pleocytosis: Elevated white blood cell count (typically 5-500 cells/μL).
- Lymphocytic Predominance: Predominantly lymphocytes, characteristic of viral encephalitis. Neutrophilic pleocytosis can be seen early in viral encephalitis, or in bacterial/partially treated bacterial meningitis.
- Gold Standard for Viral Detection: Highly sensitive and specific for detecting viral DNA/RNA (e.g., HSV-1, HSV-2, VZV, enteroviruses, arboviruses).
- HSV PCR: Critically important for HSV encephalitis due to its treatability with antivirals.
- Oligoclonal Bands / IgG Index: May be positive in some autoimmune or chronic inflammatory CNS conditions.
- Autoimmune Antibodies from CSF: More specific than serum antibodies for CNS autoimmune encephalitis.
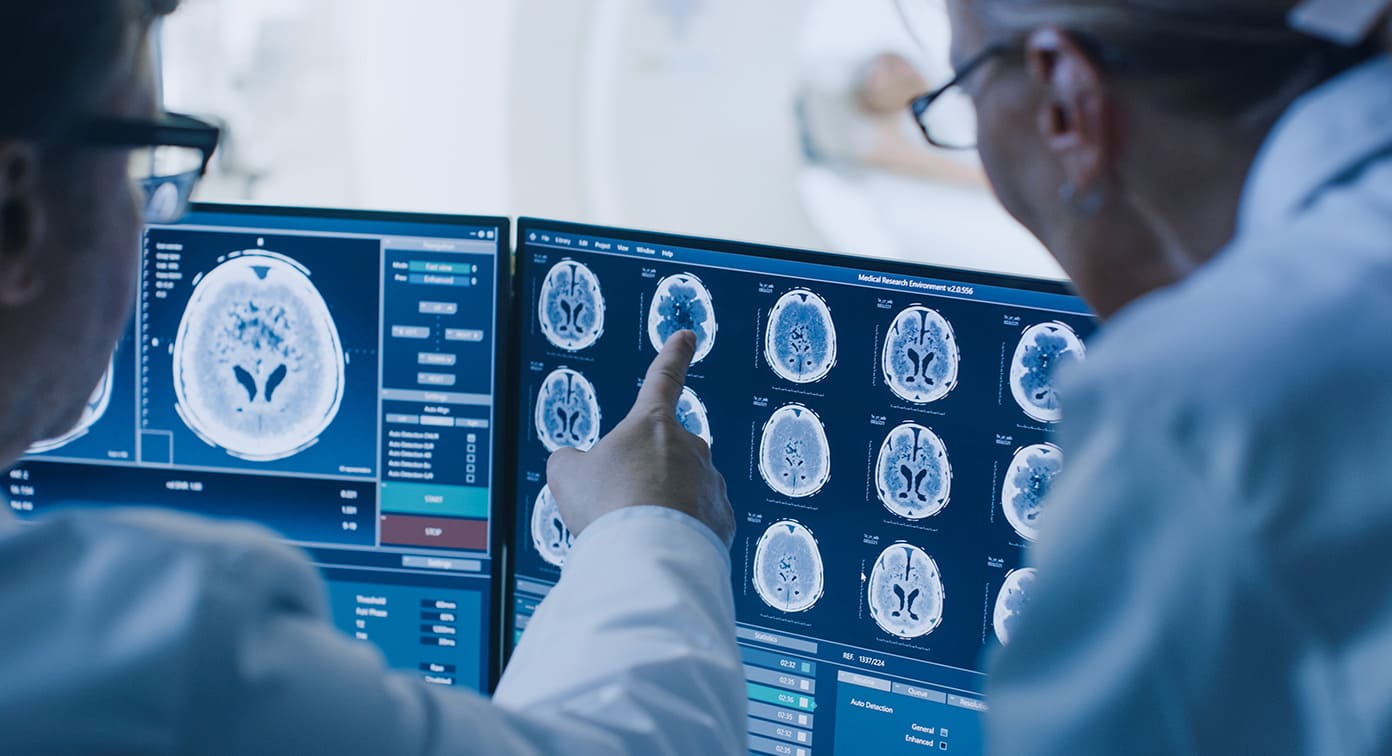
Imaging Studies:
A. Computed Tomography (CT) Scan of the Brain (Non-contrast):
- Purpose: Usually the initial imaging study. Primarily used to rule out other intracranial pathologies (e.g., space-occupying lesions like tumors or abscesses, significant hemorrhage, hydrocephalus) before performing a lumbar puncture, thus preventing cerebral herniation.
- Findings in Encephalitis: Often normal in the early stages of encephalitis. May show subtle areas of edema, hypodensity, or mass effect in later stages. Cannot definitively diagnose encephalitis or differentiate viral types.
B. Magnetic Resonance Imaging (MRI) of the Brain (with and without contrast):
- T2-weighted and FLAIR (Fluid-Attenuated Inversion Recovery) sequences: Hyperintense (bright) signals in affected brain regions, indicating inflammation, edema, and neuronal damage.
- Diffusion-Weighted Imaging (DWI) / Apparent Diffusion Coefficient (ADC): Can show restricted diffusion in areas of cytotoxic edema, indicating acute cellular injury.
- Gadolinium Enhancement: Areas of inflammation may show enhancement after contrast administration, indicating BBB breakdown.
- Specific Patterns:
- HSV Encephalitis: Classically affects the medial temporal lobes, insular cortex, and often the inferior frontal lobes, often unilaterally or asymmetrically. Can show hemorrhagic transformation.
- Arboviral Encephalitis: May show thalamic, basal ganglia, or brainstem involvement (e.g., West Nile Virus), or diffuse cortical involvement.
- ADEM: Multifocal, asymmetric white matter lesions, often involving the brainstem and cerebellum.
- Anti-NMDA Receptor Encephalitis: Often normal initially, but can show subtle changes in hippocampal or cortical regions.
5 Electroencephalography (EEG):
- Diffuse Slowing: Generalized background slowing (theta and delta waves) is common, reflecting diffuse cortical dysfunction. The degree of slowing often correlates with the severity of altered mental status.
- Focal Slowing: May indicate focal inflammation.
- Epileptiform Discharges: Spikes, sharp waves, or spike-and-wave discharges, indicating seizure activity or epileptogenic potential.
- Periodic Lateralized Epileptiform Discharges (PLEDs): Often seen in HSV encephalitis, characterized by repetitive sharp waves or spikes appearing at regular intervals over one hemisphere, indicative of severe focal cerebral dysfunction and a strong association with seizures.
- Non-convulsive Seizures/Status Epilepticus: EEG is essential to diagnose these, as they may present only as persistent altered mental status.
Management of Encephalitis
The management of encephalitis requires urgent recognition, supportive care, and targeted treatment based on the suspected or confirmed etiology. The primary goals are to preserve neurological function, prevent complications, and reduce morbidity and mortality.
Aims of Management:
- Stabilize the Patient: Address immediate life-threatening issues (airway, breathing, circulation, seizures, increased ICP).
- Reduce Brain Inflammation and Edema: Minimize neuronal damage.
- Treat the Underlying Cause: Administer specific antiviral, antibacterial, antifungal, antiparasitic, or immunomodulatory therapies.
- Manage Complications: Control seizures, manage increased ICP, prevent secondary infections, address electrolyte imbalances.
- Provide Supportive Care: Maintain hydration, nutrition, skin integrity, and psychological support.
- Facilitate Rehabilitation: Initiate early rehabilitation to maximize functional recovery.
First Aid & Initial/Emergency Management :
A. Airway, Breathing, Circulation (ABC) - Standard Resuscitation:
- Airway: Assess patency. Be prepared for intubation and mechanical ventilation, especially if the patient has a depressed level of consciousness (GCS < 8), poor respiratory effort, or risk of aspiration.
- Breathing: Monitor respiratory rate, depth, and oxygen saturation. Administer supplemental oxygen.
- Circulation: Monitor heart rate, blood pressure, and cardiac rhythm. Maintain adequate cerebral perfusion pressure (CPP). Establish IV access.
B. Neurological Stabilization:
- Immediate control: If seizures are ongoing, administer benzodiazepines (e.g., lorazepam IV, diazepam IV/rectal) as first-line.
- Long-term control/prevention: Follow with a longer-acting antiepileptic drug (AED) such as fosphenytoin, levetiracetam, valproate, or phenytoin (IV loading dose) to prevent recurrence.
- Status Epilepticus: Follow established protocols for refractory status epilepticus, which may include continuous EEG monitoring and general anesthesia with propofol or midazolam.
- Head Elevation: Elevate the head of the bed to 30 degrees to promote venous drainage.
- Maintain Head Alignment: Keep the head in a neutral position (avoiding neck flexion or rotation).
- Osmotic Therapy: Administer mannitol (IV bolus) or hypertonic saline (IV) to draw fluid out of the brain parenchyma.
- Sedation and Paralysis: May be necessary in intubated patients to reduce agitation and coughing, which can increase ICP.
- Ventriculostomy: In severe cases, an external ventricular drain (EVD) may be placed to monitor ICP directly and drain CSF.
- Corticosteroids: (e.g., dexamethasone) are generally not recommended for routine viral encephalitis as they can be detrimental in some viral infections. However, they are indicated and beneficial for autoimmune encephalitis, ADEM, or if there is significant cerebral edema contributing to mass effect, or when vasogenic edema is prominent.
- Avoid Hypotension: Maintain mean arterial pressure (MAP) to ensure adequate cerebral perfusion pressure (CPP = MAP - ICP).
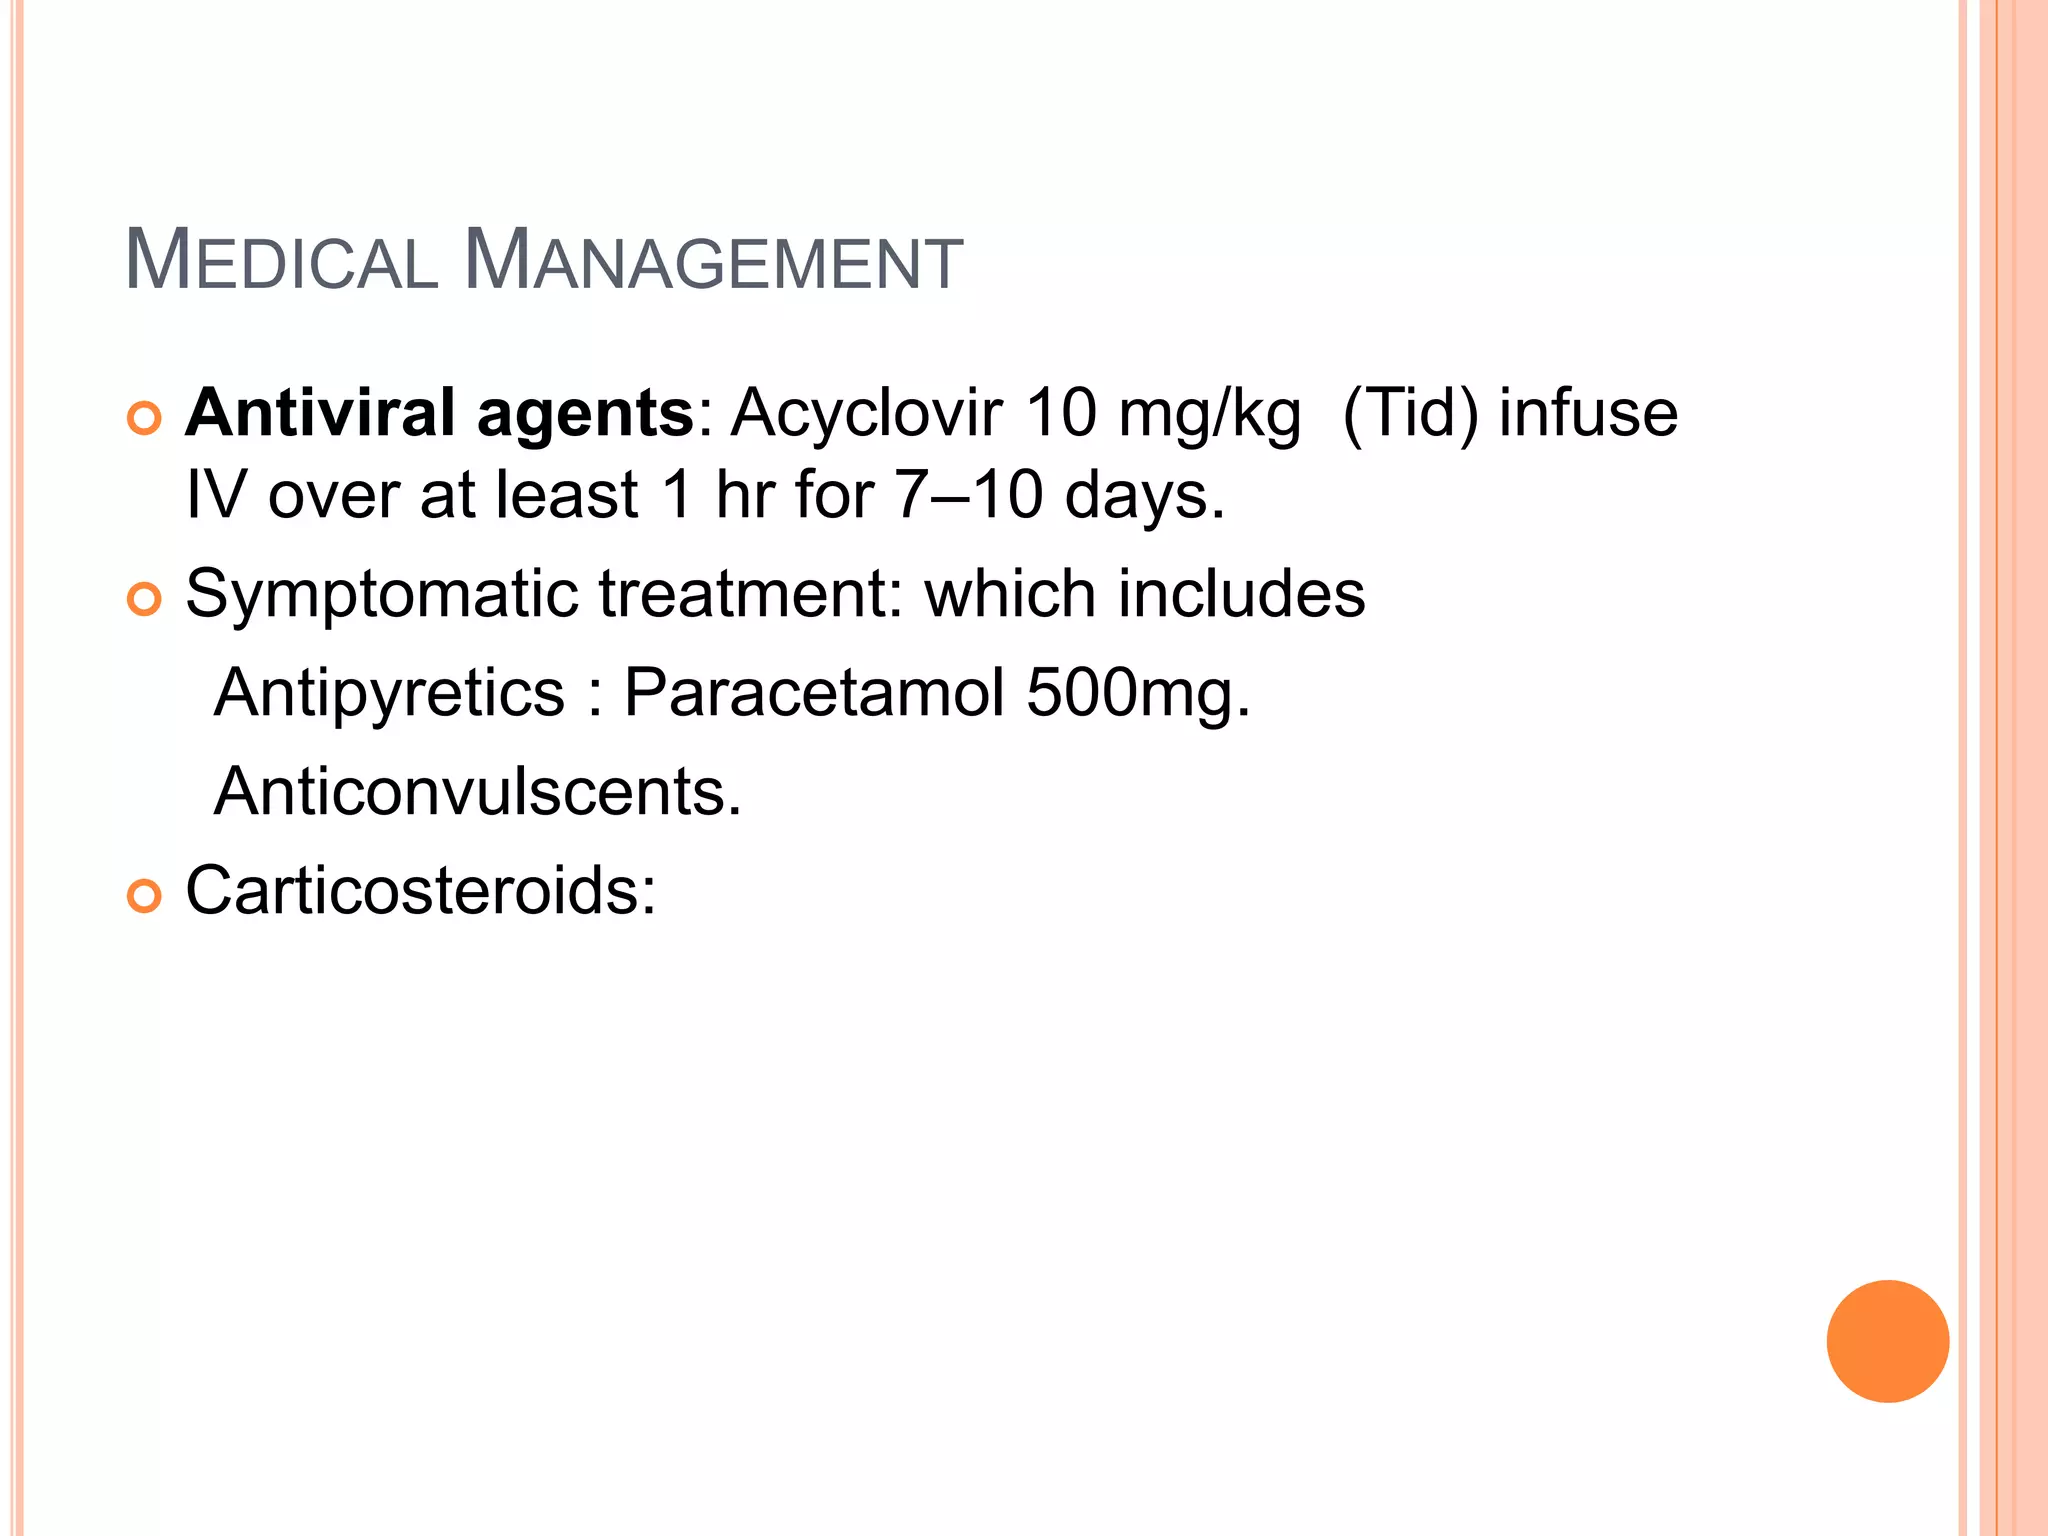
C. Empiric Antimicrobial Therapy (Begin STAT):
- Acyclovir IV: This is the most crucial empiric drug. It must be initiated immediately if HSV encephalitis is suspected, even before definitive diagnosis, as delayed treatment significantly increases mortality and morbidity. HSV-E is the most common treatable viral encephalitis.
- Dosage: 10 mg/kg IV every 8 hours, adjusted for renal function.
- Third-generation cephalosporin (e.g., ceftriaxone IV) to cover common bacterial meningitis pathogens.
- Vancomycin IV to cover resistant pneumococci.
- Ampicillin IV if Listeria monocytogenes is suspected (e.g., in neonates, elderly, immunocompromised, alcoholics).
D. General Supportive Care:
- Fluid and Electrolyte Management: Monitor closely, especially for hyponatremia. Avoid over-hydration to prevent worsening cerebral edema.
- Nutrition: Initiate enteral or parenteral nutrition if the patient cannot take oral intake.
- Temperature Control: Aggressively manage fever with antipyretics (e.g., acetaminophen) and cooling blankets, as hyperthermia increases cerebral metabolic demand and can worsen brain injury.
- Bladder and Bowel Care: Indwelling urinary catheter for accurate output measurement and to prevent distention. Bowel regimen to prevent constipation.
- Skin Care: Regular turning and repositioning to prevent pressure ulcers, especially in immobile patients.
- Eye Care: Lubricate eyes if corneal reflexes are absent or blinking is impaired.
- Venous Thromboembolism (VTE) Prophylaxis: Deep vein thrombosis (DVT) and pulmonary embolism (PE) prophylaxis (e.g., pneumatic compression devices, low-molecular-weight heparin) for immobilized patients.
- Stress Ulcer Prophylaxis: With proton pump inhibitors or H2 blockers.
3. Specific Treatment Modalities (Post-diagnosis):
A. Viral Encephalitis:
- Herpes Simplex Virus (HSV) & Varicella-Zoster Virus (VZV): Continue IV Acyclovir for 14-21 days.
- Cytomegalovirus (CMV): Treat with Ganciclovir and/or Foscarnet, especially in immunocompromised patients.
- Other Viruses (e.g., Arboviruses, Enteroviruses, Measles, Mumps): Currently, no specific antiviral treatments are available. Management is primarily supportive. Research into new antivirals is ongoing.
- Rabies: Post-exposure prophylaxis is effective; once clinical symptoms appear, it is almost universally fatal.
B. Autoimmune Encephalitis:
- First-line Immunotherapy:
- High-dose intravenous corticosteroids (e.g., methylprednisolone IV for 3-5 days).
- Intravenous Immunoglobulin (IVIG).
- Plasma Exchange (PLEX).
- These can be used alone or in combination.
- Second-line Immunotherapy (for refractory cases):
- Rituximab (anti-CD20 monoclonal antibody).
- Cyclophosphamide.
- Tumor Search and Removal: If paraneoplastic (e.g., ovarian teratoma in anti-NMDA receptor encephalitis), tumor resection is crucial for long-term improvement.
C. Other Infectious Agents:
- Bacterial Encephalitis/Meningoencephalitis: Appropriate intravenous antibiotics based on culture results and sensitivity (e.g., for Listeria, Mycoplasma).
- Fungal Encephalitis: Specific antifungal agents (e.g., Amphotericin B, fluconazole, voriconazole).
- Parasitic Encephalitis: Specific antiparasitic drugs (e.g., for toxoplasmosis, amebiasis).
4. Rehabilitation:
- Early Intervention: As soon as the patient is medically stable, rehabilitation should begin.
- Multidisciplinary Team: Physical therapy, occupational therapy, speech therapy, cognitive rehabilitation, neuropsychology, and social work.
- Focus: Address residual neurological deficits (motor weakness, ataxia, cognitive impairment, aphasia, memory deficits) to maximize functional independence.
5. Follow-up Care:
- Long-term Monitoring: Patients may require long-term follow-up for cognitive, behavioral, psychological, and motor sequelae.
- Epilepsy Management: Ongoing management of seizures if they persist.
- Psychiatric Support: For new-onset or exacerbated psychiatric symptoms.
Complications of Encephalitis
Encephalitis can lead to a wide array of severe and potentially permanent complications, ranging from acute life-threatening conditions to chronic neurological and psychological sequelae. The nature and severity of complications depend on the etiology, the extent of brain damage, patient age, and the promptness and effectiveness of treatment.
A. Acute/Life-Threatening Complications:
- Mechanism: Cerebral edema (vasogenic and cytotoxic) and inflammation lead to increased brain volume. If compensatory mechanisms fail, ICP rises dramatically.
- Consequences: Compromises cerebral perfusion (CPP = MAP - ICP), leading to ischemia. If severe and prolonged, can cause shifting of brain tissue (herniation) through anatomical openings (e.g., transtentorial, uncal, tonsillar), compressing vital brainstem structures and resulting in respiratory arrest, cardiovascular collapse, and death.
- Clinical Signs: Worsening headache, vomiting, papilledema, pupillary changes (e.g., fixed and dilated pupil in uncal herniation), Cushing's triad (hypertension, bradycardia, irregular respirations), decreased level of consciousness.
- Mechanism: Severe neuronal irritation and damage can lead to continuous seizure activity or recurrent seizures without recovery of consciousness.
- Consequences: Prolonged seizure activity itself can cause further neuronal damage (excitotoxicity), metabolic derangements (hypoxia, acidosis, hyperthermia), and systemic complications. It is a medical emergency with significant morbidity and mortality.
- Mechanism: Inflammation can obstruct the flow of cerebrospinal fluid (CSF) within the ventricular system (non-communicating hydrocephalus) or impair its reabsorption at the arachnoid villi (communicating hydrocephalus), leading to CSF accumulation and ventricular enlargement.
- Consequences: Increased ICP, further brain compression, and neurological deterioration.
- Mechanism: Inflammation can cause vasculitis (inflammation of blood vessels), leading to thrombosis (clot formation), narrowing of vessels, or vessel rupture. Herpes Simplex Encephalitis (HSV-E) can be hemorrhagic.
- Consequences: Areas of brain tissue die due to lack of blood supply (ischemia/infarction) or bleeding occurs within the brain, leading to further neurological deficits.
- Mechanism: CNS injury can disrupt ADH regulation or lead to increased release of natriuretic peptides.
- Consequences: Hyponatremia (low sodium), which can worsen cerebral edema and increase the risk of seizures. Careful fluid and electrolyte management is crucial.
- Mechanism: Direct involvement of brainstem respiratory centers, severe depression of consciousness, aspiration pneumonia, or prolonged status epilepticus leading to muscle fatigue.
- Consequences: Requires mechanical ventilation, increases risk of ventilator-associated pneumonia and other complications of critical illness.
- Mechanism: Patients are often immunocompromised (due to illness, steroids), immobilized, and have indwelling catheters (IVs, urinary catheters), increasing susceptibility to hospital-acquired infections (e.g., pneumonia, UTIs, central line infections).
- Consequences: Worsens overall prognosis and increases mortality.
B. Long-Term Neurological and Neuropsychiatric Sequelae:
The degree of recovery is highly variable, but many survivors experience permanent deficits.
- Memory Deficits: Most common and debilitating, especially with temporal lobe involvement. Can range from mild forgetfulness to severe anterograde and retrograde amnesia.
- Executive Dysfunction: Difficulties with planning, problem-solving, decision-making, attention, and multitasking.
- Reduced Processing Speed: Slower mental processing.
- Language Deficits (Aphasia): Difficulty with speech production, comprehension, reading, or writing.
- Mechanism: Scar tissue (gliosis) formed in damaged brain areas can become epileptogenic foci.
- Consequences: Requires long-term antiepileptic medication. Can significantly impact quality of life, driving privileges, and employment.
- Weakness (Paresis/Paralysis): Residual weakness or spasticity.
- Ataxia: Impaired coordination and balance.
- Movement Disorders: Dystonia, chorea, tremors (less common but possible depending on the area of brain damage).
- Personality Changes: Irritability, impulsivity, aggression, disinhibition.
- Mood Disorders: Depression, anxiety, emotional lability.
- Psychosis: Hallucinations, delusions.
- Sleep Disturbances: Insomnia, hypersomnia, disrupted sleep-wake cycle.
- Fatigue: Persistent and debilitating fatigue.
- Visual Field Defects: Loss of part of the visual field.
- Hearing Loss: Less common, but possible.
- Hypopituitarism: Damage to the hypothalamus or pituitary gland can lead to deficiencies in various hormones (e.g., growth hormone, thyroid hormones, adrenal hormones), requiring hormone replacement therapy.
- Especially if intubated or with dysphagia leading to aspiration.
C. Other Complications:
- Contractures and Deformities: Due to prolonged immobility.
- Deep Vein Thrombosis (DVT) / Pulmonary Embolism (PE): Due to immobility.
- Pressure Ulcers: Due to immobility and altered sensation/consciousness.
Prognosis & Prevention of Encephalitis
The prognosis of encephalitis is highly variable and depends on numerous factors. Prevention, where possible, is the most effective strategy.
1. Prognosis:
A. Factors Influencing Prognosis:
- HSV Encephalitis: Despite antiviral treatment, mortality remains around 10-20%, and a significant percentage of survivors (20-40%) experience moderate to severe neurological sequelae. Untreated, mortality is >70%.
- Arboviral Encephalitis: Varies widely by virus. Eastern Equine Encephalitis (EEE) has a very high mortality (up to 30-50%) and severe deficits in survivors. West Nile Virus (WNV) has lower mortality but can still cause significant neurological issues.
- Autoimmune Encephalitis: Generally has a better prognosis with early and appropriate immunotherapy, but relapses can occur, and some patients have chronic deficits.
- Enteroviral Encephalitis: Often has a good prognosis, especially in children, with full recovery possible.
- Glasgow Coma Scale (GCS): Lower GCS scores at presentation (indicating more severe altered mental status/coma) are associated with worse outcomes.
- Presence of Seizures/Status Epilepticus: Increases the risk of long-term neurological deficits.
- Presence of Increased ICP: Signifies severe cerebral involvement and poorer prognosis.
- Early initiation of specific antiviral therapy (e.g., acyclovir for HSV-E) is critical. Delays in treatment significantly worsen outcomes.
- Prompt diagnosis and initiation of immunomodulatory therapy for autoimmune encephalitis also improve prognosis.
B. Recovery and Long-term Sequelae:
- Cognitive Impairment: Memory loss (often severe and debilitating), executive dysfunction, attention deficits.
- Behavioral and Psychiatric Problems: Personality changes, depression, anxiety, agitation, psychosis.
- Epilepsy: New-onset seizures can occur years after the initial illness.
- Motor Deficits: Weakness, incoordination, balance problems.
- Sensory Deficits: Visual or hearing impairments.
- Fatigue: A common and persistent complaint.
2. Prevention:
A. Vaccination:
- Measles, Mumps, Rubella (MMR): Routine childhood vaccination has dramatically reduced the incidence of post-infectious encephalitis due to these viruses.
- Varicella (Chickenpox): Vaccination reduces the risk of VZV encephalitis.
- Japanese Encephalitis (JE): Available for travelers to endemic areas and residents in high-risk regions.
- Tick-borne Encephalitis (TBE): Vaccine available in endemic regions of Europe and Asia.
- Rabies: Pre-exposure vaccination for high-risk individuals (e.g., veterinarians, wildlife workers) and post-exposure prophylaxis after animal bites.
- Influenza: Annual vaccination can prevent influenza-associated encephalitis.
- Polio: Eradication efforts through vaccination have nearly eliminated polio encephalitis.
- Hib (Haemophilus influenzae type b) and Pneumococcal vaccines: While primarily preventing bacterial meningitis, these can indirectly reduce the risk of secondary encephalitis.
B. Mosquito and Tick Bite Prevention (for Arboviral Encephalitis):
- Personal Protective Measures:
- Use insect repellents containing DEET, picaridin, or oil of lemon eucalyptus.
- Wear long-sleeved shirts and long pants when outdoors, especially at dawn and dusk.
- Treat clothing and gear with permethrin.
- Environmental Control:
- Eliminate standing water around homes (breeding sites for mosquitoes).
- Use window and door screens.
- Community-level mosquito control programs (e.g., larvicides, adulticides).
- Awareness: Stay informed about local arbovirus activity.
C. General Hygiene and Infection Control:
- Handwashing: Frequent and thorough handwashing helps prevent the spread of many viral infections (e.g., enteroviruses).
- Avoid Contact with Sick Individuals: Reduce exposure to respiratory viruses.
- Safe Food Handling: To prevent foodborne infections that could rarely lead to encephalitis.
D. Prompt Treatment of Systemic Infections:
- Early and effective treatment of systemic viral or bacterial infections can prevent their spread to the CNS.
E. Travel Precautions:
- Consult travel clinics for advice on vaccinations and prophylaxis for specific destinations where encephalitis-causing agents are endemic.
Encephalitis Lecture Notes Read More »