Gout
Gout
Gout is a metabolic disorder characterized by elevated serum uric acid levels and deposits of urate crystals in synovial fluids and surrounding tissues.
It is derived from the Latin word “Gutta” meaning a “drop” (of liquid).
Gout also is a kind of arthritis that occurs when uric acid builds up in blood and causes joint inflammation, it can be acute or chronic.
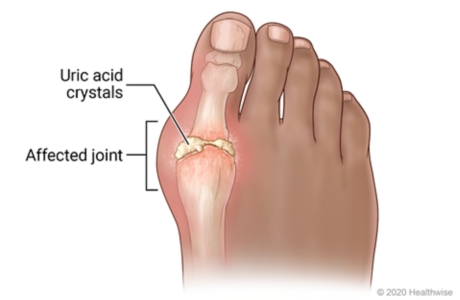
Acute: The affected joints often appear reddened and swollen and are sensitive to touch. The pain is described as a burning sensation. The development of acute gout is typically triggered by trauma, alcohol use, surgery, and systemic infection.
Chronic: This is characterized by visible deposits of urate crystals (tophi) that form nodules and may be painful during gout attacks.
Cause
Gout is associated with the presence of hyperuricemia (high blood levels of urate, or serum urate levels greater than ~6.8 mg/dl
Hyperuricemia: Gout occurs when urate crystals accumulate in your joint, causing the inflammation and intense pain of a gout attack. Urate crystals can form when you have high levels of uric acid in your blood.
NOTE: Not everyone with hyperuricemia develops gout as this condition requires two essential processes to develop – crystallization and inflammation. When uric acid levels become elevated, crystals will form in the joints, which will then trigger the inflammatory process.
Risk Factors
- Gender, common in males than females. Men have higher urate levels than women
- Obesity
- Age. Increased age is associated with reduced renal function & increased use of diuretics, which interfere with urate clearance.
- Having certain health conditions, including:
- Congestive heart failure
- Hypertension (high blood pressure)
- Insulin resistance
- Metabolic syndrome
- Diabetes
- Poor kidney function
- Using certain medications, such as thiazides and loop diuretics since they interfere with urate clearance by effects on multiple transporters in the proximal renal tubule. Asprin, aspirin inhibits urate secretion and increases serum urate levels at commonly used doses,
- Drinking alcohol. The risk of gout is greater as alcohol intake goes up.
- Eating or drinking food and drinks high in fructose (a type of sugar). Plasma uric acid levels rise within minutes after fructose infusion
- Having a diet high in purines, which the body breaks down into uric acid. Purine-rich foods include red meat.
- Family history of Gout.
- Chemotherapy-induced tumor lysis syndrome where the high rate of cancer cell death produces a large increase in urate.
Signs & Symptoms of Gout
- Podagra – an acute episodes of arthritis associated with the big toe. The big toe is the most common target for painful gout related inflammation because the combination of decreased temperature, lower pH and level of dehydration.
- Tophi (plural of tophus) which are deposits of urate that form in patients suffering from chronic hyperuricemia. They are most commonly found in joints, cartilage, bones.
- Urate kidney stones forming in the ureter (urolithiasis). These usually occur in patients having an acidic urine pH.
- Nephropathy caused by urate crystal deposition in the renal medulla in severe cases of the disease.
Other signs and symptoms include,
- Onset is usually nocturnal, will sudden swelling and excruciating pain.
- Joint pain usually begins over two to four hours and during the night.
- May have low grade fever.
- Usually subside within 2 to 10 days.
Stages/ Phases of Gout
The four phases of gout include asymptomatic hyperuricemia, acute gouty arthritis, intercritical gout and chronic tophaceous gout.
ASYMPTOMATIC HYPERURICEMIA
Asymptomatic hyperuricemia is the term for an abnormally high serum urate level, without gouty arthritis or nephrolithiasis. In this first stage of gout, the person has no joint pain, no red or swollen joints, just an elevated uric acid blood test.
ACUTE GOUTY ARTHRITIS
Acute gout is characterized by the sudden onset of pain, erythema, limited range of motion and swelling of the involved joint. This is when the urate crystals are released into the joint fluid and cause an inflammatory reaction, bringing in many white blood cells and releasing inflammatory chemicals that cause the pain, redness, and swelling.
INTERCRITICAL GOUT
Following recovery from acute gouty arthritis, the patient reenters an asymptomatic phase of the disease. This phase is referred to as “intercritical gout. This phase is where a person has already had a gout episode but is presently not having any joint pain or swelling, no signs and symptoms of gout.
RECURRENT GOUTY ARTHRITIS (Chronic or Tophaceous Gout)
Because the uric acid deposits can form nodules called “tophi,” often at the bunion point of the big toe or at the elbow. This stage is where a person can have some joint pain from gout just about all the time, It usually takes many years of uncontrolled gout for someone to get into this stage.
During this stage, progressive joint damage develops, so patients with gout should be treated before this starts happening.
The frequency of subsequent acute attacks of gout usually increases over time. Approximately 60 percent of patients have a second attack within the first year, and 78 percent have a second attack within two years. Only 7 percent of patients do not have a recurrence within a 10-year period

Pathophysiology of Gout.
Normal healthy joints are lined by a synovial membrane containing both fibroblast-like and macrophage-like cells that function to maintain joint homeostasis, including the supply of nutrients and the production of a clear viscous fluid to reduce friction between joint cartilage during movement.
When urate crystals form within the joint during periods of hyperuricemia, they become coated by proteins which increases their pro-inflammatory properties. Protein coating may also restrain urate crystals from leaving joint areas.
The presence of protein-coated urate crystals initiates a series of events including phagocytosis of urate crystals, activation of membrane signaling events from cells in the synovial membrane, and the release of multiple cytokines.
Cytokines released from cells within the joint (in particular IL-1β) cause chemotaxis and activation of neutrophils, monocytes and numerous other inflammatory cells. Once within the joint, neutrophils and other inflammatory cells interact with urate crystals, inducing the release of additional inflammatory mediators including prostaglandins, nitric oxide, leukotrienes and other mediators that contribute to both tissue damage and hypersensitivity of pain receptors.
Diagnostic Tests / Investigations
- Joint fluid test. A needle is used to draw fluid from the affected joint. Urate crystals may be visible when the fluid is examined under a microscope. This is a more accurate way to confirm a gout diagnosis.
- Blood test. Gout occurs when uric acid, a bodily waste product, builds up in the bloodstream and forms as crystals in the joints. A blood test that shows high levels of uric acid could help confirm a diagnosis of gout. Not definitive.
- X-ray imaging. Joint X-rays can be helpful to rule out other causes of joint inflammation.
- Ultrasound. It uses sound waves to detect urate crystals in the joints or deposits of uric acid crystals that form hard, visible lumps in or near the joints, called tophi.
- Dual-energy computerized tomography (DECT). This test combines X-ray images taken from many different angles to visualize urate crystals in joints.
- Creatinine. This test measures the levels of creatinine, a waste product made by your muscles, in a sample of blood or urine. Abnormal levels could be a sign of kidney disease.
- Blood Urea Nitrogen (BUN). Often performed in conjunction with the creatinine test, this test checks for blood levels of urea nitrogen, a bodily waste product normally excreted through the kidneys. A high level could mean kidneys are not working properly.
- Urinalysis. Your doctor may order check for high levels of uric acid in your urine, which could indicate a risk for kidney stones.
Management of Gout
Aims
- To alleviate the pain and inflammation associated with acute attacks.
- To decrease uric acid levels.
- To prevent complications.
Medical Management.
- The acute treatment of gout is focused on treating the pain & inflammation caused by the accumulation of urate crystals in joints (most commonly affecting the large toe).
- However, because anti-inflammatory drugs have no effect on uric acid levels and do not prevent joint damage or renal stones, anti-inflammatory agents should not be used for long-term therapy in patients who are appropriate candidates for urate-lowering treatment.
There are 3 common anti-inflammatory treatment options for treatment of acute gout:
- NSAIDs
- COLCHICINE
- GLUCOCORTICOIDS (Corticosteroids)
- NSAIDs e.g
- Naproxen, Ibuprofen (over the counter options)
- Indomethacin (more potent prescribed NSAIDs)
- Indication:
- Treatment of inflammation & pain associated with acute attacks of gout
- Mechanism of Action:
- Non-selective inhibitors of cyclooxygenase (COX) 1 & 2
- COX inhibition reduces the synthesis of prostaglandins that are involved in mediating inflammatory responses & pain associated with gout.
- Relative contraindications:
- Renal insufficiency (inhibiting prostaglandin synthesis can induce renal failure)
- Peptic ulcer (increased risk for GI bleeding)
- CV disease (increased risk of stroke or MI)
- NSAID allergy
- Treatment with other anticoagulants (increased bleeding risk)
- COLCHICINE
- To reduce pain & inflammation associated with acute attacks of gout most effective when taken at the first sign of articular discomfort (at early stages of neutrophil chemotaxis & activation)
- colchicine treatment is typically reserved for patients with NSAID contraindications, or who do not adequately respond to NSAIDs.
- Can be combined with NSAID.
- GLUCOCORTICOIDS (Corticosteroids)
- an alternative for patients with contraindications to both NSAIDs & colchicine.
- can be given by intra-articular injection, oral or parenteral administration, with the route depending on the severity of symptoms and the number of joints affected
Combination Therapy
- Combination therapy can be tried in patients with severe pain, or pain that is not adequately relieved by monotherapy. Common examples include:
- Colchicine + NSAID
- Colchicine + oral glucocorticoid
- NSAID + intraarticular glucocorticoid
- Colchicine + intraarticular glucocorticoid
- Oral glucocorticoid + intraarticular glucocorticoid
Lowering uric acid in the body
- the recommended 1st line drug therapy, decrease the synthesis of uric acid from purines
- Allopurinol (Zyloprim ®)
- a purine analog
- “not an innocuous drug”, and is recommended for symptomatic hyperuricemia only.
- Concurrent treatment with colchicine or NSAIDs during the first 3-6 months of urate-lowering therapy has been shown to reduce the risk of flare-ups.
- N.B. Allopurinol can cause relatively rare, but serious (life-threatening) drug hypersensitivity reactions (e.g. Stevens-Johnson & DRESS syndromes). Allopurinol is one of the most frequent causes of these reactions .
- Uricosuric drugs are organic acids that inhibit the reabsorption of uric acid by inhibiting anionic transport sites of the renal proximal tubule; inhibiting renal reabsorption enhances uric acid clearance. The only uricosuric drug available in the Uganda is probenecid.
- Probenecid
- for patients who can’t tolerate allopurinol, or require additional urate lowering; can be combined with a xanthine oxidase inhibitor.
- typically administered concomitantly with colchicine to reduce the likelihood of gouty flare-up
- can lower mean serum uric acid by 30-40%
- not effective in the setting of renal dysfunction
- it can promote kidney-stone formation in patients with high urinary uric acid levels, and is contraindicated in patients with a history of kidney stones (nephrolithiasis)
- converts uric acid to a water soluble metabolite
- Pegloticase (Krystexxa ®)reserved for the treatment of severe, treatment-refractory chronic gout.
- while Pegloticase is effective in lowering uric acid levels, little is known about its ability to reduce the frequency of recurrent attacks of gout, or the optimal duration of Pegloticase therapy.
- uricase (uric oxidase) is an enzyme found in almost all organisms, but the gene for uricase is non-functional in humans (Wikipedia). It converts uric acid to a metabolite (allantoin) that is 5-10 times more water soluble than uric acid.
- infusions every 2 weeks are effective in lowering uric acid levels, but cost, infusion reactions, and development of tolerance (which may be due to development of antibodies) have limited its use.
Surgical Management
If gout symptoms have occurred on and off without treatment, uric acid crystals may have built up in the joints to form gritty chalky nodules called tophi.
The tophi can cause infection, pain, pressure and deformed joints. Surgery is recommended to do excision and remove the tophi.
Patient advice.
- sweetened soft drinks & fruit juices
- any foods containing high fructose corn syrup such as ice cream, desserts, syrup
- avoid consuming organ meats (kidney, liver, sweetbreads)
- limit serving sizes of beef & pork
- reduce wine & spirits, and avoid all alcohol intake during gout attacks.
- beer contains purines & alcohol consumption can produce lactic acid that interferes with urate clearance
- modify diet & increase exercise to achieve a healthy BMI
- weight loss can enhance the renal excretion of urate.
- low fat or non-fat dairy products
- vegetables
- Many drugs including thiazides, loop diuretics, niacin, & aspirin may contribute to producing hyperuricemia. In some cases adequate substitutes, or dosage reductions are feasible, but therapeutic benefits must be considered.
Nursing Management using Nursing Process.
Assessment: Acute Pain
Sudden and severe pain occurring in one or more joints, usually in the big toe, is the classic symptom of gout. This occurs due to the accumulation of uric acid, forming sharp crystals in the joints.
Nursing Diagnosis: Acute Pain related to Inflammatory process as evidenced by:
Reddened, swollen joints, Distraction behavior, Expressive behavior, Guarding behavior, Positioning to ease pain, Limited range of motion, Reports pain characteristics and intensity
Expected Outcome:
- The patient will verbalize pain relief and perform activities of daily living without discomfort
- The patient will display an absence of redness, swelling, and warmth to the affected joints
Interventions:
1. Administer pain medications as indicated.
NSAIDs are usually prescribed to help relieve pain and reduce joint inflammation in patients with gout. Steroids can also help reduce damage to the joints.
2. Elevate the limb.
Elevating the affected joint can help reduce inflammation.
3. Apply cool compresses.
Nonpharmacologic interventions such as the application of cool compresses and ice can reduce inflammation and soothe burning sensations.
4. Adjust lifestyle behaviors.
Gout attacks can be minimized by reducing risk factors such as the intake of alcoholic beverages, sugary drinks, and high-purine foods such as red meats and some seafood.
Assessment: Impaired Physical Mobility
Patients with gout often find it difficult to walk or stand when they are having flare-ups in their feet, knees, or ankles because of severe and sudden pain and swelling. When there is joint swelling, the joints can become stiff, and painful when moved, and the range of motion will become more limited.
Nursing Diagnosis: Impaired Physical Mobility related to: Pain, Inflammatory process, Limited range of motion , Joint tenderness, Joint stiffness as evidenced by:
Altered gait, Decreased range of motion, Difficulty turning, Slowed movement, Spastic movement, Uncoordinated movement, Hesitancy to move.
Expected outcomes:
- The patient will be able to ambulate with minimal discomfort
- The patient will participate in activities to improve their range of motion
Interventions:
1. Encourage weight loss.
Obesity places extra stress on joints and also increases the incidence of diabetes, hypertension, and other chronic conditions that are risk factors for gout.
2. Encourage active and passive ROM exercises.
Range of motion exercise can help preserve the flexibility and mobility of affected joints. Gout causes joint stiffness and patients can be provided with exercises they can do themselves or with someone else to maintain their mobility.
3. Refer to PT or OT.
A physical therapist or occupational therapist can help evaluate the extent of impaired physical mobility in patients with gout.
4. Encourage the use of mobility aids when necessary.
Mobility aids like handrails, canes, and shower benches promote patient safety during gout flare-ups and prevent accidental falls and other injuries.