Muscular System BNS
BNS 111: Anatomy & Physiology
SEMESTER I - Muscular System
Introduction to the Muscular System: Types, Structure, Functions, Contraction, and Energy
The Muscular system is a dynamic powerhouse responsible for movement, maintaining posture, stabilizing our joints, and even generating body heat. It's composed of specialized cells called muscle fibers, which have the unique ability to shorten and generate force – a property known as contractility. The muscular system allows for a vast range of activities, from the gross movements of walking and running to the fine control needed for facial expressions, and the vital internal actions like breathing and pumping blood.
Key Functions of the Muscular System:
The combined actions of muscles perform several essential functions for the body:
- Producing Movement: This is the most obvious function. Skeletal muscles are attached to bones, and their contractions pull on these bones, acting as levers to cause movement at joints. Smooth muscle contracts to move substances through internal organs, and cardiac muscle contracts to pump blood.
- Maintaining Posture: Even when you are sitting or standing still, your muscles are not completely relaxed. They are in a state of slight, continuous contraction called muscle tone. This constant tension helps maintain body position and posture against the force of gravity.
- Stabilizing Joints: Tendons, which are the fibrous cords that connect muscles to bones, often cross over joints. The tension in these tendons, even at rest (muscle tone), significantly helps to stabilize the joints and prevent unwanted movements or dislocations. This is especially important in joints with less structural support from ligaments or bone shape, like the shoulder.
- Generating Heat: Muscle tissue is metabolically very active. As muscles contract and perform work, they produce heat as a byproduct of cellular respiration. Muscle activity, particularly shivering (rapid, involuntary muscle contractions), is a major source of body heat, essential for maintaining normal body temperature. Nearly 85% of the heat produced in the body can come from muscle contraction.
- Guarding Entrances and Exits: Skeletal muscles form sphincters (ring-like muscles) around the openings of the digestive and urinary tracts, allowing for voluntary control over swallowing, urination, and defecation. Smooth muscle also forms involuntary sphincters.
- Protecting Internal Organs: Layers of skeletal muscle, particularly in the abdominal wall, help protect the underlying soft organs from trauma.
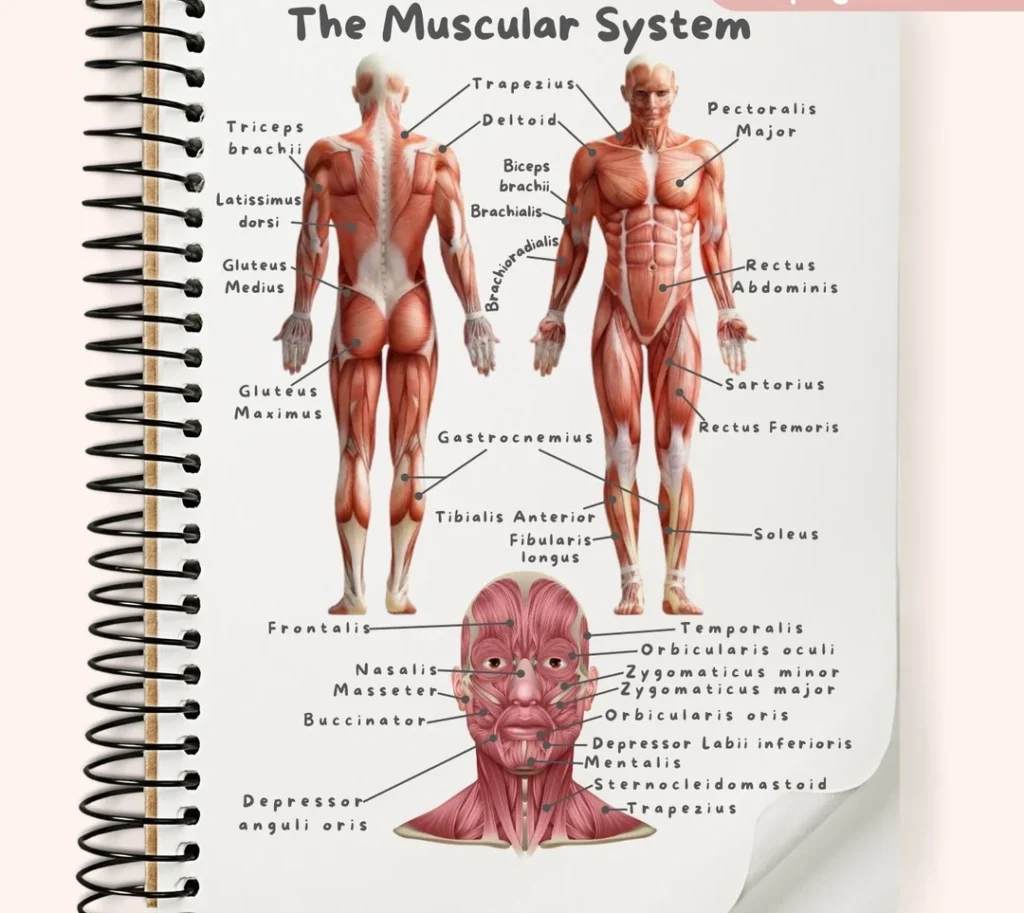
![[An overview diagram showing the major muscles of the human body, anterior and posterior views. Label main muscle groups.]](https://nursesrevisionuganda.com/wp-content/uploads/2025/07/1105_Anterior_and_Posterior_Views_of_Muscles2-1024x631-1.jpg)
Types of Muscle Tissue
There are three distinct types of muscle tissue in the human body, each specialized for different roles and controlled in different ways. We covered these briefly at the tissue level, but it's worth reviewing them in the context of the muscular system:
Skeletal Muscle:- Description: These muscles are typically attached to the bones of the skeleton and their contractions cause voluntary body movements. Under a microscope, skeletal muscle fibers (cells) are long, cylindrical, have multiple nuclei (multinucleated), and show characteristic light and dark bands called striations due to the organized arrangement of contractile proteins.
- Control: Voluntary. Their activity is consciously controlled by the somatic division of the nervous system, although some actions (like reflexes) can be involuntary.
- Location: Forms the bulk of the muscles that move the skeleton, found throughout the body attached to bones via tendons. Examples include the biceps, triceps, quadriceps, hamstrings, and muscles of the back and abdomen.
- Functions: Primary functions are body movement, maintaining posture, stabilizing joints, and generating heat. They are also involved in voluntary control of openings and protecting organs.
- Regeneration: Limited ability to regenerate. Severe damage often results in scar tissue formation (fibrosis).
![[Microscopic view of skeletal muscle tissue, showing its long, cylindrical fibers, striations, and multiple nuclei located peripherally.]](https://nursesrevisionuganda.com/wp-content/uploads/2025/07/microscopic-skeletal-muscle-e1751345586323.webp) Smooth Muscle:
Smooth Muscle:
- Description: Found in the walls of internal hollow organs and tubes. Smooth muscle fibers are spindle-shaped (tapered at both ends), have a single central nucleus (uninucleated), and lack the striations seen in skeletal and cardiac muscle, appearing "smooth" under the microscope. The contractile proteins are present but arranged differently.
- Control: Involuntary. Its contraction is controlled by the autonomic nervous system, hormones, and local chemical signals. We have no conscious control over smooth muscle activity.
- Location: Found in the walls of the digestive tract, urinary tract, respiratory passages, blood vessels, uterus, fallopian tubes, intrinsic eye muscles, and arrector pili muscles in the skin.
- Functions: Propels substances through tubes (e.g., peristalsis in intestines), regulates diameter of openings and passageways (e.g., regulating blood flow by changing blood vessel diameter, regulating airflow in bronchioles), mixes contents in hollow organs (e.g., churning food in stomach), expels contents (e.g., emptying bladder, childbirth).
- Regeneration: Has a better capacity for regeneration than skeletal or cardiac muscle.
![[Microscopic view of smooth muscle tissue, highlighting its spindle shape, single central nucleus, and lack of striations.]](https://nursesrevisionuganda.com/wp-content/uploads/2025/07/Smooth-musclet-tissue-1-1-e1751389483746.png) Cardiac Muscle:
Cardiac Muscle:
- Description: Found *only* in the wall of the heart (myocardium). Cardiac muscle cells are branched, typically have one central nucleus (though sometimes two), and *are* striated. A key distinguishing feature is the presence of intercalated discs between adjacent cells, which are specialized junctions containing gap junctions (for rapid electrical signal spread) and desmosomes (for strong cell-to-cell adhesion). These discs enable coordinated contraction of the heart.
- Control: Involuntary. The heart has its own internal pacemaker cells that initiate rhythmic contractions, but the rate and force are influenced by the autonomic nervous system and circulating hormones.
- Location: Exclusively in the myocardium (heart muscle).
- Function: Propels blood throughout the entire circulatory system through rhythmic and forceful contractions (heartbeat).
- Regeneration: Has very limited or negligible regenerative capacity in adults. Damage (like from a heart attack) is mostly replaced by non-contractile scar tissue, which impairs heart function.
![[Microscopic view of cardiac muscle tissue, showing striations, branching cells, central nuclei, and prominent intercalated discs connecting the cells.]](https://nursesrevisionuganda.com/wp-content/uploads/2025/07/Microscopic-view-of-cardiac-muscle-tissue.jpg)
Microscopic Anatomy of Skeletal Muscle
To truly understand how skeletal muscle contracts and produces force, we must examine its intricate structure, from the whole muscle organ down to the molecular level. A skeletal muscle is a complex organ composed of skeletal muscle tissue, connective tissues, blood vessels, and nerves, all organized in a hierarchical manner:
![[Diagram showing the hierarchical structure of a skeletal muscle, starting from the entire muscle organ, down to a fascicle, a single muscle fiber (cell), and finally a myofibril, illustrating the connective tissue coverings at each level.]](https://nursesrevisionuganda.com/wp-content/uploads/2025/07/Diagram-showing-the-hierarchical-structure-of-a-skeletal-muscle.jpg)
- Connective Tissue Coverings:
- Epimysium: The outermost, dense irregular connective tissue layer that surrounds the entire skeletal muscle organ. It's like the tough outer casing of a bundle of wires.
- Perimysium: A layer of fibrous connective tissue that surrounds bundles of muscle fibers. These bundles are called fascicles. The perimysium divides the muscle into these visible bundles. It's like the wrapping around smaller bundles of wires within the main cable.
- Endomysium: A delicate sheath of loose areolar connective tissue that surrounds and electrically insulates each individual skeletal muscle fiber (muscle cell). It contains capillaries to supply nutrients and oxygen, and nerve fibers that stimulate the muscle fiber. This is the thin insulation around each single wire.
- Muscle Fiber (Muscle Cell or Myocyte):
- Sarcolemma: The specialized plasma membrane of the muscle fiber. Unlike typical cell membranes, the sarcolemma has structures called T-tubules (Transverse tubules) which are invaginations (tube-like extensions) that penetrate deep into the muscle fiber. The sarcolemma is excitable and conducts electrical signals (action potentials) from the neuromuscular junction throughout the muscle fiber.
- Sarcoplasm: The cytoplasm of the muscle fiber. It contains the usual organelles (mitochondria, ribosomes, etc.) but also large amounts of stored glycogen (a polysaccharide used for glucose storage, readily available fuel for ATP production) and myoglobin (a red protein similar to hemoglobin, which stores oxygen within the muscle cell, providing a local oxygen reserve for aerobic respiration).
- Myofibrils: These are densely packed, rod-like structures that run parallel to the length of the muscle fiber, occupying about 80% of its volume. Myofibrils are the actual contractile elements of the muscle cell. Their arrangement of light and dark bands gives skeletal muscle its striated appearance. Each myofibril is composed of repeating functional units called sarcomeres.
- Sarcoplasmic Reticulum (SR): A specialized smooth endoplasmic reticulum that forms a network of interconnected tubules and sacs surrounding each myofibril like a sleeve. Its main function is the storage and release of intracellular calcium ions (Ca²⁺). At intervals, the SR tubules expand to form sacs called terminal cisternae.
- Triad: The region formed by a T-tubule flanked on either side by two terminal cisternae of the SR. This close arrangement is critical for excitation-contraction coupling, the process by which the electrical signal traveling down the T-tubule triggers the release of Ca²⁺ from the SR.
- Nuclei: Skeletal muscle fibers are multinucleated, with the nuclei located just beneath the sarcolemma. This large number of nuclei supports the high metabolic needs of the large muscle fiber.
- Myofibrils and Myofilaments:
- Thick Filaments: Composed primarily of the protein myosin. Each myosin molecule has a tail and two globular heads. The tails bundle together to form the central rod of the thick filament. The heads project outward from the thick filament at various angles. Myosin heads are often called "cross-bridges" because they link the thick and thin filaments during contraction. They contain binding sites for actin and ATP, and they have ATPase activity, meaning they can break down ATP to release energy needed for the power stroke.
- Thin Filaments: Composed mainly of the protein actin. Actin molecules are spherical (G actin) and polymerize to form long, fibrous strands (F actin) that are twisted into a double helix. Associated with the actin filaments are two important regulatory proteins: Tropomyosin, a rod-shaped protein that spirals around the actin filament and, in a relaxed muscle, covers and blocks the myosin-binding sites on the actin molecules; and Troponin, a complex of three proteins located along the tropomyosin. Troponin has a binding site for calcium ions (Ca²⁺). The troponin-tropomyosin complex acts as a "switch" that determines whether or not myosin can bind to actin.
- Elastic Filaments: Composed of the protein Titin. These large filaments extend from the Z-disc through the thick filament to the M-line. Titin provides elasticity to the muscle fiber, helping it recoil after stretching, and helps hold the thick filaments in place.
- Z-Disc (or Z-Line): These are protein structures that serve as the boundaries of each sarcomere. Thin filaments are anchored to the Z-discs. Think of them as the walls at either end of a room.
- I-Band (Isotropic Band): The lighter-colored band that spans the Z-disc and contains only the portions of thin (actin) filaments that do not overlap with thick filaments. This band appears light because only thin filaments are present. The I-band shortens significantly during contraction.
- A-Band (Anisotropic Band): The darker-colored band located in the center of the sarcomere. This band represents the entire length of the thick (myosin) filaments. Where the thin and thick filaments overlap within the A-band, it appears darker. The length of the A-band remains constant during contraction.
- H-Zone (Hensen's Zone): A lighter region in the center of the A-band. It contains only the thick (myosin) filaments where they do not overlap with thin filaments. The H-zone shortens or disappears completely during maximal contraction.
- M-Line: A protein structure located in the exact center of the H-zone (and thus the center of the sarcomere and A-band). It serves to anchor the thick filaments in place.
Skeletal muscles are wrapped and supported by layers of fibrous connective tissue. These layers provide structural integrity, allow muscles to transmit force to bones via tendons, and provide pathways for blood vessels and nerves:
A single, large, elongated skeletal muscle cell. Skeletal muscle fibers can be very long, extending nearly the entire length of the muscle. Key components within a muscle fiber, adapted for contraction, include:
Each myofibril is a long chain of repeating contractile units called sarcomeres. The striations of skeletal muscle are due to the arrangement of even smaller protein filaments within the myofibrils, called myofilaments. There are two main types of myofilaments that interact to cause contraction:
![[Detailed diagram illustrating the structure of thick (myosin) and thin (actin, tropomyosin, troponin, elastic/titin) filaments and showing their arrangement within a sarcomere.]](https://nursesrevisionuganda.com/wp-content/uploads/2025/07/Structure-of-Sarcomere.webp)
The Sarcomere
The Sarcomere is the fundamental contractile unit of a skeletal muscle fiber. It is the repeating structural and functional unit along the length of a myofibril. Each sarcomere is the region between two successive Z-discs. The precise arrangement of thick and thin filaments within the sarcomere creates the characteristic banding patterns (striations) of skeletal muscle observed under a microscope. The shortening of millions of sarcomeres in unison is what causes a muscle fiber, and thus the entire muscle, to contract. Key regions within the sarcomere include:
Nervous System Control of Muscle Contraction: Neuromuscular Transmission
Skeletal muscle contraction is initiated by a signal from a motor neuron of the somatic nervous system. The crucial communication occurs at the Neuromuscular Junction (NMJ), a specialized type of synapse where the axon terminal of a motor neuron meets a skeletal muscle fiber. This is the point where the electrical signal from the nerve is translated into a chemical signal, which then triggers an electrical signal in the muscle fiber to begin the contraction process.
![[Diagram of a motor unit, showing a motor neuron originating from the spinal cord, its axon branching out, and each axon branch forming a neuromuscular junction with a different skeletal muscle fiber within the muscle.]](https://nursesrevisionuganda.com/wp-content/uploads/2025/07/Diagram-of-a-motor-unit.jpg)
Motor Unit
A Motor Unit is the functional unit of neuromuscular control. It consists of a single motor neuron and *all* the individual skeletal muscle fibers that this neuron innervates (supplies with a nerve connection). When a motor neuron is activated, it sends an electrical impulse (action potential) down its axon, and this signal reaches all of the muscle fibers in that unit simultaneously, causing them all to contract together. The size of a motor unit (the number of muscle fibers controlled by one neuron) varies greatly depending on the muscle's function:
- Small Motor Units: Contain only a few muscle fibers per motor neuron (e.g., muscles controlling eye movements or fine finger movements). This allows for very precise and fine control of movement.
- Large Motor Units: Contain hundreds or even thousands of muscle fibers per motor neuron (e.g., large muscles of the thigh or back). These generate more force but allow for less precise control.
![[Diagram of a motor unit, showing a motor neuron originating from the spinal cord, its axon branching out, and each axon branch forming a neuromuscular junction with a different skeletal muscle fiber within the muscle.]](https://nursesrevisionuganda.com/wp-content/uploads/2025/07/nueromuscular-junction.png)
Structure of the Neuromuscular Junction (NMJ)
The NMJ is a specialized chemical synapse with a unique structure adapted for efficient signal transmission:
- Axon Terminal (Synaptic Knob): The branched ending of the motor neuron's axon. It does not directly touch the muscle fiber but is separated by a small gap. The terminal contains numerous synaptic vesicles filled with the neurotransmitter Acetylcholine (ACh).
- Synaptic Cleft: A narrow, fluid-filled space that separates the axon terminal of the motor neuron from the muscle fiber membrane. The chemical messenger (ACh) diffuses across this gap.
- Motor End-Plate: A specialized region of the sarcolemma (muscle fiber plasma membrane) at the NMJ. It is highly folded (junctional folds) to increase the surface area and contains a high concentration of specific ACh receptors (ligand-gated ion channels).
![[Detailed diagram of the neuromuscular junction, clearly labeling the presynaptic axon terminal, synaptic vesicles containing ACh, the synaptic cleft, the motor end-plate with junctional folds, and acetylcholine receptors on the muscle fiber membrane.]](https://nursesrevisionuganda.com/wp-content/uploads/2025/07/Detailed-diagram-of-the-neuromuscular-junction-clearly-labeling-the-presynaptic-axon-terminal.jpg)
Process of Neuromuscular Transmission (Excitation-Contraction Coupling Initiation)
This is the sequence of events that transmits the signal from the motor neuron across the NMJ to initiate an electrical signal (action potential) in the muscle fiber:
- Action Potential Arrives: An electrical signal (action potential) travels down the motor neuron's axon and reaches the axon terminal.
- Voltage-Gated Calcium Channels Open: The depolarization caused by the arriving action potential opens voltage-gated calcium channels in the membrane of the axon terminal. Calcium ions (Ca²⁺) from the extracellular fluid flow into the axon terminal.
- ACh Release: The increase in intracellular Ca²⁺ concentration in the axon terminal triggers the synaptic vesicles containing ACh to fuse with the axon terminal membrane (exocytosis) and release ACh into the synaptic cleft.
- ACh Binds to Receptors: ACh diffuses across the synaptic cleft and binds to the specific ACh receptors located on the motor end-plate of the sarcolemma.
- Ligand-Gated Ion Channels Open (End-Plate Potential): The binding of ACh to its receptor causes the ligand-gated ion channels to open. These channels allow sodium ions (Na⁺) to flow into the muscle fiber and potassium ions (K⁺) to flow out. Since more Na⁺ enters than K⁺ leaves, the inside of the muscle fiber membrane at the motor end-plate becomes less negative (depolarizes), creating a local depolarization called the end-plate potential (EPP).
- Action Potential Generation in Muscle Fiber: The EPP is a graded potential. If it is strong enough to reach a critical voltage (threshold) in the adjacent regions of the sarcolemma (where voltage-gated channels are present), it triggers the opening of voltage-gated sodium channels. This causes a large influx of Na⁺, generating a full-blown action potential that propagates (travels) along the entire length of the sarcolemma and, importantly, down into the T-tubules. This muscle action potential is the electrical signal that will trigger the release of calcium from the SR, initiating contraction (excitation-contraction coupling).
- ACh is Degraded: The enzyme Acetylcholinesterase (AChE), located in the synaptic cleft and on the motor end-plate, rapidly breaks down ACh into acetic acid and choline. This breakdown is crucial because it removes ACh from the receptors, closing the ion channels and allowing the motor end-plate to repolarize and be ready for the next signal. If AChE were inhibited, ACh would remain bound, causing continuous muscle stimulation and potentially paralysis (e.g., in nerve gas poisoning).
![[Series of detailed diagrams illustrating the step-by-step process of neuromuscular transmission at the NMJ, from arrival of action potential to ACh release, binding, EPP generation, and initiation of muscle action potential.]](https://nursesrevisionuganda.com/wp-content/uploads/2025/07/Step-by-step-process-of-neuromuscular-transmission-at-the-NMJ-1.jpg)
Mechanism of Muscle Contraction: The Sliding Filament Theory
Once an action potential is generated and propagates along the sarcolemma and down the T-tubules, it triggers the release of calcium ions from the sarcoplasmic reticulum. These calcium ions are the key that unlocks the interaction between the thick and thin filaments, leading to muscle contraction. The widely accepted model explaining this mechanical process is the Sliding Filament Theory. This theory states that during contraction, the thin (actin) filaments slide past the thick (myosin) filaments towards the center of the sarcomere, causing the sarcomere to shorten. Importantly, the individual filaments themselves do NOT shorten in length; it's their relative position that changes. This sliding action pulls the Z-discs closer together, shortening the I-bands and H-zone, while the A-band remains the same length.
![[Diagram clearly illustrating the difference between a relaxed sarcomere and a contracted sarcomere, showing how the thin filaments move inwards and the Z-discs get closer while the thick and thin filaments retain their original length.]](https://nursesrevisionuganda.com/wp-content/uploads/2025/07/Diagram-clearly-illustrating-the-difference-between-a-relaxed-sarcomere-and-a-contracted-sarcomere.jpg)
The Contraction Cycle (Cross-Bridge Cycling):
The sliding of the filaments is driven by the cyclical interaction between the myosin heads of the thick filaments and the actin molecules of the thin filaments, often called cross-bridge cycling. This cycle requires the presence of calcium ions and is powered by ATP hydrolysis. The steps are:
- Calcium Signal and Exposure of Binding Sites: The action potential in the muscle fiber leads to the release of Ca²⁺ from the SR into the sarcoplasm. These Ca²⁺ ions bind to the troponin protein on the thin filaments. This binding causes a change in the shape of troponin, which in turn pulls the tropomyosin molecule *away* from covering the active (myosin-binding) sites on the actin filaments. The binding sites on actin are now exposed and available.
- Cross-Bridge Formation: With the actin binding sites exposed, the energized ("cocked") myosin heads can now attach to these sites on the actin filaments, forming a linkage called a cross-bridge. The myosin head is in a high-energy state at this point because it has already hydrolyzed ATP (split ATP into ADP and inorganic phosphate, Pi), storing that energy.
- The Power (Working) Stroke: Once the cross-bridge is formed, the myosin head pivots or swivels, changing its shape and pulling the thin (actin) filament towards the center of the sarcomere (towards the M-line). This movement generates the force of contraction. During the power stroke, the ADP and Pi that were attached to the myosin head are released.
- Cross-Bridge Detachment: A new molecule of ATP binds to the myosin head. The binding of this fresh ATP molecule to the myosin head causes it to detach from the actin binding site, breaking the cross-bridge. ATP binding is necessary for detachment.
- Reactivation ("Cocking") of the Myosin Head: The ATP molecule that just bound is rapidly hydrolyzed (broken down) into ADP and Pi by the ATPase enzyme located on the myosin head. This hydrolysis releases the energy stored in the ATP molecule, and this energy is used to "re-cock" or return the myosin head to its high-energy, ready-to-bind position, preparing it for another cycle of interaction with actin.
![[Series of detailed diagrams illustrating the steps of the sliding filament theory and cross-bridge cycling: 1. Calcium binding to troponin/tropomyosin movement, 2. Cross-bridge formation, 3. Power stroke, 4. ATP binding and detachment, 5. ATP hydrolysis and re-cocking of myosin head.]](https://nursesrevisionuganda.com/wp-content/uploads/2025/07/steps-of-the-sliding-filament-theory-and-cross-bridge-cycling.jpg)
Muscle Relaxation:
Muscle relaxation is an active process that requires the removal of the calcium signal. Contraction stops when the nerve signal from the motor neuron ends. Without continued stimulation:
- ACh is Degraded: Acetylcholine (ACh) in the synaptic cleft is rapidly broken down by Acetylcholinesterase (AChE), stopping the stimulation of the motor end-plate.
- Calcium Pumped Back into SR: Calcium pumps (using ATP) in the membrane of the sarcoplasmic reticulum actively transport Ca²⁺ ions from the sarcoplasm back into the SR lumen for storage. This reduces the Ca²⁺ concentration in the sarcoplasm significantly.
- Tropomyosin Re-covers Binding Sites: As Ca²⁺ detaches from troponin (due to lower Ca²⁺ concentration), the troponin molecule returns to its original shape. This allows tropomyosin to move back and cover the myosin-binding sites on the actin filaments again.
- Cross-Bridge Cycling Stops: Myosin heads can no longer bind to actin because the binding sites are blocked. Cross-bridge cycling ceases.
- Muscle Fiber Relaxes: The thin filaments passively slide back to their original position. This is aided by the elastic properties of the muscle (e.g., Titin) and the pull of gravity or opposing muscles. The sarcomeres lengthen, and the muscle fiber returns to its resting length.
Energy for Muscle Contraction
Muscle contraction is a high-energy demanding process. The immediate source of energy that directly powers the movement of the myosin heads during the power stroke, the detachment of myosin from actin, and the pumping of calcium back into the SR during relaxation is Adenosine Triphosphate (ATP). However, muscle fibers store only a very limited amount of ATP, enough for just a few quick contractions (about 4-6 seconds worth of maximal effort). Therefore, muscles must have efficient ways to regenerate ATP continuously to support ongoing activity.
![[Flowchart or diagram comparing the three main metabolic pathways for ATP production in muscle cells: Creatine Phosphate System (Direct Phosphorylation), Anaerobic Glycolysis, and Aerobic Respiration. Show inputs, outputs, speed, duration supported, and location.]](https://nursesrevisionuganda.com/wp-content/uploads/2025/07/Flowchart-or-diagram-comparing-the-three-main-metabolic-pathways-for-ATP-production-in-muscle-cells-1.jpg)
Pathways for ATP Regeneration:
Muscle fibers utilize different metabolic pathways to synthesize ATP, depending on the availability of oxygen and the intensity and duration of the muscular activity:
- Direct Phosphorylation (Creatine Phosphate System): This is the most immediate and fastest way to regenerate ATP. Muscle fibers contain a high-energy molecule called Creatine Phosphate (CP), which is a storage form of energy. When ATP is used up during contraction, an enzyme called Creatine Kinase quickly catalyzes the transfer of a phosphate group from CP to ADP, directly producing ATP.
- Source of Phosphate: Creatine Phosphate (CP).
- Oxygen Required: No (Anaerobic).
- Speed: Very fast (single enzyme step).
- ATP Yield: 1 ATP molecule is produced for each molecule of CP.
- Duration Supported: Provides energy for short bursts of intense activity, lasting about 10-15 seconds (when combined with stored ATP). It's used for activities like sprinting, lifting heavy weights, or jumping.
- Limitation: CP is stored in limited amounts and is quickly depleted during maximal effort.
- Anaerobic Pathway (Glycolysis): When stored ATP and CP are depleted, and oxygen is not available quickly enough (especially during high-intensity exercise that exceeds the supply), the muscle relies on anaerobic glycolysis. This pathway breaks down glucose (obtained from the blood or from glycogen stored in the muscle fibers) into two molecules of pyruvic acid in the cytoplasm. This process, glycolysis, yields a net of 2 ATP molecules per glucose molecule. If oxygen levels remain low, the pyruvic acid is converted into lactic acid.
- Source of Fuel: Glucose.
- Oxygen Required: No (Anaerobic).
- Speed: Fast (faster than aerobic respiration, but slower than CP system).
- ATP Yield: Relatively low (2 ATP per glucose molecule).
- Duration Supported: Provides energy for moderate-duration, high-intensity activities, lasting about 30-60 seconds (e.g., a 400-meter sprint).
- Byproduct: Lactic acid, which can accumulate and contribute to muscle fatigue and that burning sensation during intense exercise.
- Limitation: Low ATP yield and production of lactic acid.
- Aerobic Pathway (Aerobic Respiration): This is the most efficient pathway for ATP production and is used to support prolonged, low-to-moderate intensity activities. It occurs primarily in the mitochondria and requires a continuous supply of oxygen. This pathway can use a variety of fuels, including glucose (from blood or glycogen), fatty acids (from adipose tissue or stored triglycerides in muscle), and even amino acids. These fuels are completely broken down in a series of steps (Krebs cycle and oxidative phosphorylation) in the presence of oxygen, producing large amounts of ATP, carbon dioxide, and water.
- Source of Fuel: Glucose, Fatty Acids, Amino Acids.
- Oxygen Required: Yes (Aerobic).
- Speed: Slowest pathway (involves many steps).
- ATP Yield: Very high (approximately 30-32 ATP per glucose molecule; even more from fatty acids).
- Duration Supported: Provides energy for activities lasting minutes to hours (e.g., jogging, walking, endurance activities), as long as fuel and oxygen are supplied.
- Limitation: Slower to activate and depends on adequate oxygen and fuel delivery.
Muscle Fatigue and Oxygen Debt
Muscle Fatigue: This is a state of physiological inability to contract effectively, even when the muscle is still receiving neural stimulation. It's a protective mechanism to prevent total depletion of ATP, which could lead to permanent damage. While the exact causes are complex and involve multiple factors, key contributors include:
- Ionic Imbalances: Changes in the concentration of ions like K⁺, Na⁺, and Ca²⁺ across the muscle fiber membrane due to repetitive stimulation, affecting the ability to generate and propagate action potentials and release calcium from the SR.
- Accumulation of Inorganic Phosphate (Pi): From ATP and CP breakdown, which can interfere with calcium release and myosin's power stroke.
- Accumulation of Lactic Acid: Lowers muscle pH, interfering with enzyme activity and calcium handling.
- Depletion of Energy Stores: Running out of ATP, CP, or glycogen.
- Central Fatigue: Fatigue originating in the nervous system, where the brain signals less effectively to the muscles.
Oxygen Debt (Excess Postexercise Oxygen Consumption - EPOC): After strenuous exercise that involves significant anaerobic activity, the body continues to consume oxygen at a higher rate than its resting level for some time during recovery. This elevated oxygen uptake is referred to as "oxygen debt repayment" or EPOC. It's the extra oxygen needed by the body to restore all physiological processes back to their pre-exercise state. This includes using the extra oxygen to:
- Replenish oxygen stores in myoglobin and blood.
- Resynthesize ATP and creatine phosphate reserves in muscle fibers.
- Convert accumulated lactic acid back into pyruvic acid (which can then enter aerobic pathways) or convert it back into glucose by the liver (Cori cycle).
- Restore normal ionic gradients across cell membranes.
- Meet the increased metabolic demands of tissues (like the heart and respiratory muscles) that remained elevated during exercise, and to deal with the elevated body temperature.
Muscle Mechanics and Types of Body Movements
Skeletal muscles produce movement by pulling on bones across joints, acting as biological levers. Understanding how muscles are attached to bones and how they coordinate their actions is fundamental to understanding body movement.
Origin and Insertion
When a skeletal muscle contracts, it shortens and generates tension. This tension is transmitted to bones via tendons, causing the bone to move around a joint. For any given muscle, there are two points of attachment to bone:
- Origin: The attachment of the muscle tendon to the bone that remains relatively stationary or less movable during a specific action. Think of this as the muscle's anchor point.
- Insertion: The attachment of the muscle tendon to the bone that moves when the muscle contracts. The insertion is pulled towards the origin during contraction.
![[Diagram clearly illustrating the concepts of muscle origin and insertion using a specific muscle (e.g., Biceps Brachii or Gastrocnemius) and showing how contraction pulls the insertion towards the origin.]](https://nursesrevisionuganda.com/wp-content/uploads/2025/07/concepts-of-muscle-origin-and-insertion-using-a-specific-muscle.jpg)
Muscle Actions and Roles (Group Function)
Skeletal muscles rarely act in isolation; they typically function in coordinated groups to produce smooth and efficient movements. Muscles in a group may play different roles during a specific movement:
- Prime Mover (Agonist): The muscle or group of muscles that has the primary responsibility for causing a specific movement. It generates the main force for the action. For example, the Brachialis muscle is the prime mover for elbow flexion.
- Antagonist: A muscle or group of muscles that opposes or reverses the action of the prime mover. Antagonists are typically located on the opposite side of the joint from the agonist. They help regulate the speed and power of the movement and prevent overstretching of the agonist. When the prime mover contracts, the antagonist usually relaxes. For elbow flexion, the Triceps Brachii is the antagonist. When extending the elbow, the Triceps becomes the agonist, and the Brachialis/Biceps become the antagonists.
- Synergist: Muscles that assist the prime mover in performing its action. They may add extra force to the movement, reduce undesirable side movements, or stabilize a joint. For example, the Biceps Brachii and Brachioradialis are synergists to the Brachialis during elbow flexion.
- Fixator: A type of synergist that specifically stabilizes the bone or origin of the prime mover. By holding the origin stable, the prime mover can act more efficiently on the insertion. For example, muscles that stabilize the scapula are fixators when the arm moves.
![[Diagram illustrating the roles of different muscles (agonist, antagonist, synergist, fixator) during a specific movement, such as elbow flexion or forearm pronation/supination.]](https://nursesrevisionuganda.com/wp-content/uploads/2025/07/roles-of-different-muscles-agonist-antagonist-synergist-fixator.jpg)
Types of Muscle Contractions:
Muscle contraction refers to the activation of myosin's cross-bridges, which can generate tension. This tension may or may not result in a change in muscle length or joint movement.
- Isotonic Contraction: The muscle length changes (it shortens or lengthens) as it generates tension, resulting in movement. The tension typically remains relatively constant during the contraction.
- Concentric Contraction: The muscle shortens while generating force (e.g., lifting a weight, flexing the elbow). The force generated by the muscle is greater than the resistance.
- Eccentric Contraction: The muscle lengthens while still generating force (e.g., slowly lowering a weight, extending the elbow while resisting). This type of contraction is often associated with delayed-onset muscle soreness. The force generated by the muscle is less than the resistance, but it controls the movement.
- Isometric Contraction: The muscle generates tension, but its overall length does not change significantly, and no visible movement occurs at the joint. This happens when the muscle is trying to move an immovable object or maintain a fixed position against gravity. The force generated by the muscle is equal to the resistance (e.g., holding a heavy weight in a fixed position, pushing against a wall). Muscle tone involves many isometric contractions.
![[Diagram illustrating isotonic (concentric and eccentric) and isometric contractions with simple examples like lifting and holding a weight.]](https://nursesrevisionuganda.com/wp-content/uploads/2025/07/isotonic-concentric-and-eccentric-and-isometric-contractions.jpg)
Common Types of Body Movements:
Describing patient mobility and physical assessment findings accurately requires using precise anatomical terms for movements that occur at joints. These movements are produced by muscles pulling on bones:
- Flexion: Decreases the angle of a joint, typically moving a body part forward from the anatomical position (e.g., bending the elbow, bending the knee, flexing the trunk forward, flexing the hip).
- Extension: Increases the angle of a joint, straightening a body part, typically moving it back towards the anatomical position (e.g., straightening the elbow, straightening the knee, extending the trunk backward). Hyperextension is extension beyond the anatomical position.
- Abduction: Movement of a limb or part *away* from the midline of the body (e.g., lifting the arm or leg out to the side). For fingers and toes, it's movement away from the midline of the hand or foot.
- Adduction: Movement of a limb or part *toward* the midline of the body (e.g., bringing the arm or leg back towards the body). For fingers and toes, it's movement toward the midline of the hand or foot.
- Rotation: The turning of a bone around its own longitudinal axis. Can be medial (internal) rotation (turning the anterior surface towards the midline) or lateral (external) rotation (turning the anterior surface away from the midline). (e.g., turning the head to look left or right, rotating the arm at the shoulder).
- Circumduction: A complex movement that combines flexion, extension, abduction, and adduction in sequence, resulting in the distal end of the limb moving in a circle while the proximal end remains relatively stable, creating a cone shape in space (e.g., circling your arm at the shoulder joint).
- Dorsiflexion: Bending the foot upwards at the ankle, bringing the toes closer to the shin (like lifting your foot off the gas pedal).
- Plantar Flexion: Bending the foot downwards at the ankle, pointing the toes away from the shin (like pressing the gas pedal or standing on tiptoes).
- Inversion: Turning the sole of the foot medially (inward).
- Eversion: Turning the sole of the foot laterally (outward).
- Supination: Rotating the forearm laterally so the palm faces anteriorly (in anatomical position) or superiorly (if the elbow is flexed, like holding a bowl of soup).
- Pronation: Rotating the forearm medially so the palm faces posteriorly (in anatomical position) or inferiorly (if the elbow is flexed).
- Opposition: The unique movement of the thumb that allows its tip to touch the tips of the other fingers on the same hand. This is crucial for grasping and manipulating objects.
![[Illustrations showing various common body movements (flexion, extension, abduction, adduction, rotation, circumduction) at different joints.]](https://nursesrevisionuganda.com/wp-content/uploads/2025/07/common-body-movements-flexion-extension-abduction.webp)
![[Illustrations showing movements of the ankle and foot (dorsiflexion, plantar flexion, inversion, eversion) and movements of the forearm/wrist (supination, pronation, opposition of the thumb).]](https://nursesrevisionuganda.com/wp-content/uploads/2025/07/common-body-movements-flexion-extension-abduction-adduction-rotation-circumduction-at-different-joints.jpg)
Major Skeletal Muscles of the Body (General Overview)
While there are over 600 skeletal muscles in the human body, nursing students need to be familiar with the location and primary actions of the major muscles, especially those relevant to physical assessment, movement, and clinical procedures like intramuscular injections. This section provides a general overview by body region. Detailed study of individual muscle origins, insertions, and specific nerve supply requires referring to anatomical charts, atlases, and models.
Muscles of the Head and Neck:
Responsible for facial expressions, chewing (mastication), swallowing, and movements of the head and neck.
- Muscles of Facial Expression: (e.g., Frontalis - raises eyebrows; Orbicularis Oculi - closes eye; Zygomaticus - elevates corner of mouth for smiling). These muscles insert into the skin rather than bone.
- Muscles of Mastication: (e.g., Masseter & Temporalis - prime movers for jaw closure, powerful for chewing).
- Sternocleidomastoid: Large muscle on the side of the neck, flexes the head (bending neck forward) and rotates the head to the opposite side.
- Trapezius (Upper Fibers): Also extends the neck.
Muscles of the Trunk:
Support and move the vertebral column, thorax, and abdomen; involved in breathing, posture, and protecting internal organs.
- Anterior/Lateral Abdomen:
- Rectus Abdominis: ("Abs" or "six-pack") Paired vertical muscles running down the midline of the anterior abdomen. Prime mover of vertebral column flexion (bending forward), also compresses abdomen.
- External Oblique: Superficial lateral abdominal muscle, fibers run diagonally downwards and medially (like putting hands in pockets). Compresses abdomen, rotates trunk to the opposite side, lateral flexion.
- Internal Oblique: Deeper lateral abdominal muscle, fibers run diagonally upwards and medially (opposite direction of external oblique). Compresses abdomen, rotates trunk to the same side, lateral flexion.
- Transversus Abdominis: The deepest abdominal muscle layer, fibers run horizontally across the abdomen. Primary function is to compress the abdomen and stabilize the core.
- Posterior Back:
- Trapezius: Large, superficial muscle covering the upper back and neck. Upper fibers elevate scapula; middle fibers retract scapula; lower fibers depress scapula. Also extends the head and neck.
- Latissimus Dorsi: Large muscle of the lower back and side. Powerful extensor, adductor, and medial rotator of the arm (important in pulling and swimming movements).
- Erector Spinae Group: Deep, powerful muscles running vertically along the spine (Iliocostalis, Longissimus, Spinalis). Prime movers of back extension, important for maintaining erect posture. Unilateral contraction causes lateral flexion.
- Rhomboids (Major and Minor): Located deep to the trapezius, retract (pull together) and elevate the scapula.
- Thorax (Breathing Muscles):
- Intercostal Muscles: Muscles located between the ribs. External intercostals lift the rib cage during inspiration. Internal intercostals depress the rib cage during forced expiration.
- Diaphragm: A large, dome-shaped muscle that forms the floor of the thoracic cavity and the roof of the abdominal cavity. It is the primary muscle of inspiration (breathing in) when it contracts and flattens.
These form the abdominal wall, providing core support and enabling trunk movement:
Arranged in layers, supporting and moving the spine and rib cage:
Involved in the mechanics of respiration:
Muscles of the Upper Limbs:
Responsible for the wide range of movements of the shoulder, arm, forearm, wrist, and hand.
- Shoulder and Arm Movement:
- Deltoid: Large, triangular muscle forming the rounded contour of the shoulder. Prime mover of arm abduction (lifting arm out to the side). Also involved in flexion, extension, and rotation of the arm. A common and preferred site for intramuscular injections in adults due to its accessibility and size.
- Pectoralis Major: Large fan-shaped muscle of the upper chest. Prime mover of arm flexion, adduction (bringing arm towards midline), and medial rotation.
- Rotator Cuff Muscles: A group of four muscles (Supraspinatus, Infraspinatus, Teres Minor, Subscapularis) and their tendons that surround and stabilize the shoulder joint. They are critical for shoulder stability and assist in rotation and abduction movements. Common site of tendinitis and tears.
- Forearm Movement (Elbow Joint):
- Biceps Brachii: Anterior arm muscle with two heads. Prime mover of elbow flexion (bending the arm). Also a powerful supinator of the forearm (turning palm up).
- Brachialis: Lies deep to the biceps. The true prime mover of elbow flexion.
- Triceps Brachii: Large posterior arm muscle with three heads. Prime mover of elbow extension (straightening the arm).
- Wrist and Hand Movement:
- Flexor Carpi muscles: (e.g., Flexor Carpi Radialis, Flexor Carpi Ulnaris) On the anterior forearm, primarily flex the wrist.
- Extensor Carpi muscles: (e.g., Extensor Carpi Radialis Longus/Brevis, Extensor Carpi Ulnaris) On the posterior forearm, primarily extend the wrist.
- Flexor Digitorum muscles: (e.g., Flexor Digitorum Superficialis, Flexor Digitorum Profundus) On the anterior forearm, primarily flex the fingers.
- Extensor Digitorum muscles: On the posterior forearm, primarily extend the fingers.
- Intrinsic Hand Muscles: Small muscles located entirely within the hand. Responsible for fine movements of the fingers, including opposition of the thumb.
Located in the upper arm, act on the elbow:
Located in the forearm, their tendons cross the wrist and hand to move the hand and fingers:
Muscles of the Lower Limbs:
Large, powerful muscles adapted for bearing weight, maintaining posture, balance, and locomotion (walking, running, jumping).
- Hip and Thigh Movement:
- Iliopsoas: (Formed by Iliacus and Psoas Major) Deep anterior hip muscle. The prime mover of hip flexion (lifting the thigh towards the trunk).
- Gluteus Maximus: The largest muscle in the body, forms the bulk of the buttock. Prime mover of hip extension (straightening the hip), especially powerful during climbing stairs, running, and standing up from sitting.
- Gluteus Medius & Minimus: Located beneath the Gluteus Maximus. Important abductors (move leg away from midline) and medial rotators of the thigh. Critically, the Gluteus Medius stabilizes the pelvis during walking, preventing the opposite side from dropping. The Gluteus Medius is a common and safer site for intramuscular injections in adults (using the ventrogluteal or dorsogluteal site, being careful to locate correctly to avoid the sciatic nerve) due to its thickness and location away from major nerves compared to the Gluteus Maximus.
- Adductor Group: Group of muscles on the medial (inner) thigh (e.g., Adductor Longus, Magnus, Brevis, Gracilis). Primarily adduct the thigh (bring leg towards midline).
- Sartorius: Longest muscle in the body, crosses the anterior thigh diagonally. Flexes, abducts, and laterally rotates the thigh, and flexes the knee ("crossing legs" muscle).
- Knee and Lower Leg Movement:
- Quadriceps Femoris Group: A large, powerful group on the anterior thigh (Rectus Femoris, Vastus Lateralis, Vastus Medialis, Vastus Intermedius). They extend the leg at the knee (straightening the knee). The Rectus Femoris also flexes the hip. The Vastus Lateralis is a common and preferred site for intramuscular injections, especially in infants and young children, due to its large size and relative safety.
- Hamstring Group: Muscles on the posterior thigh (Biceps Femoris, Semitendinosus, Semimembranosus). They flex the leg at the knee (bending the knee) and extend the thigh at the hip.
- Tibialis Anterior: Muscle on the anterior lower leg. Prime mover of dorsiflexion (lifting the foot upwards at the ankle).
- Gastrocnemius & Soleus: Muscles forming the calf (posterior lower leg). They share the common Achilles tendon and are prime movers of plantar flexion (pointing the foot downwards). Gastrocnemius also helps flex the knee.
- Fibularis (Peroneus) Group: Muscles on the lateral lower leg. Prime movers of foot eversion (turning the sole outwards) and assist in plantar flexion.
- Foot and Toe Movement:
- Extensor Digitorum Longus/Brevis: Extend the toes.
- Flexor Digitorum Longus/Brevis: Flex the toes.
- Intrinsic Foot Muscles: Small muscles within the foot that help support the arches and fine tune toe movements.
Muscles in the thigh and lower leg act on the knee and ankle:
Muscles in the lower leg and foot act on the foot and toes:
Muscle Attachments and Actions Summary:
Skeletal muscles connect to bones, usually via strong, fibrous cords called tendons. The tension generated during muscle contraction is transmitted through the tendon to the bone, causing movement at the joint. The point of attachment that moves when the muscle contracts is called the Insertion, and the relatively stable point of attachment is called the Origin. Understanding a muscle's origin and insertion helps predict the movement it will produce. Muscles act on bones like levers, with the joint serving as the fulcrum. The body primarily utilizes third-class levers, which favor speed and range of motion over brute force, allowing us to move our limbs quickly over large distances even with relatively small muscle shortening.
![[Diagrams illustrating the concept of muscle origin and insertion, and showing how muscles act on joints as levers (maybe show a simple example like the elbow joint).]](https://nursesrevisionuganda.com/wp-content/uploads/2025/07/concept-of-muscle-origin-and-insertion-and-showing-how-muscles-act-on-joints-as-levers-1.png)
Common Disorders of the Muscular System
The muscular system, particularly skeletal muscle, is vulnerable to a range of disorders resulting from injury, genetic defects, autoimmune attacks, problems with nerve supply, infection, or overuse. As nurses, you will encounter patients with these conditions, requiring knowledge of the underlying issues for proper assessment and care.
- Muscle Strains (Pulled Muscles): One of the most common muscle injuries, occurring when muscle fibers or the tendon connecting the muscle to bone are overstretched or torn. This often happens due to sudden, forceful movements, inadequate warm-up, overuse, or fatigue. Severity ranges from a mild strain (few fibers torn) to a severe tear (most fibers or tendon ruptured). Symptoms include sudden pain, tenderness, swelling, bruising, and weakness. Common sites include the hamstrings, quadriceps, calf muscles, and muscles of the back and shoulder.
- Tendinitis: Inflammation of a tendon. This is often an overuse injury caused by repetitive motions that irritate the tendon, but it can also result from sudden injury or aging. Symptoms include pain, tenderness, and swelling around the affected joint or tendon. Common examples include Achilles tendinitis (back of ankle), rotator cuff tendinitis (shoulder), patellar tendinitis ("jumper's knee"), and epicondylitis ("tennis elbow" or "golfer's elbow").
- Fibromyalgia: A chronic disorder characterized by widespread musculoskeletal pain, often described as aching, burning, or stiffness. It is accompanied by fatigue, sleep disturbances, cognitive difficulties ("fibro fog"), and often specific "tender points" in predictable locations on the body that are painful when pressed. The cause is not fully understood but is believed to involve abnormalities in how the brain and spinal cord process pain signals, leading to increased sensitivity. It is not primarily a disease of muscle inflammation.
- Muscular Dystrophy (MD): A group of inherited genetic diseases characterized by progressive weakness and degeneration (wasting, atrophy) of skeletal muscles. Different types exist, caused by mutations in genes responsible for producing essential muscle proteins. Duchenne Muscular Dystrophy (DMD) is one of the most common and severe forms, typically affecting males. It is caused by a mutation in the gene for dystrophin, a protein crucial for maintaining the structural integrity of muscle fibers. Without dystrophin, muscle fibers are easily damaged and progressively replaced by fibrous and fatty tissue, leading to severe weakness and loss of function.
- Myasthenia Gravis (MG): An autoimmune disease that affects the neuromuscular junction. In MG, the body's immune system mistakenly produces antibodies that attack and block or destroy the acetylcholine (ACh) receptors on the motor end-plate of skeletal muscle fibers. This reduces the muscle fiber's ability to respond to nerve signals. The hallmark symptom is fluctuating skeletal muscle weakness and fatigue, which worsens with activity and improves with rest. Commonly affects muscles controlling the eyes (drooping eyelids, double vision), face, swallowing, speech, and limbs.
- Amyotrophic Lateral Sclerosis (ALS) (also known as Lou Gehrig's Disease): A progressive and devastating neurodegenerative disease that specifically affects the motor neurons in the brain, brainstem, and spinal cord. As these motor neurons degenerate and die, they lose the ability to send signals to voluntary muscles. This denervation leads to progressive muscle weakness, atrophy (wasting), fasciculations (muscle twitching), stiffness (spasticity), and eventually paralysis of voluntary muscles. The muscles controlled by affected neurons can no longer be moved. It typically does not affect sensation or cognitive function initially. It is ultimately fatal as muscles needed for breathing become paralyzed.
- Compartment Syndrome: A serious and potentially limb-threatening condition resulting from increased pressure within a confined muscle compartment (a group of muscles, nerves, and blood vessels enclosed by tough fascia). This increased pressure compresses blood vessels and nerves, restricting blood flow (ischemia) to the tissues within the compartment. It causes severe pain (often disproportionate to the injury), swelling, numbness, tingling, and potentially irreversible muscle and nerve damage or tissue death (necrosis) if not rapidly treated. Can be acute (due to trauma like fracture, crush injury, or severe burn) or chronic (often exercise-induced). Acute compartment syndrome is a surgical emergency often requiring immediate fasciotomy (surgical incision into the fascia to relieve pressure).
- Hernias: While not a primary muscle disease, hernias frequently involve the muscular wall of the abdomen. They occur when there is a weakness or tear in the fascia and muscle layers, allowing part of an internal organ (most commonly a loop of intestine or fatty tissue) to protrude through the opening. Inguinal hernias (in the groin) are the most common type. Abdominal muscle weakness or increased intra-abdominal pressure (from lifting, coughing, straining) can contribute to hernia formation.
- Muscle Spasms and Cramps: Sudden, involuntary, and often painful contractions of a muscle or group of muscles. Spasms are typically less sustained than cramps. Causes are varied and can include muscle fatigue, dehydration, electrolyte imbalances (e.g., low potassium or calcium), nerve irritation, or underlying medical conditions.
- Atrophy: A decrease in the size and strength of muscle tissue. It can result from disuse (e.g., immobilization in a cast, prolonged bed rest, sedentary lifestyle), malnutrition, nerve damage (denervation atrophy, as seen in ALS or spinal cord injuries), or certain chronic diseases.
- Contractures: A permanent shortening of a muscle or other soft tissue (tendons, ligaments, joint capsule) around a joint. This leads to a deformity and significant limitation in the joint's range of motion. Contractures often develop as a complication of prolonged immobilization, spasticity (e.g., after a stroke or spinal cord injury), burns, or nerve damage. Prevention often involves regular stretching and passive range of motion exercises.
- Polymyositis and Dermatomyositis: Inflammatory muscle diseases (myopathies) characterized by chronic muscle inflammation, weakness, and sometimes skin rash (dermatomyositis). They are considered autoimmune conditions.
As nurses, your role in caring for patients with musculoskeletal disorders is extensive. This includes conducting thorough physical assessments (checking range of motion, muscle strength, presence of pain, swelling, deformities, skin integrity over bony prominences), administering medications (pain relief, anti-inflammatories, immunosuppressants, antibiotics, intramuscular injections - requiring accurate site selection like the vastus lateralis or deltoid), assisting with mobility and transfers, providing education on exercise, body mechanics, and disease management, monitoring for complications (like compartment syndrome, deep vein thrombosis, contractures), and ensuring patient safety. A solid understanding of muscle anatomy and physiology is foundational to this care.
![[Images illustrating common muscular disorders: muscle strain, tendinitis, muscular dystrophy (showing muscle wasting), myasthenia gravis (e.g., drooping eyelid), diagram of compartment syndrome, image of an inguinal hernia.]](https://nursesrevisionuganda.com/wp-content/uploads/2025/07/common-muscular-disorders.jpg)
Revision Questions: Muscular System
Test your understanding of the key concepts covered in the Muscular System section:
- Identify the three distinct types of muscle tissue found in the human body. For each type, describe its key structural features, location(s), mode of control (voluntary/involuntary), and primary function(s).
- Explain the hierarchical organization of a skeletal muscle, starting from the entire muscle organ down to the myofilaments. Describe the role of the connective tissue coverings (epimysium, perimysium, endomysium).
- Describe the key components of a skeletal muscle fiber (cell), including the sarcolemma, sarcoplasm, myofibrils, sarcoplasmic reticulum (SR), and T-tubules. Explain the function of the SR and T-tubules in muscle contraction.
- Explain the structure and composition of thick (myosin) and thin (actin, tropomyosin, troponin) filaments. How do the regulatory proteins (tropomyosin and troponin) control the interaction between actin and myosin in a relaxed muscle?
- Describe the structure of a sarcomere, identifying the A-band, I-band, H-zone, M-line, and Z-discs. Explain how the appearance of these regions changes during muscle contraction according to the Sliding Filament Theory.
- Explain the structure of the Neuromuscular Junction (NMJ), identifying the axon terminal, synaptic cleft, and motor end-plate. Describe the role of Acetylcholine (ACh) and Acetylcholinesterase (AChE) at the NMJ.
- Outline the step-by-step process of neuromuscular transmission, starting from the arrival of an action potential at the motor neuron terminal and ending with the generation of an action potential in the muscle fiber (excitation).
- Explain the Sliding Filament Theory of muscle contraction. Describe the key events of the cross-bridge cycle (attachment, power stroke, detachment, re-cocking) and explain how this cycle causes the sarcomere to shorten.
- What role do calcium ions (Ca²⁺) play in initiating and regulating muscle contraction? Where are these calcium ions stored in a muscle fiber, and how are they released?
- Describe the process of muscle relaxation, explaining how the calcium signal is removed and how this leads to the thin filaments sliding back to their original position.
- Muscle contraction requires ATP. Name and briefly describe the three main metabolic pathways that muscle fibers use to regenerate ATP. For each pathway, state its speed, duration supported, and whether it requires oxygen.
- Explain the concepts of Muscle Fatigue and Oxygen Debt (EPOC). What are some potential contributing factors to muscle fatigue? Why do we continue to breathe heavily after strenuous exercise?
- Explain the concept of a Motor Unit and how the size of a motor unit relates to the function of a muscle. How is the force of muscle contraction increased?
- Explain the difference between a muscle's Origin and Insertion. Using an example muscle (e.g., Biceps Brachii or Quadriceps), identify its origin and insertion and explain how its contraction produces movement.
- Describe the roles of muscles working in a group during a specific movement: Prime Mover (Agonist), Antagonist, Synergist, and Fixator. Provide an example illustrating these roles.
- Explain the difference between Isotonic (Concentric and Eccentric) and Isometric muscle contractions. Give a practical example of each type of contraction.
- Define and give an example of five different types of body movements that occur at joints (e.g., flexion, abduction, rotation, dorsiflexion, supination).
- Identify and state the general action of two major muscles in each of the following regions: Head/Neck, Anterior Abdominal Wall, Back, Upper Limb, and Lower Limb.
- Describe three common disorders affecting the muscular system, explaining the underlying problem and major symptoms for each (e.g., Muscle Strain, Muscular Dystrophy, Myasthenia Gravis, ALS, Fibromyalgia).
- As a nurse, why is it important to understand the anatomy and physiology of the muscular system? Give examples of nursing activities that require this knowledge.
References for BNS 111: Anatomy & Physiology
These references cover the topics discussed in BNS 111, including the Muscular System.
- Tortora, G.J. & Derickson N.,P. (2006) Principles of Anatomy and Physiology; Harper and Row
- Drake, R, et al. (2007). Gray's Anatomy for Students. London: Churchill Publishers
- Snell, SR. (2004) Clinical Anatomy by Regions. Philadelphia: Lippincott Publishers
- Marieb, E.N. (2004). Human Anatomy and physiology. London: Daryl Fox Publishers.
- Young, B, et al. (2006). Wheater's Functional Histology: A Text and Colour Atlas: Churchill
- Sadler, TW. (2009). Langman's Medical Embryology. Philadelphia: Lippincott Publishers
Muscular System BNS Read More »