Epistaxis(Nose Bleed)
This is bleeding from the nostrils/Nasal bleeding which may be arterial venous, or capillary
Epistaxis, commonly known as a nosebleed, is defined as hemorrhage from the nasal cavity.
More precisely, it refers to bleeding from the blood vessels lining the inside of the nose. This bleeding can range from a minor ooze to a severe gush, and can originate from either the anterior (front) or posterior (back) parts of the nasal cavity.
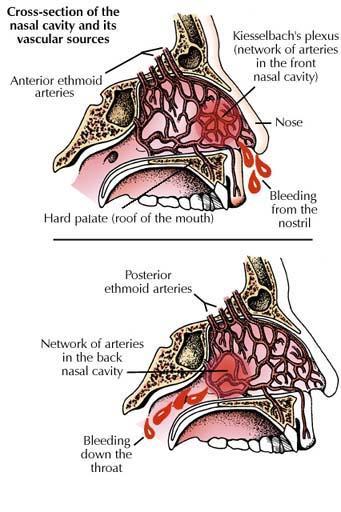
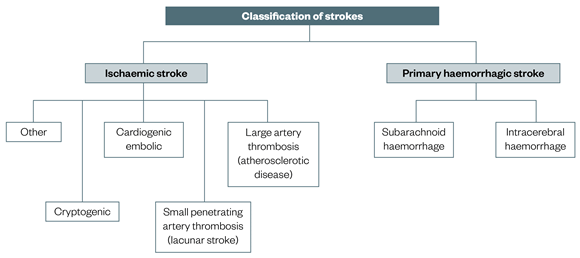
Epistaxis is broadly classified into two main types based on the anatomical location of the bleeding source: anterior epistaxis and posterior epistaxis.
- Location: This is the most common type of nosebleed, accounting for approximately 90-95% of all cases. It originates from the anterior (front) part of the nasal septum.
- Vascular Source: The primary source of bleeding in anterior epistaxis is usually Kiesselbach's Plexus (also known as Little's Area). This is a highly vascularized area located on the anteroinferior part of the nasal septum, where several arteries converge:
- Anterior ethmoidal artery
- Posterior ethmoidal artery
- Sphenopalatine artery
- Greater palatine artery
- Superior labial artery
- Characteristics:
- Commonality: Very common, especially in children and young adults.
- Severity: Usually less severe and easier to control.
- Bleeding Pattern: Typically presents as a steady ooze or slow trickle of blood, often from one nostril.
- Visibility: The bleeding site is often visible upon anterior rhinoscopy.
- Management: Due to its accessibility and generally less severe nature, anterior epistaxis is often manageable with simple first aid measures and local treatments.
- Location: This type of nosebleed originates from the posterior (back) part of the nasal cavity, specifically from blood vessels located deeper within the nose, often closer to the throat.
- Vascular Source: The main blood supply for posterior epistaxis typically comes from branches of the sphenopalatine artery and, less commonly, the ascending pharyngeal artery. These vessels are larger and less accessible than those in Kiesselbach's plexus.
- Characteristics:
- Commonality: Less common than anterior epistaxis, accounting for about 5-10% of cases. More prevalent in older adults.
- Severity: Tends to be more severe, profuse, and difficult to control.
- Bleeding Pattern: Blood often flows profusely backward into the throat (even if also flowing out the anterior nares), causing gagging, coughing, or spitting of blood. It can also flow out of both nostrils.
- Visibility: The bleeding site is usually not visible with routine anterior rhinoscopy and often requires specialized equipment (e.g., endoscope) for visualization.
- Management: Posterior epistaxis often requires medical intervention, such as posterior nasal packing or surgical procedures, due to its severity and inaccessible location.
| Feature | Anterior Epistaxis | Posterior Epistaxis |
|---|---|---|
| Location | Anterior nasal septum (Kiesselbach's Plexus) | Posterior and superior nasal cavity |
| Vascular Source | Kiesselbach's Plexus (ethmoidal, sphenopalatine, etc.) | Sphenopalatine artery branches, ascending pharyngeal artery |
| Frequency | ~90-95% of cases | ~5-10% of cases |
| Age Group | Children, young adults | Older adults |
| Severity | Less severe, usually self-limiting | More severe, often profuse, difficult to control |
| Bleeding Pattern | Ooze/trickle from one nostril | Profuse, often flows into throat (and/or both nostrils) |
| Visibility | Often visible | Usually not visible on routine exam |
| Management | Simple first aid, local measures | Medical intervention (packing, surgery) |
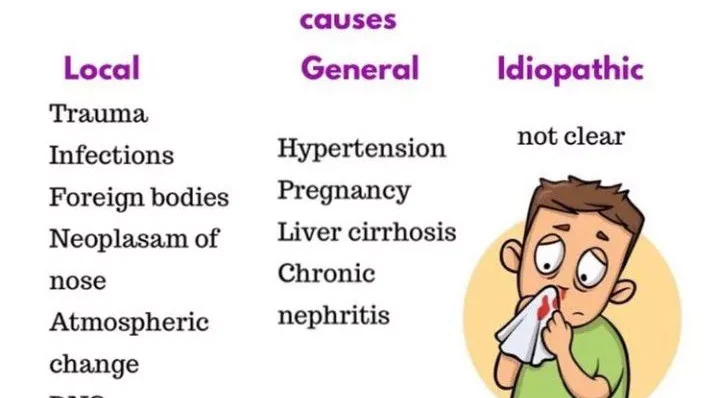
Epistaxis can result from a wide range of local and systemic factors, acting alone or in combination.
- Trauma (Most Common Cause):
- Nose Picking: Especially common in children, causing direct injury to Kiesselbach's plexus.
- Forceful Nose Blowing: Can rupture superficial blood vessels.
- Foreign Bodies: Objects inserted into the nose (common in children).
- Facial/Nasal Trauma: Fractures of the nose or face.
- Surgery: Nasal or sinus surgery (e.g., septoplasty, turbinectomy).
- Barotrauma: Rapid changes in atmospheric pressure (e.g., diving, flying).
- Inflammation and Infection:
- Rhinitis: Allergic or non-allergic rhinitis can cause irritation and inflammation of the nasal mucosa.
- Sinusitis: Inflammation of the sinuses can affect adjacent nasal mucosa.
- Upper Respiratory Tract Infections (URTIs): Colds, flu, leading to inflammation, congestion, and forceful blowing.
- Vestibulitis: Bacterial infection of the nasal vestibule.
- Irritation/Environmental Factors:
- Dry Air/Low Humidity: Especially in cold climates or heated indoor environments, causing drying, cracking, and crusting of the nasal mucosa.
- Chemical Irritants: Exposure to fumes or chemicals.
- Irritant Sprays: Overuse of nasal decongestant sprays (which can also cause rhinitis medicamentosa).
- Structural Abnormalities:
- Deviated Nasal Septum: Can lead to turbulent airflow, drying, and crusting on the convex side.
- Nasal Polyps: Though rarely bleeding directly, can be associated with inflammation.
- Perforated Septum: Can lead to drying and crusting around the perforation site.
- Tumors (Rare but serious):
- Benign: Angiofibroma (common in adolescent males, often presents with severe epistaxis), hemangioma, inverted papilloma.
- Malignant: Carcinomas of the nose or paranasal sinuses.
- Coagulopathies (Bleeding Disorders):
- Inherited: Hemophilia, von Willebrand disease, platelet function disorders.
- Acquired:
- Anticoagulant Medications: Warfarin, heparin, direct oral anticoagulants (DOACs like rivaroxaban, apixaban).
- Antiplatelet Medications: Aspirin, clopidogrel, ticagrelor.
- Liver Disease: Impaired synthesis of clotting factors.
- Kidney Failure (Uremia): Platelet dysfunction.
- Thrombocytopenia: Low platelet count (e.g., due to chemotherapy, ITP).
- Disseminated Intravascular Coagulation (DIC).
- Vascular Disorders:
- Hereditary Hemorrhagic Telangiectasia (HHT) / Osler-Weber-Rendu Syndrome: An inherited disorder causing fragile blood vessels (telangiectasias) in the nose, GI tract, and other organs, leading to recurrent, often severe, bleeding.
- Atherosclerosis: Can affect the integrity of nasal blood vessels, particularly in older individuals.
- Hypertension (High Blood Pressure):
- While not a direct cause of epistaxis, poorly controlled hypertension can significantly aggravate existing nosebleeds by increasing hydrostatic pressure within the fragile nasal vasculature, making them harder to stop and more profuse. Severe epistaxis can also cause a transient rise in blood pressure due to anxiety.
- Infections:
- Systemic Viral Infections: Some severe viral infections can cause platelet dysfunction or vasculitis.
- Granulomatous Diseases: Such as Wegener's granulomatosis, sarcoidosis (can cause inflammation and vessel fragility).
- Nutritional Deficiencies:
- Vitamin C deficiency (Scurvy): Impairs collagen synthesis, leading to fragile capillaries.
- Vitamin K deficiency: Impairs synthesis of clotting factors.
- Alcohol Abuse:
- Can lead to liver dysfunction (impaired clotting factor production) and direct vasodilatation, increasing the risk of bleeding.
- Medications (other than anticoagulants/antiplatelets):
- Nasal Steroid Sprays: Can sometimes cause local irritation and drying if improperly used or overused, particularly in the anterior septum.
- Illicit Drugs: Cocaine use, especially intranasal, causes vasoconstriction followed by rebound vasodilation and severe mucosal damage, often leading to septal perforations and recurrent epistaxis.
In a significant number of cases, particularly with anterior epistaxis, no clear cause can be identified despite thorough investigation. These are termed "idiopathic."
The pathophysiology of epistaxis primarily revolves around the unique vascular anatomy of the nasal cavity and the mechanisms that disrupt the integrity of these blood vessels, leading to hemorrhage.
The nasal mucosa is exceptionally vascular, supplied by a rich network of arteries originating from both the internal and external carotid artery systems. These vessels anastomose (connect) extensively.
- External Carotid Artery Branches:
- Sphenopalatine Artery: The major blood supply to the lateral nasal wall and posterior septum. Its branches are a common source of posterior epistaxis.
- Greater Palatine Artery: Supplies the hard palate and contributes to the posterior-inferior septum.
- Superior Labial Artery: A branch of the facial artery, contributes to the anterior septum.
- Internal Carotid Artery Branches:
- Anterior Ethmoidal Artery: Supplies the anterior-superior septum and lateral wall.
- Posterior Ethmoidal Artery: Supplies the posterior-superior septum and lateral wall.
These arteries converge in specific areas, creating highly vascular plexuses that are particularly prone to bleeding:
- Kiesselbach's Plexus (Little's Area): This is the most common site for anterior epistaxis. Located on the anterior-inferior part of the nasal septum, it's a superficial network of vessels formed by anastomoses of the anterior ethmoidal artery, sphenopalatine artery, greater palatine artery, and superior labial artery. Its superficial location and exposure to trauma make it highly vulnerable.
- Woodruff's Plexus: Located on the posterior-lateral wall of the inferior meatus, this area is fed predominantly by branches of the sphenopalatine artery. It is a common site for posterior epistaxis.
Epistaxis occurs when the delicate lining of the nasal mucosa, and the underlying blood vessels, are damaged or become excessively fragile, allowing blood to escape into the nasal cavity. The primary mechanisms include:
- Trauma:
- Direct Mechanical Injury: Physical forces (e.g., nose picking, forceful blowing, foreign bodies, facial trauma) directly shear or rupture the superficial blood vessels, especially in Kiesselbach's plexus. The fragile nature of these vessels, particularly venules and capillaries, makes them susceptible.
- Mucosal Desiccation: Dry air, often exacerbated by low humidity or heating, causes the nasal mucosa to dry out, become brittle, crack, and crust. When these crusts are dislodged (e.g., by picking or blowing), they tear the underlying fragile vessels, initiating bleeding.
- Inflammation:
- Vasodilation and Increased Permeability: Inflammatory processes (e.g., rhinitis, sinusitis, URTI) cause local vasodilation and increased vascular permeability. This makes the blood vessels engorged, more fragile, and prone to rupture, especially with minor trauma or increased pressure.
- Mucosal Edema and Friability: Inflamed mucosa becomes edematous and friable, further increasing its susceptibility to bleeding.
- Systemic Factors Affecting Hemostasis:
- Coagulopathies: Conditions that impair any part of the clotting cascade (e.g., deficiency in clotting factors, platelet dysfunction or thrombocytopenia) directly compromise the body's ability to form a stable clot at a site of vascular injury. This results in prolonged and more severe bleeding, even from minor vessel damage.
- Anticoagulant/Antiplatelet Medications: These drugs interfere with the coagulation cascade or platelet aggregation, respectively, making blood thinner and increasing the likelihood and duration of bleeding episodes.
- Hypertension (Aggravation, not direct cause): While not directly causing vessel rupture, elevated systemic blood pressure increases the hydrostatic pressure within the nasal capillaries and arterioles. When a vessel is already damaged or fragile, this increased pressure can prevent clot formation, dislodge a forming clot, or make the bleeding more profuse and harder to stop.
- Vascular Fragility: Conditions like Hereditary Hemorrhagic Telangiectasia (HHT) involve structurally abnormal and fragile blood vessels (telangiectasias) that lack the normal muscular and elastic tissue, making them extremely prone to spontaneous bleeding.
- Structural Abnormalities:
- A deviated nasal septum can alter airflow dynamics, leading to localized drying and crusting on the convex side, making the mucosa and vessels more prone to damage.
The clinical manifestations of epistaxis can vary depending on the type (anterior vs. posterior), severity, and duration of the bleed.
- Visible Blood Flow:
- From the Nostrils (Anteriorly): This is the most obvious sign. Blood typically flows out of one or both nostrils. In anterior epistaxis, it's often a steady trickle or ooze.
- Into the Throat (Posteriorly): In posterior epistaxis, blood often flows backward into the nasopharynx and is then swallowed, coughed up, or spit out. Patients may complain of a "trickle" down the back of their throat, or of spitting up blood. This can lead to nausea and vomiting of swallowed blood (hematemesis).
- From Both Nostrils: Can occur with severe anterior bleeds that overcome the nasal septum's midline, or more commonly with posterior bleeds where blood fills the nasal cavity and exits both anteriorly and posteriorly.
- Blood-Stained Sputum or Vomitus: Due to swallowed blood, especially in posterior bleeds.
- Gagging/Choking Sensation: From blood flowing down the throat.
- Anxiety/Fear: Patients, especially children, can become very anxious and frightened by the sight and sensation of blood.
- Nausea/Vomiting: Swallowed blood is irritating to the stomach lining and can induce nausea and vomiting.
- Dizziness/Lightheadedness: With significant blood loss, especially if rapid.
- Weakness/Fatigue: Also associated with substantial blood loss.
- Palpitations/Tachycardia: The body's compensatory response to hypovolemia (reduced blood volume) if bleeding is severe.
- Hypotension: A sign of significant blood loss and impending shock in severe cases.
- Pallor: Pale skin, especially visible in the mucous membranes, indicating anemia from blood loss.
- Thirst: A symptom of hypovolemia.
- Nasal Congestion/Fullness: A sensation that the nasal passages are blocked, particularly if clots form.
- Headache (less common but possible): Could be related to the underlying cause (e.g., severe hypertension) or associated with anxiety.
- Bleeding primarily from one nostril, often visible.
- Usually stops with direct pressure.
- Generally less profuse.
- More commonly bilateral anterior bleeding, or primarily bleeding into the pharynx (swallowing blood, spitting up blood).
- Often profuse and may not stop with direct anterior pressure.
- More likely to cause systemic symptoms due to greater blood loss.
- More common in older individuals, especially those with hypertension or on anticoagulants.
Observing other symptoms or reviewing patient history can provide clues to the cause:
- Recent trauma: Nose picking, injury, surgery.
- Recent URTI or allergies: Sneezing, nasal discharge, congestion.
- Medication use: Anticoagulants, antiplatelets, nasal sprays.
- Medical history: Hypertension, liver disease, bleeding disorders.
- Recurrent, spontaneous bleeds: Suggests underlying systemic issues (e.g., HHT, coagulopathy).
- Visible telangiectasias: In the nasal mucosa or on skin, suggesting HHT.
Diagnosing epistaxis primarily involves identifying the bleeding site, assessing the severity of blood loss, and investigating any underlying local or systemic causes. This typically involves a combination of thorough history taking, physical examination, and, when indicated, laboratory or imaging studies.
A detailed history is crucial and should cover:
- Onset and Duration: When did the bleeding start? How long has it been bleeding? Is it continuous or intermittent?
- Severity: How much blood has been lost (estimated)? Is it a trickle or a gush?
- Unilateral or Bilateral: Which nostril is bleeding? Is it coming from both? Is blood flowing down the throat?
- Prior Episodes: History of previous nosebleeds, their frequency, severity, and how they were managed.
- Precipitating Factors:
- Trauma: Nose picking, injury, foreign body insertion, recent surgery.
- Environmental: Dry air, recent air travel.
- Recent Illness: Colds, flu, allergies.
- Medications: Anticoagulants (warfarin, DOACs), antiplatelets (aspirin, clopidogrel), NSAIDs, nasal sprays (steroids, decongestants), herbal supplements.
- Associated Symptoms: Dizziness, lightheadedness, weakness, nausea, vomiting of blood, headache, vision changes.
- Past Medical History:
- Bleeding Disorders: Hemophilia, von Willebrand disease, liver disease, kidney disease.
- Hypertension: Is it controlled?
- Vascular Abnormalities: Hereditary Hemorrhagic Telangiectasia (HHT).
- Other relevant conditions: Diabetes, recent infections.
- Social History: Alcohol use, recreational drug use (especially intranasal cocaine).
- Family History: History of bleeding disorders in the family.
The physical examination aims to locate the bleeding site, assess blood loss, and identify any local abnormalities.
- General Assessment:
- Vital Signs: Blood pressure, heart rate, respiratory rate, oxygen saturation. (Crucial for assessing hemodynamic stability and severity of blood loss).
- Level of Consciousness: Assess for signs of hypovolemia.
- Skin/Mucous Membranes: Check for pallor, signs of dehydration.
- Evidence of Bleeding: Note any external bleeding, blood-stained clothes.
- Nasal Examination (Rhinoscopy):
- Equipment: Headlight or head mirror, nasal speculum, suction, good lighting.
- Initial Step: Gently clear clots from the nose (patient may be asked to blow gently or suction can be used).
- Anterior Rhinoscopy: Carefully inspect the anterior nasal septum (Kiesselbach's plexus) and lateral nasal wall for visible bleeding sites, engorged vessels, erosions, crusting, or foreign bodies.
- Posterior Inspection: If anterior bleeding is controlled but still suspected, or if blood is flowing into the pharynx, inspect the oropharynx for blood trickling down the posterior pharyngeal wall.
- Note: If bleeding is profuse, initial attempts at localization might be challenging. Control of the bleeding often precedes a definitive diagnosis of the exact site.
- Other Relevant Examinations:
- Oral Cavity/Oropharynx: To assess for swallowed blood, gag reflex.
- Skin/Mucosa: Check for petechiae, ecchymoses, telangiectasias (especially with suspected bleeding disorders or HHT).
Laboratory tests are generally not needed for minor, easily controlled anterior epistaxis. They are indicated for severe, recurrent, or persistent bleeding, or when an underlying systemic cause is suspected.
- Complete Blood Count (CBC):
- Hemoglobin and Hematocrit: To assess for anemia due to significant blood loss.
- Platelet Count: To detect thrombocytopenia.
- Coagulation Profile:
- Prothrombin Time (PT) and International Normalized Ratio (INR): Essential for patients on warfarin or suspected liver disease.
- Activated Partial Thromboplastin Time (aPTT): To assess intrinsic and common pathways (e.g., heparin, hemophilia).
- Bleeding Time: (Less commonly used now, often replaced by platelet function tests) to assess platelet function.
- Blood Type and Cross-Match: For severe bleeding with potential for transfusion.
- Liver Function Tests (LFTs) and Renal Function Tests (RFTs): If liver or kidney disease is suspected as an underlying cause.
- Von Willebrand Factor Antigen/Activity: If von Willebrand disease is suspected.
- Computed Tomography (CT) Scan of the Sinuses:
- Indicated if a tumor, foreign body, severe sinusitis, or bony anomaly is suspected as the cause of recurrent or intractable epistaxis.
- Angiography:
- May be performed in cases of severe, refractory posterior epistaxis to precisely locate the bleeding vessel for embolization (a treatment).
The management of epistaxis focuses on two main goals: stopping the acute bleeding and preventing recurrence. The approach varies depending on the severity, location (anterior vs. posterior), and underlying cause of the nosebleed.
These are steps that can often be performed by the patient or a layperson:
- Stay Calm: Reassure the patient, especially children, as anxiety can raise blood pressure and worsen bleeding.
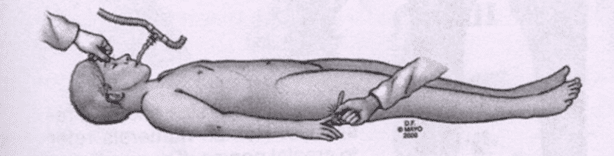
- Positioning: Sit upright, lean slightly forward. This prevents blood from flowing down the throat (which can cause nausea, vomiting, or airway compromise) and reduces venous pressure in the nose.
- Apply Direct Pressure: Firmly pinch the soft part of the nose (just above the nostrils, below the bony bridge) between the thumb and forefinger for 10-15 consecutive minutes, without releasing pressure to check.
- Breathe through Mouth:
- Apply Cold Compress: Place a cold compress or ice pack on the bridge of the nose, forehead, or back of the neck. This can cause vasoconstriction and help slow bleeding.
- Avoid: Lying flat, tilting the head back, sniffing or blowing the nose vigorously (can dislodge clots), or stuffing the nose with tissue (can cause further trauma).
- Seek Medical Attention: If bleeding persists after 15-20 minutes of direct pressure, or if bleeding is severe, rapid, or associated with other concerning symptoms (e.g., dizziness, weakness).
If bleeding persists, pharmacological treatment is required.
- If the cause is a foreign body, it is removed if visible using forceps and antibiotics are given.
- Pack the nose with a piece of gauze soaked with adrenaline or vitamin K or TEO using forceps to stop bleeding. It is can be left in position for 24-48 hours.
- Cauterization with electrical cautery or diathermy machine to seal off the bleeders can be done in theatre
- Ligaturing of the bleeding blood vessels can also be done
- Pressure can also be inserted on the bleeding area in the nose by inflating a special balloon which is inserted in the nose.
- In severe bleeding, the patient is resuscitate with IV Fluids like normal saline or given oral fluids to prevent to prevent shock and dehydration.
- Blood transfusion may also be considered depending on the lost blood after doing Hb, grouping and cross-matching.
If first aid fails, or for more severe bleeds, medical intervention is required.
- Airway, Breathing, Circulation (ABC) Assessment: For severe bleeds, ensure the patient is hemodynamically stable. Administer IV fluids or blood products if significant blood loss has occurred.
- Locate Bleeding Site: As discussed in diagnostics, clear clots and use a nasal speculum and light source to identify the source.
- Topical Vasoconstrictors:
- Application: Apply cotton pledgets soaked in a vasoconstrictor (e.g., oxymetazoline, phenylephrine) with a local anesthetic (e.g., lidocaine) directly to the bleeding site. This helps to reduce blood flow and anesthetize the area for further intervention.
- Cauterization:
- Chemical Cautery: Using silver nitrate sticks to burn (cauterize) the small, identified bleeding vessel. This is effective for anterior bleeds. Requires careful application to avoid septal perforation.
- Electrical (Electrocautery): Using an electrocautery device to seal the bleeding vessel. More effective for larger vessels or when chemical cautery fails. Requires local anesthesia.
- Nasal Packing:
- Purpose: Applies direct pressure to the bleeding site when cautery is not feasible or fails, or when the exact source isn't localized.
- Anterior Packing:
- Material: Absorbable (e.g., dissolvable sponges, oxidized cellulose) or non-absorbable (e.g., gauze strips coated with antibiotic ointment, nasal balloons/sponges like Merocel, Rapid Rhino).
- Procedure: Carefully insert the packing material to fill the nasal cavity and apply sustained pressure. Non-absorbable packs typically remain in place for 24-72 hours and require antibiotic prophylaxis to prevent toxic shock syndrome.
- Posterior Packing:
- Indication: For severe posterior epistaxis that cannot be controlled by anterior packing.
- Material: Larger balloons (e.g., Foley catheter, specialized nasal balloons) that inflate in the nasopharynx to provide posterior pressure, often combined with anterior packing.
- Risks: Can be uncomfortable, carries risks of airway obstruction, pressure necrosis, and often requires hospitalization and continuous monitoring.
- Medication Adjustment:
- Anticoagulants/Antiplatelets: Discuss with the prescribing physician about temporarily discontinuing or adjusting the dose, weighing the risk of bleeding against the risk of thrombosis. Reversal agents (e.g., Vitamin K for warfarin) may be considered in severe cases.
- Hypertension Management: Optimize blood pressure control, as high BP can exacerbate bleeding.
When medical interventions fail or for specific underlying causes:
- Ligation of Blood Vessels:
- Endoscopic Sphenopalatine Artery Ligation: A highly effective and minimally invasive procedure for posterior epistaxis. The sphenopalatine artery (and its branches) is identified endoscopically and ligated (tied off) or clipped.
- External Carotid Artery Ligation: Reserved for very severe cases when sphenopalatine ligation fails or is not feasible. Involves an incision in the neck.
- Ethmoidal Artery Ligation: For bleeding from the ethmoidal arteries (usually anterior-superior bleeds), accessed through an external incision.
- Septal Surgery:
- Septoplasty: To correct a deviated nasal septum that may be contributing to recurrent epistaxis by altering airflow or exposing mucosa to trauma.
- Repair of Septal Perforation: If a perforation is the cause.
- Embolization:
- Procedure: Radiologists use angiography to identify the bleeding vessel (usually a branch of the external carotid artery system) and then inject particles to block (embolize) the vessel.
- Indication: For severe, intractable posterior epistaxis, especially if other methods fail or if the patient is not a surgical candidate.
- Avoid Trauma:
- Discourage nose picking. Keep fingernails short.
- Gentle nose blowing.
- Moisturize Nasal Passages:
- Saline Nasal Sprays/Gels: Use regularly to keep mucosa moist.
- Humidifiers: Especially in dry environments or during winter.
- Petroleum Jelly/Antibiotic Ointment: Apply a small amount to the anterior septum to moisturize and protect.
- Manage Underlying Conditions:
- Control Hypertension: Ensure blood pressure is well-managed.
- Optimize Coagulation: Carefully manage anticoagulant/antiplatelet therapy under medical supervision.
- Treat Rhinitis/Sinusitis: Address allergic or infectious causes of nasal inflammation.
- Address HHT: Specialized management for telangiectasias.
- Avoid Irritants:
- Limit exposure to chemical fumes or excessive dry air.
- Avoid overuse of nasal decongestant sprays.
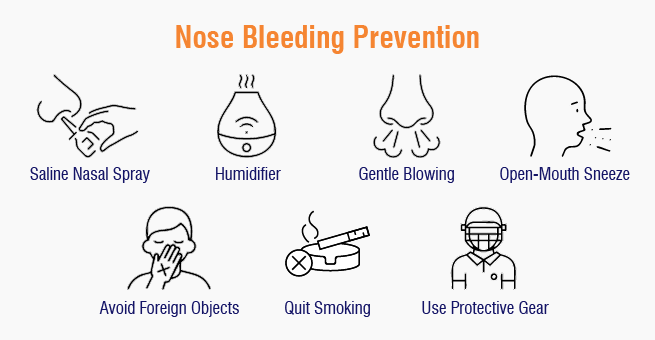
Preventing epistaxis involves addressing both local nasal factors and underlying systemic conditions that contribute to bleeding. The goal is to maintain nasal mucosal integrity, avoid trauma, and optimize the body's hemostatic mechanisms.
- Nasal Moisturization:
- Saline Nasal Sprays/Gels: Regular use (2-4 times daily) helps keep the nasal mucosa hydrated, preventing dryness, cracking, and crusting.
- Humidifiers: Use a humidifier, especially in bedrooms, during dry seasons or in arid climates. This adds moisture to the air, reducing mucosal desiccation.
- Petroleum Jelly or Antibiotic Ointment: Applying a small amount of petroleum jelly (e.g., Vaseline) or an antibiotic ointment (e.g., bacitracin, mupirocin) to the anterior nasal septum (Kiesselbach's area) twice daily can moisturize, protect the delicate mucosa, and reduce crusting.
- Avoid Nasal Trauma:
- No Nose Picking: This is a major cause of anterior epistaxis, particularly in children. Keep fingernails trimmed short.
- Gentle Nose Blowing: Advise patients to blow their nose gently, one nostril at a time, rather than forcefully clearing both simultaneously.
- Careful Foreign Body Removal: If a foreign body is suspected, seek medical attention rather than attempting removal at home, which can cause further trauma.
- Protective Gear: In contact sports or activities with a risk of facial injury, use appropriate protective gear.
- Address Environmental Factors:
- Avoid Overly Dry Environments: If possible, minimize exposure to extremely dry, hot, or cold air.
- Minimize Irritant Exposure: Reduce exposure to chemical fumes, dust, and other nasal irritants.
- Proper Use of Nasal Medications:
- Nasal Steroid Sprays: Ensure proper technique to avoid direct impingement on the nasal septum (aim slightly away from the septum). If irritation or dryness occurs, discuss with a healthcare provider about alternative formulations or strategies (e.g., using a saline rinse beforehand).
- Decongestant Sprays: Advise against prolonged use (>3-5 days) to prevent rhinitis medicamentosa, which causes rebound congestion and mucosal irritation.
- Manage Underlying Medical Conditions:
- Hypertension Control: For patients with hypertension, strict adherence to antihypertensive medication and regular monitoring of blood pressure is critical. Well-controlled blood pressure reduces the risk of recurrent and severe bleeds.
- Coagulopathy Management:
- Anticoagulant/Antiplatelet Therapy: Patients on these medications should have their dosages regularly reviewed by their prescribing physician to ensure the lowest effective dose is used, balancing the risk of thrombosis against the risk of bleeding. Close monitoring of INR (for warfarin) or platelet function is essential. Patients should be educated on signs of bleeding and when to seek medical attention.
- Bleeding Disorders: Patients with inherited or acquired bleeding disorders require specialized management by a hematologist, which may include prophylactic factor replacement, desmopressin, or other targeted therapies.
- Liver/Kidney Disease: Optimal management of these conditions is important to mitigate their impact on hemostasis.
- Hereditary Hemorrhagic Telangiectasia (HHT): Management often involves dedicated HHT clinics, which may employ strategies like humidification, nasal emollients, topical estrogems, and sometimes laser photocoagulation or septal dermoplasty for severe cases.
- Avoid Alcohol and Illicit Drugs:
- Alcohol: Can impair liver function (affecting clotting factors) and cause vasodilation, increasing bleeding risk.
- Intranasal Drug Use (e.g., cocaine): Causes severe vasoconstriction, followed by rebound vasodilation and mucosal necrosis, leading to septal perforations and recurrent, often severe, epistaxis. Complete cessation is crucial.
- Nutrition and Hydration:
- Adequate Hydration: Maintaining good overall hydration can contribute to healthy mucous membranes.
- Balanced Diet: Ensure adequate intake of vitamins and minerals, particularly Vitamin C and K, which are important for vascular integrity and clotting factor synthesis.
- Recognition of Warning Signs: Educate patients on identifying early signs of a nosebleed and when to initiate first aid.
- When to Seek Medical Attention: Clearly communicate when a nosebleed warrants a visit to the doctor or emergency room (e.g., persistent bleeding despite first aid, very heavy bleeding, associated dizziness/weakness, recurrence, use of blood thinners).
- Compliance with Treatment: Emphasize the importance of adhering to prescribed medications and follow-up appointments, especially for chronic conditions.
When a patient presents with epistaxis, nurses play a vital role in assessment, immediate management, education, and support. This involves identifying relevant nursing diagnoses and planning appropriate interventions.
Related to blood or clots in the nasopharynx/oropharynx.
| Intervention | Rationale |
|---|---|
| Maintain patient in an upright, leaning-forward position during active bleeding. | Prevents blood from flowing into the throat/airway. |
| Encourage gentle spitting of blood rather than swallowing. | Reduces risk of nausea/vomiting and aspiration. |
| Provide emesis basin and tissues. | Facilitates spitting and hygiene. |
| Monitor for signs of aspiration (e.g., coughing, choking, difficulty breathing). | Early detection of airway compromise. |
| If packing is present, ensure it is secure and not causing posterior displacement that could obstruct the airway. | Prevents mechanical airway obstruction. |
| Have suction equipment readily available, especially for posterior bleeds or patients with altered consciousness. | Immediate clearance of airway if needed. |
Related to active bleeding, sight of blood, perceived seriousness.
| Intervention | Rationale |
|---|---|
| Maintain a calm and reassuring demeanor. | Reduces patient anxiety and promotes trust. |
| Explain all procedures simply and clearly before performing them. | Reduces fear of the unknown. |
| Provide a brief, clear explanation of what a nosebleed is and why it's happening. | Knowledge reduces anxiety. |
| Encourage patient to focus on slow, deep breaths. | Promotes relaxation and calmness. |
| Provide a sense of control by involving the patient in first aid (e.g., asking them to hold pressure). | Empowers the patient. |
| Offer emotional support and answer questions honestly. | Validates patient feelings. |
Related to effective first aid measures, prevention strategies, and appropriate follow-up care.
| Intervention | Rationale |
|---|---|
| Teach proper first aid measures (positioning, direct pressure, duration). Provide written instructions. | Empowers patient for home management. |
| Educate on prevention strategies (nasal moisturization, avoiding trauma, gentle nose blowing). | Reduces recurrence risk. |
| Discuss triggers to avoid (e.g., nose picking, dry air). | Helps prevent future episodes. |
| Explain the importance of seeking medical attention if bleeding persists or recurs. | Ensures timely medical intervention. |
| Review medication use (e.g., correct nasal spray technique, interaction with anticoagulants). | Prevents medication-related bleeding. |
| Emphasize the importance of follow-up care if an underlying cause is identified. | Ensures long-term management. |
Related to active blood loss.
| Intervention | Rationale |
|---|---|
| Monitor vital signs closely (BP, HR, RR) for signs of hypovolemia (tachycardia, hypotension). | Detects hemodynamic instability early. |
| Estimate blood loss (e.g., by weighing blood-soaked materials, observing quantity). | Assesses severity of bleeding. |
| Assess skin turgor and mucous membranes for signs of dehydration. | Monitors fluid status. |
| Administer intravenous fluids as prescribed. | Restores fluid volume. |
| Obtain blood samples for CBC if significant blood loss is suspected. | Monitors Hb/Hct levels. |
| Prepare for blood transfusion if necessary. | Treats severe blood loss/anemia. |
Related to nasal packing, cautery, or mucosal irritation.
| Intervention | Rationale |
|---|---|
| Administer prescribed analgesics (e.g., acetaminophen, ibuprofen). | Reduces pain sensation. |
| Explain that nasal packing or cautery can cause discomfort or pressure. | Manages expectations. |
| Apply cold compresses to the face/neck to reduce swelling and pain. | Provides local pain relief/vasoconstriction. |
| Educate on expected sensations post-procedure. | Prepares patient. |
| Encourage relaxation techniques. | Augments pain management. |
Related to nasal packing, mucosal trauma, or compromised skin integrity.
| Intervention | Rationale |
|---|---|
| If nasal packing is inserted, administer prophylactic antibiotics as prescribed. | Prevents Toxic Shock Syndrome/sinusitis. |
| Monitor for signs of infection (fever, purulent discharge, worsening pain, foul odor). | Early detection of complications. |
| Educate patient on symptoms to report. | Empowers patient self-monitoring. |
| Ensure proper sterile technique during packing insertion/removal. | Prevents introduction of pathogens. |
| Emphasize meticulous hand hygiene. | Standard infection control. |
Related to uncontrolled underlying medical conditions.
| Intervention | Rationale |
|---|---|
| Collaborate with the interdisciplinary team (physician, pharmacist) to optimize management of underlying conditions (e.g., adjust antihypertensives, review anticoagulant therapy). | Addresses root causes. |
| Provide thorough patient education on the importance of adherence to medication and lifestyle modifications. | Promotes long-term health. |
| Facilitate referrals to specialists (e.g., ENT, hematologist) as needed. | Ensures specialized care. |
| Follow up with the patient to assess adherence and effectiveness of interventions. | Monitors progress. |
Epistaxis(Nose Bleed) Read More »