Care and Treatment of Pressure Sores

Demonstrate care and treatment of pressure areas (e.g hands and feet) (PEX 1.6.3)
Pressure areas are parts of the body susceptible to developing pressure sores (bedsores) due to prolonged pressure, friction, and moisture. Proper care and treatment are essential for prevention and healing.
This PEX focuses on demonstrating the skills required for:
- Identifying patients at high risk for pressure sores.
- Inspecting pressure areas (such as heels, elbows, sacrum, etc.) for signs of redness, warmth, or breakdown.
- Implementing preventive measures, including repositioning, using pressure-reducing devices, and maintaining skin hygiene.
- Providing care for existing pressure sores (if applicable and within scope of practice).
- Documenting skin assessments and interventions.
TREATMENT OF PRESSURE AREAS
Pressure areas These are places which are liable to pressure sores due to weight applied heavily and the tissue is compressed between the bed and the bony prominence. The blood supply to the area is interfered with and the skin gives way, this is called a decubitus ulcer.
Pressure sore/bed sore/decubitus ulcer: Is an ulcer occurring on the skin of any bedridden patient particularly over bony prominences or where two skin surfaces press against each other. Due to constant pressure circulation becomes inadequate and finally death of tissues occurs.
Causes:
- Direct or immediate cause - the pressure caused by weight of the body continuously remaining in one position e.g. in splints, casts and bandages.
- Friction - friction of the skin with rough beddings cause injury to the skin e.g. wrinkles in bed cloths, cramps of food in bed, chipped or rough bed pans, hard surfaces of plaster casts and splints.
- Moisture - the skin contact with moisture for a prolonged period can lead to maceration of the skin.
- Infections - pressure of pathogenic organisms due to unhygienic condition, pathogenic organisms multiply and the infection settles on the skin.
Common sites for bed sores according to positions:
Supine position: Occiput, Scapular, Supine process (in the presence of lodosis or severe emaciated patients), Elbow, Sacrum and skin folds of the buttocks, Heels
Lateral position: Ear, Acromion process (shoulder), Ribs, Iliac crest, Greater trochanter, Media and lateral condyles, Malleolus (ankle)
Prone position: Cheek and ear, Acromion process, Breast (female patients), Anterior superior supinous process, Genitalia (male patients), Knees, Toes
Patients liable to pressure sore/predisposing factors:
- Paralyzed patients - The skin is deprived of its nerve supply and the patient can neither move to avoid pressure nor feel its effect. Sore of paralyzed parts are known as trophic ulcers. These ulcers rise with great speed extending alarmingly and are very difficult to prevent.
- Obese/heavy patients - This carry much weight on their pressure areas.
- Emaciated and malnourished patient - The skin breaks easily since it’s thin.
- Patients with incontinence - The skin is frequently soaked by urine. Urine contains urea which irritates the skin.
- Debilitating diseases - These include; diabetes, neoplasms, anemia, edema, due to various causes.
- Very ill patients confined to bed or patients with long term illnesses e.g. fractured patients.
- Patients with spinal injury
- Elderly patients with circulatory problems.
Clinical presentation of a bed sore:
- First degree: Redness, heat, tender, discomfort in the affected part, inflamed and painful. The area becomes cold to touch and insensitive. Localized edema
- Second degree: Later they are becomes blue, purple, insensitive, circulation cut off, gangrene develops and the epidermis breaks.
- Third degree: Suppuration and sloughing occurs which may burrow right down to the bones.
Preventive measures of bed sores:
- Daily examination of patients with high risk of pressure sore for signs and symptoms. Routine attention to the pressure areas.
- Relieve pressure by good nursing care e.g. bed making practices i.e. use of special mattress (sorbo), beds and comfort devices.
- Change position at least 2 hourly for all bedridden patients.
- Loosening tight bandages and restraints.
- Avoid friction by providing smooth, firm and wrinkle free beds, keep the bottom cloths free from crumbs and foreign bodies.
- Prevent moisture by changing linen when it is wet or soiled. Sweat, urine, feces must not be allowed to remain in contact with the skin.
- In cases of incontinence of urine, an indwelling catheter should be inserted under very strict sterile procedure.
- Give a well balanced diet, high in proteins and plenty of fluids to maintain the general health of the patient.
Requirements (Care of Pressure Areas): trolley
Top shelf:
- Soap in a soap dish
- A galipot for oil/Vaseline
- Flannel
- Bowl of warm water
- 2 jug of hot and cold water if necessary
Bottom shelf:
- Bath towel
- Mackintosh and towel
- Toilet paper
- Draw sheet
- Bed sheet
- Patient’s gown
- Receiver for used paper
- Clean gloves
At the bed side:
- Screens
- Hamper
- Bedpan
Procedure:
- Collect the equipment required for the procedure.
- Explain the procedure to the patient.
- Screen the bed for privacy.
- Position the patient exposing the part to be treated.
- Wash hands thoroughly and put on gloves then flannel.
- Apply soap to a dump flannel; wash the area in circular movements.
- Dry the area and massage with oil/Vaseline in circular motion. Do not massage over reddened or inflamed area itself but start just outside the affected area and move outwards in a circle to stimulate circulation.
- The bed is then straightened out and the patient is made comfortable. Bed line is changed if necessary.
- Clear away and wash hands and dry.
- Record and report the findings to the nurse in-charge or the physician.
Demonstrate Washing of Patient's Hair (PEX 1.6.4)
(Note: While your notes describe bed bath procedures, a specific section for washing patient's hair was not detailed. This PEX would involve demonstrating this practical skill.)
Washing a patient's hair when they are unable to do it themselves is important for hygiene and comfort.
This PEX focuses on demonstrating the skills required to:
- Prepare the necessary equipment (basin, water, shampoo, towels, waterproof sheeting).
- Position the patient comfortably and safely to protect the bed linen from water.
- Wash the patient's hair gently and thoroughly.
- Rinse and dry the hair properly.
- Ensure the patient is comfortable after the procedure.
Carry out Treatment of Infested Hair (PEX 1.6.5)
(Note: A specific section for treating infested hair was not detailed in your notes. This PEX would involve demonstrating this practical skill.)
Treating infested hair (e.g., with lice) is important for patient hygiene and preventing spread.
This PEX focuses on demonstrating the skills required to:
- Identify infested hair.
- Prepare and use appropriate treatment products (e.g., medicated shampoo, comb).
- Follow isolation precautions to prevent spread during treatment.
- Thoroughly comb through the hair to remove nits and lice.
- Clean equipment and dispose of waste properly after treatment.
- Educate the patient/family on preventing re-infestation.
Care of the Patient's Eyes and Ears (PEX 1.6.6)
Providing proper care for the patient's eyes and ears is essential for hygiene, comfort, and preventing complications.
This PEX focuses on demonstrating the skills required for:
- Cleaning the patient's eyes correctly (as detailed in the 'Eye Care' section below).
- Providing ear care, including cleaning the external ear canal (as detailed in the 'Ear Care' section below).
- Identifying signs of infection or other issues in the eyes or ears and reporting them.
- Administering eye drops or ointment (as detailed in the 'Eye Care' section below).
- Administering ear drops (as detailed in the 'Ear Care' section below).
Eye Care
EYE CARE Eye care helps to prevent infection and to maintain their function. Hygienic care of the eye is always done as part of the general bathing procedure.
Reasons for eye care:
- To maintain the cleanliness of the eyes
- To prevent infection
- To keep the eyes in normal functioning
- To wash out discharge prior instillation of eye drops or ointment.
- In preparation for operation.
Common eye problems:
- Conjunctivitis (burning, itching, red-watery and painful eyes with increased secretions)
- Cataracts
- Glaucoma
- Strabismus
- Squint
- Foreign bodies
- Trachoma
General rules in eye care:
- Unconscious patients are at a risk for eye injury. Daily swabbing of the eyes with wet sterile swab is important.
- Cleaning of the eyes is done from the inner canthus of the eye to the outer canthus of the eye.
- Use normal saline to remove the crust.
- During bath, each eye is cleaned with a spat portion of the wash cloth.
- When sterile procedure is required, each eye is cleaned with separate swabs, swabbing each once only.
Requirements (for general eye care): A tray containing;
- A galipot of swabs
- A galipot of sterile normal saline or plain water
- Face towel
- Receive for used swabs
- A drug if any
- A kidney dish with a pair of artery forceps.
Procedure (General Eye Care):
- Collect the equipment needed.
- Explain the procedure to the patient.
- Position the patient flat if the condition allows/permits or in sitting up position.
- Wash hands.
- Wet the swabs in sterile saline or plain water.
- Stand in front of the patient and clean the eyes with sterile swabs.
- Squeeze the excessive fluid from the swab and gently wipe the eye lids from the inner to the outer canthus.
- Use one swab for one swabbing and separate swabs for each eye.
- When the eyes are clean, wipe the face with face towel.
- Instill any medication if required.
- Leave the patient comfortable.
- Clear away and wash hands.
- Record and report the procedure to the nurse in-charge.
Instillation of Eye Drops
Reasons: As treatment of bacterial infection, As anesthesia, Diagnostic purpose
Requirements: Tray containing; Pipette in galipot (sterile) or drop bottle, Galipot of swabs, Treatment sheet
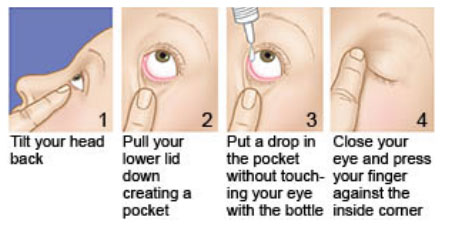
Procedure:
- Collect the equipment needed.
- Explain the procedure to the patient.
- Check the prescription and note the eye to be treated.
- Position the patient in sitting up or lying down position.
- Wash hands.
- A swab is placed down the lower lid up to the lash margin.
- The patient is asked to look up and drop is instilled onto the lower fornix.
- The swab is kept on the lid until the patient closes the eye and any tears are absorbed in the swab.
- Patient is left comfortable
- Clear away and wash hand
- Report and record the procedure on the patient’s chart.
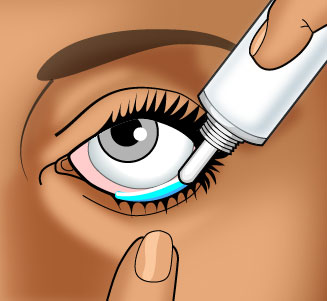
Application of Eye Ointment
Requirements: A tray containing; Eye ointment, Galipot of swabs, Treatment sheet
Procedure:
- Collect the equipment needed.
- Explain the procedure to the patient.
- Position the patient in sitting up or lying down position.
- The swab is placed on the lower lid; the upper lid is drawn up.
- The nozzle of the eye ointment tube is placed 1cm away from the lower lid and the ointment is pressed horizontally onto the lower lid from within outward.
- Any surplus ointment is gently wiped off with a swab.
- Leave the patient comfortable.
- Clear away and wash hands.
- Report and record the procedure on the patient’s chart.
Eye Irrigation
Washing of the conjunctiva sack with a stream of fluid (water).
Purpose: To remove foreign body from the eye, To remove chemicals which have been accidentally splashed into the eye(s), To wash out discharge, Before administration of medication, In preparation for eye operations
Requirements: Tray - sterile
- Irrigating solution - Normal saline at 37°c or plain boiled cooled water (sterile).
- Eye irrigator (Undine) or rubber bulb /syringe without a needle in bowl
- Sterile gloves
- Litmus paper
- Eye pad
- A bottle of ophthalmic irrigation fluid (incase more is needed)
- Galipot of cotton balls or facial tissues
- 2 receivers
- Mackintosh cape and towel
- Eye lid retractor, if any
Procedure:
- Collect the equipment which are needed for the procedure.
- Explain the procedure to the patient or care taker incase of the child.
- Screen for privacy or close the adjacent windows and door.
- The patient is placed in the comfortable position either sitting up or reclining position with the head turned to the affected side.
- The mackintosh cape and towel are placed under the patient’s head.
- Wash the hand and put on gloves.
- The patient is given a receiver to hold placed against the cheek to collect the lotion.
- If there is much discharge or ointment this must be removed with moist swabs first.
- The undine or bulb is filled with lotion. About 12mls should be used and care taken to see that the level of the fluid does not come above the air outlet.
- Some lotion is run onto the inner side of the forearm to test the temperature or use lotion thermometer if available.
- The eyelids are held apart with the first and second finger of one hand or use an eye lid retractor (if available). The undine or bulb is held 3 to 5cm away from the eye. The flow is started on the cheek then brought up to the nasal side of the eye. The flow is kept up steadily until all the lotion is used.
- The eyelids and the cheek are gently dried by the swab.
- Apply eye drop or ointment if prescribed by the physician.
- Clear away and make the patient comfortable.
- Discard the waste (solution and swabs), sterile and replace the reusable articles for next use.
- Wash hands
- Record the procedure and report the findings and treatment given to the nurse in-charge/physician.
- Refer the patient to the physician if the eyes show evidence of ulceration.
N.B:
- When irrigating both eyes, ask the patient to tilt his head towards the side being irrigated to avoid contamination.
- For chemical burns irrigate each eye for at least 15 minutes with normal saline solution to dilute and wash out the harsh chemicals.
- If the patient cannot identify the specific chemical, use litmus paper to determine if the chemical is acid or alkaline or to be sure the eye has been irrigated adequately.
- An irrigation fluid may be pre-packed in a disposable set for use or a sterile 50ml syringe may be used.
Warm Eye Compress
Is the placing of the warm compress/pack over the affected area or eye.
Indications: To relieve discomfort/pain, To reduce inflammation, To enhance absorption of drugs, To promote drainage of superficial infections
Requirement: Tray - sterile
- Bowl of warm water
- Sterile water/normal saline in a bowl
- Mackintosh and towel
- Sterile swabs
- Sterile gloves
- Receiver
Procedure:
- Identify the patient and the eye to be treated.
- Collect the equipment needed for the procedure.
- Explain the procedure to the patient to obtain consent.
- Provide privacy to the patient.
- Position the patient in sitting up or lying down position for this procedure.
- Wash hands and put on gloves.
- Place the bowl with the solution in the bowl with warm water.
- Place the swabs in the warm water/solution.
- Squeeze out the excess solution.
- Instruct the patient to close his/her eye, gently apply the swab on top of the affected eye. If the patient complains the compress is too hot, remove it immediately.
- Change the compress every few minutes for the prescribed length of time.
- Use a dry swab to clean and dry the patients’ face.
- If required apply eye drops/ointment.
- Leave the patient comfortable.
- Clear away and wash hands.
- Record and report the procedure /findings to the physician or nurse in charge.
Cold Eye Compress
Is placing of a cold compress/pack over the affected area or eye to relieve discomfort.
Indication: To reduce swelling or bleeding, To ease peri-orbital discomfort, To relieve itching
Requirement: Tray
- Small plastic bag or glove
- Ice cubes/chips
- Strapping
- Sterile solution (water or normal saline)
- Swabs
- Mackintosh and towel
- Clean gloves
Procedure:
- Identify the patient and which eye to be treated.
- Collect the equipment needed for the procedure.
- Explain the procedure to the patient or caretaker.
- Position the patient to lie down for this procedure.
- Place the mackintosh and towel to protect the patient’s clothes.
- Place the ice or clips in the plastic bag or glove to make an ice pack (keep the ice pack small to avoid excess pressure on the eye).
- Remove excess air from the bag or glove and tie a knot at the end.
- Wash hands, dry and put on glove.
- Moisten the swab with the solution.
- Place the moist swab over the affected closed eye (the swab helps to conduct the cold from the ice pack).
- Place the ice pack on top of the gauze and tape it onto the place.
- If the patient complains that the compress is too cold, remove it immediately.
- After 15-20 minutes, remove the tape, ice pack and gauze.
- Use the dry swab to clean and dry the patients face.
- If required apply eye drops/ointment if required.
- Leave the patient comfortable and clear away.
- Wash hand and document the procedure and findings.
Ear Care
EAR CARE
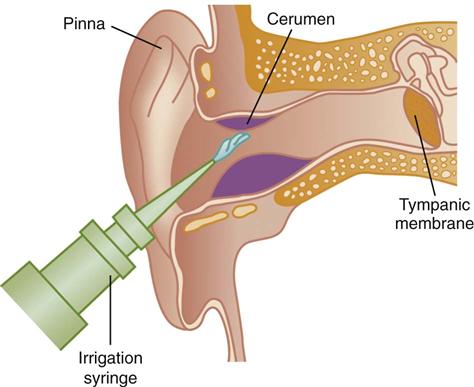
Ear Irrigation/Syringing
Is the washing of the external auditory canal with a stream of fluid.
Purpose:
- To remove the ear wax
- To remove foreign bodies (except hygroscopic substances)
- To cleanse the ear in case of purulent discharge caused by middle ear infection.
- For antiseptic effect
- To apply heat
- To evaluate vestibular functions (e.g. bithermal caloric test).
Solution used:
- Boric acid 2-4%
- Sodium bicarbonate solution 1%
- Normal saline
- Hydrogen peroxide 2%
- Sterile water
Requirements: Tray - sterile
- Ear syringe in a receiver
- Prescribed sterile solution e.g. sodium bicarbonate (warmed 37-38°c) in a bowl
- Head light and mirror (if available)
- Galipot of swabs
- Cotton tipped applicators
- Water proof pad
- Mackintosh cape and towel
- Jug of extra sterile solution
- Sterile gauze
- Clean gloves
- Emesis/vomitus bowl
- Auriscope
Procedure:
- Collect the equipment needed for the procedure.
- Explain the procedure to the patient and how he should cooperate.
- Bring the equipment to the patient’s bedside or nearer the patient.
- Check the physician’s order.
- Place the mackintosh cape and towel to protect the patient and beddings.
- Wash hands
- Have the patient sit up or lie with the head tilted the side of the affected ear. The patient is given a receiver to hold against the cheek under the ear to catch/receive the returning solution.
- The uses auriscope to examine the ear to ascertain whether the impaction is due to foreign hygroscopic (attracts or absorbs moisture-if water contacts such a substance it may cause it to swell and produce intense pain).
- Fill the ear syringe or irrigator and expel the air out.
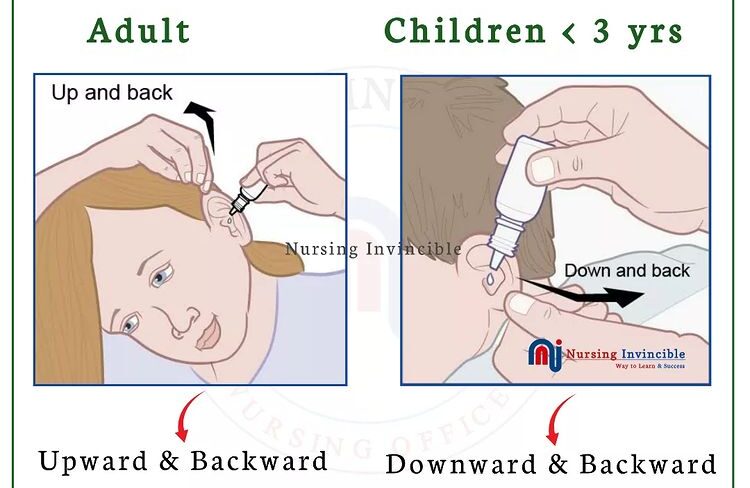
- The nurse takes the pinna of the ear between the first and second fingers of one hand and draws it gently upwards and slightly backward for adults, upward and back for a child over 3 years of and down and back for an infant or child up to 3 years of age to help straighten the meatus (auditory canal).
- Holding the syringe in the other handle, the nozzle is rested against the thumb and the first finger of the hand holding the ear to keep it steady and the flow of lotion is directed along the roof of the meatus using only sufficient force to remove secretions. Do not occlude the auditory canal with the nozzle; allow the solution to flow out unimpeded.
- The procedure is repeated several times until the ear is clean.
- On completion, place the cotton ball loosely in auditory meatus/canal and have the patient lie on the side of the affected ear on a towel or absorbent pad so as the excess fluid to flow out.
- the meatus is then examined to see if it is clear
- The returned solution is also examined to see the result.
- The outside of the ear and cheek is dried and ear reexamined with the auriscope.
- Discard the returned solution and swabs.
- Clear away the equipment.
- The syringe is disconnected and the nozzle cleaned, dried and replace to safe place for next use.
- wash hands
- Report and document the procedure, the findings/results and the patient’s response.
- Remove the cotton ball and asses drainage after 15 minutes.
N.B:
- If the patient complains of pain, the procedure is stopped immediately.
- The irrigation solution should at least at room temperature.
- If irrigation does not dislodge the wax, instill several drops of prescribed glycerin, carbonide peroxide or other solutions as directed, 2 to 3 times daily which helps to soften and loosen impaction.
- Take care not to irrigate an older adult’s ears with cool water, it can cause dizziness.
Instillation of Medication into the Ear
Is the administration or introduction of medication into the ear.
Purpose: To soften the ear wax for removal, To reduce localized inflammation and destroy infective organisms in the external ear canal, To relieve pain, To facilitate the removal of a foreign body.
Contra-indications: Rupture of tympanic membrane
Requirement: Clean gloves, Cotton tipped applicators, Medication bottle with dropper, Cotton balls/swabs, Kidney dish/receiver, Bowl with normal saline (if necessary)
Procedure:
- Collect the equipment needed for the procedure.
- Identify and explain the procedure to the patient, assess for allergy to certain medication, redness/abrasion in the pinna or meatus, type and amount of discharge, complaints of discomfort specific drug reactions and patient knowledge about the medication to be administered and the purpose.
- Check the medication order for the name, dose, time, amount and the ear to be treated.
- Position the patient to a comfortable position to assume during and after instillation (lie on the side with the ear being treated uppermost).
- Obtain assistance in case of children or infants, to immobilize them.
- Clean the meatus of ear canal, using cotton tipped applicators. Use normal saline if necessary.
- Warm the container in the hand or by placing it for a short time in warm water. Do not instill cold medicine in the ear (irritation).
- Fill the ear dropper partially with medication (prescribed amount).
- Straighten auditory canal and instill the correct number of drops along the side of ear canal by holding the dropper 1cm (1/2inch) above ear canal.
- Press gently and firmly onto the tragus of the ear.
- Instruct the patient to remain in that position for about 5 minutes.
- Place a small piece of cotton fluff loosely at the meatus of auditory canal for 15-20 minutes.
- Assess the patients’ comfort, response and check for the discharge from the ear.
- On completion make the patient comfortable
- Clear away and wash hands.
- Report and document the procedure, medication given, dose (number of drops and patients’ response).
Nasal Care
Irrigation of the nose
Is the washing out or the nasal cavity.
Procedure:
- Collect the equipment needed for the procedure.
- Explain the procedure to the patient.
- Provide the privacy to the patient
- Position the patient in recumbent position if the condition allows.
- Inspect the condition of the nose and sinuses, clean the patient’s nose.
- The easiest and safest way is to ask the patient to sniff in an alkaline solution into the nose and spit it out.
- Repeat the procedure until the nose is clear.
- Instill the medication if prescribed.
- Make the patient comfortable
- Clear away, clean, dry and replace the re-useable article in safe place for the next use.
- Wash hands
- Report and document the procedure, medication given, dose (number of drops) and the patient’ response.
Nasal Instillations
Is the process by which a liquid is introduced into the nasal cavity drop by drop.
Purpose: To treat allergies, To treat sinus infection, To treat nasal congestion, To give local anaesthesia
General rules:
- Medications are instilled only on written order from the doctor.
- Avoid oil base solutions as nasal drops since it interferes with normal cilliary action and may cause aspiration pneumonia.
- Avoid the use of decongestant drops for a long period, because they become ineffective.
- Administer drugs in correct concentration.
- Identify the drug correctly and follow the rules for administration of medication.
- Medical asepsis should be observed carefully throughout the procedure.
Requirement: Prepared medication with clean dropper, Penlight, Clean gloves, Facial tissues/face towel, Small pillow, Receiver, Tissue paper, Medical card/patient’s chart
Procedure:
- Identify the patient to be given medication and review the physician’s order.
- Collect the equipment needed for the procedure.
- Explain the procedure to the patient to obtain consent and help alley anxiety. Tell the patient what to expect e.g. burning sensation or stinging of mucosa or choking sensation as the medication trickles into the throat.
- Bring the equipment to bedside or near the patient.
- Provide privacy to the patient.
- Position the patient in a comfortable position.
- Determine which sinus is affected by referring to medical record, assess the patient’s medical history (hypertension, heart disease diabetes and hyperthyroidism and ask about known allergies to nasal instillations.
- Wash hands and put on gloves if the patient has nasal discharge.
- Inspect the condition of the nose and sinuses using penlight. Palpate sinuses for tenderness.
- Instruct the patient to clear or blow nose gently unless contraindicated (increased intracranial pressure or nose bleeding).
- Tilt the head backwards and support with a non dominant hand
- Instruct the patient to breathe through the mouth
- Hold the dropper 1cm above the nares and instill/administer the number of drops towards the midline of ethmoid bone.
- Ask the patient to remain in that position for 5 minutes and then offer face tissue to blot the running nose but caution the patient against blowing for several minutes.
- Assist the patient to a comfortable position after absorption of medication.
- Clear away and discard off the used supplies and then wash hands.
- Record the procedure, finding, medication, number of drops, the nostril used, time given and patient’s response.
- Observe the patient for 15-30 minutes for side effect after administration of drug.
- Ask if the patient is able to breathe through the nose, if not administer the nasal decongestant and ask the patient to occlude one nostril at a time and breathe deeply.

Perineal Care
PERINEAL CARE Is the cleaning the perineum from the cleanest to the less clean area including external genitalia and surrounding areas, the urethral orifice to the anal orifice.
Purpose:
- To prevent sepsis
- To remove discharge and prevent bad odor
- To relieve itching
- To promote healing of stitches
- To promote comfort
Patients who need perineal care:
- Unable to do self care or bedridden patients
- After surgery on the genitourinary system
- Patients with indwelling catheters
- Patients with excessive vaginal discharges
- Post partum patients
- Incontinence of urine and stool
- Genitourinary tract infections
Requirements: A trolley containing;
Top shelf:
- Basin of warm water or antiseptic solution
- Soap in a soap dish
- Sterile swabs and pads if required
- Long artery forceps in the kidney dish
Bottom shelf:
- Mackintosh and towel
- Receiver for used swabs
- Gloves
- Clean personal clothes/patient’s gown
- Clean Bed linen if needed
- Flannel/ Wash cloth and towel, if able to help him/herself
- Lotion thermometer/bath thermometer
- Bedpan and urinal with covers
At the bedside:
- Screens
- Hamper if necessary
Procedure:
- Collect all the equipment needed
- Explain the procedure to the patient
- Provide privacy
- Position the patient in dorsal recumbent position.
- Wash hands thoroughly and put on gloves.
- Fold back the bed clothes to the foot of the bed, leaving the patient covered to the waist with top sheet.
- Place the mackintosh and towel under the buttocks.
- Remove soiled pad if any for the case of female patients and place in a receiver on the bottom of the trolley.
- Wash abdomen, inside the thighs and buttocks using soap, water and flannel. Rinse and dry thoroughly with the patient’s towel.
- Wash hands and put on gloves.
- Put the bed pan in position.
- Holding the jug at the level of symphysis pubis, pour water/lotion over the perineum to wash off the discharge (females). For the male patient cleanse the penis.
- Hold the swabs with forceps or sterile gloved hand and clean from above downwards towards the anal canal.
- Use one swab for one swabbing.
- For female patient clean the perineum from the middle outward in the following order; the vulva, the labia majora on both sides, inside of the labia minora on both sides, then vestibule and dry thoroughly. Clean the perineal region and anus well. Gently visualize vulva for debris
- If male patient clean the fore penis using circular motions from underneath upwards and the rest of it using up- downwards sweeps to scrotum and clean the anal area thoroughly and dry. Carefully examine gluteal folds, scrotal folds.
- Remove the bed pan by supporting the hips. Turn the patient to one side and dry the buttocks.
- Apply the medicine and pad if necessary.
- Remove the mackintosh if any extra one is used, if not dry the mackintosh and remake the bed, leave the patient comfortable.
- Clear away, clean and replace the equipment to the appropriate place of storage.
- Remove the gloves and Wash hands.
- Record the procedure and report any abnormality seen on the patient to the nurse in-charge or physician.

Catheter Care/Hygiene
CATHETER CARE/HYGIENE Is the maintenance in the cleanliness of the surrounding area around the urethra to decrease contamination of the catheter by bacterial flora.
Before procedure you should:
- Assess the catheter patency and urine color, consistency and amount while performing the care to determine if the catheter and drainage system are functioning correctly.
- Determine the condition of the urinary meatus and perineal area to monitor for redness swelling or drainage, stool or vaginal discharge as indicator of infection. External infections may migrate up the catheter and lead to urinary tract infection.
- Determine the clients emotional reaction and feelings related to the catheter (nurse-patient relationship)
Requirements: Trolley
Top shelf:
- Galipot of sterile swabs
- Soap in a soap dish
- Galipot of lotion/antiseptic or warm water in basin
- Clean gloves
- Wash towel in bowl
Bottom shelf:
- Mackintosh and towel
- Measuring jar
- Receiver for used gloves
- Adhesive tape and scissors
- Receiver for used swabs
- Clean bed linen
At the bed side:
- Screens
- Hamper
Procedure:
- Collect all equipment needed.
- Explain the procedure to the patient.
- Provide adequate privacy by screening the bed and closing the adjacent windows if any.
- Position the patient in supine position.
- Wash hands and put on gloves.
- Place the mackintosh and towel beneath the buttocks
- Carry out perineal care and after the perineal care, cleanse meatus if there is excessive purulent drainage with non-irritating antiseptic lotion.
- Cleanse catheter from meatus out to end of catheter, taking care not to pull out the catheter.
- Repeat catheter care any time it becomes soiled with stool or other drainage.
- On completion, make the patient comfortable.
- Clear away, clean and replace the equipment. Remove gloves and wash hands thoroughly and dry.
- Record the procedure in the patient’s chart and report the findings to the nurse in-charge of physician.