Nurses Revision

Uncategorized

Carryout admission transfer and discharge of patients

Topic: Carryout admission transfer and discharge of patients (Topic 2.5, PEXs 2.5.1 - 2.5.3)

Admission (PEX 2.5.1: Admit patients)

ADMISSION, OBSERVATION AND DISCHARGE OF PATIENTS

Admission Is the allowing of a patient(s) to stay in hospital for observation, investigation, treatment and care purposes.

Purpose (of Admission):

  • For proper management of the patient’s condition.
  • To assess the patient’s status from which a nursing care plan can be initiated and implemented.
  • To make the patient feel welcome, comfortable and at ease.
  • To acquire vital information regarding the patient for further management.
  • To monitor the patient’s progress and sudden changes; this produces fear and anxiety.

Types of admission:

  • Emergency admission: This means the patient are admitted in acute conditions requiring immediate treatment e.g. patient with accidents, poisoning, burns and heart attacks. Routine admission is postponed until the patient is out of danger.
  • Routine/planned admission: The patients are admitted for investigations, medical or surgical treatment given accordingly e.g. patients with hypertensions, diabetes and bronchitis. Preparation before the arrival of the patient on ward is started when the ward is informed of incoming patient and all the necessary items are made ready according to the patient’s condition.

General Rules on Admission:

  • Nurses should make every effort to be friendly and courteous with the patient (good nurse-patient relationship)
  • Make proper observations of the patient’s condition, record and report.
  • Orient the patient and relatives to hospital and ward policies.
  • Observe policies in dealing with medico-legal cases.
  • Deal with the patient’s belongings very carefully to prevent communicable diseases.
  • Isolate the patients who are suffering from communicable diseases.
  • The nurse should recognize the various needs of the patient and meet them without delay.
  • There is need to understand the fears and anxieties of the patient and help them to over come.
  • The nurse should find out the likes and dislikes of the patient and include the patient in his plan of care.
  • The nurse should address the patient by their name and proper title.
  • The patient’s valuables and clothes should be handed over to the relatives with proper recording.

Equipment needed for admission:

  • Admission bed
  • Vital observation equipment
  • Equipment used for physical examination such as weighing scale, inch tape measure etc.
  • Admission forms (patient’s case sheet, doctors, nurses’ and progress notes)
  • Investigation forms (blood, x-ray, urine stool and sputum)
  • Bath trolley if needed.
  • Complete record in a file.
  • Emergency treatments, oxygen apparatus, suction apparatus.
  • Admission book.

Procedure (Admitting a Patient):

  1. When the ward has been informed that a new patient is going to be admitted, a bed is prepared either; an admission bed for a seriously ill patient as this patient needs a bed bath OR an occupied bed for walking patient as s/he will be able to go to the bathroom.
  2. On arrival: - greet the patient and relatives and introduce yourself to them.
  3. Receive the patient cordially and seat them comfortably.
  4. Introduce the patient to other persons in the ward if necessary.
  5. Complete the admission record and should be filled in block letters especially full name, age, address, phone number if possible.
  6. Collect history and carry out simple physical examination e.g. vital observations, weight and consent form signed if required. The charts are filled by the nurse in charge.
  7. Issue visitor a pass or explain to the relatives rules about visiting hours and then they can leave. Do not let them go if you will need consent form signed in case of minors.
  8. Handover the patient’s valuables to the relatives if need be.
  9. Orient the patient to the ward; toilet, bathroom, drinking water supply, nurse’s station and treatment room.
  10. Help the patient to maintain personal hygiene and change into hospital clothes. A bed bath should be given to patients who cannot do it for themselves and those who can go to the bathroom depending on the condition.
  11. Encourage the patient to take hospital diet if any, especially when therapeutic diet is ordered.
  12. A specimen of urine should be obtained, tested or sent to the laboratory for investigation.
  13. A nurse should observe the patient, during the admission especially when giving a bed bath and note any obvious deformities or skin conditions and report or record in the patient’s chart.

Observations made on admission: The nurse should observe the patient for the following;

  • Observe the whole patient, whether weak, paralyzed, emaciated edematous, dehydrated etc.
  • Special observations:
    • Skin: color; pale, blue, jaundice, on touch, warm/cold, clammy or dry, sores, operation scars etc.
    • Eyes: yellow, infected, sunken
    • Mucous membrane: pale, blue, dry, moist, tongue; coated, conjunctiva; pale, infected
    • Skeletal system: deformities, injuries, wounds, paralyzed, gait.
    • Excreta: stool; color, quantity, smell, formed or diarrhea, with blood. Urine; color, quantity, smell, frequency. Vomit; frequency, quantity, content. Sputum; mucus, blood, purulent.
  • Vital observations: Temperature, Pulse rate, Respiration, Blood pressure.
  • Mental state: oriented, conscious, semi-conscious, unconscious, delirious.
  • Position in bed: posture
  • Facial expression: anxious, worried, feeling pain.

Equipment for diagnostic examination: All the equipment needed for the physical examination are kept ready at hand.

  • Sphygmomanometer
  • Stethoscope
  • Fetoscope
  • TPR tray (thermometer, wrist watch and patient’s chart)
  • Tongue depressor
  • Pharyngeal retractor
  • Laryngoscope
  • Tape measure
  • Flash light (torch)
  • Weigh machine and height measurement
  • Ophthalmoscope
  • Otoscope
  • Tuning fork and head mirror
  • Nasal speculum
  • Patellar hammer (percussion hammer)
  • Safety pins
  • Cotton wool
  • Cold and hot water
  • Snelle’s chart
  • Alcohol swabs
  • Drape or sheet
  • Dressing gauze
  • Gloves (sterile and non-sterile)
  • Lubricants
  • Pen light
  • Wool or cotton applicator
  • Skin pencil
  • Substance for testing smell (e.g. pepper, mint) and taste (sugar, salt)
  • Toilet paper
  • Swabs
  • Sponge forceps
  • Specimen containers and slides
  • Protoscope
  • Spatula
  • Vaseline or KY jelly
  • Hebitane/antiseptic lotion
  • Labels and lab forms
  • Test tubes and pipettes
  • Vaginal speculum

Methods of Examination:

  • Inspection: Visual examination of the body is called inspection. It is the observation with the naked eyes to determine the structure and functions of the body.
  • Palpation: It is the feeling of the body or parts with the hands to note the size and positions of the organs. In palpation the finger pads are used to feel, not the finger tips.
  • Percussion: Is the examination by tapping with the fingers on the body to determine the condition of the internal organs by the sound that’s produced. It is done by placing a finger of the left hand firmly against the part to be examined and tapping with the finger tips of the right hand.
  • Auscultation: It is the listening to sounds within the body with the aid of a stethoscope, fetoscope or directly with the ear placed on the body.
  • Others:
    • Manipulations: It is moving of the part of the body to note the flexibility. A limitation of movements is discovered by this method.
    • Testing reflexes: The response of the tissues to external stimuli is tested by the means of percussion patellar hammer, safety pins, wisp of cotton, hot and cold water etc.

ROLES OF NURSE BEFORE, DURING AND AFTER THE DIAGNOSTIC EXAMINATION

Before (Diagnostic Examination):

  • Nurse prepares patient by ensuring the patient understands and compliance with the pre-procedure requirements.
  • Reassurance of the patient and care taker/family.
  • Teach relaxation techniques e.g. deep breathing exercises.
  • Ensure the patient is in the **list of patients to be worked on**.
  • Collect the specimen for investigation including blood for grouping and cross matching.
  • Pass catheter if need be.
  • Nil per mouth if ordered by the physician.
  • Removal of objects e.g. jewellery or hair clips and any other object which will interfere with the procedure.
  • Ensure all supplies and equipment to be used available
  • Review patient’s history and physical information to determine current condition, chief complaint.
  • The patient’s identity is checked
  • Ensure safe keeping of the patient’s valuables
  • Determine current medications patient is taking, existence of allergies, history of drug use or abuse including tobacco and alcohol, adverse experience with anesthesia, sedatives or analgesics and last oral intake.
  • Reinforce physician’s explanations of procedure to patient and family-patient education.
  • Minimize anxiety through anxiety management techniques, ensuring short waiting time and offering reassurance and support
  • Ensure written consent is obtained
  • Obtain and document baseline data on patient; temperature, heart rate, and rhythm, respiratory status including oxygen requirements, depth of respirations, breath sounds and oxygen saturation, blood pressure, skin condition, level of consciousness and mental status, ability to ambulate, weakness and/or sensory loss in extremities (if indicated), and description and intensity of any current painful condition.
  • Pass I.V line and regulate continuous infusion at a keep open rate.
  • Prepare all drugs to be administered including readying reversal agents for possible administration.

During (Diagnostic Examination):

  • Administer medications under direct supervision of responsible physician.
  • Continuously observe and document patient responses.
  • Provide reassurance and emotional support throughout the procedure.
  • Inform the physician immediately of adverse response or any significant changes in baseline parameters.
  • Maintain continuous I.V line if required.
  • Perform emergency management procedure if necessary.
  • Continuous reassurance of the patient and care take (if any) during the procedure.
  • Encourage relaxation of the muscles.
  • Check the patient’s identification band to ensure the correct patient.
  • Review the medical record of allergies.
  • Assess vital signs including pain throughout the procedure.
  • Assist the physician with the procedure.
  • Assess the patient’s ability to maintain and tolerate the prescribed position.
  • Assess for related symptoms indicating complications specific to the procedure.
  • Remain with the patient during induction and maintenance of anesthesia.
  • Position, drape and monitor the patient’s condition e.g. monitor the patient’s air way.
  • Explain what the physician is doing so that the patient knows what to expect.
  • Label and handle the specimen according to the type of materials obtained.
  • Secure clients transport from the diagnostic area.

After (Diagnostic Examination):

  • Check the identification band and call the patient by name.
  • Assess the patient closely for signs of air way distress, adverse reaction to anesthesia or other medications.
  • Assess for bleeding in those areas where a biopsy was performed.
  • Continue monitoring the patient’s condition - observe and record the vital parameters
  • Position the patient in recommended position for comfort and accessibility to facilitate performance of nursing measures.
  • Assess and document vital signs including pain and monitor according to the frequency required for the specific test.
  • Notify the physician when any results are obtained from the diagnostic test
  • Reassure the patient and family
  • Maintain I.V line if required and administer medications prescribed.
  • Implement the physician’s orders regarding the post procedure care of the patient.
  • Evaluate the patient’s tolerance to exercises and oral fluids.
  • Record the procedure.
  • Notify the physician when the patient is fully alert or recovered for an order to discharge.
  • Review discharge instructions.

Transfer (PEX 2.5.2: Transfer patients) & Referral

REFERRAL/TRANSFER PROCEDURE Transfer/referral is the preparation of a patient and the referral records in order to shift or move the patient to another department within the same hospital or to another hospital/home.

Purpose (of Transfer/Referral):

  • To provide necessary treatment and nursing care
  • To provide specialized treatment/care
  • To obtain necessary diagnostic tests and procedures
  • To place most appropriate utilization of available personnel and services
  • To match intensity of care, based on the patient’s level of needs and problems

Types of transfer of the patient:

  • Internal transfer: Is the transfer of the patient to a unit that provided special care or care suiting to his needs within the hospital e.g. from the general wards to intensive care unit (ICU)
  • External transfer: Is the transfer of the patient from one hospital to another for the purpose of special care e.g. from a general hospital to a specialized hospital i.e. cancer centre/institute.

Equipment needed (for Transfer):

  • Wheel chair/stretcher (transport)
  • Identification labels
  • Patient’s belongings
  • Patient’s investigation records and file

Procedure (Transferring a Patient):

  1. Check the doctor’s order for the transfer of the patient
  2. Inform the patient and relatives, concerned department about the transfer of the patient.
  3. Assess the method for transport
  4. Inform the receiving ward in-charge/hospital where the patient is to be transferred.
  5. Check the patient’s chart for complete recording of vital signs, nursing care and treatment given.
  6. Collect all the patient’s investigation reports e.g. x-rays and help the relatives to collect other belongings.
  7. Maintain the patient’s physical well being during transport to a new nursing unit/hospital, as you assist his arrival to the new unit.
  8. Cancel the hospital diet of the transferring patient if she has been on special diet.
  9. Make arrangements to settle the due bills if going to another hospital.
  10. Record the date, time, mode of transfer and general condition of the patient by the time of transfer.
  11. Assist in transferring the patient to a wheel chair or stretcher and accompany the patient to the new area.
  12. On arrival, hand over the patient, documents, belongings and report verbally to the in-charge nurse of the receiving unit/hospital about the patient’s condition and what has been done.
  13. Collect the ward/previous hospital’s articles and come back with it (them)
  14. Clean the unit and equipment thoroughly and keep ready for the next patient/use.

Discharge (PEX 2.5.3: Discharge of patients)

(Note: The provided notes combine Admission, Observation, and Discharge in a single title, but detailed procedural steps specifically for "Discharge of patients" are not explicitly outlined as a numbered procedure in the same way as others in your document. Based on the context and common nursing practice, the discharge process typically involves ensuring the patient is medically stable, providing discharge instructions, arranging follow-up care, and completing necessary paperwork.)

Discharge of a patient is the process of formally releasing a patient from the hospital or healthcare facility. It is a planned process that begins early in the patient's stay.

Key aspects of the discharge process generally include:

  • Confirmation of medical stability and readiness for discharge by the physician.
  • Providing clear and understandable discharge instructions to the patient and/or family, including medication schedules, dietary restrictions, activity limitations, and wound care (if applicable).
  • Educating the patient and family on signs and symptoms to watch for and when to seek further medical attention.
  • Arranging for follow-up appointments or home healthcare services if needed.
  • Completing all necessary discharge paperwork and documentation.
  • Ensuring the patient has transportation arranged to their next destination.
  • Gathering and returning the patient's personal belongings.
  • Answering any final questions the patient or family may have.

Topic: Carry out sterilization and disinfection (Topic 2.6, PEXs 2.6.1 - 2.6.2)

Decontamination (PEX 2.6.1: Carry out decontamination)

Decontamination Is the process of rendering objects and surfaces free of most organisms and safe to handle and use.

Decontamination is often the first step in reprocessing reusable medical devices, making them safe for further cleaning, disinfection, or sterilization. It reduces the risk of exposure to healthcare workers handling contaminated items.

This PEX focuses on demonstrating:

  • Handling contaminated items safely using appropriate PPE.
  • Cleaning visible soil from instruments and equipment.
  • Soaking items in appropriate disinfectant solutions (if applicable) before further processing.
  • Using cleaning procedures to remove microorganisms (approximately 80% of microorganisms are removed during cleaning).
  • Following facility policies for handling and initial processing of contaminated items.

(Note: Detailed procedural steps specifically for "Decontamination" as a separate procedure were not provided in the original notes, but the concept is integrated into cleaning and sterilization protocols).

Sterilization (PEX 2.6.2: Carry out sterilization) & Disinfection

Sterilization Is the process by which the pathogens as well as spores and viruses are destroyed.

Sterilization aims to eliminate *all* forms of microbial life, including highly resistant bacterial spores. It is essential for items that will penetrate sterile tissue or enter the vascular system.

Disinfection Is the means of destroying pathogenic organisms carried out to render instrument and surfaces free for safe handling and use.

Disinfection reduces the number of pathogenic microorganisms but does not necessarily eliminate all spores. It is used for items that come into contact with intact skin or mucous membranes.

This PEX focuses on demonstrating:

  • Selecting the appropriate sterilization or disinfection method based on the type of item and its intended use.
  • Preparing items for sterilization or disinfection (e.g., cleaning, packaging).
  • Operating sterilization equipment (e.g., autoclave - if applicable and trained).
  • Using appropriate disinfectants at the correct concentration and contact time.
  • Handling sterilized or disinfected items aseptically.
  • Monitoring and documenting the sterilization or disinfection process.

Principles related to Sterilization and Disinfection from the notes:

  • Proper sterilization policy is a code of practice, which if correctly followed will ensure a clean and safe health unit, where multiplication and spread of harmful microbes is kept under control.
  • Disinfect, clean and sterilize items like **Drainage under water seal gadgets**.
  • Wash the flatus tube with soap and water, autoclave or sterilize the tube for 5 minutes.

Underpinning knowledge/ theory for Admission, Transfer, Discharge, Sterilization, and Disinfection:

(This is covered within the sections above, pulling from the curriculum outline and your notes.)

  • General principles in patient care
  • Nursing procedures and applications
  • Ethics in nursing care (related to patient rights, confidentiality)
  • Infection prevention and control principles
  • Patient rights (relevant to admission/discharge)
  • Body mechanics (relevant to patient transfer)
  • Communication skills (relevant to admission/transfer/discharge/reporting)
Nurses Revision

Carryout admission transfer and discharge of patients Read More »

Carry out adequate feeding of patients

Adquate Feeding and Ward Reports

Carry out adequate feeding of patients (PEX 1.3.1)

Providing adequate nutrition is fundamental to patient recovery and well-being. Nurses assist patients who are unable to feed themselves due to weakness, physical limitations, or medical conditions.

Purpose of Assisting with Feeding:

  • Ensure the patient receives adequate nutrition and hydration.
  • Promote comfort and dignity during meal times.
  • Monitor the patient's food intake and tolerance to the diet.
  • Prevent aspiration (food or liquid entering the lungs).
  • Provide an opportunity for social interaction and assessment of the patient's condition.

Patients Requiring Assistance with Feeding:

  • Weak or fatigued patients
  • Patients with difficulty swallowing (dysphagia)
  • Patients with physical limitations affecting hand or arm movement
  • Confused or disoriented patients
  • Patients with vision impairment
  • Patients with tubes or devices affecting the mouth or throat

Requirements:

  • Patient's prescribed meal tray with appropriate food and drink
  • Feeding utensils (spoon, fork, knife - as needed)
  • Drinking straw or cup with lid
  • Napkin or cloth
  • Moist washcloth or wet wipe for hand/face cleaning
  • Towel or bib to protect clothing
  • Barrier cream if needed for skin protection
  • Gloves (if potential contact with body fluids or patient has infection)
  • Comfortable chair or bed in a quiet environment

Procedure for Assisting with Feeding:

  1. Perform hand hygiene and gather all necessary equipment.
  2. Verify the patient's identity and explain the procedure.
  3. Assess the patient's readiness to eat and their ability to participate.
  4. Assist the patient to a comfortable and safe position for eating, preferably sitting upright in a chair or high-Fowler's position in bed (at least 45-60 degrees). This helps prevent aspiration.
  5. Ensure the environment is clean and pleasant, minimizing distractions.
  6. Offer the patient a moist washcloth or wet wipe to clean their hands.
  7. Place the tray on a table within the patient's reach or on a bedside table.
  8. Describe the food items on the tray, especially if the patient has vision impairment.
  9. Assist the patient with cutting food if necessary.
  10. Offer fluids periodically throughout the meal to help with swallowing and hydration.
  11. Feed the patient small amounts, allowing them time to chew and swallow completely before offering the next bite.
  12. Use a spoon for feeding most foods; avoid using a fork for patients with dysphagia or poor coordination.
  13. Check for pocketing (food held in the cheeks) frequently, especially in patients with dysphagia.
  14. Observe for signs of swallowing difficulty or aspiration, such as coughing, choking, or wet vocal quality. If these occur, stop feeding immediately and notify the nurse in charge.
  15. Engage in conversation with the patient if appropriate, making the meal a social experience.
  16. Monitor the patient's food and fluid intake. Note how much of each item is consumed.
  17. After the meal, offer the patient a moist washcloth to clean their face and hands, and assist with **oral hygiene**.
  18. Return the tray to the appropriate area.
  19. Document the amount of food and fluid intake, any difficulties encountered, and the patient's response.
  20. Clean and store equipment, and perform hand hygiene.

Demonstrate giving and receiving of ward reports/records (PEX 1.3.7)

Effective communication during handoff is vital for patient safety and continuity of care. Ward reports (or shift reports) are structured exchanges of information between healthcare providers at the change of shift.

Purpose of Ward Reports:

  • To transfer essential information about patients from one shift to the next.
  • To provide a clear overview of the patient's current condition, treatment plan, and any changes or concerns.
  • To ensure continuity of care and prevent errors.
  • To provide an opportunity to ask questions and clarify information.
  • To prioritize patient care for the upcoming shift.
  • To meet legal requirements for accurate documentation.

Key Information to Include in a Ward Report:

  • Patient's name, age, diagnosis, and physician.
  • Current condition and significant changes since the last report.
  • Vital signs and other monitoring data.
  • Current treatment plan and any recent interventions.
  • Medications administered and patient response.
  • Results of recent **tests or investigations**.
  • Patient's level of consciousness and ability to communicate.
  • Status of **IV lines, tubes, drains, or other devices**.
  • Recent intake and output.
  • **Skin integrity** and presence of pressure areas.
  • Any safety concerns or fall risks.
  • Patient's emotional or psychological status.
  • Family involvement and concerns.
  • Planned procedures, appointments, or tests for the upcoming shift.
  • Specific nursing interventions required.

Methods of Giving/Receiving Ward Reports:

  • Verbal Report: May be given face-to-face, during walking rounds at the patient's bedside, or over the phone (less common for comprehensive reports).
  • Written Report: Often involves using a standardized form or electronic health record summary.
  • Walking Rounds/Bedside Report: Healthcare providers from the off-going and on-coming shifts visit each patient together to discuss the plan of care.

General Guidelines for Giving a Ward Report:

  1. Be prepared and organized. Have all necessary information and notes readily available.
  2. Reports should be clear, concise, and accurate. Focus on essential information and any changes.
  3. Maintain confidentiality; use a private area if giving a verbal report not at the bedside.
  4. Report in a systematic manner, usually by patient or room number.
  5. Highlight any critical information, urgent concerns, or potential risks.
  6. Allow time for the receiving nurse to ask questions.
  7. Document the report given according to facility policy.

General Guidelines for Receiving a Ward Report:

  1. Be present and ready to receive the report at the designated time.
  2. Listen actively and take notes as needed.
  3. Ask questions to clarify any unclear information or to gather more details about specific patients.
  4. Verify information if necessary (e.g., double-check medication orders or vital signs).
  5. Acknowledge understanding of the report.
  6. Prepare to prioritize care based on the information received.

Carry out adequate feeding of patients Read More »

Perform bladder and bowel care 

Perform bladder and bowel care (PEX 1.3.3)

Bladder and bowel care is vital for patient comfort, hygiene, and preventing complications like incontinence-associated dermatitis, UTIs, constipation, and fecal impaction.

This PEX focuses on demonstrating the skills required to:

  • Assess the patient's bladder and bowel function (e.g., continence, frequency, consistency).
  • Assist patients with using a bedpan or urinal (as detailed in the 'Giving a Urinal' and 'Giving a Bed Pan' sections below).
  • Provide perineal care as needed (as detailed in the 'Perineal Care' section below).
  • Implement measures to promote regular bowel elimination, such as offering fluids and fiber (within dietary restrictions).
  • Monitor and record output/elimination.
  • Identify signs of bladder or bowel issues and report them.

Giving a Urinal

Urinal is used for male patients to void the urine; the nurse should be able to assist the bed ridden patient to void into a urinal (a plastic or steel receptacle for urine in bed) by taking the penis with a towel and placing it into the urinal.

In case of female patients, a nurse should provide a bedpan for the bedridden to collect the urine.

Purpose:

  • To promote comfort
  • To assist to void
  • To prevent bed wetting
  • To maintain the urinary output record
  • To minimize the physical and emotional strain.

Timing of patients to void: It is advisable to offer the patient a bed pan or urinal at the following times;

  • Early morning when the patient wakes up.
  • Before doctor’s round in the morning.
  • After mid-day meal.
  • After 4PM tea.
  • After supper.
  • When a night nurse comes on duty, and further when necessary at night.

Requirements (for giving a urinal/bedpan):

Trolley:

Top shelf:

  • Gloves
  • Clean linen if required
  • Hand washing basin/mug and water
  • Soap in a soap dish
  • Basin and rowel

Bottom shelf:

  • Clean urinal/bed pan (female patient)
  • Measuring jar
  • Toilet paper if required
  • Mackintosh and draw sheet
  • Mackintosh and towel

At the bedside:

  • Screens

Procedure:

  1. Collect the equipment needed.
  2. Explain the procedure to the patient.
  3. Provide adequate privacy to help the patient relax and able to void.
  4. Wash hands thoroughly and put on gloves.
  5. Place the patient in a proper body alignment.
  6. Place a mackintosh and draw sheet on the bed to prevent soiling of the bed or the patient’s body.
  7. Lift the beddings or roll back and position the urinal so that the patient may grasp the handle and allow him place it rightly, if he is conscious or else position the penis into the urinal when he is not able.
  8. Remain with helpless patients, get assistance from relatives if need be.
  9. Remove the urinal/bed pan after the patient has voided.
  10. Assist the patient to wash the perineal area or dry up with the tissue for the case of female patients and to wash hands.
  11. Change the bed linen if required.
  12. Place the patient in a proper comfortable position.
  13. Measure and empty the urine in the sluice room and clean the urinal/bed pan ready for the next use. Specimen is kept if necessary or sent to the laboratory as ordered.
  14. Remove the gloves and wash hands after the procedure.
  15. Record the procedure and the findings to the patient’s chart and remember to fill in the amount in the fluid balance chart of the patient (input output chart)
  16. Report any abnormalities to the nurse in-charge or physician.

Giving a Bed Pan

Bed pan is made of steel or plastic device to meet the elimination need of the patient confined in bed. Bed pans are used by female patients for voiding and fecal elimination and males for elimination of feces.

Purpose:

  • To promote comfort
  • To facilitate bowel and bladder emptying.
  • To collect specimen for diagnostic purpose.
  • To promote continence during bowel and bladder training.
  • To give perineal wash.

Indications (for giving a bedpan):

  • patients with spinal injury
  • post operative patients
  • patients with fractures and on traction
  • chronic bed ridden patients
  • Patients who are on strict bed rest.

Requirements: Same as for giving a urinal, but with a Bedpan with lid on the Bottom shelf.

Procedure:

  1. Collect all the equipment needed.
  2. Explain the procedure to the patient and to assist in the lifting of the hip.
  3. Provide adequate privacy to help in elimination.
  4. Position the patient for easy lifting by lowering the head of the bed so the patient in in supine position.
  5. Wash hands and put on gloves.
  6. Place the mackintosh under the buttocks to prevent soiling.
  7. Assist the patient to lateral position using the side rail for support or 2nd nurse or relative.
  8. Place the warm, dry bed pan under the patient’s buttocks; powder the bed pan if necessary.
  9. While holding the bed pan with one hand, help the patient to roll on his/her back while pushing against the bedpan towards the center of the bed to hold it in place. OR
  10. Assist the patient to lift the buttocks while in supine position by supporting the back with the left hand and slip the bed pan under the patient’s buttocks placing it firmly and in a right position. If the patient is not able to lift him/herself, two nurses or three nurses should help to lift the patient onto the bedpan.
  11. Encourage the patient to assume a normal position for defecation if possible.
  12. Provide adequate time to pass motion/urine.
  13. Once the patient has passed, permit to clean self by giving a toilet paper. Assist to pour water to wash hands on completion.
  14. If the patient is unable to clean, pour water and clean using long artery forceps and cotton balls.
  15. Remove the bed pan by carefully lifting the patient with the help of more nurses if not able by him/herself. OR
  16. Ask the patient to raise his/her hips and withdraw gently the bed pan.
  17. Cover it immediately and dry the wet mackintosh or remove if an extra one was used.
  18. Secure or put back the draw sheet and position the patient comfortably.
  19. Bring the bed pan to the sluice room, empty, clean and disinfect if necessary. Dry and keep for the next use.
  20. Specimen may be kept if needed or sent to the laboratory as ordered.
  21. Remove the gloves and wash hands thoroughly after the procedure.
  22. Record and report the findings to the nurse in-charge or physician.

Passing a flatus tube (PEX 1.3.4)

INSERTION OF THE FLATUS TUBE A flatus tube is passed to relieve flatulence in the abdomen. It is a special kind of tube with the opening at the end, not at the side like the catheter.

A flatus tube is passed to relieve abdominal distention due to accumulation of gas in the lower bowel often after abdominal operation.

Requirement: Tray

  • Galipot of swabs
  • Galipot of lubricant
  • Bowl containing; flatus tube, glass connection, rubber tubing
  • Receiver for used tube
  • Receiver for used swabs
  • Dressing towel
  • Bowl of water
  • Gloves

Procedure:

  1. Collect the equipment needed for the procedure.
  2. Explain the procedure to the patient.
  3. Provide the patient with privacy using screens and closing of adjacent windows.
  4. Position the patient in a comfortable position e.g. in left lateral position.
  5. Wash hands and put on gloves.
  6. Place the mackintosh and towel in position.
  7. Connect up the apparatus and lubricate the flatus tube.
  8. Place the end of the rubber tubing under the water in the bowl and pass the lubricated end of the flatus tube 10-15cm into the rectum. Watch for air bubbles passing out of the end of the tube through the water.
  9. The tube may be left in position for 30 minutes if necessary. If not, remove the tube.
  10. Leave the patient comfortable and clear away.
  11. Wash the flatus tube with soap and water, autoclave or sterilize the tube for 5 minutes. Wash the equipment, dry and put away (keep for the next use).
  12. Remove the gloves and wash hands.
  13. Record the procedure and report the results to the physician or in-charge.

Administration of enemata (PEX 1.3.5)

ENEMAS/CLYSIS An enema is a solution introduced into the rectum and sigmoid colon to remove fecal matter and/or flatus. Enema can also be used to instill medications or nutrition (nourishment.) The commonest enema used is the cleansing enema. This type of enema stimulates peristalsis via irritation of the colon/rectum and by causing intestinal distention with fluid.

There are types of cleansing enema i.e. the large volume and small volume enema.

  • Large volume enema - is designed to clean the colon off as much feces as possible, between 500 to 1000ml of fluid is instilled into the colon.
  • Small volume enema - is designed to clear the rectum and the sigmoid colon off the fecal matter, between 50 to 200ml is most frequently administered using pre-packed disposal kit making it ideal for home care use.

Purpose:

  • To promote defecation by stimulating peristalsis (primary purpose) - purgative enema.
  • To relieve constipation or fecal impaction.
  • To prevent involuntary defecation during surgical procedure.
  • To promote visualization of the intestinal tract by x-ray film or instrument examination; diagnostic purpose - barium enema.
  • To help establish regular bowel function during bowel training program.
  • To relieve flatulence and fecal matter.
  • To reduce temperature e.g. cold enema.
  • To check diarrhea e.g. starch opium enema.
  • To cleanse the bowel before x-ray studies.
  • To induce anesthesia e.g. anesthetic enema.
  • To administer medications.
  • To destroy intestinal parasites e.g. anti-helminthic enema.
  • To administer fluids and nutrients (for nutrition)
  • To relieve inflammation.

Classification of enemas: Enema is classified as cleansing, retention and return flow/Harris flush enema.

Cleansing enema: Removes feces from the colon, the most frequently used solution types are; tap water (hypotonic), normal saline solution (isotonic), soap suds solution and low volume hypertonic solution.

The large volumes of solution may present a danger to the patient with weakened intestinal walls, so the suggested maximum volume according to age group of the patients are as follows;

  • Infant - 150-250ml at the T° of 100°F
  • Toddler - 250-350ml at the T° of 100°F
  • School age - 350-500ml at the T° of 100°F
  • Adolescent - 500-750ml at the T° of 100°F
  • Adults - 750-1000ml at the T° 105 to 110°F

N.B. Soap suds may be added to tap water or saline to create the irritating effect to the intestinal tract. Only pure castle soap is safe or plain yellow soap/soft soap. Soaps or detergents can cause serious bowel inflammation. The recommended ratio of soap solution is 5ml (1 tea spoon) of castle soap to 100ml of warm water or saline.

Retention enema: These are retained in the bowel for a prolonged period for different reasons as given below;

  • Oil enema - it is given to soften the fecal matter in cases of constipation, to make defecation easier. It must be retained for ½ or 1 hour, about 115 to 200ml of solution is administered to adults at the temperature of 100°F (37.8°C). The solutions used are olive oil, gingerly oil, castor at the ratio of 1:2.
  • Carminative enema - it is also known as antispasmodic enema. It is given to relieve gaseous distention of the abdomen by increasing peristalsis and expulsion of flatus. Common solutions used include 8 to 16ml of turpentine mixed thoroughly with 600ml to 120ml of soap solution, milk (warm) and molasses enema 90 to 230ml well mixed with equal quantity, and the MCW enema (30ml of magnesium sulphate, 60ml of glycerin and 90ml of warm water)
  • Medicated enema - used to administer medication that are absorbed through the rectal mucosa e.g. dexamethasone for ulcerative colitis, neomycin solution before bowel surgery.
  • Anti-helminthic enema - is given to destroy and expel intestinal parasites (worms). Cleansing enema must be given prior to anti helminthic enema so that the drug comes in to direct contact with worms and the lining of the intestines. The solution used is infusion of quassia 15gm of chips to 600ml of water or hypertonic saline solution (sodium chloride) 60ml with 600ml of water - amount of solution given is 250ml.
  • Nutritive/nutrient enema - it is given to supply food and fluids to the body rectally. Secretion of the fluids depend upon the ability of the colon to absorb it, nutrient enema is particularly useful in condition like hemophilia. The solution used is normal saline, glucose saline 250ml 5%, peptonized milk 120ml. amount of solution used is 110 to 1700ml in 24 hours or 180 to 270ml 4 hourly intervals. The temperature of the solution is 100°F (37.8°C)
  • Cold enema/ice-water enema - is given to reduce body temperature in hyper pyrexia and heat stroke. It is given in the form of colonic irrigations, the temperature of the solution is 80 to 90°F (27 to 32°C)
  • Glycerin enema - given to children, fever patients and post operative patients. Pure glycerin and water at ratio of 1:2 is given.
  • Astringent enema - given to contract the tissues and blood vessels and helps to check bleeding and inflammation hence lessening the amount of mucus discharge and gives temporary relief in the inflamed area. It is usually given in colitis and dysentery. The solution used are tannic acid 25g to 600ml of water, alum 30g to 600ml of water and silver nitrate 2%(silver nitrate is dissolved in distilled water)
  • Sedative enema - this contains an anesthetic drug to produce anesthesia in the patient. The commonly used drugs are paraldehyde and over tin, the dose given is as per the doctor’s order. Or starch and opium is given.
  • Stimulant enema - given to treat shock and collapse. Coffee enema is given in case of opium poisoning. Solution used are black coffee 1 teaspoon of coffee powder to 300ml of water and amount used is 180 to 240ml at the temperature of 108 to 110°F (42- 43°C)
  • Emollient enema/starch enema - given in case of diarrhea to relieve irritation in an inflamed mucous membrane. The solution used is starch and opium Tr, opium 1 to 2ml added to 120-180ml of starch mucilage or rice water at the temperature of 100 to 105°F (37.8 to 40.5°C)

Contraindications (Enemas):

  • Acute myocardial infarction and cardiac problems
  • Acute renal failure (sodium retention problem)
  • Dehydrated patients
  • Young infants
  • Appendicitis
  • Obstetrical and gynecological problems e.g. fistulae (RVF) etc.

Methods of giving enema:

  • Enema can and tube method - when large amounts of fluid are to be given, this method is used e.g. soap and water enema.
  • Funnel and catheter method - when small quantity of fluid is to be given, this method is used e.g. oil enema.
  • Glycerin syringe and catheter method - when small quantity of fluid is to be given, this method is used e.g. purgative enema.
  • Rectal drip method - when fluid is to be administered very slowly in -order to aid in its absorption e.g. nutrient enema.

General Rules (Enema Administration):

  • The appropriate size of rectal catheter or rectal tube of enema is affine Jacques or French 22’’ for adults, 12’’ for infants and 14 to 18’’ for school age children.
  • The rectal tube needs to be smooth and flexible.
  • The rectal tube is lubricated with water soluble lubricant or Vaseline to facilitate insertion and to decrease irritation of the rectal mucosa.
  • The temperature of the solution needs to be adjusted according to the purpose of the enema.
  • The amount of the solution to be administered depends upon the type of enema, the age and the size of the person.
  • The patient should be placed in left lateral position, when enema is to be administered. In this position the sigmoid colon is below the rectum thus facilitating instillation of the fluid.
  • The distance to which the tube is inserted depends upon the age and the size of the patient. For an adult it is normally 7.5 -10cm (3 to 4 inches), for children 2.5 to 3.75cm (1 ½ inches)
  • The height of enema should not be above 18 inches (20cm) from the anus.
  • The length of the time that enema solution is to be retained depends on the purpose. For example oil enema retention is usually for 2-3 hours and other cleansing enemas are normally retained for 5 to 10 minutes.
  • Pre-packed enema will have its own instructions which need to be followed.
  • Prevent air from entering into the rectum by expelling air from the tube.
  • If the rectum is impacted, attempt to remove the fecal matter with a gloved finger.
  • Make sure the whole apparatus used for the administration of enema is in good condition before beginning the procedure.
  • Regulate the flow of fluid according to the type of enema.
  • Listen to the patient’ complaints while giving the enema and do not ignore and discomfort however small it is.
  • The solution should be given slowly. So that the patient does not experience discomfort and expel the solution for the case of retention enema.

Requirements (Enema Administration):

Trolley:

Top shelf:

  • Funnel or enema can/container
  • Rubber tubing
  • Glass connection
  • Rectal catheter in different sizes according to the patient in a kidney dish
  • Gate clip/screw clamp and nozzle
  • Lubricant and applicator (Vaseline or KY jelly)
  • Swabs in galipot
  • Jug of fluid/solution
  • Thermometer for enema solution (lotion thermometer)
  • Gloves

Bottom shelf:

  • Receiver for used swabs and applicator
  • Receiver for used catheter
  • Bed pan or bedside commode, if patient will not be able to ambulate to the toilet.
  • Urinal with cover.
  • Toilet paper
  • Strapping and scissors
  • Mackintosh and towel
  • Sterile drainage bottle, if catheter to remain in position
  • Basin and wash cloth
  • Clean bed linen, if needed

At the bedside:

  • Screens
  • Hamper if necessary
  • I.V stand pole

Procedure (Enema Administration - Detailed):

  1. Collect all the necessary equipment needed.
  2. Explain the procedure to the patient.
  3. Position the patient in left lateral position
  4. Wash hands thoroughly and put on gloves.
  5. Attach tubing to enema can and clamp the tube.
  6. Prepare the solution at required temperature and check the temperature using bath thermometer.
  7. Hang the enema can/solution on I.V stand and adjust the height to 18 inches from the bed.
  8. Place the mackintosh and towel beneath the patient.
  9. If there is a question regarding the patient’s ability to hold the solution, place a bed pan on the bed nearby.
  10. Pour the solution into the can, expel the air and clamp the tube. Air entry into the rectum may cause discomfort.
  11. Lubricate the tube (tip) 5cm (2 inches)
  12. Separate the patient’s buttocks and visualize the anus clearly, insert rectal tube gently to a distance of 2-4 inches.
  13. Encourage the patient to take deep breaths during administration of the fluid.
  14. Clamp or pinch the rectal tube if the fluid is about to get over to avoid air entry.
  15. Remove the rectal tube and dispose it off properly.
  16. Instruct the patient to hold the solution for 10-15 minutes.
  17. Clean the lubricant, any solution, any feces from the anus with toilet tissue.
  18. Have the patient to continue to lie on the left side for the prescribed length of time.
  19. When the patient has retained the enema for the prescribed time, assist to the bedside commode or toilet or position in supine onto the bedpan.
  20. When the patient has finished expelling the enema, assist to clean the perineal area if not able to do so.
  21. Return the patient to comfortable position. Place the clean dry protective pad under the patient to catch any solution or feces that may continue to be expelled.
  22. Clear away, clean and replace the equipment.
  23. Remove gloves and wash hands thoroughly.
  24. Record the procedure to the patient’s chart and report any abnormalities to the nurse in-charge or physician.

Assignment: Read and make short notes on other types of enemas.

Carry out relevant investigations (PEX 1.3.6)

Nurses assist with various investigations to help diagnose and monitor patient conditions. This PEX involves demonstrating the ability to prepare for and assist with these investigations, potentially including collecting specimens or preparing the patient.

Based on the detailed notes, the procedure for Urine Testing is provided, which aligns with carrying out relevant investigations.

Urine Testing

URINE TESTING Is the observation and examination of urine in order to diagnose illness.

Points to observe and report (“CASDORA”)

  • C-Color
  • A-Amount
  • S-Specific Gravity
  • D-Deposits
  • O-Odor
  • R-Reaction (PH)
  • A-Abnormalities

Color: Normal urine color is clear amber. It can be pale if a lot of fluids is taken and darker when no or little fluid is taken, in this case the urine is described as concentrated.

  • Blood - small amount give smoky appearance, large amount give a red color.
  • Bile - small amount give a dark brown color (like strong tea), larger amounts give a brownish green color.

Amount: The average adult passes 1 to 1 ½ liters of urine in 24 hours depending on fluid intake.

Specific gravity: Is the density of fluid compared to that of an equal volume of water. The specific gravity of normal urine is 1010-1025.

Deposits: Urine contains 4% solids which are in solution. Deposits which may be found in urine are;

  • Mucus - this forms a white fluffy cloud at the bottom of the glass.
  • Urates - these form a pink deposit at the bottom of the glass. Usually present when urine is concentrated.
  • Phosphates - white sediment at the bottom of the glass.
  • Pus - this is seen as a white ropy deposit in the urine.

Odor: The characteristic odor of urine may be altered by the presence of;

  • Acetone - the urine has a sweet smell like new mown grass.
  • Infection - the urine may have an offensive fishy odor e.g. in gonorrhea.
  • Ammonia - this is due to decomposition of urine.

Reaction: Urine is normally acidic but becomes alkaline if allowed to stand for some time, due to the presence of ammonia. The reaction is tested using a litmus paper or multi test urine sticks. Acid urine turns the blue litmus paper red. Alkaline urine turns the red litmus paper blue. Urine which does not change the color of either litmus paper is neutral.

Multi-test urine sticks have an indicator strip which gives the reaction of urine in terms of ph. The stick is dipped into the urine and the color change compared with the given chart.

Abnormality: The abnormalities to be detected are;

  • Protein - color changes to green indicating that protein is present.
  • Sugar/glucose - if glucose is present, the color turns to blue.
  • Acetone (ketone bodies) - the color turns to mauve to dark purple depending on the amount of ketones present in the urine.

Requirements:

Tray:

  • Rack of test tubes
  • Reagent: Benedict’s solution
  • Acetest tablets
  • Esbach’s tube
  • Spirit lamps or candles or paraffin lamp
  • Glass container
  • Glass rode
  • Acetic acid, acetest powder
  • Uristix/clinistix tablets
  • Box of matches
  • Ethylated spirit
  • White paper/filter paper

Or (for testing with litmus/urine sticks)

  • Red and blue litmus paper or urine sticks
  • Clean gloves
  • Receiver for used litmus paper or urine sticks
  • Receiver for used gloves
  • Urine container (must be clean) and marked and urine in it
  • Pipette in a kidney dish or dropper/syringe
  • Urinometer
  • Pen and form to record

Procedure:

  1. Collect the equipment needed.
  2. Wash hands and put on the gloves.
  3. Observe the urine for color and deposits/appearance. Presence of pus and mucus, blood, phosphates etc. color amber yellow or not
  4. Measure the amount of urine using the measuring jar.
  5. Place the urinometer in the container containing urine allow it to float to measure the specific gravity.
  6. Use a dropper/pipette and drop the urine onto the litmus paper and observe the color to test the ph. Or dip the urine stick into the urine and color change compared with the given color in the chart.
  7. Clear away and wash hands thoroughly.
  8. Record the findings and report any abnormalities to the nurse in-charge or physician.

Testing Urine Abnormalities

Testing urine abnormalities involves specific chemical tests:

Abnormality Reagent Method Result
Protein (any of the methods may be used) Boiling method Urine must be acidic in reaction. If necessary add 2-3 drops of acetic acid
Half fill the test tube with urine; boil the top 1/3 over the lamp.
If a white cloud appears, add 2 drops of acetic acid.
If the cloud persists, protein is present. Interpret according to the thickness of the urine.
Albustix Dip the treated end of the stick into the urine. Remove immediately and wipe the back part of the strip on the edge of the container to remove the extra urine. Compare with the scale on the container. Do not handle the treated end with fingers. The result is read immediately. A change of color will show the approximate amount of protein present as shown on the color chart.
Sugar/glucose Benedict’s test Put 5mls of Benedict’s reagent in a clean test tube and add 8 drops of urine. Boil the bottom end of the test tube for 2 minutes over a spirit lamp. Sugar is present if the color changes as follows: green +, yellow ++, orange +++, brick red ++++.
Clinistix Dip the treated end of the stick into the urine. Compare with the scale on the container. Do not handle the treated end with fingers. The result is read immediately. A change of color will show the approximate amount of sugar present as shown on the color chart.
acetone Acetest tablets/powder One acetest tablet is placed on a clean white surface. One drop of urine is put on to the table and results read in 30 seconds. The tablet turns mauve to dark purple depending on the amount of ketones present in the urine. Compare the color of the tablet to the color chart.
Nurses Revision

Perform bladder and bowel care  Read More »

Care and Treatment of Pressure Sores

Demonstrate care and treatment of pressure areas (e.g hands and feet) (PEX 1.6.3)

Pressure areas are parts of the body susceptible to developing pressure sores (bedsores) due to prolonged pressure, friction, and moisture. Proper care and treatment are essential for prevention and healing.

This PEX focuses on demonstrating the skills required for:

  • Identifying patients at high risk for pressure sores.
  • Inspecting pressure areas (such as heels, elbows, sacrum, etc.) for signs of redness, warmth, or breakdown.
  • Implementing preventive measures, including repositioning, using pressure-reducing devices, and maintaining skin hygiene.
  • Providing care for existing pressure sores (if applicable and within scope of practice).
  • Documenting skin assessments and interventions.

TREATMENT OF PRESSURE AREAS

Pressure areas These are places which are liable to pressure sores due to weight applied heavily and the tissue is compressed between the bed and the bony prominence. The blood supply to the area is interfered with and the skin gives way, this is called a decubitus ulcer.

Pressure sore/bed sore/decubitus ulcer: Is an ulcer occurring on the skin of any bedridden patient particularly over bony prominences or where two skin surfaces press against each other. Due to constant pressure circulation becomes inadequate and finally death of tissues occurs.

Causes:

  • Direct or immediate cause - the pressure caused by weight of the body continuously remaining in one position e.g. in splints, casts and bandages.
  • Friction - friction of the skin with rough beddings cause injury to the skin e.g. wrinkles in bed cloths, cramps of food in bed, chipped or rough bed pans, hard surfaces of plaster casts and splints.
  • Moisture - the skin contact with moisture for a prolonged period can lead to maceration of the skin.
  • Infections - pressure of pathogenic organisms due to unhygienic condition, pathogenic organisms multiply and the infection settles on the skin.

Common sites for bed sores according to positions:

Supine position: Occiput, Scapular, Supine process (in the presence of lodosis or severe emaciated patients), Elbow, Sacrum and skin folds of the buttocks, Heels

Lateral position: Ear, Acromion process (shoulder), Ribs, Iliac crest, Greater trochanter, Media and lateral condyles, Malleolus (ankle)

Prone position: Cheek and ear, Acromion process, Breast (female patients), Anterior superior supinous process, Genitalia (male patients), Knees, Toes

Patients liable to pressure sore/predisposing factors:

  • Paralyzed patients - The skin is deprived of its nerve supply and the patient can neither move to avoid pressure nor feel its effect. Sore of paralyzed parts are known as trophic ulcers. These ulcers rise with great speed extending alarmingly and are very difficult to prevent.
  • Obese/heavy patients - This carry much weight on their pressure areas.
  • Emaciated and malnourished patient - The skin breaks easily since it’s thin.
  • Patients with incontinence - The skin is frequently soaked by urine. Urine contains urea which irritates the skin.
  • Debilitating diseases - These include; diabetes, neoplasms, anemia, edema, due to various causes.
  • Very ill patients confined to bed or patients with long term illnesses e.g. fractured patients.
  • Patients with spinal injury
  • Elderly patients with circulatory problems.

Clinical presentation of a bed sore:

  • First degree: Redness, heat, tender, discomfort in the affected part, inflamed and painful. The area becomes cold to touch and insensitive. Localized edema
  • Second degree: Later they are becomes blue, purple, insensitive, circulation cut off, gangrene develops and the epidermis breaks.
  • Third degree: Suppuration and sloughing occurs which may burrow right down to the bones.

Preventive measures of bed sores:

  • Daily examination of patients with high risk of pressure sore for signs and symptoms. Routine attention to the pressure areas.
  • Relieve pressure by good nursing care e.g. bed making practices i.e. use of special mattress (sorbo), beds and comfort devices.
  • Change position at least 2 hourly for all bedridden patients.
  • Loosening tight bandages and restraints.
  • Avoid friction by providing smooth, firm and wrinkle free beds, keep the bottom cloths free from crumbs and foreign bodies.
  • Prevent moisture by changing linen when it is wet or soiled. Sweat, urine, feces must not be allowed to remain in contact with the skin.
  • In cases of incontinence of urine, an indwelling catheter should be inserted under very strict sterile procedure.
  • Give a well balanced diet, high in proteins and plenty of fluids to maintain the general health of the patient.

Requirements (Care of Pressure Areas): trolley

Top shelf:

  • Soap in a soap dish
  • A galipot for oil/Vaseline
  • Flannel
  • Bowl of warm water
  • 2 jug of hot and cold water if necessary

Bottom shelf:

  • Bath towel
  • Mackintosh and towel
  • Toilet paper
  • Draw sheet
  • Bed sheet
  • Patient’s gown
  • Receiver for used paper
  • Clean gloves

At the bed side:

  • Screens
  • Hamper
  • Bedpan

Procedure:

  1. Collect the equipment required for the procedure.
  2. Explain the procedure to the patient.
  3. Screen the bed for privacy.
  4. Position the patient exposing the part to be treated.
  5. Wash hands thoroughly and put on gloves then flannel.
  6. Apply soap to a dump flannel; wash the area in circular movements.
  7. Dry the area and massage with oil/Vaseline in circular motion. Do not massage over reddened or inflamed area itself but start just outside the affected area and move outwards in a circle to stimulate circulation.
  8. The bed is then straightened out and the patient is made comfortable. Bed line is changed if necessary.
  9. Clear away and wash hands and dry.
  10. Record and report the findings to the nurse in-charge or the physician.

Demonstrate Washing of Patient's Hair (PEX 1.6.4)

(Note: While your notes describe bed bath procedures, a specific section for washing patient's hair was not detailed. This PEX would involve demonstrating this practical skill.)

Washing a patient's hair when they are unable to do it themselves is important for hygiene and comfort.

This PEX focuses on demonstrating the skills required to:

  • Prepare the necessary equipment (basin, water, shampoo, towels, waterproof sheeting).
  • Position the patient comfortably and safely to protect the bed linen from water.
  • Wash the patient's hair gently and thoroughly.
  • Rinse and dry the hair properly.
  • Ensure the patient is comfortable after the procedure.

Carry out Treatment of Infested Hair (PEX 1.6.5)

(Note: A specific section for treating infested hair was not detailed in your notes. This PEX would involve demonstrating this practical skill.)

Treating infested hair (e.g., with lice) is important for patient hygiene and preventing spread.

This PEX focuses on demonstrating the skills required to:

  • Identify infested hair.
  • Prepare and use appropriate treatment products (e.g., medicated shampoo, comb).
  • Follow isolation precautions to prevent spread during treatment.
  • Thoroughly comb through the hair to remove nits and lice.
  • Clean equipment and dispose of waste properly after treatment.
  • Educate the patient/family on preventing re-infestation.

Care of the Patient's Eyes and Ears (PEX 1.6.6)

Providing proper care for the patient's eyes and ears is essential for hygiene, comfort, and preventing complications.

This PEX focuses on demonstrating the skills required for:

  • Cleaning the patient's eyes correctly (as detailed in the 'Eye Care' section below).
  • Providing ear care, including cleaning the external ear canal (as detailed in the 'Ear Care' section below).
  • Identifying signs of infection or other issues in the eyes or ears and reporting them.
  • Administering eye drops or ointment (as detailed in the 'Eye Care' section below).
  • Administering ear drops (as detailed in the 'Ear Care' section below).

Eye Care

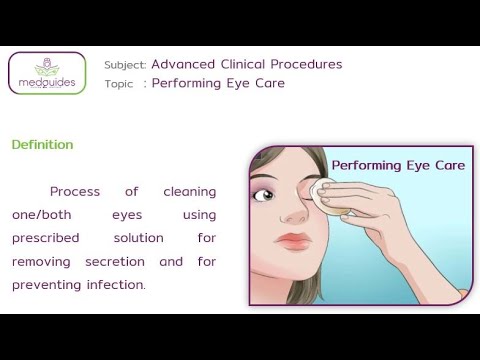
EYE CARE Eye care helps to prevent infection and to maintain their function. Hygienic care of the eye is always done as part of the general bathing procedure.

Reasons for eye care:

  • To maintain the cleanliness of the eyes
  • To prevent infection
  • To keep the eyes in normal functioning
  • To wash out discharge prior instillation of eye drops or ointment.
  • In preparation for operation.

Common eye problems:

  • Conjunctivitis (burning, itching, red-watery and painful eyes with increased secretions)
  • Cataracts
  • Glaucoma
  • Strabismus
  • Squint
  • Foreign bodies
  • Trachoma

General rules in eye care:

  • Unconscious patients are at a risk for eye injury. Daily swabbing of the eyes with wet sterile swab is important.
  • Cleaning of the eyes is done from the inner canthus of the eye to the outer canthus of the eye.
  • Use normal saline to remove the crust.
  • During bath, each eye is cleaned with a spat portion of the wash cloth.
  • When sterile procedure is required, each eye is cleaned with separate swabs, swabbing each once only.

Requirements (for general eye care): A tray containing;

  • A galipot of swabs
  • A galipot of sterile normal saline or plain water
  • Face towel
  • Receive for used swabs
  • A drug if any
  • A kidney dish with a pair of artery forceps.

Procedure (General Eye Care):

  1. Collect the equipment needed.
  2. Explain the procedure to the patient.
  3. Position the patient flat if the condition allows/permits or in sitting up position.
  4. Wash hands.
  5. Wet the swabs in sterile saline or plain water.
  6. Stand in front of the patient and clean the eyes with sterile swabs.
  7. Squeeze the excessive fluid from the swab and gently wipe the eye lids from the inner to the outer canthus.
  8. Use one swab for one swabbing and separate swabs for each eye.
  9. When the eyes are clean, wipe the face with face towel.
  10. Instill any medication if required.
  11. Leave the patient comfortable.
  12. Clear away and wash hands.
  13. Record and report the procedure to the nurse in-charge.

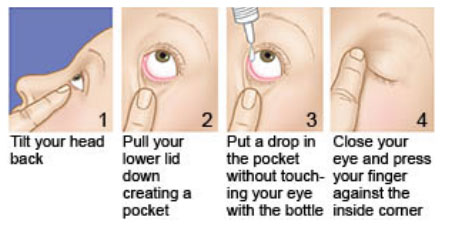
Instillation of Eye Drops

Reasons: As treatment of bacterial infection, As anesthesia, Diagnostic purpose

Requirements: Tray containing; Pipette in galipot (sterile) or drop bottle, Galipot of swabs, Treatment sheet

Procedure:

  1. Collect the equipment needed.
  2. Explain the procedure to the patient.
  3. Check the prescription and note the eye to be treated.
  4. Position the patient in sitting up or lying down position.
  5. Wash hands.
  6. A swab is placed down the lower lid up to the lash margin.
  7. The patient is asked to look up and drop is instilled onto the lower fornix.
  8. The swab is kept on the lid until the patient closes the eye and any tears are absorbed in the swab.
  9. Patient is left comfortable
  10. Clear away and wash hand
  11. Report and record the procedure on the patient’s chart.

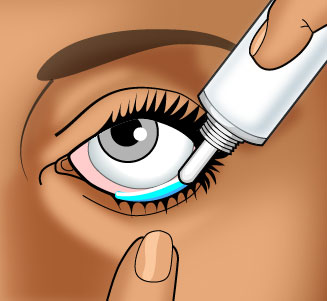
Application of Eye Ointment

Requirements: A tray containing; Eye ointment, Galipot of swabs, Treatment sheet

Procedure:

  1. Collect the equipment needed.
  2. Explain the procedure to the patient.
  3. Position the patient in sitting up or lying down position.
  4. The swab is placed on the lower lid; the upper lid is drawn up.
  5. The nozzle of the eye ointment tube is placed 1cm away from the lower lid and the ointment is pressed horizontally onto the lower lid from within outward.
  6. Any surplus ointment is gently wiped off with a swab.
  7. Leave the patient comfortable.
  8. Clear away and wash hands.
  9. Report and record the procedure on the patient’s chart.

Eye Irrigation

Washing of the conjunctiva sack with a stream of fluid (water).

Purpose: To remove foreign body from the eye, To remove chemicals which have been accidentally splashed into the eye(s), To wash out discharge, Before administration of medication, In preparation for eye operations

Requirements: Tray - sterile

  • Irrigating solution - Normal saline at 37°c or plain boiled cooled water (sterile).
  • Eye irrigator (Undine) or rubber bulb /syringe without a needle in bowl
  • Sterile gloves
  • Litmus paper
  • Eye pad
  • A bottle of ophthalmic irrigation fluid (incase more is needed)
  • Galipot of cotton balls or facial tissues
  • 2 receivers
  • Mackintosh cape and towel
  • Eye lid retractor, if any

Procedure:

  1. Collect the equipment which are needed for the procedure.
  2. Explain the procedure to the patient or care taker incase of the child.
  3. Screen for privacy or close the adjacent windows and door.
  4. The patient is placed in the comfortable position either sitting up or reclining position with the head turned to the affected side.
  5. The mackintosh cape and towel are placed under the patient’s head.
  6. Wash the hand and put on gloves.
  7. The patient is given a receiver to hold placed against the cheek to collect the lotion.
  8. If there is much discharge or ointment this must be removed with moist swabs first.
  9. The undine or bulb is filled with lotion. About 12mls should be used and care taken to see that the level of the fluid does not come above the air outlet.
  10. Some lotion is run onto the inner side of the forearm to test the temperature or use lotion thermometer if available.
  11. The eyelids are held apart with the first and second finger of one hand or use an eye lid retractor (if available). The undine or bulb is held 3 to 5cm away from the eye. The flow is started on the cheek then brought up to the nasal side of the eye. The flow is kept up steadily until all the lotion is used.
  12. The eyelids and the cheek are gently dried by the swab.
  13. Apply eye drop or ointment if prescribed by the physician.
  14. Clear away and make the patient comfortable.
  15. Discard the waste (solution and swabs), sterile and replace the reusable articles for next use.
  16. Wash hands
  17. Record the procedure and report the findings and treatment given to the nurse in-charge/physician.
  18. Refer the patient to the physician if the eyes show evidence of ulceration.

N.B:

  • When irrigating both eyes, ask the patient to tilt his head towards the side being irrigated to avoid contamination.
  • For chemical burns irrigate each eye for at least 15 minutes with normal saline solution to dilute and wash out the harsh chemicals.
  • If the patient cannot identify the specific chemical, use litmus paper to determine if the chemical is acid or alkaline or to be sure the eye has been irrigated adequately.
  • An irrigation fluid may be pre-packed in a disposable set for use or a sterile 50ml syringe may be used.

Warm Eye Compress

Is the placing of the warm compress/pack over the affected area or eye.

Indications: To relieve discomfort/pain, To reduce inflammation, To enhance absorption of drugs, To promote drainage of superficial infections

Requirement: Tray - sterile

  • Bowl of warm water
  • Sterile water/normal saline in a bowl
  • Mackintosh and towel
  • Sterile swabs
  • Sterile gloves
  • Receiver

Procedure:

  1. Identify the patient and the eye to be treated.
  2. Collect the equipment needed for the procedure.
  3. Explain the procedure to the patient to obtain consent.
  4. Provide privacy to the patient.
  5. Position the patient in sitting up or lying down position for this procedure.
  6. Wash hands and put on gloves.
  7. Place the bowl with the solution in the bowl with warm water.
  8. Place the swabs in the warm water/solution.
  9. Squeeze out the excess solution.
  10. Instruct the patient to close his/her eye, gently apply the swab on top of the affected eye. If the patient complains the compress is too hot, remove it immediately.
  11. Change the compress every few minutes for the prescribed length of time.
  12. Use a dry swab to clean and dry the patients’ face.
  13. If required apply eye drops/ointment.
  14. Leave the patient comfortable.
  15. Clear away and wash hands.
  16. Record and report the procedure /findings to the physician or nurse in charge.

Cold Eye Compress

Is placing of a cold compress/pack over the affected area or eye to relieve discomfort.

Indication: To reduce swelling or bleeding, To ease peri-orbital discomfort, To relieve itching

Requirement: Tray

  • Small plastic bag or glove
  • Ice cubes/chips
  • Strapping
  • Sterile solution (water or normal saline)
  • Swabs
  • Mackintosh and towel
  • Clean gloves

Procedure:

  1. Identify the patient and which eye to be treated.
  2. Collect the equipment needed for the procedure.
  3. Explain the procedure to the patient or caretaker.
  4. Position the patient to lie down for this procedure.
  5. Place the mackintosh and towel to protect the patient’s clothes.
  6. Place the ice or clips in the plastic bag or glove to make an ice pack (keep the ice pack small to avoid excess pressure on the eye).
  7. Remove excess air from the bag or glove and tie a knot at the end.
  8. Wash hands, dry and put on glove.
  9. Moisten the swab with the solution.
  10. Place the moist swab over the affected closed eye (the swab helps to conduct the cold from the ice pack).
  11. Place the ice pack on top of the gauze and tape it onto the place.
  12. If the patient complains that the compress is too cold, remove it immediately.
  13. After 15-20 minutes, remove the tape, ice pack and gauze.
  14. Use the dry swab to clean and dry the patients face.
  15. If required apply eye drops/ointment if required.
  16. Leave the patient comfortable and clear away.
  17. Wash hand and document the procedure and findings.

Ear Care

EAR CARE

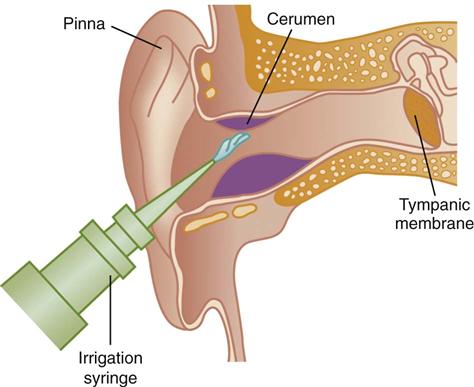
Ear Irrigation/Syringing

Is the washing of the external auditory canal with a stream of fluid.

Purpose:

  • To remove the ear wax
  • To remove foreign bodies (except hygroscopic substances)
  • To cleanse the ear in case of purulent discharge caused by middle ear infection.
  • For antiseptic effect
  • To apply heat
  • To evaluate vestibular functions (e.g. bithermal caloric test).

Solution used:

  • Boric acid 2-4%
  • Sodium bicarbonate solution 1%
  • Normal saline
  • Hydrogen peroxide 2%
  • Sterile water

Requirements: Tray - sterile

  • Ear syringe in a receiver
  • Prescribed sterile solution e.g. sodium bicarbonate (warmed 37-38°c) in a bowl
  • Head light and mirror (if available)
  • Galipot of swabs
  • Cotton tipped applicators
  • Water proof pad
  • Mackintosh cape and towel
  • Jug of extra sterile solution
  • Sterile gauze
  • Clean gloves
  • Emesis/vomitus bowl
  • Auriscope

Procedure:

  1. Collect the equipment needed for the procedure.
  2. Explain the procedure to the patient and how he should cooperate.
  3. Bring the equipment to the patient’s bedside or nearer the patient.
  4. Check the physician’s order.
  5. Place the mackintosh cape and towel to protect the patient and beddings.
  6. Wash hands
  7. Have the patient sit up or lie with the head tilted the side of the affected ear. The patient is given a receiver to hold against the cheek under the ear to catch/receive the returning solution.
  8. The uses auriscope to examine the ear to ascertain whether the impaction is due to foreign hygroscopic (attracts or absorbs moisture-if water contacts such a substance it may cause it to swell and produce intense pain).
  9. Fill the ear syringe or irrigator and expel the air out.
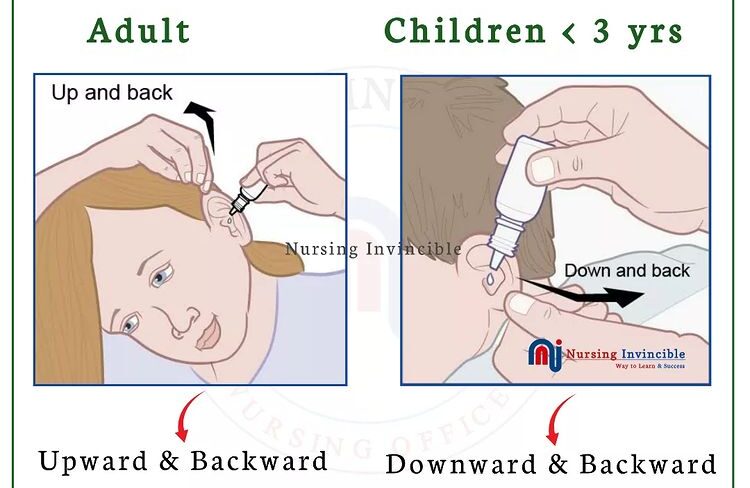
  10. The nurse takes the pinna of the ear between the first and second fingers of one hand and draws it gently upwards and slightly backward for adults, upward and back for a child over 3 years of and down and back for an infant or child up to 3 years of age to help straighten the meatus (auditory canal).
  11. Holding the syringe in the other handle, the nozzle is rested against the thumb and the first finger of the hand holding the ear to keep it steady and the flow of lotion is directed along the roof of the meatus using only sufficient force to remove secretions. Do not occlude the auditory canal with the nozzle; allow the solution to flow out unimpeded.
  12. The procedure is repeated several times until the ear is clean.
  13. On completion, place the cotton ball loosely in auditory meatus/canal and have the patient lie on the side of the affected ear on a towel or absorbent pad so as the excess fluid to flow out.
  14. the meatus is then examined to see if it is clear
  15. The returned solution is also examined to see the result.
  16. The outside of the ear and cheek is dried and ear reexamined with the auriscope.
  17. Discard the returned solution and swabs.
  18. Clear away the equipment.
  19. The syringe is disconnected and the nozzle cleaned, dried and replace to safe place for next use.
  20. wash hands
  21. Report and document the procedure, the findings/results and the patient’s response.
  22. Remove the cotton ball and asses drainage after 15 minutes.

N.B:

  • If the patient complains of pain, the procedure is stopped immediately.
  • The irrigation solution should at least at room temperature.
  • If irrigation does not dislodge the wax, instill several drops of prescribed glycerin, carbonide peroxide or other solutions as directed, 2 to 3 times daily which helps to soften and loosen impaction.
  • Take care not to irrigate an older adult’s ears with cool water, it can cause dizziness.

Instillation of Medication into the Ear

Is the administration or introduction of medication into the ear.

Purpose: To soften the ear wax for removal, To reduce localized inflammation and destroy infective organisms in the external ear canal, To relieve pain, To facilitate the removal of a foreign body.

Contra-indications: Rupture of tympanic membrane

Requirement: Clean gloves, Cotton tipped applicators, Medication bottle with dropper, Cotton balls/swabs, Kidney dish/receiver, Bowl with normal saline (if necessary)

Procedure:

  1. Collect the equipment needed for the procedure.
  2. Identify and explain the procedure to the patient, assess for allergy to certain medication, redness/abrasion in the pinna or meatus, type and amount of discharge, complaints of discomfort specific drug reactions and patient knowledge about the medication to be administered and the purpose.
  3. Check the medication order for the name, dose, time, amount and the ear to be treated.
  4. Position the patient to a comfortable position to assume during and after instillation (lie on the side with the ear being treated uppermost).
  5. Obtain assistance in case of children or infants, to immobilize them.
  6. Clean the meatus of ear canal, using cotton tipped applicators. Use normal saline if necessary.
  7. Warm the container in the hand or by placing it for a short time in warm water. Do not instill cold medicine in the ear (irritation).
  8. Fill the ear dropper partially with medication (prescribed amount).
  9. Straighten auditory canal and instill the correct number of drops along the side of ear canal by holding the dropper 1cm (1/2inch) above ear canal.
  10. Press gently and firmly onto the tragus of the ear.
  11. Instruct the patient to remain in that position for about 5 minutes.
  12. Place a small piece of cotton fluff loosely at the meatus of auditory canal for 15-20 minutes.
  13. Assess the patients’ comfort, response and check for the discharge from the ear.
  14. On completion make the patient comfortable
  15. Clear away and wash hands.
  16. Report and document the procedure, medication given, dose (number of drops and patients’ response).

Nasal Care

Irrigation of the nose

Is the washing out or the nasal cavity.

Procedure:

  1. Collect the equipment needed for the procedure.
  2. Explain the procedure to the patient.
  3. Provide the privacy to the patient
  4. Position the patient in recumbent position if the condition allows.
  5. Inspect the condition of the nose and sinuses, clean the patient’s nose.
  6. The easiest and safest way is to ask the patient to sniff in an alkaline solution into the nose and spit it out.
  7. Repeat the procedure until the nose is clear.
  8. Instill the medication if prescribed.
  9. Make the patient comfortable
  10. Clear away, clean, dry and replace the re-useable article in safe place for the next use.
  11. Wash hands
  12. Report and document the procedure, medication given, dose (number of drops) and the patient’ response.

Nasal Instillations

Is the process by which a liquid is introduced into the nasal cavity drop by drop.

Purpose: To treat allergies, To treat sinus infection, To treat nasal congestion, To give local anaesthesia

General rules:

  • Medications are instilled only on written order from the doctor.
  • Avoid oil base solutions as nasal drops since it interferes with normal cilliary action and may cause aspiration pneumonia.
  • Avoid the use of decongestant drops for a long period, because they become ineffective.
  • Administer drugs in correct concentration.
  • Identify the drug correctly and follow the rules for administration of medication.
  • Medical asepsis should be observed carefully throughout the procedure.

Requirement: Prepared medication with clean dropper, Penlight, Clean gloves, Facial tissues/face towel, Small pillow, Receiver, Tissue paper, Medical card/patient’s chart

Procedure:

  1. Identify the patient to be given medication and review the physician’s order.
  2. Collect the equipment needed for the procedure.
  3. Explain the procedure to the patient to obtain consent and help alley anxiety. Tell the patient what to expect e.g. burning sensation or stinging of mucosa or choking sensation as the medication trickles into the throat.
  4. Bring the equipment to bedside or near the patient.
  5. Provide privacy to the patient.
  6. Position the patient in a comfortable position.
  7. Determine which sinus is affected by referring to medical record, assess the patient’s medical history (hypertension, heart disease diabetes and hyperthyroidism and ask about known allergies to nasal instillations.
  8. Wash hands and put on gloves if the patient has nasal discharge.
  9. Inspect the condition of the nose and sinuses using penlight. Palpate sinuses for tenderness.
  10. Instruct the patient to clear or blow nose gently unless contraindicated (increased intracranial pressure or nose bleeding).
  11. Tilt the head backwards and support with a non dominant hand
  12. Instruct the patient to breathe through the mouth
  13. Hold the dropper 1cm above the nares and instill/administer the number of drops towards the midline of ethmoid bone.
  14. Ask the patient to remain in that position for 5 minutes and then offer face tissue to blot the running nose but caution the patient against blowing for several minutes.
  15. Assist the patient to a comfortable position after absorption of medication.
  16. Clear away and discard off the used supplies and then wash hands.
  17. Record the procedure, finding, medication, number of drops, the nostril used, time given and patient’s response.
  18. Observe the patient for 15-30 minutes for side effect after administration of drug.
  19. Ask if the patient is able to breathe through the nose, if not administer the nasal decongestant and ask the patient to occlude one nostril at a time and breathe deeply.

Perineal Care

PERINEAL CARE Is the cleaning the perineum from the cleanest to the less clean area including external genitalia and surrounding areas, the urethral orifice to the anal orifice.

Purpose:

  • To prevent sepsis
  • To remove discharge and prevent bad odor
  • To relieve itching
  • To promote healing of stitches
  • To promote comfort

Patients who need perineal care:

  • Unable to do self care or bedridden patients
  • After surgery on the genitourinary system
  • Patients with indwelling catheters
  • Patients with excessive vaginal discharges
  • Post partum patients
  • Incontinence of urine and stool
  • Genitourinary tract infections

Requirements: A trolley containing;

Top shelf:

  • Basin of warm water or antiseptic solution
  • Soap in a soap dish
  • Sterile swabs and pads if required
  • Long artery forceps in the kidney dish

Bottom shelf:

  • Mackintosh and towel
  • Receiver for used swabs
  • Gloves
  • Clean personal clothes/patient’s gown
  • Clean Bed linen if needed
  • Flannel/ Wash cloth and towel, if able to help him/herself
  • Lotion thermometer/bath thermometer
  • Bedpan and urinal with covers

At the bedside:

  • Screens
  • Hamper if necessary

Procedure:

  1. Collect all the equipment needed
  2. Explain the procedure to the patient
  3. Provide privacy
  4. Position the patient in dorsal recumbent position.
  5. Wash hands thoroughly and put on gloves.
  6. Fold back the bed clothes to the foot of the bed, leaving the patient covered to the waist with top sheet.
  7. Place the mackintosh and towel under the buttocks.
  8. Remove soiled pad if any for the case of female patients and place in a receiver on the bottom of the trolley.
  9. Wash abdomen, inside the thighs and buttocks using soap, water and flannel. Rinse and dry thoroughly with the patient’s towel.
  10. Wash hands and put on gloves.
  11. Put the bed pan in position.
  12. Holding the jug at the level of symphysis pubis, pour water/lotion over the perineum to wash off the discharge (females). For the male patient cleanse the penis.
  13. Hold the swabs with forceps or sterile gloved hand and clean from above downwards towards the anal canal.
  14. Use one swab for one swabbing.
  15. For female patient clean the perineum from the middle outward in the following order; the vulva, the labia majora on both sides, inside of the labia minora on both sides, then vestibule and dry thoroughly. Clean the perineal region and anus well. Gently visualize vulva for debris
  16. If male patient clean the fore penis using circular motions from underneath upwards and the rest of it using up- downwards sweeps to scrotum and clean the anal area thoroughly and dry. Carefully examine gluteal folds, scrotal folds.
  17. Remove the bed pan by supporting the hips. Turn the patient to one side and dry the buttocks.
  18. Apply the medicine and pad if necessary.
  19. Remove the mackintosh if any extra one is used, if not dry the mackintosh and remake the bed, leave the patient comfortable.
  20. Clear away, clean and replace the equipment to the appropriate place of storage.
  21. Remove the gloves and Wash hands.
  22. Record the procedure and report any abnormality seen on the patient to the nurse in-charge or physician.

Catheter Care/Hygiene

CATHETER CARE/HYGIENE Is the maintenance in the cleanliness of the surrounding area around the urethra to decrease contamination of the catheter by bacterial flora.

Before procedure you should:

  • Assess the catheter patency and urine color, consistency and amount while performing the care to determine if the catheter and drainage system are functioning correctly.
  • Determine the condition of the urinary meatus and perineal area to monitor for redness swelling or drainage, stool or vaginal discharge as indicator of infection. External infections may migrate up the catheter and lead to urinary tract infection.
  • Determine the clients emotional reaction and feelings related to the catheter (nurse-patient relationship)

Requirements: Trolley

Top shelf:

  • Galipot of sterile swabs
  • Soap in a soap dish
  • Galipot of lotion/antiseptic or warm water in basin
  • Clean gloves
  • Wash towel in bowl

Bottom shelf:

  • Mackintosh and towel
  • Measuring jar
  • Receiver for used gloves
  • Adhesive tape and scissors
  • Receiver for used swabs
  • Clean bed linen

At the bed side:

  • Screens
  • Hamper

Procedure:

  1. Collect all equipment needed.
  2. Explain the procedure to the patient.
  3. Provide adequate privacy by screening the bed and closing the adjacent windows if any.
  4. Position the patient in supine position.
  5. Wash hands and put on gloves.
  6. Place the mackintosh and towel beneath the buttocks
  7. Carry out perineal care and after the perineal care, cleanse meatus if there is excessive purulent drainage with non-irritating antiseptic lotion.
  8. Cleanse catheter from meatus out to end of catheter, taking care not to pull out the catheter.
  9. Repeat catheter care any time it becomes soiled with stool or other drainage.
  10. On completion, make the patient comfortable.
  11. Clear away, clean and replace the equipment. Remove gloves and wash hands thoroughly and dry.
  12. Record the procedure in the patient’s chart and report the findings to the nurse in-charge of physician.
Nurses Revision

Care and Treatment of Pressure Sores Read More »

Bed Bath

Topic: Carry out proper patient's hygiene (PEX 1.6.1 - 1.6.6)

Carry out bed bath (PEX 1.6.1)

BED BATH Is bathing of a patient who is confined to bed and cannot or has no capability of self bathing.

Purpose:

  • To cleanse the body off dirt, debris and perspiration (sweating) and toxic substances.
  • To refresh (relieve fatigue) and provide tactile stimulation.
  • To stimulate circulation.
  • To provide comfort and relaxation.
  • To enhance self-concept (self esteem)
  • To regulate body temperature.
  • To induce sleep.
  • To prevent bed/pressure sores by minimizing skin irritation.
  • To give health instruction to the patient.
  • To prevent contracture by giving exercise-stretching of body muscles.

Types of patients needing a bed bath:

  • Unconscious or semi-conscious patients.
  • Post-operative patients
  • Patients with strict bed rest.
  • Paraplegic patients
  • Orthopedic patients in plaster cast and traction
  • Seriously ill patients

Types of cleansing bath:

  • Bed bath; it is the bathing of a patient who is confined to bed.
  • Therapeutic bath; doctor specifies the temperature of the water, medications to be added and the body part is to be treated.
  • Partial bath; it is the act of cleaning particular areas in the body for example face, axilla, genitalia, upper and lower limbs.
  • Self-administered bath; this is the same as in bed bath except the patient is assisting in taking the bath.
  • Tub bath or bathroom bath; this bath is allowed to the patient only if h/she has enough confidence for self help and is able to withstand the procedure.

Factors Affecting the Skin (Relevance to hygiene and pressure areas)

  • Impaired self care
  • Immobilization
  • Exposure to pressure and moisture
  • Vascular insufficiency
  • Reduced sensation
  • Nutritional alterations
  • Constrictive external device

Equipment for bed bath:

Top shelf:

  • Basin
  • 2 large jugs (1 for hot water, 2nd for cold water)
  • 2 flannels (wash cloth)
  • Soap in soap dish
  • Nail brush and razor blade/nail cutter
  • Tooth brush/stick and tooth paste
  • Mug of clean water and receiver
  • Face towel
  • Comb and oil/Vaseline
  • Tray of pressure areas
  • Bowl of swabs or toilet paper
  • Bath thermometer

Bottom shelf:

  • 2 bath towels
  • Clean bed linen
  • Clean patient’s gown/dress (depend on the sex)
  • Draw mackintosh and towel
  • Receiver for used swabs
  • Pail or bucket for dirty water
  • Gloves
  • Nurse’s apron

At the bedside:

  • Bedpan or + urinal with cover
  • Soiled linen container
  • Screens

Procedure:

  1. Collect all the equipment needed always before beginning the procedure
  2. Explain the procedure to the patient
  3. Maintain the privacy of the patient by screening and closing the adjacent windows; and to prevent draught.
  4. Give the patient a bedpan or urinal if required
  5. Remove the top bed clothes and pillows, except the sheet and one pillow to maintain the position.
  6. Remove the gown, wash and dry each part separately uncovering only the part to be washed.
  7. Mix hot and cold water in a basin half full and check the temperature using the back of the hand or bath thermometer (temperature should be 110°F to 115°F)
  8. Spread the face towel around the neck. Wet the sponge towel/flannels and remove excessive water then clean the body in the following order;
  9. Face:

    • Wash the forehead, face, over and behind the ears and neck.
    • Clean the eyes from inner to outer end. Rinse the sponge towel and wipe the face.
    • Dry with the face towel thoroughly well to prevent chills.

    Arms:

    • Place the towel lengthwise under the furthest arm. If there is I.V line do not disturb it.
    • Take soapy sponge and soap the arm and axilla.
    • Massage the pressure areas.
    • Rinse and dry well, paying attention to the skin under the breast.
    • Cover the finished parts to prevent draught.

    Chest:

    • Expose only the part to be washed.
    • Wet and apply soap to the chest in rotator movement, paying attention to skin creases (folds)
    • Remove soap thoroughly by wiping from neck to chest and dry with a bath towel.

    Abdomen:

    • Fold the top sheet to the suprapubic region and cover the chest with a bath towel.
    • Wet and clean the abdomen with soap.
    • Clean the umbilicus and dry it with a bath towel.
    • Cover the patient with the top sheet and remove the towel.

    Back:

    • Turn the patient on side or lateral position close to the edge of the bed, with the back towards the nurse.
    • Expose the back and buttocks; spread the bath towel on the bed, close to the patient’s back.
    • Wet the area and apply soap with rotator movements, clean and remove soap and dry the area.
    • Treat pressure areas.
    • Straighten the under bed linen and in-put clean linen and mackintosh if necessary.
    • Help the patient to return to supine position.

    Legs:

    • Uncover the furthest leg 1st and place a towel and mackintosh under the leg.
    • Apply soap to the leg and make sure to give special attention to the groin.
    • Treat pressure areas/points.
    • Place the foot in the basin to wash.
    • Rinse and dry well, paying special attention in between the toes.
    • Repeat the procedure on the next/other leg.

    Pubic region:

    • Clean the pubic region with swabs or toilet paper (for helpless patient), if able permit the patient to clean by him/herself.
    • Give perineal care and dry the perineum thoroughly well, apply Vaseline to provide comfort.
    • Clean the mouth if the patient is unable to do it. If able give a stick or tooth brush with tooth paste and mug of water. Hold the receiver for the patient.
    • Cut the nails if necessary and comb the hair.
    • Make the bed and leave the patient comfortable.
    • Clear away and wash hands.
  10. Record the procedure and report any abnormality seen on the patient to the nurse in-charge.

Baby Bath

BABY BATH Is the washing of the baby’s body to maintain its hygiene. The nurse/midwife helps the parents in bathing the baby and teaches them to do it, highlighting on infant’s reaction to various stages of bathing.

Purpose:

  • To maintain the baby’s hygiene.
  • To teach the mother (parents) or care-takers on how to bath the baby.

Requirements:

Top shelf:

  • 2 jugs (1 with hot water and 2nd with cold water)
  • Baby’s soap in a soap dish
  • Galipot of sterile swabs
  • Normal saline
  • Bath thermometer
  • Temperature tray (containing; galipot of swabs, thermometer, galipot of solution/disinfectant, TPR chart and pen plus second hand ticker watch)
  • Tray for cord care (galipot of swabs, cord scissors in a receiver, N/S, cord ligature, 2 receivers: - for used swabs and used instruments)
  • A pair of sterile gloves

Bottom shelf:

  • Receiver for used swabs
  • Plastic apron for the nurse/midwife
  • Clean baby clothes
  • Two baby towels (bath towels)
  • Napkins/diapers
  • Draw mackintosh and towel
  • Barrier cream and powder if necessary
  • Weighing scale

On the stool or table:

  • Basin

On the floor next to the bath area:

  • 2 pails (for soiled clothing and soiled napkins)
  • If diapers, a large receiver is required

NB. The requirements can be laid on a trolley or a table. The nurse/midwife may bath the baby while; sitting on a low stool or chair with the baby on his/her laps. Or Standing with the baby on the table.

Procedure:

  1. Prepare/collect the necessary equipment.
  2. Arrange the equipment on the trolley or the table for easy reach.
  3. Explain the procedure to the parent(s) or care-taker.
  4. Provide privacy by closing nearby/adjacent windows and doors in the vicinity of the bath.
  5. Put on the apron and wash hands.
  6. Check the baby’s temperature and record on the chart.
  7. Put cold then hot water in the basin.
  8. Test the temperature with bath thermometer if available (T° 37-38°C) or test using the elbow, it should feel warm not hot, if no thermometer is available.
  9. Undress the baby leaving the napkin on or diaper if dry.
  10. Weigh the baby
  11. Wrap the baby firmly in a towel leaving the head exposed.
  12. Put dirty linen/clothes and napkins in a bucket respectively.
  13. Hold the baby firmly under the left arm supporting the head with left hand.
  14. Lower the head over the basin and wash face using clear clean water without soap.
  15. Clean the eyes and ears with cotton swabs and water. If there is a discharge, use normal saline to clean them using a swab once working from inside outwards for each eye or ear.
  16. Discard the used swabs in the receiver.
  17. Dry the face with a towel.
  18. With the right hand, using soap/baby shampoo, make lather/foam and apply to the baby’s head. Massage gently and then rinse off the foam thoroughly taking care not to splash water in the baby’s face.
  19. Dry the baby’s head with bath towel.
  20. Unwrap the baby and remove the napkin or diaper and clean the buttocks with a swab if necessary.
  21. Hold the baby across your lap with the left hand holding firmly while grasping the shoulder around the axilla/armpit at the same time supporting the head.
  22. Soap the baby’s body, arms and legs, taking care on the skin folds. Turn the baby and soap the back and in between the buttocks.
  23. As the skin is now slippery, great care should be taken in handling the baby. Hold the baby firmly with the left hand under the right axilla and the right hand supporting the buttocks and grasping the left thigh (legs), with the baby’s head resting or supported by the nurse’s left arm, then gently lower the baby into the basin.
  24. While continuing to support the baby with left hand, using the right hand to rinse the baby thoroughly well paying attention on skin folds, in between the buttocks and groins.
  25. Place the bath towel neatly over the laps or on the table and lift the baby onto it. Wrap the baby well to prevent from getting cold.
  26. Dry gently and thoroughly seeing that all skin folds e.g. fingers, arms, neck, axial, groin, in between the buttocks are dry.
  27. When the skin is dry, apply barrier cream e.g. petroleum jelly to the whole body. If necessary apply powder at the groins and in between the buttocks.
  28. Clean the umbilical cord stamp with normal saline and shorten the ligatures if necessary.
  29. Dress the baby in clean napkin/diapers and clothes, keeping the baby warm.
  30. Discard the towel in the bucket
  31. Give baby to the mother to feed before taking him/her to sleep.
  32. Clear away the used articles.
  33. Document the bath, family participation, condition of the baby, urine and bowel movement and report any abnormalities noted during the procedure e.g. bruises, rashes, excoriation (peeling of the skin)

General Rules (Baby Bath):

  • Safety should be observed by keeping the baby warm, lying in safe place.
  • Prevent falls, burns and aspiration of water.
  • Before bathing the baby, assess the family’s preference and home practices.
  • Allow parents to make their own decisions as much as possible and retain control.
  • Baby should be bathed prior feeding to reduce the risk of vomiting and aspiration.
  • Bathing should be postponed in cold weather unless the room is heated.
  • Powder is not recommended on baby’s skin especially when broken.

Carry out oral care/mouth care (PEX 1.6.2)

MOUTH CARE/ORAL HYGIENE Mouth care is the maintenance in the cleanliness of the mouth. It is important because the mouth is the portal entry of food and digestion starts from the mouth and the entry of any pathogen in the mouth directly affects the health of the person.

Purpose:

  • To maintain oral hygiene among bedridden patients.
  • To prevent and treat mouth infections.
  • To keep the mouth fresh and clean.
  • To prevent dental carries and tooth decay.
  • To prevent the mucous membrane from becoming dry and cracked, hence keeping mouth moist.
  • To prevent sordes and sores which result into ulceration.
  • To prevent infection of parotid glands.
  • To stimulate salivation and increase appetite.
  • To prevent complications such as stomatitis, glossitis, pyorrhea, parotitis etc.
  • To stimulate circulation in the gums thus maintaining healthy teeth.
  • To remove food debris
  • To prevent halitosis.
  • To create a feeling of general well being.

Patients who require frequent mouth care:

  • Unconscious, semi-conscious patients
  • Helpless or very ill patients
  • Patient with higher body temperature/high fevers
  • Malnourished and dehydrated patients
  • Patients having local diseases of the mouth
  • Paraplegic patients
  • Post-operative patients

Solutions commonly used for mouth wash:

  • Potassium permanganate (KMNO4); 1 crystal to a glass of water
  • Sodium chloride; 1 teaspoon to a pint of water
  • Potassium chloride; 4 to 6 percent
  • Hydrogen peroxide (H2O2); 1:8 solution

Dentifrices used:

  • Glycerin with lime juice; equal parts
  • Sodium bicarbonate paste
  • Reliable tooth paste or powder

Emollient/lubricant commonly used:

  • Cream or butter
  • White Vaseline
  • Liquid paraffin
  • Glycerin borax
  • Olive oil

Requirements for mouth care: A tray containing;

  • Mackintosh and towel
  • Small jug/glass of warm water
  • Patient’s towel to protect the patient
  • Two receivers; for waste water and used swabs
  • Paper bag if a second receiver is not available
  • A bowl for dentures if necessary
  • A galipot with moistener/lubricant
  • A galipot with swabs
  • A galipot of sodium bicarbonate solution; 5g in ½ liter of water
  • Kidney dish containing; a pair of artery forceps, anon-toothed dissecting forceps, mouth gag, tongue depressor.
  • Face towel
  • Galipot of gauze
  • A towel to cover the tray

N.B: If the patient can clean his/her own tooth brush and paste or the nurse may give him or her a soft stick /tooth brush with tooth paste to clean his/her teeth and a glass of warm normal saline to gargle with or plain clean water.

Procedure:

  1. Collect the equipment required and bring to the bedside of the patient.
  2. Explain the procedure to the patient.
  3. Position the patient and protect his clothes with the patient’s towel.
  4. Place the small mackintosh with a towel underneath the patient’s chin to protect the bed (if on lying down position)
  5. Position the pillow according to comfort of the patient.
  6. Wash hands and remove patient’s dentures if any, keep safely.
  7. Inspect the mouth, note and report any abnormality detected.
  8. Pour antiseptic solution into the galipot.
  9. Soak the swab in solution and squeeze out excess solution by using artery clamp or press against the side of the galipot to prevent dripping.
  10. Clean using up and down movements from gums to crown, clean oral cavity (inside of cheeks) from proximal to distal, outer and inner aspect of the teeth and clean the tongue gently from inner to outer aspect, avoid touching the palate which may make the patient feel sick and want to vomit.
  11. Change swabs as often as needed and discard used swabs into the receiver or paper bag.
  12. Give the patient a glass of water if he can rinse his mouth. Instruct him to gargle and spill it to the receiver. If not able cleanse the mouth till it’s thoroughly clean.
  13. Dry the face using a face towel.
  14. Wipe the lips with dabbing movements and apply a lubricant using gauze.
  15. Leave the patient comfortable, clean and replace the equipment to the storage place.
  16. Wash hands
  17. Document the time, solution used, date, condition of oral cavity, abnormalities noticed and patient’s condition to the chart and give/inform the findings to the nurse in-charge or physician.

Mouth Irrigation

MOUTH IRRIGATION It is the washing out or removal of plaque or food debris in between the teeth using streams of pulsating water jets.

Indications:

  • Fractures of the jaw in conscious patients only
  • Bleeding tooth sockets
  • Food debris

Requirements: Tray

  • Jug of lotion (1/2 - 1 litre) sodium bicarbonate
  • Large syringe (10-20ml)
  • Fine catheter in a kidney dish
  • Galipot of swabs or tissues (hand wipes/tissue)
  • Receiver for used lotion
  • Mackintosh and towel
  • Lotion thermometer
  • Gloves

Procedure:

  1. Collect the equipment needed.
  2. Explain the procedure to the patient.
  3. Provide privacy to the patient.
  4. Position the patient in a comfortable position (sit the patient up if possible or turn onto the side).
  5. Wash hands and put on gloves.
  6. Place the mackintosh and towel around the neck.
  7. Draw up the lotion in the syringe and connect to the catheter.
  8. Place the end of the catheter into the patient’s mouth and ask him/her to hold it about 1” from the mouth.
  9. Hold the end of the catheter close to the syringe and inject the lotion slowly into the mouth.
  10. Pinch the catheter between the finger, disconnect the syringe and refill it.
  11. Reconnect the syringe and inject the lotion as before.
  12. Remove the catheter and the syringe and place in the receiver and ask the patient to rinse the lotion around the mouth.
  13. Hold the second receiver under the chin and ask the patient to spit the lotion into it.
  14. Repeat the procedure until the mouth is clean.
  15. On completion, make the patient comfortable, dry around the mouth with the tissue/swabs and smear a little moistener on the lips.
  16. Clear away and wash hands.
  17. Report and record the procedure and findings.
Nurses Revision

Bed Bath Read More »

Bed Making

Demonstrate Bed Making (PEX 1.4.1 - 1.4.9)

BED MAKING: Bed making is a key nursing skill that is essential for the promotion of patient care, comfort, hygiene and wellbeing.

Bed making requires technical and practical skills and consideration should be given to issues of safety, moving and handling and infection control practices.

There are many types of beds to suit the different conditions of the patient.

Two nurses should work together to make a bed and should face each other. Work from top to bottom of the bed except when putting on a counter pane (bed cover).

Purpose of Bed Making
  • To keep the ward neat and tidy.
  • To keep/make the patient comfortable.
  • To prevent cross infection and complications such as bed sores.
  • For treatment of certain conditions e.g. shock or quickening of healing of the patient.
Rules of Bed Making
  • All equipment should be collected before starting the procedure.
  • Any conversation during bed making should not be on personal matters between the nurses but should be focused on the patient.
  • Close adjacent windows to protect the patient from draught on a cold day.
  • Patient must never be exposed, screen the bed and close the ward to visitors.
  • The bed should be made free from crumbs and creases, so as to give maximum comfort to the patient.
  • Sheets have to be smooth and when tucking in, MITRE the corners.
  • Pillows and other bed accessories should be well arranged to give support and comfort where necessary.
  • When pillows are being shaken, the nurse should turn away from the patient and not over the patient.
  • The bed should be made in a way suitable for treating certain conditions such as shock and to prevent complications as a result of bad nursing.
  • Always use clean beddings and linen for each patient.
  • Always wash hands after making beds of infectious or septic patients before moving to the next bed.
  • Do not put any linen of another patient to the next patient’s bed.
  • If linen is dropped on the floor, it should not be used.
  • Always have a dirty linen container or hamper at hand in which to put dirty linen, never put it on the floor or carry the across the ward to prevent cross infection.
  • The patient’s face should not be covered with sheets or blankets.
  • The open end of a pillow case should face away from the main door or entrance of the ward.
  • Two nurses are required and they should work in harmony avoiding unnecessary movements of the bed and themselves.
  • Extra assistance should be available and if necessary, one should be called upon to help lift the patient.
  • Do not make a bed when a sterile procedure is in progress in the ward.
  • Beddings from the infectious patients should first be soaked in a disinfectant e.g. jik (3.5%=3.5/0.5-1=6) 1.6,(6%=6/0.5-1=11)1.11 for 24 hours before washing.
  • Use large mackintoshes for incontinent patients to protect the beddings.
  • Use small mackintoshes at the head of the bed for unconscious or post operative patients.
  • Use a bed cradle over leaking wounds e.g. in burns.
  • Beds should be made in such a way that the patient can be put in without difficulty.
  • Allow room for the patient’s feet for free movement or turning when placing the top sheet over the patient.
  • Always wash hands before and after bed making.
Types of Beds
  • Unoccupied bed/hospital bed
  • Occupied bed
  • Admission bed
  • Admission bed for burns
  • Operation/post-operative bed
  • Bed for complete rest
  • Cardiac bed
  • Divided bed
  • Plaster and fracture bed
Appliances Used in Bed Making
  • Mackintosh/plastic sheet: Protects the beddings during procedures. Protects the beddings in case of vomitus, urine, blood, faeces from soiling the bed sheets and the mattress.
  • Hot water bottles: To provide added warmth to the patient. The hot bottles must always be covered and the cover tight enough before use. Never place it directly on the patient’s skin to avoid burns.
  • Bed cradle: To keep the weight of the bed sheets away from the patient’s affected area e.g. in burns.
  • Bed blocks/bed elevators: To elevate the top or bottom of the bed e.g. in patients with shock, cardiac problems etc. To promote drainage in case of chest drainage.
  • Backrest/bed rest: To help the patient sit up-right for those with chest problems (breathing difficulties), cardiac problems etc. different degrees of elevation can be made with pillows placed on top of the backrest.
  • Sandbags: To prevent movement of limbs in the treatment of some conditions like fracture of the limbs.
  • Air rings: These are place under the buttocks to relieve pressure so as to prevent bed sores.
  • Foot rest: A small piece of wood or cloth rolled neatly at the foot of the bed for the patient to support his/her feet in-order to prevent slipping/falling down the bed.
  • A cardiac table: It is the table place in front of the patient over the bed for meals, medicine or any leisure activity e.g. a magazine newspaper or work etc. it is used in patients with cardiac conditions in cardiac bed.
  • Fracture boards: To make a firm surface for support and it is placed across the bed springs under the mattress.
I. Prepare and Make an Unoccupied Bed (PEX 1.4.1)

Is an empty bed and is fully covered with a counter pane to protect it from dust and dirt while waiting for the new patient for admission.

Purpose:
  • To protect the bed from dust and dirt
  • To keep a ready bed for the admission and emergency.
  • To give the room/ward a neat and tidy appearance.
Requirements:
  • Items on the trolley: Spring cover, 2 bed sheets, 1 mackintosh/draw mackintosh, 1 ground mackintosh, 1 draw sheet, 1 pillow and pillow case, 1 blanket, 1 bed cover/counter pane.
  • Items in the ward: 2 chairs/stools for stripping the bed, a dirty linen container/hamper, hospital bed, mattress and mattress cover.
  • Appliances needed for the unoccupied bed: Foot rest, bed blocks, bed cradle, fracture board.
Procedure:
No. Action Rationale / Elaboration
1Collect 1st all the requirements needed. Bring always the hamper with you.Promotes efficiency and workflow. A hamper prevents carrying dirty linen across the ward, reducing cross-infection.
2Clear the room 1st of unnecessary equipment e.g. kidney dishes, bed pans and the belongings of the patient or from the family.Provides a safe, uncluttered working environment and maintains ward tidiness.
3Pull the bed from the wall.Allows nurses to access all sides of the bed without straining, promoting good body mechanics.
4Place the 2 chairs at the foot of the bed.Provides a clean surface to place stripped reusable linen or new linen.
5Wash hands.Standard infection control precaution.
6Turn the mattress to see whether the spring cover is straight or complete springs (not broken).Ensures patient safety and comfort; broken springs can cause injury or pressure points.
7Replace the ground mackintosh then the bottom sheet and start to tuck in from the top (see that the right side is up). Mitre the corners, tuck in at the bottom and then the sides.Mitering secures the sheet firmly to the mattress, preventing wrinkles that can cause skin breakdown.
8Replace the mackintosh/draw mackintosh, put at the height of the patient’s buttocks. Place the draw sheet covering the mackintosh completely.Protects the bottom sheet from soiling. The draw sheet absorbs moisture and prevents the patient's skin from touching the plastic/rubber mackintosh.
9Put on the top sheet, tuck in the bottom, mitre each corner and leave the top free.Secures the top linens while allowing room for the patient to enter.
10Place the blanket on the bed then turn back the blanket and top sheet on top of the blanket.Provides warmth and creates a neat fold at the top for aesthetic and functional purposes.
11Replace the pillow(s) to the bed (open ends away from the entrance) after shaking them.Shaking fluffs the pillow for comfort. Pointing open ends away from the door improves aesthetic appearance and reduces collection of dust/drafts inside the case.
12Put the bed cover to the bed, tuck in the bottom only, mitre corners and leave the sides hanging down but make sure it is covering the whole bed.Protects the underlying clean linens from dust while awaiting a new patient.
13Push back the patient’s bed to the original position. Clear away and wash hands. Document the procedure and replace the equipment to their place of storage.Restores the ward environment and ensures proper documentation.
II. Demonstrate Stripping and Changing of Patient Linen (PEX 1.4.2)

STRIPPING THE BED: This means undressing the bed or removing the bed linen from the bed in preparation to lay/make afresh.

Requirements:
  • As for the unoccupied bed (requirements list above).
  • Trolley.
Procedure:
No. Action Rationale / Elaboration
1Collect 1st all the requirements needed. Bring always the hamper with you.Organization prevents delays and breaks in infection control.
2Clear the room 1st of unnecessary equipment e.g. kidney dishes, bed pans and the belongings of the patient or from the family.Prevents accidental spills or breakage during bed stripping.
3Pull the bed from the wall and place the 2 chairs at the foot of the bed.Ensures ergonomic access and a place to temporarily store reusable items.
4Wash hands.Prevents the spread of microorganisms.
5Un-tuck all the beddings first.Prevents tearing the linen and makes folding easier.
6Take away the pillows and undress.Pillows are stripped and cases discarded into the hamper.
7Fold the bed cover, blanket, top sheet in three, the bottom part should be on top and put on the chairs provided one by one. Fold the draw sheet and mackintosh, put on the chairs. Bottom sheet is also folded in three, bottom part 1st as the top will be tucked in first when putting it on again.Folding reusable linen methodically ensures the clean side remains protected and makes re-making the bed highly efficient. Soiled items go directly to the hamper.
8Remove the ground mackintosh by rolling it off the bed and put to the chairs.Rolling contains any potential dust or debris.
9Re make the bed as required (refer to procedures for occupied or unoccupied bed).Provides a fresh environment for the patient.
III. Prepare and Make an Occupied Bed (PEX 1.4.3)

OCCUPATION BED: Is a suitable, comfortable and appropriate bed for hospitalized patients. It is made as usual and one corner of the linen is folded back at 90° to let the patient in. (Open bed: Patient is allowed out of bed).

Purpose:
  • To provide clean bed
  • To provide comfort to the patient.
Requirements:
  • The requirements needed are as for the hospital bed/unoccupied bed.
  • In addition: gloves.
Procedure:
No. Action Rationale / Elaboration
1Collect all the equipment needed. Explain the procedure to the patient.Ensures patient is informed and cooperative.
2The patient is allowed out of bed when able. Pull the bed from the wall.Facilitates easier bed making when the patient can safely sit in a chair.
3Wash hands thoroughly and put on gloves.Standard precautions against bodily fluids that may be on the linens.
4Strip the bed and replace with clean linen.Removes soiled items directly to the hamper.
5The bed is made in the same way as the unoccupied bed except for the bed cover. Fold 1st the blanket, then put the bed cover over the blanket and fold the top sheet back over the bed cover.Protects the blanket from touching the patient's face and creates a neat edge.
6Fold half of the beddings back in a corner of 90° at the side of the locker, so that it is easy for the patient to get into the bed.This is the hallmark of an "open bed," signaling it is ready for immediate patient use.
7Push back the patient’s bed to the original position. Clear away, wash hands, and document.Maintains ward safety and updates nursing records.
IV. Prepare and Make a Closed Bed (with patient in bed)

With the patient in bed / closed bed: The bed is made with the patient in, for a patient who is not able to get out of bed. It is usually done by two nurses.

Purpose:
  • To provide comfort to the patient
  • To change the soiled bed linen.
Requirements:
  • As for the unoccupied bed
  • In addition: gloves
Procedure:
No. Action Rationale / Elaboration
1Collect the equipment, explain the procedure, screen the bed, and close adjacent windows for privacy.Preserves patient dignity and prevents drafts exposing the patient to cold.
2Pull the bed from the wall. Wash hands thoroughly and put on gloves. Place 2 chairs at the foot of the bed.Ensures adequate working space for both nurses.
3Remove all the pillows except one for the patient to rest his head. Loosen the beddings on all sides and then strip the bed.Minimizes bulk making it easier to turn the patient. Retaining one pillow provides neck support.
4Turn the patient on his left, placing one pillow under his head. The nurse towards the side the patient is facing should support the patient so that he does not feel afraid of falling down.Ensures patient safety and trust during turning maneuvers.
5Roll the draw sheet and mackintosh to the center of the bed near the patient’s back. If the bottom sheet needs changing, roll it to the center of the bed near the back of the patient.Contains the soiled linen in the center, freeing up half the mattress for clean linen.
6Place the clean bottom sheet to halfway the bed over the mattress. Make sure that the middle fold is in the middle of the bed. Tuck the head end first, mitre the corner at the top, bottom and then sides.Provides a tight, wrinkle-free foundation on the first side.
7Bring back the mackintosh and draw sheet if clean, tuck them under the mattress.Re-establishes the protective layers.
8Turn the patient on his right side, placing one pillow under his head, the nurse towards the side the patient is facing should support the patient.Rolls the patient over the "bump" of dirty and clean linen to the clean side of the bed.
9The 2nd nurse removes the soiled linen and puts the linen in the dirty linen container. Straightens out the bottom sheet, mackintosh, draw sheet and tuck them separately and firmly. Mitres the corners beginning from top then bottom and sides.Completes the bottom foundation tightly, removing all sources of wrinkles and infection.
10Turn the patient back to the center of the bed and support him whilst his pillows are plumped and arranged. Position the patient comfortably.Restores proper body alignment.
11As soon as the top sheet has been replaced over the patient, the sheet or blanket covering him may be removed and replace the top bed clothes.Maintains patient modesty and warmth at all times; they are never left exposed.
12Ensure that the bed clothes are loose enough over the patient’s feet. A bed cradle may be used to support their weight if needed but in the absence of this, the patient is asked to cross one foot over the other whilst the bed is being made, ensuring plenty of room for his feet.Prevents foot drop (plantar flexion contracture) by relieving the downward pressure of tight linens on the toes.
13Push back the patient’s bed, replace locker, open windows. Clear away, wash hands, and document.Restores the environment.
V. Prepare and Make an Admission Bed (PEX 1.4.4)

ADMISSION BED FOR NEW PATIENTS: The bed is made for the newly admitted patients. It contains the pack that can be lifted off the bed or fixed on one side.

Requirements:
  • As for the hospital bed
  • Additional: 2 admission sheets
Procedure: Admitting the patient in a clean bed
No. Action Rationale / Elaboration
1Collect equipment, pull bed from wall, wash hands, place 2 chairs at foot of bed, turn mattress to check springs.Standard preparation and safety check.
2Place the bottom sheet, mitre corners from top to bottom. Add the mackintosh and draw sheet, tuck in firmly then place the bottom admission sheet, mitre corners from top to bottom and tuck in the sides.The admission sheet acts as an extra protective layer for a newly arrived patient who may be soiled or bleeding before a full admission bath is done.
3The top admission sheet is placed over the admission bottom sheet and left hanging. The other top sheet and blanket are added on top of the admission sheets and then the bed cover.Prepares the top layers efficiently.
4Turn back the bed cover, blanket and the two top sheets to make a pack. Tuck one side or don’t, roll the beddings to the other side while the top admission sheet is rolled together to the pack.Creating a "pack" (folding the linens to one side or the bottom) allows rapid and easy transfer of a stretcher/trolley patient directly into the bed.
5Push the bed back to its original position. Place the chair at the top side of the bed and put the pillow whilst waiting for the patient.Ensures the room is ready for the incoming admission.
N.B:
  • Admit the patient between the admission sheets.
  • Cover the whole bed with a bed cover if the patient is not yet admitted to prevent dust and dirt.
  • Remove the admission sheets after the bed bath has been given to the patient.
VI. Prepare and Make Bed for Burns (PEX 1.4.6)

ADMISSION BED FOR BURNS: It is the bed made for new patient with burns only.

Requirements:
  • As for the unoccupied bed
  • Additional: 2 old sheets and if possible sterile sheets, Mackintosh pillow cover, A mosquito net, Bed cradle, Bed blocks.
  • At the bedside: Infusion stand.
Procedure:
No. Action Rationale / Elaboration
1Collect all the equipment needed, pull bed from wall, wash hands, place 2 chairs at foot of bed.Standard preparation.
2Make as an admission bed instead of admission sheets, use old or sterile sheets and make a pack.Sterile sheets reduce the high risk of infection in burn patients who have lost their primary skin barrier. Old sheets are used if heavy exudate/ointments will permanently stain linens.
3Cover the pillows with the mackintosh covers before putting on the pillow cases.Protects the pillows from serous fluid weeping from face/neck burns.
4Push back the bed to the original position. Put/hang the mosquito net to protect the patient from flies.Flies can carry severe pathogens into open burn wounds; physical barriers are essential.
5Place the bed cradle over the affected area to relieve weight of the beddings over the affected part.Even the light weight of a sheet causes excruciating pain and tissue damage on exposed burn surfaces.
6Bed blocks are used to elevate the foot of the bed if the patient is in shock.Trendelenburg-like positioning promotes venous return to the heart in severe hypovolemic burn shock.
7If the patient is bathed on admission, the sheets are removed when it is completed. If patient is still in shock or the burns are extensive, then the sheet should be left until the patient has recovered from shock and the admission bath is then given.Prioritizes hemodynamic stability and life-saving measures over routine hygiene.
8Clear away, wash hands, and document the procedure.Maintains medical records.
VII. Prepare and Make Post-Operative Bed (PEX 1.4.7)

POST-OPERATIVE BED: This bed is prepared to receive the patients who have undergone surgical procedures, recovering from the effects of anesthesia.

Purpose:
  • To place the patient in bed with minimum discomfort.
  • To make a comfortable and safe bed for the patient who is recovering from the effects of anesthesia.
  • To prepare to meet any emergency.
Requirements:
  • As for the unoccupied bed
  • Additional: A small mackintosh and towel, Bed elevator, Emergency tray (mouth gag, air way piece, tongue depressor, drugs e.g. adrenaline, swabs), Hot water bottles.
  • At the bedside: Infusion stand.
  • On the locker: Post-operative observation tray (BP machine, stethoscope/pulsometer or watch, thermometer and observation chart).
Procedure:
No. Action Rationale / Elaboration
1Collect equipment, pull bed from wall, wash hands, place chairs at foot of bed, strip bed in usual way, put dirty linen into hamper.Clears the area completely to provide a fresh, sterile environment post-surgery.
2Make a clean bed with clean linen, making it as the hospital bed but with a pack which can easily be removed when lifting the patient onto the bed.A "pack" allows rapid, smooth transfer of an unconscious or sedated patient from the theater stretcher to the bed without manipulating limbs excessively.
3Instead of the pillows, put the small mackintosh and towel across the top of the bed and tuck in at the top.Post-op patients frequently experience nausea/vomiting from anesthesia; this protects the mattress. Pillows are avoided initially to maintain an open, unobstructed airway (preventing neck flexion).
4Push the bed back to the wall. Put the pillow(s) on the chair/stools, which will be used later when the patient recovers.Readies the pillows for when the patient is fully conscious and airway reflexes are intact.
5Clear away, wash hands, and document.Prepares the room fully for immediate emergency intake.
VIII. Prepare and Make a Cardiac Bed (PEX 1.4.5)

CARDIAC BED: Is used to help the patient to assume a sitting up position; which can afford him great comfort with least strain. Cardiac bed is used for patients with heart diseases, those with dyspnoea to provide easy breathing.

Purpose:
  • To relieve dyspnoea
  • To assist recovery of the patient
  • To provide comfort and prevent complications
Requirements:
  • As for the unoccupied bed
  • Additional: Back rest, At least 4-6 pillows and pillow cases, Air cushion/air ring and cover if required, Bed blocks, Sand bags and cover/foot support (i.e. small board, a pillow, rolled cloth etc; may be necessary to support the feet), Cardiac table.
  • On the locker: Sputum mug, a bell: so that the patient can reach it easily.
Procedure:
No. Action Rationale / Elaboration
1Collect the equipment needed, wash hands, place 2 chairs at foot of bed.Standard preparation.
2Prepare the bed as the open bed with the patient but in a sitting up position.Orthopneic position drops the diaphragm and reduces venous return, significantly easing respiratory effort in cardiac failure.
3When making the bed, take care to see that the patient’s shoulders are covered if possible. It is better to use a bed jacket or shawl or a small blanket - the bed clothes will be restricting.Provides warmth without the heavy restriction of full blankets pulling down on the chest, which increases work of breathing.
4Place the back rest and pillows so as to support the patient in upright position and use a bed elevator or bed blocks to prevent the patient from slipping down the bed.Proper support prevents muscular fatigue and maintains the chest expansion necessary for adequate oxygenation.
5Place sandbags/board/small pillow/rolled cloth against the feet where necessary as foot support.Prevents the patient from sliding down the bed, which would cause friction/shearing on the sacrum and reduce the effectiveness of the upright position.
6Push the bed back to its original position. Place the cardiac table over the bed for the patient to use whilst reading or performing any tolerable activity.The table allows the patient to lean forward (tripod position) resting their arms, utilizing accessory muscles to breathe more effectively.
IX. Prepare and Make a Divided Bed (PEX 1.4.8)

DIVIDED/AMPUTATION/STUMP BED: The bed is used for the patients who have had an amputation of the leg or have had a fractures lie in extension or for pelvic examination or treatment. It is commonly used for patients whose leg(s) has been amputated in order to keep the stump visible and elevated.

Purpose:
  • To keep the stump in a good position.
  • To help in the observation of the stump for bleeding constantly and apply tourniquet instantly if necessary.
  • To ensure safety and comfort to the patient by preventing soiling and staining of the linen.
  • To prevent jerking movements of the amputated leg, causing complications.
Requirements:
  • As for the unoccupied bed
  • Additional: 1 sheet, 1 blanket, 2 sandbags and covers, Mackintosh and dressing towel, Tourniquet and towel (only if ordered by the doctor in charge of the case), An emergency dressing trolley, Bed cradle.
Procedure:
No. Action Rationale / Elaboration
1Collect equipment, pull bed from wall, wash hands, place 2 chairs at foot of bed.Standard preparation.
2Make the bed in two halves; across the middle or for the amputation bed at the level of amputation. The top half having a sheet, blanket and counter pane and then the bottom half having a sheet and the blanket.This division allows the nurse to instantly inspect the surgical site/stump for catastrophic hemorrhage without exposing the patient's entire body.
3This may be too hot for the patient at day time, so the top blanket may be omitted. At night, however it is much colder and both blankets may be needed.Thermoregulation is customized based on environmental conditions and patient comfort.
4On completion push back the bed to its original position. Clear away, wash hands, and document.Maintains ward standards and clinical records.
X. Prepare and Make a Fracture Bed (PEX 1.4.9)

PLASTER AND FRACTURE BEDS: Is used for a patient with fracture of the trunk or extremities to provide firm support by use of a fracture board placed under the mattress. Fracture bed is a hard firm bed designed for the patient with a fracture particularly of the spine, pelvis or femur.

Purpose:
  • To make the patient comfortable.
  • To maintain the position and give support to the fracture.
  • To aid in immobilizing the fracture.
  • To prevent unnecessary pain.
Requirements:
  • As for the unoccupied bed
  • Additional: Fracture board, Bed cradle, Sandbag with cover, Extra pillows (at least 3).
Procedure:
No. Action Rationale / Elaboration
1Collect equipment, pull bed from wall, wash hands, place 2 chairs at foot of bed.Standard preparation.
2This bed is made as the occupied bed.Accommodates the immobilized patient.
3The fracture boards are made the same width as the bed, and their purpose is to make a firm surface for placed support. They are placed across the bed springs under the mattress.A sagging mattress would cause misalignment of the healing bone fragments, leading to non-union, malunion, or severe pain, particularly in spinal fractures.
4Put the bed cradle over the affected part, so as to lift the weight of the beddings from the patient.Weight from blankets can alter the alignment of a fracture (especially foot/leg) or cause pressure sores on toes (foot drop).
5Push back the bed to the original position. Clear away, wash hands, and document.Restores the environment.
XI. To Change the Bottom Sheet From Side to Side

This method is used for changing the bottom sheet for most patients in the hospital especially those not able to move out of bed.

Requirements:
  • Trolley: 1 air ring and cover, 1 draw sheet, 1 draw mackintosh, A tray for treating pressure areas may be required, 1 sheet, Gloves.
  • At the bedside: 2 stools/chairs, Hamper, Screen.
Procedure:
No. Action Rationale / Elaboration
1Collect equipment, explain procedure, close windows, screen bed, pull from wall, place stools, wash hands, put on gloves, arrange clean linen and hamper.Ensures privacy, warmth, workflow efficiency, and infection control.
2Fold the clean sheets across the width in three or roll them for easy placement.Makes positioning the sheet under the patient seamless and quick.
3Strip the top bed clothes as usual, leaving the sheet covering the patient on a hot day or a blanket and sheet on a cold day. Back rest, air ring, and foot support are removed.Maintains modesty and temperature control while removing obstacles to turning.
4Both nurses lift the patient carefully down the bed off the draw sheet.Repositioning prevents skin shearing and gives access to the linens.
5One nurse supports the patient, while the other removes the draw sheet and mackintosh, and then rolls the soiled bottom sheet down as far as the patient’s back and straightens the mattress cover and ground mackintosh.Rolling keeps the soiled parts contained and away from the patient's skin.
6The same nurse puts in the clean sheet, tucking it at the top and on her side as far as the dirty linen. She then puts in the draw mackintosh and draw sheet, tucks on her side. Replace the backrest, pillows and air ring. Treat pressure areas if necessary.Establishes the clean foundation on one half of the bed. Treating pressure areas is ideal at this moment while the back is exposed.
7Both nurses lift the patient back up the bed and make sure that the pillows are comfortable. Then tuck in the mackintosh and draw sheet, top side of the bottom sheet on the second side.Completes the transition of the patient onto the fresh linen.
8Draw the soiled sheet to the bottom of the bed from under the patient’s legs and put it in the hamper.Safely removes the contaminated linen.
9Brush any crumbs/creases from the mackintosh and mattress, straighten them. Pull clean sheet down to bottom, tuck in, mitre corners.Ensures the foundation is tight, smooth, and free of pressure-inducing wrinkles.
10Put on top bed clothes, push bed back, clear away, remove gloves, wash hands, and document.Completes the procedure.

NB. Some means should be used to prevent the patient in this position from slipping down the bed. This may be achieved by putting a sand bag or a pillow (with mackintosh cover) against the feet. This will also prevent foot drop or the foot of the bed may be raised on a bed elevator/bed blocks.

XII. To Change the Bottom Sheet From Top to Bottom

This method is used for changing the bottom sheet when the patient is nursed in an upright position and must not be flat e.g. chronic heart disease.

Requirements:
  • Trolley: 1 air ring and cover, 1 draw sheet, 1 draw mackintosh, A tray for treating pressure areas may be required, 1 sheet, Gloves.
  • At the bedside: 2 stools/chairs, Hamper, Screen.
Procedure:
No. Action Rationale / Elaboration
1Collect equipment, explain procedure, close windows, screen bed, pull from wall, place stools, wash hands, put on gloves, arrange clean linen and hamper.Maintains privacy, dignity, and infection control protocols.
2Fold the clean sheets across the width in three or roll them for easy placement.Allows the sheet to be fed down from the top of the bed smoothly.
3Strip the top bed clothes as usual, leaving the sheet covering the patient on a hot day or a blanket and sheet on a cold day. Back rest, air ring, and foot support are removed.Prevents chilling and exposure, while clearing the working space.
4Both nurses lift the patient carefully down the bed off the draw sheet.Safely shifts the patient's weight downward to expose the top half of the mattress.
5One nurse supports the patient, while the other removes the draw sheet and mackintosh, and then rolls the soiled bottom sheet down as far as the patient’s back and straightens the mattress cover and ground mackintosh.Rolling soiled linen downwards prevents contamination of the newly exposed mattress area.
6The same nurse puts in the clean sheet, tucking it at the top and on her side as far as the dirty linen. She then puts in the draw mackintosh and draw sheet, tucks on her side. Replace the backrest, pillows and air ring. Treat pressure areas if necessary.Secures the top foundation. Patients who must remain upright can immediately lean back onto the clean upper portion.
7Both nurses lift the patient back up the bed and make sure that the pillows are comfortable. Then tuck in the mackintosh and draw sheet, top side of the bottom sheet on the second side.Moves the patient off the lower soiled linens entirely.
8Draw the soiled sheet to the bottom of the bed from under the patient’s legs and put it in the hamper.Removes the dirty linen completely without pulling it over the patient.
9Brush any crumbs/creases from the mackintosh and mattress, straighten them. Pull clean sheet down to bottom, tuck in, mitre corners.Creates a smooth, tight finish that protects skin integrity.
10Put on top bed clothes, push bed back, clear away, remove gloves, wash hands, and document.Leaves the patient comfortable and restores the ward.
References
  • World Health Organization (WHO) Guidelines for Patient Safety and Infection Control in Healthcare Settings.
  • Standard Nursing Fundamentals: Clinical Skills and Bed Making Procedures (PEX 1.4.1 - 1.4.9).
  • Basic Nursing Care and Ward Management Protocols.

Quick Quiz

Foundations Nursing Day 5 and 6 Quiz

FON - mobile-friendly and focused practice.

Privacy: Your details are used only for quiz tracking and certificates.

Bed Making Read More »

General Principles in Patient Care

Topic: Perform General Nursing Care
Demonstrate Appropriate Methods of Lifting/Positioning a Patient (PEX 1.3.8)

Safe and effective patient lifting and positioning are crucial skills for nurses to prevent injury to both the patient and themselves, promote patient comfort, and facilitate various procedures and recovery.

This PEX focuses on demonstrating:
  • Using proper body mechanics when lifting and moving patients.
  • Selecting the appropriate method for lifting or moving based on the patient's condition and ability.
  • Positioning patients correctly in various therapeutic positions (as detailed in the 'Positions Used in Nursing' section).
  • Using assistive devices (if available) for lifting and transferring.
  • Communicating with the patient during the lifting/positioning process.
  • Ensuring patient safety and comfort throughout the procedure.
Positions Used in Nursing

Positioning is placing the person in a proper body alignment for the purpose of preventive, promotive, curative and rehabilitative aspect of health.

Purpose of position:
  • To provide comfort to the patient.
  • To relieve pressure on various parts of the body.
  • To improve circulation.
  • To prevent formation of deformity.
  • To carry out investigations (medical and surgical).
  • To prevent pressure sores.
  • To provide proper body alignment.
  • To conduct delivery.
  • To carry out nursing interventions.
Types of positions commonly used in nursing:
  • Recumbent/supine position
  • Dorsal recumbent position
  • Semi-recumbent position
  • Lithotomy position
  • Prone position
  • Lateral or sim’s position
  • Fowler’s/sitting up position
  • Knee-chest or genupectoral position
  • Trendelenburg’s position
Types of patients who need special care:
  • Unconscious patients
  • Infants and children
  • Hemiplegics and paraplegic patients
  • Immediate post-operative patients
  • Orthopedic patients
  • Cardiac patient etc.
Specific Positions
Recumbent/supine position

One or two pillows may be used for this position. The patient lies on the back with his head and shoulders slightly elevated on the pillow(s). His legs should be slightly flexed and a small pillow under the knees or the legs are left straight.

One pillow: This is used to provide full relaxation for acutely ill patients and for patients on complete bed rest. It is also used when examining the trunk.

Two pillows: The patient lays in bed with 2 pillows under his head. This is commonly used in both medical and surgical nursing.

Indications:

  • It is a common position used by most patients.
  • Used for examination of the trunk (chest and abdomen).

Contraindications:

  • Elderly patients.
  • Patients with operations on the abdomen, breast, and thorax.
  • Prone to hypostatic pneumonia.
  • Patients with long-standing illness and neurological conditions.
Semi-recumbent position

The patient is half sitting up, supported by three or more pillows. This is a comfortable position for patients who are recovering from an illness and who wish to be able to read in bed.

Indications:

  • Recovering patients.
  • To obtain good drainage in the pelvis.
  • To prevent straining of abdominal muscles.
Prone position
Prone position

The patient lies on the front of the body and has his head turned to one side. A pillow is provided on which to rest the side of his face, a small soft pillow is placed under the abdomen and pelvis, the knees are flexed and the lower leg supported on a pillow, under the ankles. It is useful when there is danger of bed sores forming on the back or for change of position when the patient is in a plaster bed with a fractured spine.

Indications:

  • Post-operative patients.
  • Prevention of bed sores.
  • Relieve abdominal distension.
  • Patients having injuries and burns of the back.

Contraindications:

  • Not tolerated by the elderly.
  • Patients with cardiovascular conditions.
  • Patients with respiratory problems.
Lateral/sim’s position

The patient lies on the right or left side of his body with legs flexed at the thighs. The left lateral is the most commonly used and the patient lies on the left side. A pillow is kept in front of the abdomen, the back, and one under the upper leg.

Indications:

  • Used for giving of an enema.
  • Examination of the rectum.
  • Inserting suppositories.
  • Taking of rectal temperature.
  • It is used as a change of position from the semi-recumbent position.
  • Colonic irrigation.
  • Giving back care.
Sitting up position
Sitting up position

The patient is sitting nearly upright at least at an angle of 45° attained by means of a special bed or use of a back rest and pillows. Asorbo foam cushion/air ring to relieve weight at the sacrum and ileum is usually placed under the buttocks, and it is necessary to use some means to prevent the patient from slipping down the bed. This may be done by using a foot rest or elevating the bed on bed blocks. The position is used in cases where there is dyspnoea e.g., heart disease, pneumonia, bronchitis.

Indications:

  • Dyspnoea.
  • Improve thrombosis.
  • Post-operatively to assist drainage from abdominal or pelvic cavity.
  • To relax the muscles of the abdomen and thighs.
  • To relieve tension on abdominal sutures.
  • To promote comfort.
  • To relieve edema of the chest and abdomen.
Semi-prone position
Semi-prone position

The position is similar to lateral except with the upper knee flexed and the upper part of the trunk turned so that the patient lies almost prone, one arm behind the back, the other arm flexed at the shoulder and elbow lying in front of the patient’s face. The head is turned on one side, no pillows are used. This position ensures the greatest safety for the unconscious patients because it prevents danger of the tongue falling and blocking air passage, and also allows any secretions run out of the mouth (drain).

Indications:

  • Unconscious patients.
  • Those returning from the operating theatre.
  • Rectal examination.
  • Relaxation in antenatal exercises.

NB. The patients who have had an abdominal operation are placed in recumbent position but all other cases are put back into bed on the semi-prone position unless otherwise ordered.

Contraindications:

  • Patients with deformities of the hip or knee may be unable to assume this position.
Dorsal recumbent position

Patient lies on the back with the knees fully flexed, thighs flexed and externally rotated, feet flat on the bed. The patient is placed on the back in bed with two or more pillows under the head and one pillow under the knees or the bed is elevated at the top to maintain the position.

Indications:

  • Catheterization.
  • Vaginal douche.
  • Vulva, vaginal, and rectal examination.
  • Vaginal operations.
  • Insertion of tampons.
  • Patients with abdominal or pelvic operations unless erect/sitting position is indicated.
Lithotomy position
Lithotomy position

The patient lies on her back, the legs are separated and supported on the stirrups, thighs are flexed on the abdomen and the patient’s buttocks are kept at the edge of the bed or table. One pillow is placed under the patient’s head.

Indications:

  • Gynaecology examinations, treatments, and operations on the genitourinary system.
  • For delivery.
  • Rectal examination and operations.

Contraindications:

  • Patients with arthritis or joint deformity.
Knee-chest position
Knee-chest position

The patient rests on the knees and the chest, the head is turned to one side with one cheek on a pillow and another pillow placed under the chest. The weight is on the chest and knees.

Indications:

  • Used for sigmoidoscopy.
  • Vaginal and rectal examination.
  • First aid treatment in cord prolapse or retroverted uterus.
  • As exercise for postpartum and gynaecology.

Contraindications:

  • Patients with cardiovascular and respiratory problems.
Trendelenburg’s position

The patient lies on his back, the head is lower than the trunk, the foot of the bed is elevated at a 45° angle, the body is on an inclined angle, and the legs hang downward over the end of the table.

Indications:

  • Used in emergency situations like shock and hemorrhage (arrest bleeding from lower limbs).
  • Used in vaginal surgeries.
  • Used to displace intestines from the pelvic cavity to the upper abdomen.
  • Operations on the pelvic organs.
Jack knife or Kroaske/Bozeman position

The patient is placed on a prone position with the hips directly over the band of the examining table. Tip the table with the head lower than the hips. Lower the foot part of the table so that the patient’s feet are below the level of his head. Place the pillow under the pelvis and abdomen to relieve the strain.

Indications:

  • Operation on the rectum and coccyx.
  • Drainage.
Walchers position
Walchers position

The patient is placed flat on his back with the sacrum resting on the edge of the table. Lower the legs slowly towards the floor. Elevate the buttocks slightly if the table permits.

Indications:

  • To increase the diagonal conjugate of the pelvis in high forceps delivery and in breech presentation.
  • To relax the perineum.
Standing/erect position

The patient stands with the knees separated about ten inches with one foot on a low stool. Instruct her to place one hand on the back of the chair for support and the other hand on her hip.

Indications:

  • Vaginal examination for determining the degree of uterus prolapse.
  • Examination of hernia.
Lifting and Turning of Patients

A good nurse always knows how to lift and turn her patient gently. Great strength is not necessary to do this, it will need much practice.

To Lift a Patient Who Is in Sitting up Position in Bed
Procedure I: Orthodox lift
  1. Two nurses are necessary.
  2. Move the patient forward from the pillows, each nurse placing a hand under the patient’s axilla.
  3. Ask the patient to fold the arms across the chest and bend the head forward (chin on chest) and bend the knees a little.
  4. Place the arm nearest the head of the bed behind the buttocks at the patient’s back, grasping each other’s wrist firmly.
  5. Slip the other hand under the patient’s high up at the junction of the thighs and buttocks, grasping each other’s wrist firmly.
  6. Each nurse should grip with one hand and be gripped on the other hand by the second nurse.
  7. They then lift the patient down the bed and off the draw sheet.
Orthodox lift
Procedure II: Australian/shoulder lift
  1. Both nurses face the head of the bed.
  2. Bend down and place shoulder nearest to the patient under the axilla to act as a crutch.
  3. Place the hand of the same arm under the thighs as in method I/procedure I.
  4. The free hand is placed flat on the bed behind the patient’s back and is used to take the weight when doing the lifting.
  5. Lift the patient down the bed and off the draw sheet.
Australian/shoulder lift
To Turn a Patient onto the Side
  1. See that the patient’s knees are flexed, and put arms and legs in position for turning.
  2. Place one hand behind the shoulder furthest away and the other over the hips.
  3. Then turn the patient onto the side towards you.
Turning a Patient onto the Side
To Lift a Patient onto the Bed from the Stretcher
  1. Three nurses are necessary.
  2. Put the head of the stretcher to the foot of the bed.
  3. Three nurses stand on the side nearest the bed, one lifts the head and shoulders, one the hips and the third at the legs.
  4. All lift the patient together then move to the right and place the patient very carefully on the bed.
  5. Make the patient comfortable in the bed.
Lifting a Patient onto the Bed from the Stretcher
To Lift a Patient onto the Bed from the Theatre Trolley
  1. Wheel the trolley up beside the bed.
  2. Then lift the patient onto the canvas stretcher and place him on the prepared bed.
  3. Remove the poles and put them back on the trolley.
  4. Remember the patient returning from theatre is usually unconscious; handle him very gently and carefully.
  5. Place the arms and legs in position for turning and turn patient to the left side and roll the canvas and mackintosh up to the back.
  6. Roll the patient back to the middle of the bed and then to the right side as above and take out the canvas and mackintosh, put on the theatre trolley.
  7. Put the patient into the position which is used for the condition e.g. semi-prone or lateral.

NB. The patient should lie facing the locker side of the bed because the post-anesthetic tray should be ready on it and the nurse will remain by the bedside (on this side.)

To Help a Patient Out Of Bed Onto A Chair
Requirements:
  • Patient’s gown
  • Slippers/sandals
  • Pillow from the bed
  • Arm chair
  • Blanket to put over the knees may be required
  • A bell
Procedure:
  1. Help the patient into the gown and slippers.
  2. Bring the chair to the side of the bed.
  3. Place the patient’s legs over-side of the bed and help him to stand.
  4. Support the patient while he turns to sit into the chair.
  5. Place a pillow comfortably behind the back and fold a blanket over the knees if necessary.
  6. Give the patient some activity to do e.g. a book or knitting material and if he is alone a bell to ring in case he feels faint.
Assisting a patient from bed to chair
Perform Tepid Sponging (PEX 1.3.9)

TEPID SPONGING is the process of sponging with tepid water to cool the skin/reduce fever by evaporation and the temperature of the water used is 80-90°F (22-28°C).

Purpose:
  • To reduce the high temperature in a febrile state to normal.
  • To stimulate circulation.
  • To decrease toxicity.
  • To relieve nervousness and delirium and hence soothe the nerves and promote sleep.
Requirements:
Trolley: Top shelf:
  • A large basin of Luke warm water
  • Jug of tepid water
  • 6 sponge cloths/face towels in a bowl
  • Face towel in iced water in a bowl for a compress
  • Bath thermometer
Bottom shelf:
  • Clean linen/bed sheets
  • Patient’s gown
  • Mackintosh and draw sheet
  • 2 bath towels
  • Temperature tray
  • Bucket for used water
At the bed side:
  • Screens
  • Hamper
  • Cold drink for the patient
  • Drugs with adrenaline
Procedure:
  1. Collect all the equipment needed.
  2. Explain the procedure to the patient.
  3. Provide adequate privacy by screening and closing the adjacent windows.
  4. Wash hands thoroughly.
  5. Take the temperature of the patient and chart it.
  6. Strip the bed up to the top sheet and take off the patient’s gown.
  7. Soak the face cloth in the ice cold water.
  8. Apply the cold compress to the forehead of the patient.
  9. Sponge the face and dry with a face towel (the face and back are the only parts to be dried to avoid chills).
  10. Place the cold sponge in each axilla and groins, change if necessary.
  11. Sponge the neck, expose the arms and sponge using long slow sweeping movements for 3 minutes on each arm. Pour water over the hands and change the compress on the fore head.
  12. Change the water if necessary and check the temperature again.
  13. Cover the upper half of the body and expose the lower half of the body. Sponge the legs with long slow sweeping movements and pour water over the feet.
  14. Remove the compress from the forehead and face cloths from the axillae and groins.
  15. Turn the patient gently on the side, sponge the back using two face towels/cloths with long strokes/sweeping movements and dry.
  16. Remake the bed using clean linen, give the patient a clean gown and leave him/her comfortable.
  17. Give the patient a cold drink. The patient is left for 20 - 30 minutes, then the temperature is taken again and charted in the TPR/BP chart. It should fall by 1°C.
  18. Clear away and wash hands.
  19. Report and record the procedure to the patient’s chart.
N.B:
  • If the patient shows any sign of collapse during the procedure, the procedure is stopped at once, dry the skin and report to the nurse in-charge. Remake the bed. Clear away. The procedure should be left for 20 minutes before commencing.
  • The patient must be observed carefully throughout the procedure for signs of chills or any abnormality.
  • The patient is moved as little as possible.

Quick Quiz

Foundations Nursing Day 5 and 6 Quiz

FON - mobile-friendly and focused practice.

Privacy: Your details are used only for quiz tracking and certificates.

General Principles in Patient Care Read More »

Taking Vital Signs or Observations

Taking Vital Signs or Observations
I. Introduction to Vital Signs (PEX 1.5.1 - 1.5.4)

Vital signs are measurements of the body's most basic functions. They should be looked at in total, to monitor the vital functions of the body. They help reflect changes in the body, determine the patient’s usual state of health, and signal early physiological deterioration.

There are four primary vital signs, often noted as BT, BP, HR, and RR:

  • Body Temperature (BT)
  • Blood Pressure (BP)
  • Pulse / Heart Rate (HR)
  • Breathing Rate / Respiratory Rate (RR)
Purpose of Taking Vital Observations
  • To assess the baseline health status of an individual.
  • To plan and implement appropriate nursing care.
  • To modify or change the mode of medical treatment based on physiological response.
  • As a routine part of a complete physical assessment.
  • To help understand the present problem and assist in accurate diagnosis.
  • To understand and evaluate the effectiveness of the prescribed treatment or interventions.
Timing of Taking Vital Observations
  • On the patient’s admission to the hospital or health unit to establish a baseline.
  • On a routine schedule according to the physician’s order or hospital policy (e.g., 6:00 am to 6:00 pm).
  • During a patient’s visit to the clinic or physician’s office.
  • Before and after any invasive diagnostic procedure.
  • Before and after a surgical procedure (e.g., 1st 48 hrs postoperatively or 4-hourly with very ill patients or those presenting with fever).
  • Before and after administration of medication that affects the cardiovascular, respiratory, and temperature control functions (e.g., antihypertensives, antipyretics, digitalis, or opioids).
  • When the patient’s general physical condition changes abruptly (e.g., loss of consciousness, increased intensity of pain, or signs of shock).
  • Before and after nursing interventions influencing any one of the vital signs (e.g., before ambulating a patient who has been previously on bed rest, before range of motion exercises, blood transfusions, or tepid sponging).
  • Whenever the patient reports to the nurse about any non-specific symptoms of physical distress (e.g., “feeling funny,” dizzy, or "different").
Normal Values and Ranges of Vital Signs
Temperature:
  • Normal value: 98.4°F or 37°C in adults.
  • Normal ranges: 97°F - 99°F or 36°C - 37.2°C.
Pulse:
  • Normal value: 72 b/m in adults.
  • Normal ranges:
    • Adult (18yrs +): 60 - 90 b/m
    • Children (1 - 18yrs): 90 - 120 b/m
    • Infants (1 month - 1yr): 120 - 140 b/m
    • Neonate / Newborn (0 - 28 days - 1 month): 140 - 160 b/m
  • Old age: May be slower.
  • Extremely old age: May be more rapid.
Respiration:
  • Normal value: 16 breaths/minute (adults).
  • Normal ranges:
    • Adults: 16 - 20 breaths/minute
    • Neonates: 30 - 44 breaths/minute
    • Children: 20 - 22 breaths/minute
    • Old age: 10 - 24 breaths/minute
Blood Pressure:
  • Normal value: 120/80 mmHg (in adults).
  • Normal ranges:
    • Adult: 90/60 - 120/90 mmHg. (Note: 90-120 / 60-90 mmHg).
    • Infants: 70-90 / 50 mmHg
    • Newborn (neonates): 30-50 / 10 mmHg (Note: Diastolic can be very low and difficult to auscultate in neonates, often measured via mean arterial pressure on monitors).
Guidelines for Taking Vital Signs
  • The primary nurse caring for the patient is the best one to take vital signs, interpret their significance, and make decisions about the care.
  • Equipment used to measure vital signs must be appropriate and working properly to ensure accurate findings. (e.g., using the correct BP cuff size prevents falsely elevated or lowered readings).
  • Knowing the normal range for all vital signs helps the nurse to detect abnormalities rapidly.
  • A client’s normal range may differ from the standard range for that age or physical state. (e.g., highly trained athletes naturally have bradycardia).
  • A normal value for the client serves as a baseline for comparing conditions over time.
  • Know the client’s medical history and therapies or medications for vital sign changes.
  • Control or minimize environmental factors that may affect vital signs. For example, measuring a pulse immediately after the patient experiences an emotional upset will give unclear results for the client’s actual resting state.
  • An organized, systemic approach when taking vital signs ensures accuracy of findings and efficiency of care.
II. Take Patient's Temperature (PEX 1.5.1)

Temperature is the degree of heat maintained by the body, monitored and measured using a clinical thermometer. Alternatively, it is the degree of warmth or the balance maintained between heat produced (thermogenesis) and heat lost (thermolysis) in the body, or the degree of heat of a substance or body as measured by a thermometer.

Purpose of Assessing Temperature
  • To determine the exact core body temperature.
  • To assist in medical and nursing diagnosis.
  • To evaluate the patient’s recovery from illness.
  • To plan immediate nursing interventions (e.g., administering antipyretics or initiating tepid sponging).
  • To evaluate the patient’s response to treatment.
  • To recognize any variation from the normal and understand its clinical significance.
Normal Body Temperature from Different Sites (Adults)
  • Oral: 37°C or 98.4°F (Range: 36°C - 37°C).
  • Rectal: 37.6°C or 99.6°F. Generally 1° higher than mouth temperature. It is considered the most accurate core temperature.
  • Axilla: 36.4°C or 97.6°F. Generally 1° lower than mouth temperature (Range: 36°C - 37°C).
  • Groin: Same as for the axilla.
N.B (Important Notes):
  • Temperature varies at different times of the day, with the evening temperature being about 1° (one degree) higher than that of the morning because of muscular and metabolic activity.
  • The temperature also varies according to the site used for taking it. (e.g., the skin temperature i.e., axilla in a healthy person may be 36.1°C while the oral/mouth temperature is usually a degree higher and the rectal temperature may be 37.2°C or 99°F).
  • When taking temperature, never be satisfied with anything but an accurate result. Incorrect results mislead diagnosis, prescription, and treatment.
  • The mouth, axilla, groin, rectum, and vagina are suitable places for taking temperature, but as the reading varies according to the site, the same place must be used each time for the same patient to ensure consistency.
Factors Affecting Temperature
General Factors:
  • Time of the day: Morning (lower) vs. evening (higher due to diurnal rhythms).
  • Site used: Rectal is highest; axillary is lowest.
  • Gender: Women normally have a higher temperature than men, especially during ovulation (due to progesterone surge).
  • Age: Temperature is highest in neonates and lowest in the elderly (due to reduced metabolic rate and subcutaneous tissue loss).
  • Emotional conditions: Stress and anxiety elevate body temperature.
  • Environment: Extreme weather changes affect thermoregulation.
Factors Influencing Heat Production (Thermogenesis):
  • Metabolism and oxidation of food (Basal Metabolic Rate).
  • Muscle activity and exercise.
  • Strong emotions, excitement, anxiety, and nervousness.
  • Change in atmospheric temperature.
  • Diseases/conditions: Bacterial invasions or infections trigger the hypothalamus to raise the set point.
  • Sympathetic stimulation: Release of epinephrine and nor-epinephrine.
Factors Influencing Heat Loss (Thermolysis):
  • Sleep: Body temperature lowers due to reduced muscle activity.
  • Fasting: Leads to decreased heat production.
  • Illness and lower vitality: Due to a depressed nervous system, heat production is lowered.
  • Prolonged exposure to cold environment.
  • Use of narcotic drugs: Suppress the temperature-regulating center in the hypothalamus.
Mechanisms of Body Heat Loss:
  • Conduction: Transfer of heat from the body to a substance (air, water, and clothes) directly in contact.
  • Radiation: Transfer of heat from the body to heat waves which travel through space.
  • Evaporation: Transfer of heat from the body in the form of vapor (liquid sweat is converted into vapor).
  • Convection: Transfer of heat from the surface of one subject to the surface of another, such as skin, by the movement of heated air or fluid particles.
General Rules for Taking Temperature
  • The mouth is the usual place to take temperature, but it must not be used for:
    • A child under 5 years.
    • Patients with difficulty breathing or much coughing.
    • Unconscious or mentally confused patients.
    • Patients with disease or recent surgery of the mouth or nose.
  • It should not be taken immediately after hot or cold fluids. Wait for 10 minutes after the patient has eaten or drunk. (This allows the oral mucosa to return to normal core temperature).
  • Grasp the thermometer securely by the upper end of the stem; never hold it by the bulb as it will easily be broken or contaminated.
  • If the patient bites or breaks a thermometer in the mouth, quickly give cold water to rinse (to prevent mercury or glass ingestion) and inform the in-charge for further management.
  • If taking temperature by rectum, always hold the thermometer for the patient in place, especially in children, to prevent injury.
  • Report to the supervisor a temperature below 35°C (Hypothermia) or above 38°C (Pyrexia).
  • Always wash the used thermometer with cold water and soap or disinfect with a disinfectant. Never use hot water to wash a glass clinical thermometer as it will expand the mercury and shatter the glass.
  • Never take oral and rectal temperature at the same time.
  • Shake it by a quick movement of the wrist below 35°C or 94°F. Care should be taken when shaking near objects to avoid breakages.
  • Patients are never told what the exact vital sign reading is directly; simply explain and reassure the patient, i.e., “you are fine, okay, don’t worry.”
Types of Thermometers
  • Clinical thermometer: An instrument used for recording body temperature. It is made of glass with a hollow tube running through the center. At one end is a bulb containing mercury which rises into the center tube when heated. The mercury remains stationary at the registration point until shaken down due to a constriction in the tube. Degrees of temperature are marked from 35°C - 43°C or 94°F - 110°F.
  • Electronic or digital thermometer: Consists of a battery-powered display unit, a thin wire cord, and a temperature-sensitive probe covered by a disposable plastic sheath to prevent the transmission of infection. Separate probes (often color-coded) are available for oral and rectal insertion.
  • Disposable thermometer: A single-use thermometer made of thin plastic strips with chemically impregnated paper. Used for children to take oral and axillary temperatures only. Needs about 45 seconds to record; generally less accurate.
  • Tympanic membrane thermometer: Small hand-held devices similar to otoscopes with disposable speculums. Uses infrared-sensing electronics and liquid crystal displays. Results are displayed in 1-2 seconds after placing the speculum in the outer third of the ear canal. It is highly accurate as it reflects core temperature from the tympanic membrane (which shares blood supply with the hypothalamus).

Temperature Procedures


1. Oral Temperature Procedure

Requirement: Temperature tray containing an oral clinical thermometer in a jar containing a disinfectant solution (e.g., hibitane cetrimide 1-20), a gallipot of swabs, a gallipot of water, a receiver for used swabs, a watch with a second hand ticker, a temperature chart, and a pen.

Step Action Rationale / Elaboration
1Collect the equipment needed. Explain the procedure to the patient.Ensures preparedness and gains patient cooperation while alleviating anxiety.
2Position the patient (sitting or lying down) and give privacy.Ensures patient comfort and dignity.
3Wash hands.Infection control standard precaution.
4Hold the color-coded end or stem of the glass thermometer with fingertips.Prevents contamination of the bulb and transferring nurse's body heat to the sensor.
5If stored in disinfectant solution, rinse in cold plain water and dry before use. Inspect for cracks.Chemical disinfectants can irritate the oral mucosa and alter taste. Broken glass is an injury hazard.
6Read mercury level. If above desired level, grasp tip securely and sharply flick the wrist downward until reading is below 35°C or 94°F.Ensures the thermometer starts from a baseline below normal body temperature to capture an accurate rise.
7Ask the patient/client to open the mouth and gently place the thermometer under the tongue in the posterior sublingual pocket, lateral to the center of the lower jaw.The posterior sublingual pocket has a rich blood supply directly from the carotid artery, reflecting core body temperature accurately.
8Ask the patient to hold the thermometer with lips closed. Caution against biting or talking.Closed lips seal in the heat. Biting poses a risk of shattering the glass and mercury exposure.
9Leave the thermometer in place for 3 minutes (or according to agency policy).Allows sufficient time for the mercury to fully expand to the patient's temperature.
10Remove thermometer, read at eye level while holding horizontally. Wipe in rotating movements with a wet swab from stem to bulb.Wiping from the cleaner area (stem) to the dirtier area (bulb) prevents spreading microorganisms up the stem.
11Place it back in its jar, chart the readings, and report unusual variations. Clear away, wash hands.Maintains accurate medical records and prompts timely medical interventions if required.

Contraindications for Oral Temperature: Disease, injuries, inflammation, and surgeries of the oral cavity. Infants, children below 5 years, mentally disturbed, delirious, uncooperative, and unconscious patients. Patients with breathing problems, convulsions, oxygen masks, or severe cough. Should not be taken immediately after a hot bath, smoking, or consuming hot/cold drinks.

2. Axillary Temperature Procedure

Used when oral temperature is contraindicated.

Step Action Rationale / Elaboration
1Collect equipment, explain procedure, provide privacy, and wash hands.Standard preparation and infection control.
2Inspect the axilla and dry it thoroughly with a dry swab.Moisture (sweat) will cool the area through evaporation, leading to a falsely low reading.
3Dry thermometer, shake mercury below 35°C, and inspect for cracks.Prepares the equipment safely.
4Insert into the center of the axilla with bulb in contact with skin folds. Ensure clothing does not interfere.Skin-to-bulb contact is essential for conductive heat transfer.
5Keep elbow at the side and place arm across the chest to retain thermometer in position.Creates a sealed cavity to trap the body heat for accurate measurement.
6Leave in place for 3 minutes.Provides adequate time for temperature equilibration.
7Remove, read at eye level, wipe from stem to bulb with twisting motion, chart findings, and clean up.Ensures accurate documentation and maintains hygiene.

Contraindications for Axillary Temperature: Sores or burns at the site. Emaciated or very thin patients (as they cannot form a proper skin-fold cavity to trap the heat).

3. Groin Temperature Procedure

Rules apply as for the axilla, but one leg is flexed over the other.

Step Action Rationale / Elaboration
1Collect equipment, explain procedure, provide privacy, and wash hands.Standard preparation.
2Inspect the groin and dry it thoroughly with a dry swab.Removes sweat to prevent evaporative cooling.
3Prepare thermometer (shake down, check for cracks).Safety and baseline reset.
4Insert in the center of the groin by asking the patient to abduct the thigh and flex the upper leg over the other.Creates a closed cavity to trap heat effectively.
5Leave in place for 3 minutes.Time for accurate registration.
6Remove, read, wipe from stem to bulb, chart, and clean up.Documentation and hygiene.

Contraindications for Groin Temperature: Sores or burns at the site. Emaciated or thin patients.

4. Rectal Temperature Procedure

Used for head injuries, head operations, and children under 5 years. The rectal thermometer has a blunt end colored blue (or red in some regions) to prevent inadvertent use elsewhere.

Requirement: Rectal thermometer, gallipot of swabs, gallipot of water (2: lukewarm and cool), receiver for used swabs, watch, chart, pen, Vaseline/lubricant, and gloves.

Step Action Rationale / Elaboration
1Collect equipment, explain procedure, and screen the bed for privacy.Rectal procedures can cause embarrassment; privacy is paramount.
2Position patient in Sim’s position with upper leg flexed to expose only the anal area.Sim's position provides optimal visualization and access to the anal sphincter.
3Wash hands and put on gloves. Swab the area.Protects the nurse from exposure to fecal matter and pathogens.
4Clean/dry thermometer, check for cracks, shake below 35°C.Ensures accuracy and safety.
5Squeeze lubricant on a swab and dip the bulb into it, covering 2.5-3.5 cm (1-1.5 inches) for adult or 1.2-2.5 cm (0.5-1 inch) for an infant.Lubrication reduces friction, preventing mucosal tearing and minimizing patient discomfort.
6With non-dominant hand, separate buttocks and ask patient to breathe in slowly and relax.Relaxation decreases the tone of the external anal sphincter, easing insertion.
7Gently insert thermometer into anus along rectal wall towards the umbilicus. (1.2-2.5cm for infants, 2.5-3.5cm for adults). Do not force.Directing towards the umbilicus aligns with the natural anatomical curve of the rectum, registering the hemorrhoidal artery temperature rather than fecal temperature. Forcing can cause perforation.
8If resistance is felt during insertion, withdraw immediately and report.Resistance may indicate an obstruction (e.g., tumor, severe impaction).
9Hold thermometer in place for 3 minutes.Prevents the thermometer from slipping out or migrating deeper inward.
10Remove, wipe off secretions towards the bulb, read at eye level, and chart.Cleaning from stem to bulb (clean to dirty) prevents spreading fecal bacteria up the shaft.
11Wash in lukewarm water/disinfectant, rinse in cool water, dry, replace. Clear away, remove gloves, wash hands.Standard decontamination process.

Contraindications for Rectal Temperature: Injuries, disease, inflammation, and surgeries of the rectum. Patients with fecal impaction or chronic diarrhea. Patients requiring bowel wash/enema.

Conversions (Temperature)
  • The Fahrenheit scale ranges from 32°F to 212°F whereas the Centigrade scale ranges from 0°C to 100°C.
  • Fahrenheit to Centigrade: C = (F - 32) × 5/9
  • Centigrade to Fahrenheit: F = (C × 9/5) + 32
Rigors

Rigor is a sudden attack of intense shivering when the heat-regulating center in the brain is disturbed. It is seen in certain infections like malaria and in allergic reactions (e.g., after an intravenous infusion).

Stages of Rigors & Management:
  1. Cold stage: The patient feels a severe chill, experiences extreme shivering, and body temperature rises (hyperpyrexia). The hypothalamus has reset to a higher temperature, making the body feel cold and initiating shivering to generate heat.
    • Provide rest and supplementary oxygen (shivering highly increases oxygen demand).
    • Offer hot drinks and use hot water bottles to provide warmth.
    • Provide an extra blanket. Give more fluids.
  2. Hot stage: The patient feels extremely hot. The new set-point has been reached, shivering stops, and vasodilation begins to attempt to release the trapped heat.
    • Remove extra blankets and hot water bottles.
    • Perform cold/tepid sponging and apply ice pack compresses.
  3. Sweating stage: The patient sweats profusely. The fever is "breaking" and the hypothalamus resets to normal. Evaporative cooling takes over.
    • Wipe the patient with a wet towel and cover with a clean, dry sheet.

N.B: During all three stages, monitor the temperature closely and record it in the patient’s chart.

III. Take Patient's Pulse Rate (PEX 1.5.3)

Pulse is the wave of expansion and recoil of an artery in response to the pumping action of the heart (specifically the left ventricle). This can be felt by the examining fingers over superficial arteries.

Purpose of Assessing Pulse
  • To determine the number of heartbeats occurring per minute.
  • To evaluate the amplitude (strength) of the pulse.
  • To assess the vascular status of the distal limbs (perfusion).
  • To assess the response of the heart to cardiac medications, physical activity, blood volume changes, and gas exchange.
  • To assess the heart’s ability to deliver oxygenated blood to distant areas of the body.
  • To obtain information about the heart rhythm and patterns of beats (regularity).
Common Sites of Taking Pulse
Site Location
Radial arteryIn front of the wrist at the thumb side.
Brachial arteryMedially above the elbow (antecubital fossa).
Carotid arteryAt the side of the neck between the trachea and sternocleidomastoid muscle.
Temporal arteryOver the temporal bone.
Facial arteryAbove the lower jaw (mandible).
Femoral arteryIn the groin.
Tibial artery (Posterior)Behind the medial malleolus of the ankle.
Dorsalis pedisOn the dorsal aspect (top) of the foot.
ApicalAt the left side of the chest in the 4th, 5th, and 6th intercostal spaces (mid-clavicular line).
PoplitealMedial or lateral to the popliteal fossa (behind the knee) with the knees flexed.
Ulnar pulseOuter aspect of the wrist along the little finger side.
FontanellesOn the head of infants.
Observations Made on Taking Pulse
  • Rate: The number of beats per minute. Corresponds with age (average for adults is 72 b/m).
  • Rhythm: The regularity of beats. The distance/time between beats is equally spaced if regular.
  • Volume: The fullness of an artery; the force of blood felt at each beat (described as full/bounding, large, small, weak, or thready). Represents the amount of blood distending the artery with each stroke.
  • Tension: The degree of arterial compressibility (high/low). The pulse should feel soft. If it is difficult to compress or obliterate, tension is high (suggesting hypertension or arteriosclerosis); if easy to compress, it is low (suggesting hypotension or hypovolemia).
Factors that Affect the Pulse
  • Age: Children have faster beats; very old persons typically have a slower pulse rate.
  • Sex: It is generally slower in men than in women.
  • Stature: Slower in tall people than in short people.
  • Position: Slower at rest and sleep than in a standing position (gravity compensation).
  • Emotions: Anger or excitement increases the rate temporarily via sympathetic stimulation.
  • Exercise: Much faster during exercise due to increased cellular oxygen demand.
  • Fever: Increases the pulse rate (tachycardia) as metabolic rate increases.
  • Extreme heat and cold: Generally increase the heart rate.
  • Drugs: May increase (e.g., adrenaline, caffeine) or decrease (e.g., digitalis, beta-blockers, morphine) the pulse.
  • Shock and hemorrhage: Rapid, weak pulse to compensate for low blood volume.
  • Diseases: Thyrotoxicosis and myocardial failure increase the rate.
  • Fasting: Can increase the pulse.
  • Head tumors: Increased intracranial pressure generally causes a slow, bounding pulse (part of Cushing's triad).
Abnormal Pulse
  • Tachycardia: Rapid heart action indicated by a pulse rate of more than 100 b/m. Commonly found in patients with fevers, thyrotoxicosis, organic heart disease, nervous disorders, and intake of drugs like morphine, caffeine, and alcohol.
  • Bradycardia: An abnormally slow heart rate indicated by a pulse rate of less than 60 b/m. Commonly caused by opium poisoning, heart muscle disorder, cerebral tumors (increased ICP), and myxedema (severe hypothyroidism).
  • Dicrotic pulse (abnormal volume): There is one heartbeat but two arterial pulsations felt, giving the sensation of a double beat due to a flabby, weak arterial wall.
  • Abnormal rhythm: Intermittent pulse and extra systoles due to cardiac irritability, hypoxia, digitalis overdose, potassium imbalance, or arrhythmias.
  • Water hammer or Corrigan’s pulse: A full volume, collapsing pulse. Found in aortic regurgitation, where blood is forcefully ejected into the artery but then leaks back into the left ventricle due to non-closure of the aortic valve.
General Rules and Procedure for Taking Radial Pulse
  • Count the pulse for one full minute, especially when there is an irregularity.
  • Observe the rate, rhythm, volume, and tension.
  • Do not take the pulse immediately after exercise, emotional stress, or painful treatment (wait 10-15 minutes).
  • Choose a suitable site and be aware of any medications interfering with heart rate (e.g., digitalis).
  • Notify the physician if the rate is <60 or >100, or if there are abnormal patterns (missing beats). If abnormal, assess again by having another nurse conduct the measurement.
Radial Pulse Procedure

Requirement: Small tray, watch with a second hand, pen, TPR chart.

Step Action Rationale / Elaboration
1Collect equipment and explain the procedure to the patient.Ensures preparedness and alleviates anxiety.
2Position patient sitting or lying down. Bend elbow at 90°, support lower arm, and slightly extend wrist with palm downwards.A relaxed arm prevents muscle contractions from masking the arterial pulsation.
3Wash and dry hands.Infection control.
4Place the tips of the 1st two or middle three fingers of the dominant hand over the groove along the radial (thumb) side of the patient’s wrist, applying slight pressure.Fingertips are highly sensitive. Never use your thumb, as it has its own strong pulsation which can be confused with the patient's pulse.
5When easily palpable, look at the watch and begin to count the rate.Establishing the rhythm before counting ensures accuracy.
6If regular, count for 30 seconds and multiply by 2. If irregular, count for a full minute.A full minute ensures accurate capture of premature or missed beats in an irregular rhythm.
7Assess the regularity, strength (volume), rate, and tension.Provides a complete hemodynamic picture rather than just a number.
8Make comfortable, record findings immediately, wash hands, and report abnormalities.Timely documentation ensures continuity of care.
IV. Take Patient's Respiratory Rate (PEX 1.5.4)

Respiration is the act of breathing in / taking in oxygen (inspiration/inhalation) and breathing out / expelling out of carbon dioxide (expiration/exhalation). The exchange of gases between the blood and lungs is called external or pulmonary respiration, while the exchange of gases between the blood and cells is known as internal respiration.

Purpose of Assessing Respirations
  • To determine the baseline respiratory status of the patient.
  • To determine the number of respirations occurring per minute.
  • To gather information about the rhythm and depth of breathing.
  • To assess the response of a patient to any related therapy or medication (e.g., bronchodilators, opioid analgesics).
Factors Influencing Respiration
  • Sex: Females have a slightly more rapid respiratory rate than males.
  • Exercise: Exertion increases the metabolic rate, creating an oxygen demand and stimulating faster respiration.
  • Rest and sleep: Metabolism decreases, so respiratory rate is normal or decreased.
  • Emotions: Sudden stressful conditions (fear, anxiety, excitement) influence and rapid the respiratory rate via sympathetic arousal.
  • Atmospheric pressure changes: In high altitudes where oxygen content is low, the rate of respiration is increased to fulfill oxygen demands.
  • Disease: Respiratory rate increases in some heart/lung diseases (to compensate for hypoxia) and decreases when there is pressure on the brain's respiratory center (medulla) due to tumors or injury.
Characteristics of Normal & Abnormal Respirations
Normal Respiration (Eupnoea):

Normal breathing is effortless, painless, quiet, and automatic. It consists of the rhythmical rising and falling of the chest wall. Regular and even, producing no noise. (Resting adult rate: 16-20 b/m).

Abnormal Respirations:
  • Stridor: A noisy, shrill, vibrating, or whistling inspiration occurring in obstruction of the upper airway. Commonly seen in laryngitis and foreign body obstruction.
  • Wheezing: A difficult, louder/noisy expiration due to partial obstruction of smaller bronchi and bronchioles (e.g., asthma, emphysema).
  • Apnoea: Temporary cessation of breathing. Seen in very ill patients or CNS disorders.
  • Dyspnoea: Forced, painful, difficult, or labored breathing, sometimes accompanied by cyanosis. Seen in heart/respiratory diseases, airway obstruction, and convulsions.
  • Orthopnoea: Inability to breathe easily except when sitting up in an upright position. A classic sign of congestive heart failure.
  • Cheyne-Stokes breathing: Periodic breathing starting with slow/shallow respirations that gradually increase in rate/depth to a climax, followed by a pause (apnea for 5-30 seconds), then the cycle repeats. Common in patients near death.
  • Asphyxia: A state of suffocation where lungs fail to get sufficient oxygen to supply vital organs.
  • Rale (Crackles): An abnormal rattling or bubbling sound caused by fluid/mucus in the airway, seen in bronchitis or pneumonia.
  • Hyperpnoea / Kussmaul’s breathing: Abnormal forced, deep, regular, but rapid breathing. A compensatory mechanism seen in diabetic ketoacidosis (blowing off CO2).
  • Croup: Difficult, noisy breathing (barking cough) due to laryngeal spasms.
  • Stertorous breathing: Heavy, noisy, snoring-like breathing occurring in unconscious patients.
  • Biot’s respiration: Shallow breathing interrupted by irregular periods of apnoea; seen in severe central nervous system disorders.
  • Cyanosis: Blueness or discoloration of skin/mucous membranes due to tissue hypoxia.
  • Bradypnoea: Abnormal slowness of breathing.
  • Tachypnoea: Abnormal rapid breathing rate.
General Rules and Procedure for Counting Respirations
  • The patient should be placed in a comfortable sitting-up position.
  • Respirations should be counted when the patient is unaware of the counting. (Do this immediately after counting the pulse, keeping fingers on the wrist so the patient does not voluntarily alter their breathing).
  • Observe the full respiratory cycle (inspiration, expiration, and pause).
  • For children, count respirations before disturbing them to take their temperature.
  • Observe Rate, Depth (shallow/deep), Discomfort (painful breathing), and Movements (use of accessory abdominal or thoracic muscles).
Respiration Counting Procedure
Step Action Rationale / Elaboration
1Collect equipment (watch, pen, chart) and explain procedure.Standard preparedness. (Note: Only explain you are taking vital signs; do not specifically say "I am counting your breathing" to avoid voluntary alteration).
2Position patient, placing their arm relaxed across the abdomen/lower chest.Allows the nurse to feel the rise and fall of the chest/abdomen while appearing to check the pulse.
3Observe one complete respiratory cycle (inspiration, expiration, pause).Establishes a baseline visual rhythm.
4Look at the watch and count "one" with the first full respiratory cycle.Ensures precise timing.
5If regular in adults, count for 30 seconds and multiply by 2.Standard quick assessment for normal rhythms.
6If infant, young child, or adult with irregular/abnormal rate, count for one full minute.Infants and children often have periodic, irregular breathing natively; a full minute yields true averages.
7Note depth, rhythm, and symmetry of chest wall movement.Assesses adequacy of ventilation and detects unilateral lung pathology.
8Replace patient's clothes/linen, make comfortable, record findings, and wash hands.Maintains dignity, thermal comfort, and infection control.
V. Take Patient's Blood Pressure (PEX 1.5.2)

Blood pressure is the force or pressure that the circulating blood exerts on the elastic walls of the blood vessels (arteries) in which it is contained.

Purpose of Assessing Blood Pressure
  • To obtain a baseline rate for diagnosis and treatment planning.
  • To compare with subsequent changes that may occur during the care of the patient.
  • To assist in evaluating the status of the patient’s overall blood volume and vascular resistance.
  • To evaluate the patient’s hemodynamic response to physical condition changes or treatment with IV fluids and cardiovascular medications.
Types of Pressure
  • Systolic pressure: The highest degree of pressure exerted by the blood against the arterial wall as the left ventricle contracts and forces blood into the aorta.
  • Diastolic pressure: The lowest degree of pressure when the heart is in its resting period (relaxation phase) just before the next contraction of the left ventricle.
Factors Influencing Blood Pressure
  • Age: Adults’ BP tends to increase with advancing age due to decreased arterial compliance (older adults often run 140/80 to 160/90 mmHg).
  • Exercise: Increases BP due to increased cardiac output.
  • Stress: Anxiety, fear, pain, and emotional stress trigger sympathetic nervous system response, causing vasoconstriction and a rise in BP.
  • Medication: Narcotics, analgesics, and antihypertensives lower BP; stimulants raise it.
  • Diurnal variation: Lowest in the early morning and higher in the late evening.
  • Sex: Generally higher in men than in women (until menopause, after which women's risk catches up).
  • Bleeding/Hemorrhage: Causes a rapid drop in blood volume, leading to low blood pressure (hypotension).
General Rules of Taking Blood Pressure
  • Do not take blood pressure on an arm if:
    • The arm has an active intravenous infusion line (compresses the line).
    • The arm is injured, fractured, or diseased.
    • The arm has an arteriovenous (AV) shunt or fistula for renal dialysis (cuff pressure can clot or damage the fistula).
    • It is on the same side of the body where a female patient had a radical mastectomy (risk of causing severe lymphedema).
  • Postpone BP taking on a patient who is highly anxious, angry, in acute pain, or a crying child until they are calm, to avoid falsely elevated readings.
  • Allow the patient to rest for at least 5-10 minutes prior to taking blood pressure.
  • Do not take blood pressure more than 3 times in succession on the same arm to prevent venous congestion, which alters readings and causes discomfort.
Blood Pressure Procedure

Requirement: Sphygmomanometer, Stethoscope, Patient’s chart, Pen.

Step Action Rationale / Elaboration
1Collect equipment and explain the procedure to the patient.Gains cooperation and allays anxiety which could artificially elevate the BP.
2Place patient in comfortable position (lying or sitting) with the arm resting on a surface at heart level.If the arm is below heart level, the reading will be falsely high due to gravity; if above, it will be falsely low.
3Wash hands and bring equipment to the bedside.Infection control and workflow efficiency.
4Apply deflated cuff evenly over the brachial artery. The lower edge should be 2 inches (2.5-5 cm) above the antecubital fossa, with the two tubes turning towards the palm.Leaving space above the fossa ensures the stethoscope bell/diaphragm can be placed directly on the skin without touching the cuff, avoiding artefactual noise.
5Palpate brachial artery. Place the stethoscope bell/diaphragm over the pulse. Ensure earpieces point forward.Forward-pointing earpieces align with the ear canal for optimal sound conduction.
6Close the pump valve (clockwise). Pump air into the cuff until the manometer registers 20-30 mmHg above the point where the radial pulsation disappears.Estimating the systolic obliteration point first prevents over-inflation (causing pain) and under-inflation (missing the auscultatory gap).
7Open valve slowly (anti-clockwise) to release air at 2-3 mmHg per second. Note the number where the 1st loud tapping sound begins (Systolic pressure).The first Korotkoff sound indicates that arterial pressure has overcome cuff pressure during ventricular contraction.
8Continue releasing pressure slowly. Note the point where the sound ceases or becomes completely muffled (Diastolic pressure).The final disappearance of sound (Korotkoff Phase V) indicates free, uninterrupted blood flow during ventricular relaxation.
9Allow remaining air to escape rapidly to zero. Wait one minute before re-inflating if a repeat is necessary.Waiting allows trapped venous blood to clear out of the arm, preventing falsely elevated diastolic readings on the second attempt.
10Make comfortable, record findings immediately (e.g., 120/80 mmHg), wash hands, and report abnormalities.Ensures permanent, accurate medical record keeping.
References
  • World Health Organization (WHO) clinical guidelines for vital sign monitoring.
  • Standard nursing fundamentals text regarding basic physiological measurements and physical examination (PEX).
  • Local hospital or agency protocols for vital sign documentation and frequency.

Quick Quiz

Foundations Nursing Day 4 Quiz

FON - mobile-friendly and focused practice.

Privacy: Your details are used only for quiz tracking and certificates.

Taking Vital Signs or Observations Read More »

General Principles and Rules of All Nursing Procedure

Topic: General principles and rules of all nursing procedures

These are guidelines that should be observed as a nurse carries out all nursing procedures:

  1. Show interest and devotion to duty and be alert and prompt in all your assignments.
  2. Make the patient the focus of attention, as she/he is the sole reason for the existence of the nursing profession.
  3. Be clean in appearance and behave with an apparent ease and assurance in all-nursing procedures.
  4. Demonstrate and inspire confidence, knowledge of and efficiency in techniques at all times.
  5. Use the available equipment and nursing appliances, which should be collected quickly, quietly and methodically.
  6. Trays and trolleys must be neat and complete to give an adequate nursing procedure.
  7. Thoroughly test all equipment to make sure it is in good condition, before preparing the tray or trolley.
  8. Display a high sense of responsibility in administration and custody of drugs and in the dispensation of any kind of treatment.
  9. Keep up to date with new methods, techniques, drugs and lotions; know exactly their use, dosage, toxic effects and calculation of the dosage.

Patient's Comfort (Principles related to Procedures)

Ensuring maximum comfort for the patient during any procedure is essential and reflects respect for their privacy. Key aspects include:

  1. Ensure maximum comfort to the patient and respect his/her privacy by:
    • Telling him/her what is to take place, explaining the procedure as simple as possible.
    • Protect the patient from draught and avoid undue exposure, make sure that windows are closed and screens appropriately placed.
    • Establish a good nurse/patient relationship to secure the patient’s confidence and to induce their tranquility of mind.
    • Observe any change in the patient’s general condition during the procedure.
  2. Always prepare everything that will be required and have it by the patient’s bedside before beginning the procedure.
  3. Lift and handle the patient as gently as possible exhibiting courtesy, efficiency, and skill.

General Rules for Carrying out Nursing Procedures (Detailed Steps)

  1. Collect the equipment needed and prepare the tray /trolley.
  2. Explain the procedure to the patient.
  3. Screen the bed and close adjacent windows.
  4. Bring the tray / trolley to the bed side.
  5. Position the patient.
  6. Wash hands.
  7. Carry out the procedure.
  8. On completion of the procedure leave the patient comfortable.
  9. Leave the surroundings dry and tidy.
  10. Clean and replace the equipment.
  11. Wash hands.
  12. Report and record procedure.
  13. Send any specimens obtained to the Laboratory as soon as possible.

Topic: Hospital Economy

Understanding how resources are managed efficiently in the hospital setting is part of the introductory aspects of the nursing profession.

Note: Detailed information specifically titled "Hospital Economy" or elaborating on its principles and rules was not present in the provided lecture notes document beyond the initial curriculum outline. However, understanding the responsible use of resources, such as equipment and supplies, as mentioned in other sections (e.g., equipment maintenance, preparation for procedures), is a practical aspect of hospital economy.

Topic: Cleaning Methods

WARD MAINTENANCE PRACTICES

Daily Cleaning

A. Ward Maintenance

  • Collect all equipment necessary on the trolley.
  • Make the patient’s beds and pull bed and lockers away from the wall.
  • Collect and put away all the equipment not necessary on the ward for immediate use.
  • The floor is swept and mopped.
  • Carry out dump and dry dusting of all ward furniture and equipment, using the ward cleaning trolley.
  • Return beds and lockers to their position.
  • Replace sputum mugs with clean ones empty the used ones, rinse well in the sluice room, leave soaked in the disinfectant.
  • Give out clean drinking mugs and feeding cups. Refill bottles for drinking water if required.
  • Clean used equipment and keep in the proper place.

In dressing and treatment rooms:

  • Shelves - Wash daily and whenever necessary
  • Sinks and wash basins - wash daily and after use with vim or hebitane.
  • Sterilizers - empty, clean inside with hebitane when necessary, refill with clean water.
  • Trolleys - wash daily and after with soap and water, dry thoroughly. Do not use gumption or vim on food trolleys.
  • Lifting forceps - boiled daily and whenever contaminated forceps jars cleaned, boiled and lotion changed daily. Lotion jar inspected daily and more lotion added if required. Or boiled or autoclaved daily and kept in a dry sterile container.
  • Soiled dressing buckets - keep lid on at all times, keep the outside clean. And they should be thoroughly cleansed after emptying.

Hygiene in Special Areas (Operating theatre, Intensive care unit (ICU), Pre-mature unit and Labour suit.)

Operating theatre:

  • Operating tables, trolleys and shelves - dump dust daily using water and detergent.
  • Walls - dump cleaning 2.5-3m downward daily with water and detergent.
  • Floors - scrub with water and detergent daily and whenever soiled and leave to dry.
  • Floors where there are spillages of body fluids - apply 1% hydrochloride for 15min and spot clean. Clean after every operation. Do weekly cleaning of all equipment and areas.

Note: The same method of cleaning applies to all the rest of the special areas mentioned above (intensive care unit, pr-mature unit and labour suit.)

B. Equipment Maintenance (Detailed Procedures - extracted from your notes):

It is the responsibility of every health worker in the hospital to see that all equipment is very well looked after, serviced regularly and given immediate attention when there is any defect.

Equipment should be handled with care and breakages reported immediately, this will definitely keep the hospital expenditure very low.

1. Electric machine

Have regular servicing of the machines and as soon as they are out of order, make a requisition to the maintenance department, have them inspected and repaired.

  • Refrigerators: These are regulated in order to be effective, regulators should be regularly checked and temperatures recorded every day. Defrosting should be carried out weekly, and then the interior is thoroughly washed with hot soapy water, rinsed and the shelves replaced. Ice trays are taken out and washed with cold water.
  • Suction machines: Wash with soap and water daily and whenever used. Replace the lotion in the bottles.
  • Autoclaves: Dump dust them daily, check the functionality of the water and pressure gauges. Always unplug from the mains when not in use.
  • Boilers and sterilizers: Empty, clean inside with gumption/hebitane. When necessary refill with clean water and always unplug from the mains when not in use.
  • Hot plates: Any substance spilt on it should be wiped off immediately using a dump cloth. Always unplug from the mains when not in use.
  • Oxygen concentrators: Dump dust daily; make sure there is water in the wolf’s bottles and check the regulator daily. Always unplug from the mains when not in use and clean the filter.
  • Lamps: Dump then dry and dust shades and bulbs daily.

2. Oxygen cylinders

Dump dust them daily. Check whether the flow meters are working; check whether there is oxygen in the cylinder and the far the water level in the wolf’s bottles. Label the empty cylinders boldly with the word ‘Empty.’

3. Drainage under water seal gadgets

Disinfect, clean and sterilize.

4. Beds

Make them and dump dust the rails daily. On discharge of the patient; wash with soap and water.

5. Bed rests/backrests

Dump dust daily, wash with soap and water, rinse and dry when necessary and on discharge on an infectious patient disinfect.

6. Bed blocks/elevators

Dump dust daily. On discharge of the patients, scrub with soap and water.

7. Bed cradles

Wash with soap and water, rinse and dry when necessary and in discharge of the patient, scrub with soap and water.

8. Fracture boards

On discharge of the patients, scrub with soap and water.

9. Drip stands

Dump dust daily, wash with soap and water whenever necessary and keep them dry.

10. Trolleys

Wash daily and after use with soap and water, dry thoroughly. Do not use vim on food trolleys.

11. Enamel ware

Wash with soap and water after use, if stained use vim or hebitane/gumption, rinse and dry.

12. Stainless steel ware

Wash with soap or detergent and water, rinse and dry. Do not use vim.

13. Plastic ware

Wash with soap or detergent and water, rinse and dry. Use vim if necessary.

14. Shelves

Wash daily and whenever necessary.

15. Sinks and hand washing basins

Wash daily and after use with vim.

16. Crockery and glass ware

Wash daily with soap or detergent and water, rinse and dry.

17. Cutlery

Wash with soap or detergent and water, rinse and dry.

18. Soiled dressing buckets

Keep the lid on at all times, keep the outside clean. And they should be thoroughly cleansed after emptying.

N.B: Use large basins for dusting; do not use receivers and bowls.

19. Infusion stands

Dump and dust daily, wash with soap and water, dry when necessary.

Weekly Cleaning

In the ward:

  • Move the beds from one side of the ward to the other
  • Put lockers outside the ward

Proceed on the empty side as follows;

  • Brush walls and ceiling and wire gauze of ventilators with long handled brush.
  • Wash painted walls with soap and water, cleaning any edges and corners carefully.
  • Wash lamp shades.
  • The sweeper then sweeps and scrubs the floor.
  • Clean windows.
  • Replace beds

Repeat the same procedure on the other side.

  • Scrub lockers and return to the ward when dry.
  • Turn out and scrub all cupboards.
  • Polish furniture if necessary.

In the ward annexes (kitchen, bathroom, linen room etc)

Turn out and clean both the room and equipment.

Refrigerators:

Defrosting should be carried weekly, when the interior is washed thoroughly with hot soapy water, rinsed and the shelves replaced. The ice trays are taken out and washed with cold water.

Bedding and linen:

Care of mattress foam-rubber with cotton and plastic:

Do not remove the plastic mattress cover, wash with soap and water, rinse and dry whenever necessary.

Pillows:

May be protected by plastic cover under cotton cover, to avoid soiling. The cover is removed for laundry whenever dirty, do not remove the plastic cover, wash with and soap, dry and put on the cover.

Rubber goods:

Use only soap and cold water. Before hanging to dry wipe off excess water, do not fold if they are to be out of use for a long time, powder them before storing away.

Do not hang on hot pipes or boiling sterilizers or in the sun.

All linen from the infectious patients should be soaked in disinfectant and soiled linen should be sluiced before sending to laundry.

If linen has been stained with blood soak in cold water for 2-3 hours then rinse.

On discharge of patients all linen should be removed and sent to laundry.

Rubber sheets:

Mackintoshes are washed in soapy water and rinsed, hang out to dry, but never folded.

Rubber tubing:

Rubber tubing-catheters and long tubing; these should be washed in soapy water, and under running water, rolled in the hands immediately after use. Rinse and roll and hang to dry.

Woolen blankets:

Bed blankets; avoid frequent washing, but they should be sent to laundry whenever soiled.

Ward linen:

To avoid cross infection in hospitals great care should be taken in handling of soiled linen contain discharges from patients.

During bed making soiled linen should be separated and be put in a special dirty container/hamper.

A trolley should be used for clean linen.

DAMP DUSTING

Is the cleaning/brushing off, of the dust from a surface using a slightly wet cloth e.g. as of a table, chair, floor or wall etc.

Requirement (prepare a trolley):

Top shelf:

  • Basin of clean water
  • Soap and vim
  • 2 Clean dusters in bowl
  • A jar of clean water

Bottom shelf:

  • Container for rubbish
  • Bucket for dirty water
  • Gloves
  • Apron
  • Gumboots

Procedure:

  1. Wash hands and put on gloves. Put on apron and gumboots.
  2. Always start to dust from the highest points or things first and work downward so you do not dirtied surfaces already cleaned.
  3. Remove items from the surface to be cleaned.
  4. Dampen or rinse the cloth in cleaning water.
  5. Wipe away the dust with the damp cloth/duster.
  6. Flat surfaces, wipe in straight lines beginning with the edges once each time.
  7. Turn the cloth on each side 2nd pass and rinse regularly in clean water.
  8. Take care to damp dust the edges and undersides of the surfaces after the tops.
  9. Where there are extendable items, such as bedside tables, are to be damp dusted extend the before beginning to work.
  10. Polish with the dry duster to clean and dry.
  11. Change the cleaning water when it becomes soiled (dirty)
  12. Greasy or stubborn deposits may require repeated passes.
  13. Replace any items moved on the clean surface when it is dry.
  14. On completion, clean and dry all equipment and store safely and tidily in a secure storage area.
  15. Remove gloves and wash hands.
  16. Document the procedure

N.B: The basin used for dusting should be large one, receivers and dressing bowls are not to be used.

RULES ON CARE OF ALL TYPES OF LINEN

  • Linen should be used only for the purpose it is intended for.
  • Avoid frequent laundering of woolen articles.
  • All linen should be marked, checked before and on retuning from laundry.
  • Check all linen after laundry for any repairs
  • Lending and borrowing is avoided, lending book may be necessary
  • Removal of stains;
    • Blood- soak immediately in cold water, if it fails to come off, use hydrogen peroxide or ammonia and rinse it well with cold water afterwards.
    • Ink- put immediately in cold water or milk, until the stain fades, later use methylated spirit.
    • Coffee and tea stains- wash in cold water, then put in hot water.
    • Iodine stains- use hot water or ammonia the rinse.
    • Stains caused by drugs- use hot water or ammonia the rinse.
Nurses Revision

General Principles and Rules of All Nursing Procedure Read More »

Infection Prevention and Control

Carry Out Infection Prevention and Control
Infection

Infection is the successful invasion and multiplication of micro-organisms in the body to cause disease. There are many different species of micro-organisms that affect the human body as a host and cause a disease.


Causes and The Chain of Infection

Infection happens when tiny living things called micro-organisms successfully enter the body and multiply, causing disease. There are many different types of micro-organisms that can affect the human body and cause illness.

For an infection to happen, there needs to be a chain of events. Breaking any link in this chain can prevent infection. Based on updated guidelines, the chain involves the following components:

  • Infectious Agent: This is the microorganism (germ or bug) that can cause harmful infections and make you ill. Common infections in care homes are respiratory such as colds and flu and stomach bugs like norovirus and Clostridioides difficile (C. diff).
  • Reservoir of Infection: Where the micro-organisms live, multiply, and grow.
    • Examples: Men, animals, people, environment.
    • This can be on a person (for example in their respiratory tract), or on equipment, the environment, food, or water.
  • Portal of Exit (Mode of Escape / Way Out): How micro-organisms leave the reservoir or find a way out of the infected person so they can spread.
    • Nose: exhalation, sneezing (expired air).
    • Mouth: coughing.
    • Urinary system: urine.
    • Gastrointestinal tract: faeces, sickness, and diarrhoea.
    • Wounds and ulcers: discharge, pus.
    • Skin: sweat (e.g., Ebola, Hep.B).
  • Mode of Transmission (Vehicle for Transmission): How micro-organisms travel from the reservoir to another person once the germ is out.
    • Direct/Indirect contact: Contaminated hands, or on equipment such as a commode, linen, crockery, and cutlery.
    • Airborne/Droplet: In the air by coughing or sneezing.
    • Fluids: Water, food, contact with body fluids and blood.
  • Portal of Entry (Mode of Entry / Way In): How micro-organisms enter a new person's body.
    • Nose: inhalation.
    • Mouth: ingestion, eyes and mouth.
    • Urethra / Genital tract: direct contact with fluids.
    • Trans-placental: mother to fetus.
    • Mucous membranes, unhealthy skin, and open wounds: direct contact (e.g., gonorrhea can be got through kissing).
    • Invasive devices: Any tubes put into the body such as a catheter or feeding tube.
  • Susceptible Host: A person who is at risk of getting the infection, usually because they have low immunity, are unable to fight the infection, or are already weak.
    • Examples: People with low immunity, residents, staff, or visitors.
    • Elderly people can have decreased immune systems and catch infections easier.
    • Infections also spread quickly in care homes due to many residents living closely together.
Ways in which infection can be prevented (Breaking the Chain of Infection)

Breaking the chain of infection is crucial in nursing. Key methods include:

Isolation or barrier nursing:

Is the separation of the patient and his unit from others to prevent the direct or indirect contact of infectious agents to a susceptible person e.g., droplet infection, clothing etc.

Hand washing:

Is the single most important means of preventing the transmission of infection. Careful washing of hands using soap, water and nail brush reduces the number of bacteria.

Use of protective gears:

Gears such as gloves, gowns, masks, gargles, gumboots; help protect the nurse from pathogen. They serve as a barrier when handling articles which are contaminated.

Principles of Infection Control

Infection prevention and control are very important in nursing to protect patients, healthcare workers, and the community. The main goal is to break the chain of infection. There are five basic universal principles of infection control:

  • Hand washing: This is the single most important way to prevent the spread of infection. Proper hand washing with soap and water or using alcohol hand rub reduces the number of bacteria.
    • Routine hand washing
    • Antiseptic hand washing
    • Alcohol hand rub
    • Surgical hand scrub
  • Use of personal protective equipment (PPE): Wearing gloves, gowns, masks, and other protective gear creates a barrier to protect nurses from pathogens and prevents the spread of micro-organisms.
  • Cleaning, disinfection, and sterilization: Cleaning removes visible dirt and most micro-organisms. Disinfection destroys most pathogenic micro-organisms. Sterilization destroys all micro-organisms, including tough spores and viruses. These processes are essential for making instruments and surfaces safe to handle. Sterilization policy is a code of practice, which if correctly followed will ensure a clean and safe health unit, where multiplication and spread of harmful microbes is kept under control.
  • Safe waste management and disposal: Handling and disposing of medical waste correctly prevents the spread of infection. Waste should be segregated (sorted) at the point of generation.
  • Isolation of infectious patients: Separating patients with infectious diseases from others helps prevent direct or indirect contact and stops the spread of pathogens.

Other important measures include maintaining a clean environment, ensuring proper ventilation, safe handling of food and water, safe disposal of waste, controlling rodents and insects, immunization, and promoting personal hygiene.

Use of Personal Protective Equipment (PPE) (PEX 1.2.2)

Understanding and demonstrating the correct use of protective equipment is a crucial practical skill for nurses. Using PPE correctly is a crucial part of infection control. PPE creates a barrier to protect you from contact with infectious materials.

Adequate protective gears:
  • Gloves: Wear sterile surgical single use gloves for procedures, examination disposable gloves for general tasks, and heavy-duty utility gloves for cleaning.
  • Plastic aprons: Wear these for all procedures where there is a potential of contamination from splashing of blood and body fluids, handling of soiled dressings and used linen from all patients.
  • Gowns: Worn in operating theatres and other areas where a patient may bleed heavily.
  • Eye/face protection: Protective eye wear (goggles or face shields) and face masks be made fully available and worn where applicable or when there is a risk of splashes or sprays reaching your eyes, nose, or mouth.
  • Boots: Worn in places where spillage of blood, body fluids, secretion and excretions are anticipated. NB. Clean boots with soap and water immediately after use. In case of contamination with blood or body fluids; disinfect.
  • Surgical masks: Wear a mask to protect the mucous membranes of the nose and mouth from splashes of body fluids.
Perform Routine and Weekly Cleaning of the Ward (PEX 1.2.3)

Maintaining a clean ward environment is crucial for infection prevention and patient well-being. Keeping the ward clean is essential for preventing infections. This involves daily and weekly cleaning tasks. This PEX involves demonstrating the practical skills of ward cleaning.

Ward Maintenance Practices: Daily Cleaning
A. Ward Maintenance
  1. Collect all necessary equipment on the trolley.
  2. Make the patient’s beds and pull bed and lockers away from the wall.
  3. Collect and put away all the equipment not necessary on the ward for immediate use.
  4. The floor is swept and mopped.
  5. Carry out dump and dry dusting of all ward furniture and equipment, using the ward cleaning trolley.
  6. Return bed and lockers to their position.
  7. Replace sputum mugs with clean ones, empty the used ones, rinse well in the sluice room, leave soaked in the disinfectant.
  8. Give out clean drinking mugs and feeding cups. Refill bottles for drinking water if required.
  9. Clean used equipment and keep in the proper place.
In dressing and treatment rooms (Daily):
  • Shelves: Wash daily and whenever necessary.
  • Sinks and wash basins: Wash daily and after use with cleaning agent like vim or hebitane.
  • Sterilizers: Empty, clean inside with hebitane when necessary, refill with clean water.
  • Trolleys: Wash daily and thoroughly with soap and water (after use). Do not use rough cleaners like gumption or vim on food trolleys.
  • Trolley mop and jar: Boil daily, change or refill fresh lotion daily.
  • Lifting forceps: Boil daily and whenever contaminated, clean forceps jars, boil forceps, and change lotion daily. Lotion jar inspected daily and more lotion added if required. Or boiled or autoclaved daily and store boiled or autoclaved forceps in a dry sterile container.
  • Soiled dressing buckets: Keep lid on at all times, keep the outside clean. Thoroughly clean after emptying.
Hygiene in Special Areas (Daily):

Operating theatre, Intensive Care Unit (ICU), Pre-mature unit, and Labour suit have stricter cleaning routines:

  • Operating tables, trolleys and shelves: Damp dust daily using water and detergent.
  • Walls: Damp cleaning 2.5-3m downward daily with water and detergent.
  • Floors: Scrub with water and detergent daily and leave to dry when soiled.
  • Floors with body fluid spills: Apply 1% hydrochloride for 15 minutes, then spot clean. Clean after every operation. Do weekly cleaning of all equipment and areas.

Note: The same method of cleaning applies to all other special areas mentioned above (intensive care unit, pre-mature unit, and labour suit).

B. Equipment Maintenance (Daily / When Necessary)

It is the responsibility of every health worker in the hospital to see that all equipment is very well looked after, serviced regularly and given immediate attention when there is any defect. Equipment should be handled with care and breakages reported immediately; this will definitely keep the hospital expenditure very low.

  • Electric machines: Have regular servicing of the machines and as soon as they are out of order, make a requisition to the maintenance department, have them inspected and repaired.
  • Refrigerators: These are regulated in order to be effective, regulators should be regularly checked and temperatures recorded every day. Defrosting should be carried out weekly, and then the interior is thoroughly washed with hot soapy water, rinsed and the shelves replaced. Ice trays are taken out and washed with cold water.
  • Suction machines: Wash with soap and water daily and whenever used. Replace the lotion in the bottles.
  • Autoclaves: Dump dust them daily, check the functionality of the water and pressure gauges. Always unplug from the mains when not in use.
  • Boilers and sterilizers: Empty, clean inside with gumption/hebitane. When necessary refill with clean water and always unplug from the mains when not in use.
  • Hot plates: Any substance spilt on it should be wiped off immediately using a dump cloth. Always unplug from the mains when not in use.
  • Oxygen concentrators: Dump dust daily; make sure there is water in the wolf’s bottles and check the regulator daily. Always unplug from the mains when not in use and clean the filter.
  • Lamps: Dump then dry and dust shades and bulbs daily.
  • Oxygen cylinders: Dump dust them daily. Check whether the flow meters are working; check whether there is oxygen in the cylinder and the water level in the wolf’s bottles. Label the empty cylinders boldly with the word "Empty."
  • Drainage under water seal gadgets: Disinfect, clean and sterilize after use.
  • Beds: Make them and dump dust the rails daily. On discharge of the patient; wash beds with soap and water.
  • Bed rests/backrests: Dump dust daily, wash with soap and water, rinse and dry when necessary and on discharge on an infectious patient disinfect.
  • Bed blocks/elevators: Dump dust daily. On discharge of the patients, scrub with soap and water.
  • Bed cradles: Wash with soap and water, rinse and dry when necessary and on discharge of the patient, scrub with soap and water.
  • Fracture boards: On discharge of the patients, scrub with soap and water.
  • Drip stands / Infusion stands: Dump and dust daily, wash with soap and water whenever necessary and keep them dry.
  • Trolleys: Wash daily and after use with soap and water, dry thoroughly. Do not use rough cleaners or vim on food trolleys.
  • Enamel ware: Wash with soap and water after use, if stained use vim or hebitane/gumption, rinse and dry.
  • Stainless steel ware: Wash with soap or detergent and water, rinse and dry after use. Do not use vim.
  • Plastic ware: Wash with soap or detergent and water, rinse and dry after use. Use vim if necessary.
  • Shelves: Wash daily and whenever necessary.
  • Sinks and hand washing basins: Wash daily and after use with vim.
  • Crockery and glass ware: Wash daily with soap or detergent and water, rinse and dry.
  • Cutlery: Wash daily with soap or detergent and water, rinse and dry.
  • Soiled dressing buckets: Keep the lid on at all times, keep the outside clean. They should be thoroughly cleaned after emptying. N.B: Use large basins for dusting; do not use receivers and bowls for this.
Ward Maintenance Practices: Weekly Cleaning
In the ward:
  1. Move the beds from one side of the ward to the other.
  2. Put lockers outside the ward.
  3. Proceed on the empty side as follows:
    • Brush walls and ceiling and wire gauze of ventilators with long handled brush.
    • Wash painted walls with soap and water, cleaning any edges and corners carefully.
    • Wash lamp shades.
    • The sweeper then sweeps and scrubs the floor.
    • Clean windows.
    • Replace beds.
  4. Repeat the same procedure on the other side.
  5. Scrub lockers and return to the ward when dry.
  6. Turn out and scrub all cupboards.
  7. Polish furniture if necessary.
In the ward annexes (kitchen, bathroom, linen room etc) (Weekly):
  • Turn out and clean both the room and equipment.
  • Refrigerators (Weekly): Defrosting should be carried weekly, when the interior is washed thoroughly with hot soapy water, rinsed and the shelves replaced. The ice trays are taken out and washed with cold water.
Bedding and Linen Care
  • Care of mattress foam-rubber with cotton and plastic: Do not remove the plastic mattress cover, wash with soap and water, rinse and dry whenever necessary.
  • Pillows: May be protected by plastic cover under cotton cover, to avoid soiling. The cover is removed for laundry whenever dirty, do not remove the plastic cover, wash with soap, dry and put on the cover.
  • Rubber goods: Use only soap and cold water. Before hanging to dry wipe off excess water, do not fold if they are to be out of use for a long time, powder them before storing away. Do not hang on hot pipes or boiling sterilizers or in the sun.
  • Rubber sheets: Mackintoshes are washed in soapy water and rinsed, hang out to dry, but never folded.
  • Rubber tubing: Rubber tubing-catheters and long tubing; these should be washed in soapy water, and under running water, rolled in the hands immediately after use. Rinse and roll and hang to dry.
  • Woolen blankets: Bed blankets; avoid frequent washing, but they should be sent to laundry whenever soiled.
  • Ward linen: To avoid cross infection in hospitals great care should be taken in handling of soiled linen containing discharges from patients. During bed making soiled linen should be separated and be put in a special dirty container/hamper. A trolley should be used for clean linen. All linen from the infectious patients should be soaked in disinfectant and soiled linen should be sluiced before sending to laundry. If linen has been stained with blood soak in cold water for 2-3 hours then rinse. On discharge of patients all linen should be removed and sent to laundry.
Damp Dusting

Is the cleaning/brushing off, of the dust from a surface using a slightly wet cloth e.g. as of a table, chair, floor or wall etc.

Requirement (prepare a trolley):
  • Top shelf: Basin of clean water, Soap and vim, 2 Clean dusters in bowl, A jar of clean water.
  • Bottom shelf: Container for rubbish, Bucket for dirty water, Gloves, Apron, Gumboots.
Procedure:
  1. Wash hands and put on gloves. Put on apron and gumboots.
  2. Always start to dust from the highest points or things first and work downward so you do not dirtied surfaces already cleaned.
  3. Remove items from the surface to be cleaned.
  4. Dampen or rinse the cloth in cleaning water.
  5. Wipe away the dust with the damp cloth/duster.
  6. Flat surfaces, wipe in straight lines beginning with the edges once each time.
  7. Turn the cloth on each side 2nd pass and rinse regularly in clean water.
  8. Take care to damp dust the edges and undersides of the surfaces after the tops.
  9. Where there are extendable items, such as bedside tables, are to be damp dusted extend the before beginning to work.
  10. Polish with the dry duster to clean and dry.
  11. Change the cleaning water when it becomes soiled (dirty).
  12. Greasy or stubborn deposits may require repeated passes.
  13. Replace any items moved on the clean surface when it is dry.
  14. On completion, clean and dry all equipment and store safely and tidily in a secure storage area.
  15. Remove gloves and wash hands.
  16. Document the procedure.

N.B: The basin used for dusting should be a large one, receivers and dressing bowls are not to be used.

Carry out Appropriate Waste Management and Disposal (PEX 1.2.4)

It is essential that every health care worker without exception, who handles and disposes the waste, understands the nature of waste and risks, the color code of waste bins, uses personal protective equipment, is conversant with emergency procedures, and is aware they are liable to discipline for non-compliance.

Effective waste management is essential for preventing the spread of infection in a healthcare setting. This PEX focuses on demonstrating:

  • Segregating waste correctly at the point of generation using the established color codes.
  • Using appropriate containers for different types of waste.
  • Handling and disposing of waste safely to minimize risks.
  • Properly disposing of sharps.
  • Understanding and implementing emergency procedures related to waste handling.
Medical Waste Segregation (Updated Guidelines)

Segregate waste at the point of generation according to the type. Place each type in a separate bin/container that is color coded according to the type of waste to ensure proper segregation and compliance with updated waste management standards. The bins should be well covered and the waste handlers should wear protective gears.

Category / Type of Waste Type of Bin (Color Code) Examples of Waste
Infectious and Highly Infectious Waste RED BIN
  • Soiled gauze and cotton (used gauze or dressing)
  • Used gloves
  • Giving sets (used I.V fluid lines)
  • Body parts or anatomical waste (e.g., placenta, extracted teeth)
  • Pathological wastes
  • Sputum containers, used test tubes
  • Any material contaminated with blood or other body fluids
Non-Infectious Waste BLACK BIN
  • Food leftovers / food peelings
  • Paper waste (discarded paper)
  • Packaging materials
  • Cardboard boxes
  • Empty bottles or cans
  • Wet waste and dry waste
Pharmaceutical and Chemical Waste (Toxic Waste) BROWN BIN
  • Vials
  • Laboratory reagents (including expired reagents)
  • Radiology chemicals
  • Pharmaceutical waste (e.g., expired drugs)
Sharp Waste SAFETY BOX
  • Used syringe needles, needle cuts
  • Cut from used infusion sets
  • Used scalpels, blades
  • Broken glass
Proper sharp disposal:

Sharps should be handled with extreme caution to avoid injuries during use, disposal or reprocessing. Where possible, all sharps should be disposable.

Carry out Isolation of Infectious Patients (PEX 1.2.5)

Isolation is a key measure in infection control. It means separating a patient who has an infectious disease from other patients, visitors, and staff to prevent the spread of the infection. The goal is to prevent direct contact (like touching) or indirect contact (like through contaminated objects or air) between the infectious patient and others who might be at risk.

Definition of Isolation: Is the separation of the patient and his unit from others to prevent the direct or indirect contact of infectious agents to a susceptible person e.g. droplet infection, clothing etc.

This PEX focuses on demonstrating: Identifying patients who require isolation, placing the patient in the appropriate isolation room or area, implementing specific isolation protocols based on the mode of transmission (e.g., airborne, droplet, contact), ensuring appropriate use of PPE when entering and leaving the isolation area, educating the patient, family, and other staff about the isolation protocols, and maintaining necessary supplies within the isolation area.

Perform Hand Washing (PEX 1.2.1)

Hand washing is the single most important means of preventing the transmission of infectious agents.

Rules for hand washing:
  • Wash hands on starting and completion of duty shifts.
  • Before performing any invasive or non-invasive procedures.
  • Between handling of patients and between the procedures on the same patient.
  • After handling of patients and procedures.
  • After handling contaminated articles like urinals, bed pans etc.
  • Nails should be short to avoid the dirt and micro-organisms.
  • Remove the watch and jewelry from the hands and wrist before starting to wash the hands.
  • Fold back sleeves above the elbow if necessary.
  • Stand away from the wash basin.
  • Avoid splashing water onto the uniform.
Requirements:
  • Soap/antiseptic lotion/detol
  • Bowl
  • Nail brush
  • Hand towel
  • Running water/tap water
Procedure:
  1. Turn on the tap using the elbow and regulate the flow of water.
  2. Wet the hands and lower arms under the running water. Keep the hands, fore arms lower than the elbows during washing.
  3. Apply soap to the hands, replace soap in the dish.
  4. Scrub the hands, area between the fingers and wrist in rotatory movements for 15-30 seconds.
  5. Clean finger nails with a brush or use finger nails of the other hand.
  6. Rinse hands and wrist, fore arm and elbow in running water. Ensure that the hand and fore arm are lower than the elbow during washing.
  7. Close the tap using the elbow.
  8. Dry the hands from fingers to wrist and fore arm, now hold hands above the elbows ready to put on gloves for the procedure.
Surgical Hand Washing (Detailed Procedure)

The hands should be thoroughly cleaned for about 3-5 minutes (in operation room, hands are scrubbed up to 10 minutes.)

  1. Wet the hands and fore arms.
  2. Apply soap (containing 3% hexachlorophene) to make a good lather/foam e.g. Detol, Protex etc.
  3. Clean under the nails for 30 seconds. Nails should be kept very short.
  4. Rinse thoroughly.
  5. Apply soap to the arms again.
  6. Scrub with the brush so that every area receives 15-30 strokes.
  7. Add little amount of water frequently and use just enough detergent to maintain the lather.
  8. Rinse the arms and hands.
  9. In rinsing keep palms higher than the elbow so that the water does not run over them from the arms.
  10. Dry on a sterile towel moving from the palms to the arms. Hold hands above the elbow ready to put on gloves for the procedure.
Underpinning Knowledge / Theory for Infection Prevention and Control
  • Infection prevention and control principles
  • Definition of infection
  • Chain of infection
  • Modes of transmission (Causes of Infection)
  • Types of microorganisms (relevant to causing infection)
  • Sterilization and disinfection techniques
  • Medical waste management
  • Hand hygiene
  • Isolation procedures
  • Use of Personal Protective Equipment (PPE)
  • Routine and terminal cleaning
Learning-Working Assignments (LWAs) and related Practical Exercises (PEXs):
  • PEX 1.2.1: Perform hand washing
  • PEX 1.2.2: Demonstrate appropriate use of protective equipment
  • PEX 1.2.3: Perform routine and weekly cleaning of the ward
  • PEX 1.2.4: Carry out appropriate waste management and disposal
  • PEX 1.2.5: Carry out isolation of infectious patients
Revision Questions for Infection Prevention and Control
  1. Define infection and list three modes of escape for microorganisms from a reservoir.
  2. What is the single most important means of preventing the transmission of infection?
  3. List at least four types of protective gear used in nursing practice.
  4. Explain the purpose of isolating a patient with an infectious disease.
  5. Describe the correct procedure for routine daily cleaning of a patient ward.
  6. Outline the color coding system for medical waste segregation and give an example of waste for each color.
  7. What is the difference between sterilization and disinfection?
  8. Explain the importance of proper handling and disposal of sharps.
  9. Describe the key steps in performing surgical hand washing.
  10. When should medical gloves be worn, and how do they help prevent infection?
References
  • Uganda Catholic Medical Bureau (2015) Nursing and Midwifery procedure manual 2nd Edition Print Innovations and Publishers Ltd. Uganda
  • Nettina .S,M (2014) Lippincott Manual of Nursing Practice 10th Edition, Wolters Kluwer, Philadelphia, Newyork
  • Gupta, L.C., Sahu,U.C. and Gupta P.(2007):Practical Nursing Procedures. 3rd edition. JAYPEE brothers, New Delhi.
  • Craveni, R. Hirnle, C. and Henshaw, M.C. (2017). Fundamentals of Nursing Human Health and Function. 8th Edition. Wolters Kluwer
  • Hill, R., Hall, H and Glew, P. (2017). Fundamentals of Nursing and Midwifery, A person-Centered Approach to care. Wolters Kluwer
  • Rosdah I, BC and Kowalkski, TM (2017) Text book for Basic Nursing 11th Edition Wolters Kluwer.
  • Samson .R. (2009) Leadership and Management in Nursing Practice and Education 1st Edition Jaypee Brothers Medical Publishers India.
  • Taylor.C.R (2015) Fundamentals of Nursing, The Art and Science of person – centred nursing care, 8th Edition Wolters Kluwer, Health/Lippincott Williams and Wilkins.
  • Timby, K.B (2017) Fundamental Nursing Skills and concept 11th Edition Wolters Kluwers, Lippincotts Williams and Wilkins.
  • Lynn, P. (2015) Tyler's Clinical nursing skills, A Nursing Process Approach 4th Edition Wolters Kluwers, China
  • Gupta, D.S. (2005) Nursing Interventions for the critically ill 1st Edition Jaypee Brothers Medical Publishers Ltd. India.
  • Uganda Catholic Medical Buraeu (2010) Nursing and Midwifery Procedure Manual. 1st Ed. Print Innovations and Publishers Ltd., Uganda.
  • Carter, J. P. (2012) Lippincott's Textbook for nursing Assistant. 3rd Edition. Walters Kluwers. Lippingcotts Williams and Wilkins
  • Jensen, S. (2015) Nursing Health Assessment; A host Practice Approach. 2nd Edition. Wlaters Kluwer,
  • Gupta, D.S. (2005) Nursing Interventions for the Critically Ill. 1st Edition. Jaypee Brothers Medical Publishers Ltd. India.
  • UCMB. (2015) Nursing and Midwifery Procedure Manual. 2nd Edition. Print Innovation and Publishers Ltd. Kampala. Uganda.
  • Karesh, P. (2012) First Aid for Nurses. 1st Edition. Jaypee Brothers Publishers Ltd. India.
  • Molley, S. (2007) Nursing Process; A Clinical Guide. 2nd Edition. Jaypee Brothers Medical Publishers Ltd. India.
  • Carter, J.P. (2016) Lippincott's Textbook for Nursing Assistants. 4th Edition. Wolters Kluwer, Lippincotts Williams and Wilkins.
  • Rahim,A. (2017). Principles and practices of community medicine. 2nd Edition. JAYPEE Brothers Medical Publishers Ltd. New Delhi
  • Cherie Rector, (2017),Community & Public Health Nursing: Promoting The Public's Health 9e Lippincott Williams and Wilkins
  • Gail A. Harkness, Rosanna Demarco (2016) Community and Public Health Nursing 2nd edition, Lippincott Williams and Wilkins
  • Basavanthapp, B.T and Vasundhra, M.K (2008), Community Health Nursing, 2nd edition. JAYPEE Brothers Medical Publishers Ltd. New Delhi
  • Kamalam, S. (2017), Essentails in Community Health Nursing Practice 3rd edition. JAYPEE Brothers Publishers Ltd. New Delhi
  • James F. McKenzie, PhD, MPH, MCHES, MEd,and Robert R. Pinger, PhD, (2018) An Introduction to Community & Public Health, 9th edition, Jones and Bartlett Publishers. Sandburg, Massachusetts.
  • Maurer, F.A, Smith, C.M (2005), Community /Public health Nursing Practice, 3rd edition ELSEVIER SAUNDERS, USA
  • МОН, (2013) Occupational Safety and Health Training Manual, 1st Edition
  • МОН, (2008), Policy for Mainstreaming Occupational Health & Safety In The Health Service Sector.
  • Wooding, N. Teddy, N. Florence, N. (2012) Primary Health Care in East Africa. 1st Edition. Fountain Publishers. Kampala. Uganda.

Quick Quiz

Foundations Nursing Day 3 Quiz

FON - mobile-friendly and focused practice.

Privacy: Your details are used only for quiz tracking and certificates.

Infection Prevention and Control Read More »

Want notes in PDF? Join our classes!!

Send us a message on WhatsApp
0726113908

Scroll to Top
Enable Notifications OK No thanks