Psoriasis
Psoriasis is a chronic, immune-mediated inflammatory disease that primarily affects the skin, characterized by periods of exacerbation and remission.
It is not simply a skin condition; it is a systemic disease that manifests most visibly on the skin and can also impact joints (psoriatic arthritis) and other organ systems.
Psoriasis is a chronic non contagious auto immune disease of the skin in which the epidermal cells are produced at an abnormal rate.
- Chronic: This means it is a lifelong condition with no known cure. Patients will experience flare-ups (worsening of symptoms) and periods of remission (improvement or resolution of symptoms), but the underlying predisposition remains.
- Immune-Mediated: Psoriasis is driven by an overactive immune system. Specifically, certain immune cells (particularly T-cells) become overactive and trigger an inflammatory response in the skin. This abnormal immune activity leads to the rapid growth of skin cells.
- Inflammatory: The affected skin areas exhibit signs of inflammation, such as redness (erythema), swelling, and heat. This inflammation is a direct result of the immune system's attack on healthy skin cells.
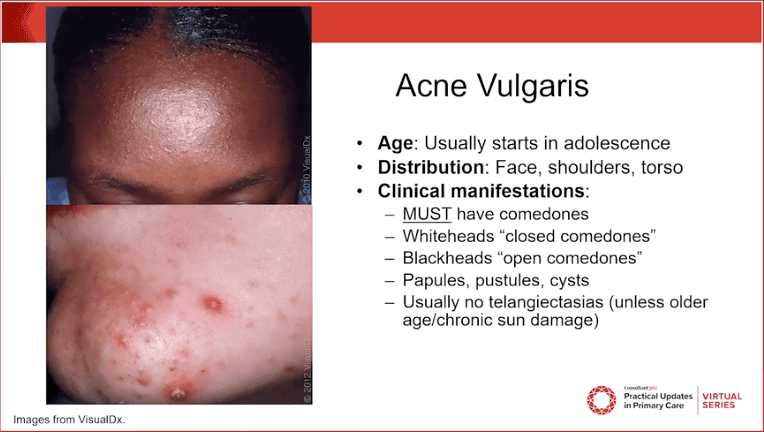
- Skin Disease: The most prominent and characteristic signs of psoriasis appear on the skin. These manifestations are typically well-demarcated, erythematous (red), scaly plaques, often covered with silvery scales. While skin is the primary target, nails and joints can also be affected.
- Accelerated Keratinocyte Turnover: In healthy skin, keratinocytes (the main cells of the epidermis) mature and shed over approximately 28-30 days. In psoriasis, this process is dramatically accelerated, occurring in as little as 3-7 days. This rapid turnover leads to the accumulation of immature skin cells on the surface, forming the characteristic thick, silvery scales.
Understanding the epidemiology and risk factors of psoriasis helps us appreciate its global impact and identify individuals who may be more susceptible to the disease.
- Prevalence:
- Psoriasis is a common chronic inflammatory disease, affecting approximately 2-3% of the global population.
- Prevalence varies geographically, with higher rates observed in Northern European and Scandinavian populations (e.g., up to 11% in some studies) and lower rates in East Asian and African populations.
- It affects males and females equally.
- Age of Onset:
- Psoriasis can occur at any age, from infancy to old age.
- There are typically two peaks of onset:
- Early-onset (Type I): Occurs between 15 and 30 years of age (peak in the early 20s). This type is often associated with a stronger genetic predisposition and is usually more severe.
- Late-onset (Type II): Occurs between 50 and 60 years of age. This type is generally less severe and has a weaker genetic link.
- Approximately one-third of psoriasis cases begin in childhood or adolescence.
Psoriasis is a multifactorial disease, meaning it results from a complex interplay of genetic, immunological, and environmental factors.
- If one parent has psoriasis, the risk for a child is about 10-25%.
- If both parents have psoriasis, the risk for a child can be as high as 50-70%.
- Streptococcal infections (e.g., strep throat): A common trigger for guttate psoriasis, especially in children and young adults.
- Other infections (e.g., HIV) can also exacerbate psoriasis.
- Physical injury to the skin (e.g., cuts, scrapes, burns, insect bites, surgical incisions, even aggressive scratching) can induce psoriatic lesions in that area. This phenomenon is highly characteristic of psoriasis.
- Psychological stress is a well-recognized trigger for psoriasis flares in many individuals. The exact mechanisms are still being researched but involve neuro-immune interactions.
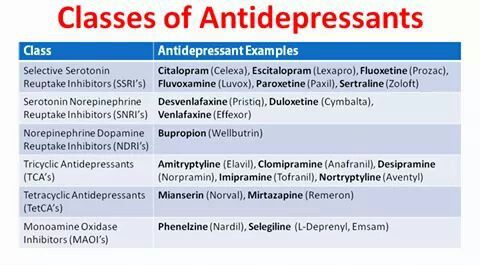
- Certain drugs can induce or worsen psoriasis. Common culprits include:
- Beta-blockers (used for hypertension, heart disease)
- Lithium (used for bipolar disorder)
- Antimalarials (e.g., chloroquine, hydroxychloroquine)
- NSAIDs (Nonsteroidal Anti-inflammatory Drugs)
- Systemic corticosteroids (withdrawal of systemic steroids can trigger severe flares, especially pustular or erythrodermic psoriasis).
- Interferon
- Cigarette smoking is an independent risk factor for psoriasis development and can also worsen existing disease. It's thought to be related to its effects on the immune system and inflammation.
- Heavy alcohol intake, particularly in men, is associated with an increased risk and severity of psoriasis, and can also interfere with treatment efficacy.
- Obesity is strongly linked to an increased risk of developing psoriasis and can exacerbate its severity. It's also associated with a poorer response to treatment and a higher risk of psoriatic comorbidities. Adipose tissue is metabolically active and can contribute to systemic inflammation.
- While not a primary cause, low vitamin D levels have been observed in psoriasis patients, and vitamin D analogues are a common treatment.
The pathophysiology of psoriasis is complex, involving a dysregulation of the immune system that leads to chronic inflammation and rapid turnover of skin cells. It's primarily considered a T-cell mediated autoimmune disease.
The central players in psoriatic inflammation are a type of white blood cell called T-lymphocytes (T-cells) and various cytokines (signaling proteins) they produce.
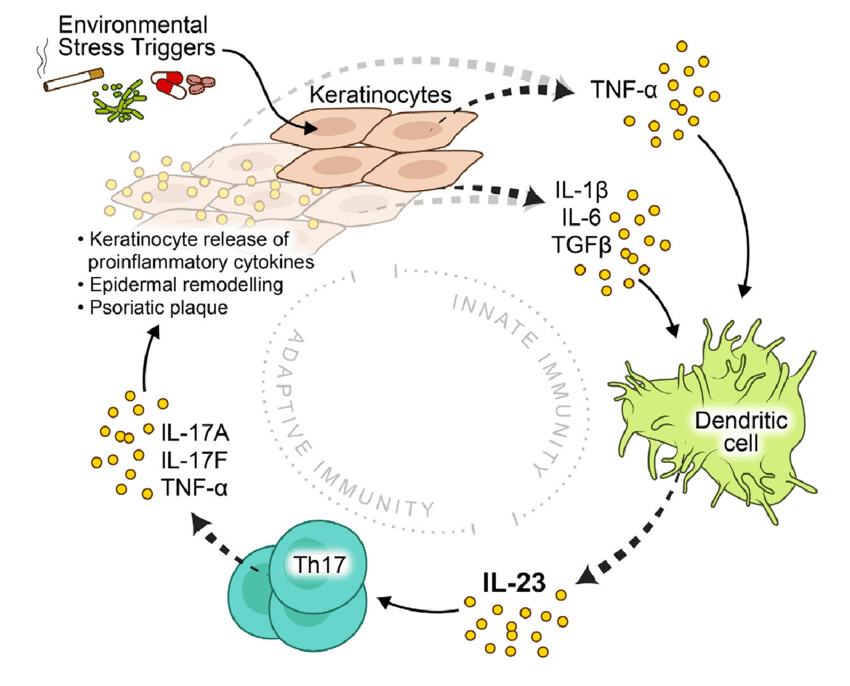
- Initiation by Antigen-Presenting Cells (APCs):
- It is hypothesized that initial triggers (e.g., genetic predisposition, environmental factors like trauma or infection) activate resident dendritic cells (a type of APC) in the skin.
- These activated dendritic cells produce inflammatory cytokines, particularly IL-12 and IL-23.
- Activation and Differentiation of T-cells:
- IL-12 and IL-23 act on naive T-cells, promoting their differentiation into specific types of effector T-cells:
- Th1 cells (T-helper 1): Stimulated by IL-12, they produce cytokines like interferon-gamma (IFN-γ) and TNF-alpha.
- Th17 cells (T-helper 17): Stimulated by IL-23 (and IL-6), they are considered key drivers in psoriasis. Th17 cells produce a range of inflammatory cytokines, notably IL-17A, IL-17F, IL-22, and TNF-alpha.
- Resident memory T-cells (Trm): These T-cells, which "remember" previous inflammation, are found in psoriatic plaques and can quickly reactivate the inflammatory cascade upon re-exposure to triggers.
- IL-12 and IL-23 act on naive T-cells, promoting their differentiation into specific types of effector T-cells:
- Cytokine Cascade:
- The activated Th1 and Th17 cells, along with other immune cells (e.g., macrophages, neutrophils), release a cascade of pro-inflammatory cytokines into the skin.
- Key Pro-inflammatory Cytokines:
- TNF-alpha (Tumor Necrosis Factor-alpha): A central inflammatory mediator involved in many chronic inflammatory diseases. It promotes inflammation, activates keratinocytes, and attracts other immune cells.
- IL-17 (Interleukin-17): A potent cytokine that plays a crucial role in psoriasis. It directly stimulates keratinocyte proliferation and the release of further inflammatory mediators.
- IL-22 (Interleukin-22): Also directly stimulates keratinocyte proliferation and contributes to epidermal hyperplasia.
- IL-23 (Interleukin-23): Essential for the survival and expansion of Th17 cells, thus sustaining the inflammatory cycle.
The constant bombardment of keratinocytes by these inflammatory cytokines (especially IL-17, IL-22, TNF-alpha) leads to the hallmark features of psoriatic plaques:
- Accelerated Keratinocyte Proliferation (Epidermal Hyperplasia):
- Normal keratinocyte turnover is about 28-30 days. In psoriasis, it's reduced to 3-7 days.
- This rapid proliferation leads to a massive accumulation of immature keratinocytes, forming thickened epidermis (acanthosis) and the characteristic silvery scales.
- Abnormal Keratinocyte Differentiation:
- The rapid cell division means keratinocytes don't have enough time to mature properly.
- They retain their nuclei in the stratum corneum (parakeratosis), which contributes to the silvery, flaky appearance of the scales.
- There is a loss of the granular layer of the epidermis.
- Inflammation and Angiogenesis:
- The inflammatory environment leads to the dilation and proliferation of blood vessels in the upper dermis (angiogenesis). This contributes to the redness (erythema) of the psoriatic plaques and accounts for the Auspitz sign (pinpoint bleeding when scales are removed, due to thin epidermis over dilated capillaries).
- Inflammatory cells (neutrophils, T-cells) infiltrate the epidermis and dermis. Neutrophils can aggregate to form sterile microabscesses (Munro's microabscesses) in the stratum corneum, particularly visible in pustular psoriasis.
- Genetic factors (e.g., HLA-Cw6, genes related to IL-23R/IL-12B, TNF-alpha) predispose individuals by influencing the immune system's responsiveness and regulation. These genetic variants can lead to a more easily triggered and sustained inflammatory response.
The pathophysiology of psoriasis can be visualized as a vicious cycle:
- Genetic predisposition + Environmental trigger (e.g., trauma, infection, stress).
- Activation of APCs in the skin.
- APCs release IL-12 and IL-23.
- These cytokines activate and differentiate T-cells (Th1, Th17).
- Activated T-cells release a cascade of pro-inflammatory cytokines (e.g., TNF-alpha, IL-17, IL-22).
- These cytokines drive keratinocyte hyperproliferation and abnormal differentiation, as well as inflammation and angiogenesis.
- The resulting skin changes perpetuate the inflammatory environment, creating a chronic cycle.
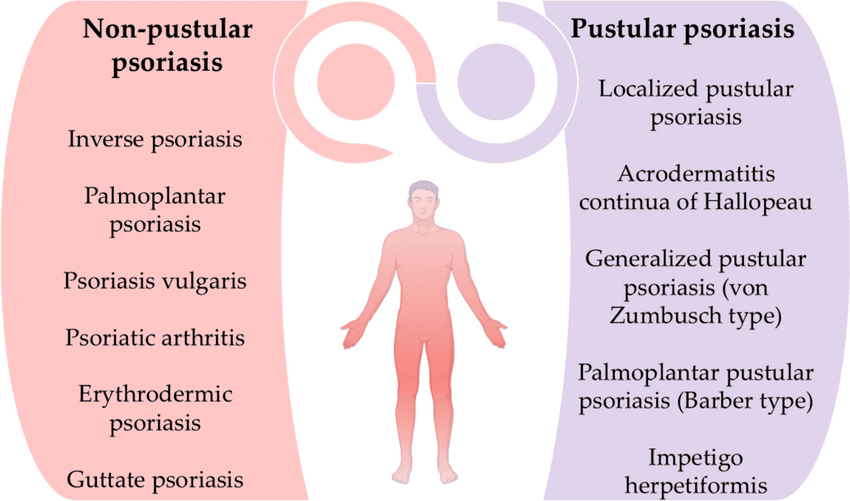
Psoriasis can manifest in several distinct clinical types, each characterized by specific lesion morphology, distribution, and associated features. It's also important to recognize associated conditions like nail psoriasis and psoriatic arthritis.

- Plaque Psoriasis (Psoriasis Vulgaris):
- Most Common Type: Accounts for approximately 80-90% of all cases.
- Appearance: Characterized by well-demarcated, erythematous (red) plaques covered with silvery-white scales. The plaques can vary in size from small to large, often coalescing to form larger patches.
- Texture: Lesions are typically raised, thickened, and often feel rough.
- Location: Commonly found on the extensor surfaces of the body (e.g., elbows, knees, scalp, lower back, sacral area). However, it can appear anywhere.
- Symptoms: Often itchy (pruritic), and can be painful, especially if the skin cracks or bleeds.
- Auspitz Sign: When the silvery scales are gently scraped, pinpoint bleeding occurs due due to the thinning of the epidermis over dilated capillaries.
- Koebner Phenomenon: New psoriatic lesions can appear at sites of skin trauma (e.g., scratches, cuts, surgical scars).
- Guttate Psoriasis:
- Appearance: Characterized by numerous small (0.5-1.5 cm diameter), salmon-pink, drop-like lesions with fine scales.
- Location: Often appears suddenly and widely over the trunk and proximal extremities.
- Trigger: Frequently triggered by a preceding streptococcal infection (e.g., strep throat) 1-3 weeks prior to onset, especially in children and young adults.
- Course: Can resolve spontaneously, but some cases may progress to chronic plaque psoriasis.
- Inverse Psoriasis (Flexural Psoriasis):
- Appearance: Presents as smooth, shiny, erythematous plaques without significant scaling. The moist environment prevents the typical scale formation.
- Location: Found in skin folds (intertriginous areas) such as the armpits (axillae), groin, under the breasts, in the belly button, and in the gluteal cleft.
- Symptoms: Often exacerbated by friction, sweating, and often accompanied by itching and pain. Can be challenging to differentiate from fungal infections.
- Pustular Psoriasis:
- Appearance: Characterized by sterile pustules (small, pus-filled blisters) on red, inflamed skin. The pustules are not infectious.
- Types:
- Generalized Pustular Psoriasis (GPP / Von Zumbusch Psoriasis): A rare, severe, and potentially life-threatening form. Presents with widespread pustules, high fever, malaise, extreme fatigue, and often requires hospitalization. Can be triggered by abrupt withdrawal of systemic corticosteroids, infection, or certain medications.
- Localized Pustular Psoriasis (e.g., Palmoplantar Pustulosis): Affects specific areas, most commonly the palms and soles. Characterized by crops of sterile pustules on a red, thickened background. Often chronic and difficult to treat, and not typically associated with systemic symptoms.
- Erythrodermic Psoriasis:
- Rarest and Most Severe Form: Affects almost the entire body surface (over 90% BSA), causing widespread redness, scaling, and shedding of skin.
- Symptoms: Patients often experience severe itching, pain, swelling, and systemic symptoms like fever, chills, malaise, and fluid loss.
- Complications: Can lead to serious complications such as dehydration, hypothermia or hyperthermia (due to impaired skin barrier), fluid and electrolyte imbalance, and high-output cardiac failure. Requires immediate medical attention and often hospitalization.
- Triggers: Can develop gradually from chronic plaque psoriasis or be triggered by systemic corticosteroid withdrawal, severe sunburn, infection, or certain medications.
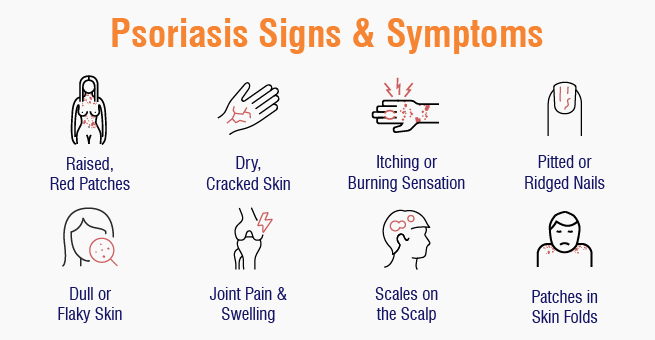
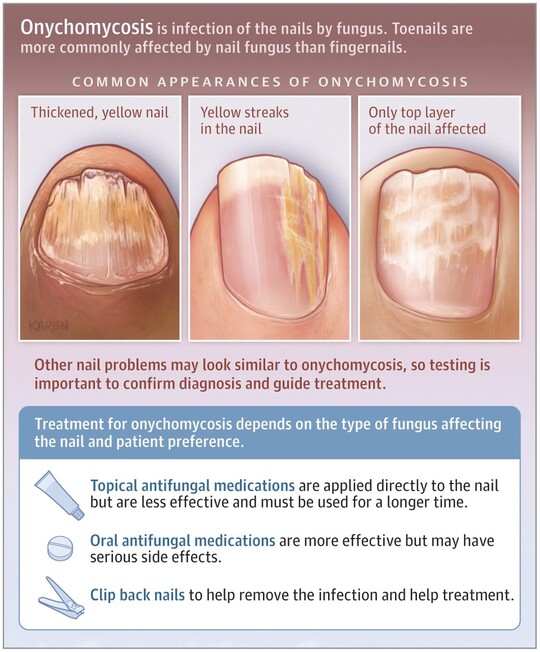
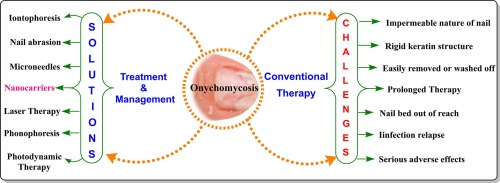
- Nail Psoriasis (Psoriatic Onychodystrophy):
- Affects approximately 50% of psoriasis patients and up to 80% of those with psoriatic arthritis.
- Appearance: Can manifest as:
- Pitting: Small depressions in the nail plate.
- Onycholysis: Separation of the nail plate from the nail bed.
- Oil spots (salmon patches): Translucent, reddish-yellow discoloration under the nail plate.
- Subungual hyperkeratosis: Thickening of the nail bed, accumulation of scales under the nail.
- Crumbing: Disintegration of the nail plate.
- Impact: Can be painful, functionally impairing, and aesthetically distressing.
- Psoriatic Arthritis (PsA):
- Definition: A chronic inflammatory arthritis associated with psoriasis, affecting up to 30% of psoriasis patients.
- Onset: Can precede, coincide with, or (most commonly) follow the onset of skin psoriasis.
- Symptoms:
- Joint Pain and Swelling: Can affect peripheral joints (fingers, toes, knees, ankles) and/or axial skeleton (spine, sacroiliac joints).
- Dactylitis ("Sausage Fingers/Toes"): Inflammation of an entire digit.
- Enthesitis: Inflammation at sites where tendons or ligaments attach to bone (e.g., Achilles tendon).
- Morning Stiffness: Joint stiffness that is worse in the morning and improves with activity.
- Fatigue.
- Subtypes: Can be symmetrical, asymmetrical, distal (DIP joint dominant), spondylitis, or arthritis mutilans (a severe, deforming type).
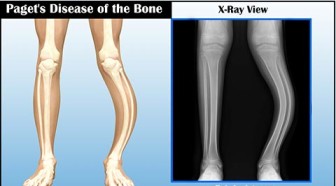
- Diagnosis: Clinical, often supported by imaging (X-rays, MRI) and exclusion of other arthropathies.
- Oral Psoriasis: Very rare, can appear as white or grey lesions, fissured tongue, or geographic tongue.
- Psoriasis of the Eyes: Can cause conjunctivitis, blepharitis, or uveitis.
Diagnosing psoriasis typically relies heavily on the characteristic clinical appearance of the lesions. However, in atypical cases or when differentiation from other skin conditions is necessary, additional diagnostic tools may be employed.
- Patient History:
- Onset and Duration: When did the lesions first appear? How long have they been present?
- Progression: Have they spread? Have they changed in appearance?
- Symptoms: Are they itchy (pruritic)? Painful? Burning?
- Precipitating Factors: Has the patient identified any triggers (stress, infection, trauma, medications)?
- Family History: Is there a family history of psoriasis or psoriatic arthritis?
- Medical History: Past medical conditions, current medications (including over-the-counter drugs and supplements), alcohol and tobacco use.
- Systemic Symptoms: Ask about joint pain, stiffness, swelling (to screen for psoriatic arthritis); fever, malaise (for severe forms like erythrodermic or generalized pustular psoriasis).
- Impact on Quality of Life: Assess the psychological and social impact of the disease.
- Physical Examination:
- Skin Inspection:
- Lesion Morphology: Carefully observe the size, shape, color, and texture of the lesions (e.g., well-demarcated erythematous plaques with silvery scales are classic for plaque psoriasis).
- Distribution: Note the location of the lesions (extensor surfaces, scalp, lower back, flexural areas, palms/soles, nails).
- Auspitz Sign: Gently scrape a scale to check for pinpoint bleeding. (Often done cautiously as it can irritate the skin).
- Koebner Phenomenon: Look for lesions in areas of trauma or scarring.
- Nail Examination: Inspect for signs of nail psoriasis (pitting, oil spots, onycholysis, subungual hyperkeratosis).
- Joint Examination:
- Palpate joints for tenderness, swelling, and warmth.
- Assess range of motion.
- Look for dactylitis (sausage digits) or enthesitis. (Crucial for screening for psoriatic arthritis).
- Mucous Membranes: Examine mouth, genitals for inverse psoriasis (less common).
- Skin Inspection:
- When Indicated: A skin biopsy is generally not required for typical cases of psoriasis where the clinical presentation is classic. However, it is invaluable in:
- Atypical presentations.
- When the diagnosis is uncertain and needs to be differentiated from other inflammatory dermatoses (e.g., eczema, seborrheic dermatitis, lichen planus, cutaneous T-cell lymphoma, tinea infections).
- Suspected drug-induced eruptions.
- Histopathological Findings:
- Epidermal Hyperplasia (Acanthosis): Marked thickening of the epidermis.
- Parakeratosis: Retention of nuclei in the stratum corneum (outermost layer), which is normally anucleated. This correlates with the silvery scales.
- Elongated Rete Ridges: Downward projections of the epidermis are elongated and thickened.
- Dilated Blood Vessels: In the dermal papillae, close to the epidermis.
- Inflammatory Infiltrate: Lymphocytes and neutrophils in the upper dermis and epidermis.
- Munro's Microabscesses: Collections of neutrophils in the stratum corneum (especially in pustular forms).
- Spongiform Pustules of Kogoj: Intraepidermal collections of neutrophils (especially in pustular forms).
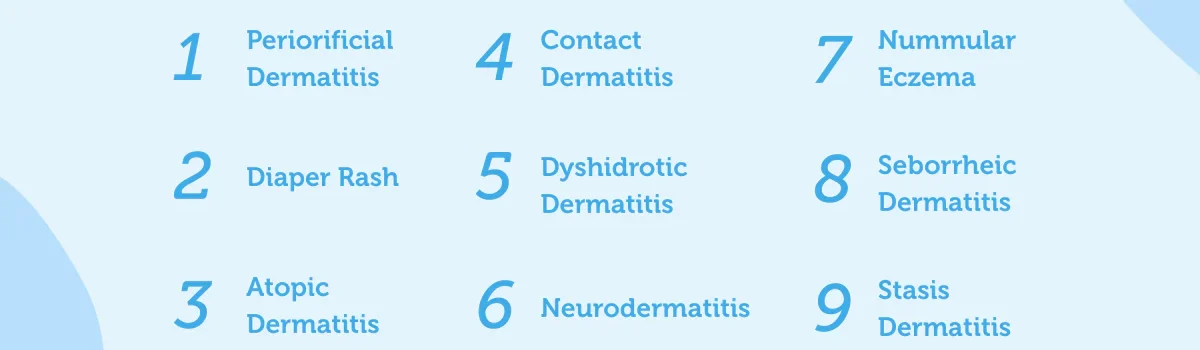
It's important to consider other conditions that may resemble psoriasis, especially in its atypical forms:
- Seborrheic Dermatitis: Can overlap with psoriasis (sebopsoriasis), but typically less erythematous, greasier scales, and predilection for face, scalp, chest.
- Atopic Dermatitis (Eczema): Often more poorly demarcated, intense pruritus, and usually affects flexural surfaces (though inverse psoriasis affects flexural surfaces, its appearance is different).
- Lichen Planus: Characterized by purple, polygonal, pruritic papules and plaques, often with Wickham's striae.
- Pityriasis Rosea: Oval, erythematous, fine-scaling patches, often following skin cleavage lines, usually preceded by a "herald patch."
- Tinea (Fungal Infections): Can mimic plaque or inverse psoriasis; usually unilateral, often with active border; potassium hydroxide (KOH) examination or fungal culture helps differentiate.
- Cutaneous T-cell Lymphoma (Mycosis Fungoides): Can appear as erythematous, scaly patches and plaques, requiring biopsy for differentiation.
- Drug Eruptions: Many drugs can cause psoriasiform rashes.
- Generally not used for diagnosis of skin psoriasis.
- May be ordered to:
- Rule out other conditions (e.g., antistreptolysin O (ASO) titer for guttate psoriasis triggered by strep infection).
- Monitor for comorbidities (e.g., lipids, glucose for metabolic syndrome).
- Baseline monitoring for systemic therapies (e.g., complete blood count, liver and kidney function tests for methotrexate).
- Screen for psoriatic arthritis (e.g., inflammatory markers like ESR, CRP, though not specific for PsA; rheumatoid factor and anti-CCP antibodies are typically negative in PsA, helping differentiate from rheumatoid arthritis).
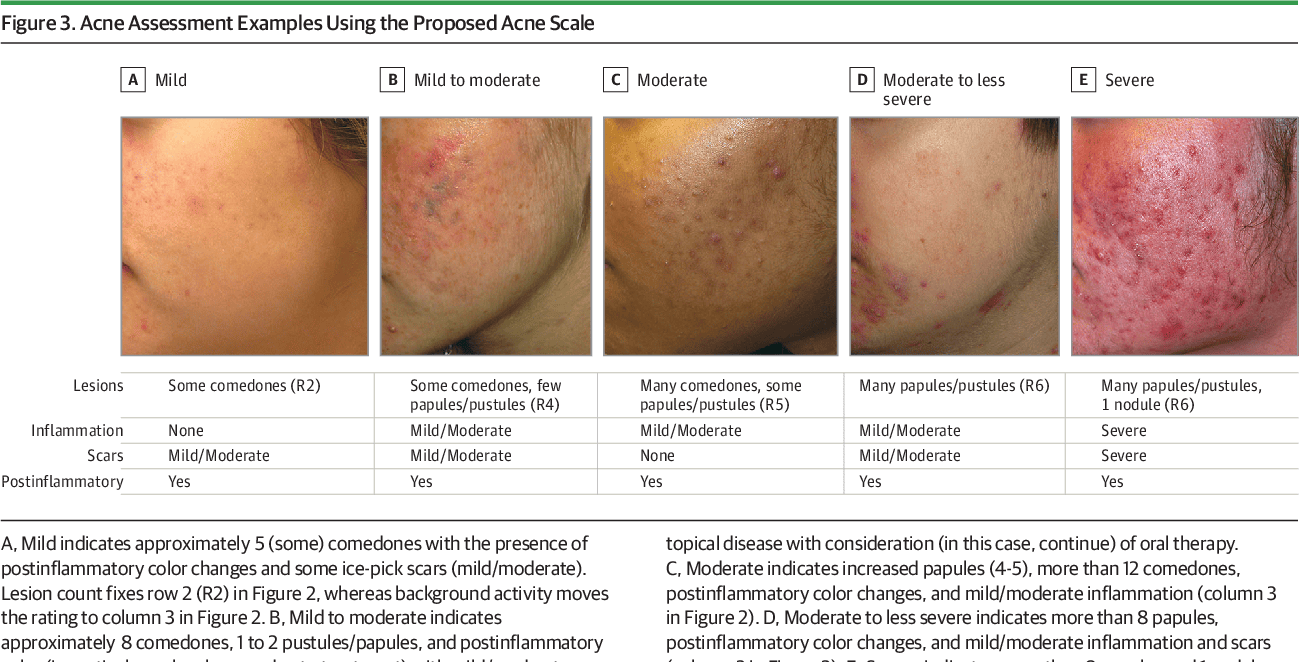
Assessing the severity of psoriasis is crucial for determining the appropriate treatment strategy, monitoring treatment effectiveness, and evaluating the overall impact of the disease on a patient's life. Severity assessment typically involves a combination of objective measures of skin involvement and subjective measures of patient well-being.
These scales quantify the extent and characteristics of psoriatic lesions.
- Psoriasis Area and Severity Index (PASI):
- Description: The most widely used and validated tool for assessing the severity of plaque psoriasis in clinical trials and often in clinical practice. It considers the area of involvement and the severity of erythema (redness), induration (thickness), and desquamation (scaling).
- Calculation:
- The body is divided into four regions: head (10%), upper extremities (20%), trunk (30%), and lower extremities (40%).
- For each region, the area of involvement (A) is estimated on a scale from 0 to 6 (0=none, 1=<10%, 2=10-29%, 3=30-49%, 4=50-69%, 5=70-89%, 6=90-100%).
- The severity of erythema (E), induration (I), and desquamation (D) for the affected areas within each region is rated on a scale from 0 to 4 (0=none, 1=mild, 2=moderate, 3=severe, 4=very severe).
- The PASI score is calculated using a complex formula: PASI = 0.1(H(Eh+Ih+Dh) + 0.2(U(Eu+Iu+Du) + 0.3(T(Et+It+Dt) + 0.4(L(El+Il+Dl)
- The final PASI score ranges from 0 to 72.
- Interpretation:
- Mild Psoriasis: PASI < 10
- Moderate Psoriasis: PASI 10-20
- Severe Psoriasis: PASI > 20
- Limitation: Can be time-consuming to calculate and requires training, making it less practical for routine clinical use by general practitioners.
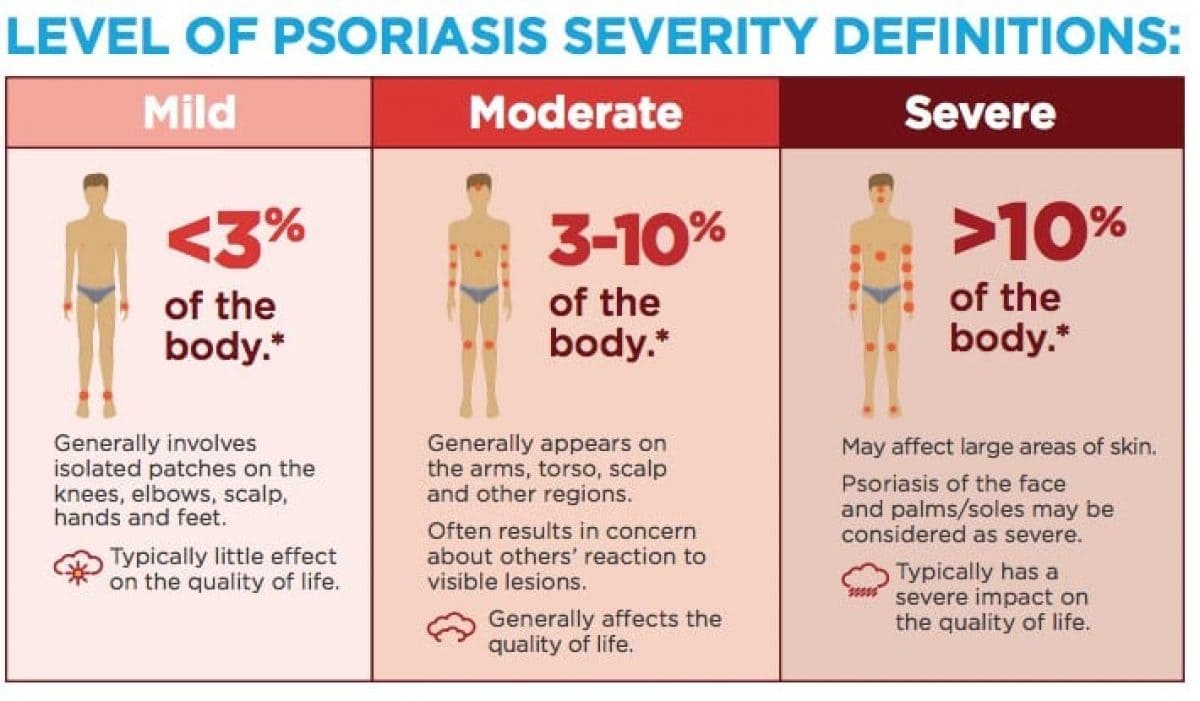
- Body Surface Area (BSA):
- Description: A simpler and quicker measure. It estimates the percentage of the total body surface area affected by psoriasis.
- Calculation: Often estimated using the "rule of palms," where the patient's palm (including fingers) represents approximately 1% of their total BSA.
- Interpretation:
- Mild Psoriasis: < 3% BSA
- Moderate Psoriasis: 3-10% BSA
- Severe Psoriasis: > 10% BSA
- Limitation: Does not account for the redness, thickness, or scaling of the lesions, nor does it consider involvement of critical areas (e.g., face, genitals, palms/soles) which can significantly impair quality of life even with small BSA.
- Physician's Global Assessment (PGA) or Static Physician's Global Assessment (sPGA):
- Description: A subjective assessment by the clinician, providing an overall evaluation of the patient's psoriasis severity.
- Scale: Typically a 5- or 6-point scale ranging from clear/almost clear to severe/very severe, based on the physician's holistic judgment of erythema, induration, and desquamation.
- Advantage: Quick and easy to use.
- Limitation: More subjective and less quantitative than PASI.
These tools evaluate how psoriasis affects a patient's daily life, which is critical for defining severity, especially if it affects critical areas or causes significant distress.
- Dermatology Life Quality Index (DLQI):
- Description: A widely used, 10-item questionnaire completed by the patient. It assesses the impact of skin disease on various aspects of daily life over the past week.
- Questions Cover: Symptoms and feelings, daily activities, leisure, work/school, personal relationships, and treatment.
- Score: Ranges from 0 (no impact) to 30 (extremely large impact).
- Interpretation:
- 0-1: No effect on patient's life
- 2-5: Small effect
- 6-10: Moderate effect
- 11-20: Very large effect
- 21-30: Extremely large effect
- Importance: A high DLQI score, even with a low BSA, can indicate severe disease from the patient's perspective, warranting systemic treatment.
- Psoriasis Disability Index (PDI):
- Similar to DLQI but specific to psoriasis.
Based on a combination of these measures, psoriasis is often categorized for treatment planning:
- Mild Psoriasis:
- BSA < 3% to 5%
- PASI < 5-10
- DLQI < 5
- No involvement of critical areas (e.g., face, palms, soles, genitals, nails) causing significant functional or psychological impairment.
- Moderate to Severe Psoriasis:
- BSA > 5% to 10%
- PASI > 10
- DLQI > 5
- OR significant involvement of critical areas, even if BSA is low, due to profound impact on quality of life, function, or psychological well-being.
- OR failure of topical treatments.
- OR presence of psoriatic arthritis.
- Treatment Selection: Guides the choice between topical therapies, phototherapy, systemic medications (oral or injectable biologics). More severe disease often necessitates more aggressive systemic treatments.
- Monitoring: Allows clinicians to objectively track a patient's response to treatment over time (e.g., PASI 75 - 75% improvement in PASI score is a common endpoint in clinical trials).
- Research: Standardizes patient populations for clinical studies.
- Communication: Provides a common language for healthcare providers.
- Patient Advocacy: Helps justify access to more expensive systemic therapies for patients with severe disease.
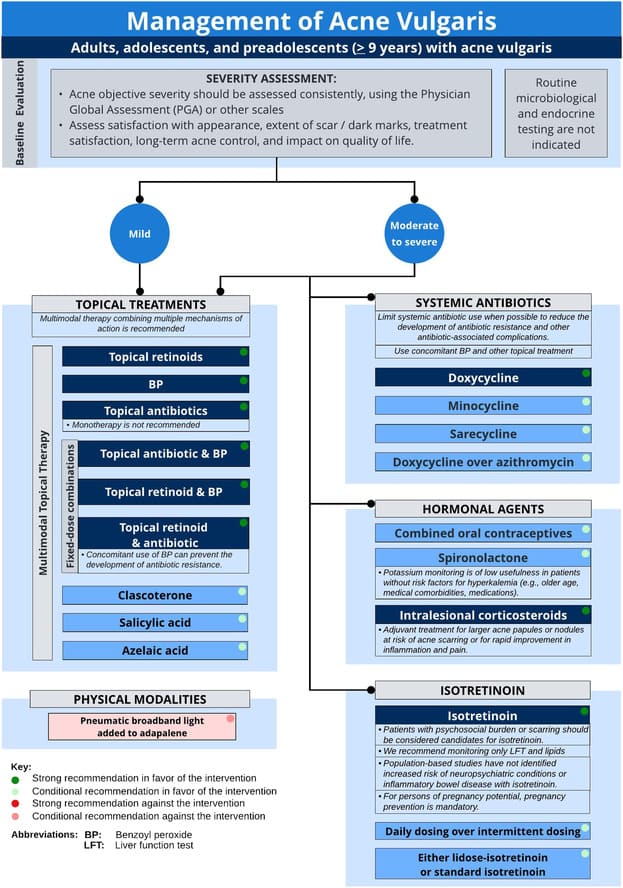
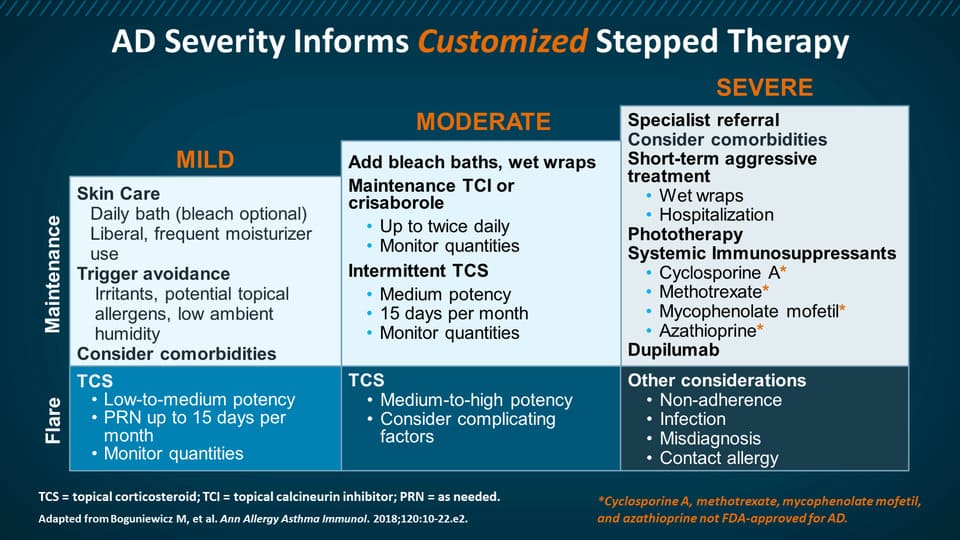
The management of psoriasis is highly individualized, depending on the type and severity of psoriasis, the presence of comorbidities, patient preferences, and response to previous treatments. It often follows a "step-up" approach, starting with less intensive therapies for mild disease and progressing to more potent systemic treatments for moderate to severe cases.
- Patient Education: Crucial for adherence, self-management, and coping.
- Identification and Avoidance of Triggers: Stress reduction, managing infections, avoiding certain medications, cessation of smoking and alcohol.
- Addressing Comorbidities: Managing associated conditions like psoriatic arthritis, cardiovascular disease, obesity, and mental health issues.
- Psychosocial Support: Psoriasis can significantly impact mental health; support groups and counseling can be beneficial.
These are applied directly to the skin.
- Corticosteroids (Topical):
- Mechanism: Anti-inflammatory, antiproliferative, vasoconstrictive.
- Forms: Creams, ointments, lotions, gels, foams, sprays. Potency varies (low, medium, high, super high).
- Use: Often first-line for localized plaques. High potency for thick plaques on trunk/extremities, lower potency for face/intertriginous areas.
- Side Effects: Skin atrophy, telangiectasias, striae, hypopigmentation, folliculitis. Systemic absorption can occur with extensive use of high-potency steroids. Tachyphylaxis (decreasing response over time) can occur. Intermittent use or pulse therapy helps mitigate side effects.
- Vitamin D Analogues:
- Agents: Calcipotriene (calcipotriol), calcitriol.
- Mechanism: Regulate keratinocyte proliferation and differentiation, reduce inflammation.
- Use: Effective for mild to moderate plaque psoriasis, often used in combination with topical corticosteroids.
- Side Effects: Skin irritation, burning, itching. Minimal risk of hypercalcemia with appropriate use.
- Topical Retinoids:
- Agent: Tazarotene.
- Mechanism: Normalizes keratinocyte differentiation, anti-inflammatory.
- Use: Mild to moderate plaque psoriasis. Often used with corticosteroids to reduce irritation.
- Side Effects: Irritation, redness, burning, photosensitivity. Contraindicated in pregnancy.
- Calcineurin Inhibitors:
- Agents: Tacrolimus, pimecrolimus.
- Mechanism: Immunomodulatory, suppress T-cell activation.
- Use: Off-label for inverse psoriasis, facial psoriasis, or areas where steroids are contraindicated due to risk of atrophy.
- Side Effects: Burning, itching (especially initially). No risk of skin atrophy.
- Coal Tar:
- Mechanism: Antiproliferative, anti-inflammatory.
- Use: Available in various concentrations, often in shampoos, creams, and lotions. Less frequently used due to odor, staining, and messiness.
- Side Effects: Folliculitis, photosensitivity, skin irritation.
- Anthralin:
- Mechanism: Reduces keratinocyte proliferation.
- Use: Short-contact therapy for chronic plaques.
- Side Effects: Significant skin irritation and staining (skin, clothing, hair). Less commonly used.
Uses specific wavelengths of ultraviolet light.
- Narrowband UVB (NB-UVB):
- Mechanism: Suppresses DNA synthesis in keratinocytes, induces apoptosis of activated T-cells.
- Use: Most common form of phototherapy. Effective for widespread plaque psoriasis, guttate psoriasis. Usually 2-3 times per week in a clinic setting.
- Side Effects: Erythema (sunburn), itching, dryness, increased risk of skin cancer (though less than PUVA), premature skin aging.
- Home Phototherapy: Can be prescribed for selected patients with appropriate training and supervision.
- Psoralen plus UVA (PUVA):
- Mechanism: Psoralen (a photosensitizing agent taken orally or applied topically) makes the skin more sensitive to UVA light. This combination inhibits cell proliferation.
- Use: Highly effective, especially for thick plaque psoriasis or palmoplantar psoriasis.
- Side Effects: Nausea (oral psoralen), severe sunburn, increased risk of skin cancer (squamous cell carcinoma, melanoma), premature skin aging, cataracts (eye protection essential). Due to higher risk profile, NB-UVB is generally preferred.
- Excimer Laser (308 nm):
- Mechanism: Targets specific areas with NB-UVB light.
- Use: For localized, persistent plaques (e.g., scalp, elbows, knees) without affecting surrounding healthy skin.
- Side Effects: Localized erythema, blistering.
These medications work throughout the body and require careful monitoring.
- Traditional Systemic Agents (Non-biologics):
- Methotrexate (MTX):
- Mechanism: Folic acid antagonist, immunosuppressive, reduces cell proliferation.
- Use: Long-standing, effective for moderate to severe plaque psoriasis and psoriatic arthritis. Administered once weekly (oral or injectable).
- Side Effects: Nausea, fatigue, hepatotoxicity (liver damage, requires regular monitoring of liver function tests), myelosuppression (bone marrow suppression, requires blood counts), lung toxicity. Contraindicated in pregnancy. Folic acid supplementation is usually given to reduce side effects.
- Cyclosporine:
- Mechanism: Calcineurin inhibitor, potent immunosuppressant.
- Use: Rapid onset of action, highly effective for severe, recalcitrant psoriasis (including erythrodermic and pustular) or as a bridge therapy. Short-term use generally preferred.
- Side Effects: Nephrotoxicity (kidney damage, requires regular monitoring of kidney function and blood pressure), hypertension, gingival hyperplasia, hirsutism, increased risk of infection and certain malignancies.
- Acitretin (Oral Retinoid):
- Mechanism: Normalizes keratinocyte proliferation and differentiation.
- Use: Effective for severe plaque psoriasis, generalized pustular psoriasis, and erythrodermic psoriasis. Less effective for psoriatic arthritis.
- Side Effects: Teratogenic (absolute contraindication in pregnancy, and women must avoid pregnancy for 3 years after stopping), dry mucous membranes (lips, eyes), hair loss, hyperlipidemia, hepatotoxicity.
- Apremilast (PDE4 Inhibitor):
- Mechanism: Inhibits phosphodiesterase 4 (PDE4), leading to increased intracellular cAMP, which modulates pro-inflammatory and anti-inflammatory mediators.
- Use: Oral medication for moderate plaque psoriasis and psoriatic arthritis.
- Side Effects: Diarrhea, nausea, headache, weight loss, depression.
- Methotrexate (MTX):
- Biologic Therapies (Advanced Systemic Agents):
- Mechanism: Target specific components of the immune system involved in psoriasis pathogenesis (e.g., TNF-alpha, IL-12/23, IL-17, IL-23). They are highly effective but expensive and given via injection or infusion.
- TNF-alpha Inhibitors:
- Agents: Adalimumab (Humira), Etanercept (Enbrel), Infliximab (Remicade), Certolizumab pegol (Cimzia).
- Mechanism: Block the action of TNF-alpha, a key pro-inflammatory cytokine.
- Use: Moderate to severe plaque psoriasis and psoriatic arthritis.
- Side Effects: Increased risk of serious infections (tuberculosis, fungal infections, bacterial sepsis), reactivation of hepatitis B, demyelinating diseases, heart failure exacerbation, injection site reactions. Screening for TB and HBV is mandatory before starting.
- IL-12/23 Inhibitors:
- Agent: Ustekinumab (Stelara).
- Mechanism: Targets the p40 subunit common to IL-12 and IL-23, blocking their activity.
- Use: Moderate to severe plaque psoriasis and psoriatic arthritis.
- Side Effects: Similar to TNF-alpha inhibitors (infections), often better tolerated with less frequent dosing.
- IL-17 Inhibitors:
- Agents: Secukinumab (Cosentyx), Ixekizumab (Taltz), Brodalumab (Siliq).
- Mechanism: Block IL-17A, a key cytokine in psoriasis inflammation.
- Use: Highly effective for moderate to severe plaque psoriasis and psoriatic arthritis. Brodalumab has a black box warning for suicidal ideation.
- Side Effects: Increased risk of infections (candidiasis), exacerbation of inflammatory bowel disease (especially Crohn's).
- IL-23 Inhibitors:
- Agents: Guselkumab (Tremfya), Risankizumab (Skyrizi), Tildrakizumab (Ilumya).
- Mechanism: Specifically block the p19 subunit of IL-23, preventing activation of Th17 cells.
- Use: Latest generation of biologics, highly effective for moderate to severe plaque psoriasis and psoriatic arthritis, generally well-tolerated.
- Side Effects: Upper respiratory tract infections, headache, injection site reactions.
- Janus Kinase (JAK) Inhibitors (Small Molecule - Oral):
- Agent: Tofacitinib (Xeljanz - approved for psoriatic arthritis, not currently for skin psoriasis in all regions), Upadacitinib (Rinvoq - approved for psoriatic arthritis, also for atopic dermatitis).
- Mechanism: Block the JAK pathway involved in signaling for multiple cytokines, including those in psoriasis.
- Use: Oral option for psoriatic arthritis and potentially skin psoriasis (off-label or in trials).
- Side Effects: Increased risk of serious infections, herpes zoster, cardiovascular events, thrombosis, malignancy. Require careful monitoring.
- Often used to enhance efficacy, reduce side effects of individual agents, or manage difficult-to-treat areas. Examples:
- Topical corticosteroids + Vitamin D analogues.
- Phototherapy + Systemic agents.
- Biologics + Methotrexate (for psoriatic arthritis).
- Psoriatic Arthritis: Requires systemic therapy (DMARDs, biologics) to prevent irreversible joint damage.
- Erythrodermic/Generalized Pustular Psoriasis: Medical emergency, often requires hospitalization and rapid-acting systemic agents (e.g., cyclosporine, methotrexate, biologics).
- Nail Psoriasis: Difficult to treat, often requires systemic therapy, intralesional steroid injections, or topical therapies under occlusion.
- Scalp Psoriasis: Often treated with medicated shampoos (tar, salicylic acid), steroid solutions, foams, or calcipotriene solutions. Systemic agents for severe cases.
Psoriasis is now recognized as a systemic inflammatory disease that significantly increases the risk of developing several associated medical conditions, known as comorbidities. This understanding underscores the importance of a holistic approach to patient care, moving beyond just managing skin lesions.
- Description: As previously discussed, PsA is a chronic inflammatory arthritis that affects up to 30% of individuals with psoriasis. It can affect peripheral joints, the axial skeleton, and entheses.
- Significance: Early diagnosis and treatment are crucial to prevent irreversible joint damage and maintain physical function. It often requires systemic therapy, including biologics, independent of skin disease severity.
This is one of the most significant and well-established comorbidities, contributing to reduced life expectancy in severe psoriasis.
- Metabolic Syndrome: A cluster of conditions that increase the risk of heart disease, stroke, and type 2 diabetes. Psoriasis patients have a higher prevalence of:
- Obesity: Particularly central obesity.
- Type 2 Diabetes Mellitus (T2DM): Insulin resistance is more common.
- Dyslipidemia: Abnormal lipid levels (high triglycerides, low HDL, high LDL).
- Hypertension: High blood pressure.
- Increased Risk of Cardiovascular Events: Psoriasis patients, especially those with severe disease, have an increased risk of:
- Myocardial Infarction (Heart Attack)
- Stroke
- Peripheral Artery Disease
- Cardiovascular Mortality
- Description: Psoriasis patients have a higher incidence of Crohn's disease and ulcerative colitis, the two main forms of IBD.
- Connection: Shared genetic predispositions (e.g., specific HLA alleles) and common inflammatory pathways (e.g., IL-23/Th17 axis) are thought to link these conditions.
- Clinical Relevance: Certain biologic treatments for psoriasis (e.g., some IL-17 inhibitors) may exacerbate IBD, while others (e.g., TNF-alpha inhibitors, ustekinumab) are effective treatments for both.
The chronic, visible nature of psoriasis, coupled with its associated symptoms (itching, pain), significantly impacts mental well-being.
- Depression: Highly prevalent in psoriasis patients, ranging from mild to severe.
- Anxiety: Often co-occurs with depression.
- Low Self-Esteem and Body Image Issues: The cosmetic impact can lead to social stigma and isolation.
- Suicidal Ideation: The risk of suicidal thoughts and attempts is higher in individuals with severe psoriasis.
- Psychological Distress: Can worsen psoriasis flares and impact treatment adherence.
- Description: Emerging evidence suggests a link between psoriasis and an increased risk of developing chronic kidney disease, particularly with severe disease.
- Possible Mechanisms: Chronic inflammation, presence of other comorbidities like hypertension and diabetes, and nephrotoxic effects of some psoriasis treatments (e.g., cyclosporine).
- Description: Psoriasis patients have a higher prevalence of NAFLD, which can progress to non-alcoholic steatohepatitis (NASH), cirrhosis, and liver failure.
- Connection: Strongly linked to metabolic syndrome, obesity, and insulin resistance, all of which are common in psoriasis.
- Clinical Relevance: Important to monitor liver function, especially if patients are on hepatotoxic medications like methotrexate.
- Description: Psoriasis patients may have a slightly increased risk of certain cancers.
- Types:
- Non-melanoma Skin Cancers: Squamous cell carcinoma (SCC) and basal cell carcinoma (BCC), particularly with long-term phototherapy (especially PUVA) or immunosuppressive treatments.
- Lymphoma: A small but increased risk, particularly cutaneous T-cell lymphoma, and potentially systemic lymphomas with certain systemic treatments.
- Other Cancers: Some studies suggest a modest increased risk of lung, kidney, and gastrointestinal cancers, though this area requires further research.
- Osteoporosis: Chronic inflammation and certain treatments (e.g., oral corticosteroids for flares) may contribute.
- Uveitis: Inflammation of the eye, particularly in those with psoriatic arthritis or ankylosing spondylitis.
- Sleep Apnea: More prevalent, likely linked to obesity.
- Holistic Patient Care: Dermatologists, primary care physicians, and other specialists must work collaboratively.
- Early Screening: Regular screening for comorbidities (e.g., blood pressure, lipids, glucose, liver function, mental health assessment) is essential, especially in patients with moderate to severe psoriasis.
- Risk Factor Modification: Lifestyle interventions (diet, exercise, smoking cessation, alcohol moderation) are crucial.
- Treatment Choice: When selecting systemic therapies, potential effects on comorbidities (both positive and negative) should be considered. For instance, a TNF-alpha inhibitor might treat both skin psoriasis and psoriatic arthritis, and potentially reduce cardiovascular risk.
Nursing diagnoses provide a way to describe actual or potential health problems that nurses can identify and treat independently. Interventions are the actions nurses take to achieve desired patient outcomes.
Related to: Inflammatory process leading to hyperproliferation of epidermal cells, characterized by erythematous, scaly plaques, fissures, and lesions (Objective 1, 2).
Defining Characteristics: Disruption of skin surface (lesions, scales, erythema), presence of plaques, dry skin, potential for bleeding/crusting.
Goals/Outcomes: Patient will demonstrate improved skin integrity, reduced scaling/erythema, and absence of new lesions.
| Action/Assessment | Detail/Rationale |
|---|---|
| Assessment | Regularly assess skin condition, documenting location, size, color, and characteristics of lesions (Objective 2). Monitor for signs of infection (redness, warmth, purulent drainage, odor, pain) in affected areas. Evaluate effectiveness of current topical treatments. |
| Therapeutic Management | Administer prescribed topical medications (corticosteroids, vitamin D analogues, retinoids) as ordered, ensuring proper application technique and patient education (Objective 7). Apply emollients and moisturizers frequently, especially after bathing, to maintain skin hydration and reduce dryness/scaling (e.g., petroleum jelly, urea creams) (Objective 7). |
| Skin Care | Educate on gentle skin care: patting skin dry rather than rubbing, using lukewarm water for bathing, avoiding harsh soaps. Protect skin from trauma (Koebner phenomenon) by advising loose-fitting clothing, avoiding scratching, and protective padding as needed (Objective 2). |
| Patient Education | Teach proper application of topical agents, including dosage, frequency, and potential side effects (Objective 7). Advise on trigger avoidance (e.g., harsh chemicals, excessive sun exposure if photosensitive, stress management) (Objective 1, 7). |
Related to: Inflammatory process, skin dryness, nerve irritation, and lesion formation (Objective 1, 2).
Defining Characteristics: Verbal reports of itching or pain, observed scratching, irritability, restless sleep, skin excoriations.
Goals/Outcomes: Patient will report decreased pain/pruritus intensity, demonstrate effective coping strategies, and experience improved sleep patterns.
| Action/Assessment | Detail/Rationale |
|---|---|
| Assessment | Routinely assess pain and pruritus levels using a subjective scale (e.g., 0-10) and document its impact on daily activities and sleep. Identify triggers that exacerbate itching or pain. |
| Therapeutic Management | Administer prescribed antipruritic medications (e.g., antihistamines, gabapentin for neuropathic itch) as ordered (Objective 7). Apply cool compresses or cool, moist dressings to affected areas to soothe irritated skin. Recommend colloidal oatmeal baths or similar soothing preparations. |
| Non-pharmacological | Educate on distraction techniques and relaxation strategies (e.g., deep breathing, meditation) to manage discomfort. Advise keeping fingernails short and clean to minimize skin damage from scratching. |
| Patient Education | Discuss the chronic nature of symptoms and the importance of consistent management. Encourage wearing soft, breathable fabrics (cotton) to prevent irritation. |
Related to: Visible skin lesions, societal stigma, perception of unattractiveness, and chronicity of the condition (Objective 2, 8).
Defining Characteristics: Verbalization of negative feelings about body, avoiding social situations, hiding affected body parts, feelings of shame/embarrassment, reluctance to engage in intimate relationships.
Goals/Outcomes: Patient will verbalize increased acceptance of self, engage in social interactions, and demonstrate coping mechanisms for managing feelings about their appearance.
| Action/Assessment | Detail/Rationale |
|---|---|
| Assessment | Listen actively to patient's feelings and concerns about their appearance. Assess for signs of depression, anxiety, or social withdrawal (Objective 8). Evaluate the impact of psoriasis on relationships, work, and leisure activities. |
| Therapeutic Management | Provide a supportive and non-judgmental environment; emphasize that the condition is not contagious. Focus on patient strengths and positive attributes. Encourage discussion about feelings and concerns. |
| Referrals | Refer to support groups (e.g., National Psoriasis Foundation) or psychological counseling as needed (Objective 8, 9). |
| Patient Education | Educate family members and significant others to foster understanding and support. Advise on cosmetic camouflage techniques if desired. Reinforce the importance of adhering to treatment to improve skin appearance, which can positively impact body image. |
Related to: Feelings of embarrassment or shame due to visible lesions, fear of rejection, and perceived stigma from others (Objective 8).
Defining Characteristics: Reports of feeling lonely, lack of social contact, withdrawal, expression of feelings of being different.
Goals/Outcomes: Patient will participate in desired social activities, identify strategies to improve social interaction, and express feelings of connectedness.
| Action/Assessment | Detail/Rationale |
|---|---|
| Assessment | Determine the patient's usual social patterns and extent of withdrawal. Explore specific fears or anxieties related to social interactions. |
| Therapeutic Management | Encourage participation in activities that do not emphasize skin appearance initially. Facilitate connection with peer support groups. Role-play responses to insensitive comments or questions. |
| Patient Education | Provide accurate information about psoriasis to the patient and offer suggestions on how to explain it to others. Reinforce that psoriasis is not contagious. |
Related to: New diagnosis, lack of exposure to information, misinterpretation of information (Objective 1, 2).
Defining Characteristics: Verbalization of questions, inaccurate follow-through of instructions, development of preventable complications.
Goals/Outcomes: Patient will verbalize understanding of psoriasis, its management, and potential complications.
| Action/Assessment | Detail/Rationale |
|---|---|
| Assessment | Assess current knowledge base and learning needs regarding psoriasis, its causes, triggers, and treatment options. Identify preferred learning style. |
| Therapeutic Management | Provide clear, concise, and accurate information verbally and in writing (brochures, reliable websites). Explain the chronicity of psoriasis and the need for ongoing management, rather than a "cure" (Objective 1). |
| Medication Review | Review all prescribed medications (topical, phototherapy, systemic, biologics) including their purpose, dosage, administration, side effects, and monitoring requirements (Objective 7). |
| Clarification | Clarify myths and misconceptions about psoriasis (e.g., contagiousness). |
| Patient Education | Teach symptom recognition and when to contact a healthcare provider. Emphasize the importance of lifestyle modifications and trigger avoidance. |
Related to: Complex treatment regimen, financial constraints, side effects of treatment, lack of perceived benefit, lack of social support (Objective 7, 8).
Defining Characteristics: Failure to follow prescribed treatment plan, verbalized reluctance to adhere, worsening of condition despite treatment.
Goals/Outcomes: Patient will adhere to prescribed treatment regimen, verbalize factors influencing noncompliance, and demonstrate commitment to health management.
| Action/Assessment | Detail/Rationale |
|---|---|
| Assessment | Identify barriers to adherence (e.g., cost, inconvenience, side effects, forgetfulness, lack of understanding). Explore patient's beliefs and attitudes about their illness and treatment. |
| Therapeutic Management | Collaborate with the patient to develop a realistic and manageable treatment plan. Simplify regimens where possible (e.g., fewer applications, combination products). Address financial barriers by connecting patients with patient assistance programs or social work resources. Provide positive reinforcement for adherence. |
| Patient Education | Reiterate the benefits of adherence and the potential consequences of non-adherence (e.g., flares, progression of disease, comorbidities). Empower the patient in decision-making about their care. |