Ankylosing Spondylitis
Ankylosing Spondylitis (AS) is a chronic, systemic, inflammatory rheumatic disease that primarily affects the axial skeleton, particularly the sacroiliac joints and the spine.
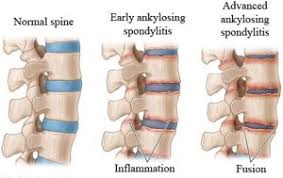
Ankylosing spondylitis (AS) is a medical condition that involves the inflammation (spondylitis) and fusion/stiffening (ankylosis) of the vertebrae or small bones in the spine.
Ankylosing spondylitis (AS) is a chronic inflammatory condition mainly affecting the spine that causes progressive stiffness and pain.
The term "ankylosing" refers to the new bone formation that can lead to fusion or stiffening of joints and vertebrae, and "spondylitis" means inflammation of the vertebrae.
Also known as Bechterew disease, ankylosing spondylitis is described as a rare type of arthritis. The disease is found to be more common in men than in women, and is usually found in adult patients more than younger people.
- Chronic Inflammation: It is a persistent inflammatory condition, often leading to structural damage over time.
- Axial Skeleton Involvement: The hallmark feature is inflammation of the sacroiliac (SI) joints (sacroiliitis) and the intervertebral joints and ligaments of the spine (spondylitis). This inflammation typically starts in the lower back and can progress upwards.
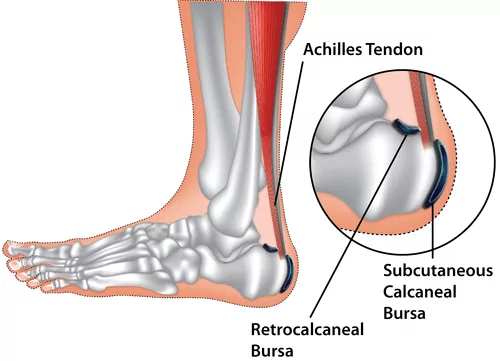
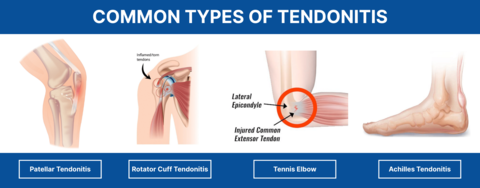
- Enthesitis: A distinctive feature is inflammation at the sites where tendons, ligaments, or joint capsules insert into bone. This can occur in the spine, heels (Achilles tendonitis, plantar fasciitis), ribs, and other areas.
- New Bone Formation: Chronic inflammation, especially at the entheses and around the vertebral bodies, stimulates osteoproliferation (new bone growth). This leads to the formation of syndesmophytes, which are bony bridges that can eventually fuse adjacent vertebrae, resulting in a stiff, immobile spine (the characteristic "bamboo spine" appearance on X-rays).
- Progressive Nature: AS is often a progressive disease, with symptoms worsening over time, potentially leading to significant pain, stiffness, loss of spinal mobility, and functional impairment.
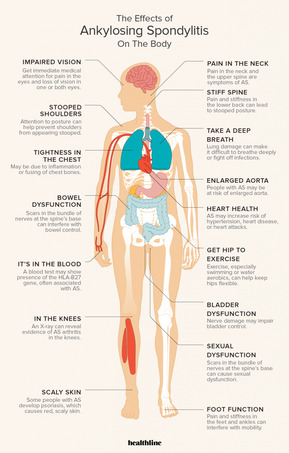
- Systemic Disease: Although primarily affecting the skeleton, AS is a systemic disease, meaning it can affect other organs and systems, leading to various extra-articular manifestations (e.g., eye inflammation, inflammatory bowel disease, cardiac involvement).
- Genetic Predisposition: There is a strong genetic component, with a high association with the Human Leukocyte Antigen B27 (HLA-B27) gene.

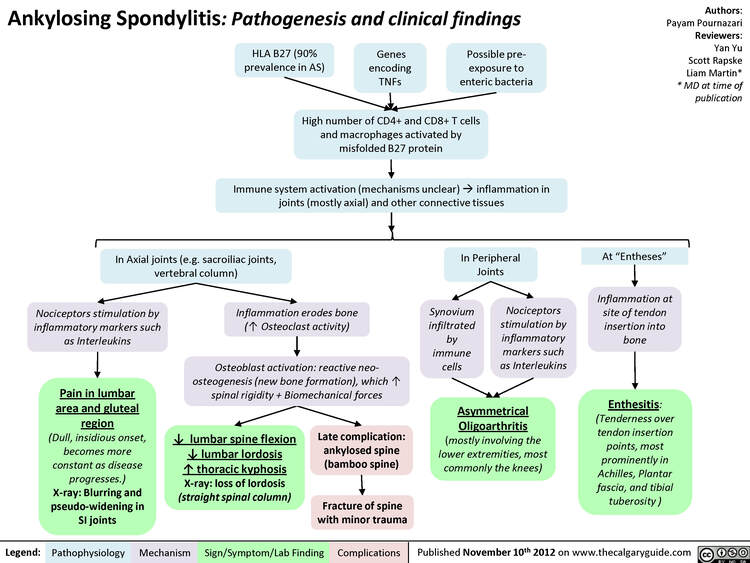
The development of AS is complex, involving a combination of genetic, environmental, and immunological factors.
- Genetic Predisposition (Primary Risk Factor):
- HLA-B27 Gene: This is by far the strongest genetic risk factor. Over 90% of individuals with AS of Caucasian descent carry the HLA-B27 allele. However, it's important to note:
- Not everyone with HLA-B27 develops AS (only about 5-10% of HLA-B27 positive individuals develop AS).
- A small percentage of individuals with AS (5-10%) do not carry the HLA-B27 gene, especially in certain ethnic groups.
- Other Genes: While HLA-B27 accounts for a significant portion of the genetic risk, other genes have also been identified through genome-wide association studies (GWAS), including those involved in the IL-23/Th17 pathway (e.g., IL23R, ERAP1) and immune regulation, which contribute to the overall susceptibility.
- HLA-B27 Gene: This is by far the strongest genetic risk factor. Over 90% of individuals with AS of Caucasian descent carry the HLA-B27 allele. However, it's important to note:
- Family History:
- Having a first-degree relative (parent, sibling) with AS significantly increases the risk, particularly if that relative is also HLA-B27 positive. The risk for first-degree relatives of an AS patient is about 10-20% if they are also HLA-B27 positive.
- Environmental Factors (Potential Triggers):
- Infections: There is some evidence suggesting that certain bacterial infections (e.g., Klebsiella species, other enteric bacteria) may act as triggers in genetically susceptible individuals, particularly in the gut microbiome. The "arthritogenic peptide" hypothesis proposes molecular mimicry between bacterial antigens and self-antigens in HLA-B27 positive individuals.
- Gut Microbiome: Dysbiosis (imbalance) in the gut microbiota is increasingly recognized as a potential contributor to the development and progression of spondyloarthritis, including AS.
- Mechanical Stress: While not a primary cause, repetitive mechanical stress or trauma might exacerbate inflammation or initiate symptoms in susceptible individuals, particularly at enthesial sites.
- Smoking: While not a direct cause, smoking has been identified as a significant factor that can lead to more severe disease progression, worse radiographic outcomes, and a poorer response to treatment in AS patients.
- Immune System Dysfunction: AS is an autoimmune or autoinflammatory disease, characterized by an aberrant immune response. The interaction between genetic factors (like HLA-B27) and environmental triggers is thought to lead to this dysregulation.
Exact etiology remains elusive, current understanding points to a process where chronic inflammation leads to characteristic structural changes, primarily in the axial skeleton.
The etiology of AS is multifactorial, meaning it arises from a combination of factors rather than a single cause:
- Genetic Predisposition:
- HLA-B27: This major histocompatibility complex (MHC) class I allele is the most significant genetic factor. While its exact role is still debated, several theories exist:
- Arthrogengic Peptide Theory: HLA-B27 might present specific "arthritogenic" peptides (from bacterial or self-proteins) to T-cells, triggering an autoimmune response.
- Misfolding Theory: HLA-B27 protein may misfold in the endoplasmic reticulum, leading to an "unfolded protein response" and activation of inflammatory pathways.
- Heavy Chain Dimerization: HLA-B27 heavy chains can form homodimers on the cell surface, which might be recognized by specific killer cell immunoglobulin-like receptors (KIRs) on NK cells and T cells, contributing to inflammation.
- Non-HLA Genes: Recent genetic studies have identified over 100 non-HLA genetic loci associated with AS. Many of these are involved in the IL-23/Th17 pathway (e.g., IL23R, ERAP1, STAT3, JAK2, TYK2), highlighting the critical role of this inflammatory pathway in AS.
- HLA-B27: This major histocompatibility complex (MHC) class I allele is the most significant genetic factor. While its exact role is still debated, several theories exist:
- Environmental Triggers:
- Gut Microbiota: Dysbiosis (imbalance) in the gut microbiome is increasingly implicated. It's hypothesized that an altered gut flora, possibly due to certain bacterial infections (e.g., Klebsiella species), could initiate or perpetuate an inflammatory response, particularly in genetically susceptible individuals. This might involve increased intestinal permeability ("leaky gut"), allowing bacterial products to enter the bloodstream and trigger systemic inflammation.
- Mechanical Stress: Repeated microtrauma or mechanical stress at entheseal sites (where ligaments and tendons attach to bone) could initiate local inflammation, especially in the context of genetic susceptibility.
The disease process in AS is characterized by chronic inflammation at specific sites, followed by an aberrant repair process leading to new bone formation.
- Initial Lesion: Enthesitis:
- The primary pathological event in AS is enthesitis, inflammation at the entheses. This occurs particularly where ligaments, tendons, and joint capsules insert into bone, prominently in the axial skeleton (e.g., discovertebral junctions, sacroiliac joints) and peripheral sites (e.g., Achilles tendon insertion, plantar fascia).
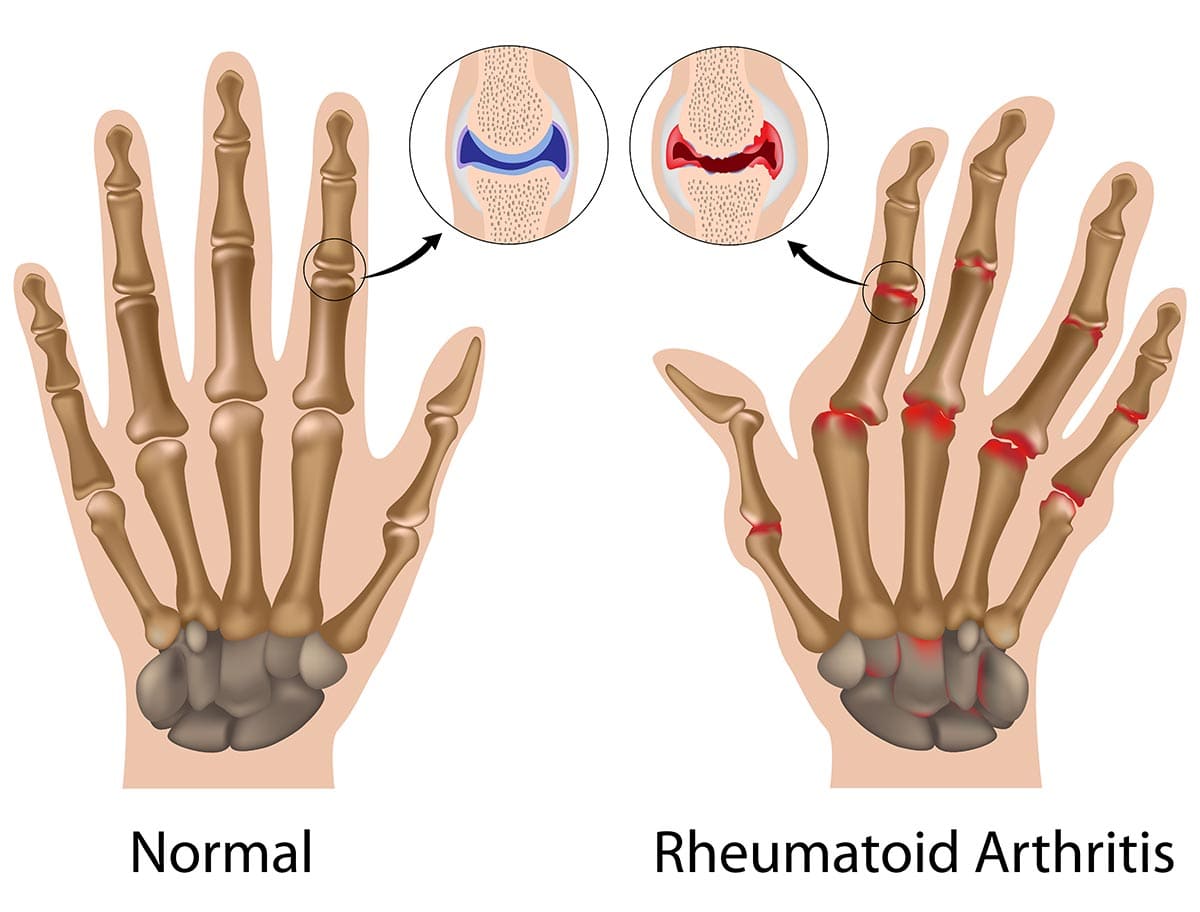
- Instead of typical cartilage erosion seen in rheumatoid arthritis, AS involves inflammation of the bone immediately adjacent to the enthesis (osteitis or bone marrow edema).
- Immune cells, particularly T cells (especially Th17 cells) and macrophages, infiltrate these sites, releasing pro-inflammatory cytokines.
- Key Inflammatory Pathways and Cytokines:
- IL-23/Th17 Pathway: This is a central pathway in AS pathogenesis. IL-23 promotes the differentiation and survival of Th17 cells, which produce IL-17 and IL-22. These cytokines are potent pro-inflammatory mediators, promoting inflammation, bone resorption (initially), and subsequently, new bone formation.
- TNF-alpha: Tumor Necrosis Factor-alpha is another critical pro-inflammatory cytokine abundantly found in inflamed entheses and synovial fluid of AS patients. It plays a significant role in perpetuating inflammation, pain, and tissue damage.
- IL-1, IL-6: Other cytokines like Interleukin-1 and Interleukin-6 also contribute to the inflammatory cascade.
- Sacroiliitis:
- Inflammation typically begins in the sacroiliac (SI) joints. This starts with osteitis and erosions, particularly on the iliac side (which has thinner cartilage).
- Over time, repetitive inflammation and repair lead to subchondral bone sclerosis (hardening), erosions, and eventually, bony bridging (ankylosis) across the joint, causing fusion.
- Spondylitis and Spinal Ankylosis:
- Inflammation then ascends the spine. It occurs at the discovertebral junction (where the annulus fibrosus inserts into the vertebral body) and in the small apophyseal (facet) joints.
- This inflammation leads to Romanus lesions (erosions at the vertebral corners) and reactive bone formation.
- New bone formation then extends along the outer fibers of the annulus fibrosus, forming syndesmophytes. These are thin, vertical bony growths that bridge adjacent vertebrae.
- Progressive syndesmophyte formation leads to fusion of the vertebrae, resulting in the characteristic rigid, often kyphotic ("bamboo spine") deformity.
- Bone Remodeling Paradox:
- A unique feature of AS is the "bone remodeling paradox." While inflammation often causes bone loss (osteoporosis) in the early stages and periphery, there is simultaneously excessive new bone formation in the axial skeleton, leading to ankylosis. The precise mechanisms linking inflammation to this pathological bone formation are still under investigation, but involve pathways like Wnt signaling.
- Extra-Axial Manifestations:
- Inflammation can also affect peripheral joints, especially lower limb joints.
- Enthesitis can manifest as Achilles tendonitis or plantar fasciitis.
- Systemic inflammation can lead to extra-skeletal manifestations like uveitis (eye inflammation), inflammatory bowel disease, and cardiovascular involvement.
These are the most common and defining symptoms of AS.
- Inflammatory Back Pain:
- Characteristic Type: This is distinct from mechanical back pain. It typically presents as a dull, insidious ache, usually in the lower back and buttocks, often bilateral.
- Onset: Usually gradual, over weeks or months, typically before age 40.
- Pattern: Worsens with rest or inactivity (especially in the second half of the night, leading to awakening), and improves with exercise and activity.
- Morning Stiffness: A prominent feature, lasting at least 30 minutes, often for several hours, and improving with movement.
- Progression: Can ascend the spine, affecting the thoracic and cervical regions, and may eventually lead to persistent pain even at rest.
- Stiffness and Limited Spinal Mobility:
- Progressive stiffening of the spine is a hallmark. Patients often develop a stooped posture (kyphosis) and reduced range of motion in all spinal planes (flexion, extension, lateral bending, rotation).
- The Schober test (a measure of lumbar flexion) and measures of cervical rotation and chest expansion are used to quantify spinal mobility limitations.
- Reduced chest expansion can sometimes lead to restrictive lung disease due to involvement of costovertebral and costosternal joints.
- Sacroiliac (SI) Joint Pain:
- Often localized to the buttocks, sometimes radiating down the back of the thigh. It can be unilateral initially but commonly becomes bilateral.
- Tenderness upon palpation of the SI joints or provocative maneuvers (e.g., Faber test, Gaenslen's test) may be present.
These symptoms can occur in addition to or sometimes even before axial involvement, especially in women and children.
- Peripheral Arthritis:
- Occurs in about 30-50% of AS patients.
- Typically affects large joints of the lower limbs (hips, knees, ankles) in an asymmetric, oligoarticular pattern (affecting 1-4 joints).
- Hip involvement can be severe and lead to significant functional impairment, sometimes requiring joint replacement.
- Enthesitis:
- Inflammation where tendons or ligaments attach to bone. This is a very common feature and can be a source of significant pain.
- Common sites: Achilles tendon insertion (Achilles tendinitis), plantar fascia insertion (plantar fasciitis), tibial tuberosity, iliac crest, greater trochanter, and sites of rib attachment.
- Can cause localized pain and swelling.
AS is a systemic disease, and inflammation can affect various non-skeletal organs.
- Ocular (Eyes):
- Acute Anterior Uveitis (AAU) / Iritis: The most common extra-skeletal manifestation, occurring in 25-40% of patients.
- Symptoms: Sudden onset of unilateral eye pain, redness, photophobia (sensitivity to light), and blurred vision.
- Importance: Requires prompt ophthalmological treatment to prevent permanent vision loss. Can recur.
- Gastrointestinal (GI):
- Inflammatory Bowel Disease (IBD): Subclinical gut inflammation is very common (up to 60-70% on endoscopy/biopsy), and clinically overt Crohn's disease or ulcerative colitis occurs in 5-10% of AS patients.
- Symptoms: Abdominal pain, diarrhea, weight loss, blood in stool.
- Dermatological (Skin):
- Psoriasis: Occurs in about 10-15% of AS patients, often preceding or co-occurring with joint symptoms.
- Symptoms: Red, scaly patches on the skin.
- Cardiovascular (Heart):
- Occurs in a small percentage of patients, usually after many years of disease.
- Aortic Insufficiency: Due to inflammation of the aortic valve.
- Conduction Abnormalities: Such as atrioventricular block, potentially requiring a pacemaker.
- Cardiomyopathy: Less common.
- Pulmonary (Lungs):
- Apical Fibrosis: Rare but can occur, characterized by fibrosis in the upper lobes of the lungs.
- Restrictive Lung Disease: Due to impaired chest wall expansion caused by costovertebral joint fusion.
- Renal (Kidneys):
- IgA Nephropathy: Can occur but is usually subclinical.
- Amyloidosis: A rare but severe complication, particularly in long-standing, active disease, leading to kidney failure.
- Systemic Symptoms:
- Fatigue is a common and often debilitating symptom.
- Low-grade fever and weight loss are less common but can occur during active disease flares.
The diagnosis of Ankylosing Spondylitis (AS) is primarily clinical, based on a combination of patient history, physical examination findings, laboratory tests, and imaging studies.
- Inflammatory Back Pain: Detailed assessment of back pain characteristics is crucial (onset, duration, severity, nocturnal worsening, improvement with activity, morning stiffness duration).
- Age of Onset: Typically before 40 years.
- Family History: Inquire about AS or other spondyloarthropathies in first-degree relatives.
- Extra-Axial Symptoms: Ask about peripheral arthritis, enthesitis (e.g., heel pain), acute anterior uveitis (eye pain, redness, photophobia), psoriasis, or inflammatory bowel disease symptoms.
- Systemic Symptoms: Fatigue, low-grade fever, weight loss.
- Response to NSAIDs: Improvement with NSAIDs is a characteristic feature.
- Spinal Mobility:
- Lumbar Flexion (Schober's Test): A measure of spinal flexion. A mark is made 10 cm above and 5 cm below the L5 spinous process. The patient flexes forward, and the distance between the marks is remeasured. An increase of less than 5 cm is indicative of reduced mobility.
- Lateral Spinal Flexion: Measure the distance from the fingertip to the floor during lateral bending.
- Cervical Rotation and Extension: Assess range of motion.
- Chest Expansion: Measure chest circumference at the 4th intercostal space during maximal inspiration and expiration. Reduced expansion (<2.5 cm or <1 inch) can indicate costovertebral joint involvement.
- Sacroiliac (SI) Joint Examination: Palpation and provocative maneuvers (e.g., direct pressure over SI joints, Gaenslen's test, FABER test - Flexion, Abduction, External Rotation) to elicit pain.
- Enthesitis Sites: Palpate common enthesis sites (e.g., Achilles tendon insertion, plantar fascia, iliac crest, tibial tuberosity) for tenderness.
- Peripheral Joint Examination: Assess for swelling, tenderness, and range of motion in peripheral joints.
- Posture: Observe for kyphosis (forward curvature) of the thoracic spine, loss of lumbar lordosis (flattening of the lower back), and protraction of the head and neck.
- Erythrocyte Sedimentation Rate (ESR) and C-Reactive Protein (CRP): Elevated levels of ESR and CRP are common in AS, reflecting systemic inflammation. However, these markers can be normal in up to 50% of patients, especially in early or milder disease. They are useful for monitoring disease activity and treatment response.
- While not diagnostic on its own, the presence of the HLA-B27 allele strongly supports a diagnosis of AS, especially in the context of typical clinical symptoms and imaging findings.
- It is particularly useful in distinguishing inflammatory back pain from mechanical back pain, and in early stages before definite radiographic changes are visible.
- A negative HLA-B27 does not rule out AS, as a small percentage of patients are negative.
- Complete Blood Count (CBC): May show mild anemia of chronic disease.
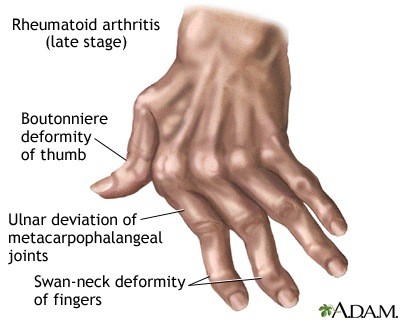
- Rheumatoid Factor (RF) and Anti-Cyclic Citrullinated Peptide (anti-CCP) antibodies: Typically negative, helping to differentiate AS from rheumatoid arthritis.
Imaging is critical for identifying the characteristic structural changes of AS.
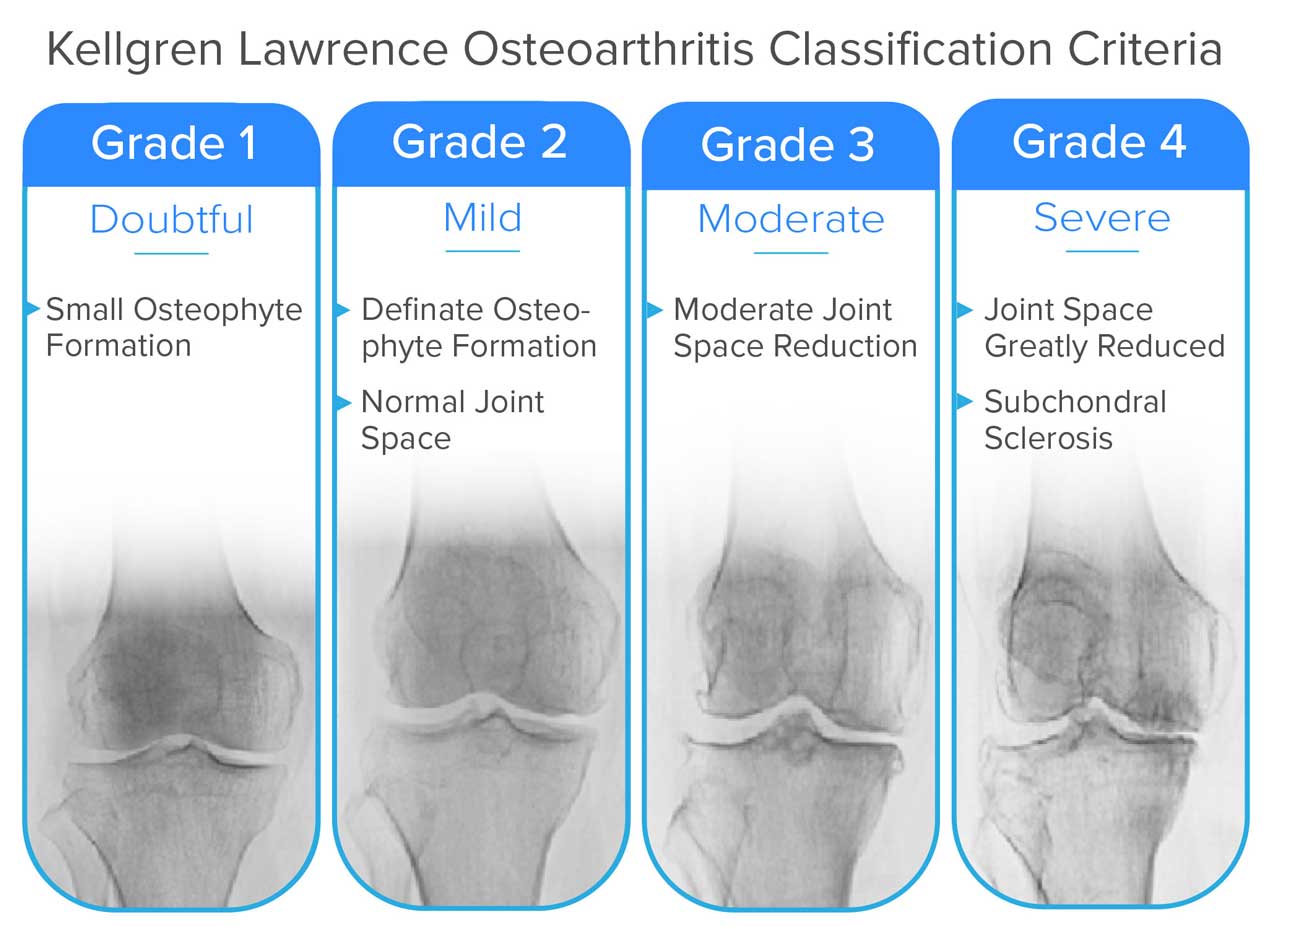
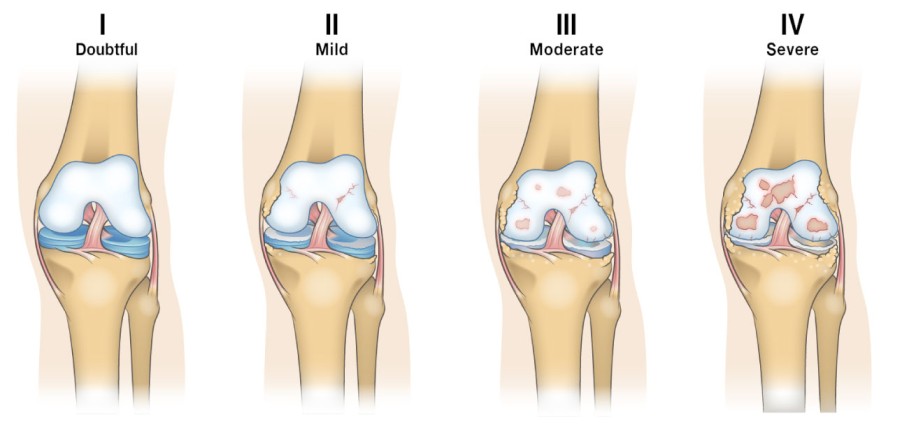
- Sacroiliac Joints: Standard anteroposterior (AP) view of the pelvis. Early changes include subchondral erosions, sclerosis, joint space widening, followed by narrowing and eventual fusion. Radiographic sacroiliitis is graded (0-4), and a definitive diagnosis often requires bilateral grade 2-4 or unilateral grade 3-4 sacroiliitis.
- Spine: Lateral views of the lumbar, thoracic, and cervical spine. Key findings include:
- Romanus lesions: Erosions at the vertebral corners ("shiny corners").
- Squaring of Vertebral Bodies: Loss of the normal concavity of the anterior vertebral body.
- Syndesmophytes: Bony bridges between vertebrae.
- Bamboo Spine: Complete fusion of the vertebral column due to extensive syndesmophyte formation (a late, advanced stage).
- Other Sites: X-rays of peripheral joints or enthesis sites (e.g., heels) may show erosions, new bone formation (e.g., heel spurs), or joint damage.
- Sacroiliac Joints and Spine: MRI is highly sensitive for detecting early inflammatory changes in AS, even before they are visible on X-rays.
- Active Sacroiliitis: MRI can show bone marrow edema (reflecting active inflammation/osteitis) in the SI joints and spine, which is a key criterion for diagnosing non-radiographic axial spondyloarthritis and for early AS.
- Structural Lesions: MRI can also visualize erosions, fat deposition, and ankylosis.
- Indications: Especially useful in patients with inflammatory back pain and suspected AS but normal conventional X-rays (to diagnose non-radiographic axial spondyloarthritis).
- While not routinely used for primary diagnosis due to radiation exposure, CT can provide more detailed images of bony changes in the SI joints and spine than X-rays, particularly useful for assessing subtle erosions or fusion.

The Assessment of SpondyloArthritis International Society (ASAS) classification criteria (2009) are widely used for diagnosing axial spondyloarthritis (including AS) and non-radiographic axial spondyloarthritis.
- For patients with >3 months of back pain and age of onset <45 years, ASAS criteria require either:
- Sacroiliitis on imaging + ≥1 SpA feature: (where "SpA feature" includes inflammatory back pain, arthritis, enthesitis, uveitis, dactylitis, psoriasis, Crohn's/colitis, good response to NSAIDs, family history of SpA, HLA-B27, elevated CRP).
- HLA-B27 + ≥2 other SpA features.
The management of Ankylosing Spondylitis (AS) aims to alleviate symptoms (pain, stiffness), improve physical function, prevent structural damage, and maintain quality of life.
There is no cure for AS yet and the goals of treatment for this disease is the relief of stiffness and pain.
- To reduce pain and stiffness.
- To maintain or improve spinal mobility and physical function.
- To prevent structural damage and progression of the disease.
- To control extra-articular manifestations.
- To improve quality of life and work participation.
- To educate the patient on self-management and adherence to treatment.
These are essential for all patients with AS and should be initiated early.
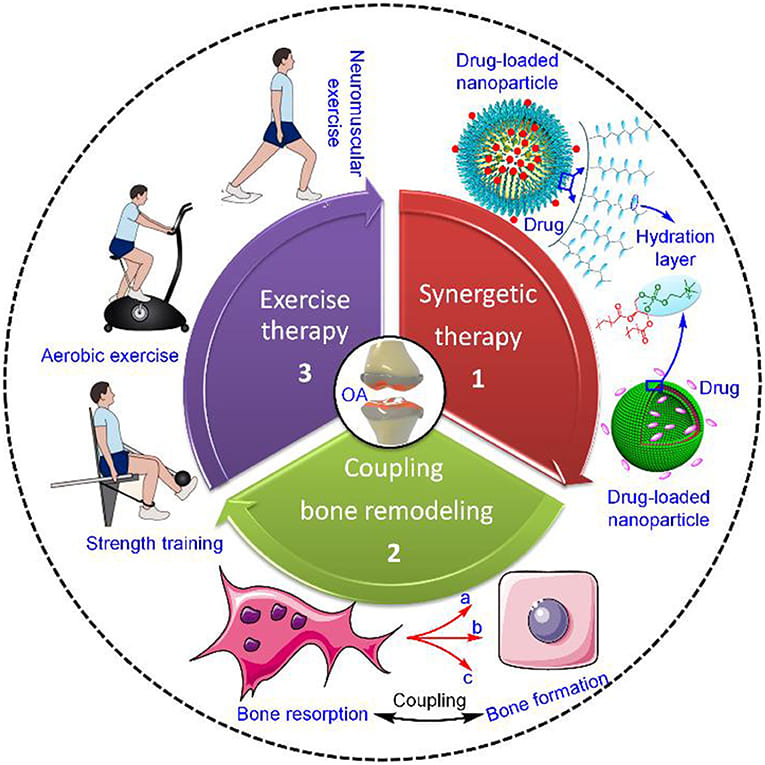
- Exercise and Physical Therapy:
- Regular Exercise: Crucial for maintaining spinal mobility, improving posture, strengthening core muscles, and reducing stiffness. Includes aerobic exercise, stretching, and strengthening.
- Specific Exercises: Focus on spinal extension, deep breathing exercises (to maintain chest wall mobility), and posture correction.
- Hydrotherapy: Exercises in water can be particularly beneficial as buoyancy reduces stress on joints.
- Physical Therapist Guidance: A specialized physical therapist can teach appropriate exercises and help design an individualized exercise program.
- Patient Education:
- Understanding the disease, its chronic nature, and the importance of continuous therapy and exercise.
- Information on pain management techniques, posture, and body mechanics.
- Lifestyle Modifications:
- Smoking Cessation: Smoking significantly worsens disease progression (radiographic damage) and reduces treatment efficacy. It is strongly advised.
- Weight Management: Maintaining a healthy weight reduces stress on joints and can improve overall well-being.
- Good Posture: Awareness and practice of good posture, even during sleep (e.g., sleeping on a firm mattress with a thin pillow).
- Ergonomics: Adapting work and home environments to reduce physical stress.
These are used to control inflammation, reduce pain, and slow disease progression.
- First-Line Treatment: Nonsteroidal Anti-inflammatory Drugs (NSAIDs):
- Mechanism: Reduce inflammation and pain by inhibiting prostaglandin synthesis.
- Role: Often the first-line treatment for axial and peripheral symptoms. Many patients experience significant relief.
- Usage: Can be used on-demand or continuously, depending on disease activity. Continuous use has been shown to potentially slow radiographic progression in some studies.
- Examples: Ibuprofen, naproxen, celecoxib.
- Side Effects: Gastrointestinal (ulcers, bleeding), cardiovascular (increased risk of events), renal effects.
- Second-Line Treatment for Peripheral Arthritis: Conventional Synthetic Disease-Modifying Anti-Rheumatic Drugs (csDMARDs):
- Mechanism: Immunosuppressive and anti-inflammatory effects.
- Role: Primarily effective for peripheral arthritis; generally not effective for axial disease or enthesitis in AS.
- Examples: Sulfasalazine (most commonly used for peripheral AS), methotrexate (less effective than sulfasalazine for SpA).
- Side Effects: Gastrointestinal upset, liver enzyme elevation, blood dyscrasias.
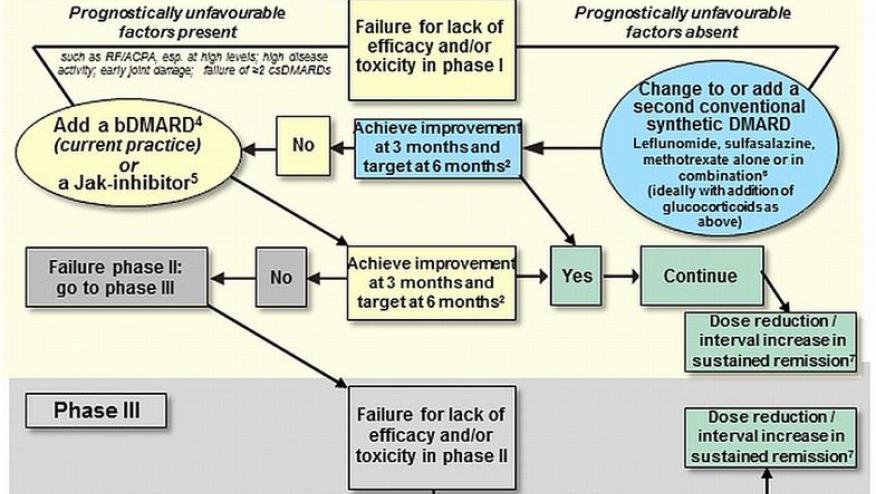
- Third-Line Treatment for Persistent Active Disease (especially axial and enthesitis): Biological Disease-Modifying Anti-Rheumatic Drugs (bDMARDs):
- Mechanism: Target specific inflammatory cytokines or pathways.
- Role: Indicated for patients with active AS (axial or peripheral) who have failed or are intolerant to at least two different NSAIDs. They are highly effective in reducing inflammation, pain, stiffness, and improving function. Some evidence suggests they may slow radiographic progression.
- Types:
- TNF-alpha Inhibitors (Anti-TNF agents): The most established and widely used bDMARDs for AS.
- Examples: Adalimumab, Etanercept, Infliximab, Golimumab, Certolizumab pegol.
- Side Effects: Increased risk of infections (especially tuberculosis, fungal infections), injection site reactions, infusion reactions, demyelinating disorders.
- IL-17 Inhibitors: A newer class of biologics targeting IL-17, a key cytokine in AS pathogenesis.
- Examples: Secukinumab, Ixekizumab.
- Role: Effective for axial and peripheral symptoms, as well as psoriasis.
- Side Effects: Increased risk of infections (especially candidiasis), inflammatory bowel disease exacerbation.
- TNF-alpha Inhibitors (Anti-TNF agents): The most established and widely used bDMARDs for AS.
- Targeted Synthetic Disease-Modifying Anti-Rheumatic Drugs (tsDMARDs):
- Mechanism: Small molecules that target specific intracellular signaling pathways, such as Janus Kinase (JAK) inhibitors.
- Role: Some JAK inhibitors are approved for AS (e.g., Tofacitinib, Upadacitinib) for patients who have failed bDMARDs or have contraindications.
- Side Effects: Increased risk of infections (herpes zoster), cardiovascular events, venous thromboembolism.
- Corticosteroids:
- Systemic Corticosteroids: Generally not recommended for routine management of axial AS due to their limited efficacy and significant side effects with long-term use. May be used short-term for severe flares of peripheral arthritis or acute anterior uveitis.
- Local Corticosteroid Injections: Can be effective for specific sites of peripheral arthritis or enthesitis (e.g., heel pain), and for acute anterior uveitis (topical eye drops).
- Pain Management (Adjunctive):
- Analgesics: Acetaminophen or weak opioids (e.g., tramadol) may be used for additional pain relief when NSAIDs are insufficient, but with caution due to potential for dependency and side effects.
- Muscle Relaxants: May be used short-term for severe muscle spasms.
Surgery is generally reserved for specific situations where medical and non-pharmacological therapies have failed or for severe complications.
- Hip Arthroplasty (Joint Replacement):
- Indicated for severe, painful hip arthritis with significant functional limitation, often due to irreversible joint damage.
- Spinal Osteotomy:
- A complex and high-risk procedure performed to correct severe, fixed spinal deformities (e.g., severe kyphosis) that significantly impair vision (patient cannot see straight ahead) or function. It aims to restore a more horizontal gaze and improve quality of life.
- Spinal Stabilization Surgery:
- May be required in cases of spinal fractures (often due to brittle, osteoporotic bone) or atlantoaxial subluxation (instability in the neck).
- Acute Anterior Uveitis: Requires urgent ophthalmological consultation and topical corticosteroid eye drops, sometimes with pupil dilating drops. Systemic therapy (e.g., anti-TNF agents) can reduce recurrence.
- Inflammatory Bowel Disease: Managed in conjunction with a gastroenterologist, often with specific bDMARDs that treat both IBD and AS.
- Psoriasis: Managed by a dermatologist; some bDMARDs (e.g., IL-17 inhibitors, some TNF inhibitors) treat both AS and psoriasis.
- Cardiac Complications: Managed by a cardiologist.
Nursing care for patients with Ankylosing Spondylitis (AS) is holistic and patient-centered, focusing on managing symptoms, promoting physical and psychological well-being, educating patients, and facilitating self-management.
A thorough and ongoing nursing assessment is fundamental:
- Pain Assessment:
- PQRSTU: Provokes, Quality, Radiates, Severity (0-10), Timing, Understanding.
- Assess location, intensity, characteristics (inflammatory vs. mechanical), aggravating/alleviating factors.
- Impact of pain on daily activities, sleep, and mood.
- Mobility and Function Assessment:
- Spinal mobility: Observe posture, gait, range of motion (Schober's test, chest expansion if applicable).
- Peripheral joint involvement: Assess for swelling, tenderness, reduced range of motion.
- Functional status: Ability to perform Activities of Daily Living (ADLs), use of assistive devices.
- Fatigue: Assess severity and impact on daily life.
- Psychosocial Assessment:
- Impact of chronic pain and disability on mental health (depression, anxiety), social interactions, work, and relationships.
- Coping mechanisms, support systems, body image issues.
- Medication Adherence and Side Effects:
- Review current medications, including NSAIDs, DMARDs, biologics.
- Assess for adherence, understanding of medication purpose, and any experienced side effects.
- Extra-Articular Manifestations:
- Eyes: Inquire about symptoms of uveitis (pain, redness, blurred vision, photophobia).
- GI: Ask about abdominal pain, diarrhea, blood in stool (IBD symptoms).
- Skin: Check for psoriatic lesions.
- Cardiovascular/Pulmonary: Assess for symptoms related to these systems (e.g., shortness of breath, palpitations).
- Knowledge Level: Assess the patient's understanding of AS, its management, and self-care strategies.
Based on the assessment, nurses implement:
- Administer medications: NSAIDs, analgesics, DMARDs, biologics as prescribed, monitoring for effectiveness and side effects.
- Non-pharmacological strategies:
- Heat/Cold therapy: Apply heat to stiff joints/muscles; cold packs to acutely inflamed areas.
- Relaxation techniques: Deep breathing, guided imagery, distraction.
- Encourage regular exercise and stretching: Reinforce physical therapy regimens.
- Adequate rest: Promote good sleep hygiene.
- Encourage regular exercise: Stress the importance of daily stretching and posture-improving exercises.
- Assist with mobility: Provide assistive devices (e.g., canes, walkers) if needed.
- Positioning: Advise on maintaining good posture during daily activities and sleep. Encourage sleeping on a firm mattress, often without a pillow or with a thin one, to prevent spinal flexion. Prone lying for short periods can help maintain spinal extension.
- Referral to PT/OT: Facilitate adherence to physical and occupational therapy programs.
- Disease Education: Explain AS in understandable terms, including its chronic nature, potential progression, and the importance of ongoing management.
- Medication Education: Teach about medication names, dosages, purpose, administration (e.g., biologic injections), potential side effects, and warning signs to report. Emphasize strict adherence.
- Exercise Instruction: Reinforce specific exercises and stretching routines. Provide written instructions or links to resources.
- Posture and Body Mechanics: Teach proper posture, lifting techniques, and ergonomic principles.
- Lifestyle modifications: Emphasize smoking cessation, weight management, and avoiding prolonged static positions.
- Flare Management: Teach patients to recognize signs of a flare-up and strategies for managing them.
- Eye Care: Educate on symptoms of uveitis and the need for immediate ophthalmological evaluation if symptoms occur.
- Active Listening: Provide an opportunity for patients to express fears, frustrations, and concerns.
- Coping Strategies: Help patients identify and utilize effective coping mechanisms.
- Referrals: Connect patients with support groups, counseling services, or social workers as appropriate.
- Encourage independence: Foster a sense of control and self-efficacy.
- Regular follow-up: Schedule and facilitate regular appointments with the rheumatologist and other specialists.
- Monitor for side effects: Of medications (e.g., infection signs with biologics, GI issues with NSAIDs).
- Recognize signs of complications:
- Spinal fractures: Educate on warning signs (sudden severe back pain after minor trauma).
- Severe kyphosis: Monitor posture changes.
- Cauda Equina Syndrome: Educate on symptoms (leg weakness, numbness, bowel/bladder dysfunction) and need for urgent medical attention.
- Uveitis recurrence: Reiterate symptom recognition.
- Vaccinations: Ensure patients receiving biologics or csDMARDs are up-to-date on recommended vaccinations (e.g., flu, pneumonia, herpes zoster, COVID-19) as per guidelines.
- For patients undergoing hip replacement or spinal surgery, provide standard pre-operative education, post-operative pain management, wound care, mobility assistance, and rehabilitation support.
Nurses collaborate closely with the multidisciplinary team, including:
- Rheumatologists: For medical management, disease monitoring.
- Physical and Occupational Therapists: For exercise programs, mobility aids, ergonomic advice.
- Ophthalmologists: For uveitis management.
- Gastroenterologists: For IBD management.
- Pain Management Specialists: For complex chronic pain.
- Social Workers/Psychologists: For psychosocial support and resources.
Related to vertebral and joint inflammation secondary to ankylosing spondylitis, as evidenced by pain score of 10 out of 10, guarding sign on the affected area (commonly lower back, hip, shoulders), joint swelling, hunched-forward posture, restlessness, and irritability.
Related to vertebral and joint inflammation and pain secondary to ankylosing spondylitis, as evidenced by pain score of 8 to 10 out of 10, fatigue, disinterest in ADLs due to pain, verbalization of tiredness and generalized weakness.
Related to vertebral and joint inflammation as evidenced by severe pain rated 10/10, failure to perform ADLs, and verbalization of fatigue.
The prognosis of Ankylosing Spondylitis (AS) is highly variable, ranging from mild disease with minimal impact to severe, progressive disease leading to significant disability.
- Age of Onset: Earlier age of onset (particularly in childhood or adolescence) is often associated with more severe disease and a higher risk of hip involvement.
- Gender: Historically, men were thought to have more severe spinal disease, but recent data suggest similar rates of progression for men and women, though women may experience more peripheral involvement.
- HLA-B27 Status: HLA-B27 positivity is associated with a higher likelihood of axial involvement and disease severity.
- Baseline Radiographic Damage: Patients with more severe radiographic damage at diagnosis tend to have worse outcomes.
- Disease Activity: Persistently high disease activity, as measured by inflammatory markers (ESR, CRP) and clinical indices, is associated with a poorer prognosis and faster radiographic progression.
- Presence of Extra-Articular Manifestations: Early or severe uveitis, IBD, or psoriasis can indicate a more active and potentially aggressive disease course.
- Response to Treatment: Good response to NSAIDs and particularly to bDMARDs is associated with better long-term outcomes.
- Smoking Status: Smoking is a significant negative prognostic factor, accelerating radiographic progression and potentially reducing treatment efficacy.
- Hip Involvement: Early hip involvement is a strong predictor of a more severe disease course and increased risk of needing hip replacement surgery.
Primarily due to chronic inflammation and new bone formation.
- Progressive Spinal Stiffness and Deformity:
- Loss of Lumbar Lordosis: Flattening of the natural curve of the lower back.
- Thoracic Kyphosis: Exaggerated forward curvature of the upper back (hunchback appearance), commonly referred to as a "stooped" posture.
- Cervical Involvement: Can lead to a fixed neck flexion, making it difficult to look straight ahead ("chin-on-chest" deformity).
- These deformities can significantly impair daily activities, vision, and balance.
- Spinal Fractures: The stiff, fused spine becomes brittle and osteoporotic, making it highly susceptible to fractures, even from minor trauma. These fractures can be unstable and lead to neurological damage (e.g., spinal cord injury).
- Atlantoaxial Subluxation: Instability between the first two cervical vertebrae (atlas and axis), which can lead to cervical cord compression, though it is rare.
- Cauda Equina Syndrome: A rare but severe complication where chronic arachnoiditis (inflammation of the membranes surrounding the spinal cord) causes compression of the nerve roots in the lower spinal canal, leading to bowel/bladder dysfunction, leg weakness, and sensory deficits.
- Peripheral Joint Damage: Particularly in the hips and shoulders, leading to pain, functional limitation, and sometimes requiring joint replacement.
- Severe Enthesitis: Chronic inflammation at enthesial sites, leading to pain and potential functional impairment.
- Acute Anterior Uveitis (AAU): Recurrent attacks can lead to complications such as glaucoma, cataracts, and permanent vision loss if not promptly and adequately treated.
- Cardiovascular Disease:
- Aortic Insufficiency: Inflammation of the aortic valve and root, leading to leakage of the aortic valve.
- Conduction Abnormalities: Inflammation of the heart's conduction system, causing arrhythmias (e.g., atrioventricular block) that may require a pacemaker.
- Increased Risk of Atherosclerosis: Chronic systemic inflammation contributes to an increased risk of cardiovascular events (heart attack, stroke), similar to other chronic inflammatory diseases.
- Pulmonary Complications:
- Restrictive Lung Disease: Due to reduced chest wall expansion caused by rib cage stiffening, leading to reduced lung capacity.
- Apical Lung Fibrosis: Scarring in the upper lobes of the lungs, typically late in the disease, which can lead to impaired breathing and sometimes cavitation or fungal infections.
- Renal Amyloidosis: A rare but serious complication where abnormal proteins (amyloid) deposit in the kidneys, leading to kidney failure. More common in long-standing, uncontrolled inflammatory disease.
- Osteoporosis: Despite new bone formation in the spine, generalized osteoporosis (thinning of the bones) is common in AS, increasing the risk of fragility fractures. This is due to chronic inflammation, reduced mobility, and sometimes corticosteroid use.
- Inflammatory Bowel Disease (IBD): Patients with AS have an increased risk of developing clinically overt Crohn's disease or ulcerative colitis.
- Psoriasis: Increased prevalence of psoriasis.
Historically, AS was associated with a small but significant increase in mortality, primarily due to cardiovascular complications, respiratory failure, renal amyloidosis, and complications from spinal fractures. However, with improved diagnostic methods and effective therapies (especially bDMARDs), the mortality gap between AS patients and the general population has narrowed considerably. Early diagnosis and proactive management are key to improving long-term outcomes and reducing complications.
Ankylosing Spondylitis Read More »


:max_bytes(150000):strip_icc()/2548611-article-wrist-tendonitis-5a71f4a0d8fdd5003613b12c.png)