

Symptoms Control

Pain Management
The World Health Organization (WHO) states that freedom from cancer pain and pain caused by other diseases like HIV/AIDS should be a basic human right. No person should suffer unnecessarily from pain that can be treated.
In Uganda, where cancer and HIV/AIDS are major causes of illness and death, pain management is one of the most important services nurses can provide. Yet pain remains one of the most undertreated symptoms in our health facilities.
Pain cannot be managed properly without first being assessed. Assessment tells us:
- Where the pain is
- What type of pain it is
- How severe it is
- What is causing it
- What the patient has already tried
Without assessment, treatment is only guessing — and guessing causes suffering.
Pain Assessment CLICK HERE if you haven't read it yet
The WHO has established five fundamental principles that guide all pain management in palliative care. Every nurse must know these by heart.
Pain pathways in the central nervous system (CNS) undergo "wind-up" or central sensitization. If pain is left untreated or allowed to fluctuate wildly, the spinal cord receptors (NMDA receptors) become hyper-reactive. This means it takes exponentially MORE medication to treat pain once it has "broken through" than it takes to prevent it in the first place.
Always give treatment orally when possible.
- The oral route is the safest, most convenient, and most acceptable route for patients.
- Oral medicines can be taken at home without a nurse present.
- Oral morphine is cost-effective compared to injections or tablets.
- Patients prefer oral medicines because they avoid the pain and fear of injections.
- If the patient is vomiting severely.
- If the patient is unconscious and cannot swallow.
- If the patient has a bowel obstruction.
- In these cases, use rectal, subcutaneous, buccal (inside the cheek), or intravenous routes.
Nursing tip: Even unconscious patients can absorb small amounts of oral morphine through the mucosa of the mouth (buccal) or rectum. (Physiology: Buccal and rectal routes bypass the hepatic first-pass metabolism, allowing the drug to enter the systemic circulation directly via the capillary beds).
Persistent pain requires regular, round-the-clock dosing.
- Give analgesics at fixed, regular intervals — not just when the patient asks.
- Give the next dose before the previous one has worn off.
- For oral morphine, this means every 4 hours (6 doses per day).
- Do not wait for the patient to complain of pain. By the time they complain, the pain has already returned and is harder to control.
- Pain that is allowed to return causes fear, anxiety, and suffering.
- It takes more medicine to relieve pain that has "broken through" than to prevent it.
- Regular dosing keeps a steady level of medicine in the blood. (Maintaining therapeutic plasma concentration).
Nursing tip: Write a clear schedule for the patient and family. For example: "Take morphine at 6am, 10am, 2pm, 6pm, 10pm, and 2am."
Use the WHO analgesic ladder as a guide to management. You can move stepwise up or down the ladder.
The WHO analgesic ladder is a step-by-step system for choosing pain medicines based on pain severity.
- Start at the step that matches the patient's pain level.
- If pain is not controlled, move up to the next step.
- If pain improves, you can move down to a lower step.
- Step 1 drugs can be used with Step 2 and Step 3 drugs.
- BUT: Weak opioids (Step 2) must NEVER be given with strong opioids (Step 3) because they work on the same receptors and do not add benefit. (Physiological reason: They compete for the exact same Mu-opioid receptors. Giving Codeine with Morphine just wastes the Codeine and can even antagonize/block the stronger Morphine's effect!).
Dosage is determined on an individual basis. No two patients are the same.
- The "right dose" is the dose that relieves the patient's pain without causing intolerable side effects.
- There is no standard dose of morphine that fits everyone.
- Factors that affect the dose include:
- Age (elderly need lower starting doses).
- Weight (very thin/cachexic patients need lower doses).
- Kidney function (impaired kidneys cause morphine to build up).
- Previous use of opioids (patients already on codeine may need higher starting doses of morphine).
- Severity and type of pain.
- Psychological and social factors.
Pay attention to the details of care, including side effects and adjuvant medicines.
- Regular laxatives are needed in ALL patients who receive opiates — except those with persistent diarrhea.
- Antiemetics are usually required with initial morphine use, especially in African patients who seem more prone to nausea.
- Not all pain responds to opiates and the ladder.
- Bone pain → NSAIDs +/− opiates
- Nerve compression → steroids
- Increased intracranial pressure (ICP) → steroids
- Inflammation → steroids
- Muscle pain/spasm → muscle relaxants
- Neuropathic pain → tricyclic antidepressants (amitriptyline) and anticonvulsants
| Principle | What It Means | Nursing Action |
|---|---|---|
| Avoid unnecessary delay | Do not make a patient in severe pain wait for hours. | Give pain relief immediately. Do not delay for "doctor's rounds." |
| Give adequate dosages | Do not under-dose out of fear. | Follow the WHO ladder. Titrate up if pain persists. |
| Schedule according to pharmacology | Know how long each medicine lasts. | Morphine lasts 4 hours. Paracetamol lasts 4-6 hours. Plan doses accordingly. |
| Titrate the dose for each patient | Increase gradually until pain is controlled. | Increase morphine by 30-50% every 24-48 hours if needed. |
| Give written instructions | Patients and families need clear guidance. | Write the schedule in simple language or local language. |
| Prescribe a breakthrough dose | Extra medicine for sudden flares of pain. | Give 1/6 to 1/10 of the total daily morphine dose every 1 hour as needed. |
| Prevent and treat side effects | Side effects can stop patients from taking medicine. | Give laxatives with every opioid. Give antiemetics if nausea occurs. |
| Treat other symptoms aggressively | Constipation and muscle spasms make pain worse. | Treat constipation before it becomes severe. Treat spasms with muscle relaxants. |
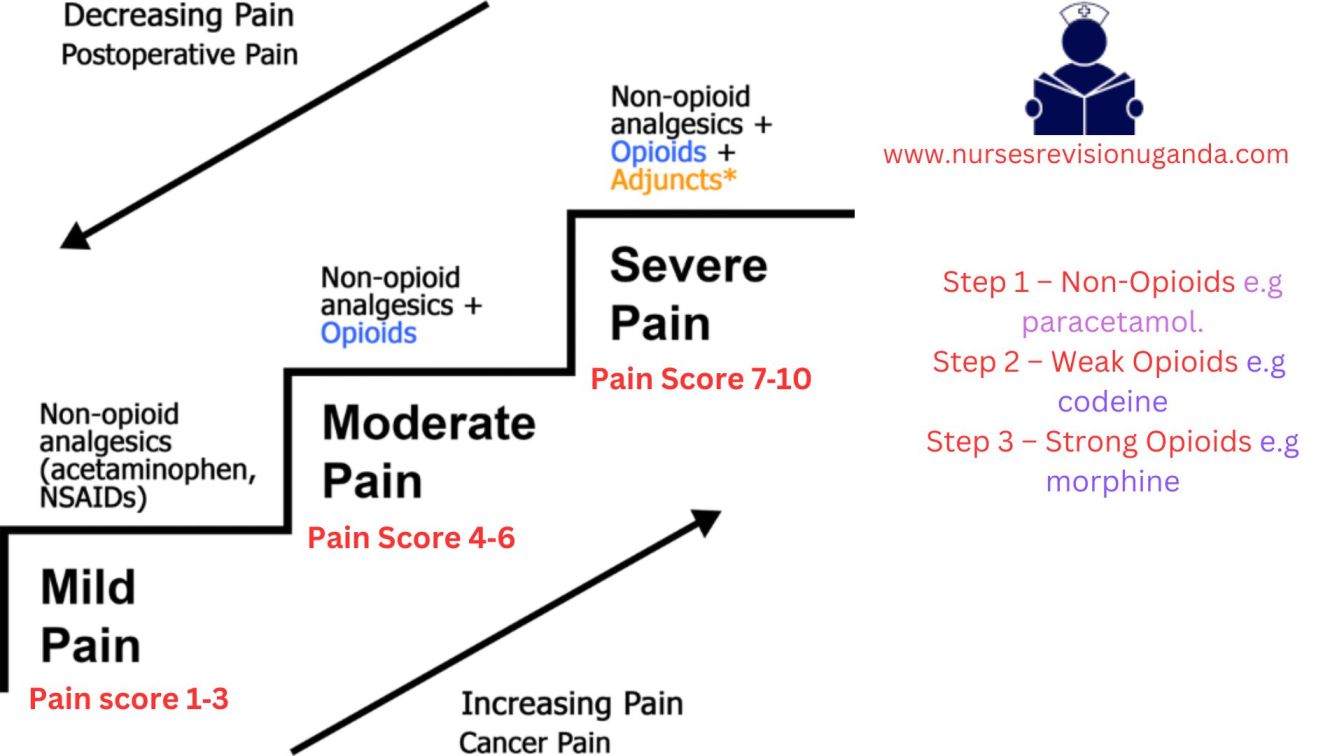
The WHO analgesic ladder was created as a method for effectively managing pain in cancer patients. It has proven successful in providing pain relief to approximately 90% of cancer patients when used correctly.
The ladder has three steps. You move up the ladder as pain severity increases.
Used for pain scores of 1-3 out of 10 (or 1-2 out of 5).
| Paracetamol (Acetaminophen) | |
|---|---|
| Adult dose | 500mg–1g orally every 6 hours |
| Maximum daily dose | 4g (4000mg) per day |
| How it works | Acts centrally in the brain to reduce pain and fever. |
| Notes |
|
| Ibuprofen (NSAID — Non-Steroidal Anti-Inflammatory Drug) | |
|---|---|
| Adult dose | 400mg orally every 6–8 hours |
| Maximum daily dose | 1.2g (1200mg) per day |
| How it works | Acts peripherally to reduce inflammation, pain, and fever. Blocks prostaglandins. (Physiology: Inhibits the Cyclooxygenase (COX) enzymes, stopping the conversion of arachidonic acid to inflammatory prostaglandins). |
| Notes |
|
| Diclofenac (NSAID) | |
|---|---|
| Adult dose | 50mg orally every 8 hours |
| Maximum daily dose | 150mg per day |
| Notes |
|
Paracetamol and NSAIDs can be given together because they work in different ways (paracetamol centrally in the brain, NSAIDs peripherally at the site of injury). This combination often provides far better relief than either drug alone without requiring an opioid.
Used for pain scores of 4-6 out of 10 (or 3-4 out of 5). Used when Step 1 drugs do not control the pain.
| Codeine | |
|---|---|
| Adult dose | 30–60mg orally every 4 hours |
| Maximum daily dose | 240mg per day (this is the "ceiling dose") |
| How it works | A weak opioid that blocks pain signals in the brain and spinal cord. (It is a prodrug; the liver enzyme CYP2D6 converts about 10% of codeine into active morphine). |
| Notes |
|
| Tramadol | |
|---|---|
| Adult dose | 50–100mg orally every 4–6 hours |
| Maximum daily dose | 400mg per day |
| How it works | Weak opioid with additional effects on serotonin and norepinephrine (also helps mood). |
| Notes |
|
Used for pain scores of 7-10 out of 10 (or 5 out of 5). Used when Step 1 and Step 2 drugs do not control the pain.
Morphine is the "gold standard" against which all other opioid analgesics are measured. When used correctly:
- Patients do not become addicted.
- Tolerance is uncommon in the way people fear.
- Respiratory depression does not usually occur when started carefully and titrated properly.
Key principle: The correct morphine dose is the one that gives pain relief. There is no ceiling or maximum dose — the right dose is the one that controls the patient's pain without intolerable side effects. However, you must increase the dose gradually.
| Patient Type | Starting Dose | Frequency | Notes |
|---|---|---|---|
| Standard adult | 5–10mg | Every 4 hours | For patients new to strong opioids |
| Patient changing from Step 2 (e.g., codeine 30mg q4h) | 10mg | Every 4 hours | Already has some opioid tolerance |
| Cachexic patient (very thin/weak) or no prior opioids | 5mg | Every 4 hours | Start low to avoid side effects |
| Frail/elderly patient | 2.5mg | Every 6–8 hours | Due to likelihood of impaired renal function reducing excretion. |
In Uganda, the most common dose is 30mg per 24 hours (e.g., 5mg every 4 hours).
Oral morphine solution comes in different strengths (identified by cap color):
| Strength | Color | Concentration | Typical Use |
|---|---|---|---|
| Weak | Green | 5mg per 5ml | Starting dose for most patients |
| Strong | Red | 50mg per 5ml | Patients on higher doses |
| Very strong | Blue | 100mg per 5ml | Patients on very high doses |
Nursing tip: Always double-check the concentration before giving morphine. Giving 5ml of the red bottle (50mg) instead of the green bottle (5mg) is a 10-fold overdose!
Black Box Warning:
- When morphine is administered as an epidural drug, patients must be closely monitored in a fully equipped and staffed environment for at least 24 hours due to the risk of adverse effects.
- Extended-release tablets of morphine have a potential for abuse similar to other opioid analgesics.
- Morphine is classified as a Schedule II controlled substance and should be used strictly according to dispensing instructions. Tablets or capsules should be taken whole and should not be broken, chewed, dissolved, or crushed.
- Alcohol consumption should be avoided when taking morphine products.
- Failure to adhere to these warnings could result in fatal respiratory depression.
"Titrating" means adjusting the dose until pain is controlled.
How to titrate:- Start with the initial dose (e.g., 5mg every 4 hours).
- Assess pain regularly.
- If pain is still severe after 24-48 hours: Add the total daily dose + total breakthrough doses given in 24 hours. Divide by 6 to get the new 4-hourly dose.
- OR: Increase by 30–50% increments (e.g., 5mg → 7.5mg → 10mg → 15mg). Increments of less than 30% are ineffective. Do not increase by tiny amounts.
- Patient takes 5mg every 4 hours = 30mg per day.
- Needs 3 breakthrough doses of 5mg each = 15mg extra.
- Total in 24 hours = 45mg.
- New regular dose = 45mg ÷ 6 = 7.5mg every 4 hours.
Even patients on regular morphine may have breakthrough pain — sudden flares of pain that "break through" the regular control.
Management:- Give an additional dose of oral morphine.
- The breakthrough dose is usually 1/6 to 1/10 of the total daily dose.
- If using 30mg per day, breakthrough dose = 5mg.
- If breakthrough doses are needed more than 2-3 times per day, the regular 4-hourly dose needs to be increased.
Once pain is stable on regular immediate-release morphine for 2-3 days:
- Calculate the total daily dose of immediate-release morphine.
- Divide by 2 to get the twice-daily (every 12 hours) slow-release dose.
- Continue to give immediate-release morphine for breakthrough pain.
- Patient takes 10mg every 4 hours = 60mg per day.
- Slow-release morphine = 30mg every 12 hours.
- Continue immediate-release 10mg every 1 hour as needed for breakthrough.
| Route | When to Use | Conversion Ratio |
|---|---|---|
| Rectal | Patient cannot swallow but rectum is functional | Same as oral dose (1:1) |
| Subcutaneous (SC) | Patient cannot swallow, needs continuous infusion | PO:SC = 2:1 (e.g., 10mg oral = 5mg SC) |
| Intravenous (IV) | Rapid relief needed, patient in hospital | PO:IV = 2–3:1 (e.g., 30mg oral = 10mg IV) |
| Buccal (inside cheek) | Small amounts for unconscious patients | Absorbed directly through mouth mucosa |
Pethidine is sometimes used for severe pain, but it is NOT recommended in palliative care because:
| Problem | Explanation |
|---|---|
| Short duration of action | Only lasts 3 hours — too short for chronic pain control. |
| Toxic metabolite | Metabolite norpethidine accumulates and causes CNS excitation and convulsions (seizures), especially in renal impairment. |
| Needs injection | Must be given by IM injection, meaning the patient must be near medical help and endure more pain from the needle. |
| Addiction risk | Higher risk of euphoria and addiction compared to morphine. |
Use pethidine ONLY for: Short-term control of severe pain after an operation — not for long-term palliative care.
Case: A 70-year-old palliative cancer patient is currently on Step 2 of the WHO ladder (Codeine 60mg every 4 hours), but reports his pain is still an 8/10. The doctor suggests adding a low dose of Morphine (5mg) on top of the Codeine. As the nurse, what is your intervention?
Answer: You must intervene and stop this order. Principle 3 (By the Ladder) states that Weak Opioids (Codeine) must NEVER be combined with Strong Opioids (Morphine). They compete for the exact same Mu receptors, so there is no added benefit. The correct action is to stop the Codeine entirely and transition the patient completely onto Step 3 (Morphine).
Understanding how morphine works helps nurses explain it to patients, monitor for side effects, and advocate for proper use.
Morphine exerts its action by:
- Binding to opioid receptors in the brain and spinal cord (specifically mu and kappa receptors), resulting in profound pain relief (analgesia).
(Physiology Expansion: Opioid receptors are G-protein coupled. When morphine binds, it opens Potassium (K+) channels to hyperpolarize the cell, and closes Calcium (Ca2+) channels on the presynaptic nerve. This strictly halts the release of pain neurotransmitters like Substance P and Glutamate!) - Acting on the spinal cord to modify the transmission of pain signals from the periphery to the brain.
- Activating inhibitory pathways from the brain stem and basal ganglia — these are the body's natural "pain control systems." (Specifically, the descending inhibitory pathways from the Periaqueductal Gray - PAG).
- Acting on the limbic system and higher brain centers to modify the emotional response to pain. This is why morphine not only reduces the sensation of pain but also reduces the fear and distress associated with it.
- Affecting the gastrointestinal and respiratory systems partly through the autonomic nervous system and partly through direct interaction with opioid receptors in peripheral tissues.
| Feature | Detail & Physiological Context |
|---|---|
| Plasma half-life | 2–3 hours (unaffected by constant usage) |
| Effective duration of action | Approximately 4 hours (This is the exact pharmacological reason why we dose oral immediate-release morphine every 4 hours!) |
| Metabolism | Mainly in the liver via glucuronidation. |
| Metabolites (CRITICAL) |
|
| Excretion | Glucuronide metabolites are excreted in the urine. |
| Renal impairment | Including normal age-related decline, can lead to accumulation of M3G and M6G, causing adverse effects: cognitive impairment, nausea, vomiting, myoclonus (muscle jerking). |
| Liver disease | Not reported to alter morphine pharmacokinetics significantly, but care must be taken with severe hepatic dysfunction. |
Morphine is indicated for:
| Use | Explanation & Pathophysiology |
|---|---|
| Moderate to severe pain | The primary indication in palliative care. |
| Acute myocardial infarction (heart attack) | Alleviates chest pain and reduces anxiety. (It also causes venodilation, reducing preload on the damaged heart, which decreases cardiac workload). |
| Severe acute and chronic pain | When non-narcotic analgesics have proven ineffective. |
| Pre-anesthetic medication | To calm the patient before surgery. |
| Shortness of breath (dyspnea) | From heart failure and pulmonary edema. (Morphine decreases the brainstem's sensitivity to CO2 build-up, reducing the terrifying sensation of air hunger). |
| Diarrhea | Morphine slows gut movement by binding to Mu receptors in the GI tract. |
| Cough | Morphine heavily suppresses the cough reflex in the medullary cough center. |
| Side Effect | Explanation | Nursing Management |
|---|---|---|
| Constipation | Morphine slows down the gut. This happens to EVERY patient on opioids. Tolerance to constipation NEVER develops. | Always give a laxative alongside morphine (unless the patient has diarrhea). Example: Bisacodyl 5mg at night, increase to 15mg if needed. |
| Nausea and vomiting | Morphine stimulates the Chemoreceptor Trigger Zone (CTZ) in the brain. Common in the first few days. | Give anti-emetics: Metoclopramide (Plasil) 10mg every 8 hours OR Haloperidol 0.5–1.5mg once a day. |
| Drowsiness | Common in the first few days as the body adjusts. | Reassure the patient. If it persists beyond 3 days, reduce the morphine dose slightly. |
| Itching (Pruritus) | Not very common, but can occur. (Due to morphine directly causing mast cells to release histamine—this is a side effect, NOT a true allergic reaction). | Reduce the dose of morphine if needed. Give antihistamines. |
- Acute or severe asthma: Morphine can worsen respiratory symptoms (depresses respiratory drive and releases histamine causing bronchoconstriction).
- Gallbladder disease: May intensify or mask pain from biliary tract spasms. (Morphine specifically causes spasms of the Sphincter of Oddi).
- GI obstruction: Morphine slows gut movement and can worsen a mechanical obstruction.
- Severe hepatic / renal impairment: Metabolism altered or toxic metabolites accumulate.
- Elderly, debilitated, or cachectic patients: Start with reduced doses (e.g., 2.5mg) due to decreased organ function and body mass.
- Adverse Effects: Dysphoria (restlessness/depression), Hallucinations, Dizziness, Overdose (severe respiratory depression or cardiac arrest).
- Interactions:
- CNS Depressants (alcohol, sedatives) potentiate respiratory depression.
- MAO Inhibitors (antidepressants) increase risk of Serotonin Syndrome (agitation, hallucinations, rapid heartbeat, high temp).
- Tricyclic Antidepressants enhance analgesia but increase sedation.
- Epidural morphine: Monitor closely for 24 hrs due to delayed respiratory depression.
- Extended-release tablets: Do not break, chew, dissolve, or crush! Breaking them destroys the slow-release matrix, causing a massive, fatal dose dumping.
- Avoid alcohol: Synergistic respiratory depression.
| Date: | 25/3/2014 |
| Patient: | Baluku John |
| IP No: | 123/14 |
| Age / Sex: | 68 years / Male |
| Diagnosis: | Cancer of the penis (Ca penis) |
| Medication: | Liquid morphine 5mg in 5ml (Green cap) |
| Instructions: | Take 5ml every 4 hours AND 10ml at night (Double dose at night helps patient sleep through without waking up for a dose) |
| Supply: | 250ml |
Morphine overdose is rare when used correctly, but nurses must know how to respond.
- Naloxone: A pure opioid receptor antagonist. It rips morphine off both mu and kappa receptors to reverse effects. Given IV. Restores normal breathing and consciousness.
- Administration Alert: Administer if respiratory rate is fewer than 10 breaths per minute.
- Adverse effects: Sudden rapid loss of analgesia (severe pain returns instantly!), increased BP, tremors, hyperventilation.
- Clinical Caution: The half-life of Naloxone is very short (30-60 mins). The half-life of Morphine is longer. The patient can slip back into an overdose state once the Naloxone wears off. Continuous monitoring and multiple doses are often needed!
- Activated charcoal / Laxatives: Used if oral overdose just occurred, to bind morphine in gut and promote elimination.
These three concepts are often confused. Nurses must understand the difference to educate patients and families.
- Opioid Dependence: Means the patient cannot function without the drug.
- Psychological dependence (addiction): Cravings and compulsive drug-seeking behavior. Very rare in patients using morphine for real pain.
- Physiological dependence: The body physically adapts. If the drug is stopped abruptly, the patient gets withdrawal symptoms (sweating, tremors, diarrhea). Prevented by tapering gradually over 2-3 days.
- Therapeutic dependence: The underlying cause of pain is not resolved, so the patient needs ongoing morphine. This is normal and appropriate.
- Tolerance: The body gets used to the drug, and higher doses may be needed over time to achieve the same effect.
- Myth: "If we increase the dose, the patient is becoming addicted."
- Truth: Needing more morphine usually means the disease is progressing (the tumor is growing/pain is getting worse), not addiction.
- Addiction: Very rare in medical settings when used for real pain. Driven by psychological craving for a "high," not pain relief.
- Cognitive Impairment: Some sedation/memory deficit may occur for the first 3-5 days. This is NOT addiction; it is simply the brain adjusting. It usually resolves completely.
Many patients, families, and even health workers in Uganda fear morphine. These fears prevent patients from getting the relief they need. You must address each myth with facts.
| Myth / Fear | The Clinical Truth |
|---|---|
| "Morphine is only offered when death is imminent. / Reserved until the end." | The degree of pain, not the stage of illness, determines the need. Early use does not diminish later effectiveness. There is no upper dose limit! |
| "Morphine hastens death / kills patients." | Morphine relieves suffering, it does NOT speed up death. Properly prescribed, it allows patients to function and live with dignity. |
| "Pain medications always cause heavy sedation." | Initial sedation occurs due to chronic sleep deprivation. Once rested and pain-free, patients regain normal alertness. |
| "Injectable morphine is more effective than oral." | Oral morphine is well absorbed and is the preferred route (By the Mouth). Injections are only for when oral is impossible. |
| "Patients cannot experience pain while sleeping / laughing." | Pain can wake patients from sleep. Distraction (laughing/TV) reduces pain perception temporarily, but the physical pain is still there. |
| "Vital signs are reliable indicators of pain." | Vital signs can be completely NORMAL in chronic pain because the autonomic nervous system adapts. Always trust the patient's self-report! |
Adjuvants are drugs primarily used for other purposes but are highly effective in relieving pain under certain circumstances, especially for opiate semi-responsive and opiate-resistant pain.
- Use: Neuropathic pain (burning, electric, shooting nerve pain).
- Mechanism: Increases serotonin and norepinephrine in the spinal cord, which strengthens the descending inhibitory pain pathways.
- Dose: Start 12.5mg at night. It takes up to a week to see response. (Given at night because a side effect is drowsiness).
- Side effects: Anticholinergic effects (dry mouth, urinary retention, postural hypotension).
- Use: Neuropathic pain (stabbing/shooting nature).
- Mechanism: Blocks voltage-gated sodium/calcium channels, stopping the hyper-excitable "misfiring" of damaged nerves.
- Side effects: Sedation, ataxia (unsteady walking), dizziness.
- Use: Raised Intracranial Pressure (headache), Nerve compression, Metastatic bone pain, Organ capsule distension (liver tumor stretching capsule).
- Mechanism: Massively reduces peritumoral edema (swelling around the tumor).
- Side effects: Gastric irritation, oral thrush (candidiasis), fluid retention, steroid-induced diabetes. (Caution in HIV/AIDS patients - may need prophylactic fluconazole).
- Use: Spasmodic pain (biliary colic, bowel obstruction, ureteric colic).
- Use: Intractable metastatic bone pain. (Mechanism: Inhibits osteoclasts, stopping the tumor from destroying the bone).
- Antibiotics: For fungating, infected wounds.
- Frangipani petals: Traditional remedy for post-herpetic neuralgia (shingles pain).
- Capsaicin cream: Depletes Substance P in nerve endings for neuropathic pain.
Pain is influenced by psychological, cultural, social, and spiritual factors. These methods work alongside medicines — they do not replace them.
Why does massage or rubbing an injury make it feel better? According to Melzack & Wall's Gate Control Theory, non-painful tactile stimulation (rubbing/massage) activates large, fast A-beta nerve fibers. These fast fibers rush to the spinal cord and physically "close the gate" on the slower C-fibers that are trying to carry the pain signals up to the brain!
- Physical: Massage, heat/cold, physiotherapy, surgery, radiotherapy. (Shrinks tumors, reduces muscle tension).
- Psychological: Counseling, relaxation, imagery, distraction (music, TV). (Reduces anxiety which amplifies pain).
- Social: Financial/legal support, family counseling. (Resolves worries that make pain feel worse).
- Spiritual: Prayer, life review. (Addresses fear of death and loss of meaning).
- Not all methods suit every patient (e.g., do not massage a bone with metastases; do not use heat on an open wound).
- Do not tell a patient in severe pain to "just pray". Give morphine AND provide spiritual support.
- In resource-limited settings like Uganda, these methods are especially valuable when medicines are scarce.
- Buccal Absorption: Oral morphine can be absorbed through the buccal mucosa or rectum—useful for unconscious patients.
- Treat Pain First: A patient in severe pain cannot discuss psychosocial concerns or make end-of-life decisions. Control the physical pain first!
- Psychosocial Aggravation: No amount of analgesia will relieve pain if the root cause is untreated fear, guilt, or family conflict (Total Pain concept).
- Short-Term Use is Safe: Opiates can be used short-term for sickle cell crisis, burns, or cryptococcal meningitis without causing addiction.
- Constipation Prevention: Assess for side effects at every interaction. Constipation is the most common side effect and MUST be prevented proactively.
Case: A 45-year-old female with advanced cervical cancer presents with severe, burning, shooting pain radiating down her right leg. She is currently taking Morphine 10mg every 4 hours, but complains the pain is keeping her awake at night. What adjuvant medication would be the most appropriate addition to her regimen?
Answer: The burning, shooting nature of the pain indicates it is Neuropathic Pain (likely from the tumor pressing on the lumbosacral plexus). The best addition is an Antidepressant (e.g., Amitriptyline 12.5mg at night) or an Anticonvulsant (e.g., Gabapentin). Amitriptyline is especially useful here because it treats neuropathic pain and its side effect of drowsiness will help her sleep through the night.
- World Health Organization (WHO) Guidelines for the Pharmacological and Radiotherapeutic Management of Cancer Pain in Adults and Adolescents.
- Palliative Care Association of Uganda (PCAU) and Ministry of Health Uganda Clinical Guidelines on Pain Management.
- Melzack R, Wall PD. Pain mechanisms: a new theory. Science. 1965 Nov 19;150(3699):971-9.

Assessment OF Pain
Pain assessment is the systematic process of gathering information about a patient's pain. It is the first and most important step in pain management. If we do not assess pain properly, we cannot treat it properly.
Good assessment is the key to effective pain management. Without assessment, we are only guessing — and guessing causes suffering.
We covered Pain already, incase you want to view Pain Introduction, Click Here.- Nurses spend the most time with patients.
- Nurses are often the first to notice when a patient is in pain.
- Nurses give the pain medicines and must know if they are working.
- In Uganda, where doctors may not be present in every ward or clinic, nurses are frequently the main health workers responsible for pain assessment.
- You cannot treat what you do not understand.
"Pain is whatever the patient says it is, existing whenever they say it does."
- Believe the patient. If they say they have pain, they have pain.
- Do not rely only on vital signs (heart rate, blood pressure) to decide if someone is in pain. In chronic pain, these signs may be normal even when pain is severe.
Pain is not just a physical sensation. It has physical, psychological, social, spiritual, and cultural dimensions. A thorough assessment looks at all of these.
- Pain must be assessed at every patient contact.
- After giving pain medicine, reassess to see if it worked.
- Measure pain at regular intervals: every 6 hours, every 4 hours, or every 2 hours in severe cases.
- Use simple tools and simple language.
- Complex questionnaires may be too demanding for very sick palliative care patients.
- Use tools that match the patient's literacy level, language, and culture.
A thorough pain assessment goes far beyond asking "Where does it hurt?" We must assess the whole person.
Use these questions to build a clear picture of the physical pain:
| Question | What to Ask | Why It Matters |
|---|---|---|
| Onset | "When did the pain start?" | Tells us if the pain is new, worsening, or chronic. |
| Nature | "What does the pain feel like?" (burning, stabbing, throbbing, aching, stinging) | Helps identify the type of pain. Words like "shooting," "burning," or "electric" suggest neuropathic pain, which needs different medicines. |
| Site & Radiation | "Where is the pain? Does it spread to other areas?" | Helps locate the source. Referred pain may indicate specific organ or nerve involvement. |
| Type | "What type of pain is it?" | Is it somatic, visceral, neuropathic, or bone pain? |
| Duration & Changes | "How long has the pain been there? Has it changed?" | Tells us if the disease is progressing or if treatment is failing. |
| Precipitating / Aggravating Factors | "What makes it worse?" (movement, eating, coughing, lying down, bowel movement) | Helps us plan care. For example, if movement worsens pain, we give medicine before turning the patient. |
| Relieving Factors | "What makes it better?" (rest, heat, cold, prayer, sitting up, medicines, herbs) | Helps us choose treatments and understand what the patient has already tried. |
| Impact on Function | "Does it stop you from walking, sleeping, eating, or working?" | Shows how much the pain is destroying quality of life. |
| Impact on Mood & Sleep | "Does the pain make you sad, angry, or unable to sleep?" | Links physical pain to psychological suffering. |
| Previous Medications | "What have you taken before? Did it help? Any side effects?" | Guides future prescribing. If paracetamol failed, we move up the WHO ladder. |
| Meaning of Pain | "What do you think this pain means?" | The patient may think "This pain means I am dying." This fear makes pain feel worse. |
- Inspect: Look at the body for swelling, redness, wounds, pressure sores, or visible tumors.
- Palpate: Gently touch the painful area to check for tenderness, masses, or temperature changes.
- Auscultate: Listen to bowel sounds, breathing, and heart sounds if relevant.
- Check movement: Can the patient move? Are they guarding a limb? Is there stiffness?
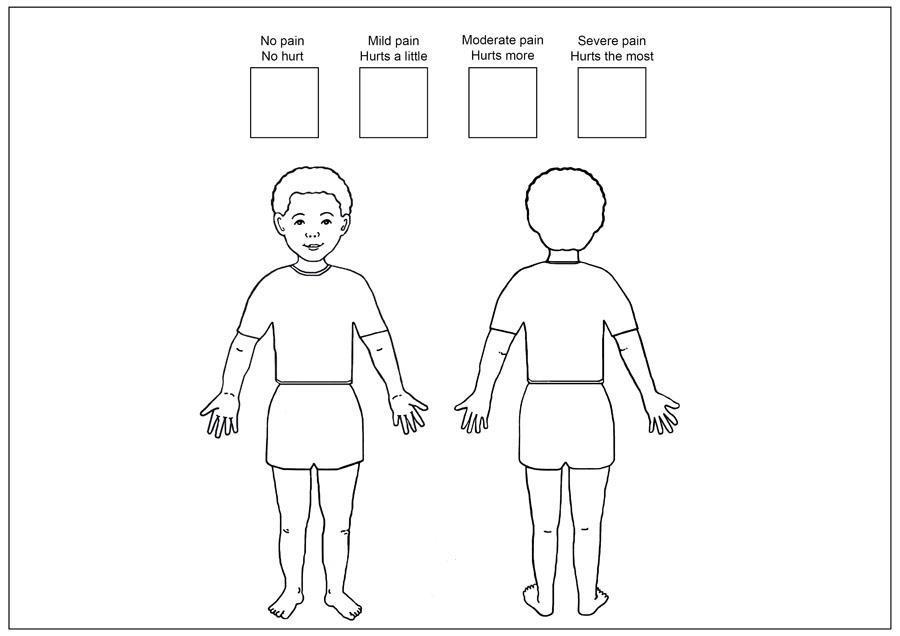
- Document findings: Record everything in writing and mark pain locations on a body chart.
A body chart is a simple drawing of a human body. The patient marks where they feel pain. This is especially useful when:
- The patient has pain in more than one place.
- The patient has difficulty describing locations with words.
- The nurse needs to compare pain locations over time.
How to use it: Give the patient a pen and ask them to mark an X where it hurts the most. Use different marks (circles, shading) for different types or intensities of pain.
In palliative care, we do not order endless tests. We limit investigations to those that will significantly impact treatment decisions.
- Example: Ordering an X-ray to see if a bone is broken may change how we position the patient.
- Example: Ordering a CT scan just to "confirm what we already know" may be unnecessary and cause the patient distress and expense.
Understand how far the disease has progressed. This helps us know if the pain is from: The disease itself (tumor pressing on a nerve), A complication (infection, fracture), or Treatment side effects.
Pain is deeply affected by the mind. A patient who is terrified or depressed feels more pain. Ask about:
| Area | Questions to Ask |
|---|---|
| History of illness & understanding | "What do you understand about your illness?" "What have the doctors told you?" |
| Emotional & psychological response | "How are you feeling inside?" "Are you sad, scared, or angry?" |
| Role impact | "How is the illness affecting your role as a parent, mother, father, lover, or breadwinner?" |
| Hopes & fears | "What are you hoping for?" "What are you most afraid of?" |
| Future plans | "Do you have plans for the future?" (This reveals hope or hopelessness). |
| Losses & disappointments | "What have you already lost because of this illness?" (job, independence, body image). |
| Unfinished business | "Is there anything you still want to do or say?" |
| Things to accomplish | "What is most important to you now?" |
Why this matters in Uganda: Many patients fear that pain means death is coming. This fear makes the pain feel worse. Addressing the fear is part of treating the pain.
Pain does not exist in a vacuum. A patient who is worried about school fees or eviction feels more pain. Ask about:
| Area | Questions to Ask |
|---|---|
| Role impact | "How is the illness affecting your ability to work and care for your family?" |
| Family history | "Who is around you? Where are they? How important are they? How supportive are they?" |
| Life stresses | "What is happening with money, jobs, housing, children, and sources of support?" |
| Genogram (Family Tree) | Draw a family tree. This helps the patient open up, shows family patterns, reveals conflicts, and acts as a therapeutic tool to discuss death and vulnerabilities. |
Nursing action: If a patient is in pain AND worried about rent, relieving the pain is only half the battle. Link them with social support.
Spiritual pain can feel like physical pain. Patients may say "My heart hurts" when they mean they are spiritually broken. Assess:
| Time Frame | What to Explore |
|---|---|
| Past | Regrets, guilt, shame. "Is there anything in your past that troubles you?" |
| Present | Anger, grief for the loss of their own life, lost sense of purpose. "Do you feel life still has meaning?" |
| Future | Hopes and fears of dying and death. "Are you afraid of what comes after death?" |
In Uganda: Many patients are deeply religious. Spiritual pain may be expressed as "Why has God allowed this?" or "I am being punished." Recognizing this helps us provide spiritual care alongside pain medicine.
Culture shapes how pain is expressed, treated, and understood. In Uganda, with over 50 ethnic groups, cultural assessment is essential.
| Area | What to Assess |
|---|---|
| Symptom description | How does the patient describe pain? Some cultures use words like "heat," "heaviness," or "wind" rather than "pain." |
| Language | Does the patient speak English? Do they need an interpreter? |
| Family role | Who makes decisions? The patient, the elder, the husband, or the eldest son? |
| Autonomy & confidentiality | Can the patient keep their diagnosis private, or does the family demand to know everything? |
| Attitudes toward ill-health | Is illness seen as a curse, punishment, or natural event? |
| Food & diet | Are there cultural foods or restrictions that affect medicine-taking? |
| Western medicine vs. other therapies | Has the patient used herbs, traditional healers, or prayers? Do they trust modern medicine? |
| Attitudes toward death | Is death discussed openly or taboo? |
| Rituals surrounding death | Are there specific rituals the patient wishes to observe? |
Nursing action: Respect cultural beliefs. Do not dismiss traditional medicine — ask about it, and work with it when safe.
The PQRST tool is a simple, structured way to remember all the important questions to ask about pain. It is one of the most important tools for nursing exams and clinical practice.
- "Where is the pain?" "Can you point to where the pain is?" "Does the pain spread?" "Put an X where it hurts the most."
- "Does anything worsen the pain, such as eating, bowel movements, or movement in general?"
- "Does anything alleviate or improve the pain?"
- "Does the pain get better when staying still?"
- "Does it improve after having a bowel movement?"
- "Does it improve after wound discharge?"
- "Does using hot or cold compresses help?"
- "Does praying or being with friends provide relief?"
- "Have you tried any medications, painkillers, or herbs? Do they help?"
- "Did any treatment reduce or eliminate the pain?"
"What does the pain feel like to you?" "How would you describe your pain?"
| Words the Patient Uses | What It May Mean | Type of Pain |
|---|---|---|
| "Aching," "throbbing," "gnawing" | Somatic or bone pain | Nociceptive |
| "Cramping," "squeezing," "pressure" | Visceral (organ) pain | Nociceptive |
| "Burning," "shooting," "stabbing," "electric," "pins and needles" | Nerve damage | Neuropathic |
| "Dull," "constant," "heavy" | Deep tissue or organ involvement | Mixed |
Why this matters: Neuropathic pain (nerve pain) does not respond well to standard painkillers like morphine alone. It needs adjuvant medicines (amitriptyline, gabapentin). If you hear words like "burning" or "shooting," you must tell the doctor.
"Where does the pain start?" "Does the pain radiate to any other areas?"
- Examples of radiation: Back pain that radiates down the leg = sciatica (nerve compression). Shoulder pain from liver cancer = referred pain from the diaphragm. Chest pain radiating to the arm = heart pain (angina).
- Site: "Where is your pain?" (Use a body chart). Mark the exact location.
- Severity: "On a scale of 0 to 5, how severe is the pain?" (Or 0 to 10, but 0-5 is easier in Uganda). "How does the pain affect your daily life?" "Does it prevent you from engaging in normal activities, sleeping, moving, sitting, or eating?"
- "How long have you had the pain?"
- "Is the pain constant or does it come and go?"
- "Does the pain worsen at a specific time of day or night?"
- "Have you received any previous pain treatments?"
- "Are you on any pain treatment now? Does it help?"
This is sometimes added to PQRST as a sixth element. It is critical in palliative care.
- "What are your fears about the pain?" "What do you think is causing the pain?" "What does the pain mean to you?"
- Common answers in Uganda: "I'm being punished." "I'm going to die." "There is no hope." "I have to suffer; it is my destiny." "I'm being eaten away."
- Nursing action: When you know what the pain means to the patient, you can address the fear AND the physical sensation. If a patient believes pain means death, reassurance that pain can be controlled gives them hope.
Case: A patient with advanced cervical cancer complains of pain. When you ask her to describe it (The "Q" in PQRST), she says, "It feels like an electric shock shooting down my right leg."
Question: What type of pain is this, and why is this distinction crucial for your treatment plan?
Answer: This is classic Neuropathic Pain (nerve pain). It is crucial because standard WHO ladder painkillers (like Paracetamol or even Morphine alone) are often ineffective. You must alert the doctor to prescribe an adjuvant medication like Gabapentin or Amitriptyline.
Pain assessment tools help us measure pain so we can track it over time and see if treatment is working. They turn a subjective experience into a number or picture we can record.
- Establish a baseline score at the first assessment.
- Reassess regularly and plot scores on a graph to see trends.
- Choose a tool that matches the patient's understanding and literacy level.
- Remember: Most tools do not measure anxiety. Anxiety and pain have similar behavioral signs (restlessness, grimacing). It is possible to measure anxiety instead of pain. Always ask about both.

Ask the patient to rate their pain intensity on a numerical scale (0 = No pain, 10 = Worst pain imaginable). In Uganda, it is easier to use a 0 to 5 scale:
| Score | Meaning | Nursing Action |
|---|---|---|
| 0 | No pain | Continue monitoring. |
| 1 | Little pain | Mild — may need non-drug methods or paracetamol. |
| 2 | A bit more pain | Mild to moderate — monitor closely. |
| 3 | Quite some pain | Moderate — may need weak opioid (codeine). |
| 4 | Quite a lot of pain | Severe — needs strong opioid (morphine). |
| 5 | Overwhelming pain — worst imaginable | Severe — needs morphine urgently. |
- Verbal-Descriptor Variation: Instead of numbers, use words: "No pain", "Mild pain", "Mild-to-moderate pain", "Moderate pain", "Severe pain", "Very severe pain".
- How to use with patients who struggle with numbers: Use fingers: "Show me with your fingers how bad the pain is. Zero fingers = no pain. Five fingers = worst pain."

Uses a hand gesture to represent pain level:
- Clenched fist (0 fingers) = No hurt / No pain at all.
- 1 finger extended = A little pain.
- 2 fingers extended = A bit more pain.
- 3 fingers extended = Quite some pain.
- 4 fingers extended = Quite a lot of pain.
- 5 fingers extended (open hand) = Hurts worst / Worst possible pain.
- Important cultural warning: In some cultures, a closed fist might be interpreted as the worst possible pain (anger, fighting). You must explain the scale clearly to the patient.
- Example explanation for a Ugandan patient: "I would like to find out the level of pain that you have. Can you tell me on a scale of 0 to 5, where 0 is no pain at all, 1 is a little pain, 2 is a bit more, 3 is quite some pain, 4 is quite a lot of pain, and 5 is overwhelming pain — the worst pain imaginable. Where would you put your pain on that scale?"
- Note on African use: Experiences in Africa have shown that many people prefer the Hand Scale over the Faces Scale because it feels more natural and less like a child's tool.
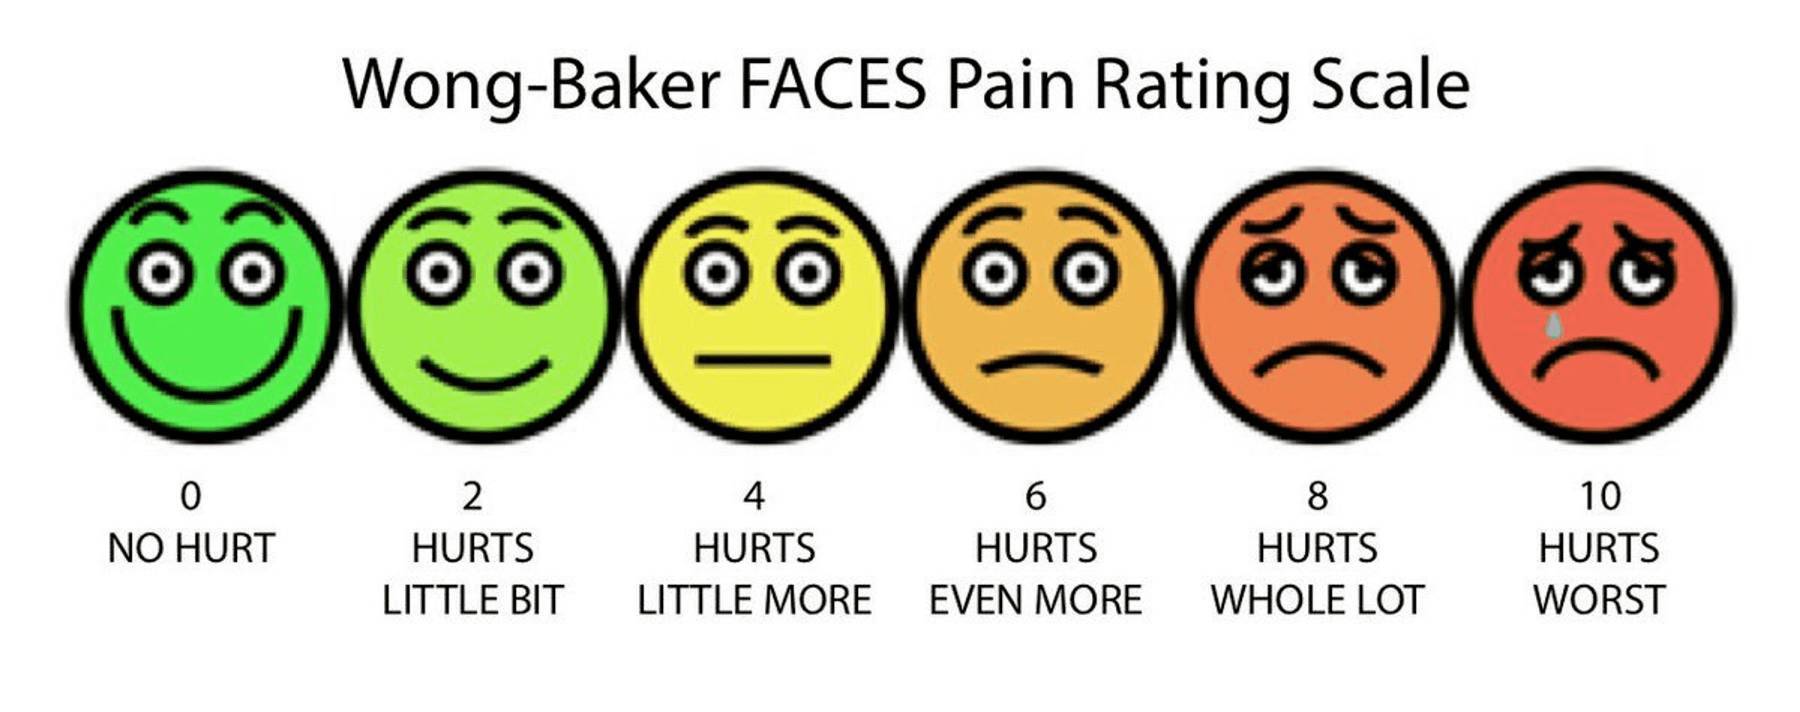
- Shows six cartoon faces with expressions ranging from a broad smile (no hurt) to a very sad, crying face (hurts worst). Numbered 0, 2, 4, 6, 8, 10 (or simplified 0-5).
- Important instructions for the nurse: Train the patient: Explain that they are rating their pain level, not their emotions.
- Bad use: A patient points to a sad face because they feel sad about their diagnosis, not because they are in pain.
- Good use: "Point to the face that shows how much the pain hurts your body, not how sad you feel in your heart."
- When to use it: Best for children, elderly patients with dementia, or adults with low literacy. Be aware that in some African settings, adults may feel this scale is too childish.
- Body Chart: A drawing of the front and back of a human body. Useful for identifying multiple pain sites, referred pain, or radiation.
- Eland Body Scale: Helps assess multiple sites and differing intensities in children. Ask the child to assign colors (e.g., Green = No pain, Yellow = Little, Orange = Moderate, Red = Severe) and color in a body outline. Children may not have the words to describe pain, but they can use colors and drawings.
Pain management in children is complex. Although there are similarities with adults, children have specific needs and challenges.
| Myth | Fact |
|---|---|
| Newborns do not feel pain. | Newborns do have the ability to perceive pain. Their nervous system is developed enough to feel pain. |
| Young children cannot process or remember pain. | Children of all ages can experience and remember pain. Painful experiences in childhood can cause long-term fear of medical settings. |
| Children become accustomed to repeated painful procedures. | Repeated painful procedures still cause distress and pain every time. They do not "get used to it." |
| Children are unable to tell where it hurts. | Children can indicate the location of their pain, especially with tools like the Eland Body Scale or by pointing. |
| Opioids should be avoided due to addiction risk. | Psychological addiction to opioids is rare in children who are using them for real pain. |
| Incomplete myelination means children don't feel pain. | Proper pain perception (nociception) is possible without complete myelination. |
| Younger children have higher pain sensitivity. | Pain tolerance generally increases with age. Younger children may actually feel pain more intensely. |
| Children always communicate when they have pain. | Children may not express pain due to fear of doctors, fear of injections, or wanting to be brave. |
| Children are not aware they have chronic pain. | Children may not recognize or understand chronic pain, but they still feel it. It may show as irritability, refusal to play, or sleep problems. |
| Barrier | Explanation |
|---|---|
| Limited tools | Few age-appropriate, validated pain tools available in our settings. |
| Lack of knowledge | Health workers do not know which tools to use for different ages. |
| Insufficient training | Nurses are not trained in how to use pain scales for children. |
| Difficulty interpreting scores | A child's pain score may not match their behavior. |
| Anxiety vs. psychological pain | Hard to tell if the child is anxious, scared, or actually in physical pain. |
| Factors inhibiting children reporting | Fear of doctors/nurses, fear of illness, reluctance to bother caregivers, avoidance of injections, eagerness to leave the hospital. |

| Letter | Step | What to Do |
|---|---|---|
| Q | Question the child | If the child can respond, ask them directly. If not, question the parent/caregiver. |
| U | Use pain rating scales | Use appropriate scales (Eland Body Scale, Faces Scale, Hand Scale) to quantify pain. |
| E | Evaluate behavior and physiological changes | Watch for crying, facial grimacing, guarding, refusal to move, changes in sleep or eating, increased heart rate, or sweating. |
| S | Secure the caregiver's involvement | Listen to mothers, fathers, and caregivers. Include them in decision-making. They know subtle changes in their child's behavior. Ask them about comforting strategies that work. |
| T | Take the cause of pain into account | Consider the underlying disease or problem. Is the pain from the illness, a procedure, or a side effect? |
| T | Take action and evaluate results | Develop a treatment plan. Reassess using the same pain scale. Adjust treatment. Use pain diaries for chronic pain. |
| Category | Score 0 | Score 1 | Score 2 |
|---|---|---|---|
| Face | No particular expression or smile. | Occasional grimace or frown, withdrawn, disinterested. | Frequent to constant quivering chin, clenched jaw. |
| Legs | Normal position or relaxed. | Uneasy, restless, tense. | Kicking, or legs drawn up. |
| Activity | Lying quietly, normal position, moves easily. | Squirming, shifting back and forth, hesitant to move. | Arched, rigid or jerking. |
| Cry | No cry (awake or asleep). | Moans or whimpers; occasional complaint. | Crying steadily, screams or sobs, frequent complaints. |
| Consolability | Content, relaxed. | Reassured by occasional touching, hugging or being talked to, distractible. | Difficult to console or comfort. |
- 0: Relaxed and comfortable
- 1-3: Mild discomfort
- 4-6: Moderate pain
- 7-10: Severe discomfort or pain or both
- Pain assessment is not a one-time event. It is a continuous cycle.
- After starting treatment: Reassess within 2-3 days of initiating analgesia to see if the medicine is working.
- After each dose: Check pain relief after giving oral medicine (30-60 minutes) or injectable medicine (15-30 minutes).
- Regularly: Every 4-6 hours for stable patients; every 2 hours for severe pain.
- Before and after procedures: Always assess pain before moving a patient, changing a dressing, or inserting a catheter.
| Date | Time | Pain Score (0-5) | Medicine Given | Relief? | Side Effects | Nurse's Notes |
|---|---|---|---|---|---|---|
| 7/7 | 08:00 | 4 | Morphine 10mg | Some relief after 1 hour | None | Patient able to eat breakfast |
| 7/7 | 12:00 | 3 | Morphine 10mg | Good relief | None | Patient slept 2 hours |
| 7/7 | 16:00 | 2 | Morphine 10mg | Good relief | None | Patient sat up and talked to family |
Important warning: Most pain measurement tools do not consider the presence of anxiety. Anxiety and pain have similar behavioral indicators: restlessness, grimacing, fast breathing, crying.
It is possible to measure anxiety and think it is pain. Always ask: "Are you worried or frightened?" as well as "Are you in pain?" If anxiety is high, treat it AND assess whether physical pain is still present.
| Patient Type | Recommended Tool | Why |
|---|---|---|
| Adult, literate, speaks your language | Numerical Rating Scale (0-5 or 0-10) | Quick, easy to track over time. |
| Adult, low literacy, or prefers non-verbal | Hand Scale | Culturally preferred in many African settings. Easy to understand. |
| Child over 3 years | Faces Scale or Hand Scale | Visual and intuitive. |
| Child with multiple pain sites | Eland Body Scale | Shows location and intensity simultaneously. |
| Child under 3 or non-verbal | QUESTT tool + behavioral observation + FLACC | They cannot self-report; rely on behavior and caregivers. |
| Patient with language barrier | Body chart + Hand Scale + interpreter + FLACC | Visual tools transcend language. |
Not asking (assuming patient will tell you), Not believing ("They are exaggerating"), Using vital signs only, Using the wrong tool, Forgetting anxiety.
Fear of addiction (hiding pain to avoid morphine), Fear of injections, Cultural stoicism (enduring pain silently to be strong), Cognitive impairment, Language barrier.
No pain assessment tools available, No time, No training, No documentation forms.
- Assess pain at every contact — Do not wait for the patient to complain.
- Use the right tool — Match the tool to the patient's age, literacy, and culture.
- Believe the patient — Accept their report as truth.
- Assess holistically — Ask about physical, psychological, social, spiritual, and cultural factors.
- Document everything — Record scores, locations, qualities, and impacts.
- Establish a baseline — Get the first score before treatment starts.
- Reassess regularly — Check after medicines and at set intervals.
- Communicate findings — Tell the doctor if pain is severe or not responding to treatment.
- Advocate — If pain is undertreated, speak up for the patient.
- Know the PQRST tool inside out — be able to list every question for each letter.
- Know the difference between the NRS, Hand Scale, and Faces Scale — when to use each, and their advantages in Uganda.
- Be able to explain why the Hand Scale is often preferred in Africa — cultural appropriateness, simplicity.
- Know the myths about pain in children — examiners love to test this.
- Be able to describe the QUESTT tool — all six steps.
- Understand the importance of baseline measurement — you cannot know if treatment worked without a starting point.
- Know the barriers to pain assessment — especially anxiety vs. pain confusion.
- Be able to describe the holistic dimensions — physical, psychological, social, spiritual, cultural.
- Know the reassessment timeline — 2-3 days after starting treatment, every 4-6 hours routinely.
- World Health Organization (WHO) Guidelines on the Pharmacological Treatment of Persisting Pain in Children with Medical Illnesses.
- African Palliative Care Association (APCA) Guidelines for Pain Assessment in African Settings.
- Uganda Ministry of Health - Clinical Guidelines for Pain Management and Palliative Care.
Assessment OF Pain Read More »

Introduction to Pain in Palliative Care
Pain is an unpleasant experience that involves both physical sensations and emotions. It is often connected to actual or possible harm to body tissues. Pain is something we feel when our body is hurt, sick, or under threat.
"Pain is what the patient says hurts."
This means pain is subjective. Each person shapes their own understanding of pain based on their personal experiences, culture, fears, and beliefs. If a patient says they are in pain, they are in pain. As nurses, we must believe them.
"Pain is an unpleasant sensory and emotional experience associated with actual or potential tissue damage, or described in terms of such damage."
What this means in simple words:
- Pain is not just a physical feeling. It is also an emotional experience.
- Pain can happen even when there is no visible injury (potential damage).
- The patient describes the pain in their own words, and we must accept that description.
"Pain is whatever the experiencing person says it is, existing whenever he says it does."
What this means for nurses:
- The patient is the expert on their own pain.
- We cannot measure pain with a thermometer or a blood test.
- We must ask the patient, listen to them, and believe them.
- Pain is the symptom that patients fear the most when they are nearing the end of life. It affects quality of life more than almost any other problem.
- Pain affects around 98% of cancer and HIV/AIDS patients in advanced stages.
- Cancer pain is typically constant and worsens as the disease progresses.
- In developing countries like Uganda, where less than 5% of cancer patients have access to chemotherapy or radiotherapy, pain tends to worsen gradually until death because the disease cannot be stopped by curative treatment.
A study conducted in Africa involving patients with Stage IV AIDS (the most advanced stage) identified the most common pains reported:
| Type of Pain | Percentage of Patients | Cause / Notes |
|---|---|---|
| Lower limb pain | 66% | Often caused by peripheral neuropathy (nerve damage), common in HIV/AIDS. |
| Mouth pain | 50.5% | Often from oral thrush, ulcers, or infections. |
| Headache | 42.3% | From infections like meningitis, or raised pressure in the skull. |
| Throat pain | 39.8% | From infections, difficulty swallowing, or esophageal thrush. |
| Chest pain | 17.5% | From lung infections, TB, or other chest problems. |
💡 Nursing Implication
In Uganda, where HIV/AIDS is a major cause of illness, nurses must be prepared to assess and manage these specific types of pain every day. Note that HIV-induced lower limb pain is heavily linked to viral damage of nerves and the toxic effects of older Anti-Retroviral (ARV) drugs like Stavudine (d4T).
Acute pain serves as a useful mechanism that alerts the body to the presence of harmful or potentially harmful stimuli in the environment, such as:
- Extreme heat (burning)
- Extreme cold (frostbite)
- Sharp objects (cuts)
- Disease or injury
Think of acute pain like a fire alarm. It warns us that something is wrong and needs attention.
In palliative care, pain is often chronic (long-lasting). It no longer serves as a useful warning. Instead, it becomes a problem itself that causes suffering and needs to be relieved.
Understanding how pain happens helps nurses understand why different medicines work in different ways.
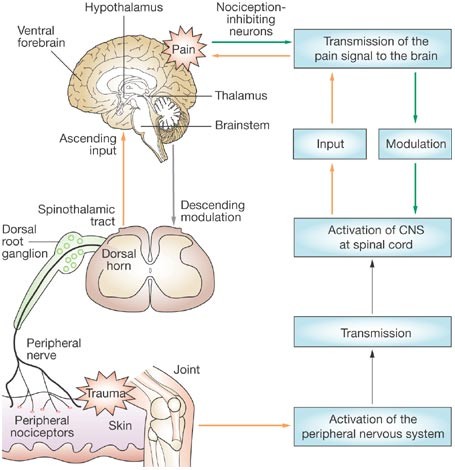
Pain travels through the body like a message passing through several stations:
- Pain begins when free nerve endings called nociceptors (pain sensors) are stimulated.
- These nociceptors are found in the skin, connective tissues, muscles, bones, and internal organs.
- They can be activated by:
- Physical stimuli: Pressure, heat, cold, cutting.
- Chemical stimuli: Chemicals released when tissues are injured or inflamed.
When tissues are injured, the body releases chemicals that activate the pain sensors. These include:
- Prostaglandins (cause inflammation and swelling)
- Bradykinin (dilates blood vessels and causes pain)
- Serotonin (affects mood and pain signaling)
- Histamine (causes itching and swelling)
- Potassium ions and Hydrogen ions (acidic environment around injury)
Pharmacology Expansion: This is why anti-inflammatory drugs like ibuprofen and diclofenac (NSAIDs) work — they directly inhibit the COX enzyme, stopping the production of prostaglandins right at the site of injury!
- The pain signal travels along peripheral nerves (nerves outside the brain and spinal cord) to the dorsal horn of the spinal cord.
- In the spinal cord, the signal crosses over to cells of the spinothalamic tract.
- These cells carry the impulses up the spinal cord, through the brain stem, to the thalamus (a relay station in the brain).
Pharmacology Expansion: Local anesthetics (like lidocaine) work by blocking the sodium channels along these peripheral nerves, stopping the "Transmission" phase entirely. Opioids (morphine) work primarily at the dorsal horn to stop the signal from ascending to the brain.
- From the thalamus, impulses are delivered to various areas of the cerebral cortex (the thinking and feeling part of the brain).
- The brain interprets the signal as pain and creates a reaction (pulling away, crying, guarding the area).
| Type | Location | What They Detect |
|---|---|---|
| Somatic nociceptors | Skin, muscles, bones, connective tissues | Pain from the surface and structure of the body. (Usually sharp, aching, easy to locate). |
| Visceral nociceptors | Internal organs (liver, stomach, intestines, etc.) | Pain from inside the body. (Usually dull, cramping, hard to locate). |
The concept of Total Pain was developed by Dame Cicely Saunders in the 1960s. She is the founder of the modern hospice movement.
Cicely Saunders taught that pain is not just a physical phenomenon. In palliative care, pain has four dimensions that are all connected and must all be addressed.
This is the actual bodily sensation of pain. It includes:
- The disease itself (tumor pressing on organs, bones, or nerves).
- Undesirable effects of treatment (surgery wounds, chemotherapy side effects, radiation burns).
- Insomnia (pain that stops sleep).
- Chronic fatigue (tiredness that never goes away).
- Other physical symptoms like nausea, constipation, or shortness of breath that make pain feel worse.
This is the emotional suffering that comes with illness. It includes:
- Anger at delays in diagnosis ("Why did the doctors not find this earlier?").
- Anger at treatment failure ("The medicine is not working!").
- Disfigurement (feeling ugly or ashamed because of weight loss, wounds, or surgery scars).
- Fear of pain ("Will it get worse?").
- Fear of death ("What will happen when I die?").
- Feelings of helplessness ("I cannot do anything for myself anymore").
- Anger at friends who do not visit ("Where is everyone now that I am sick?").
This is the suffering caused by changes in the patient's place in society and family. It includes:
- Worry about family ("Who will take care of my children?").
- Worry about finance ("We have no money for school fees or food").
- Loss of job (cannot work anymore).
- Loss of income (the family has no money because the breadwinner is sick).
- Loss of social position (people used to respect me, now they pity me or avoid me).
This is the suffering of the soul and spirit. It includes:
- "Why has this happened to me?" (searching for a reason).
- "Why does God allow me to suffer like this?" (feeling abandoned by God).
- "Is there any meaning or purpose in life?" (feeling that life has become meaningless).
- Guilt about past actions.
- Fear of what happens after death.
- Giving morphine alone will not relieve total pain.
- We must also provide emotional support, social help, family counseling, and spiritual care.
- The four dimensions are interrelated (connected). For example:
- Worry about money (social) makes pain feel worse (physical).
- Fear of death (spiritual) causes anxiety (psychological) that increases pain.
- Lack of sleep (physical) causes anger (psychological).
Case: A 45-year-old mother with advanced breast cancer cries all night, complaining of severe pain in her chest wall. You give her Morphine, but an hour later she is still crying, saying the pain is a 10/10. When you sit and talk to her, she reveals she is terrified about who will pay her children's school fees if she dies.
Question: Which dimension of Total Pain is primarily preventing the morphine from working, and what is your nursing intervention?
Answer: She is experiencing severe Social and Psychological pain (worry over finances and fear of death/abandonment of children). The intervention requires more than just increasing her morphine dose—you must sit with her, provide counseling, and involve a social worker to discuss her children's future. Until her mind is put at ease, her physical perception of pain will remain amplified.
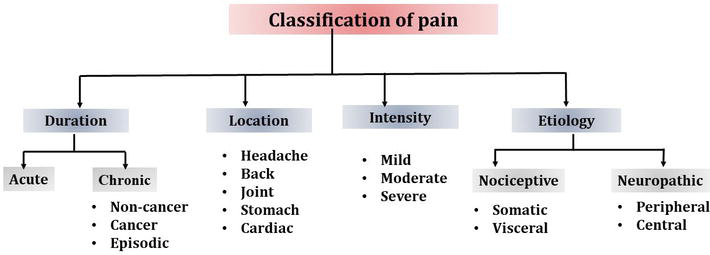
To assess and treat pain effectively, the nurse must understand what type of pain the patient has. Pain can be classified in several ways.
| Feature | Description |
|---|---|
| Onset | Sudden, definite onset. |
| Duration | Limited and predictable (hours to days). |
| Cause | Definite injury or illness (fracture, surgery, infection). |
| Behavior | Help-seeking behavior: crying, moving about, calling for help. |
| Signs | Sympathetic overactivity: fast heartbeat (tachycardia), pale skin (pallor), high blood pressure (hypertension), sweating, grimacing, crying, anxious, dilated pupils (papillary dilatation). |
In cancer: Acute pain may be caused by direct effects of the disease (tumors pressing on nerves/organs) or treatment-related effects (radiotherapy, surgery, and chemotherapy harming tissues).
| Feature | Description |
|---|---|
| Onset | Gradual or ill-defined (unclear when it started). |
| Duration | Continues unabated (does not stop), may become progressively more severe. |
| Cause | Results from a chronic pathological process (cancer, HIV neuropathy, arthritis). |
| Behavior | Patient may appear depressed and withdrawn. They do NOT show obvious distress like acute pain patients. |
| Signs | No signs of sympathetic overactivity. The heart rate, blood pressure, and sweating may be normal! |
💡 Crucial Nursing Note on Chronic Pain
Because chronic pain patients do not look like they are in pain (no crying, no sweating, normal BP), nurses and families often mistakenly think they are exaggerating, faking it, or "getting used to it." This is wrong. Chronic pain is very real, the body has just adapted its vital signs. You MUST believe the patient's report!
This means the nerve pathways are intact (normal). The feeling of pain is a normal response to a harmful stimulus (like a cut, burn, or tumor). It is divided into two groups:
| Feature | Description |
|---|---|
| Location | Skin, muscles, bones, connective tissues. |
| Description | Well localized (patient can point exactly to where it hurts). Described as aching, throbbing, or gnawing. (Gnawing means deep, persistent, boring ache like a rat chewing). |
| Examples | Bone infiltration by cancer, soft tissue infiltration, ulceration, infection, toothache, burns. |
| Treatment | Usually controlled with common analgesics: paracetamol, NSAIDs (ibuprofen, diclofenac) for mild pain, opioids (morphine) for severe pain. Radiotherapy may help for bone pain. |
| Feature | Description |
|---|---|
| Location | Internal organs (liver, stomach, intestines, bladder). |
| Description | Not well localized (patient cannot point to one spot). Described as a feeling of pressure, cramping, or squeezing. |
| Examples | Tumor in an organ, bowel obstruction (blockage), stretching of the liver capsule from tumor growth. |
| Treatment | Paracetamol, NSAIDs, opioids. Steroids can reduce inflammation. Antispasmodics help reduce spasms. |
This means there is damage to the nerve pathways themselves. The nerves send abnormal signals to the brain, even when there is no harmful stimulus.
| Feature | Description |
|---|---|
| Mechanism | Abnormal response to a normal or noxious stimulus. |
| Causes | Nerve infiltration by cancer, infection from HIV or herpes zoster (shingles), peripheral neuropathy from drugs (like some ARVs or TB treatment), CNS injury, pain following surgery. |
| Description | Burning, pricking, stinging, pins and needles, insects crawling under the skin, numbness, hypersensitivity (pain from light touch), shooting pain, electric shocks. |
| Treatment | Adjuvant drugs tend to work better than standard analgesics. Antidepressants (amitriptyline) are most commonly used. Anticonvulsants (carbamazepine, gabapentin) for shooting pain. Neuropathic pain may be partly or totally resistant to opiates like morphine! |
💡 Nursing Implication
If a patient says their pain is "burning" or "like electricity," standard painkillers (paracetamol, diclofenac) alone will not work. Tell the doctor that adjuvant medicines (like Amitriptyline or Gabapentin) are needed.
| Type | What It Means | Examples | Treatment |
|---|---|---|---|
| Peripheral pain | Damage to peripheral nerves (nerves outside the brain and spinal cord). | Nerve compression by tumor, chemotherapy-induced nerve damage. | Targeted nerve pain medications (gabapentin, amitriptyline). |
| Central pain | Damage to the central nervous system (brain or spinal cord). | Stroke, spinal cord injury, tumor pressing on the spinal cord. | Neuropathic pain medications. |
| Type | Description | Example | Management |
|---|---|---|---|
| Breakthrough pain | A sudden, transitory (temporary) increase in pain that "breaks through" regular pain control. | A patient who is comfortable on morphine suddenly has severe pain. | Adjust the pain management plan. Give extra ("rescue") doses of short-acting medicine. |
| Incident pain | Pain that occurs only in specific circumstances, usually related to movement or activity. | Pain when the patient turns in bed, walks, coughs, or is moved by the nurse. | Address the specific trigger. Give medicine before the activity if possible. |
| Procedural pain | Pain caused by medical procedures. | Pain during wound dressing, catheter insertion, injection, blood draw. | Give appropriate pain management before the procedure. |
Important in children: Incident pain and procedural pain are particularly significant in children. Children may become terrified of nurses and doctors if procedures hurt. Always give pain relief before painful procedures.
| Concept | Description | Analogy | Influencing Factors |
|---|---|---|---|
| Pain Threshold | The minimum intensity at which a stimulus is perceived as painful. It is the physiological point where "sensation" becomes "pain." | Like a smoke detector setting; the point where the amount of smoke triggers the alarm to sound. | Genetics, neurological health, and the sensitivity of pain receptors (nociceptors). |
| Factors Lowering Threshold | Conditions that make a person more sensitive to pain, meaning less stimulation is required to feel hurt. | Like a hair-trigger on a doorbell that rings even if a light breeze hits it. | Lack of sleep, anxiety, depression, fatigue, and chronic inflammation. |
| Factors Raising Threshold | Conditions that increase resilience to pain, meaning a stronger stimulus is needed before it is felt. | Like wearing thick gloves that prevent you from feeling the prick of a needle. | Distraction, strong emotions (like adrenaline), certain medications, and relaxation techniques. |
Pain is not just about the injury or disease. Many factors make pain feel worse or better.
| Factor | Why It Increases Pain |
|---|---|
| Discomfort | Being uncomfortable (hot, cold, lying on a hard bed, dirty sheets) focuses attention on pain. |
| Insomnia | Tired brains cannot cope with pain. Pain feels worse at night. |
| Fatigue | Physical exhaustion lowers the body's ability to tolerate pain. |
| Anxiety | Worry and fear make the body tense and amplify pain signals. |
| Fear | Fear of death, fear of more pain, fear of being alone — all increase suffering. |
| Anger | Anger releases stress hormones that increase inflammation and pain perception. |
| Sadness | Depression and sadness lower the brain's natural pain-blocking chemicals. |
| Depression | Depressed patients feel pain more intensely and respond less to treatment. |
| Boredom | When the mind has nothing else to focus on, pain becomes the center of attention. |
🧠 Mnemonic: Factors That Increase Pain
Remember: "DAFIA BED"
Discomfort
Anger
Fatigue
Insomnia
Anxiety
Boredom
Exhaustion
Depression
| Factor | Why It Decreases Pain |
|---|---|
| Relief of other symptoms | When nausea, constipation, or shortness of breath are treated, pain feels less severe. |
| Understanding | When the patient understands what is happening and what to expect, fear decreases and pain decreases. |
| Companionship | Having someone sit with you, hold your hand, or talk to you distracts from pain and releases calming hormones. |
| Creative activity | Music, drawing, storytelling, or prayer distract the brain from pain. |
| Relaxation | Relaxed muscles and slow breathing reduce tension and pain. |
| Reduction in anxiety | When anxiety is treated (through counseling or medicine), pain decreases. |
| Elevation in mood | Happiness and hope release natural painkillers (endorphins) in the brain. |
| Analgesics | Directly block pain signals. |
| Anxiolytics | Anti-anxiety medicines reduce anxiety that amplifies pain. |
| Antidepressants | Treat depression and can also directly reduce nerve pain. |
- The patient's mood: A happy patient tolerates pain better than a sad patient.
- The patient's morale: Hope and determination reduce pain. Hopelessness increases it.
- The meaning of the pain: If a patient thinks "This pain means I am dying," the pain feels worse. If they think "This pain is being treated and I will be comfortable," it feels better.
- Psychological and spiritual factors: Beliefs, prayers, and mental strength affect pain.
- Social circumstances: A patient with family support feels less pain than an isolated patient.
- Emotional component: Patients may describe pain as "agonizing," "cruel," or "terrible" — these words show the emotional weight of pain.
- Gender differences: Men and women may experience pain differently due to biological, psychological, and social factors. Women may report pain more openly; men may hide it due to cultural expectations of toughness.
- Integrated multi-disciplinary teams: Managing chronic pain requires doctors, nurses, counselors, social workers, and spiritual leaders working together.
- Holistic support: Addressing feelings of helplessness, building resilience, and caring for the whole person improves pain control.
Severe pain in advanced illness has negative effects on every part of the patient's life.
- Pain causes stress hormones (like cortisol and adrenaline) to flood the body, which can:
- Increase heart rate and blood pressure.
- Suppress the immune system (making the patient more vulnerable to infections).
- Interfere with digestion and sleep.
- Psychologically, pain causes anxiety, depression, anger, and hopelessness.
Pain does not exist alone. It interacts with and worsens other symptoms:
- Nausea: Pain makes nausea worse.
- Constipation: Pain and opioids both cause constipation. (Physiological note: Pain causes sympathetic nervous system firing, which halts GI peristalsis).
- Shortness of breath: Pain makes breathing shallow and fast.
- Depression: Pain causes depression; depression causes more pain.
- Anxiety: Fear of pain causes anxiety.
- Insomnia: Pain prevents sleep; lack of sleep increases pain.
The patient's ability to move, work, eat, bathe, and care for themselves is further impaired. A patient who could walk with mild pain may become completely bedridden with severe pain.
- Autonomy (the ability to make one's own choices and control one's own life) is challenged. The patient cannot do what they want. They must depend on others for everything.
- Dignity is challenged. The patient may feel humiliated by needing help with toileting, bathing, or feeding. Uncontrolled pain makes a person feel helpless and stripped of their humanity.
The patient and family may interpret severe pain as a sign that death is coming very soon. This causes panic, grief, and spiritual crisis.
💡 Nursing Role: Reassurance
Reassure the patient that pain can be controlled. Pain does not always mean death is hours away. Good pain control can allow weeks or months of meaningful life.
Despite knowing how to treat pain, many patients in Uganda and other countries suffer unnecessarily because of these barriers:
- Nurses and doctors do not ask about pain regularly.
- They do not use pain assessment tools.
- They rely on vital signs (heart rate, blood pressure) instead of asking the patient. Remember: In chronic pain, vital signs may be normal even when pain is severe.
- Health workers do not know about the WHO analgesic ladder.
- They do not know how to use morphine safely.
- They do not know the difference between nociceptive and neuropathic pain.
- Fear of constipation, drowsiness, or addiction prevents health workers from prescribing strong painkillers. (This irrational fear of prescribing opioids is called "Opiophobia").
- Families refuse morphine because they fear the patient will die sooner or become a "drug addict."
- Myths about pain:
- "Pain is normal and must be endured."
- "Strong pain medicine is only for dying people."
- "If I take morphine now, it won't work later."
- "Pain means the cancer is spreading — there is no point treating it."
- Myths about opioids:
- "Morphine is addictive." (Truth: Addiction is extremely rare when opioids are used properly for severe cancer pain).
- "Morphine causes death."
- "Morphine is illegal."
- In Uganda, morphine may not be available in all health facilities.
- Patients live far from hospitals and cannot afford transport.
- Palliative care services are concentrated in cities, leaving rural areas underserved.
💡 Nursing Role: Advocacy
As nurses, we must educate patients and families, advocate for better access to medicines, and treat pain aggressively wherever we work. You are the bridge between the suffering patient and the life-changing medication!
Different types and causes of pain look and feel different. Recognizing the clinical presentation helps nurses identify the type of pain and suggest the right treatment.
| Type of Pain | Clinical Presentation & Description | Common Examples |
|---|---|---|
| Visceral Pain | Not well localized. Constant, aching sensation. Often described as deep, squeezing, or cramping. | Pain from a liver tumor or bowel obstruction. |
| Bone Pain | Well localized with local tenderness. Resembles a nagging toothache (persistent, deep, throbbing). Worsens with movement and weight bearing. (Physiology: Tumors release prostaglandins which stimulate osteoclasts to destroy bone). | Cancer that has spread (metastasized) to the spine, hip, or leg bones. |
| Colic (Colicky Pain) | Gripping pain associated with spasms (sudden muscle contractions). Comes in waves — intense pain, then relief, then intense pain again. | Bowel obstruction, kidney stones, bladder spasms. |
| Raised Intracranial Pressure (ICP) | Generalized headache. Worsens in the mornings and when lying down (because lying flat prevents venous drainage from the head, increasing pooling). Accompanied by nausea, projectile vomiting, and blurred vision. | Brain tumor, brain infection (toxoplasmosis or cryptococcal meningitis in HIV patients). |
| Neuropathic Pain | Burning, sharp, stabbing, shooting, or a nagging ache. Associated with numbness, tingling, or hypersensitivity. May follow a dermatomal distribution (a specific nerve path/band on the skin). | Shingles (herpes zoster) pain on chest/face; HIV peripheral neuropathy causing burning feet. |
| Spiritual Pain | Emotional form of suffering. Expressed through nightmares. Feeling abandoned by God, worthless, or meaningless. | "God has forgotten me" or terrifying dreams about death. |
Sometimes pain shows through behavior rather than words:
- Refusal to take medication: The patient may be too sore to swallow, or the medicine may cause pain.
- Self-harming behaviors: The patient may hit themselves, pull at wounds, or become aggressive. This can be a sign of severe, uncontrolled pain or confusion.
- In Uganda and many African countries, pain is undertreated.
- Many patients with cancer and HIV/AIDS suffer until death because they cannot access strong pain medicines.
- Less than 5% of cancer patients have access to chemotherapy or radiotherapy, so pain control becomes the most important treatment.
- HIV-related neuropathy: Burning pain in the feet and legs, often caused by the virus or by anti-retroviral drugs (ARVs) like stavudine (d4T).
- Kaposi's sarcoma pain: Painful skin lesions and swelling, especially in the legs.
- Cancer pain: Cervical cancer, breast cancer, prostate cancer, and lymphoma are common and often present late with severe pain.
- Tuberculosis (TB) pain: Chest pain, bone pain from TB of the spine (Pott's disease).
- Malaria and other infections: Headaches, muscle pain, joint pain.
- Some patients believe pain is a punishment from God or ancestors.
- Some believe they must endure pain silently to show strength.
- Some fear that taking strong medicine means they are giving up hope.
- Nursing response: Educate gently. Explain that pain relief is part of God's care and that strong medicine allows the patient to pray, be with family, and live with dignity.
Nurses are often the only health workers available in rural areas. Nurses must be able to assess pain, give pain medicines, teach families, and advocate for better access to morphine. Every nurse in Uganda must know the WHO analgesic ladder and how to use oral morphine.
- Pain is whatever the patient says it is. Believe them.
- Pain has four dimensions: Physical, psychological, social, spiritual. Treat all four.
- Acute pain has signs (fast heart rate, sweating, crying). Chronic pain often does not. Do not rely on vital signs alone.
- Nociceptive pain responds to standard painkillers. Neuropathic pain needs adjuvant medicines.
- Morphine is safe and essential for severe pain. It does not kill patients when used correctly.
- Constipation is the only side effect of morphine that never goes away. Always give laxatives.
- Pain in children is real and often undertreated. Use age-appropriate tools.
- In Uganda, pain is a major public health issue. Nurses are the frontline warriors against it.
Case: A 70-year-old male with advanced prostate cancer is lying perfectly still in bed. His HR is 72, BP is 120/80, and he is not sweating. However, when you ask him, he says his pain is a 9/10. The nursing student next to you whispers, "He must be lying, his vitals are normal and he isn't crying."
Question: How do you correct the student using the principles of palliative care pain?
Answer: You explain that this patient has Chronic Pain. In chronic pain, the body's sympathetic nervous system adapts, meaning the heart rate, BP, and sweating return to normal. Furthermore, patients with chronic pain often lie still or appear withdrawn rather than crying out. The golden rule is: "Pain is what the patient says hurts."
Memorize these formulas to easily recall complex lists during your nursing exams!
🧠 "Please Stop Playing, Start Living"
- Physical
- Social
- Psychological
- Spiritual
- Living (Reminder that total pain affects the whole life)
- Nociceptive = Normal nerves, Normal response
- Neuropathic = Nervous nerves, Nasty signals
🧠 "SHOCK & PAIN"
- Sweating
- Hypertension (high BP)
- Obvious distress (crying, moving)
- Crying
- Keep watching (tachycardia)
- Pallor (pale skin)
- Anxiety
- Increased heart rate (tachycardia)
- Non-stop complaints
🧠 "The DARK Side"
- Depressed
- Apathy (lack of interest)
- Restless or withdrawn
- Kept inside (hidden suffering, normal vitals)
🧠 "DAFIA BED"
- Discomfort
- Anger
- Fatigue
- Insomnia
- Anxiety
- Boredom
- Exhaustion
- Depression
🧠 "BAD MAP"
- Beliefs and myths (patient/doctor attitudes)
- Access problems (services unavailable)
- Don't know (inadequate knowledge)
- Missing assessment (inadequate pain assessment)
- Afraid of side effects (Opiophobia)
- Poor services (poorly accessible)
📝 Make sure you can do the following before entering the exam room:
- Know both definitions of pain (IASP and McCaffery) word for word.
- Be able to draw and explain the pain pathway: nociceptors ➔ peripheral nerves ➔ dorsal horn ➔ spinothalamic tract ➔ thalamus ➔ cerebral cortex.
- Name the chemical mediators of pain: prostaglandins, bradykinin, serotonin, histamine, potassium, hydrogen ions.
- Explain Total Pain with all four dimensions and give examples for each.
- Compare acute and chronic pain in a table (onset, duration, signs, behavior, sympathetic activity).
- Compare somatic and visceral pain (location, description, examples, treatment).
- Describe neuropathic pain and why it needs adjuvant drugs, not just morphine.
- Know the African HIV pain study percentages (lower limb 66%, mouth 50.5%, headache 42.3%, throat 39.8%, chest 17.5%).
- List the factors that increase and decrease pain.
- Describe the clinical presentation of bone pain, visceral pain, raised intracranial pressure, and neuropathic pain.
- List the barriers to pain management and how nurses can overcome them.
- State the principles of pain management (comprehensive approach, multiple causes, WHO ladder, subjectivity, pediatric considerations).
- International Association for the Study of Pain (IASP). (2007). IASP Taxonomy.
- McCaffery, M. (1968). Nursing practice theories related to cognition, bodily pain, and man-environment interactions.
- Saunders, C. (1964). The symptomatic treatment of incurable malignant disease.
- World Health Organization (WHO). Cancer pain relief and palliative care.
Introduction to Pain in Palliative Care Read More »

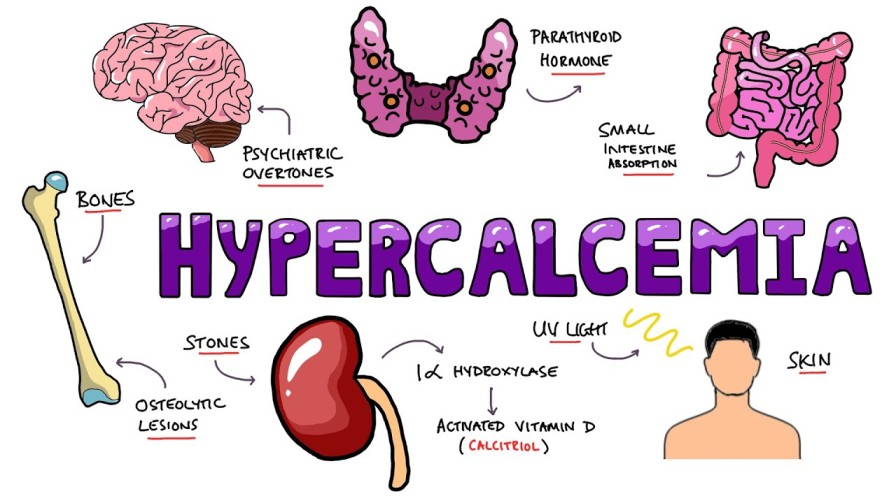

PALLIATIVE CARE EMERGENCIES
Palliative care emergencies refer to any sudden change in a patient's condition that necessitates immediate and urgent intervention.
These are not the dramatic emergencies of a trauma ward (like a car accident), but they are equally serious in their impact on a dying patient's comfort and dignity.
In palliative care, an emergency is defined by what the patient and family experience, not just by medical severity.
A sudden increase in pain, a terrifying bleed, or a patient who suddenly cannot move their legs, these are emergencies because they cause sudden suffering, fear, and potential rapid deterioration of quality of life.
| Feature | General Emergency | Palliative Care Emergency |
|---|---|---|
| Goal | Save life, cure disease | Relieve suffering, maintain dignity, respect wishes |
| Timeframe | Act immediately to prevent death | Act promptly to prevent suffering |
| Patient condition | Usually stable enough for aggressive treatment | Often frail, near end of life (cachectic, immunosuppressed) |
| Treatment options | All available | Limited by prognosis, patient wishes, resources |
| Outcome hoped for | Recovery | Comfort, peace, quality of life |
| Family involvement | Often excluded during crisis | Central to decision-making |
In palliative care emergencies, we do not always aim to "save life" — we aim to save quality of life, to prevent unnecessary suffering, and to honor the patient's wishes. Aggressive interventions that prolong the dying process without adding comfort are considered medically inappropriate.
Before acting, the nurse and team must pause and think. Every emergency in palliative care requires careful consideration of multiple factors:
- What exactly is happening? Is it pain, bleeding, paralysis, confusion?
- How sudden is it? Did it develop over hours or minutes?
- Is it truly new, or an escalation of an existing problem?
Why this matters: A sudden collapse from a pulmonary embolism needs different thinking than a gradual increase in pain. The nurse must identify the problem accurately before treating.
- How strong is the patient? Are they alert, weak, bedridden, or unconscious?
- What other symptoms do they have? Are they already struggling with breathlessness, nausea, or confusion?
- Can they swallow? This determines whether oral medicines are possible.
Why this matters: A frail, cachexic patient with advanced cancer cannot tolerate aggressive interventions the way a stronger patient might. The nurse must match the intervention to the patient's capacity.
- How far has the disease progressed? Is the patient expected to live days, weeks, or months?
- Is this emergency likely to be the "final event"? For example, a massive hemorrhage in a patient with advanced head and neck cancer (carotid blowout) may be the terminal event.
- What has the patient already been through? Multiple hospital admissions, failed treatments, exhaustion?
Why this matters: If a patient is in their final days, subjecting them to a traumatic transfer to hospital, invasive tests, or painful procedures may cause more harm than good. The nurse must ask: "Will this help them live better, or just prolong dying?"
- What treatments exist for this emergency? Radiotherapy for spinal cord compression? Surgery for a blocked bowel? Blood transfusion for severe anemia?
- Are these treatments available in this setting? In rural Uganda, a CT scan, an MRI, or an operating theater may be hours or days away.
- Can the patient reach the treatment? Transport costs, road conditions, family capacity to travel.
Why this matters: In Uganda, availability is often the deciding factor. The nurse must know what is realistically possible and not promise what cannot be delivered.
- How much will treatment cost? Surgery, radiotherapy, blood transfusions, and some medicines are expensive.
- Can the family afford it? In Uganda, many families sell land, borrow money, or go without food to pay for treatment.
- Is the cost justified by the benefit? Will expensive treatment add days of suffering or days of quality life?
Why this matters: Palliative care in Uganda must be affordable and appropriate. The nurse must advocate for treatments that are effective and accessible, and help families make informed decisions without guilt.
- Will the treatment work? What is the chance of success?
- What are the side effects? Will the treatment cause more nausea, pain, confusion, or weakness?
- Is the burden worth the benefit? For example, emergency radiotherapy for spinal cord compression may prevent paralysis but cause severe fatigue.
Why this matters: In palliative care, "first, do no harm" is paramount. A treatment that causes more suffering than relief is not appropriate.
- What has the patient said they want? Have they expressed a wish to die at home? To avoid hospitals? To "not be a burden"?
- Have they made an advance directive or living will? (Rare in Uganda, but increasingly important).
- Are they able to express wishes now? If confused or unconscious, what did they say before?
Why this matters: The patient's autonomy (right to make decisions about their own body and life) is central to palliative care. Even in an emergency, we must respect their wishes unless they are unconscious and we must act in their best interest.
- What does the family want? Do they want everything possible done? Or do they want the patient to be comfortable at home?
- Is there family conflict? Different family members may disagree about treatment.
- What are the cultural expectations? In some Ugandan cultures, "doing everything" is seen as love; in others, allowing natural death is respected.
Why this matters: Families in Uganda are often the primary caregivers and decision-makers. The nurse must listen to them, educate them, and help them reach consensus. However, the patient's wishes come first if they are known.
When a palliative care emergency occurs, the nurse must assess systematically and quickly:
Establish an accurate diagnosis. What is actually happening? Do not assume. A patient who suddenly cannot walk may have spinal cord compression, a stroke, severe weakness from anemia, or a fractured bone. Ask questions, examine, review the history.
Can this problem be reversed? Or is it part of the natural progression toward death? Example: A blocked bowel from tumor may be reversed with surgery in some cases, but not in others. Example: Severe pain from a pathological fracture can be relieved with morphine and radiotherapy, but the fracture itself may not heal. Why this matters: If irreversible, the focus shifts entirely to comfort.
How will resolving (or not resolving) this problem affect the patient? Will treating it improve their quality of life for days or weeks? Will leaving it untreated cause unbearable suffering? Will aggressive treatment cause more suffering than the problem itself?
Will active intervention enhance the patient's quality of life? This is the central question in palliative care emergencies. A blood transfusion may give a patient energy to say goodbye to their children. Emergency surgery may give a patient weeks of comfortable life at home. But intensive care admission may only prolong dying in a patient who wishes to die at home.
Can we actually do what we are considering? Is the treatment available in this hospital, this district, this country? Can the family pay? If not, are there alternatives?
What does the patient want? (If able to express). What does the family want? Is there consensus? If not, the nurse may need to facilitate discussion.
There are circumstances in the care of patients with life-limiting conditions that require urgent assessment and treatment. Although not a daily occurrence, rapid intervention can prevent more serious consequences. While it is important to focus on the common medical emergencies, it is important to remember that emergencies in palliative care include a wider range of issues:
- Hypercalcaemia: (High calcium in the blood). Expansion: Tumors (especially breast, lung, multiple myeloma) release Parathyroid Hormone-related Protein (PTHrP), which forces osteoclasts to destroy bone, dumping massive amounts of calcium into the blood. Symptoms: "Stones, bones, groans, and psychiatric overtones" (confusion, severe constipation, thirst).
- Spinal cord compression: Expansion: Tumor metastasizes to the vertebral body, expands, and collapses the bone backward into the spinal canal, crushing the spinal cord. It causes sudden back pain followed by paralysis and loss of bowel/bladder control. Irreversible if not treated with high-dose steroids (Dexamethasone) within 24-48 hours.
- Superior Vena Cava Obstruction (SVCO): Expansion: A lung tumor or lymphoma physically pinches the main vein returning blood from the head to the heart. Blood backs up, causing massive swelling of the face/neck, prominent chest veins, and severe breathlessness.
- Massive haemorrhage: (Severe bleeding, e.g., a tumor eroding into a major artery).
- Severe uncontrolled pain
- Pathological fractures: Bones hollowed out by cancer breaking under normal weight.
- Acute bowel obstruction: Tumors physically blocking the intestines.
- Sepsis and infections: Common due to neutropenia (low white blood cells) from chemotherapy.
These are equally important and often overlooked:
| Emergency Type | Description | Example |
|---|---|---|
| Emergency discharge | A patient wants to go home to die immediately. | "I want to die in my village. Please help me leave today." |
| Emotional emergencies | High levels of expressed anxiety, panic, or despair. | A patient screaming, "I cannot bear this anymore!" |
| Spiritual/existential emergencies | Pressure to "sort things out" before death. | A patient who needs to reconcile with an estranged child urgently. |
| Social emergencies | Sudden family crisis, eviction, or loss of caregiver. | A caregiver dies suddenly, leaving the patient alone. |
Why these matter: A patient who is terrified, who has unfinished business, or who is about to be evicted is in a true emergency — their suffering is as real as physical pain. The nurse must recognize and respond. This relates to Dame Cicely Saunders' concept of "Total Pain".
- Are they early in the illness (months to live, still relatively strong)?
- Are they mid-course (weeks to months, declining but still active)?
- Are they near the end (days to weeks, very weak, bedbound)?
- Are they actively dying (hours to days)?
Why this matters: The answer determines what is appropriate. A patient early in their illness may benefit from aggressive intervention for spinal cord compression. A patient in their final hours needs comfort, not a hospital transfer.
- Is this a new problem (e.g., a new fracture, a new infection)?
- Is this a progression of the disease (e.g., tumor growing, nerves being compressed)?
- Is this a treatment side effect (e.g., chemotherapy causing severe mucositis)?
- Is this a complication of immobility (e.g., pressure sore, DVT)?
- Is this psychological/spiritual (e.g., panic attack manifesting as chest pain)?
Why this matters: The cause determines the treatment. A panic attack needs reassurance and anxiolytics, not morphine. A pathological fracture needs immobilization and radiotherapy, not just painkillers.
- Ideas: What do they think is happening? (They may think a headache means "the cancer has gone to the brain" when it is actually tension).
- Concerns: What are they most afraid of? (They may fear paralysis more than death).
- Expectations: What do they hope will happen? (They may expect a cure, or comfort).
Why this matters: If they expect a cure when cure is impossible, they will be devastated. Align expectations with reality gently.
As a nurse, you are often the first to recognize an emergency and the first to respond.
| Role | Action |
|---|---|
| Early recognition | Know the signs of common emergencies. Monitor patients closely. |
| Rapid assessment | Use the assessment framework above. Ask the three critical questions. |
| Immediate comfort measures | Give pain relief, reassurance, position the patient, call for help. |
| Communication | Explain to the patient and family what is happening and what you are doing. |
| Coordination | Contact the doctor, arrange transport if needed, mobilize family support. |
| Documentation | Record the emergency, actions taken, and patient/family response. |
| Advocacy | Speak for the patient's wishes. Prevent unnecessary suffering from futile treatment. |
| Emotional support | Stay calm. Your calmness reassures the patient and family. |
| Follow-up | After the crisis, review what happened. Support the patient and family in processing. |

Severe uncontrolled pain is a palliative care emergency because it causes immediate and intense suffering that overwhelms the patient and family. It demands urgent, constant attention until the pain is brought under control. Pain is not "just a symptom" in this context — it is a crisis that:
- Prevents the patient from thinking, sleeping, eating, or communicating.
- Causes terror and despair in the patient and family.
- May lead to suicidal thoughts or requests for euthanasia.
- Indicates a serious underlying problem (fracture, obstruction, nerve compression) that may need specific treatment.
| Type | Description | Example |
|---|---|---|
| Anticipatory pain | Pain expected before a procedure or event | Fear of the pain of a wound dressing |
| Procedural pain | Pain caused by a medical procedure | Pain during insertion of a urinary catheter |
| Acute-on-chronic pain | Sudden severe pain in a patient with existing chronic pain | A patient with stable cancer pain who suddenly develops a pathological fracture |
| Breakthrough pain | Transitory flare of pain "breaking through" regular analgesia | A patient on regular morphine who suddenly screams with severe back pain |
Important: Acute pain that is left uncontrolled can evolve into chronic pain (present for >3 months). Physiologically, continuous severe pain signals bombard the spinal cord, activating NMDA receptors. The nervous system undergoes a "wind-up" phenomenon, becoming chemically "sensitized" — it learns to feel pain even when the original cause is gone, and normal touches begin to feel painful (Allodynia). Preventing this permanent nervous system rewiring is exactly why we treat acute pain as an absolute emergency.
| Source | Description | Example |
|---|---|---|
| Bone metastases | Cancer spread to bones (activates osteoclasts to dissolve bone) | Severe back pain from collapsed vertebrae |
| Visceral cancer | Tumors in internal organs causing pressure/stretching | Liver capsule pain from enlarged liver; bowel obstruction |
| Thoracic cancer | Cancers in the chest (lung, esophagus, pleura) | Chest wall pain from rib invasion; pleuritic pain |
| Soft tissue/bone cancer | Primary or secondary tumors in muscles, skin, or bones | Pain from a fungating breast tumor; pain from a sarcoma |
| Nervous system | Tumors or infections affecting nerves or spinal cord | Sciatica from nerve compression; burning HIV neuropathy |
| Procedure/treatment | Pain caused by surgery, radiotherapy, chemotherapy | Mucositis from chemotherapy; radiation burns; post-surgical |
| Cancer complications | Infections, bleeding, or other complications | Severe pain from infected wound; pain from abscess |
In an emergency, there is no time for a leisurely assessment. The nurse must rapidly identify the underlying cause to give the most appropriate treatment. Ask yourself: Is this a new pain or an escalation? Is there a clear trigger? Are there signs of a specific cause?
| Possible Cause | Clues on Assessment |
|---|---|
| Pathological fracture | Sudden severe bone pain after minor movement; deformity; inability to bear weight |
| Spinal cord compression | Back pain with weakness, numbness, or paralysis in legs; loss of bladder/bowel control |
| Bowel obstruction | Colicky abdominal pain, vomiting, constipation, distended abdomen |
| Infection | Fever, localized tenderness, redness, pus |
| Bleeding into tumor | Sudden increase in pain with swelling, bruising, or signs of blood loss |
| Nerve compression | Shooting, burning pain with numbness or weakness in a specific area |
- P — Position/Precipitating: "Where is the pain? What makes it worse? Did anything trigger it?"
- Q — Quality: "What does it feel like? (Burning = nerve; crushing = bone; cramping = bowel)"
- R — Radiation: "Does it spread anywhere? (To the leg = sciatica; to the shoulder = diaphragm irritation)"
- S — Severity & Site: "How bad is it? 0-10? Point to where it hurts."
- T — Timing & Treatment: "When did it start? What have you taken? Did it help?"
- Numerical Rating Scale (NRS): Adults who can count ("Rate your pain 0-10").
- Visual Analogue Scale (VAS): A 10cm line; patient marks their pain level.
- Faces Scale (Wong-Baker): Children under 8, or low literacy. Six faces from smiling to crying.
- Hand Scale: African settings. Clenched fist = 0; 5 extended fingers = worst pain.
Important: Assess pain at rest AND during movement. Incident pain needs pre-emptive analgesia before moving.
- General appearance: Distress, sweating, pallor, guarding (Indicates sympathetic NS activity).
- Vital signs: Tachycardia and hypertension suggest severe pain; fever suggests infection.
- Site of pain: Inspect for swelling, redness, deformity, wounds.
- Neurological: Check sensation, strength, reflexes (numbness = nerve/spinal cord involvement).
- Abdomen: Distension, tenderness, bowel sounds (obstruction or peritonitis).
- Mobility: Can the patient move/bear weight? (Immobility suggests fracture or spinal compression).
"To reduce the pain and allow the patient to rest. The patient will settle enough to facilitate further assessment." The first priority is not to find the exact cause — it is to relieve the suffering. Once the patient is comfortable, a more thorough assessment can follow.
- Act immediately — do not wait for the doctor to arrive if you have standing orders.
- Stay with the patient — your presence is calming and allows rapid reassessment.
- Reassure the patient and family — explain what you are doing and why.
- Give analgesia first, investigate second — comfort takes priority.
- Reassess frequently — check pain score every 15-30 minutes until controlled.
- Patient NOT already on morphine: Give stat (immediate) dose of oral morphine 5-10mg orally.
- Patient ALREADY on regular morphine: Give breakthrough/rescue dose immediately. Equivalent to their 4-hourly regular dose (e.g., if taking 10mg every 4 hours, give 10mg as breakthrough).
Why oral first? Oral morphine is effective, safe, fast-acting, and requires no needles. However, when taking morphine orally, the blood travels through the Portal Vein straight to the Liver where a massive amount of the drug is destroyed before reaching the brain (First-Pass Metabolism).
If oral is impossible, use these ratios based on circumventing the liver:
- Subcutaneous (SC): Dose is HALF the oral dose (Oral:SC ratio is 2:1) because it avoids first-pass metabolism.
- Intravenous (IV): For very rapid relief. Dose is 1/3 to 1/2 of oral dose (Oral:IV ratio is 2-3:1).
- Sublingual/Buccal/Rectal: Alternatives if vomiting or unconscious.
Wait 30 minutes after oral morphine (15 minutes after SC/IV). Reassess pain score. Ask the patient: "Has the pain changed? How bad is it now?"
- Pain relieved (score drops to ≤3/10): Continue monitoring. Document. Plan regular dosing.
- Partial relief (score improved but still 5-6/10): Repeat the same dose. Reassess in another 30 minutes.
- No relief (score unchanged/worsened to 8-10/10): Repeat the dose. Consider increasing by 50%. Call doctor for review.
Once the acute crisis is controlled, adjust the regular morphine dose:
- Calculate total morphine used in 24 hours (regular doses + breakthrough doses).
- Increase the regular 4-hourly dose based on this total. Be prepared to increase by 100% or more if the patient needed many breakthrough doses.
- Example: Patient was on 10mg every 4 hours = 60mg/day. During the emergency, needed 6 breakthrough doses of 10mg = 60mg extra. Total in 24 hours = 120mg. New regular dose = 120mg ÷ 6 = 20mg every 4 hours. This is a 100% increase — appropriate because the pain was severely uncontrolled.
Reassess pain score every 1-2 hours until stable. Review the management plan if pain is not controlled after 2-3 dose adjustments. Consider alternative causes if morphine is not working (neuropathic pain). Consider adjuvant medications.
| Cause | Specific Treatment & Physiological Rationale |
|---|---|
| Bone metastases / fracture | Radiotherapy, immobilization, surgery, NSAIDs (blocks prostaglandins), Bisphosphonates (kills bone-destroying osteoclasts) + morphine. |
| Spinal cord compression | Urgent Dexamethasone (high dose steroids massively reduce peritumoral edema taking pressure off the cord), urgent radiotherapy/surgery, morphine. |
| Visceral pain (liver, bowel) | Morphine, steroids for inflammation, antispasmodics for colic, treatment of obstruction. |
| Nerve compression / Neuropathic | Morphine (may only help partially). Adjuvants: Amitriptyline (boosts descending pain inhibition), Gabapentin/Carbamazepine (calms hyperactive nerve firing), steroids. |
| Infection / Bleeding into tumor | Antibiotics, drainage / Pressure, tranexamic acid (promotes clotting), morphine. |
- Calm environment: Reduces anxiety that chemically amplifies pain perception.
- Reassurance and explanation: "We are giving you strong medicine. The pain will get better."
- Positioning: Find the position of least pain; use pillows for support.
- Gentle touch & Cool cloth: Holding hands releases endogenous opioids (endorphins) and oxytocin, reducing fear.
- Family presence: Loved ones provide comfort; but manage them if their distress increases the patient's anxiety.
- Relaxation breathing: Once pain begins to ease, guide slow deep breathing.
- 0 min: Recognize emergency. Stay with patient. Call for help if needed. (Nurse)
- 0-5 min: Rapid PQRST assessment. Check vital signs. (Nurse)
- 5-10 min: Give stat oral morphine (5-10mg if not on morphine; breakthrough dose if on morphine). (Nurse per standing orders)
- 10-15 min: Reassure patient and family. Position for comfort. Document. (Nurse)
- 15-30 min: Reassess pain score.
- 30 min: If pain persists, repeat dose or increase by 50%.
- 30-60 min: Continue reassessment every 15-30 minutes until pain ≤3/10.
- 60 min: Once controlled, calculate total 24-hour morphine used. Adjust regular dose. Assess for cause of sudden pain escalation.
- Regular monitoring: Check pain score every 1-2 hours initially, then every 4 hours.
- Prevent constipation: Start or increase laxatives with EVERY opioid dose (Opioids paralyze the gut).
- Treat nausea: Give antiemetics if morphine causes vomiting (Stimulates the Chemoreceptor Trigger Zone - CTZ).
- Address cause: Arrange radiotherapy, surgery, antibiotics.
- Psychosocial support, Documentation, Education: Talk with family, record doses, teach family about breakthrough doses.
| Challenge | Nursing Response |
|---|---|
| Morphine availability: Not all facilities have it. | Use what is available (tramadol, pethidine short-term). Advocate urgently with pharmacy and management. |
| Transport delays: Patients in rural areas take hours to reach help. | Train family members to give oral morphine at home (Task Shifting). Provide clear written instructions and phone support. |
| Family fear of morphine: Belief that it kills. | Explain that morphine relieves pain and does not hasten death. Share success stories. Involve a respected elder or religious leader. |
| Cost of specific treatments: Radiotherapy/surgery unaffordable. | Focus on what CAN be done: morphine, positioning, family support, comfort care. Do NOT make the family feel guilty. |
| Limited diagnostic tools: No X-rays or CT scans. | Use clinical judgment. If a patient has sudden back pain with leg weakness, treat as possible spinal cord compression with steroids + morphine immediately while arranging transfer. |
| Multiple patients, few nurses: Cannot stay constantly. | Prioritize the patient in severe pain. Delegate other tasks. Ask family members to help with non-clinical care. |
Accurate documentation is essential for continuity, legal protection, and quality improvement. You must record:
- Date and time: When emergency began and when each action was taken.
- Initial assessment: PQRST findings, pain score, vital signs, physical findings.
- Actions taken: Doses given, route, time; non-pharmacological measures.
- Patient response: Pain scores after each intervention; side effects observed.
- Family communication: What was explained; their understanding and consent.
- Medical review: Doctor contacted; orders received; further plan.
- Outcome & Follow-up: Was pain controlled? Final regular dose? Monitoring schedule; education given.
"Where? What? Why?"
- Where is the patient on their disease trajectory?
- What is causing this problem at this time?
- Why (what ideas, concerns, expectations) do the patient and family have?
"RAPID-CARE"
- Reversibility — can it be reversed?
- Availability — is treatment available?
- Prognosis — where is the patient in their illness?
- Impact — how will this affect quality life?
- Diagnosis — what is the exact problem?
- Condition — how strong is the patient?
- Affordability — can the family pay?
- Requests — what do patient/family want?
- Effectiveness — will treatment help or harm?
"MORPHINE-STAT"
- Morphine immediately (stat dose)
- Oral route preferred
- Reassess every 30 minutes
- Pain score check
- Help family stay calm
- Increase dose if needed (50-100%)
- Non-pharmacological comfort measures
- Explain everything to patient and family
- Specific cause treatment once pain controlled
- Titrate regular dose based on total 24-hour use
- Adjuvants for nerve pain, bone pain, inflammation
- Teach family about breakthrough doses
"Please Question Robert Swiftly Today"
- Position / Precipitating factors
- Quality
- Radiation
- Severity & Site
- Timing & Treatment tried
- Define palliative care emergency and explain how it differs from general medical emergencies.
- List the 8 considerations for managing palliative care emergencies.
- Name the 3 critical questions to ask in any emergency and explain why each matters.
- Explain why severe uncontrolled pain is a palliative care emergency (Mention Central Sensitization/Chronic rewiring!).
- Describe the types of acute pain in palliative care (anticipatory, procedural, acute-on-chronic, breakthrough).
- List common causes of severe uncontrolled pain in palliative patients.
- Describe the rapid PQRST assessment for pain emergency.
- Explain the pharmacological management step-by-step: stat dose → assess response → repeat → titrate regular dose.
- Calculation Practice: Calculate a morphine dose increase based on breakthrough use.
- Discuss specific management for bone metastases, spinal cord compression, and neuropathic pain as causes of severe pain.
- Address the challenges of managing pain emergencies in rural Uganda and nursing responses.
- Explain the importance of non-pharmacological measures during a pain emergency.
- World Health Organization (WHO). (2014). Global atlas of palliative care at the end of life.
- African Palliative Care Association (APCA). (2010). Guidelines for Providing Palliative Care to People Living with HIV/AIDS and Cancer in Sub-Saharan Africa.
- Ferrell, B. R., & Coyle, N. (Eds.). (2010). Oxford Textbook of Palliative Nursing. Oxford University Press.
- Ministry of Health, Republic of Uganda. (2021). National Palliative Care Guidelines.
- Twycross, R., & Wilcock, A. (2011). Introducing Palliative Care. Radcliffe Publishing.
PALLIATIVE CARE EMERGENCIES Read More »

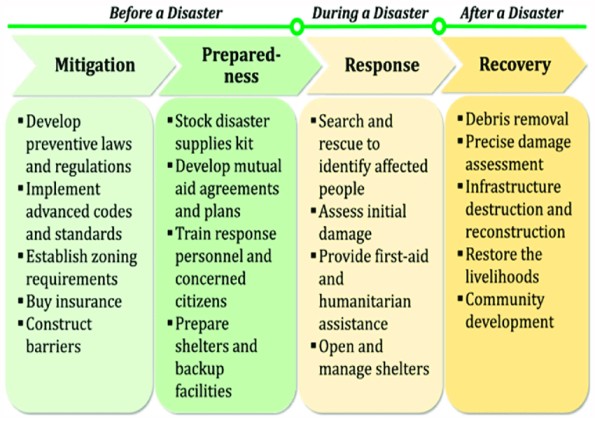
stages of disaster management
Definition: Disaster Management is a comprehensive range of activities, programs, and measures that are undertaken before, during, and after a disaster.
- Before the exam — You study, gather materials, and rest (preparation)
- During the exam — You write carefully, manage your time, and stay calm (response)
- After the exam — You review your performance and plan how to improve (recovery)
The primary purpose is to:
| Purpose | Simple Meaning |
|---|---|
| Prevent a disaster | Stop it from happening in the first place |
| Minimize impact | If it happens, reduce how bad it is |
| Facilitate recovery | Help people return to normal life after |
Disaster management never stops. Even when there is no disaster, communities must continue preparing for future ones.
Disaster management involves many different sectors working together:
- Health sector — Hospitals, clinics, community health workers
- Government — Office of the Prime Minister, local councils
- Non-Governmental Organizations (NGOs) — Red Cross, UNICEF, World Vision
- Community — Local leaders, religious institutions, families
- Private sector — Telecommunication companies, transport services
Many different professionals must work together:
- Nurses and doctors
- Engineers and architects
- Police and army
- Teachers and social workers
- Meteorologists and environmental scientists
The overall aim is to minimize:
- Loss of life — Prevent deaths
- Disability — Prevent permanent injury
- Suffering — Reduce pain and distress
- Damage — Protect property and infrastructure
There are five main objectives of disaster management. Nurses must understand each one because they play a role in all of them.
Definition: Efforts to prevent and decrease the likelihood of hazards occurring in the first place.
- Bududa landslides — Preventing settlement on steep slopes prevents deaths
- Kampala floods — Stopping construction in wetlands reduces flooding
- Karamoja drought — Planting drought-resistant crops reduces food insecurity
- Teach communities about risky behaviors
- Advocate for safe building practices
- Participate in vaccination campaigns to prevent disease outbreaks
Definition: Actions taken to lessen the effects of hazards on vulnerable populations and infrastructure.
| Prevention | Mitigation |
|---|---|
| Stops the hazard from happening | Reduces damage when hazard happens |
| Example: Banning building in floodplains | Example: Building houses on stilts in flood-prone areas |
- Building retaining walls on steep slopes in Mbale
- Installing lightning conductors on schools and hospitals
- Using fire-resistant materials in market construction
- Elevating water tanks so they survive floods
- Identify vulnerable groups in the community
- Support mitigation projects (e.g., tree planting)
- Ensure health facilities are built to withstand disasters
Definition: Preparing for potential disasters by developing response plans, training personnel, and stockpiling essential resources.
- Response plans — Written plans of what to do
- Training — Teaching people their roles
- Stockpiling — Keeping supplies ready
- Drills — Practicing what to do
- Know your hospital's disaster plan
- Maintain certification in first aid and CPR
- Participate in disaster drills
- Help prepare community emergency kits
Definition: Swift and efficient response to a disaster to mitigate its impact and provide immediate assistance to affected individuals.
- Quick activation of emergency teams
- Fast deployment of resources
- Immediate medical care
- Efficient coordination
- Triage victims quickly
- Provide first aid immediately
- Communicate clearly with team members
- Document injuries and treatments accurately
Definition: Implementation of programs and initiatives aimed at restoring the affected community and supporting the physical, emotional, and socio-economic recovery of disaster victims.
| Type | Focus | Example |
|---|---|---|
| Physical recovery | Health and body | Treating injuries, providing prosthetics |
| Emotional recovery | Mind and feelings | Counseling for trauma |
| Social recovery | Relationships and community | Rebuilding community groups |
| Economic recovery | Money and livelihood | Providing loans, restoring farms |
- Continue medical follow-up
- Provide psychological counseling
- Support rehabilitation programs
- Link victims to social services
| Objective | Key Action | Nursing Example |
|---|---|---|
| Risk Prevention | Stop hazards before they happen | Vaccination campaigns |
| Hazard Mitigation | Reduce damage from hazards | Advocating for safe housing |
| Emergency Preparedness | Be ready to respond | Stocking emergency supplies |
| Effective Response | Act quickly during disaster | Triage and first aid |
| Recovery & Rehabilitation | Restore community after disaster | Counseling and follow-up care |
Disaster management activities can be grouped into three main stages based on WHEN they happen.
| STAGES OF DISASTER MANAGEMENT | ||
|---|---|---|
| PRE-DISASTER (Before) | DURING DISASTER (During) | POST-DISASTER (After) |
|
|
|
Definition: The pre-disaster stage includes all proactive measures taken to minimize human and property losses caused by potential hazards.
- Awareness Campaigns: Teaching communities about disaster risks. Using radio, community meetings, and schools. Distributing educational materials in local languages.
- Strengthening Weak Structures: Reinforcing buildings in earthquake-prone areas. Building retaining walls on hillsides. Elevating houses in flood zones.
- Developing Disaster Management Plans:
- Household plans: Where to go, what to bring, how to communicate.
- Community plans: Evacuation routes, shelter locations, communication trees.
- Institutional plans: Hospital disaster plans, school emergency procedures.
- Mitigation Activities: Planting trees to prevent landslides. Digging drainage channels to prevent floods. Enforcing building codes.
- Preparedness Activities: Stockpiling food and water. Training first aid teams. Conducting evacuation drills.
- Educate communities about health risks and preparedness
- Identify vulnerable populations (elderly, pregnant women, disabled)
- Participate in planning at hospital and community level
- Stock medical supplies and check expiration dates
- Train community health workers in first aid
Definition: This stage focuses on addressing the immediate needs of the affected population and minimizing their suffering.
- Emergency Response Activities: Activating disaster response teams. Setting up emergency operations centers. Deploying search and rescue teams.
- Provision of Essential Services: Medical care for injured. Clean water and food distribution. Emergency shelter. Sanitation facilities.
- Rescue and Relief Efforts: Searching for trapped victims. Evacuating people from danger zones. Distributing emergency supplies. Providing psychological first aid.
- Speed — Help must arrive quickly
- Coordination — Agencies must work together, not duplicate efforts
- Prioritization — Most critical needs first
- Safety — Protect responders too
- Triage — Sort victims by severity
- First aid — Stop bleeding, open airways, treat shock
- Documentation — Record injuries and treatments
- Communication — Report needs to coordinators
- Emotional support — Calm frightened victims
Definition: Following a disaster, the emphasis shifts towards initiating recovery and rehabilitation measures for affected communities.
- Restore Essential Services: Repair roads, bridges, and communication lines. Restore water and electricity. Reopen schools and health facilities.
- Rebuild Infrastructure: Reconstruct damaged buildings. Build back better (more resilient structures). Repair homes and public buildings.
- Provide Medical Aid: Continue treating injuries. Manage chronic diseases disrupted by disaster. Mental health services for trauma.
- Facilitate Livelihood Restoration: Provide seeds and tools to farmers. Give loans to restart businesses. Create employment programs.
- Support Early Recovery and Long-Term Resilience: Help communities become stronger than before. Build early warning systems. Improve disaster preparedness for the future.
- Continue patient care — Follow up on injuries and illnesses
- Rehabilitation — Physiotherapy, prosthetic fitting
- Mental health support — Counseling, support groups
- Health education — Prevent disease in temporary shelters
- Immunization — Catch up on disrupted vaccination programs
- Empowerment — Teach communities to advocate for their needs
| Stage | When | Focus | Key Activities |
|---|---|---|---|
| Pre-Disaster | Before | Prevention & Preparedness | Awareness, planning, mitigation, stockpiling |
| Disaster Occurrence | During | Immediate Response | Rescue, relief, emergency medical care, evacuation |
| Post-Disaster | After | Recovery & Rehabilitation | Rebuilding, restoring services, counseling, economic recovery |
Disaster management requires many different people working together. No single person or profession can manage a disaster alone.
- Provide emergency medical care
- Admit mass casualties
- Perform emergency surgeries
- Serve as coordination centers for health response
- Identify dead bodies
- Determine cause of death
- Handle bodies respectfully and safely
- Issue death certificates
Psychiatrists, Psychologists, Psychiatric clinical officers, Counselors.
- Provide crisis counseling and long-term therapy
- Dispense emergency medications
- Provide first aid supplies
- Maintain stockpiles of essential drugs
- Ensure continuity of chronic disease medications
- Monitor disease outbreaks
- Coordinate vaccination campaigns
- Ensure water and food safety
- Conduct health surveillance
- Search and rescue teams
- Paramedics
- Ambulance drivers
- First responders
- Extinguish fires
- Rescue people from burning or collapsed buildings
- Provide emergency medical care
- Handle hazardous materials
Local council leaders (LC1, LC2, LC3, LC5), Office of the Prime Minister — Disaster Preparedness, Resident District Commissioners (RDCs).
- Coordinate resources and make policy decisions
Radio and TV stations, Newspapers and social media.
- Disseminate warnings and information
- Educate the public
- Important: Must report accurately to prevent panic
- Produce and distribute essential medical supplies
- Ensure availability of drugs, equipment, and PPE
- Maintain law and order
- Control traffic during evacuation
- Secure disaster scenes
- Prevent looting
- Assist with search and rescue
- Handle dead bodies safely
- Prevent disease spread from corpses
- Provide dignified burial or cremation
- Support grieving families
| Category | Personnel | Main Role in Disaster |
|---|---|---|
| Health Care | Hospitals | Emergency treatment, surgery, admission |
| Medical Examiners | Body identification, cause of death | |
| Mental Health Professionals | Crisis counseling, trauma therapy | |
| Pharmacies | Medication supply, first aid | |
| Public Health Departments | Disease surveillance, outbreak control | |
| Rescue Personnel | Search, rescue, first aid | |
| Non-Health Care | Firefighters | Fire control, rescue, hazmat |
| Government Officials | Coordination, policy, resource allocation | |
| Media | Information dissemination, public education | |
| Medical Supply Manufacturers | Production and distribution of supplies | |
| Police | Security, traffic control, scene safety | |
| Morticians/Funeral Directors | Safe body handling, dignified burial |
🔑 Exam Tip: "Disaster management is a TEAM SPORT. Nurses must know who their teammates are and how to work with them."

The Disaster Management Cycle is a continuous process that shows how disaster management activities flow from one phase to the next. It recognizes that disasters are recurring events, and communities must always be preparing for the next one.
- Phase 1: MITIGATION ➔ flows into ➔
- Phase 2: PREPAREDNESS ➔ flows into ➔
- Phase 3: RESPONSE ➔ flows into ➔
- Phase 4: RECOVERY ➔ loops back to ➔ MITIGATION
Note: The cycle is continuous. After Recovery, the community returns to Mitigation and Preparedness, hopefully stronger than before.
Definition: Mitigation refers to sustained actions that reduce or eliminate long-term risk to people and property from natural hazards and their effects.
- Eliminate the probability of disaster occurrence (where possible)
- Reduce the effects of unavoidable disasters
- Federal/National — Government policies, national building codes
- State/Regional — Regional land use plans
- Local — District and community projects
- Individual — Family decisions (where to build, how to build)
Definition: Structural mitigation involves constructing physical projects to reduce economic and social impacts of disasters.
| Project | Purpose | Ugandan Example |
|---|---|---|
| Dams and levees | Control floodwaters | Dams on the Nile |
| Retaining walls | Prevent landslides | Walls in Bududa |
| Earthquake-resistant buildings | Withstand ground shaking | Reinforced hospital in Kasese |
| Elevated houses | Survive floods | Houses on stilts in flood-prone areas |
| Lightning conductors | Protect from lightning strikes | Schools in Karamoja |
| Fire-resistant materials | Slow fire spread | Markets with concrete instead of wood |
| Strong bridges | Survive floods and earthquakes | Bridges in mountainous areas |
| Cyclone shelters | Safe buildings for evacuation | Community shelters in coastal areas |
Definition: Non-structural mitigation involves policies, awareness, and practices that reduce disaster impact without building physical structures.
| Activity | Purpose | Ugandan Example |
|---|---|---|
| Land use planning | Keep people away from danger zones | Zoning laws preventing building in wetlands |
| Building codes | Ensure safe construction | Enforcement of construction standards |
| Public education | Teach people how to protect themselves | Radio programs on landslide warning signs |
| Insurance | Financial protection after disaster | Crop insurance for farmers |
| Early warning systems | Alert people before disaster | Weather radios in Karamoja |
| Training programs | Teach skills to reduce risk | First aid training for community health workers |
- Promoting Sound Land Use Planning: Identify hazard-prone areas. Zone these areas for safe uses (parks, agriculture). Enforce zoning regulations.
- Relocating or Elevating Structures: Move houses out of floodplains. Raise buildings on pillars. Resettle communities.
- Installing Hurricane Straps: Metal straps attach roof to walls/foundation. Prevents roof blowing off.
- Buying Flood Insurance: Financial protection for belongings.
- Developing and Enforcing Building Codes: Laws specifying safe construction. Regular inspections.
- Engineering Roads and Bridges: Build to withstand earthquakes/floods. Do not block water flow.
- Using Fire-Retardant Materials: Concrete, brick, treated wood. Proper electrical wiring.
Essential supply kits prepared in advance for use during a disaster. Important because shops may be closed, roads blocked, or help delayed.
- Purpose: Personal hygiene and basic health needs
- Items: 1 hand towel, 1 washcloth, 1 bath-size bar of soap, 1 toothbrush, 1 large toothpaste, 6 adhesive bandages, 1 comb, 1 nail file/clipper.
- Packaging: Wrap in hand towel, tie with string, place inside a sealed 1-liter plastic bag.
- Purpose: Basic medical treatment for injuries and common illnesses
- Items: Sterile gauze pads, adhesive tape, triple antibiotic ointment, Aspirin, Ferrous sulfate tablets, Antacid, Mebendazole/Thiabendazole, Sulfamethoxazole/Trimethoprim, Tetmosol soap, ORS, Promethazine, Chlorhexidine, Rolled bandages.
- Purpose: Allow children to continue education
- Items: Blunt scissors, ruled paper pads, ruler, sharpener, unsharpened pencils, eraser, construction paper, crayons.
- Packaging: Prepare a cloth bag (12" x 14") with handles and closure.
- Purpose: Essential items for infants and babies
- Items: 6 cloth diapers, 2 shirts, 2 washcloths, 2 gowns, 2 diaper pins, 1 sweater, 2 receiving blankets.
- Packaging: Bundle inside one receiving blanket, secure with diaper pins.
- Purpose: Basic household items for displaced families
- Items: 2 flat double bed sheets, 2 pillow cases, 2 pillows. Additional sheets/towels/blankets as available.
- Purpose: Allow families to repair clothing
- Items: 3 uncut yards of cotton fabric, sewing scissors, needles, thread, 6 matching buttons.
- Purpose: Maintain hygiene and sanitation
- Items: 5-gallon bucket with lid, bleach, scouring pads, scrub brush, cleaning towels, sponges, laundry detergent, household cleaner, dish soap, clothespins, clothesline, dust masks, latex/work gloves, trash bags, insect repellent, air freshener.
- Personal Preparedness: Maintain good physical/psychological health, obtain first aid/CPR certification, keep family prepared.
- Professional Preparedness: Establish disaster team at work, know hospital disaster plan, participate in drills, develop educational materials.
- Community Involvement: Keep records of vulnerable populations, know community resources, promote collaboration.
- Public Education: Teach safety precautions, emergency supply storage, basic first aid.
Definition: Disaster preparedness encompasses a range of measures taken by governments, organizations, communities, and individuals to effectively respond to and cope with the aftermath of disasters.
Achieve a satisfactory level of readiness to: Save lives, Protect property, Respond effectively during emergency situations.
- Implementation and Operation: Establishing systems, ensuring resource availability, coordinating efforts.
- Early Warning Systems: Developing systems to provide timely alerts (radios, SMS, sirens).
- Preparedness Plans: Outlining specific actions, identifying roles, updating plans.
- Emergency Exercises: Conducting drills to test plans and train personnel.
- Emergency Communication Systems: Establishing robust communication networks.
- Public Education: Promoting knowledge and skills for emergency response.
- Principle 1: Risk Evaluation: Assess susceptibility to disasters. Ugandan Example: Karamoja is high risk for drought; Bududa is high risk for landslides.
- Principle 2: Standards and Regulations: Establish and enforce building codes and land-use practices.
- Principle 3: Coordination and Response Mechanisms: Organize effective coordination structures.
- Principle 4: Resource Availability: Allocate financial/logistical resources, maintain stockpiles.
- Principle 5: Public Education Programs: Inform the public about hazards, encourage personal responsibility.
- Principle 6: Disaster Simulation Exercises: Conduct regular drills to test response mechanisms.
| Characteristic | Explanation |
|---|---|
| Realistic and Simple | Practical and easy to understand; people can actually do it |
| Definite and Target-Oriented | Clear objectives and specific targets |
| Vividly Descriptive and Continuous | Activities clearly described and ongoing |
| Specified Responsibilities and Duties | Everyone knows their role |
| Aligned with Community Ideals | Reflects the values and goals of the community |
- Early Warning Systems: Multiple channels.
- Evacuation and Victim Support: Safe routes, transport for vulnerable, temporary shelters.
- Stockpiling Essential Supplies: Food, water, medicine, blankets.
- Disaster Drills and Exercises: Practice evacuations, test systems.
- Action Plans for Response and Recovery: Clear steps for immediate response and long-term recovery.
- Personal Protective Equipment (PPE): Gloves, masks, boots for responders.
- Environmental Controls: Prevent secondary disasters, protect water sources.
Members must know the plan, update it regularly, develop educational materials, organize drills, maintain records of vulnerable populations, know community resources, promote mitigation, and ensure public communication systems.
Definition: The disaster response phase focuses on providing immediate assistance to affected populations to preserve life, improve health, and boost morale.
| No. | Principle | Simple Meaning |
|---|---|---|
| 1 | Prevent the occurrence of disasters whenever possible | Stop it before it starts |
| 2 | Minimize casualties if the disaster cannot be averted | Save as many lives as possible |
| 3 | Prevent further casualties after the initial impact | Stop more people from getting hurt |
| 4 | Conduct rapid and minimal-damage rescues | Rescue quickly without causing more harm |
| 5 | Provide first aid using protected facilities | Treat victims in safe places |
| 6 | Assess the well-being of medical staff | Make sure nurses and doctors are okay |
| 7 | Deliver definitive medical care on-site and facilitate quick referrals | Treat seriously and send to hospital if needed |
| 8 | Support rehabilitation of severely injured victims | Help disabled victims recover function |
- Save and protect human life, relieve suffering.
- Contain and mitigate the emergency, provide warnings.
- Protect responding personnel, safeguard environment, protect property.
- Maintain critical activities, sustain normal services, promote self-help.
- Assist investigations, facilitate community recovery, evaluate response efforts.
Coordinated multi-agency response is crucial. Relief activities include: Rescue operations, relocation, food/water provision, emergency healthcare, disease prevention, repair vital services, and temporary shelter.
- Providing Accurate Information: Accurate information leads to efficient rescue.
- Assessment Reporting: Include geographical extent, population at risk, concurrent hazards, injuries/fatalities, shelter availability, sanitation, and healthcare status.
- Gathering Information: Via interviews, observations, physical exams, surveys, and record-keeping.
- Shelter Management: Utilize skills in health promotion, disease prevention, and emotional support.
| Action | Why It Helps |
|---|---|
| Listen attentively | Victims need to express their feelings |
| Encourage sharing of feelings | Talking helps process trauma |
| Assist in decision-making | Victims may feel overwhelmed; gentle guidance helps |
| Involve teenagers in tasks | Boredom worsens stress; tasks give purpose |
| Provide basic necessities | Food, water, and shelter reduce anxiety |
| Maintain privacy and dignity | Especially for bathing, toileting, and medical exams |
| Refer to specialists | Counselors, psychologists, psychiatrists, social workers |
Definition: The primary objective of recovery is to engage all agencies and resources to restore the economic and social life of the community.
- Continuous Threat of Communicable Diseases: Inadequate water/crowding creates risk. Nurses must teach hygiene and update immunizations.
- Worsening of Acute and Chronic Illnesses: Disrupted access to medication/care.
- Psychological Stress: Moving and cleanup cause grief. Mental health referrals are crucial.
Immediately follows the disaster; aims to meet basic needs (Food, Clothing, Security). Focus is on survival and immediate comfort. Nursing Role: Distribute supplies, basic medical care, monitor for outbreaks.
Focuses on restoring essential services to resume normal life (providing loans, social support, restoring utilities). Nursing Role: Medical follow-up, physiotherapy, social service connections.
Implementing a new phase of community organization and reducing vulnerability (Building back better, new livelihoods). Nursing Role: Educate on sanitation, maintain immunizations, support maternal/child health, family planning.
- Building temporary housing
- Providing public information
- Health and safety education
- Counseling programs
- Reconstruction of infrastructure (roads, bridges, hospitals)
- Economic impact studies and transition to sustainable development
- Q1: List and explain the five objectives of disaster management.
Answer: Risk prevention and reduction; hazard mitigation; emergency preparedness; effective and rapid response; recovery and rehabilitation. - Q2: Describe the three stages of disaster management activities.
Answer: Pre-disaster, Disaster occurrence, Post-disaster. - Q3: Differentiate between structural and non-structural mitigation. Give examples.
Answer: Structural involves physical construction (dams). Non-structural involves policies/awareness (zoning, education). - Q4: List the eight principles of disaster response (Red Cross).
Answer: Prevent occurrence, minimize casualties, prevent further casualties, rapid rescue, first aid in protected facilities, assess staff well-being, definitive care on-site, support rehabilitation. - Q5: What are the three phases of disaster recovery?
Answer: Relief, Rehabilitation, Reconstruction. - Q6: Why is community participation important?
Answer: Utilizes local knowledge/resources, ensures ownership, promotes self-sufficiency.
- Scenario A: Landslide in Bududa (Pre-Disaster Phase)
Focus: Mitigation (retaining walls), preparedness (drills), tool kits, coordinating with local leaders. - Scenario B: Flooding in Kasese (Response Phase)
Focus: Immediate priorities (triage, sanitation), assessment reporting, managing stressed victims, preventing diseases (cholera). - Scenario C: Post-Ebola Outbreak (Recovery Phase)
Focus: Trauma counseling, economic support, rebuilding health trust, environmental sanitation.
stages of disaster management Read More »