Nurses Revision

Foundations

Foundations of Nursing related content

PARENTERAL ROUTE (INJECTION)

Parenteral Route of Drug Administration

PARENTERAL ROUTES OF DRUG ADMINISTRATION

A route of administration is defined as the path by which a drug, fluid, poison, or other substance is brought into contact with the body. The parenteral route represents a crucial method of administration, bypassing the gastrointestinal tract to deliver medications safely and effectively.

FDA Guidelines – The 6 'Rights' of Administration:

To ensure patient safety and prevent medication errors, strictly adhere to these fundamental rights:

  • Right Patient: Verify the patient's identity before administration.
  • Right Drug: Ensure the correct medication is selected.
  • Right Dose: Confirm the precise amount prescribed.
  • Right Time: Administer at the correct interval.
  • Right Route: Confirm parenteral administration is appropriate.
  • Right Documentation: Accurately record the administration immediately after.
Significance of Route & Factors Affecting Choice

The chosen route significantly impacts the overall clinical outcome. The significance of selecting the correct route lies in determining the speed and efficacy of drug action, as well as its overall absorption and bioavailability. An optimal route ensures rapid action, minimal adverse reactions, better tolerability, and the rapid delivery of therapeutic concentrations of the drug directly to the desired site of action.

Factors Affecting the Choice of Route:
  • Drug-related factors: Physical and chemical properties, pH, and irritancy.
  • Patient-related factors: Age, underlying conditions, consciousness level, and compliance.
  • Therapeutic action desired: Need for local vs. systemic effects, or immediate vs. sustained release.
Classification of Drug Delivery
  • Systemic: Introduces the drug directly into the systemic circulation for wide distribution.
  • Local: Exerts action locally at the site of application before disseminating into circulation.
Routes Overview: Enteral vs. Parenteral
Enteral (enteron – of intestine) Parenteral (par – beyond; enteron)
Extends from the mouth to the rectum. Delivers medication across the body's defence barriers.
Simple, safe, and typically no sterilization required. Ideal for emergencies. Provides higher bioavailability.
Slow onset of action; affected by digestive juices, enzymes, and First-Pass Metabolism (FPM). Rapid action, No FPM, bypasses gastric irritation, suitable for irritant drugs.
Not ideal for irritants or severe emergencies. Painful, invasive, requires strict asepsis and skilled personnel; higher risk for adverse events. Provides absolute control over the actual dose of drug delivered into the body.
PREPARATION: REQUIREMENTS FOR PARENTERAL INJECTIONS

Proper preparation is vital. Ensure the following items are correctly arranged before initiating any injection procedure:

1. The Trolley Setup
  • Top shelf:
    • Small Tray.
    • Sterile syringes and needles of all capacities and appropriate sizes.
    • Prescribed sterile medications in ampoules or vials.
    • Patient’s charts and medicine lists.
    • Gallipot with swabs.
    • Antiseptic solution in a gallipot.
    • Ampoule file.
    • Sterile water for injection.
    • Injection dishes.
  • Bottom shelf:
    • Tourniquet.
    • Cannula of appropriate gauge.
    • Strapping.
    • Pair of scissors.
    • Clean gloves.
    • Sharps Safety Box.
    • Receiver for used swabs.
    • Receiver for used gloves.
2. Bedside Equipment
  • Small pillow for supporting the arm.
  • Macintosh and towel.
  • Screen for privacy.
  • Handwashing equipment.
I. INTRADERMAL OR INTRACUTANEOUS INJECTION

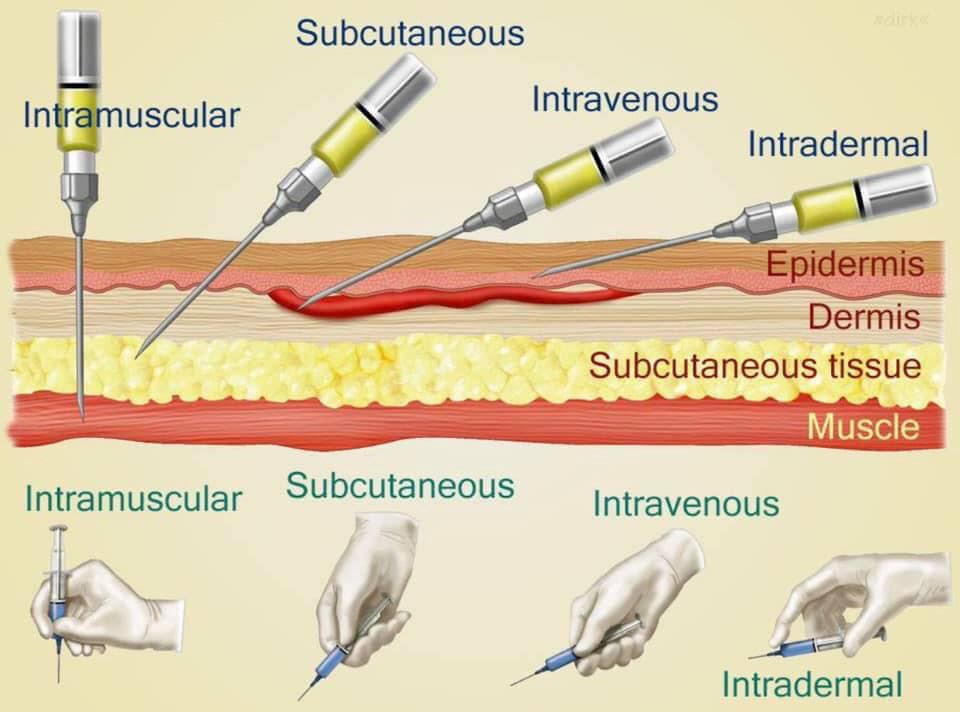
Intradermal injections are administered directly into the dermal layer of the skin. They are utilized for very small amounts of medication. The primary uses for this route include administering diagnostic tests (e.g., Mantoux test for tuberculosis, allergy testing) and the BCG vaccine.

No. Action Rationale
1 Refer to general and medicine administration rules for injections. Ensures adherence to foundational safety standards.
2 A tuberculin syringe or 1 ml syringe is used and needles. Provides accurate measurement for minute volumes.
3 Identify the patient, put in a comfortable position. Prevents errors and promotes patient cooperation.
4 Clean the skin with an antiseptic swab and allow the site to dry. Exposes the selected site and minimizes infection risk.
5 If it is a BCG vaccination, clean the site with water. Antiseptics may destroy the live attenuated BCG vaccine.
6 Stretch the patient’s skin, draw it tight and introduce the needle at an angle parallel to the skin. Facilitates entry specifically into the dermal layer.
7 Gently and slowly inject the medicine while observing for a small wheal to appear. The wheal confirms correct placement within the dermis.
8 Carefully withdraw the needle. Minimizes tissue trauma.
9 Do not massage the site after removing the needle. This may alter the test results or disperse the medication prematurely.
10 Circle the area with a pen and record time, and request the patient not to wash the area until it is assessed for the intended outcome. Necessary if it was for diagnostic purposes e.g., Mantoux test, to track the reaction area.
11 Inspect for signs of reaction when the stated duration of time has reached. Allows for accurate interpretation of diagnostic tests.
12 Report and record results. Maintains an accurate medical record and guides further treatment.
13 Clean away the used equipment. Promotes environmental hygiene and safety.
II. SUBCUTANEOUS INJECTION (HYPODERMIC)

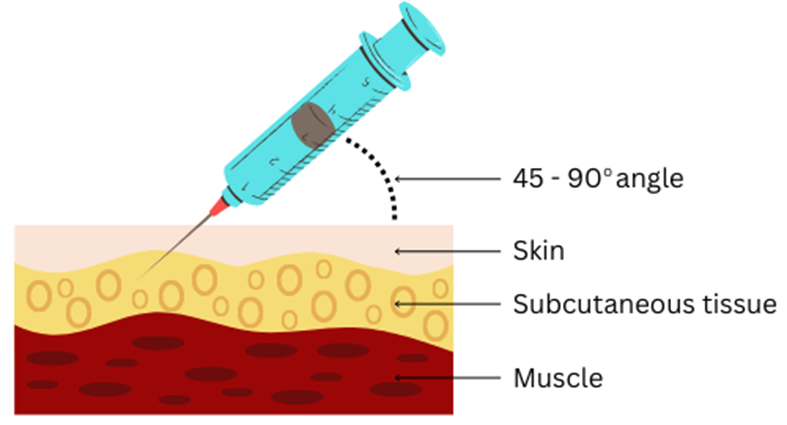
Subcutaneous (SC) injections deliver medication into the fatty tissue layer beneath the skin. This route allows for the sustained delivery of drugs. However, a notable disadvantage is the potential for local tissue bruising.

Specialized Subcutaneous Administration & Devices:
  • Hypodermoclysis: Involves the continuous SC infusion of large amounts of fluids (500-1000ml). Historically used for infants and children, but it is rarely used nowadays.
  • Insulin Pump: An external device that administers continuous or bolus insulin through a catheter inserted into the abdominal subcutaneous fat to help control blood sugar levels.
  • Medi-Jector VISION: Currently FDA approved for insulin delivery, this uses pressure to create a micro-thin stream of insulin that penetrates the skin without a needle, depositing into the SC tissue in a fraction of a second.
  • Biojector: Another needle-free device utilizing pressurized gas to drive medication through the skin into the SC tissue.
  • PenJet: A new no-needle method of delivering SC drugs. It can deliver liquid or powdered drugs using compressed gas to force the drug through the skin. It is notably used to deliver the smallpox vaccine.
No. Action Rationale
14 Help patient assume position depending on site selected. Ensures free access to site.
15 Choose a suitable needle gauge; take a 1 ml or 2 ml syringe depending on the dosage. Appropriate equipment prevents tissue damage and ensures accurate dosing.
16 Draw the medicine into the syringe. Prepares the dose.
17 Expel the air by holding the syringe with the needle pointing up. Prevents injection of air into the tissues.
18 Place the syringe in the injection dish. Maintains sterility prior to injection.
19 Explain the procedure to the patient, asking him/her not to move while the injection is being given. Encourages cooperation and allays anxiety.
20 Select the site and clean it with an antiseptic swab and let the area dry first. Reduces microorganisms and prevents stinging from wet antiseptic.
21 Grasp and pinch or squeeze the patient’s skin gently between the finger and thumb of your left hand and insert the needle at an angle of 45°. Provides for easy and less painful entry into subcutaneous tissue.
22 Pull back the (piston) plunger and inject the medicine slowly. Determines if the needle is in a blood vessel.
23 When the medicine has been injected completely, place a swab over the needle and withdraw the needle quickly and smoothly. Reduces discomfort.
24 If there is any bleeding at the site, apply firm gentle pressure with a swab until it stops. Prevents hematoma formation.
25 Make the patient comfortable and record the medicine given on the patient’s treatment sheet. Completes the documentation right of medication administration.
26 Discard syringe, gloves, and swabs appropriately and clear away the equipment. Promotes infection control measures.
III. INTRAMUSCULAR (IM) INJECTION

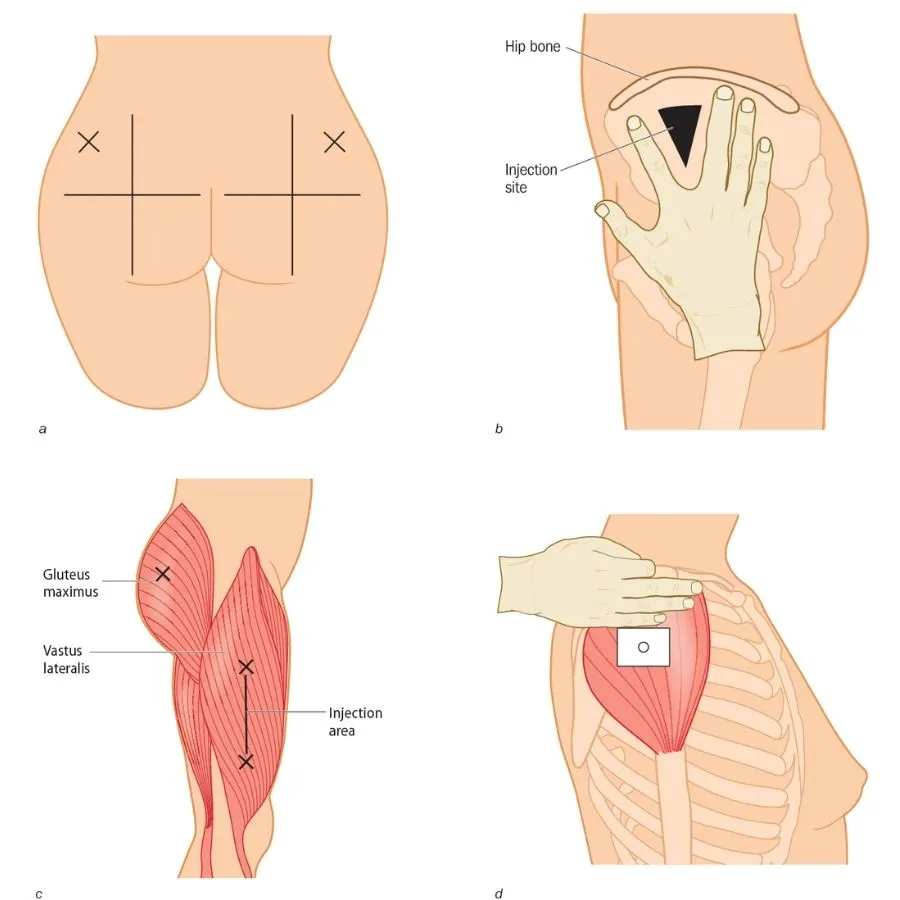
Intramuscular injections deliver medication deep into the muscle tissue, which has a rich blood supply allowing for faster absorption than the SC route. Advantages include the ability to act as a solvent and minimizing leakage into surrounding tissues. Disadvantages may involve slower onset (compared to IV), potential for nerve damage, abscesses, and absorption fluctuations. The Z-track technique is highly recommended to prevent the medication from leaking back along the needle track into the subcutaneous tissue.

Common Sites for Intramuscular Injections:
  • Gluteal Muscle (Ventrogluteal & Dorsogluteal): The outer upper quadrant of the buttock (ventrogluteal) is considered the safest site, as it reliably avoids the sciatic nerve.
  • Thigh Muscles (Rectus Femoris & Vastus Lateralis): The upper outer third of the thigh muscles provides an accessible and safe large muscle mass.
  • Deltoid Muscle: Used for small injections (up to 2 ml) if the patient has enough muscle mass, but this site should be avoided whenever possible due to proximity to the radial nerve and brachial artery.
No. Action Rationale
27 Observe the general nursing rules. Ensures foundational standards of care.
28 Read the prescription carefully and check the medicine with the other nurse, including the amount to be given. Double-checking minimizes the risk of medication errors.
29 Assemble syringe and needle, put on gloves. Prepares for the procedure while maintaining personal protection.
30 Break open the top of the ampoule (by using a gauze swab or a file) or remove the top of the rubber cap. Gains access to the medication while preventing injury from glass shards.
31 Reconstitute powdered medicines according to the instructions on the bottle. Ensures the medication is in the correct administrable form.
32 Put on gloves and draw up the prescribed dose of the medicine. Maintains sterility and secures the precise dosage.
33 Expel the air and remember that with antibiotics and multi-dose vials, the air is expelled into the container. Ensures dosage accuracy and prevents positive pressure buildup in multi-dose vials.
34 Position the patient depending on the site chosen. Proper positioning ensures muscle relaxation of the patient.
35 Select, locate, clean the site and allow it to dry. Minimizes the introduction of pathogens into deep tissue.
36 Inject the medication; grasp and pinch the area surrounding the injection site or spread skin at site as appropriate. Aids needle penetration in patients with thick muscles.
37 Hold the syringe between thumb and forefinger and pierce skin at a 90° angle and insert the needle. Ensures the needle reaches the deep muscle layer.
38 Aspirate by holding the barrel steady with a non-dominant hand. Helps to check if a needle is in a blood vessel.
39 If the blood does not appear in the syringe, inject the medication slowly and steadily. Helps to disperse medication into muscle tissue, thus decreasing a patient’s discomfort.
40 Withdraw the needle slowly and steadily while supporting at the hub of the syringe and needle. With non-dominant hand support the skin surface using cotton swab for applying counter traction at the site. Helps to reduce discomfort and prevent pulling of tissues when needle is withdrawn.
41 Apply gentle pressure at the site with a dry cotton swab but do not massage. Massaging irritates tissues at the injection site.
42 Discard the un capped needle and syringe appropriately. Promotes infection prevention and control.
43 Clear away, remove gloves and wash hands. Prevents cross-contamination.
44 Record procedure including the name of medication, dose, site and response of the patient. Reduces chances of medication errors.
Complications of Intramuscular Injections
  1. Abscess Formation: Occurs when unsterile needles and syringes are used, or when oily substances are not injected deep enough. The injection site becomes inflamed and filled with pus.
    Prevention: Strict adherence to aseptic technique, proper needle selection, and injecting oily substances deep into the muscle tissue.
  2. Nerve Injury: Incorrectly positioning the needle can damage nearby nerves, causing pain, numbness, weakness, or paralysis.
    Prevention: Thorough anatomical knowledge, correct landmark identification, and careful needle insertion.
  3. Tissue Damage/Necrosis: Injecting too much medication, using irritating substances, or repeated injections in the same site can lead to tissue damage and cell death.
    Prevention: Administering the correct dosage, choosing less irritating medications, and rotating injection sites regularly.
  4. Hematoma: A hematoma forms when blood leaks into the surrounding tissue after the injection, causing a bruise or swelling.
    Prevention: Applying pressure to the injection site after the injection.
  5. Pain and Discomfort: Intramuscular injections can be painful, especially if the medication is irritating or the injection technique is not correct.
    Prevention: Using proper injection technique, choosing a suitable needle size, and warming the medication to room temperature.
  6. Allergic Reactions: Some individuals may have an allergic reaction to the medication or the ingredients in the solution.
    Prevention: Thorough patient history, allergy testing, and careful observation.
  7. Injection into a Blood Vessel: The needle may unintentionally enter a blood vessel, leading to potential complications like drug overdose or embolism.
    Prevention: Aspirating (drawing back on the plunger) before injecting to ensure the needle is not intravascular.
  8. Delayed-Onset Muscle Soreness: Medications can cause muscle soreness or stiffness appearing hours or days after injection.
    Prevention: Staying hydrated and avoiding strenuous activity after the injection may help.
  9. Infection: Improper sterile technique can lead to local infection.
    Prevention: Strict adherence to aseptic technique.
  10. Air Embolism: Rare, but air can be injected into the bloodstream, leading to respiratory distress or cardiac arrest.
    Prevention: Proper technique to ensure no air is introduced into the syringe or needle.
IV. INTRAVENOUS (IV) INJECTION AND INFUSION

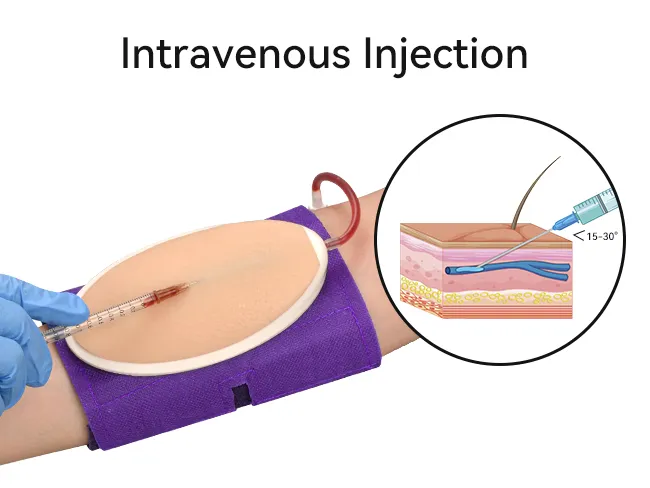
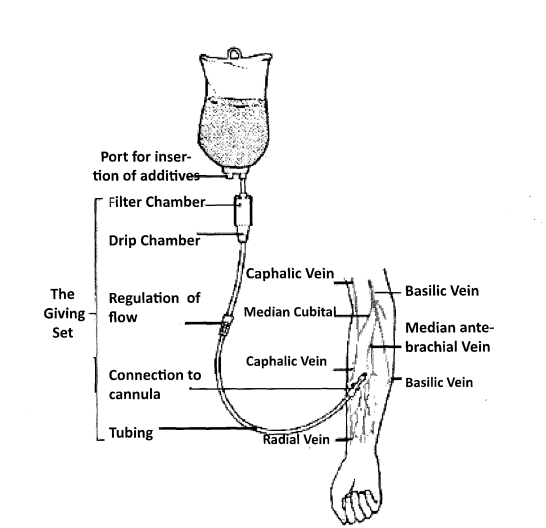
The Intravenous route is the most common parenteral route. It delivers drugs directly into the systemic circulation, providing 100% bioavailability. Types of IV administration include Bolus, Push, Slow injection, Infusion, and Central Venous Administration.

Disadvantages to consider: Susceptibility to severe Adverse Drug Reactions, requires strict asepsis, risk of inadvertent administration of wrong dose/drug, irritation leading to thrombophlebitis or cellulitis, potential injury to deeper structures, air embolism, necrosis, inability to administer suspensions or emulsions safely, and it strictly requires skilled personnel.

No. Action Rationale
45 Prepare the injection tray and take it to the patient’s bedside. Ensures all necessary items are available for the procedure.
46 Identify the patient and explain the procedure to the patient. Alleys anxiety.
47 Screen the bed and put on gloves. Provides privacy.
48 Place a small pillow and a protective sheet under the patient’s arm. Promotes comfort and protects the beddings.
49 Expose the patient’s forearm and anterior surface of the elbow. Ensures easy access to the injection site.
50 Inspect the selected vein, if it is visible and clear; apply a tourniquet or a sphygmomanometer cuff around the patient’s upper arm and inflate sufficiently about 8 to 10 cm above the site. Helps to distend and enlarge the vein.
51 Request the patient to close and open the fist for a minute. Promotes venous filling and visibility.
52 Clean the area with an antiseptic and dry with a sterile swab. Reduces microorganisms.
53 Expel air from the syringe. Ensures accurate dosing and prevents air embolism.
54 Hold the patient’s arm and with your left thumb exert pressure about 3 cm below the chosen site and make the skin tight. Stabilizes the vein and reduces movement.
55 Insert the needle at an angle of 15-45 degrees with its bevel up then quickly and steadily insert into the vein. Pull back the piston slightly if blood is aspirated. Ensures that the needle is in the vein.
56 Remove the tourniquet or deflate the cuff and inject the medicine slowly. Prevents excessive pressure in the vein and ensures proper delivery of medication.
57 When the medicine is injected, put a swab over the site and withdraw the needle. Minimizes bleeding and ensures cleanliness.
58 Apply pressure at the site with a swab for some seconds to make sure there is no bleeding. If oozing continues, apply a swab and a piece of strapping. Prevents bleeding.
59 Record the medicine in the patient’s chart and clear away. Ensures accurate medical records and maintains order.
Recommended Veins for Intravenous Infusion
Back of the Hand Forearm Lower Extremity
Dorsal metacarpal veins
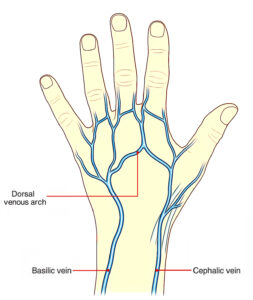
Basilic vein
Cephalic vein
Dorsal venous plexus
Medial and lateral marginal veins in the foot
Femoral and saphenous vein in the thigh
Complications of Intravenous Injections
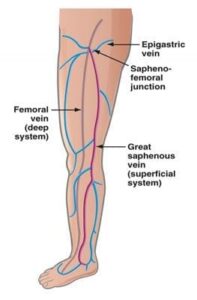
  • Incorrect IV Site Placement: Inserting the IV into the wrong vessel (e.g., artery instead of vein) can lead to severe consequences.
  • Medication Errors: Misidentification of medications, incorrect dosages, or incompatible mixing can result in serious adverse reactions.
  • Rapid Administration and Undesired Effects: Delivering medications too quickly can lead to undesirable effects like hypotension, cardiac arrhythmias, allergic reactions, and fluid overload.
  • Thrombophlebitis: Inflammation of a vein, often with a blood clot, due to frequent IV injections, improper technique, or certain medications.
  • Circulatory Overload: Infusing too much fluid too quickly can overwhelm the circulatory system, leading to fluid buildup and strain on the heart and lungs.
  • Embolism: A blood clot, air bubble, or foreign matter blocking a blood vessel can occur due to thrombophlebitis, improper placement, or air entering the line.
  • Shock: Severe allergic reactions, blood loss, or sepsis can lead to a life-threatening decrease in blood flow to vital organs.
  • Infiltration/Extravasation: When IV fluids leak out of the vein into the surrounding tissues, causing pain, swelling, and tissue damage.
  • Phlebitis: Inflammation of a vein without a clot, often caused by irritation from the IV catheter or medication.
  • Air Embolism: Air entering the bloodstream through the IV line can travel to the heart or lungs, causing blockage and leading to respiratory distress or cardiac arrest.
  • Catheter-Related Bloodstream Infection (CRBSI): A serious complication where bacteria enter the bloodstream through the IV catheter, leading to fever, chills, and sepsis.
  • Nerve Damage: Incorrect placement of the IV catheter can damage nerves in the area, resulting in pain, numbness, or weakness.
  • Hematoma: Bleeding into the surrounding tissues from the IV puncture site, appearing as a bruise.
  • Phlebosclerosis: Hardening of the vein due to repeated IV punctures or irritation from the catheter.
Intravenous Infusion Calculations and Management
Formula for Calculating the Drop Rate:
Number of mls drops per minute =
(Ordered Volume in mL × Drop Factor) / (Number of Hours × 60 minutes)

Example: If the doctor prescribes 1000 mls of 5% dextrose infusion to run over 10 hours, and the infusion set has a drop factor of 20, the calculation is: (1000 × 20) / (10 × 60) = 20000 / 600 = 33.3 drops per minute.

Factors that May Affect the Flow Rate:
  1. Height of the Infusion Bottle: Raising the infusion bottle higher will increase the rate of flow, and lowering it will decrease the rate.
  2. Patency of Infusion Set and Needle: A blood clot in the needle may stop the infusion. This may occur when there is a delay in changing the emptied infusion bottle.
  3. Kinking of the Tubing or Faulty Position of the Needle: When the needle is against or away from the vein wall, it may affect the flow.
  4. Tight Splint: A tight splint on or above the infusion needle will restrict the flow rate.
  5. Blocked Air Vent: A blocked air vent will cause the infusion to stop running.
Care of the Patient While on Intravenous Infusion:
  • Accurate Record Keeping: Keep an accurate record, including the time of starting the infusion, type of fluid, amount, and the prescribed rate of flow.
  • Frequent Assessment: Assess the patient at frequent intervals for signs of abnormal reactions such as pain, sweating, restlessness, or change of color.
  • Regular Site Inspection: Inspect the site at regular intervals for signs of infiltration.
  • Condition Monitoring: Take and record the patient’s condition regularly.
  • Daily Cleansing: If the infusion is running for some days, cleanse the area around the injection site with sterile gauze daily.
V. ADVANCED AND SPECIALIZED ROUTES OF ADMINISTRATION
1. Intra-Arterial Route

Administration proceeds directly into an artery via a catheter to specifically target the area being treated. This route requires specialized equipment such as intra-arterial ports. Because arteries possess high pressure, delivery usually requires an infusion pump or a pressure cuff.

2. Intraperitoneal Route

Involves administering substances directly into the peritoneal space (the abdominal cavity). It is predominantly utilized for infusions such as peritoneal dialysis. This route is considered risky due to the potential for severe intra-abdominal infections and organ injury.

3. Intra-Osseous Route

Fluid and medication administration is driven directly into the bone marrow space. The bone marrow presents a non-collapsible entry point, making it highly valuable in pediatric resuscitation and emergencies when intravenous access is impossible. Specialized devices like the EZ-IO are used.

4. Intracardiac Route

Involves injecting medication directly into the ventricle of the heart. This extremely invasive route is utilized exclusively in life-threatening situations (such as cardiac arrest). The landmark for injection is typically the left 4th Intercostal space along the Midclavicular Line.

5. Intra-Articular Route

Medication is applied locally into the joint space, primarily for joint pain relief. Patients typically experience initial local discomfort before profound palliation of their symptoms occurs.

6. Intrathecal, Subarachnoid, and Epidural Routes

These routes introduce medications into the sheath surrounding the spinal cord, widely used for anaesthesia and specific antibiotics:

  • Subarachnoid: Involves the instillation of a drug directly into the Cerebrospinal Fluid (CSF) after puncturing the dura and arachnoid membranes. There is free communication of the CSF in and out of the brain, making drug spread rapid. It is safely performed only in the lumbar spaces.
  • Epidural: Medication is introduced into the potential space situated just above the dura mater. Because this space safely ends at the foramen magnum, injections can technically be performed across all spinal spaces. It is exceptionally well-suited for continuous nerve blocks.
  • Combined Delivery Systems: Techniques such as the Combined Spinal Epidural or implanted Intrathecal Pain Pumps provide highly effective, sustained relief for severe, chronic pain conditions.
7. Inhalational Route

Drugs are administered directly into the respiratory tree. Formulations include aerosols, dry powders, nebulized solutions, and gases.

  • Local Effect: Primarily for respiratory distress. Effectiveness is heavily dependent on particle size, optimally ranging between < 0.5μ and > 20μ.
  • Systemic Effect: Used heavily in General Anaesthesia utilizing gaseous and volatile agents. Notable historical implementations include Exubera (an inhaled systemic insulin).
8. Intranasal Route

Aerosols or fluids are instilled directly into the nose. The massive vascular network in the nasal mucosa provides rapid absorption. However, repeated use can lead to mucosal dystrophy, and it is a common route of drug abuse. Modern devices enhancing delivery include Optinose and the Mucosal Atomization Device.

9. Mucosal Routes (Non-Nasal)
  • Conjunctival: Administered to the eye using specialized delivery systems like Occuserts and Lacriserts.
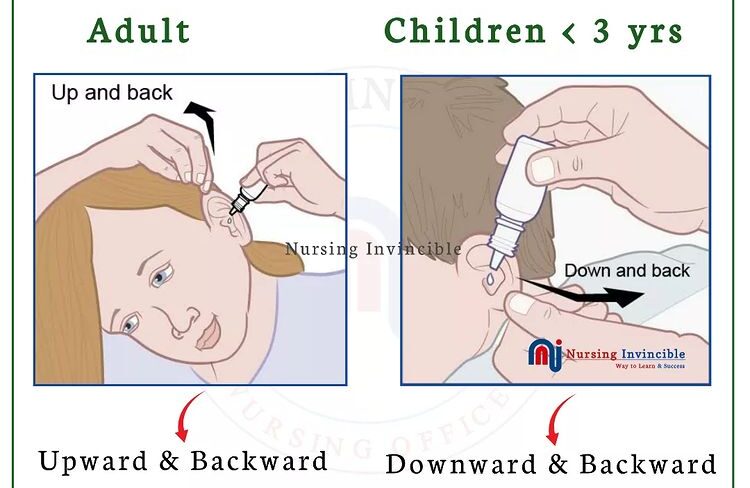
  • Otic: Applied into the ear canal.
  • Vaginal: Includes solutions, emulsions, ointments, and pessaries.
  • Urethral: Instilled directly into the urethra.
  • Endotracheal: Critical emergency drugs can be administered via the endotracheal tube, commonly remembered by the drugs: Adrenaline, Atropine, Diazepam, and Naloxone.
10. Transdermal Route

Provides sustained delivery of drugs through the skin layer into the systemic circulation, lowering the risk of side effects by maintaining steady drug levels. The drug must be potent, otherwise, the required patch size becomes impractically large.

  • Adhesive Patches: Rely on a drug reservoir continuously permeating a release membrane. Rate of absorption depends on the site, thickness/integrity of the stratum corneum, molecular size, membrane permeability, skin hydration, lipid solubility, and local blood flow.
  • Iontophoresis: A non-invasive technique that employs a mild electric current to actively drive charged drugs through the skin.
  • Phonophoresis: Relies on the movement of drug molecules through the skin forcefully driven under the influence of ultrasound waves.
Conclusion

Ultimately, no single route is ideal for all medications in all circumstances. Selecting the correct parenteral or non-parenteral route requires a comprehensive clinical assessment of the drug’s properties, the patient's status, and the precise therapeutic action required.

Summary: Advantages and Disadvantages of Common Parenteral Routes

While the parenteral route bypasses the gastrointestinal tract and first-pass metabolism, each specific pathway presents unique clinical benefits and risks. Below is a summary of the most commonly utilized parenteral routes.

Route Advantages Disadvantages
Intravenous (IV)
  • 100% Bioavailability: Entire dose enters the systemic circulation immediately.
  • Rapid Onset: The route of choice for life-threatening emergencies.
  • Volume flexibility: Can deliver large fluid volumes continuously (infusions).
  • Avoids gastric irritation and first-pass metabolism.
  • Irreversible: Once injected, the drug cannot be easily retrieved.
  • Requires strict asepsis and skilled personnel.
  • High risk of severe adverse drug reactions and anaphylaxis.
  • Risks of phlebitis, extravasation, and air embolism.
Intramuscular (IM)
  • Absorption: Faster absorption than the subcutaneous route due to rich vascularity.
  • Suitable for administering mild irritants, depot preparations, and oily solutions.
  • Provides sustained drug action over a longer period.
  • Painful: Can cause significant patient discomfort.
  • Risk of accidental injection into a blood vessel or damage to underlying nerves (e.g., sciatic nerve).
  • Limited volume capacity (usually maximum 2-3 ml per site).
  • Can cause local abscesses or hematomas.
Subcutaneous (SC)
  • Sustained Release: Allows for slow, steady, and predictable absorption (ideal for insulin and heparin).
  • Generally less painful than intramuscular injections.
  • Highly suitable for patient self-administration.
  • Restricted Volume: Only small amounts (usually < 2 ml) can be comfortably injected.
  • Unsuitable for irritating drugs, which can cause severe pain, tissue necrosis, and sloughing.
  • Absorption can be unpredictable in patients with compromised peripheral perfusion.
Intradermal (ID)
  • Localized Effect: Ideal for diagnostic testing (e.g., Mantoux test, allergy testing).
  • Very slow absorption rate, making it safe for testing sensitivities.
  • Route of choice for specific immunizations (e.g., BCG vaccine).
  • Extremely Small Volume: Limited to very minute amounts (typically 0.1 ml).
  • Requires precise injection technique to ensure the drug enters the dermis, not the subcutaneous tissue.
  • Can cause localized skin irritation or false-negative test results if administered incorrectly.
References
  • Berman, A., Snyder, S. J., & Frandsen, G. (2020). Kozier & Erb's Fundamentals of Nursing: Concepts, Process, and Practice (11th ed.). Pearson.
  • Potter, P. A., Perry, A. G., Stockert, P. A., & Hall, A. M. (2021). Fundamentals of Nursing (10th ed.). Elsevier.
  • World Health Organization (WHO). (2010). WHO Best Practices for Injections and Related Procedures Toolkit. World Health Organization.
  • Brunton, L. L., Hilal-Dandan, R., & Knollmann, B. C. (2017). Goodman & Gilman's: The Pharmacological Basis of Therapeutics (13th ed.). McGraw-Hill Education.
  • Lynn, P. (2018). Taylor's Clinical Nursing Skills: A Nursing Process Approach (5th ed.). Wolters Kluwer.

Quick Quiz

Parenteral Route Quiz

FON - mobile-friendly and focused practice.

Privacy: Your details are used only for quiz tracking and certificates.

Parenteral Route of Drug Administration Read More »
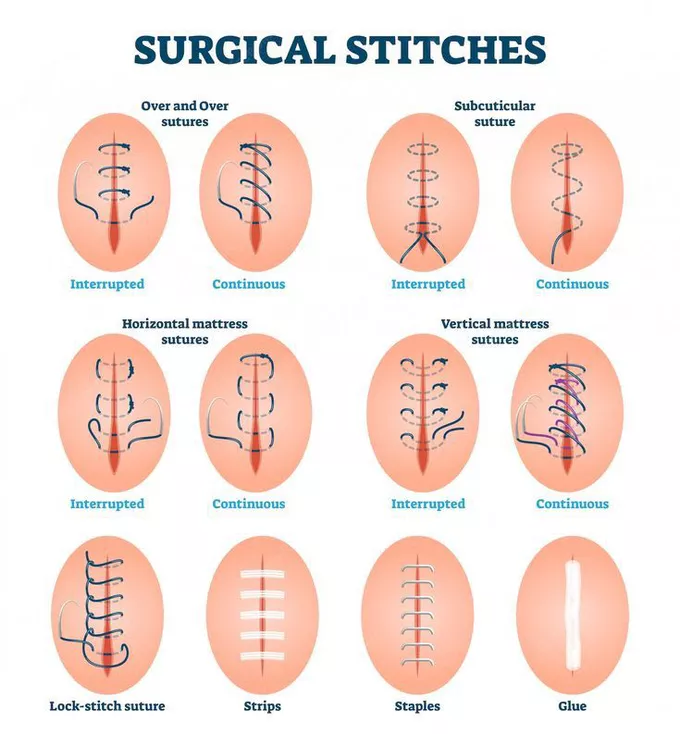
Oxygen administration)

Oxygen Administration

INHALATION

Inhalation is the breathing of air vapor or volatile medicine into the lungs.

Types
  • Dry inhalation: Oxygen Administration: this is given when the respiratory capacity is diminished as in chest injuries, pneumonia and cardiac failure.
  • Moist/steam inhalation: It is used in case of inflammation of air passages and the nasal sinuses. These are given to:
    • Warm and moisten the air breathed in and relieve irritation e.g. in bronchitis, after tracheotomy and other chest conditions.
    • To relieve inflammation and coughing e.g. in colds.
    • To relieve congestion and oedema e.g. in sinusitis and acute laryngitis.
  • Nebuliser: this produces vapors which is inhaled by the patient for example in asthma to relieve spasms of the bronchial tubes or for the relief of chest pain in angina pectoris. Other indications include Respiratory diseases eg asthma, pneumonia, Airway obstruction, Nasal congestion, Nasal bleeding, Chest injuries and Cardiac failure.
  • Oxygen administration)
  • Parts of an Oxygen Cylinder
Oxygen Therapy

Oxygen is a fundamental necessity for human survival, and in clinical settings, it is treated as a highly critical medication. The administration of oxygen must be carefully assessed, implemented, and monitored to ensure optimal patient outcomes while avoiding potential toxicity.

I. Understanding Oxygenation and Inhalation

The concepts of oxygenation and oxygen inhalation form the foundation of respiratory therapy. The ambient room air we breathe contains about 21% oxygen. When a patient's condition compromises their ability to extract or utilize this baseline oxygen, supplemental therapy becomes necessary.

Oxygenation

Oxygenation refers to the addition of oxygen to any system, including the human body. In clinical practice, oxygenation may also refer to the active process of treating a patient with supplemental oxygen, or combining a medication or other substances with oxygen (such as in nebulization).

Oxygen Inhalation

Oxygen Inhalation is the specific clinical method of supplying a higher concentration of oxygen than what is naturally found in the surrounding environmental atmosphere. This is achieved through various specialized delivery devices.

  • Oxygen is administered whenever there is a documented deficiency in the blood, often visibly manifested by cyanosis (bluish discoloration of the skin and mucous membranes).
  • Normal Parameters: Normal oxygen concentration (saturation) in the blood should ideally be maintained at more than 90% to 95% depending on the patient's baseline health and underlying conditions.
II. Purposes and Indications for Oxygen Therapy
Purposes of Oxygen Administration
  1. To Supply Oxygen: To provide adequate supplemental oxygen in conditions where there is significant interference with the normal oxygenation of blood (e.g., alveolar-capillary blockages, hypoventilation).
  2. To Reduce Respiratory Distress: Supplemental oxygen decreases the work of breathing, alleviating the physical effort and distress experienced by the patient.
  3. To Reduce Effects of Anoxemia: By increasing the oxygen tension in the alveoli and blood, it mitigates the systemic cellular damage caused by profound anoxemia (lack of oxygen in arterial blood).
Clinical Indications

Oxygen therapy is indicated in a wide variety of acute and chronic clinical scenarios. Key indications include:

  • Breathlessness (Dyspnea): Subjective feeling of difficult or labored breathing.
  • Obstructed Airway: Blockages due to physical growths, tumors, or anatomical swellings like an enlarged thyroid gland (goiter).
  • Cyanosis: A late sign of severe hypoxemia requiring immediate intervention.
  • Cardiac Failure: The heart's inability to pump effectively leads to poor systemic perfusion and secondary tissue hypoxia.
  • Respiratory Distress: From conditions like asthma, COPD exacerbations, pneumonia, or acute respiratory distress syndrome (ARDS).
  • Shock: Hypovolemic, cardiogenic, or septic shock states where cellular oxygen demand outpaces systemic supply.
  • After Severe Hemorrhage: Significant blood loss reduces the hemoglobin available to carry oxygen, necessitating supplemental O2 to saturate the remaining hemoglobin fully.
  • Anemia: Severe reduction in red blood cells impairs oxygen transport capacity.
  • Patient under Anesthesia: To maintain adequate oxygenation when respiratory drive is chemically suppressed.
  • Asphyxia: Severe deprivation of oxygen to the body that arises from abnormal breathing (e.g., choking, drowning).
  • Poisoning: Specifically, carbon monoxide (CO) poisoning, where high-flow oxygen is required to displace CO from hemoglobin.
  • Post-Operative Period: To support recovery as patients emerge from anesthesia and metabolize medications.
  • Insufficient O2 in the Atmosphere: High altitudes or confined spaces with poor ventilation.
III. Hypoxia

Hypoxia is defined as a decreased oxygen concentration in the blood and at the cellular/tissue level. It is a critical state that, if left untreated, rapidly leads to cellular dysfunction and tissue death.

Signs and Symptoms of Hypoxia

Clinical manifestations of hypoxia can be divided into early and late signs. It is crucial for nurses to recognize these signs promptly:

  • Restlessness and Anxiety: Often the earliest indicators of hypoxia as the brain becomes mildly oxygen-deprived.
  • Decreased Level of Consciousness: Confusion, lethargy, or coma can develop as hypoxia worsens.
  • Lack of Concentration: Cognitive impairment and dizziness.
  • Increased Fatigue: Extreme tiredness as cellular energy production shifts to less efficient anaerobic pathways.
  • Tachypnea: Increased rate and depth of respiration as the body attempts to draw in more oxygen.
  • Tachycardia and Elevated BP: An increased pulse rate and elevated blood pressure occur initially as a compensatory sympathetic nervous system response.
  • Pallor: Paleness of the skin due to peripheral vasoconstriction.
  • Cyanosis: A late and critical sign. It is a bluish discoloration of the skin, nail beds, and mucous membranes indicating high levels of deoxygenated hemoglobin.
  • Dyspnea: Subjective feeling of shortness of breath.
  • Clubbing of the Nails: A chronic sign of long-term hypoxia. The normal angle of the nail bed becomes distorted and enlarged (greater than 180 degrees), often seen in chronic respiratory or cardiac diseases.
IV. Sources of Oxygen and Delivery Systems
Sources of Oxygen
  • Wall Outlet: Centralized piped oxygen supply commonly found in hospital wards, intensive care units, and emergency departments. It provides a continuous, high-pressure source.
  • Portable Cylinder: Oxygen compressed into metal tanks of various sizes. Essential for patient transport, home care, or as emergency backups during power or central system failures.
Oxygen Delivery Systems

Oxygen delivery devices are broadly categorized by the concentration (FiO2) they can deliver. Selecting the right device depends on the patient's precise clinical requirements.

1. Nasal Cannula

The nasal cannula consists of a thin, flexible tube with two small nozzles (prongs) that protrude directly into the patient's nostrils.

  • Flow Rate & Concentration: Used to administer 2 to 6 Liters per minute (L/min), delivering an oxygen concentration (FiO2) of approximately 24% to 45%.
  • Setup: Connected to an oxygen source equipped with a flow meter and a humidifier.
  • Advantages: It is lightweight, comfortable, and allows the patient to carry out daily activities such as eating, drinking, and speaking without removing the device.
  • Disadvantages: Easily dislodged during sleep or movement. It can cause drying and irritation of the nasal mucosa, making humidification vital at higher flow rates (>4 L/min).
2. Face Masks

Face masks fit over the patient's nose and mouth. There are four primary types utilized in clinical practice:

  1. Simple Face Mask:
    • Application: Applicable for providing moderate oxygen therapy. Contains exhalation ports on the sides to allow exhaled CO2 to escape.
    • Flow Rate & Concentration: 5 to 8 L/min delivering an oxygen concentration between 40% to 60%.
    • Precaution: Flow rates must be at least 5 L/min to flush exhaled carbon dioxide out of the mask and prevent rebreathing.
  2. Partial Rebreather Mask:
    • Application: A simple face mask equipped with a reservoir bag attached to the base.
    • Mechanism: The reservoir bag collects the patient's exhaled air. The patient rebreathes the first 1/3rd of the expired air from the bag (which is rich in oxygen and from the anatomical dead space), mixing it with 100% source oxygen. This permits excellent oxygen conservation.
    • Flow Rate & Concentration: 6 to 10 L/min delivering 60% to 90% oxygen concentration.
    • Precaution: The reservoir bag must remain totally or partially inflated during inspiration. If it deflates completely, carbon dioxide buildup can occur.
  3. Non-Rebreather Mask:
    • Application: Similar in appearance to a partial rebreather but features specific one-way valves.
    • Mechanism: Two one-way valves prevent the patient from rebreathing the exhaled air; exhaled air escapes through the side ports. A valve between the mask and the bag prevents exhaled air from entering the oxygen reservoir.
    • Flow Rate & Concentration: 10 to 15 L/min, designed to deliver the highest concentration of non-invasive oxygen, ranging from 95% to 100%.
  4. Venturi Mask:
    • Application: A high-flow system designed to deliver a precise, predetermined oxygen concentration.
    • Mechanism: It utilizes wide-bore tubing and color-coded adapters (jets) based on the Bernoulli principle. It provides accurate control of oxygen such that it does not rise too high (which could cause respiratory depression in certain COPD patients) but remains adequate to relieve anoxia.
    • Flow Rate & Concentration: Delivers varying, exact concentrations from 24% to 60% at flow rates of 4 to 15 L/min depending on the adapter used.
    • Color-Coded Adapters (Common Standard):
      • Blue: 24% at 2 L/min
      • White: 28% at 4 L/min
      • Orange: 31% at 6 L/min
      • Yellow: 35% at 8 L/min
      • Red: 40% at 10 L/min
      • Green: 60% at 15 L/min
3. Pediatric Specific Deliveries
  • Oxygen Tent: A thin, clear plastic tent-like structure suspended over the patient. The sides are tucked firmly under the bed clothing of the patient to maintain the oxygen-rich environment. Usually used for delivering oxygen to infants and toddlers who will not tolerate masks or cannulas.
  • Oxygen Hood / Head Box: Used for neonates and young infants. It is a clear plastic device kept entirely over the head of the baby. It helps in the highly efficient, controlled delivery of oxygen and humidity. Precaution: While placing the hood over the head of the child, ensure the rigid plastic edges do not rub against the child's chin, neck, or shoulder, which could cause skin breakdown.
V. Procedure for Oxygen Administration
Articles Required for Procedure
  • O2 cylinder with flow meter connected, or wall outlet access.
  • Regulator gauge (if using a cylinder).
  • Humidifier bottle filled with sterile distilled water.
  • Cardex / Patient chart (to verify the physician's order).
  • Cylinder with stand (for stability and safety).
  • Opening key / wrench (for cylinder valves).
  • Delivery device: Nasal cannula or O2 mask with connective tubing.
  • Gauze pad / cotton balls (for cleaning nares/face).
  • A bowl with plain water (to check O2 patency/flow visually if needed).
REQUIREMENTS FOR OXYGEN ADMINISTRATION
Clean tray
  • Delivery devices: Nasal cannula, Nasal catheter, BLB oxygen mask, or simple face mask with connective tubes.
  • Rubber tubing.
  • Flowmeter and regulator gauge.
  • Humidifier with sterile distilled water.
  • Gallipot with gauze pads or cotton balls.
  • A bowl with plain water (to check O2 patency/flow).
Bedside / Other Equipment
  • Oxygen source (Wall outlet or portable Oxygen cylinder with stand).
  • Opening key / wrench (for cylinder valves).
  • Screen (for privacy).
  • Cardex / Patient chart.
PROCEDURE
Steps Action Rationale
1 Refer to the general rules. Keeps standard practice and ensures safety guidelines are followed.
2 Determine the need for oxygen therapy in the patient and verify the physician’s order / prescription in the Cardex for rate, device used, and concentration. Reduces risk of error in administration and ensures the right treatment is given to the right patient.
3 Explain the procedure to the patient and inform them how to co-operate. Alleviates patient anxiety, gains compliance, and promotes safety.
4 Wash hands. Standard infection control measure to prevent the transmission of microorganisms.
5 Turn and test the oxygen cylinder/source before bringing everything to the bedside. Check the condition of the oxygen pipe and flow meter. Conserves time and energy by confirming functional supply before patient application.
6 Provide privacy using a screen and position the patient in a sitting up, semi-Fowler's, or on one side position if possible. Promotes comfort. Elevating the head of the bed drops the diaphragm, allowing for maximum chest expansion and improved lung ventilation.
7 Clean the nostrils with a swab stick if the nostrils are blocked with secretions. Ensures a patent airway. Blocked nares will prevent oxygen from reaching the lower respiratory tract.
8 Set up O2 equipment and humidifier. Attach rubber tubing, nasal cannula/catheter, or mask to the humidifier. Ensures all components are securely connected to prevent leaks and ensure adequate delivery to the patient.
9 For nasal cannula use: Connect nasal cannulae to oxygen set up with humidification, check if oxygen is flowing out of prongs (can use the bowl of water to check flow). Regulate flow meter to prescribed level. Humidification prevents dehydration of mucous membranes. Checking flow ensures the exact prescribed dosage is flowing through the system.
10 Place prongs in the patient’s nostrils 2 inches, place tubing over and behind each ear with adjuster comfortably under the chin OR place tubing around the patient’s head with the adjuster at the back or base of the head. Place gauze pads at the ear beneath the tubing as necessary. Facilitates oxygen administration and patient comfort. Pads reduce irritation and prevent severe pressure ulcers from constant tubing pressure.
11 Encourage the patient to breathe through the nose, with the mouth closed. Nose breathing provides for optimal delivery of oxygen to the patient.
12 For B.L.B mask / Reservoir mask use: Attach face mask to oxygen source, start the flow of oxygen at the specified rate. For a mask with a reservoir, allow oxygen to fill the bag before proceeding to the next step. The bag is the primary oxygen supplier to the patient; it must be inflated to prevent carbon dioxide buildup.
13 Position the face mask over the patient’s nose and mouth, adjust the elastic strap around the patient’s head, and adjust the flow rate to avoid air leakage from the edges. A loose or poorly fitting mask will result in oxygen loss and sub-therapeutic oxygen delivery.
14 Apply padding behind ears as well as the scalp where the elastic band passes. Padding prevents skin irritation and breakdown from tight elastic bands.
15 Reassess patient’s respiratory status, including respiratory rate, effort, and lung sounds. Observe for oxygen saturation hourly (must be more than 90%). Assesses the effectiveness of oxygen therapy and dictates if further clinical adjustments are needed.
16 Check for proper flow rate every four hours. Ensure that ports of the mask are open. Flow meters can be accidentally altered. Open ports prevent CO2 rebreathing and suffocation.
17 Assess the client's face, ears, and nostrils every 8 hours. Sterile water-soluble lubricants can be used to keep the mucous membrane moist. Oxygen is highly drying; frequent assessment and lubrication prevent mucosal damage and skin integrity issues.
18 Wash hands upon completion of patient contact. Maintains strict infection control protocols.
19 Document relevant information in the patient’s record including time, flow rate, and observations made on the patient. Record any abnormal findings, outcomes, and SpO2 results, and report abnormalities. Ensures accurate medical records. Prompt reporting ensures rapid medical intervention if the patient deteriorates.
VI. Precautions and Safety Measures

Oxygen therapy carries inherent risks, ranging from physiological toxicity to severe environmental fire hazards. Nurses must diligently enforce the following precautions:

Physiological Precautions
  • Prevent Oxygen Toxicity: Never deliver more than the prescribed concentration or flow rate. Prolonged exposure to high concentrations of oxygen can cause pulmonary oxygen toxicity, leading to alveolar damage and acute respiratory distress syndrome.
  • Avoid Unauthorized Adjustments: Never increase or decrease the flow of oxygen while the cannula is merely resting in the patient's nostrils without a medical order. Always monitor SpO2 frequently to guide titration.
  • Maintain Humidification: Ensure that the humidifier bottle is always at least 1/3rd full with sterile distilled water. Dry oxygen damages the mucosal lining, impairs ciliary action, and thickens respiratory secretions.
Environmental & Fire Safety Precautions

Oxygen supports and intensely accelerates combustion. While it does not burn on its own, it causes other materials to ignite easily and burn rapidly.

  • No Smoking Rule: Promote strict safety measures. Inform the patient and all visitors that smoking is absolutely not permitted in the area of oxygen use.
  • Signage: Place prominent "NO SMOKING / OXYGEN IN USE" signs on the patient's room door and near the bed.
  • Fire Extinguishers: Always know the location of the nearest fire extinguisher close to the room.
  • Electrical Safety: Do not use electrical appliances (such as electric razors, heating pads, or radios with frayed cords) close to the oxygen source to avoid accidental sparking.
  • Avoid Oil and Grease: Oil or grease should never be used on the oxygen regulator, cylinder valves, or connections. Oil combined with pressurized oxygen can result in a violent, spontaneous explosion.
  • Cylinder Storage: O2 cylinders should be stored securely upright at a low temperature, away from heat sources or direct sunlight.
Infection Control Precautions
  • Frequent Changes: Oxygen therapy equipment is a potential source of bacterial contamination. Tubing, masks, and humidifiers should be changed frequently according to hospital policy.
  • Nasal Cannula Hygiene: Change the nasal cannula every 8 hours, or more often if it becomes visibly soiled with mucous or blood.
VII. Review Questions
  • What is oxygenation, and how does it differ from oxygen inhalation?
  • What are the primary medical indications for initiating oxygen inhalation?
  • How is hypoxia defined, and what are its early versus late signs and symptoms?
  • What are the different delivery systems of oxygen, and how do their FiO2 capacities differ?
  • What are the crucial nursing steps to safely administer oxygen to a patient?
  • What environmental and physiological precautions must be strictly enforced during oxygen administration?
References
  • Health Learning Material Center. Institute of Medicine, Tribhuwan University. Fundamentals of Nursing (2nd ed. reprint, 2010). Kathmandu: Heidal Press, Dillibazar.
  • Basvanthappa, B.T. (2004). Fundamentals of Nursing. New Delhi: Jaypee Brothers.
  • Perry, A.G. and Potter, P.A. (2007). Basic Nursing Essentials For Practice (6th ed.). Mosby.
  • Giri, M. and Sharma, P. (2013). Essential Fundamental Of Nursing (1st ed.). Kathmandu: Medhavi Publication.
  • Pathak, S. and Devkota, R. (2011). A Textbook Of Fundamentals of Nursing (2nd ed.). Kathmandu: Vidyarthi Prakashan.
  • Taylor, C.R. and Lillis, C. (2008). Fundamental Of Nursing (Volume 1). Lippincott William and Wilkins.
  • Skidmere, L. Nursing Drug Reference (2009). Mosby.

Quick Quiz

Oxygen Admin Quiz

FON - mobile-friendly and focused practice.

Privacy: Your details are used only for quiz tracking and certificates.

Oxygen Administration Read More »

Suturing

SUTURING OF THE WOUND

Suturing

Suturing is the process of closing a wound by stitching the wound edges together using a surgical needle and thread. 

It is a fundamental technique in wound management and surgical procedures to facilitate healing, prevent infection, and restore tissue integrity.


Purpose of Suturing

The primary goals of suturing are:

  • ✅ To approximate wound edges until healing occurs.
    ✅ To speed up the wound healing process by stabilizing the tissue.
    ✅ To minimize the risk of infection by reducing the open surface area.
    ✅ To improve cosmetic outcomes and minimize scarring.
    ✅ To provide additional support in high-tension areas or deep wounds.
Types of Sutures

Types of Sutures

Sutures are broadly categorized into interrupted and continuous sutures.

1. Interrupted Sutures

  • In interrupted suturing, each stitch is placed individually and tied separately.
  • This is the most commonly used wound closure technique.
  • The individual stitches are not connected, reducing the risk of wound dehiscence if one stitch fails.

✅ Advantages:
✔ Easy to place.
✔ High tensile strength.
✔ Individual stitches can be removed if infection occurs without affecting the entire closure.

❌ Disadvantages:
✖ Takes more time to place compared to continuous sutures.
✖ Requires more suture material.
✖ Each knot increases the risk of infection.


2. Continuous Sutures

  • A single thread runs through the wound in a series of stitches and is tied only at the beginning and end.
  • The stitches are connected, making it faster for long wounds or surgical incisions.

✅ Advantages:
✔ Faster than interrupted sutures.
✔ Requires less suture material.
✔ Distributes tension evenly along the wound.

❌ Disadvantages:
✖ If the suture breaks, the entire closure may fail.
✖ Increased risk of dehiscence in high-tension areas.

Retention Sutures:
These are large interrupted sutures placed in addition to standard skin sutures.

  • They support deep incisions, particularly in obese patients or high-risk wounds where dehiscence is likely.
  • Often reinforced with rubber tubing to prevent the sutures from cutting into the skin.
  • Retention sutures are typically removed after 14–21 days (longer than regular sutures).

Suturing Patterns

Based on the pattern of suturing, stitches can be classified as:

Suturing Pattern

Description

Plain Interrupted

Single, unconnected stitches; most common technique.

Plain Continuous

One continuous stitch running along the wound, tied at both ends.

Mattress Interrupted

Provides deeper support, with stitches looping through multiple layers.

Mattress Continuous

A continuous version of mattress suturing for stronger wound closure.

Blanket Continuous (Locking Stitch)

Each stitch loops into the previous one, creating a stronger hold.

💡 Suturing Technique Tip: Each suture should be placed as deep as it is wide, and the distance between the sutures should be equal to the depth and width of the wound to ensure proper healing.

Suture Materials

Suture Materials

A suture material is the thread used to stitch a wound

These materials vary in absorption, strength, and application.

Suture materials are classified into:

Type

Examples

Usage

Absorbable Sutures

Surgical gut (catgut)

Used for internal tissues (e.g., beneath the skin) where the sutures dissolve naturally.

Non-Absorbable Sutures

Silk, Nylon, Dacron, Stainless Steel

Used for skin closure, removed after healing.


1. Absorbable Sutures

Absorbable sutures naturally break down and are absorbed by the body over time.

✅ Advantages: ✔ No need for suture removal. ✔ Ideal for internal tissues (e.g., intestines, muscles, and subcutaneous tissues). ✔ Available in multiple sizes (ranging from 0000000 to No. 5). ❌ Disadvantages: ✖ May cause an inflammatory reaction as they degrade. ✖ Not suitable for long-term wound support.

Types of Absorbable Sutures

Type

Absorption Time

Description

Plain Catgut

5–10 days

Rapid absorption, used in fast-healing tissues.

Chromic Catgut

10–40 days

Coated with chromium salts to prolong absorption and reduce irritation.


2. Non-Absorbable Sutures

Non-absorbable sutures do not dissolve and need to be manually removed once the wound has healed.

✅ Advantages: ✔ High tensile strength – they do not easily break. ✔ Minimal tissue reaction, reducing inflammation. ✔ Can be used for ligatures to tie off blood vessels. ❌ Disadvantages: ✖ Requires removal after healing. ✖ Can cause irritation if left in place too long.

Common Non-Absorbable Suture Materials

Material

Properties

Usage

Silk

Soft, flexible, easy to handle

Used in skin closure and ligatures.

Nylon

High tensile strength, minimal reactivity

Used for skin sutures and deep tissue repair.

Dacron/Polyester

Strong, durable

Used in cardiovascular and orthopedic procedures.

Stainless Steel

Extremely strong, resistant to infection

Used for bone repair and surgical staples.

🔹 Ligature (Tie Sutures): A ligature is a free piece of suture material used to tie off blood vessels that have been clamped with artery forceps to prevent bleeding.


Suture Removal Guidelines

The time for removing sutures varies depending on the wound location and type.

Wound Location

Suture Removal Time

Face

3–5 days

Neck

5–7 days

Scalp

7–10 days

Trunk & Upper Limbs

10–14 days

Lower Limbs & Joints

14–21 days

Retention Sutures

14–21 days


Nursing Considerations in Suturing

  • Choose the appropriate suture material based on wound type, location, and required tensile strength.
  • Use absorbable sutures for internal tissues to avoid the need for removal.
  • Use non-absorbable sutures for skin closure, ensuring proper follow-up for suture removal.
  • Place sutures evenly to distribute tension and prevent scarring.
  • Monitor for infection (redness, swelling, pus formation) and remove affected sutures if needed.
  • Ensure wound edges are well-approximated but not overly tight to avoid necrosis.
Suture Needles

Suture Needles

Suture needles are essential tools in wound closure and are classified based on their shape, function, and method of attachment to the suture material.

1. Classification Based on Shape

Type of Needle

Description

Common Uses

Straight Needles

Used without a needle holder

Suturing skin layers and easily accessible wounds

Curved Needles

Require a needle holder; allow precise control

Deep wounds, internal tissues, and confined spaces

Half-Circle Needles

A variation of curved needles, providing greater maneuverability

Used in deeper surgical procedures

Straight Needles: Are used for superficial wounds where access is easy. They are often manipulated without a needle holder, making them suitable for skin closure.

Curved Needles: Preferred for deeper wounds or when working in confined spaces. They require a needle holder for precise placement and controlled passage through tissue. Curved needles are further categorized by the degree of curvature (e.g., 1/2 circle, 3/8 circle).


2. Classification Based on Function

Needle Type

Description

Common Uses

Cutting Needle

Three-edged triangular needle; sharp enough to cut through dense tissue

Used for skin, tendons, and the cervix

Reverse Cutting Needle

Has the cutting edge on the outside curve

Reduces risk of sutures pulling through the tissue

Non-Cutting Needle (Round Body Needle)

Rounded tip; does not cut through tissue

Used for delicate tissue like intestines, blood vessels, and subcutaneous tissues

Cutting Needles: Characterized by three-edged, triangular points designed to cut through dense tissues. Commonly used for skin, tendons, and the uterine cervix.

Non-Cutting (Round Body) Needles: Feature a rounded point that separates rather than cuts through tissues. Ideal for delicate tissues beneath the skin, reducing trauma and the risk of tearing.


3. Classification Based on Suture Attachment

Needle Type

Description

Advantages

Traumatic Needle (Eye Needle)

Has an eye/opening at one end to thread the suture

Can use different suture materials; cost-effective

Atraumatic Needle (Swaged Needle)

Suture material is pre-attached to the needle

Minimizes tissue trauma and provides better handling

Traumatic (Eyed) Needles: These needles have an eye through which the suture material is threaded. The suture diameter is larger than the needle, causing more tissue trauma during passage.

Atraumatic (Swaged/Eyeless) Needles: In these needles, the suture is directly attached to the needle during manufacturing. This results in a suture diameter equal to or smaller than the needle, minimizing tissue trauma. Atraumatic needles are preferred for delicate tissues like intestines, brain, mucous membranes, and nerves.

Suturing

Wound Suturing

In addition to standard dressing materials, the following sterile equipment is required for wound suturing:

  • Sterile gloves
  • Sterile drapes (hole sheet)
  • Sterile needle holder
  • Sterile round needle(s)
  • Sterile cutting needle(s)
  • Sterile suture material (silk, catgut, etc.)
  • Sterile tissue forceps
  • Sterile suture scissors
  • Sterile dressing forceps
  • Antiseptic solution (e.g., iodine)
  • Local anesthetic

Nurse’s Responsibilities in Wound Suturing

In most healthcare settings, suturing is the responsibility of doctors. However, in some hospitals, nurses may be responsible for suturing small wounds, depending on institutional policies.

Preliminary Wound Assessment Before Suturing

Assessment Factor

Purpose

Circumstances of injury

Helps determine wound contamination risk.

Nature of the wound

Identifies if it is caused by a sharp or blunt object, influencing suturing decisions.

Time elapsed since injury

Older wounds are at higher risk of infection and may need debridement.

Patient’s medical history

Conditions like diabetes can affect healing.

Previous wound healing history

Assesses abnormal bleeding, keloid formation, or past wound dehiscence.

Medications

Drugs like corticosteroids delay healing.

Allergy history

Checks for allergic reactions to local anesthesia.

Tetanus immunization status

Tetanus toxoid should be given if necessary.

Wound depth and location

Determines whether general anesthesia is required.

Foreign bodies

Must be removed before suturing to prevent infection.

Devitalized tissues

May need debridement before closure.

Bleeding control

Bleeding points should be ligated before suturing.

Associated complications

Identifies fractures, nerve damage, or tendon injuries requiring further intervention.

Preliminary Assessment
  1. Assess the circumstances under which the wound was produced. This will help to evaluate the possibility of wound contamination.
  2. Assess the nature of the wounding object e.g., blunt, sharp, etc. this will help to assess the depth of penetration of the object and also to identify the puncture wounds.
  3. Assess the duration of time after the injury. This will help to assess the healing process. If the wound is exposed for a prolonged period, there always is the possibility of wound infection.
  4. Check the presence of existing illness in the patient that may influence the healing process e.g. Diabetes mellitus.
  5. Prior healing history is to be assessed. This will help us to find out abnormal bleeding time, wound dehiscence in the past, formation of excessive scar tissue etc.
  6. Check the drugs, the injured person has been taking e.g., cortico-steroids. This will delay the healing process.
  7. Take a history of allergies in the past, especially allergic reaction to local anaesthetics.
  8. Date of most recent tetanus immunization. All patients with a roadside injury should be given tetanus toxoid to prevent tetanus.
  9. Wound location and the type of wound. A penetrating wound should be sutured under general anaesthesia. There is the possibility of injury of the underlying organs.
  10. Watch for the presence of foreign bodies, presence of penetrating objects etc. penetrating objects should not be disturbed until everything is ready for suturing, for fear of bleeding.
  11. Assess the presence of devitalized tissues. This necessitates debridement prior to suturing.
  12. Presence of bleeding. The bleeding points have to be ligated before suturing to prevent further bleeding.
  13. Presence of complications such as fractures, shock, tendon injuries, nerve injuries etc. this necessitates further treatment.
  14. Check the consciousness of the patient and the ability to follow.

Preparation of the Patient and the Environment

  1. Explain the procedure to win the confidence and co-operation of the patient. Explain the sequence of the procedure and tell the patient how he can cooperate with you. Reassure the patient and his relatives.
  2. Get the signature of the patient or his guardian in case anaesthesia is to be given.
  3. Prepare the wound area for a surgical procedure. Shave the hairy regions. Clean the surrounding skin thoroughly with an antiseptic. While shaving and cleaning the area, place a sterile cotton pad or gauze piece over the wound to prevent future contamination of the wound.
  4. Give analgesics if the patient is in pain.
  5. Provide privacy with curtains and drapes, if necessary.
  6. Protect the bed with a mackintosh and towel.
  7. Call for assistance if necessary e.g., to hand over the sterile supplies, to restrain the patient etc.
  8. Place the patient in a comfortable position. See that the doctors or the nurse are also in a comfortable position to do the procedure.
  9. Apply restraints in case of children.
  10. See that the unit is in order with no unnecessary articles. Clear the bedside table or over-bed table and arrange the articles conveniently.
  11. See that there is sufficient light. Adjust the spot light to provide maximum light in the wound area.
  12. Turn the patient’s head away from the wound to prevent the patient from seeing the wound and getting worried.

Wound Suturing Procedure

Step

Action

Rationale

1

Explain procedure to patient

To reduce anxiety and gain patient cooperation.

2

Adjust light

To provide optimal visualization of the wound.

3

Wash your hands

To reduce the risk of infection.

4

Clean the wound thoroughly

To remove debris and bacteria from the wound site.

5

Wash your hands again

To further minimize the risk of infection before donning sterile gloves.

6

Put on sterile gloves

To maintain a sterile field.

7

Drape the wound with the hole-sheet

To create a sterile field around the wound and isolate the area.

8

Infiltrate the edges of the wound to be sutured with local anesthesia.

To minimize patient discomfort during the procedure.

9

Approximate the edges of the fascia with the help of the tissue forceps and using the round needle and cat-gut. Suture the fascia layer first.

To close the deeper tissue layers and provide support.

10

Using the cutting needle and silk, suture the outer layer of skin approximating the edges with the help of the tissue forceps.

To close the skin edges and promote healing.

11

Clean with iodine and cover with sterile gauze.

To disinfect the wound and protect it from infection.

12

Remove the hole-sheet

To remove the drapes.

13

Make patient comfortable

To ensure patient well-being.

14

Remove all equipment, wash and return to its proper place or send for sterilization.

To maintain a clean environment and prepare instruments for future use.

After Care of the Patient and the Articles

  1. Following wound closure, clean the wound again and apply a multilayered dressing to absorb drainage and to arrest bleeding by exerting pressure.
  2. Secure the dressings with a roller bandage or adhesive tapes. As far as possible, avoid covering the wound area with adhesive straps, completely, because it may foster accumulation of moisture and subsequent maceration of the wound edges.
  3. Keep the wound as dry as possible.
  4. Remove the mackintosh and towel. Replace the bed linen. Change the garments if necessary. Make the patient comfortable by adjusting his position in bed.
  5. Ask the patient to rest in bed to prevent fainting attacks.
  6. Elevate the injured part above the heart level to minimize the oedema and pain. Mild analgesics may be given to reduce pain.
  7. Take all the articles to the utility room. Discard the soiled dressing and send it for incineration. Wash and clean the articles first in the cold water and then with warm water and soap. Wash them thoroughly and dry them. Reset the suturing tray and send for autoclaving. Replace all articles to their proper places.
  8. Wash hands. Record on the nurses record with date and time the type of the wound, the number of sutures applied, type of drainage tube applied, if any etc.
  9. Return to the bedside to assess the comfort of the patient and to observe the condition of the wound. Watch for any bleeding from the wound area. Change the dressing if there is excessive bleeding. Report to the doctor.
  10. Watch for the vital signs regularly to detect early signs of shock and collapse on the first day and signs of infection on subsequent days.
  11. Unless signs of infection occur, the dressing should be left undisturbed until time for suture removal. Changing the dressing frequently causes friction on the wound edges and increases the possibility of the wound infection.
  12. Inject tetanus toxoid, if it is not given previously.
  13. On discharge of the patient, the patient should be given the instructions about the care of the wound, and the time when he has returned for the removal of sutures.
Suture Removal Guidelines

Suture Removal Guidelines

Sutures should be removed based on wound location and healing progress. In all cases the surgeon gives the written order for the removal of the sutures.
The sutures may be removed by the surgeons or by the nurses according to the hospital customs.

Wound Location

Suture Removal Time

Face & Scalp

2–5 days

Abdominal wounds

7–10 days

Lower limbs

10–14 days


General Instructions

  1. Confirm the doctor’s orders for the removal of the sutures.
  2. The suture removal is done in conjunction with a dressing change.
  3. Toothed dissecting forceps and a pair of scissors with a short, curved, cutting tip that readily slide under the suture are used.
  4. The suture line is cleansed before and after suture removal.
  5. While removing interrupted sutures, alternate ones are removed first. The remaining sutures are removed a day or two later. If wound dehiscence occurs, the remaining sutures may then be left in place.
  6. Suture material that is beneath the skin is considered free from bacteria, and those visible outside are in contact with the resident bacteria of the skin. It is important that no part of the stitch which is above the skin level enters and contaminates the tissues under the skin.
  7. Suture material left beneath the skin acts as a foreign body and elicits the inflammatory response. While removing sutures, care to be taken to remove them completely. Each suture should be examined for its completeness. Every interrupted suture will have one knot and four ends when removed completely. The number of sutures should be counted before and after removal.
  8. If wound dehiscence occurs during the removal of the sutures, inform the surgeon immediately. In case of abdominal wounds, resuturing is imperative to prevent evisceration. In other places, if resuturing is not necessary, adhesive tapes should be applied to approximate the wound edges as closely as possible.
  9. After the removal of sutures, even if the wound is dry, a small dressing is applied for a day or two to prevent infection. The patient should be told about the care of the wound. He is advised to take rest after removal of sutures of an abdominal wound. The patient should be told not to strain the part e.g., not to cough or lift heavy weight after removal of sutures from the abdomen. This will prevent wound dehiscence.
  10. If wound discharge occurs, the patient should be instructed to contact the surgeon. Presence of pain and swelling at the wound line are the signs of complications.
  11. Abdominal belts or many tailed bandages may be applied on the abdomen after removal of abdominal sutures in obese patients to prevent wound dehiscence and evisceration.

Suture Removal Technique

  • To remove the interrupted sutures, grasp the suture at the knot with a toothed forceps and pull it gently to expose the portion of the stitch under the skin. Cut the suture with sharp scissors between the knot and the skin on one side either below the knot or opposite the knot. Then pull the thread out as one piece. The suture which is already above the skin should not be drawn under the skin.
  • After removal of sutures, every suture should be examined for its completeness. The number of sutures should be counted before and after removal. (it is not uncommon to find some sutures
    laid bury under the skin).
  • Mattress interrupted sutures have two threads underlying the skin. The visible part of the suture opposite the knot should be cut and the suture is removed by pulling it in the direction of the knot.
  • If a continuous suture is applied, it is cut through, close at each skin orifice on one side and the cut sections are removed through the opposite side by gentle traction.

Clips (Metal Sutures) in Wound Closure

Clips, also known as metal sutures or surgical staples, are used to close the skin after a surgical procedure or deep wound

Unlike traditional sutures, clips provide a fast, secure, and uniform wound closure, minimizing tissue trauma.


Purpose of Clips in Wound Closure

The primary objectives of using clips are similar to those of suturing with stitches, including:

✅ To approximate wound edges until healing occurs. ✅ To speed up wound closure and healing. ✅ To reduce the risk of infection by minimizing handling. ✅ To provide a strong and secure closure, especially for long surgical incisions. ✅ To improve cosmetic outcomes by minimizing scarring. ✅ To reduce operation time compared to conventional suturing.


Equipment Required for Clip Removal

In addition to standard equipment for dressing a septic wound, the following specialized instruments are required for removing clips:

Equipment

Purpose

Sterile Clip Removal Forceps

Specially designed to safely remove surgical clips without causing tissue trauma.

Receiver

Used to collect removed clips.

Benzene or Ether

Used to clean the surrounding skin and remove adhesive residue.

Sterile Gauze

To receive and hold the removed clips.

Antiseptic Solution

Used for cleansing the wound.

Adhesive Tape or Bandage

Secures dressing after clip removal.


Procedure for Removing Clips

Pre-Procedure Preparation

1️⃣ Explain the procedure to the patient to gain cooperation and reduce anxiety. 2️⃣ Gather and organize all necessary equipment. 3️⃣ Position the patient comfortably and drape appropriately for privacy. 4️⃣ Protect the bedding with a rubber sheet and cover to prevent contamination. 5️⃣ Remove the old dressing and discard it properly.

Clip Removal Procedure

1️⃣ Clean the wound using an antiseptic solution, starting from the cleanest area to the most contaminated part. 2️⃣ Place a sterile gauze pad near the wound to collect removed clips. 3️⃣ Hold the clip removal forceps in the right hand and the dissecting forceps in the left hand. 4️⃣ Insert the lower blade of the clip remover under the center of the clip. 5️⃣ Use the dissecting forceps to hold the clip in place as the removal forceps are squeezed. 6️⃣ Gently press the forceps together – this action bends the clip outward, disengaging it from the skin. 7️⃣ Carefully remove the clip and place it on the sterile gauze. 8️⃣ Repeat the process until all clips are removed. 9️⃣ Apply iodine or antiseptic to the puncture sites to prevent infection. 🔟 Dress the wound if necessary and secure the dressing with adhesive tape or a bandage. 🔟 Ensure patient comfort and adjust their position as needed. 🔟 Document the procedure, noting the appearance of the scar, wound healing progress, and any complications. 🔟 Dispose of all used materials properly and return reusable instruments for sterilization.

Post-Procedure Care and Monitoring

✅ Assess the wound for signs of infection or delayed healing. ✅ Monitor for bleeding or wound dehiscence (reopening of the wound). ✅ Advise the patient to avoid excessive movement that could stress the healing wound. ✅ Provide pain relief if needed. ✅ Instruct the patient on proper wound care and when to seek medical attention.


Clinical Appearance of the Wound Bed

The appearance of the wound bed provides insight into healing progress and potential complications.

Wound Bed Type

Description

Clinical Significance

Granulating

Healthy red/pink moist tissue with newly formed collagen, elastin, and capillary networks. Tissue is well vascularized and bleeds easily.

Indicates active healing and proper blood supply.

Epithelializing

Pink or whitish thin layer forming on top of granulation tissue.

Sign of wound closure and final healing stage.

Sloughy

Yellowish devitalized tissue, composed of dead cells and fibrin, often misinterpreted as pus.

Requires debridement to promote healing.

Necrotic

Black, hard, or dry tissue with greyish dead connective tissue. Prevents healing and may lead to infection.

Needs immediate debridement and intervention.

Hypergranulating

Granulation tissue grows above the wound margin, caused by bacterial imbalance or excessive irritation.

Delays wound healing and requires adjustments in wound care.

Quick Quiz

Suturing Quiz

FON - mobile-friendly and focused practice.

Privacy: Your details are used only for quiz tracking and certificates.

SUTURING OF THE WOUND Read More »

Post-Operative Nursing Care

Post-Operative Nursing Care

Post-Operative Nursing Care

Post-operative nursing care refers to the specialized care provided to patients following a surgical procedure. This care focuses on monitoring, managing, and supporting the patient’s recovery through a variety of interventions and assessments.

Aims or principles of post-operative care

  1. Prevent, Recognize, and Treat Complications: Through skillful observation and application of knowledge, proactively identify and manage potential complications throughout the recovery period, from unconsciousness to discharge.
  2. Ensure Patient Comfort: Prioritize pain management, provide emotional support, and create a comfortable and safe environment to promote healing and well-being.
  3. Restore Maximum Health and Independence: Guide the patient towards optimal physical and functional recovery, enabling them to regain their independence and return to their desired lifestyle.
post operative recovery room

Immediate care of a patient recovering from anesthesia

Transporting the patient from the operating room to the recovery room

Following the completion of the operation, the operating room staff generally dresses the patient in a clean gown and moves the patient to the stretcher. Care is taken to avoid:

  • Exposing the patient, which predisposes them to respiratory infections and shock.
  • Rough handling, which may place a strain on the sutures.
  • Hurried movements and rapid position changes, which predispose the patient to hypotension.

Recovery Room Care

After arriving, the patient is either transferred to a bed from a stretcher or left on the couch. The patient is positioned supine with the head turned to one side and the chin extended forward. This is done because the patient is unconscious or semi-conscious from anesthesia, and this position helps to avoid respiratory obstruction from a relaxed tongue falling back into the throat, or by aspiration of mucus, blood, and/or vomitus. This positioning also allows secretions to flow out or for easy suctioning.

Baseline assessment of the patient is done, including:

  • Vital signs: blood pressure, pulse, respiratory rate, airway patency, depth of respirations, chest expansion, and the color of the skin.
  • Visual assessment of the patient, presence of IV infusions, drains, or special equipment.
  • The time of admission to the recovery room.
  • The absence of reflexes, e.g., pharyngeal or swallowing reflex, to ensure proper positioning of the head (lateral head position with the neck extended forward until the patient is swallowing).
  • The patient’s level of responsiveness upon admission (e.g., touch, pain, sound, movement, etc.).
  • The temperature and vital signs, which are taken every 15 minutes until stable, then every 30 minutes for the next 2-3 hours. Temperature is taken every 2-4 hours, depending on recovery policy.
  • The quality and rate of respirations. If in distress, oxygen is given, and the anesthetist is informed of respiratory depression or change in ventilatory pattern. Arterial blood gas is determined, and mechanical breathing aids are employed to resuscitate the patient (e.g., intubation, tracheostomy, ambu-ventilation, suctioning, etc.).
  • The presence of an airway/mouthpiece meant to keep the tongue from falling back. Sometimes the patient may push this away as they regain consciousness.
  • Skin color and dryness. A pale, cold, sweating skin is one sign of shock. Also, observe the lips and nail beds for pallor and cyanosis. Run the fluids as prescribed.
  • The condition of the dressing: if soiled, note the color, type, and amount of drainage.
  • The presence of drainage tubes (e.g., thoracic, abdominal, gastric catheters). Check if the patent, clamped, whether to be connected to suction apparatus, and whether they are draining.
  • The IV infusions: note the type of IV infusion solutions, amount left in the bottle, the rate of the drip, infiltrations, and orders for any other fluid to follow. Check if medications have to be added to the IV or if there are orders for any to be added.
  • The presence of a blood transfusion: note if BT is running or if one is ordered. Watch the rate of the drip and carefully for signs of a reaction.
  • Any unusual symptoms like airway obstruction, arrhythmias, signs of shock, hemorrhage, marked temperature elevation, and signs of circulatory overload from excess IV fluids.

After the patient stabilizes (i.e., in 2-3 hours) and recovers from anesthesia, they are discharged from the recovery room by the anesthetist or surgeon. The ward nursing staff is informed to come and collect the patient.

Patient is Collected from the Recovery Room Back to the Ward

  • The ward nurses are informed about the patient to be collected from the recovery room after stabilizing.
  • A verbal report is given by the recovery room nurse to the two nurses who have come to collect the patient. This report covers the type of operation done, vital signs, the level of consciousness, wound status and drainages, infusions and blood transfusions, resuscitation done, anesthesia, problems the patient had during surgery (such as vomiting or stoppage of breathing), urinary drainage, and other post-operative instructions.
  • Brief taking of vital parameters is done by the ward nurses to confirm the report from the theater and to prove that the patient is alive.
  • The patient is rolled back to the ward with the legs in front and the head behind for easy resuscitation by the nurse behind should there be any problem.
  • The patient is gently lifted from the stretcher to the bed prepared before, and care of the anesthetized patient is instituted immediately.
on ward post operative

Immediate Post-Operative Care in the Ward

Care of Anesthetized Patient in the Ward:

The patient should not be left alone during this period because of the danger of asphyxiation, shock, falls, and hemorrhage.

Position:

  • This varies with the type of surgery. It can be supine with the head turned to one side to prevent the bulky tongue from falling back by gravity over the pharynx and blocking the airway, and to promote drainage of saliva from the mouth.
  • The head can be made lower than the shoulders to prevent the flow of fluids into the trachea, allowing secretions to pool in the cheek, making removal easier, and preventing obstruction and pneumonia. The usual position is modified Sims.

Respiratory Status: Assess the quality, depth, and rate of respirations, as well as the skin color and temperature, which indicate adequate oxygen exchange.

Neurologic Status/Level of Responsiveness: Determine whether the patient is alert and oriented, unconscious, confused, restless, etc.

Cardiovascular Status: Obtain vital signs, and check the color and temperature of the skin.

Wound:

  • Check for drainage and bleeding, and connect any drainage tubes to the suction machine or collection bag.
  • See if the dressings are soiled, and look and feel under the patient to detect pooling of blood.

Tubes: Ensure catheters, NGTs, and infusion lines are patent, check the rate and amount, look for drainage or blockage, and verify proper attachment to drainage systems.

Discharge Advice/Health Education on Home Care of the Patient:

  • The length of time needed for a patient to recover from surgery depends on the patient’s physical and mental condition prior to surgery, the magnitude of the surgery, and the development of any post-operative complications.
  • Assess the knowledge and understanding of the patient about the surgery and the preventive measures.
  • Look for learning readiness and the ability of the patient and/or family members to provide care and skills needed to perform procedures at home.
  • Teach the patient to report pain in any area, temperature elevation, cough and sputum of abnormal color, loss of energy, nausea and vomiting, change in urine characteristics, difficulty in breathing, abnormal drainage, and sudden weight loss. These are signs of complications.
  • Emphasize the importance of hand washing prior to meals, performing any procedure of care, and toileting.
  • Practice together with the patient coughing, breathing, and exercises to prevent pulmonary complications.
  • Advise the patient to avoid smoking or contact with people with RTIs.
  • Encourage the patient to continue with physical exercises, increase activity when necessary, and stop when tired. Exercises promote activity to maintain circulation and normal functioning of the systems.
  • Inform the patient to take plenty of fluids, vitamins, and electrolytes to maintain fluid/nutritional status for health (wound healing, skin integrity, elimination, liquefy secretions).
  • Teach the patient how to care for the wound: dressing change, cleansing, and skin care. Allow practicing aseptic technique in wound care and protection of the wound when bathing to maintain a clean, dry, healing wound.
  • Educate the patient on how to take drugs: checking their actions, dose, route, frequency, side effects, and food and drug interactions to ensure compliance.
  • Instruct the patient to modify their home environment to clear pathways of rugs, provide good lighting, and use articles to hold onto when walking, wearing firm and good-fitting shoes to ensure safety and prevent accidents.
  • Discuss the care of appliances such as fixators, plaster of Paris, and prostheses for the purpose of safe usage and optimal effect of supportive aids.
  • Provide information on where to find supplies and equipment for home care.
  • Give the patient contact information and the phone number of the doctor or other staff for easy follow-up or emergency calls.

POST OPERATIVE CARE

Requirement

  • As for Postoperative bed

Procedure

Steps

Action

Rationale

1

Two ward nurses (Senior and Junior) collect the patient from the theatre.

To ensure the patient’s safety.

2

Receive full report of the patient’s condition from Surgeon, anaesthetist and theatre nurse.

To promote continuity of quality care and legal purpose.

3

Take the patient to the ward while observing consciousness, color of the patient and maintain a clear airway.

4

Screen the patient bed.

To ensure privacy.

5

Pull the prepared bed away from the wall and push the theatre trolley up against the bed. Roll the patient from trolley to bed.

This enables safe lifting of the patient.

6

Position the patient in an appropriate position depending on the surgery done and making sure the airway is maintained clear.

To maintain patient airway and aid free drainage of secretions.

7

Leave the airway piece in position until the patient regains consciousness.

To prevent the tongue from falling back and causing obstruction.

8

Check the surgeon’s post-operative instructions regarding operation and care i.e. intravenous fluid therapy, medicines, nutrition, and positioning.

To promote continuity of quality care.

9

Stay with the patient until the patient is conscious. Take vital observations as prescribed or at intervals ¼ to ½ hourly depending on the patient’s condition.

Monitor and evaluate patient’s conditions and timely interventions.

10

Observe the incision site for bleeding and drainage tubes for functionality.

11

Carry out special nursing procedures as prescribed i.e. suction, intravenous fluids.

12

Provide warmth to the patient.

To prevent hypothermia.

13

Document all the care provided and report accordingly.

Monitor progress and provide appropriate interventions.

14

Give a pillow to the patient when fully conscious, and more pillows as required.

To aid comfort.

15

Observe fluid intake; give Intravenous fluids as prescribed and encourage oral fluid as indicated; measure and record in fluid balance chart.

Monitor fluid balance.

16

Observe fluid output: Encourage the patient to pass urine or empty the drainage bag, measure and record the amount passed.

17

Administer post-operative medicine as prescribed by the doctor.

Promote healing or treat pain.

18

Assist the patient to perform different exercises as taught before operation.

Prevent post-operative complications.

19

Offer general nursing care to postoperative patient.


Points to Remember:

  • Take note of the irregularities in vital observations:
    • A rising pulse rate and/or decreasing pulse volume.

    • A falling or inaudible blood pressure recording.

    • Slowing, rapid, or noisy respirations.

  • For the skin note; the color, feel of the skin, i.e. cold or clammy.

  • Dressing; note, any oozing or bleeding from the incision site. In case of bleeding is present add more sterile dressing and bandage in position, and report immediately to the nurse in charge or the doctor.

  • Special nursing care is given to patients as per operation and condition.

PERI-OPERATIVE CARE (Summary)

PRE-OPERATIVE:

  • Admission
  • Explanation to the patient about the nature of the surgery and the possible outcomes.
  • Informed Consent for admission and surgery.
  • Vital observations and other lab investigations, radiological investigations to get a baseline.
  • Preparation of the body and mind through counseling and continuous reassurance. This helps to allay anxiety as well.
  • Talk to the patient and answer questions of their concerns to reduce fear/anxiety.
  • Spiritual care if one so wishes; respective church leaders are allowed to come and see the patient.
  • A baseline Physical examination, e.g., weight, height, nutritional status, needs to be assessed prior.
  • Site preparation: involves marking/labeling, 48 hours shaving if hairy.
  • Removal of jewelry and rings.
  • Removal of dentures and prostheses.
  • Inserting an IV line.
  • Rehydration with IV fluids.
  • Administration of premedication drugs.
  • Perform required procedures like inserting NGT, catheterization, bowel irrigation.
  • Ensure enough rest and sleep.
  • Educate on anticipated activity post-operatively.
  • Starve the patient prior as per order (nil per os).
  • Make a post-op bed with all the necessary accessories required, e.g., oxygen, suction apparatus.

POST-OPERATIVE CARE:

  • Reception from theatre with all the necessary instructions.
  • Vital parameters monitoring.
  • Monitoring for bleeding, and signs of shock.
  • Admission to a warm postoperative bed from the theatre.
  • Intravenous infusion with fluids and prescribed drugs.
  • Fluid balance chart recording and monitoring.
  • Ongoing post-op medication.
  • Bowel and bladder care.
  • Rest and sleep.
  • Proper management of drainages, e.g., abdominals, etc.
  • Proper positioning to relieve pain.
  • Diet/nutrition.
  • Wound care.
  • Pain management.
  • Bed hygiene.
  • Body/skin hygiene.
  • Physiotherapy, e.g., breathing exercises.
  • Psychological care.

POST-OPERATIVE COMPLICATIONS:

  • Hemorrhage; can be primary or secondary.
  • Pain.
  • Shock.
  • Wound infection/sepsis.
  • Hypostatic pneumonia due to constant lying on the bed.
  • Delayed healing.
  • Paralytic ileus.
  • Adhesions.

Post-Operative Nursing Care Read More »

CARE OF THE PATIENT’S EYES

CARE OF THE PATIENT’S EYES.

Care of the patient’s eyes includes a range of procedures and practices aimed at maintaining the cleanliness, comfort, and health of the eyes.

It Involves:

  • Cleaning of the Eye: This includes removing debris, discharge, and crusting from the eyelids and eyelashes. It’s done gently using sterile wipes or cotton balls moistened with warm water.
  • Instillation of Eye Drops/Ointment: This is done to deliver medication directly to the eye, treating various conditions like infection, inflammation, dryness, or glaucoma.
  • Cold and Warm Compresses: These are used to reduce inflammation, calm irritation, or promote relaxation. Cold compresses are applied for injuries or swelling, while warm compresses are beneficial for dry eye or clogged tear ducts.
  • Eye Irrigation: This involves flushing the eye with a sterile solution to remove foreign objects, irritants, or excessive discharge.

Indications of Cleaning the eye

  • Patients with Eye Discharge: This can be a sign of infection, inflammation, or irritation. Cleaning the eye, instilling appropriate drops, and sometimes irrigation can help manage the discharge and promote healing.
  • Postoperative Care for Patients Following a Cataract Operation: This includes gentle cleaning of the eye, instillation of prescribed eye drops, and monitoring for signs of infection or complications.
  • Eye Care for the Unconscious Patient: This is crucial for preventing infections and maintaining eye health. It includes cleaning the eye, keeping the eyelids closed, and ensuring the eyes are protected from injury.
  • To Be Performed Prior to Instilling Eye Drops or Ointment: Cleaning the eye beforehand helps ensure that the medication is delivered effectively and avoids contamination.
  • Patients with Dry Eye Syndrome: Eye care practices can help manage symptoms by promoting tear production, lubricating the eye, and protecting the cornea.
  • Patients with Eye Allergies: Cleaning the eye and instilling antihistamine drops can help manage the symptoms of itching, redness, and watery eyes.
  • Patients with Foreign Body in the Eye: Eye irrigation with a sterile solution is essential to remove the foreign object and prevent damage to the cornea.

Aims/Purposes of Eye Care:

  • To prevent and treat infections: Cleaning and disinfecting the eye area helps reduce the risk of infections.
  • To alleviate symptoms and discomfort: Procedures like cold compressions, warm compresses, and eye irrigation can provide relief from pain, itching, and dryness.
  • To promote healing and recovery: Appropriate cleaning and medication can help facilitate healing after eye surgery or trauma.
  • To maintain optimal eye health: Regular eye care can help prevent eye diseases and preserve vision.
Cleaning of the Eye

Cleaning of the Eye

Objectives

  1. Identify the requirements for cleaning the eyes.
  2. Prepare the requirements for cleaning the eyes.
  3. Demonstrate the ability to clean the eyes.

Requirement

Tray containing:

  • Gallipot of cotton balls
  • Receiver
  • Clean/disposable gloves
  • Mackintosh and towel
  • Plastic apron
  • Gallipot of normal saline 0.9% or cooled boiled water

At the bedside:

  • Hand washing equipment
  • Screen

Procedure

Steps

Action

Rationale

1.

Observe general rules.

Promotes adherence to standards.

2.

Put the patient in a sitting up position.

To prevent the flow of solution to the healthy eye.

3.

Place protective mackintosh and towel in place.

To prevent soiling/wetting the patient’s clothes.

4.

Wash and dry hands and put on gloves.

To prevent cross infection.

5.

Stand at the right-hand side of the patient.


6.

Dip the swabs/cotton balls in the solution and bathe the eye in the following sequence: 

– Start from the healthy eye 

– Swab from the nasal to the temporal aspect, using the swab once and discard. 

– Use the dry swabs to dry the eye 

– Do the same for the other eye 

– Repeat the swabbing until the eye is cleared of all discharge.

Prevents contamination from entering the other eye. Prevent the spread of infection.

7.

Dry excess fluid with a dry swab.

Prevent the spread of infection.

8.

Thank and leave the patient comfortable.

Promotes a sense of well-being.

9.

Clear away.

Maintain the cleanliness of the environment.

10.

Document the procedure.

 
INSTILLATION OF EYE DROPS OINTMENT.

INSTILLATION OF EYE DROPS/ OINTMENT.

Instillation Of Eye Drops/ Ointment is the process of application of medication into the patients’ eyes.

Objectives

  1. Identify the requirements for instilling eye drops/ointment.
  2. Prepare the requirements for instilling eye drops/ointment.
  3. Instill the eye drops/ointment to the eyes.

Indications:

For Eye Drops:

  • To treat infections: Antibiotic eye drops are commonly used to combat bacterial infections like conjunctivitis (pink eye).
  • To keep eyes moist: Artificial tears or normal saline drops are used to lubricate the eye and relieve dryness, often prescribed after cataract surgery.
  • To anaesthetize the eye: Anaesthetic drops numb the eye surface, used for procedures like cataract surgery or foreign body removal.
  • To dilate the pupil: Mydriatic drops widen the pupil, facilitating eye exams or helping treat certain eye conditions.
  • To reduce inflammation: Steroid eye drops are used to reduce inflammation in the eye, often prescribed after eye injury or surgery.
  • To lower intraocular pressure: Glaucoma medications are often administered as eye drops to control eye pressure and prevent further damage.

For Eye Ointment:

  • To protect the vision of neonates: Prophylactic antibiotic ointment is routinely applied to newborns’ eyes to prevent infections.
  • To treat infections: Antibiotic ointments can be used to treat bacterial eye infections, often preferred for overnight treatment due to their longer-lasting effect.
  • To lubricate and soothe dry eyes: Ointments can provide a longer-lasting lubricating effect than drops, especially helpful for severe dryness.
  • To treat certain eye allergies: Steroid ointments can be used to reduce allergic inflammation.

Requirements

  • Patient’s medication chart.

Tray:

  • Prescribed eye drops/eye ointment
  • Gallipot of cotton balls
  • Receiver
  • Gloves
  • Eye pad in a sterile bowl
  • Strapping

At the Bedside:

  • Hand washing equipment

  • Screen

Procedure for eye drop

Steps

Action

Rationale

1.

Refer to general rules.

Promotes adherence to standards.

2.

Check the prescription.

Ensures correct administration of medicine.

3.

The patient may be seated or lying down for this procedure.

Provides easy access to the eye for instillation.

4.

Wash hands and put on gloves.

Prevents the spread of microorganisms.

5.

Clean the eyes as before.

Prevents entrance of microorganisms to the lacrimal duct.

6.

Place a folded swab on the lower lid up to the lash margin.

Absorbs medication that escapes from the eye.

7.

Instilling eye drops: Gently pull down the eyelid of the affected eye.

Exposes lower conjunctival sac.

8.

Request the patient to look up; hold the dropper close to the eye and drop the medicine according to the dose into the lower conjunctival sac.

To reduce stimulation of the blink reflex.

9.

Release the lower eyelid after the eye drops are installed.


10.

Request the patient to gently close the eye.


11.

Apply gentle pressure over the inner Canthus.

To prevent eye drops from falling over the inner Canthus to prevent systemic effects from the medicine.

12

Administering eye ointment:

– Gently pull down the lid

To expose the inner surface of the lid and conjunctival sac.

13

Squeeze a small amount (1.25cm) of ointment along the exposed sac from in outwards.

Promotes comfort and prevents trauma to the eye.

14

Instruct the patient to close the eyes.

The warmth helps to liquefy the ointment Prevents contamination and entrance of micro-organism into the eye.

15

Instruct the patient to roll the eyeball

Patient should keep the eye closed for a few minutes.

Allows even distribution of medication over the eye.

16

Thank and leave the patient comfortable.

Ensures patient’s comfort.

17

Clear away.

Ensures a clean environment.

18

Record treatment given on the chart.

Continuity of care and follow up.

General Principles – Application of Eye Ointment

  • Ointment may be prescribed in addition to drops. If both are prescribed, drops should be instilled first, followed by ointment after a 3-minute interval.
  • Ointment may be prescribed for structures other than the eye. This could include wounds on the lids, face, or eye socket.
  • Ointment may be prescribed for use after the first dressing. This might not happen for up to a week in some oculoplastic surgery cases.
  • If requested, visual acuity should be recorded before ointment is applied. This is because ointment clouds vision. Any existing ointment excess should be removed before taking the measurement.
  • A 5-mm strip of ointment should be applied to the inner edge of the lower fornix of the appropriate eye.
  • The patient should close his eye and remove excess ointment with a swab.
  • The patient should be advised that the ointment is likely to cause blurring of vision due to its viscous nature.
  • In the case of wounds on the lids, face, or eye socket, ointment should be squeezed directly onto the wound. It can be dispersed using a moistened swab. If the ophthalmic surgeon requests it, the wound or scar should be massaged using the ointment.

INSTILLATION OF EYE DROPS OINTMENT.

Procedure of Instillation of Eye Ointment

Steps

Action

Rationale

1.

Wash hands and prepare trolley and equipment in accordance with ANTT (Aseptic Non Touch Technique) principles.

Promotes adherence to standards.

2.

Check the patient identification band against the eye-drop medication chart.

Ensures correct patient identification and medication administration.

3.

Prepare the patient for the procedure and obtain consent, giving an explanation of the procedure including any side-effects of the medication.

Informed consent and patient understanding of the procedure.

4.

Assess the patient as before, including ensuring that the drops are not contra-indicated.

Ensures the medication is safe and appropriate for the patient.

5.

The patient should be seated.

Provides easy access to the eye for instillation.

6.

Wash hands or use alcogel.

Prevents the spread of microorganisms.

7.

Prepare equipment and place it in the tray, identifying key parts to be protected during the procedure; in this case, the tips of bottles.

Maintains aseptic technique.

8.

Check drops/ointment against the prescription.

Ensures correct medication is administered.

9.

Check the correct strength (%) of the drops against prescription.

Ensures correct dosage.

10.

Check drops/ointment have not expired. Check clarity of drops, i.e., the fluid in the bottle/minim must be clear and not discoloured.

Ensures medication is safe and effective.

11.

Check packaging/bottle seal is intact when first used.

Ensures sterility and safety of the medication.

12.

Identify any current allergy to the topical medications.

Prevents adverse allergic reactions.

13.

Ensure that the drops are instilled into the correct eye.

Ensures correct administration site.

14.

Examine the eye to be treated for the following: 

Redness not attributed to surgery or other known causes.

No stickiness or pain.

No deterioration of vision.

Allergies to the prescribed eye drops.

Assesses the condition of the eye to avoid complications.

15.

Check no contact lens in situ unless advised to the contrary by the doctor.

Prevents interference with medication absorption and eye health.

16.

Remove gloves, clean hands with alcohol gel and reapply non-sterile gloves.

Prevents contamination and maintains hygiene.

17.

Open packaging, ensuring key parts remain protected. NB: You may need to open additional packaging if the eye needs cleaning prior to drop instillation, in which case you should proceed to eye cleaning first.

Maintains aseptic technique.

18.

Instruct the patient to slightly tilt the head back and ask the patient to look up. NB: Before using any bottle of eye drops, shake the bottle first.

Facilitates easy access to the eye and proper medication distribution.

19.

Instill only one drop into the lower fornix towards the outer canthus or squeeze 5 mm of ointment along the lower fornix towards the outer canthus. NB: Ointment must only be applied after prescribed eye drops.

Ensures correct medication application.

20.

Ask the patient to gently close his eyes, counting slowly to 60. This helps to minimize systemic absorption.

Promotes proper absorption and effectiveness of the medication.

21.

Wipe away any excess drops/ointment, taking care not to wick away drops from the eye.

Maintains patient comfort and ensures proper dosage remains in the eye.

22.

If further drops are prescribed, wait an interval of 3 minutes before carrying out the procedure. Apply alcogel to hands before instilling the next eye drop.

Prevents contamination and ensures effectiveness of multiple medications.

23.

Make the patient comfortable; patients usually appreciate being given a tissue to dab their cheeks.

Ensures patient comfort and cleanliness.

24.

Dispose of clinical waste, cleanse hands, and then clean the tray.

Maintains a clean and safe environment.

25.

Cleanse hands and document the procedure in the case notes and/or drop chart.

Ensures proper record-keeping and patient safety.

WARM EYE COMPRESS.

WARM EYE COMPRESS.

A warm eye compress involves applying a warm, moist cloth or compress to the eye area. 

  • Soothe and relax the eye muscles: The warmth helps to relax the eye muscles, which can be helpful for reducing eye strain and fatigue.
  • Increase blood flow to the area: The warmth dilates blood vessels, increasing blood flow to the eye area, which can promote healing and reduce inflammation.
  • Loosen eye secretions: Warmth can help loosen mucus and other secretions in the eye, making them easier to remove.

Indications for Warm Eye Compresses

  • Pain Relief: Warm compresses can help reduce discomfort and pain in the eye area.
  • Reduce Inflammation: The warmth helps to decrease inflammation and swelling in the eye.
  • Improve Medication Absorption: Warm compresses can enhance the absorption of eye drops or ointments.
  • Promote Drainage: Warmth helps to loosen and drain secretions, which can be beneficial for superficial infections.
  • Dry eye: Warmth can help to stimulate tear production and lubricate the eye surface.
  • Stye (hordeolum): A stye is a painful red bump on the eyelid caused by a bacterial infection. Warm compresses can help to bring the stye to a head and promote drainage.
  • Blepharitis: This is a common eye condition that causes inflammation of the eyelids. Warm compresses can help to loosen debris and reduce inflammation.
  • Conjunctivitis (Pink eye): This is an infection of the conjunctiva, the thin transparent membrane that lines the inside of the eyelid and covers the white part of the eye. Warm compresses can help to soothe inflammation and promote drainage.
  • Eye strain: Warm compresses can help to relax eye muscles and relieve eye strain caused by prolonged computer use or reading.
  • Meibomian Gland Dysfunction (MGD): This condition involves a blockage of the oil glands in the eyelids, causing dry eye and other symptoms. Warm compresses can help to loosen and drain the oil glands.

Requirements

Tray

Bedside

Bowl with warm water

Screen

Sterile water or normal saline

Hand washing apparatus

Mackintosh cape and towel/dressing mackintosh


Sterile bowl


Cotton swabs


Receiver


Procedure

Steps

Action

Rationale

1

Identify the eye to be treated.

Ensure the correct eye to prevent error.

2

Follow the general rules.

Promote adherence to standards.

3

The patient may be seated or lying down for this procedure.

To ensure comfort for the patient.

4

Place the bowl with solution in a bowl of warm water.

Cold application is very uncomfortable for the patient.

5

Wash dry hands and put on gloves.

To prevent the chance of cross infection.

6

Place the swab in the warm solution (37°-41°C).

To improve circulation and relieve pain.

7

Squeeze out the excess solution.

To reduce the chance of scalding the patient and wetting patient’s clothes.

8

Instruct the patient to close the eye. Gently apply the swab on top of the affected eye.

To promote patient’s safety and prevent skin damage.

9

Change the compress every 2 minutes for the prescribed length of time.

To maintain a constant temperature for the duration of therapy.

10

Use a dry swab to clean and dry the eyes.

Promote patient’s comfort.

11

If required apply eye drops/ointment.

To prevent infection.

12

Thank and leave the patient comfortable.

Promotes patient’s well-being.


COLD EYE COMPRESS

Cold compress is placing of a cold compress/pack over the affected area or eye
to relieve discomfort.

Indications of Cold compress

  • Reduce inflammation: Cold compresses constrict blood vessels, reducing inflammation and swelling.
  • Relieve pain: The coldness helps numb the affected area, reducing pain and discomfort.
  • Reduce bleeding: Cold compresses can help stop minor bleeding by constricting blood vessels.
  • Control bruising: Applying cold compresses immediately after an injury can help reduce bruising by minimizing blood pooling.
  • To reduce swelling or bleeding: Cold compresses can help reduce swelling and bleeding in the eye area by constricting blood vessels.
  • To ease periorbital discomfort: Cold compresses can help ease pain and discomfort around the eye area.
  • To relieve itching: The coolness of the compress can help reduce itching in the eye area.

Requirements

Tray

  • Ice cubes/chips
  • Solution: sterile water or normal saline solution
  • Mackintosh and towel/Dressing mackintosh
  • Strapping
  • Cotton swabs
  • Clean gloves

At the bedside

  • Screen
  • Hand washing apparatus

Procedure of cold compress

Steps

Action

Rationale

1

Follow the general rules of nursing procedure.

Prevent solution from over the nose and into the eye.

2

Identify the eye to be treated.

To prevent errors.

3

The patient should lie down for this procedure.

To prevent the solution from wetting the patient’s clothes.

4

Position the mackintosh and towel to protect the patient’s clothes.

To prevent wetting the patient’s clothes.

5

Place the swab in the bowl of ice chips (18-27°C).

To make it easy to apply and provide comfort.

6

Wash dry hands and put on gloves.

To prevent infection.

7

Place the moist swab over the affected closed eye.

The swab helps to conduct the cold from the ice pack.

8

After 15-20 minutes, remove the cold compress.

To prevent skin change this can occur from vasoconstriction.

9

Use a dry swab to clean and dry the patient’s face.

To ensure comfort.

10

If required apply eye drops/ointment.

To prevent/treat infection.

11

Thank and leave the patient comfortable.

To ensure comfort.

12

Clear away and document procedure.

To ensure proper records are kept.

Eye Irrigation

Eye Irrigation

Eye irrigation involves flushing the eye with a sterile solution to remove foreign bodies, irritants, or discharge. This process helps cleanse the eye, reduce inflammation, and improve visual clarity.

Eye irrigation is the washing of the conjunctiva sack with a stream of fluid(water). The gentle flow of the irrigation solution washes away the offending substance from the eye. The solution is typically sterile and isotonic to minimize irritation.

Purpose/Aims of Eye Irrigation:

  • To remove foreign bodies from the eye: This includes dust, dirt, small particles, or insects that may have entered the eye.
  • To remove chemicals which have been accidentally splashed into the eye(s): This includes chemicals, smoke, fumes, or allergens that may cause irritation.
  • To washout discharge: This includes mucus, pus, or other secretions that may accumulate in the eye.
  • Reduce inflammation: The flushing action can help reduce inflammation and swelling.
  • Improve visual clarity: Removal of foreign objects or discharge can improve vision.
  • Before administration of medication: Irrigation can help prepare the eye for medication application.
  • In preparation for eye operations: Irrigation can help cleanse the eye before surgery.

Indications for Eye Irrigation:

  • Foreign body sensation: If a patient feels something in their eye, such as a speck of dust or a small insect.
  • Chemical or irritant exposure: If the eye has come into contact with a chemical or irritant.
  • Discharge or secretions: If there is excessive discharge or secretions from the eye.
  • Eye infections: In some cases, eye irrigation can help remove infectious material and reduce inflammation in certain eye infections.

Requirements

Tray-sterile

  • Irrigating solution-Normal saline at 37°C or plain boiled cooled water(sterile).
  • Sterile gloves, patient’s towel
  • Lid retractor
  • Litmus paper
  • Undine or any small container with a pouring spout e.g. feeding cup, bulb syringe or Sterile irrigation set
  • Eye pad/waterproof pad
  • Gallipot of cotton balls or facial tissues
  • 2 receivers, mackintosh cape and towel/dressing mackintosh
  • Boric acid 2 to 4 %
  • Gallipot of cotton

At the bedside

  • Wash hand equipment
  • Screen

Eye Irrigation

Procedure

Steps

Action

Rationale

1

Follow the general rules for all nursing procedures.

Promotes adherence to standards.

2

Have the patient sit or lie down with the head tilted toward the side of the affected eye. Protect the patient and the bed with a dressing mackintosh or waterproof pad and a towel.

Gravity helps the flow of solution away from the unaffected eye and from the inner canthus of the affected eye toward the outer canthus.

3

Put on gloves. Clean the eye as before.

4

Place the curved part of the receiver at the cheek on the side of the affected eye to receive the irrigating solution. If the patient is sitting up, request the patient to hold the receiver.

Cavity aids the flow of solution.

5

Expose the lower conjunctival sac and hold the upper lid open with the non-dominant hand.

To avoid injury to the conjunctival sac and prevent reflex blinking.

6

Hold the irrigator about 2.5 cm from the eye. Direct the flow of the solution from the inner to the outer canthus along the conjunctival sac.

This minimizes the risk of injury to the cornea and prevents the spread of infection from the eye to the lacrimal sac, lacrimal duct, and the nose.

7

Irrigate until the solution is clear or all the solution has been used. Use only sufficient force gently to remove secretion from the conjunctiva without touching any part of the irrigating equipment.

To prevent injury to the tissues of the eye, as well as the conjunctiva, and promote comfort for the patient.

8

Tell the patient to close the eye and move the eye periodically.

Helps to move the secretion from the upper to the lower conjunctival sac.

9

Dry the area after irrigation with cotton balls. Offer the towel to the patient if the face and neck are wet.

To provide comfort.

10

Remove gloves and wash your hands.

11

Make the patient comfortable.

12

Document the procedure or findings.

13

Clear away.

Points to remember

  •  For chemical burns, irrigate each eye for at least 15 minutes with normal saline solution to dilute and wash out the harsh chemicals.
  •  If the patient cannot identify the specific chemical, use litmus paper to determine if the chemical is acidic or alkaline or to be sure the eye has been irrigated adequately.
  • When irrigating both eyes, ask the patient to tilt his head towards the side being irrigated to avoid contamination.
  • An irrigation fluid  may be pre-packed in a disposable set for use or a sterile 50ml syringe may be used.

Quick Quiz

Eye Care Quiz

FON - mobile-friendly and focused practice.

Privacy: Your details are used only for quiz tracking and certificates.

CARE OF THE PATIENT’S EYES Read More »

BLOOD TRANSFUSION

BLOOD TRANSFUSION

Blood transfusion refers to the intravenous replacement of lost or destroyed blood with compatible human blood or blood products. It is a critical, life-saving intervention utilized to restore blood volume, improve oxygen-carrying capacity, and correct coagulation disorders. Because blood is a complex biological tissue, its administration requires strict adherence to safety protocols to prevent potentially fatal immunological and non-immunological complications.

Types of Blood Products

Modern transfusion medicine largely relies on component therapy, meaning patients receive only the specific part of the blood they need, rather than whole blood. This optimizes the use of donated blood and minimizes the risk of volume overload and other complications.

1. Whole Blood

Whole blood contains red blood cells, white blood cells, platelets, and plasma in its natural, unseparated state.

  • Indication: Indicated for patients experiencing acute massive blood loss (e.g., severe trauma, bleeding >30% of blood volume) or hypovolemic shock.
  • Purpose: Replenishes total blood volume while simultaneously raising the hemoglobin count to improve oxygen-carrying capacity.
  • Advantages: Restores both volume and oxygen delivery capacity simultaneously in catastrophic bleeding.
  • Disadvantages: High risk of fluid/circulatory overload if the patient only needs red cells; platelets and clotting factors in stored whole blood degrade rapidly.
2. Packed Red Blood Cells (PRBCs)

Red blood cells are separated from a unit of whole blood by centrifuging and removing approximately 80% of the plasma.

  • Indication: Symptomatic anemia (e.g., aplastic anemia), chronic anemia with active symptoms (fatigue, angina), or acute bleeding. Transfused when Hb is <7g/dL for general patients, and <8g/dL for patients with pre-existing cardiovascular illnesses or in post-surgery/ICU settings.
  • Purpose: Increases the number of red blood cells to improve oxygen delivery to tissues without excessively overloading the circulatory system with fluids.
  • Advantages: Minimizes the risk of circulatory overload; efficiently concentrates oxygen-carrying capacity.
  • Disadvantages: Does not provide viable platelets or significant coagulation factors.
3. Platelet Concentration

Platelets are derived from whole blood and pooled, or collected via apheresis.

  • Indication: Severe thrombocytopenia (low platelet count) leading to bleeding disorders, or qualitative platelet function defects.
  • Purpose: Provides platelets to aid in hemostasis (stopping bleeding). Platelets assist in initiating the clotting cascade, working alongside other factors like prothrombin, fibrinogen, and thromboplastin.
  • Advantages: Rapidly controls or prevents bleeding in thrombocytopenic patients.
  • Disadvantages: Short shelf life (typically 5 days); higher risk of bacterial contamination because they are stored at room temperature.
4. Plasma & Fresh Frozen Plasma (FFP)

Plasma is the fluid portion of the blood remaining after red blood cells have been removed via centrifugation. FFP is frozen shortly after collection to preserve clotting factors.

  • Indication: Used in cases of shock (burns, trauma, hemorrhage), to reverse anticoagulant effects (like Warfarin toxicity), or to correctly replace multiple clotting factor deficiencies. Can be used temporarily while awaiting cross-matched blood.
  • Purpose: Expands blood volume and provides essential proteins and functioning clotting factors.
  • Advantages: Broadly replaces multiple coagulation factors; excellent volume expander.
  • Disadvantages: Requires time to thaw before administration; carries a risk of Transfusion-Related Acute Lung Injury (TRALI).
5. Cryoprecipitate

A concentrated frozen blood product derived from thawing FFP and collecting the precipitate.

  • Indication: Low fibrinogen levels (normal is 2-4 g/L), often seen in massive hemorrhage or consumptive coagulopathies like Disseminated Intravascular Coagulation (DIC).
  • Purpose: Provides highly concentrated Factor VIII, von Willebrand factor, and fibrinogen.
  • Advantages: Delivers essential specific clotting factors in a very small fluid volume.
  • Disadvantages: Requires precise cold-chain management and thawing.
Indications for Blood Transfusion

Blood transfusions are indicated to treat symptomatic anemia, acute blood loss of >30% of blood volume, and deficient coagulation factors. Specific indications include:

  1. Severe Anemia: Seen in conditions such as complicated pregnancy, Sickle Cell Disease, complicated malaria, and aplastic anemia.
  2. Major Trauma: Following road traffic accidents (RTAs), massive chest injuries, or multiple fractures resulting in considerable blood loss.
  3. Major Surgical Operations: Preoperative, intraoperative, or postoperative states where excessive blood loss is expected or occurred (e.g., laparotomy, amputation, vascular surgery, open reduction of internal fractures, total abdominal hysterectomy).
  4. Severe Hemorrhage & Shock: To correct the effects of severe bleeding and hypovolemic shock, restoring volume and preventing organ ischemia.
  5. Severe Burns: Especially deep or third-degree burns, to replace lost fluids and vital blood proteins.
  6. Chronic Illnesses: Conditions associated with chronic bleeding or marrow suppression, such as cancer or leukemia.
  7. Obstetric Emergencies: Women during childbirth suffering from Postpartum Hemorrhage (PPH).
  8. Neonatal Conditions: Newborn babies with rhesus incompatibility or hemolytic disease of the newborn.
  9. Hereditary Coagulation Disorders: Patients with hemophilia or thalassemia requiring factor or RBC replacement.
CRITICAL PRE-TRANSFUSION CONCEPTS
  • Blood Type Matching & Rh Factor: It is imperative to ensure the ABO blood group and Rh factor of the donor match the recipient to prevent potentially fatal hemolytic transfusion reactions.
  • Crossmatching: A laboratory process where donor red cells are mixed with recipient serum to definitively ensure compatibility before administration.
  • Alternatives to Transfusion: Before transfusing, consider alternatives like erythropoietin injections (for anemia), oral/IV iron, and medications to increase platelet production, to avoid transfusion-associated risks.
  • Potential Risks: Transfusions carry risks including allergic reactions, bacterial/viral infections, fluid overload, and Transfusion-Related Acute Lung Injury (TRALI).
Vital Checks and Preparations Before Starting a Transfusion

THE "GOLDEN 15 MINUTES": Most severe, life-threatening transfusion reactions (like ABO incompatibility) occur within the first 15 minutes or first 50 mL of blood infused. The nurse MUST remain at the bedside during this entire period.

  1. Confirm the Clinical Need: Verify exactly why the transfusion is ordered, ensure no alternatives exist, and verify the exact blood product and amount required.
  2. Obtain Informed Consent: Ensure the patient is educated about the benefits, possible risks/reactions, and alternatives. Document the consent strictly according to hospital policy.
  3. Patient Identification (The Most Critical Safety Step): Verify the patient's full name, date of birth, and Hospital/ID number against their wristband. These details must exactly match the blood request form, laboratory compatibility report, and the blood unit label.
  4. Blood Grouping and Crossmatching: Confirm laboratory tests ensuring ABO and Rhesus compatibility and antibody screening to prevent dangerous hemolytic reactions.
  5. Inspect the Blood Product: Before spiking the bag, inspect for the correct blood type, expiration date, bag integrity (leaks), and visually check for clots, discoloration, or contamination. Verify special requirements (e.g., irradiated, warmed).
  6. Baseline Patient Assessment: Record baseline vital signs (Temperature, Pulse, BP, RR, SpO2) immediately before starting. Assess for fluid overload risk, allergies, heart/kidney disease, or previous transfusion reactions.
  7. Ensure Proper IV Access: Establish a large-bore cannula (18G or 20G) to allow rapid flow without hemolyzing the red blood cells. Check patency.
    Note: Only use Normal Saline (0.9% NaCl) with blood products; other fluids like Ringer's Lactate or Dextrose cause fatal clotting or hemolysis in the tubing.
  8. Prepare Emergency Equipment: Have oxygen, resuscitation equipment, antihistamines, and adrenaline readily available in case of anaphylaxis.
  9. Double-Check Procedure: Two trained, licensed staff members must independently verify the patient identity, blood compatibility, unit number, expiry date, and prescription.
  10. Patient Education: Instruct the patient to immediately report symptoms like fever, chills, itching, rash, shortness of breath, chest/back pain, or dizziness.
  11. Start Transfusion Correctly: Begin the infusion slowly (e.g., 2mL/min or ~40 drops/min) for the first 15 minutes while closely observing. Re-check vitals after 15 minutes, then adjust the rate to complete the transfusion within the recommended 4-hour limit.
Equipment Requirements

The setup for a blood transfusion is similar to standard intravenous infusion, with specific additions designed for blood products.

Top Shelf (Trolley)
  • Blood giving set with a built-in micro-aggregate filter.
  • Larger needle or cannula (18G or 20G preferred).
Bottom Shelf / General Requirements
  • Unit of properly cross-matched blood.
  • Normal Saline (0.9% NaCl) for flushing.
  • Observation chart and fluid balance chart.
  • Patient's chart with specific details of the transfusion prescription.
  • Emergency medicines as prescribed (e.g., antihistamines, diuretics, adrenaline).
Procedure

The technique of transfusion is similar to intravenous infusion.

On completion of the transfusion the empty bottle must not be washed and should be kept on the ward for 24 hours, in case it is needed for testing in the case of reaction.

  • Verify Prescription: Ensure the blood transfusion is properly prescribed, dated, and signed by the doctor. Observe the 10 'R's (Right patient, dose, route, time, blood, site, equipment, storage, disposal, documentation).
  • Record the following on the patient’s chart: –
    Date and time of starting and completing the transfusion.
    Number of the blood bottle.
    Amount of blood transfused.
    Names of nurses or doctor who checked the blood and set up the transfusion.
    Patient’s initial response to the transfusion.
    Urinary output
    Administer normal saline before and after blood transfusion.
  • THE ROLES OF A NURSE DURING BLOOD TRANSFUSION
    I. Before Blood Transfusion
    • Verify Prescription: Ensure the blood transfusion is properly prescribed, dated, and signed by the doctor. Observe the 10 'R's (Right patient, dose, route, time, blood, site, equipment, storage, disposal, documentation).
    • Establish IV Line: Insert a cannula to establish an IV line, maintain it in situ, and obtain a blood sample for laboratory grouping and cross-matching.
    • Collect & Inspect Blood Pack: Collect the compatible pack in a clean lined tray. Verify the blood group, patient's name, expiry date, Rh factor, and reference number. Check for leaks, unusual color, or clots.
    • Keep Blood at Appropriate Temperature: Wrap the blood bag with a clean towel and allow it to reach room temperature (unless a specialized blood warmer is used) to prevent inducing hypothermia or chills. Do not overheat.
    • Prepare the Infusion System: Firmly connect the blood pack to the infusion set. Fill the air chamber with a little blood and expel air from the line by running blood through it.
    • Administer Pre-medication: Administer any prescribed prophylactic treatments (e.g., Lasix/furosemide to prevent fluid overload, or antihistamines).
    • Psychological & Physical Prep: Counsel the patient, ask them to empty their bladder/bowel to avoid disconnection during the procedure, and position their arm comfortably.
    II. During Blood Transfusion
    • Note Start Time & Run Slowly: Document the exact start time. Connect and run the blood slowly for the first 10-15 minutes (The Golden 15 Minutes).
    • Watch for Reactions: Observe intensely for chills, fever, nausea, headache, urticaria, or bronchospasms. If no reaction occurs, increase to the prescribed normal rate.
    • Vital Signs Monitoring: Monitor and record Temperature, Pulse, Respiration, and BP every 15 minutes for the first hour, then half-hourly, then hourly, and immediately after completion of each unit.
    • Ensure Patency & Flow: Keep the hand/arm warm to dilate the vein. Check the infusion site frequently for swelling, leakages, or pain, and ensure the infusion time does not go beyond 4 hours for any blood component to prevent bacterial proliferation.
    III. After Blood Transfusion
    • Disconnect & Flush: Disconnect the blood set and flush the IV line with Normal Saline to clear residual blood and avoid clots in the cannula.
    • Monitor for Delayed Reactions: Take vital signs 30 minutes post-transfusion and continue to monitor for any delayed systemic reactions.
    • Preserve the Blood Bag: Do not wash the empty blood bag. Retain the empty pack (or pack with residual blood) in the ward refrigerator for 8 to 24 hours per hospital policy, in case it is needed for laboratory investigation following a delayed reaction. Dispose of it properly in the incinerator container afterward.
    • Documentation: Document the time completed, volume of blood given, serial numbers of the bags, urinary output, and the presence or absence of any reactions.
    • Follow-up Labs: Check the hemoglobin level of the patient 48 hours after the transfusion to verify if the patient has clinically benefited.
    Signs of a Blood Transfusion Reaction

    A transfusion reaction can present with a wide variety of symptoms. Nurses must be vigilant in recognizing these categories:

    • Systemic: Fever (Rise in temperature >1°C from baseline), chills or rigors, flushing, anxiety, restlessness, fatigue.
    • Skin: Itching (pruritus), rashes, urticaria (hives), mild swelling/edema.
    • Respiratory: Sneezing, wheezing, shortness of breath (dyspnea), rapid breathing (tachypnea), cyanosis, low SpO2, pulmonary edema.
    • Cardiovascular: Tachycardia, hypotension (shock), distended neck veins (fluid overload), or sudden hypertension.
    • Pain: Chest tightness, chest pain, excruciating flank/lower back pain (a classic hallmark sign of an acute hemolytic reaction).
    • Renal/Hepatic: Jaundice, hemoglobinuria (red/dark urine indicating RBC destruction), signs of acute kidney failure, nausea, and vomiting.
    Specific Complications of Blood Transfusion
    1. Allergic Reactions

    Cause: Patient hypersensitivity to plasma proteins or other substances contained in the donor blood.
    Signs & Symptoms: Itching, flushing, urticaria (hives), signs of respiratory distress, wheezing, and in severe cases, anaphylactic shock.
    Management: Stop transfusion immediately, urgently inform the doctor, and administer prescribed antihistamines or epinephrine.

    2. Febrile Non-Hemolytic Reaction

    Cause: Recipient antibodies reacting to donor white blood cells or cytokines accumulated in the stored blood.
    Signs & Symptoms: Sudden development of fever (>1°C rise) accompanied by chills, rigors, and headache.
    Management: Stop transfusion at once, notify the doctor. Provide symptomatic relief (extra blankets, prescribed antipyretics like paracetamol), and reassure the patient.

    3. Acute Hemolytic Incompatibility Reaction

    Cause: A severe, life-threatening reaction occurring when the donor’s blood is ABO/Rh incompatible with the recipient, causing rapid destruction of donor RBCs.
    Signs & Symptoms: Immediate shivering, chills, headache, low back/flank pain, nausea, vomiting, hypotension, hemoglobinuria, and impending acute renal failure.
    Management: Stop immediately. Treat for shock. Keep vein open with a new Normal Saline line. Collect blood and urine samples. Send the blood bag to the lab. Administer diuretics to maintain renal perfusion.

    4. Transfusion-Associated Circulatory Overload (TACO)

    Cause: Infusion of blood volume faster or in greater amounts than the patient's cardiovascular system can accommodate.
    Signs & Symptoms: Distended neck veins (JVD), dyspnea, dry cough, tachycardia, hypertension, and pulmonary edema.
    Management: Stop or significantly slow the transfusion. Sit the patient upright. Administer prescribed oxygen and diuretics (e.g., Furosemide). Check vital signs frequently.

    5. Pyogenic (Bacterial) Reaction / Sepsis

    Cause: Bacterial contamination of the blood product during collection, storage, or via contaminated transfusion equipment.
    Signs & Symptoms: Rapid onset of high fever, profound chills, nausea, vomiting, and profound hypotension (septic shock).
    Management: Stop the transfusion immediately. Inform the doctor and blood bank. Tepid sponge the patient. Send the blood bag for culture. Administer broad-spectrum antibiotics and IV fluids as prescribed.

    6. Transmission of Infectious Diseases

    Cause: Blood products can potentially transmit bloodborne pathogens if screening fails.
    Diseases: Malaria, Syphilis, Viral Hepatitis (B and C), and HIV/AIDS.
    Prevention: Relies entirely on rigorous, careful donor screening, questionnaires, and advanced laboratory testing of donated blood prior to release.

    Specific Nursing Management of a Severe Transfusion Reaction

    A severe transfusion reaction is a medical emergency requiring immediate, prioritized action to save the patient's life.

    Step Action Rationale
    1 STOP THE TRANSFUSION IMMEDIATELY: Clamp the tubing at once. Prevents any further incompatible or contaminated blood from infusing into the patient, limiting harm.
    2 Maintain IV Access: Keep the vein open using a completely new IV tubing set primed with Normal Saline. Do not flush the old tubing. Flushing the old tubing would push residual reactive blood into the patient. A patent IV is critical for emergency drug delivery.
    3 Assess the Patient Quickly: Rapidly evaluate ABCs (Airway, Breathing, Circulation), level of consciousness, and check for specific signs like back pain or rash. Determines the immediate severity of the reaction and guides the required resuscitation efforts.
    4 Notify the Medical Team: Call for immediate assistance from the Doctor/Clinician, senior nurse, and notify the blood bank. Mobilizes the necessary clinical support and initiates the laboratory investigation protocol.
    5 Close Monitoring: Check vital signs (BP, Temp, Pulse, RR, SpO2) every 5-15 minutes depending on severity. Detects rapid deterioration, such as impending anaphylactic shock or respiratory failure.
    6 Administer Emergency Treatment: Give prescribed therapies (Oxygen, Antihistamines, Corticosteroids, Adrenaline, IV fluids, Diuretics). Reverses allergic cascades, supports blood pressure, and mitigates specific systemic symptoms.
    7 Re-check Identification: Verify the patient's identity, blood unit number, compatibility label, and blood group. Identifies if a clerical or administrative error was the root cause of an incompatibility reaction.
    8 Send Samples to the Laboratory: Send the remaining blood bag and administration set to the lab. Draw fresh blood samples (for Direct Antiglobulin Test, hemolysis) and collect a urine sample. Laboratory analysis is required to definitively diagnose the type of reaction and presence of hemolysis or bacteria.
    9 Monitor Renal Function: Start a strict fluid balance chart. Observe urine output and color for hemoglobinuria. Hemolyzed red blood cells block renal tubules. Reduced output or red urine indicates acute kidney injury requiring immediate intervention.
    10 Supportive Care & Documentation: Keep the patient warm and reassured. Thoroughly document the exact time of onset, symptoms, vitals, interventions, and complete the institutional Transfusion Reaction form. Maintains patient comfort, fulfills legal requirements, and ensures continuity of critical care information.
    References
    • Potter, P. A., Perry, A. G., Stockert, P. A., & Hall, A. M. (2021). Fundamentals of Nursing (10th ed.). Elsevier.
    • Lynn, P. (2018). Taylor's Clinical Nursing Skills: A Nursing Process Approach (5th ed.). Wolters Kluwer.
    • World Health Organization (WHO). (2002). The Clinical Use of Blood. Geneva: WHO.

    Quick Quiz

    Blood Transfusion Quiz

    FON - mobile-friendly and focused practice.

    Privacy: Your details are used only for quiz tracking and certificates.

    BLOOD TRANSFUSION Read More »

    INSTIlLING MEDICATION

    Non-Parenteral Medication Administration

    While parenteral routes involve injections, non-parenteral routes utilize the gastrointestinal tract, skin, and mucous membranes. This section covers specialized topical, mucosal, and enteral tube administration methods.

    INSTILLING MEDICATION INTO EAR
    Introduction

    Otic (ear) medications are typically instilled to treat localized ear infections, reduce inflammation, alleviate pain, or soften cerumen (earwax) for removal. The internal structures of the ear are highly sensitive to temperature extremes, making careful preparation of the medication crucial.

    Advantages:
    • Provides a direct, localized effect with a high concentration of medication at the target site.
    • Minimizes systemic absorption, thereby reducing the risk of systemic side effects.
    Disadvantages:
    • Can cause severe vertigo, nausea, or vomiting if the instilled solution is too cold or too hot.
    • Contraindicated in certain cases of ruptured or perforated tympanic membranes unless specifically formulated and sterile.
    Requirements
    Tray
    • Cotton tipped applicators.
    • Cotton balls.
    • Bowl with warm normal saline.
    • Medication bottle with dropper.
    • Receiver.
    • Clean gloves.
    At the side
    • Screen
    • Vomit bowl
    Procedure
    Step Action Rationale
    1 Refer to general rules on nursing procedure and medicine administration. Ensures foundational safety standards and adherence to the 6 rights of medication administration.
    2 Obtain assistance in case of children or infants. Prevents accidental injury due to sudden movement during the procedure.
    3 Using a cotton-tipped applicator, clean the meatus of the ear canal. Removes any discharge before instillation.
    4 Warm medication container in hands or place in warm normal saline. Promotes patient’s comfort and prevents vertigo and vomiting.
    5 Fill ear dropper, particularly with medication. Ensures the accurate dose is ready for instillation.
    6 Straighten auditory canal:
    – For infants or children under 3 years, pull pinna down and back.
    – For an adult or child older than 3 years, pull pinna upward and backward.
    Straining the canal ensures the solution flows the entire length of the auditory canal.
    7 Instill the correct number of drops along the side of the ear canal by holding the dropper ½ to 1 cm above the ear canal. Reduces trauma to the tympanic membrane.
    8 Press gently and firmly a few times on the tragus of the ear. Pressing assists the flow of medication into the ear canal.
    9 Request the patient to remain in a side-lying position for about 5 minutes. Prevents drops from escaping and enables medication to reach all sides of the canal.
    10 Insert a small piece of cotton swab at the meatus of the auditory canal for 15-20 minutes. Cotton helps to retain medication when the patient is upright.
    11 Assess for patient comfort, response, and check for discharge/drainage from the ear. Evaluates the immediate effects and potential adverse reactions to the medication.
    12 Replace requirements and wash hands. Reduces the spread of microorganisms.
    13 Document medication administration, name of medication administered, and patient’s response. Ensures accurate record keeping and continuity of care.
    Points to remember;
    • Use sterile technique in administration when administering medication in perforated tympanic membrane.
    • Consider side effects and toxic effects and contraindications of various medicines.
    INSTILLING MEDICATION INTO THE EYES
    Introduction

    Ophthalmic medications (eye drops or ointments) are instilled into the conjunctival sac to treat localized conditions such as infections (conjunctivitis), glaucoma, inflammation, or to dilate the pupil for examination. The cornea is extremely sensitive, so direct instillation onto the cornea must always be avoided to prevent injury and severe discomfort.

    Advantages:
    • Provides rapid localized action directly to the ocular structures.
    • Can be absorbed relatively quickly into the anterior chamber of the eye.
    Disadvantages:
    • Tearing can rapidly wash the medication away, reducing absorption time.
    • If systemic absorption occurs via the nasolacrimal duct, unintended systemic side effects can happen (e.g., bradycardia from beta-blocker eye drops).
    • Ointments can cause temporary blurred vision.
    Requirements
    Tray
    • Sterile gloves sterile cotton balls soaked in sterile normal saline.
    • Dry cotton balls.
    • Adhesive strapping.
    • Receiver.
    • Dry sterile dressing pad.
    • Medication.
    At the side
    • Screen.
    Procedure
    Step Action Rationale
    1 Refer to general rules on nursing procedure and medicine administration. Promotes standardized safety and infection control protocols.
    2 Check ophthalmic preparation for name, name expiry date. Prevention medication error.
    3 Request the patient to look up the ceiling and give the patient a sterile absorbent cotton swab. If looking up prevents blinking and in this position the cornea is protected by an upper lid.
    4 Expose the lower conjunctival sac by pacing thumb or fingers of non-dominant hand just below the eye on the zygomatic arch and gently draw down the skin on the cheek. Placing fingers on the bony prominence avoids pressure to the eyeball and prevents a person from blinking or squinting.
    5 For liquid medication; discard the first drop.
    For ointment; discard the first ointment bead, hold the tube above the conjunctival sac from the canthus outwords.
    It is considered to be contaminated.
    6 Approach the eye from the side and instill the correct number of drops into the outer third of the conjunctiva holding the dropper 1-2 cm above the eye. Patient is less likely to blink if a side approach is used.
    7 Request the patient to squeeze on nasolacrimal duct for at least 30 seconds after instilling liquid medication. Pressure prevents medication running down the duct.
    8 Request the patient to close eyes but not to squeeze them. Squeezing can injure eye and push out medication.
    9 Clean the eyelid as needed by wiping from inner canthus to outer canthus. Prevents spread of infection into the lacrimal duct.
    10 Apply eye pad if required and secure it, request patient not to rub the eye. Reduces risk of injury.
    Key points;
    • If more than one eye drop is ordered, wait 5 minutes between each medication.
    • If medication for both eyes, place, in the unaffected eye first.
    ADMINISTERING NASAL DROPS
    Introduction

    Nasal drops or sprays are utilized to administer medications directly into the nasal passages. This route is typically chosen to relieve nasal congestion, moisten the mucous membranes, or treat localized sinus infections. Because the nasal mucosa contains a highly vascular network, it can also be used for systemic absorption of certain medications.

    Advantages:
    • Provides rapid relief for local congestion and inflammation.
    • Offers an alternative route for systemic drug delivery that bypasses first-pass metabolism.
    Disadvantages:
    • Excessive use of local decongestants can lead to mucosal dystrophy and severe rebound congestion.
    • Drops may flow backward into the posterior pharynx, leaving an unpleasant taste or causing potential aspiration.
    Requirements
    Tray
    • Prepared medication.
    • Pen light.
    • Receiver toilet paper.
    • Clean dropper.
    • Facial flannels.
    At the side
    • Screen
    • Small pillow.
    Procedure
    Step Action Rationale
    1 Refer to general rules on nursing procedure and medicine administration. Validates patient identity and medication accuracy.
    2 Inspect the condition of the nose and sinuses using a penlight and palpate sinuses for tenderness. Provides baseline data to monitor effects.
    3 Wash hands and put on gloves. Promotes infection prevention.
    4 Request patient to clear or blow nose gently unless contraindicated (increased intracranial pressure or nose bleeds). Removes mucous and secretions that can block the nasal passages.
    5 Position patient supine, and position head properly for access to the posterior pharynx, tilt patient’s head backward. Allows medication to flow into affected sinuses.
    6 Support the patient’s head with the non-dominant hand and instruct the patient to breathe through the mouth. Prevents straining of the muscles and mouth breathing reduces the chances of aspirating nasal drops.
    7 Hold dropper ½ – 1 cm above nares and instill prescribed number of drops towards the midline of the ethmoid bone. Avoids contamination of the dropper.
    8 Have the patient remain in the supine position for 5 minutes and offer a facial towel to blot the nose but do not blow. Prevents premature loss of medication through nares and allows maximum dose to be absorbed.
    9 Assist patient to a comfortable position after the medication is absorbed. Restores comfort.
    10 Assess patient response, replace requirements, and wash hands. To detect reactions and maintain a hygienic environment.
    11 Document and record administration of medication. Ensures accurate record keeping and continuity of care.
    ADMINISTERING MEDICATION THROUGH NASO-GASTRIC TUBE
    Introduction

    A Naso-Gastric (NG) tube is a flexible tube passed through the nose, down the esophagus, and into the stomach. Administering medications via this route is essential for patients who have an intact and functioning gastrointestinal tract but cannot swallow safely (e.g., due to dysphagia, unconsciousness, or intubation).

    Advantages:
    • Allows for the delivery of vital enteral medications when the oral route is strictly contraindicated.
    • Provides a direct pathway to the stomach for exact volume dosing.
    Disadvantages:
    • Risk of fatal aspiration if the tube is accidentally displaced into the lungs.
    • Thick medications or improperly crushed pills can clog the tube.
    • Enteric-coated or sustained-release capsules cannot be crushed for NG administration.
    Requirements
    Tray
    • All requirements for passing a tube.
    • Medication.
    • Mortar or pestle if tablets are used.
    At the side
    • Screen
    Procedure
    Step Action Rationale
    1 Refer to general rules on nursing procedure and medicine administration. Verifies safety protocols, dosages, and right patient.
    2 Position patient and place mackintosh and towel under the chest. Protects patient from spillage.
    3 Elevate the head of the bead 35° -45° Protects patient from aspiration.
    4 Assess placement of the tube, if correct flush 15-30ml of water (adults) or 5-10ml in children. Helps to maintain tube patency.
    5 Administer the prepared medication in the same manner as feeds are administered. Administer each medication and flush with 5ml after each, do not mix medications. To avoid medicine reactions.
    6 After administering the prescribed medications flush the tubing with at least 30 ml of water. Prevents clogging of feeding tube.
    7 Assess patient response, replace requirements and wash hands. Promotes patient comfort and limits cross-contamination.
    8 Document and record administration of medication. Ensures precise clinical communication and adherence to legal documentation standards.
    APPLYING TOPICAL MEDICATIONS
    Introduction

    Topical medications are applied directly to intact skin or mucous membranes. They exist in various formulations such as lotions, creams, ointments, pastes, powders, sprays, and transdermal patches. Their primary goal is usually to produce a localized effect, protecting skin, providing local anesthesia, or treating localized skin conditions.

    Advantages:
    • Painless and non-invasive procedure.
    • Delivers therapy directly to the targeted skin area, avoiding systemic side effects (except in the case of transdermal patches).
    Disadvantages:
    • Can be messy or stain patient clothing.
    • May cause localized skin irritation or allergic contact dermatitis.
    • Nurses must wear gloves to avoid unintentionally absorbing the medication systemically through their own skin.
    Requirements
    Tray
    • Gloves
    • Water in a bowl
    • Soap in a dish
    • Cotton balls or gauze pieces
    • Medicine (ointment, lotion or liniment) in appropriate container
    • Adhesive tape and dressing pad
    Procedure
    Step Action Rationale
    1 Refer to general rules on nursing procedure and medicine administration. To maitain Standards.
    2 Expose only the area where lotion/liniment is to be applied. Preserves the patient's dignity and prevents chilling.
    3 Powders; make sure the skin surface is dry and sprinkle evenly over the area till a fine layer covers the skin. Cover Area if required. Dry skin ensures the powder does not clump and prevents unwanted friction.
    4 Lotions; shake the container and put a small amount of lotion on a gauze dressing pad and apply it evenly in the direction of hair growth. Ensures homogeneous mixture of medication; applying in the direction of hair growth prevents folliculitis.
    5 Creams, ointments, and pastes; take a small quantity of medication in gloved hand, smear it evenly over skin using long strokes in the direction of hair growth. Gloves prevent absorption by the nurse. Long strokes ensure an even coat and avoid skin trauma.
    6 Spray; shake the container well to mix the contents, hold the container at 15 – 30 cm away from the area and spray, ensuring that it does not enter the eyes. Provides an even mist over the targeted area without concentrating pressure. Protects highly sensitive mucosa like the eyes.
    7 Transdermal patches; select clean dry area which is free of air, take the patch holding it without holding the adhesive edges and apply it firmly using palm of hand and press it for 10 seconds, remove the patch at the appropriate time. Ensures secure, uniform adherence to the skin allowing steady systemic absorption, and proper rotation prevents skin breakdown.
    8 Observe the area carefully for changes in color, swelling appearance of a rash. Monitors for signs of local hypersensitivity or allergic contact dermatitis.
    9 Document and record administration of medication. Secures an accurate record in the patient's chart.
    ADMINISTERING RECTAL AND VAGINAL MEDICATION
    Introduction

    Rectal and vaginal administration involves introducing medication in the form of suppositories, creams, foams, or ointments into the respective body cavities. Rectal routes are often utilized for localized effects (like bowel evacuation) or when a patient cannot tolerate oral medications due to vomiting. Vaginal medications are generally intended for localized treatment of infections or inflammation.

    Advantages:
    • Bypasses upper gastrointestinal irritation and partial first-pass hepatic metabolism (rectal).
    • Provides an effective alternate route for unconscious, vomiting, or uncooperative patients.
    Disadvantages:
    • Can cause physical discomfort, anxiety, or embarrassment for the patient.
    • Absorption from the rectal mucosa can sometimes be slow, unpredictable, or erratic.
    Requirements
    Tray
    • Rectal suppository.
    • Clean gloves.
    • Application plunger in case of vaginal cream.
    • Receiver.
    • Lubricating jelly.
    • Toilet paper receiver.
    • Swabs in a gallipot.
    • Mackintosh and towel.
    At the side
    • Screen
    I. Rectal Procedure
    Steps Action Rationale
    1. Refer to general nursing procedures. Keeps standard.
    2. Review patient’s information about the medicine. Ensures safe and correct medical administration.
    3. Receive patient knowledge about the intended administration. Ensures patient privacy and positions ensures easy access to anus.
    4. Screen bed and position patient in left lateral with upper leg flexed. Provides privacy.
    5. Wash hands and put on gloves. Reduces transfer of infection.
    6. Keep the patient draped with only the anal area exposed. Maintains privacy and facilitates relaxation.
    7. Remove suppository from foil wrap and lubricate rounded end with jelly, lubricate gloved finger of dominant hand. Lubrication reduces friction.
    8. Request the patient to take slow deep breaths. Facilitating suppository through constricted sphincter causes less pain.
    9. Retract patient’s buttocks with non-dominant hand, with index finger of dominant hand insert suppository along rectal wall to 10 cm in adult and 5 cm in children. Promotes eventual absorption.
    10. Withdraw your finger and wipe the patient’s anal area with toilet paper. Promotes comfort.
    11. Request the patient to remain flat or on one side for 5 minutes. Prevents expulsion of the medication.
    12. Check within 5 minutes to determine the suppository is in place, request the patient to retain the suppository for 30-45 minutes. Ensures effectiveness of medication.
    13. Clean, remove gloves and wash hands. Infection prevention.
    14. Record and report all patients’ responses to medication including any reactions. Ensures the effect of medicine.
    II. Vaginal Procedure
    Steps Action Rationale
    1. Explain to the patient that insertion is painless and will bring relief from itching, pain and discomfort. Reduces anxiety and ensures cooperation.
    2. Request patient to empty bowel and bladder. Promotes effectiveness.
    3. Position patient in semi recumbent, cover patient leaving the perineal area only. Ensures patient privacy.
    4. Prepare requirements, unwrap suppository, for cream, fill applicator as instructed. Promotes infection control.
    5. Put on gloves, inspect perineal/vaginal discharge. Prevents infection.
    6. Apply medicine gently into the vaginal wall. Ensures correct administration.
    7. Request the patient to remain flat or on one side for 5-10 minutes following insertion. Ensures absorption.
    8. Apply a clean perineal pad if excessive discharge or cream leakage. Promotes patient’s comfort.
    9. Clean, remove gloves and wash hands. Infection prevention.
    10. Record and report all patients’ responses to medication including any reactions. Promotes communication between team members.
    References
    • Potter, P. A., Perry, A. G., Stockert, P. A., & Hall, A. M. (2021). Fundamentals of Nursing (10th ed.). Elsevier.
    • Lynn, P. (2018). Taylor's Clinical Nursing Skills: A Nursing Process Approach (5th ed.). Wolters Kluwer.
    • Berman, A., Snyder, S., & Frandsen, G. (2020). Kozier & Erb's Fundamentals of Nursing: Concepts, Process, and Practice (11th ed.). Pearson.

    Quick Quiz

    Instilling Medication Quiz

    FON - mobile-friendly and focused practice.

    Privacy: Your details are used only for quiz tracking and certificates.

    INSTIlLING MEDICATION Read More »

    Under water seal drainage

    Under water seal drainage

    UNDER WATER SEAL DRAINAGE

    Under water seal drainage is a system that allows drainage of the pleural space using an airtight system to maintain sub-atmospheric intrapleural pressure.

    Pleural Space underwater seal drainage (1)

    It’s used when air or fluid gets trapped in the pleural space.

    • Pleural Space: This is the space between the two layers of pleura, which are thin membranes lining the lungs and the inside of the chest wall. Normally, this space has negative pressure, which helps the lungs stay inflated.

    Purpose: The water seal drainage system has two main jobs:

    • To remove air and fluid: It allows air and fluid that have accumulated in the pleural space to escape out of the chest. Under water seal drainage is used to remove blood, air, pus, or serous fluid from the pleural cavity after thoracotomy, chest injury, pleural effusion, or pneumothorax.
    • To prevent backflow: It stops air and fluid from going back into the pleural space, especially when you breathe in (inhale). This one-way system is nice for proper lung function.

    In simpler terms: Imagine a bottle with a straw dipped in water. When you blow into the straw, bubbles escape, but water doesn’t come back up the straw into your mouth. Water seal drainage works on a similar principle for your chest.

    • The underwater seal acts as a one-way valve.

    Conditions necessitating Underwater Seal Drainage

    • Traumatic Pneumothorax: This happens when an injury to the chest (like a car accident or stab wound) causes air to leak into the pleural space, collapsing the lung.
    • Hemopneumothorax: This is a combination of air and blood in the pleural space. It can also be caused by trauma.
    • Spontaneous Pneumothorax: Sometimes, a lung can collapse on its own, without an obvious injury. This is more common in tall, thin young adults or people with lung diseases.
    • Iatrogenic Pneumothorax: This occurs unintentionally as a result of a medical procedure, such as inserting a central line or during a lung biopsy.
    • Broncho-pleural Fistula: This is an abnormal connection between an airway in the lung (bronchus) and the pleural space, causing air to leak into the pleural space.
    • Emphysema: A chronic lung disease where air sacs in the lungs are damaged. In some cases, it can lead to air leaks into the pleural space.
    • Malignancy: Lung cancers or other cancers in the chest can sometimes cause fluid buildup in the pleural space (pleural effusion).
    • Pleural Effusion: This is the buildup of excess fluid in the pleural space. It can be caused by various conditions like heart failure, pneumonia, or cancer.
    • Thoracic or Thoraco-abdominal Surgeries: After surgeries in the chest or upper abdomen, chest tubes are often placed to drain air and fluid and prevent complications.

    In short: Any condition that causes air or fluid to accumulate in the pleural space and disrupt normal lung function may require water seal drainage.

    Indications of Water Seal Drainage

    The goals of water seal drainage are to:

    • Permit Drainage of Air and Fluid: The most direct purpose is to remove unwanted air, blood, or fluid from the pleural cavity. This helps to relieve pressure and allow the lung to re-expand.
    • Establish Normal Negative Pressure: The pleural space normally has a negative pressure, which is essential for keeping the lungs inflated. Water seal drainage helps to restore this negative pressure. Think of it like sucking air out of a balloon to make it inflate inside a jar.
    • Promote Lung Expansion: By removing air and fluid and restoring negative pressure, water seal drainage allows the collapsed lung to re-inflate and function properly.
    • Equalize Pressure on Both Sides of the Thoracic Cavity: Conditions like pneumothorax can disrupt the pressure balance in the chest. Water seal drainage helps to restore this balance.
    • Prevent Tension Pneumothorax: In a tension pneumothorax, air keeps getting trapped in the pleural space and cannot escape, leading to dangerous pressure buildup that can compress the heart and major blood vessels. Water seal drainage prevents this life-threatening situation by providing an escape route for the air.
    • Provide Continuous Suction (if needed): In some cases, gravity alone may not be enough to drain the air or fluid, or to re-expand the lung quickly. In these situations, gentle suction may be added to the water seal drainage system to assist the process.

    In essence: Water seal drainage aims to bring the lung back to its normal, healthy state by removing obstacles and restoring the necessary pressure for it to function.

    Site for Chest Tube Insertion

    Where is the Chest Tube Inserted? The location of the chest tube depends on the reason for drainage:

    For Thoracic Surgery (usually  two tubes):

    Anterior Chest Tube (Front):

    • Location: Usually placed in the upper and front part of the chest wall.
    • Intercostal Space: Inserted in the 2nd intercostal space (the space between the 2nd and 3rd ribs).
    • Purpose: Primarily to remove air. Air rises, so placing the tube high in the chest helps to drain air that has collected in the upper pleural cavity.

    Posterior Chest Tube (Back):

    • Location: Placed in the back of the chest.
    • Intercostal Space: Inserted in the 8th or 9th intercostal space at the mid-axillary line (roughly in line with the middle of your armpit).
    • Purpose: Primarily to remove fluid (like blood or serous fluid). Fluid tends to settle at the bottom of the pleural cavity due to gravity, so a lower tube placement is effective for drainage.
    • Tube Diameter: Tubes for fluid drainage (posterior tubes) are often wider or longer than tubes for air drainage (anterior tubes) to facilitate better fluid removal.

    For Pneumothorax (usually one tube for air removal):

    • Location: In the front or side of the chest.
    • Intercostal Space: Usually placed in the 2nd or 3rd intercostal space along the mid-clavicular line (in line with the middle of your collarbone) or anterior axillary line (front of your armpit).
    • Purpose: To remove air from the pleural space, allowing the lung to re-expand. Since air rises, a higher placement is effective for pneumothorax.

    Types of Drainage Systems

    Water seal drainage systems can be categorized based on the number of bottles (or chambers in modern systems). The basic principle remains the same, but complexity increases with more bottles.

    Under water seal drainage
    One-Bottle Drainage System (Simple System) 

    Components:

    Drainage Bottle: A single sterile bottle containing a specific amount of sterile water or saline solution.

    Two Tubes:

    1. Patient Tube (A): Connects to the chest tube from the patient. This tube is submerged underwater in the bottle, creating the water seal.
    2. Vent Tube (B): A shorter tube that vents to the atmosphere (or suction). This allows air to escape from the bottle.

    How it Works:

    • Air and fluid drain from the patient’s pleural space through tube A into the bottle.
    • The underwater seal prevents air from being sucked back into the pleural space during inhalation.
    • Air from the pleural space bubbles through the water and escapes out through vent tube B.
    • Drainage fluid collects in the bottle.

    Limitations:

    • As drainage collects in the bottle, the water level rises, increasing the positive pressure needed to push out more fluid. This can slow down drainage if a large amount of fluid needs to be removed.
    • Not ideal for large amounts of drainage or when suction is needed.
    Under water seal drainage
    Two-Bottle Drainage System (Improved Drainage and Collection)

    Components:

    • Trap Bottle (Collection Bottle): The first bottle to receive drainage from the patient. It’s simply a collection container and doesn’t contain water.
    • Underwater Seal Bottle: The second bottle, containing sterile water and acting as the water seal, similar to the one-bottle system.

    How it Works:

    • Drainage from the patient first goes into the Trap Bottle, which collects the fluid.
    • Air then passes from the Trap Bottle to the Underwater Seal Bottle.
    • The Underwater Seal Bottle functions exactly as in the one-bottle system, providing the water seal and venting air.
    • The collection of drainage in a separate bottle prevents the increasing water level issue of the one-bottle system.

    Advantages over One-Bottle System:

    • More efficient drainage, especially for larger volumes, as the water seal is not affected by the amount of drainage.
    • Allows for more accurate measurement of drainage as it’s collected in a separate bottle.
    Under water seal drainage
    Three-Bottle Drainage System (Suction Control Added)

    Components:

    • Trap Bottle (Collection Bottle): First bottle, collects drainage.
    • Underwater Seal Bottle: Second bottle, provides the water seal.
    • Manometer Bottle (Suction Control Bottle): Third bottle, controls the amount of suction applied to the system. It also contains sterile water.
    • Adjustable Vent Tube: A tube in the Manometer Bottle that is open to the atmosphere.

    How it Works:

    Drainage flows through the Trap Bottle and Underwater Seal Bottle as in the two-bottle system.

    Suction Control: The Manometer Bottle regulates the suction.

    • The depth of the vent tube in the water in the Manometer Bottle determines the amount of negative pressure (suction). For example, if the tube is submerged 20 cm underwater, the suction will be approximately -20 cm H₂O.
    • When suction is applied, air is drawn in through the adjustable vent tube and bubbles through the water in the Manometer Bottle. This bubbling indicates that the suction is working and is being controlled at the desired level.
    • Excess suction is vented to the atmosphere, preventing excessive negative pressure from being applied to the patient’s pleural space.

    Advantages of Three-Bottle System:

    • Controlled Suction: Allows for the application of gentle suction to aid in lung re-expansion and drainage, especially when gravity drainage is insufficient.
    • Safety: Prevents excessive suction, which could damage lung tissue.
    • More efficient drainage: Especially useful for persistent air leaks or when rapid lung re-expansion is needed.

    Modern Systems: Today, many systems use pre-assembled, disposable plastic units that combine the functions of these bottles into chambers within a single unit. These are often referred to as multi-chamber drainage systems and are more convenient and easier to manage, but the underlying principles are the same as the bottle systems.

    Factors Affecting Water Seal Drainage

    Several factors can influence how well a water seal drainage system works. Knowing these factors is key for effective nursing care and management.

    1. Proper Placement of Chest Catheter (Chest Tube): Rationale: Correct placement is key for effective drainage. As discussed earlier, tubes placed high are for air, and tubes placed low are for fluid.

    Considerations:

    • Intercostal Space: Using the correct intercostal space (e.g., 2nd for air, 8th-9th for fluid).
    • Anterior/Posterior: Anterior for air, posterior for fluid in surgical cases with two tubes.
    • Single Tube: If only one tube is used, it’s often placed lower for general drainage of both air and fluid, although its effectiveness for air drainage alone might be less optimal than a higher placed tube in pneumothorax.
    • Separate Bottles: If multiple tubes are placed, they should be connected to separate drainage bottles to manage drainage from different areas effectively.

    2. Proper Placement of Chest Drainage Apparatus: Rationale: Gravity is key. The drainage system must be lower than the chest for drainage to occur effectively and to prevent backflow.

    Considerations:

    • Below Chest Level: Always ensure the drainage unit is consistently below the patient’s chest level, whether the patient is in bed, sitting, or walking.
    • Gravity Assist: This helps gravity to pull drainage from the pleural space into the collection system.
    • Prevent Backflow: Keeping it low prevents fluid in the drainage system from flowing back into the pleural space, which could cause infection or other complications.
    • During Transfer: When moving the patient (e.g., to another bed or for transport), the drainage unit should be held or placed carefully below chest level. It’s also advisable to briefly clamp the tubing (as instructed by protocol or physician order) during transfer to prevent accidental spillage or backflow, but clamping should be brief and tubing must be unclamped immediately after.

    3. Length of Drainage Tubing: Rationale: Tubing length affects drainage efficiency and patient mobility.

    Considerations:

    • Not Too Short: Tubing that is too short can restrict patient movement, potentially dislodge the chest tube, or cause tension on the insertion site.
    • Not Too Long: Tubing that is too long can create loops that impede drainage flow due to increased resistance and potential fluid collection in loops.
    • Straight Line: Tubing should ideally run in a relatively straight line from the chest to the drainage system, avoiding kinks or dependent loops.
    • No Loops: Avoid creating loops in the tubing, as these can trap fluid and air, obstructing drainage.

    4. Patency of Chest Tubing: Rationale: The chest tube must be open and clear for drainage to flow.

    Considerations:

    • Frequent Checks: Regularly check the tubing for kinks, clamps, or pressure points that might obstruct flow.
    • No Kinks or Pressure: Ensure the patient is not lying on the tubing, and that bedding or clothing is not pressing on it.
    • Mucus Plugs/Clots: Clots or mucus plugs inside the tubing can block drainage.
    • Milking the Tube: If clots or plugs are suspected, gently “milking” or stripping the tubing (following hospital protocol and physician orders) can help to dislodge them and maintain patency. However, routine stripping/milking is generally discouraged as it can create excessive negative pressure and potentially damage lung tissue. Gentle manipulation to maintain patency is preferred.
    • Avoid Clamping: Never clamp the chest tubing routinely, as this can lead to tension pneumothorax if air is still leaking into the pleural space. Clamping is generally only done briefly in specific situations, such as changing the drainage system, assessing for air leaks, or prior to removal, and should be done per physician order or hospital protocol.

    5. Maintenance of Air Tight Drainage System: Rationale: The system must be airtight to maintain the water seal and suction (if used) and prevent air from entering the pleural space.

    Considerations:

    • Air Tight Seals: Ensure all connections in the drainage system (tubing connections, bottle stoppers, connections to the chest tube at the insertion site) are airtight.
    • Taping Connections: Tape all tubing connections securely to prevent accidental disconnections and air leaks.
    • Stoppers and Seals: Make sure bottle stoppers (if using bottle systems) are firmly in place and that any seals in modern systems are intact.
    • Check for Leaks: Regularly check the system for air leaks. Continuous bubbling in the water seal bottle (when not expected) may indicate an air leak in the system rather than from the patient. To check for system leaks, briefly and sequentially clamp sections of the tubing starting close to the patient. If bubbling stops when you clamp a certain section, the leak is likely in that section or closer to the patient. If bubbling continues even when clamped near the patient, the leak is likely from the patient (e.g., lung air leak) or the chest tube insertion site.

    6. Position of the Client: Rationale: Patient position can affect drainage, especially fluid drainage.

    Considerations:

    • Fowler’s Position (Semi- or High-Fowler’s): Elevating the head of the bed (Fowler’s position) is often recommended.
    • Fluid Localization: Fowler’s position helps to localize fluid in the lower pleural space, making it easier to drain through a lower placed chest tube.
    • Lung Expansion: It can also improve lung expansion and breathing mechanics.
    • Regular Repositioning: Encourage the patient to change position regularly (within activity limitations) to promote drainage from different areas of the pleural space and prevent fluid from settling in one area.

    7. Application of Mechanical Suction: Rationale: Suction, when used appropriately, can enhance drainage but must be applied correctly.

    Considerations:

    • Continuous and Gentle: Suction should be continuous and gentle, not intermittent or high pressure.

    When to Use Suction: Suction is typically used when:

    • Gravity drainage alone is not enough (e.g., persistent air leak, slow lung re-expansion).
    • The patient’s respiratory effort and cough are weak.
    • There’s a fast or significant air leak into the pleural space.
    • Speedier removal of air or fluid from the pleural space is needed.

    • Physician Order: Suction should always be applied based on a physician’s order.
    • Proper Setting: Ensure the suction is set to the prescribed level (often indicated by the water level in the suction control bottle or the setting on a modern drainage unit).
    • Bubbling in Suction Chamber: Gentle, continuous bubbling in the suction control chamber (Manometer Bottle) is a sign that suction is being applied correctly. Vigorous bubbling is usually unnecessary and can increase water evaporation and noise.

    8. Activity of the Client: Rationale: Patient activity can promote drainage and lung function.

    Considerations:

    • Movement on Bed: Encourage gentle movement in bed (turning side to side, repositioning). Movement helps to shift fluid and air within the pleural space, promoting drainage.
    • Coughing and Deep Breathing: Encourage the patient to cough and deep breathe regularly.
    • Intrapleural and Intrapulmonary Pressure: Coughing and deep breathing help to increase intrapleural and intrapulmonary pressure, which can assist in expelling air and fluid from the pleural space and promote lung expansion.
    • Walking (if appropriate): If medically appropriate and ordered by the physician, ambulation (walking) can also be beneficial, as it encourages deeper breathing and overall lung function.

    Requirements for Under Water Seal Drainage (UWSD)

    STERILE TROLLEY – Top Shelf

    A trocar and cannula, intercostal tubing, and an introducer

    Artery forceps in a receiver

    Scalpel

    Suturing material

    Safety pin

    A large Winchester bottle containing water or normal saline to a level of about 6cm

    A rubber cork pierced by a short and long glass tube or by rigid plastic tubes

    Bottom Shelf

    A pair of gloves

    Chest X-ray investigations and ultrasound scan results

    A dressing pack

    A patient’s file

    Bedside

    Hand washing equipment

    Suction machine

    Screen

    Patient’s file

    Emergency tray

    Procedure for Underwater Seal Drainage (UWSD)

    Step

    Action

    Rationale

    Preparation of equipment

    1

    Preferably a graduated bottle is used

    For correct reading of the drainage fluid

    2

    Assist Doctor to submerge the long tube in the water at 2 to 3 cm but must not touch the bottom of the bottle. The short tube acts as an escape route for air in the vacuum space in the bottle.

    To prevent air from going to pleural cavity

    3

    Assist the Doctor to connect the tube to the top of the under-water to the patient’s intercostal drainage tube.

    To drain fluid from the pleural cavity

    Procedure

    1

    Explain the procedure carefully to the patient; to understand the importance of limited movements during the period of UWSD.

    Explanation encourages patients cooperation and relieves anxiety

    2

    Take the trolley to the bedside, screen the bed and close nearby windows.

    To provide privacy

    3

    Wash and dry hands and be ready to assist the doctor.

    Promote hygiene measures

    4

    Position the patient leaning over the bed table supported by pillows. The patient’s arm which is on the side where the tube will be inserted must be placed forward and supported by a nurse.

    This position gives best access to the second or third intercostal space

    5

    Observe the patient’s colour, pulse and respirations throughout the procedure.

    To detect any change in patient condition and manage accordingly

    6

    The doctor cleans the patient’s skin, places a drape in position and injects local anaesthesia. A scalpel is used to make an incision through the skin and muscle of the intercostal space. Using the introducer, the tubing is inserted and secures it with a stitch.

    Local anaesthesia helps to relieve pain

    7

    The nurse connects the tube to the UWSD bottle once the introducer is removed, then clamps the tube with two pairs of clamps until all the connections of the apparatus are sealed.

    To be able to clip the tube so as to prevent air going to the lungs

    8

    Remove the clamps and check the functioning of the apparatus by noting if the fluid in the tube rises and falls in rhythm with the patient’s respirations.

    To ensure that the system is air tight and no air leakages and no risk of emphysema.

    9

    Apply a dressing to the wound.

    A dressing makes an airtight seal at the incision site and prevents infection.

    10

    Wash hands, clear away the equipment and leave the patient comfortable.

    To prevent spread of infections

    Changing the bottle

    11

    • Securely clamp off the drain with two clamps but for a short time. 

    • Disconnect the tubing and put used apparatus to one side. 

    • Connect new tubing and bottle and remove the clamps.

    Minimise re-infection of the patient.

    12

    Monitor the fluid in tubing whether it is moving up and down in rhythm with the patient’s respiration rate.

    To ensure that the tube is in situ and functioning.

    13

    Record the amount of drainage on the fluid balance chart and note any abnormalities.

    For effective assessment of progress of therapy and the patient

    Wash hands, Clear away and clean the used apparatus and equipment.

    To prevent spread of infections

    Points to remember

    • Make sure that all connections are secure to avoid leakages
    • Check that the patient is not compressing or kicking any part of the drainage system, to avoid obstructing the tube.
    • The bottle must always remain below the level of the patient’s chest and should preferably be in a stand to avoid being easily knocked over, to prevent back flow of fluid from drainage chamber to pleural cavity and to maintain the water seal.

    Quick Quiz

    UWSD Quiz

    FON - mobile-friendly and focused practice.

    Privacy: Your details are used only for quiz tracking and certificates.

    Under water seal drainage Read More »

    Nursing Management question approach

    Nursing Management Question Approach

    Nursing Care Management: Answering Questions with Confidence

    As nurses prepare for nursing exams, it is important to develop effective strategies for answering questions related to nursing care management. Nursing exams often include questions that require nurses to demonstrate their knowledge of nursing considerations, Nursing concerns, Nursing issues, and Nursing interventions


    In this post, we will expand into each of these areas and provide detailed explanations and examples of how to approach and answer these types of questions with confidence.

    Nursing Considerations

    Master the critical factors nurses must prioritize to ensure patient safety and effective treatment outcomes.

    In Simple Terms:

    Considerations are all the important things you must think about before and during a procedure to make sure the patient is safe and the treatment is effective.

    In nursing, considerations refer to the factors that nurses must take into account when providing care to their patients. These considerations encompass various aspects, including patient assessment, specific health conditions, treatments, interventions, and potential complications. By considering these factors, nurses can tailor their care plans and interventions to meet the unique needs of each patient.

    Question Approach: NURSING CONSIDERATIONS

    “What are ten nursing considerations when applying Plaster of Paris on a limb?”

    Simulated Examination Script

    To effectively answer this question, we need to identify and describe ten essential nursing considerations when applying Plaster of Paris on a limb. Let’s explore each consideration in detail:

    1. Assessment of Limb Condition:

    Before applying plaster of Paris, assess the condition of the limb thoroughly. This assessment includes evaluating skin integrity, checking for any open wounds or infections, and assessing neurovascular status.

    2. Proper Positioning:

    Proper positioning is essential to ensure accurate application and alignment of the plaster. Assist the patient in a comfortable position that allows easy access to the limb and facilitates proper molding.

    3. Skin Preparation:

    Preparing the skin before applying plaster of Paris is crucial to prevent skin complications. Clean the skin thoroughly, remove any hair, and ensure it is dry before applying the plaster.

    4. Education and Informed Consent:

    Provide education to the patient and their family about the plaster application process, including the expected duration, care instructions, and potential complications. Obtaining informed consent is also a vital nursing consideration.

    5. Selection and Preparation of Materials:

    Select the appropriate plaster of Paris materials and prepare them according to the manufacturer’s instructions. This involves measuring and cutting the plaster strips to the required length and immersing them in water.

    6. Proper Application Technique:

    Applying plaster of Paris requires proper technique to ensure a secure and well-fitting cast. Apply the wet plaster strips smoothly and evenly, avoiding wrinkles or excessive pressure that could compromise circulation.

    7. Patient Comfort and Pain Management:

    During the plaster application process, continuously assess the patient’s comfort and manage any associated pain. This may involve administering analgesics as prescribed, providing positioning support, and offering emotional support.

    8. Monitoring Neurovascular Status:

    Closely monitor the neurovascular status of the limb after applying the plaster. This includes assessing for signs of impaired circulation, such as changes in color, temperature, sensation, and capillary refill time.

    9. Prevention of Complications:

    To prevent complications, educate the patient and their family about proper care techniques, such as keeping the cast dry, avoiding putting weight on the cast, and recognizing signs of infection or circulation problems.

    10. Follow-Up and Evaluation:

    After applying the plaster of Paris, schedule appropriate follow-up appointments to monitor the limb’s progress, assess the cast’s integrity, and ensure proper healing. Regular evaluation is essential to detect any complications early and provide timely interventions.

    Nursing Concerns

    Nursing Concerns

    Learn how to identify and prioritize the "warning lights" of patient care to prevent complications and ensure clinical excellence.

    In Simple Terms:

    Concerns are the potential problems or dangers you worry might happen to your patient because of their condition. They are like "warning lights" you need to watch for.

    Nursing concerns refer to the specific areas of attention or any issues or problems that a nurse recognizes or identifies as something that has potential impact on the health of the patient. These concerns include the actual problems, potential risks, complications, and specific care needs associated with the patient’s health condition. Understanding nursing concerns allows nurses to provide holistic and patient-centered care.


    Have you ever wondered what nurses are thinking about when they’re caring for a patient? It’s not just about administering medication and taking vital signs. Nurses are constantly on the lookout for potential problems, known as nursing concerns, that could impact a patient’s health.

    Question Approach: NURSING CONCERNS

    “Explain five nursing concerns to address when caring for a patient with trigeminal neuralgia?”

    Simulated Examination Script

    Answer: A nurse would be concerned about:

    Risk for Injury:

    The pain might make it difficult for the patient to move around safely, increasing the chance of falls.

    Impaired Oral Intake:

    Eating and drinking can become painful, leading to malnutrition and dehydration.

    Ineffective Coping:

    Chronic pain can cause anxiety, depression, and social isolation.

    Noncompliance with Medication Regimen:

    The patient may be hesitant to take medications due to side effects or fear of addiction.

    Risk for Adverse Drug Reactions:

    Certain medications used to treat trigeminal neuralgia can have serious side effects.

    Risk for Social Isolation:

    The pain and discomfort can make it difficult for the patient to participate in social activities.

    Risk for Impaired Skin Integrity:

    The patient may have difficulty maintaining oral hygiene due to pain, leading to skin breakdown.

    Nursing Issues

    Understand the practical, everyday challenges in patient care and how to navigate them effectively in a clinical setting.

    In Simple Terms:

    Issues are the real, practical challenges you have to actively solve every day when caring for a patient, especially one with a long-term illness.

    Nursing issues refer to the specific challenges or problems that nurses may encounter when managing patients with certain health conditions. These issues encompass the physical, emotional, and social aspects that can impact patient care and require nursing interventions. Understanding nursing issues allows nurses to anticipate and address potential difficulties in providing holistic care.

    Question Approach: NURSING ISSUES

    “Outline five nursing issues of a patient with Parkinson’s disease?“

    Simulated Examination Script

    To effectively answer this question, we need to outline five nursing issues encountered when managing a patient with Parkinson’s disease. Let’s explore each issue in detail:

    1. Mobility and Gait Disturbances:

    Parkinson’s disease often presents with mobility and gait disturbances, including bradykinesia, rigidity, and postural instability. Assess and address these issues by implementing interventions such as physical therapy, assistive devices, and fall prevention strategies.

    2. Medication Management:

    Patients with Parkinson’s disease require complex medication categories to manage their symptoms. Educate patients and caregivers about the medications, their dosages, possible side effects, and the importance of adherence.

    3. Psychosocial Support:

    Parkinson’s disease can significantly impact a patient’s mental and emotional well-being. Provide psychosocial support by addressing concerns, facilitating support groups, and connecting patients and caregivers with resources for counseling or therapy.

    4. Communication Difficulties:

    As the disease progresses, patients with Parkinson’s disease may experience speech and swallowing difficulties. Employ alternative communication methods, such as augmentative and alternative communication devices, to facilitate effective communication.

    5. Nutrition and Swallowing:

    Impaired swallowing, known as dysphagia, is a common issue in Parkinson’s disease. Collaborate with dieticians and speech therapists to develop appropriate dietary modifications and swallowing techniques to ensure adequate nutrition and prevent aspiration.

    Nursing Interventions

    Master the "doing" part of nursing. Learn specific clinical actions to promote health, prevent complications, and deliver evidence-based care.

    In Simple Terms:

    Interventions are the specific actions you take—the "doing" part of nursing—to help your patient, prevent problems, and promote their well-being.

    Nursing interventions refer to the actions and activities that nurses perform to promote health, prevent complications, and manage patient care. These interventions encompass a wide range of activities, including assessment, education, medication administration, wound care, and emotional support. Understanding nursing interventions allows nurses to deliver effective and evidence-based care to their patients.

    Question Approach: NURSING INTERVENTIONS

    “Explain six nursing interventions performed during the care of a patient with a tracheostomy tube?“

    Simulated Examination Script

    To effectively answer this question, we need to explain six nursing interventions performed during the care of a patient with a tracheostomy tube. Let’s explore each intervention in detail:

    1. Tracheostomy Tube Care and Suctioning:

    Perform regular tracheostomy tube care, including cleaning and suctioning to maintain airway patency and prevent infection. This involves sterile techniques, monitoring secretion consistency, and assessing for any signs of complications.

    2. Humidification and Hydration:

    Patients with a tracheostomy tube often require humidification to maintain proper airway moisture. Ensure adequate humidification and hydration to prevent mucus plugs and support optimal respiratory function.

    3. Communication Support:

    Patients with a tracheostomy tube may face communication challenges. You should provide alternative communication methods, such as communication boards, pen and a paper or electronic devices, to facilitate effective interaction and alleviate patient frustration.

    4. Skin and Stoma Care:

    Assess and care for the tracheostomy site to prevent infection and skin breakdown. This involves regular cleaning, monitoring for redness or irritation, and applying appropriate dressings or barriers.

    5. Mobilization and Positioning:

    Proper positioning is crucial for patients with a tracheostomy tube to ensure optimal ventilation and prevent complications. Assist with positioning changes, mobilization, and providing appropriate support and stability during transfers or ambulation.

    6. Education and Support:

    Provide comprehensive education to patients and caregivers regarding tracheostomy tube care, emergency management, signs of complications, and home care instructions. Emotional support and counseling are also essential to help patients and their families adapt to the lifestyle changes associated with a tracheostomy.

    In conclusion, we have covered the question approach for each category, providing detailed explanations and examples. By considering nursing considerations, addressing nursing concerns, understanding nursing issues, and implementing nursing interventions, nurses can excel in their nursing exams and deliver high-quality care to their patients.

    Nursing Management Question Approach Read More »

    nursing exam Nursing Management nursing exam

    Nursing Exam Question Approach

    Nursing Exam Question Approach

    A comprehensive guide on how to interpret and answer UNMEB question types: EXPLAIN, OUTLINE, DESCRIBE, MENTION, IDENTIFY, STATE, LIST, WHAT, and GIVE.

    This guide explores specific nursing interventions, considerations, concerns, and issues frequently tested in professional medical exams.
    EX

    The EXPLAIN Approach

    In Simple Terms: "Explain" means to give details and reasons. You need to show *how* or *why* something happens, not just what it is.
    1
    Understand the question: Carefully read and identify the main concept. Pay attention to specific instructions.
    2
    Organize your response: Create a mental map. Start with a concise introduction, context, and clear thesis.
    3
    Provide thorough explanation: Elaborate using clear language. Use nursing terminology and case studies.

    Simulated Examination Sheet

    Qn: Explain the pathophysiology of diabetes mellitus and its effects on the body.

    Diabetes mellitus is a chronic metabolic disorder characterized by high blood glucose levels due to impaired insulin secretion, insulin action, or both. The pathophysiology of diabetes involves multiple factors that contribute to the development and progression of the disease. Firstly, in type 1 diabetes, an autoimmune process leads to the destruction of insulin-producing beta cells in the pancreas. This results in a deficiency of insulin and requires external insulin administration. On the other hand, type 2 diabetes is primarily characterized by insulin resistance, where the body’s cells become less responsive to insulin. Insulin is a hormone produced by the beta cells of the pancreas, and its main function is to regulate glucose metabolism. In diabetes, the lack of insulin or the body’s inability to use it effectively leads to hyperglycemia. Persistently high blood glucose levels can have detrimental effects on various organs and systems in the body. The effects of diabetes on the body are many. It can lead to macrovascular complications, such as cardiovascular disease, stroke, and peripheral vascular disease. Also, microvascular complications may arise, affecting small blood vessels in the eyes, kidneys, and nerves. Diabetes can also increase the risk of infections, slow wound healing, and cause diabetic neuropathy and nephropathy
    OU

    The OUTLINE Approach

    In Simple Terms: "Outline" means to create a structured summary. Use main headings and sub-points to show parts in an organized way.
    1
    Analyze the question: Identify main components that need to be outlined.
    2
    Organize your response: Identify main headings and arrange them in a coherent order.
    3
    Provide detailed information: Use concise and informative language under each heading. JUMP A LINE, UHPAB HAS VERY MANY BOOKLETS

    Simulated Examination Sheet

    Qn: Outline the steps involved in the nursing process.

    1. Assessment: Gather relevant patient data, including physical, psychological, social, and cultural aspects. Perform a comprehensive health history and physical examination. Utilize assessment tools and techniques to collect objective and subjective data. Document and organize the collected data systematically.

    2. Diagnosis: Analyze the assessment data to identify health problems, risks, or potential complications. Formulate nursing diagnoses based on the identified issues. Ensure that the diagnoses are accurate, concise, and specific.

    Collaborate with other healthcare professionals when necessary. 3. Planning: Establish patient-centered goals and outcomes in collaboration with the patient.

    Develop a nursing care plan that includes evidence-based interventions and strategies. Prioritize nursing actions based on the urgency and importance of each goal. Ensure that the care plan is feasible, realistic, and adaptable. 4. Implementation: Execute the planned nursing interventions effectively and efficiently.

    Provide safe and compassionate care while considering the patient's preferences. Document the implementation process and any modifications made. Collaborate with the interdisciplinary healthcare team to deliver comprehensive care.

    5. Evaluation: Assess the patient's response to the nursing interventions and the achievement of goals. Compare the actual outcomes with the expected outcomes. Modify the care plan if needed based on the evaluation findings. Document the evaluation results and communicate them to the healthcare team.
    DE

    The DESCRIBE Approach

    In Simple Terms: "Describe" means to paint a picture with words. Give a detailed account of characteristics or features. Describe usually likes STEPS in order, even using IMAGES where applicable!
    1
    Understand the question: Identify the main topic that needs characterization.
    2
    Provide comprehensive description: Offer thorough details, features, or components.
    3
    Use terminology: Accurately describe concepts to demonstrate knowledge.

    Simulated Examination Sheet

    Qn: Describe the stages of wound healing.

    1. Hemostasis: This initial stage begins immediately after the injury occurs. Blood vessels constrict to reduce blood flow and prevent excessive bleeding. Platelets aggregate to form a temporary clot. The clotting process releases various growth factors and cytokines, initiating the subsequent stages of healing.

    2. Inflammatory phase: This phase typically lasts for 2-3 days. Inflammation occurs as a response to tissue injury. Vasodilation and increased vascular permeability allow immune cells to migrate to the wound site. Neutrophils arrive first to eliminate debris and prevent infection. Macrophages then remove dead tissue and release additional growth factors to stimulate healing.

    3. Proliferative phase: This phase generally occurs between days 3 and 20. New blood vessels form to supply oxygen and nutrients to the wound. Fibroblasts produce collagen, which provides structural support for wound healing. Epithelial cells migrate from the wound edges to resurface the wound. Granulation tissue forms, consisting of new blood vessels, fibroblasts, and extracellular matrix.

    4. Maturation phase: This final phase can last for several months to years. Collagen fibers reorganize and remodel, increasing the wound's tensile strength. Scar tissue forms, but it may not possess the same strength and flexibility as the original tissue. The scar gradually becomes more refined and fades over time.
    ST

    MENTION / IDENTIFY / STATE

    In Simple Terms: These words mean "give a short, direct answer." Just name the facts without extra explanation.
    1
    Identify facts: Read and identify the specific information required.
    2
    Direct response: Offer a concise response. Avoid unnecessary elaboration.

    Simulated Examination Sheet

    Qn: State the types of delusions.

  • Grandiose delusions; the patient believes s/he is somebody great /important ,knowledgeable or powerful contrary to the social cultural ,religious background and experiences.

  • Delusion of guilty and worthlessness; the patient believes s/he is not worth to live even though there’s nothing to justify this belief.

  • Delusions of jealousy; the patient believes that spouse/partner is being unfaithful even when there is no evidence to suggest so.

  • Delusion of persecution: the patient believes they’re being deliberately wronged, conspired or harmed by another person or agency even when there’s no evidence to suggest so.

  • Religious delusions; the individual believes he or she has a special link with God that is out keeping with people of the same religious belief.

  • Delusions of control, influence or phenomenon; these are three types; belief that the person performs activities as a result of an extreme force.
  • LI

    The LIST Approach

    In Simple Terms: "List" means to present points one after another, usually with a short description for each.
    1
    Identify factors: Carefully identify the elements that need to be listed.
    2
    Organize: Present items in a logical order using bullet points.

    Simulated Examination Sheet

    Qn: List the risk factors for cardiovascular disease.

    - Hypertension: increases strain on heart.
    - Smoking: damages blood vessels.
    - Obesity: increases risk of diabetes.
    - Sedentary lifestyle: contributes to obesity.
    WH

    The WHAT Approach

    In Simple Terms: "What" asks for a definition. Give a clear, simple explanation of the term or concept.
    1
    Identify term: Pinpoint the specific procedure or concept to define.
    2
    Clear explanation: Offer a concise definition using simple language.

    Simulated Examination Sheet

    Qn: What is sepsis?

    Sepsis is a potentially life-threatening condition that occurs when the body’s response to an infection becomes unregulated, leading to widespread inflammation and organ dysfunction.

    Nursing Exam Question Approach Read More »

    Want notes in PDF? Join our classes!!

    Send us a message on WhatsApp
    0726113908

    Scroll to Top
    Enable Notifications OK No thanks