
Cold Chain
The Vaccine Cold Chain
Definition and Importance
The cold chain is a system of storing, transporting, and distributing vaccines at specified low temperatures—typically between +2°C and +8°C—from the point of manufacture to the point of administration. Its purpose is to ensure that vaccines remain in a potent state until they are given to a recipient.
Vaccines are sensitive biological products. Unlike other medicines, their potency, once lost, can never be regained. Exposure to excessive heat, direct sunlight, or (for some vaccines) freezing temperatures will permanently damage them. Administering a damaged, non-potent vaccine is worse than not vaccinating at all, because it gives a false sense of security while leaving the person unprotected.
The Three Pillars of the Cold Chain
A successful cold chain is a coordinated effort consisting of three essential components:
- People: The trained personnel (logisticians, storekeepers, health workers) who manage, transport, and administer the vaccines.
- Equipment: The refrigerators, cold boxes, vaccine carriers, and monitoring devices needed to store and transport vaccines safely.
- Procedures: The set rules and protocols for handling vaccines, monitoring temperatures, managing stock, and maintaining equipment.
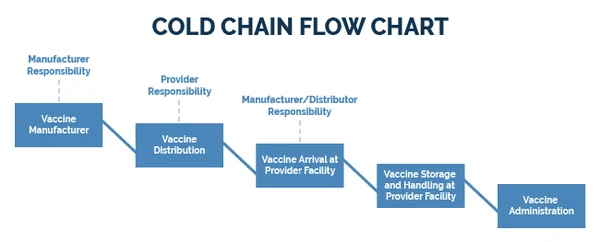
The Cold Chain System in Uganda
In Uganda, the cold chain is a tiered system designed to move vaccines from the national level down to the community.
- National Level: Vaccines arrive at Entebbe airport and are stored at the Central Vaccine Store (CVS).
- District Level: Vaccines are transported to District Vaccine Stores (DVS).
- Sub-District Level: From the DVS, vaccines are distributed to Health Sub-District (HSD) stores.
- Facility Level: Finally, vaccines reach the static health units (hospitals, health centers) where they are administered.
A health worker is responsible for maintaining the cold chain at the health unit, during transport to and from outreach sites, and during the immunization session itself. Maintaining the cold chain demands constant vigilance.
Cold Chain Equipment: Requirements and Functions
a) Cold Rooms and Freezer Rooms
- These are large, walk-in storage units located at the national level (Central Vaccine Store).
- Cold Rooms: Maintain a temperature of +2°C to +8°C for storing the majority of vaccines.
- Freezer Rooms: Maintain a temperature below -15°C for long-term storage of heat-sensitive vaccines like Oral Polio Vaccine (OPV) and for freezing large quantities of ice packs.
- These systems are always supported by standby generators to ensure continuous power.
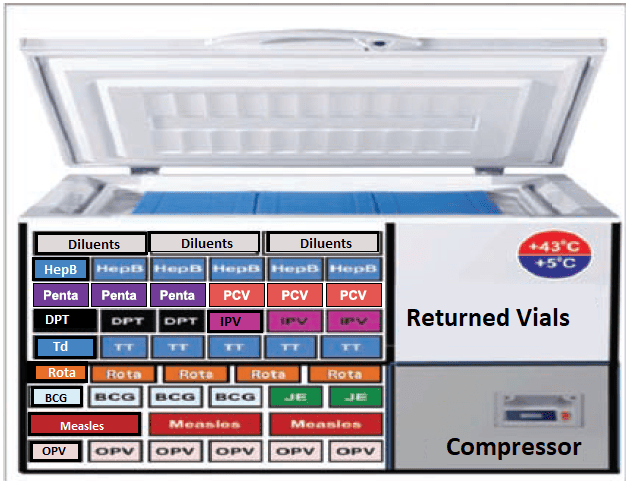
b) Refrigerators
Refrigerators are the most critical piece of equipment at the district and health facility levels.
- These are top-opening refrigerators with a lining of water-filled tubes. This "ice lining" freezes and holds the cold for long periods.
- They are highly efficient because cold air is dense and does not "spill out" when the top lid is opened.
- In case of a power outage, an ILR can maintain the correct temperature for over 72 hours, provided the lid is not opened frequently. This makes them ideal for areas with unreliable power.
- These are very common at health facilities because they can operate on multiple energy sources: electricity, or heat derived from burning gas (LPG) or kerosene.
- These use energy generated from solar panels, making them a sustainable option for facilities without access to the electrical grid.
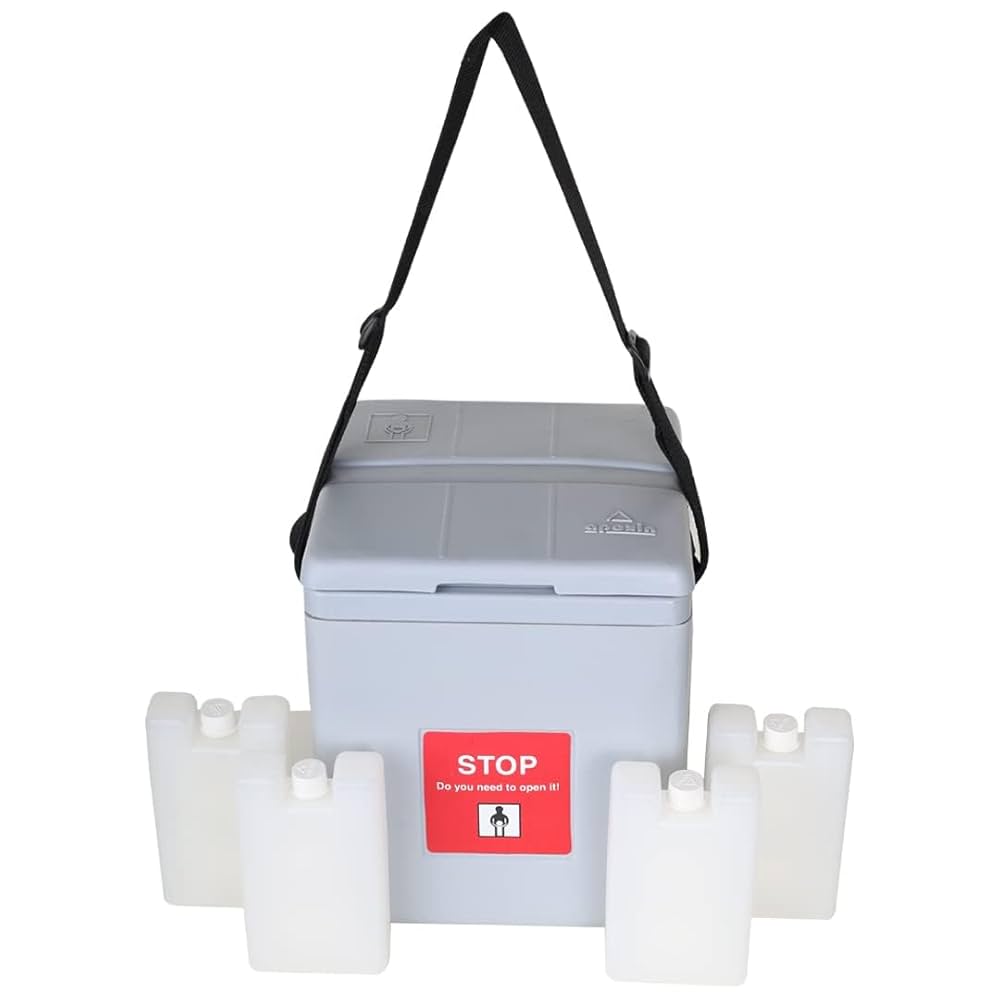
c) Cold Boxes and Vaccine Carriers
- These are large, insulated containers (5-22 liters) used for transporting vaccines from a district store to a health facility or for temporary storage during an emergency (e.g., refrigerator breakdown).
- When lined with frozen ice packs, they can maintain the cold chain for 48 to 120 hours.
- These are smaller, insulated containers, much easier to carry for outreach services or to immunization sites where health workers have to walk.
- They are lined with four conditioned ice packs and have a shorter cold life of 8 to 12 hours.
- Each carrier is supplied with a piece of soft foam (sponge) that fits on top of the ice packs. This sponge holds opened vials during a session, keeping them cool while preventing direct contact with the ice packs.
d) Ice Packs and Their Preparation
- Fill clean ice packs with cool, clean water up to the marked level. Do not overfill.
- Tighten the cap securely to prevent leakage.
- Place the ice packs in the freezer compartment, preferably flat against the evaporator surface for faster freezing.
- Freeze until solid, which typically takes at least 48 hours.
- Check for any leaks and discard leaking ice packs. Keep them out of direct sunlight, which can make the plastic brittle and cause cracks.
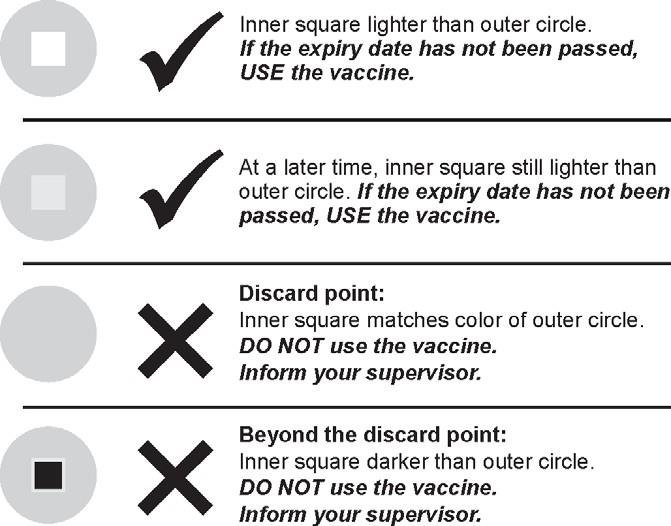
e) Temperature Monitoring Tools
- Vaccine Vial Monitor (VVM): A small, heat-sensitive label attached to a vaccine vial by the manufacturer. It has a dark outer circle and a lighter inner square. As the vial is exposed to heat over time, the inner square gradually darkens. The vaccine can be used as long as the inner square is lighter than the outer circle. If the inner square is the same color as or darker than the outer circle, the vaccine has been exposed to too much heat and must be discarded.
- Freeze Tag or Chemical Freeze Indicator: An irreversible indicator that shows if vaccines have been exposed to freezing temperatures (below 0°C). This is crucial for protecting freeze-sensitive vaccines.
- Fridge Tag or Thermometer: A device used to monitor the current temperature inside the refrigerator. It must be checked and recorded twice daily.
Practical Management of the Cold Chain at the Health Facility
Maintaining the Vaccine Refrigerator
Regular maintenance is essential to keep the refrigerator working efficiently and prevent vaccine loss.
Daily Maintenance
- Check the power source: For a gas fridge, ensure the burner flame is blue. For an electric fridge, confirm power is on. For a solar fridge, check the indicator lights.
- Never set the thermostat to the maximum setting, as this can damage freeze-sensitive vaccines.
- Always have a standby filled gas cylinder for a gas-operated refrigerator.
- Clean the outside of the fridge with a damp cloth.
Weekly Maintenance
- Check the refrigerator to ensure it is level.
- Check vaccine stock levels and expiry dates. Update the vaccine control book and perform physical counts.
- Check for ice formation on the evaporator. Defrost when the ice is about 5mm thick.
Monthly Maintenance
- Clean the inside and outside of the refrigerator with mild soap and water.
- Clean the rubber seal on the door/lid and check if it is closing tightly. If not, inform the District Cold Chain Technician (DCCT) or Assistant (DCCA).
- Check the cooling unit at the back of the fridge for dirt or dust and have it cleaned by a technician if necessary.
How to Defrost the Refrigerator
Defrosting removes ice from the evaporator to maintain cooling efficiency. Excessive frost acts as an insulator and makes the fridge work harder. For a well-maintained fridge, this can be done once a month.
- First, read and record the refrigerator's temperature.
- Line a vaccine carrier or cold box with conditioned ice packs. (To condition an ice pack, leave a frozen pack at room temperature until you can hear water sloshing inside. This ensures its surface is at 0°C, not below freezing, which protects freeze-sensitive vaccines.)
- Pack the vaccines in polythene bags and place them in the carrier, arranging them by sensitivity.
- Place a thermometer inside the carrier to monitor its temperature. Place the foam pad on top and close the lid securely.
- Turn off the refrigerator's power source (disconnect gas, unplug electricity, or switch off solar).
- Keep the lid of the fridge open until all the ice has completely melted. Do not use sharp objects to scrape off the ice.
- Once melted, clean the inside of the fridge with mild soap and a damp cloth, then dry it thoroughly.
- Turn the refrigerator back on and place a thermometer inside.
- Monitor the temperature until it returns to the safe range of +2°C to +8°C.
- Once the temperature is stable, return the vaccines to the fridge, packing them correctly.
- Record the "defrosting" action on the temperature monitoring chart.
Consequences and Management of Refrigerator Temperature
Effects of Not Defrosting
Failing to defrost the refrigerator regularly when ice builds up to 5mm or more can lead to several problems that compromise vaccine safety and equipment function:
- Vials lose labels: The increased moisture inside the compartments can cause paper labels on vaccine vials to become wet and fall off, leading to medication errors.
- Temperature fluctuates: A thick layer of ice acts as an insulator, making it harder for the refrigerator to maintain a stable, cool temperature. This can lead to temperature fluctuations that damage vaccines.
- Fridge compartments become wet: This can damage vaccine packaging and create an unhygienic environment.
- Increased energy consumption: The refrigerator will consume a lot more gas or electricity, or drain solar batteries faster, as it works harder to try and cool through the ice layer.
- Reduced storage space: Ice buildup significantly reduces the available space in the freezer compartment for freezing ice packs.
How to Monitor and Adjust the Temperature of a Refrigerator
Monitoring the Temperature
- To monitor the temperature of the main section of a refrigerator, you need a thermometer or a fridge tag.
- A temperature chart should be fixed on or near the refrigerator. These charts must be filled out diligently and reviewed on a monthly basis. Completed charts should be filed and kept for at least 3 years.
- Read the temperature on the thermometer/fridge tag every morning (e.g., 8:00 am) and every afternoon (e.g., 4:00 pm). This must be done every single day, including weekends and public holidays.
- Record the temperature immediately on the temperature chart after each reading.
Adjusting the Temperature of Vaccine Refrigerators
If the temperature reading is outside the safe range of +2°C to +8°C, you must take immediate action.
- First, make sure that the refrigerator is working. Check the power source (is the gas on? is there electricity?).
- Check whether the door or lid of the refrigerator closes properly. The rubber seal may be broken or worn out, allowing warm air to enter.
- If the refrigerator is working, turn the thermostat knob so that the arrow points to a higher number from its current position. This will make the refrigerator run more and become cooler.
- If the refrigerator is not working at all, you must implement the emergency plan: store all vaccines in a vaccine carrier or cold box with conditioned ice packs and arrange for their immediate transfer to the nearest health facility with a working refrigerator.
- Turn the thermostat knob so that the arrow points to a lower number from its current position (e.g., from position 5 to 3). This will make the refrigerator run less and become warmer.
- Immediately check all freeze-sensitive vaccines for signs of freezing. These include DPT-HepB-Hib, PCV, IPV, Rota, HPV, HepB, and TT. This is done by performing the Shake Test.
Maintaining Correct Temperature in Cold Boxes and Vaccine Carriers
- Keep the lid tightly closed on the vaccine carrier or cold box at all times, except when removing a vial.
- During immunization sessions, keep opened multi-dose vials in the foam pad (sponge) of the vaccine carrier. The sponge keeps the vials cool while holding them securely.
- Do not take out all the vials and place them on a table. If you keep opening the carrier and lifting the sponge, the inside of the carrier will become warm and compromise vaccine quality.
- Keep cold boxes and vaccine carriers in the shade. Never leave a cold box or vaccine carrier in a vehicle parked in the sun.
- Avoid dropping or rough handling (ill treatment) of cold boxes and carriers, as this can cause cracks in the insulated walls and lids, exposing vaccines to heat.
- Use a thermometer or electronic temperature monitoring device to check that the temperature inside the vaccine carrier is being maintained between +2°C and +8°C.
Key Points on Managing a Vaccine Refrigerator
- Check and record the temperature twice a day, every day, including weekends and holidays.
- Always ensure there is a reliable power source (electricity, gas, or solar). For a gas fridge, always have a full standby gas cylinder.
- Defrost your refrigerator regularly. A thick layer of ice does not keep a refrigerator cool; it makes it work harder and use more power.
- The refrigerator should always be located out of direct sunshine, away from drafts of wind, and in a well-ventilated, uncongested room.
- It is important to appoint an EPI focal person in each health center who has the main responsibility of monitoring the cold chain and taking immediate action when the temperature is too high or too low.
Troubleshooting Frequent Defrosting
If you need to defrost your refrigerator more than once a month, it may indicate a problem. Check if:
- The door is being opened too often (more than 3 times daily).
- The door is not closing properly or the rubber gasket is broken/worn out.
If these issues persist, consult the DCCT or DCCA for assistance.
The Reverse Cold Chain: Ensuring Sample Integrity and Vaccine Quality
For nurses and midwives in Uganda, understanding the "reverse cold chain" is just as crucial as knowing the conventional cold chain. While the regular cold chain ensures vaccines stay potent from manufacturer to patient, the reverse cold chain deals with the critical journey of sensitive biological samples and potentially compromised vaccines from your health facility back to a specialized laboratory. This process is vital for disease surveillance, outbreak investigation, and maintaining the integrity of our immunization programs.
Definition Elaborated:
The Reverse Cold Chain is a meticulously managed system for transporting temperature-sensitive biological samples (like stool, blood, or viral swabs) or vaccine vials from peripheral health facilities, district hospitals, or even community outreach points back to a central, regional, or national reference laboratory. Its core principle is to maintain a continuous, controlled temperature range (typically +2°C to +8°C, or frozen for some specific samples) throughout the entire backward journey, just as we do for vaccines coming to you. This ensures the viability of pathogens in clinical samples or the stability of vaccine components for accurate testing and analysis.
Primary Purpose (Disease Surveillance and Laboratory Confirmation):
This is arguably the most common and vital application of the reverse cold chain for frontline healthcare workers. It is absolutely essential for robust disease surveillance programs. When you collect a sample from a patient suspected of having a specific infectious disease, the integrity of that sample is paramount for accurate diagnosis and public health action. For example:
- Acute Flaccid Paralysis (AFP) Surveillance: Under the Polio Eradication Initiative, if you encounter a child with sudden onset of weakness or paralysis (suspected AFP), collecting two stool specimens at least 24 hours apart, but within 14 days of onset, is critical. These stool samples must be immediately placed in a cold box with ice packs and transported to the district level, and then rapidly forwarded to the Uganda Virus Research Institute (UVRI) or another designated reference laboratory. Maintaining the +2°C to +8°C range ensures that if poliovirus is present, it remains viable and can be isolated and identified in the laboratory. This is how we detect polio circulation and guide response efforts.
- Measles/Rubella Surveillance: Similarly, blood or nasopharyngeal swab samples from suspected measles or rubella cases need cold chain transport to the lab for confirmation, genotype analysis, and outbreak management.
- Cholera/Typhoid Outbreak Investigation: Stool or rectal swab samples from suspected cases must be kept cold to preserve the bacteria for culture and antibiotic sensitivity testing.
Without a functional reverse cold chain, samples degrade, pathogens die, and laboratory results become unreliable, hindering timely public health responses and outbreak control.
Secondary Purpose (Vaccine Potency Monitoring and Quality Control):
While less frequent than sample transport, the reverse cold chain is also critical when the potency or integrity of vaccines is in question. If a batch of vaccines has been exposed to temperature excursions (e.g., a refrigerator breakdown, prolonged power outage), or if there's a suspected issue with vaccine efficacy in the field, samples of these vaccines may need to be returned to a central laboratory for re-testing. Maintaining the +2°C to +8°C range during this return journey is crucial to ensure that any degradation observed in the lab is genuinely due to the initial cold chain breach and not further damage during transport.
OPV as a Cold Chain Indicator:
The Oral Polio Vaccine (OPV) is renowned for its extreme sensitivity to heat. This characteristic makes it an invaluable "canary in the coal mine" for the entire cold chain system. If you find that your OPV is consistently potent (e.g., through Vaccine Vial Monitors - VVMs - showing no change, or if lab testing confirms its viability after transportation), it provides strong assurance that other, more stable vaccines (like DPT, Measles, or Hepatitis B) have also been maintained within their optimal temperature ranges. Conversely, if OPV VVMs show heat exposure or if laboratory tests indicate degradation, it's a clear signal that there's a problem with your cold chain system that needs immediate investigation and correction, impacting all vaccines.
Scenario for Nurses and Midwives in Uganda:
Imagine you are a midwife working at a Health Centre II in a remote part of Uganda. During your routine immunization session, you identify a 5-year-old child presenting with sudden weakness in both legs, unable to stand or walk, with no history of trauma. You immediately suspect Acute Flaccid Paralysis (AFP), a key symptom of polio.
Nurses / Midwives Role in the Reverse Cold Chain:
- Sample Collection: You meticulously collect two stool samples from the child as per national guidelines, ensuring proper labeling with the child's details, date, and time.
- Immediate Cold Storage: As soon as the samples are collected, you place them into a pre-cooled vaccine carrier or cold box that contains frozen ice packs, ensuring the samples are kept between +2°C and +8°C. You never allow them to freeze.
- Documentation: You fill out the necessary laboratory request forms, ensuring all clinical details, contact information, and onset dates are accurately recorded.
- Transportation: You coordinate with the district health office or the designated sample transporter to ensure these critical samples are dispatched promptly. The transporter must also use a cold box with functioning ice packs and maintain the temperature throughout the journey from your Health Centre II to the district hospital, and then onward to the regional or national reference laboratory (like UVRI).
- Monitoring: While you don't physically accompany the samples, you rely on the system to ensure continuous cold chain maintenance. The integrity of that cold chain from your facility to the lab is what makes your diagnostic efforts meaningful.
This entire process, from your cold box at the health center to the laboratory's refrigerator, is the reverse cold chain in action. Your careful attention to maintaining sample temperature ensures that if poliovirus is indeed present, the laboratory can successfully isolate it, allowing the Ministry of Health to take swift action to prevent further spread and protect other children in Uganda.


![[Full anterior and posterior views of the human skeleton with major bones and key joints labeled.]](https://nursesrevisionuganda.com/wp-content/uploads/2025/07/Full-anterior-and-posterior-views-of-the-human-skeleton-with-major-bones-and-key-joints-labeled.jpg)
![[Diagram showing the human skeleton with the axial skeleton highlighted or color-coded differently from the appendicular skeleton.]](https://nursesrevisionuganda.com/wp-content/uploads/2025/07/axial-skeleton-highlighted-or-color-coded-differently-from-the-appendicular-skeleton.jpg)
![[Cross-section diagram of a bone showing the outer layer of compact bone surrounding the inner network of spongy bone. Maybe show a flat bone cross-section (diploe) as well.]](https://nursesrevisionuganda.com/wp-content/uploads/2025/07/ClassificationofBonesontheBasisofShape-e1751439762811.jpg)
![[Detailed, labeled diagram of a long bone showing all key anatomical features: diaphysis, epiphysis, metaphysis, epiphyseal line/plate, articular cartilage, periosteum, endosteum, medullary cavity, compact bone, spongy bone.]](https://nursesrevisionuganda.com/wp-content/uploads/2025/07/603_Anatomy_of_Long_Bone-1.jpg)
![[Cross-section diagram of a bone showing the outer layer of compact bone surrounding the inner network of spongy bone. Maybe show a flat bone cross-section (diploe) as well.]](https://nursesrevisionuganda.com/wp-content/uploads/2025/07/Cross-section-diagram-of-a-bone-showing-the-outer-layer-of-compact-bone.jpg)
![[Diagram showing the different types of bone cells (osteogenic cell, osteoblast, osteocyte, osteoclast) and their location/role in bone tissue.]](https://nursesrevisionuganda.com/wp-content/uploads/2025/07/types-of-bone-cells-osteogenic-cell-osteoblast-osteocyte-osteoclast.jpg)
![[Diagram illustrating the process of endochondral ossification, showing the hyaline cartilage model being progressively replaced by bone tissue from primary and secondary ossification centers.]](https://nursesrevisionuganda.com/wp-content/uploads/2025/07/endochondral-ossification.jpg)
![[Diagram illustrating both longitudinal growth at the epiphyseal plate and appositional growth (growth in width) occurring simultaneously in a long bone.]](https://nursesrevisionuganda.com/wp-content/uploads/2025/07/longitudinal-growth-at-the-epiphyseal-plate-and-appositional-growth-1.jpg)
![[Diagram or table illustrating common types of fractures (e.g., transverse, oblique, spiral, comminuted, compression, greenstick, open/closed).]](https://nursesrevisionuganda.com/wp-content/uploads/2023/05/ezgif.com-webp-to-jpg-11-1.jpg)
![[Diagram illustrating the four stages of fracture healing: 1. Hematoma formation, 2. Fibrocartilaginous callus formation, 3. Bony callus formation, 4. Bone remodeling.]](https://nursesrevisionuganda.com/wp-content/uploads/2023/03/Illustration-of-stages-in-bone-healing-after-a-fracture.jpg)
![[Diagram illustrating the three main structural classifications of joints: Fibrous joint (suture), Cartilaginous joint (symphysis or synchondrosis), and Synovial joint. Clearly label the components of a synovial joint (articular cartilage, joint capsule, synovial membrane, synovial fluid, joint cavity, ligaments).]](https://nursesrevisionuganda.com/wp-content/uploads/2025/07/Classification-of-Joints.png)
![[Diagrams illustrating the six different types of synovial joints (Plane, Hinge, Pivot, Condyloid, Saddle, Ball-and-Socket) with a small illustration of the bone shapes and arrows indicating the types of movement allowed for each, and examples of where they are found in the body.]](https://nursesrevisionuganda.com/wp-content/uploads/2025/07/cartilagenous-joints.jpg)
![[Diagram illustrating the three main structural classifications of joints: Fibrous joint (suture), Cartilaginous joint (symphysis or synchondrosis), and Synovial joint. Clearly label the components of a synovial joint (articular cartilage, joint capsule, synovial membrane, synovial fluid, joint cavity, ligaments).]](https://nursesrevisionuganda.com/wp-content/uploads/2025/07/types-of-synovial-joints-1.jpg)
![[Images illustrating common joint disorders: Osteoarthritis (showing cartilage erosion), Rheumatoid Arthritis (showing joint deformity), Gout (inflamed joint), diagram of a sprained ankle, diagram of a joint dislocation.]](https://nursesrevisionuganda.com/wp-content/uploads/2025/07/common-joint-disorders.webp)