Under water seal drainage is a system that allows drainage of the pleural space using an airtight system to maintain sub-atmospheric intrapleural pressure.
It’s used when air or fluid gets trapped in the pleural space.
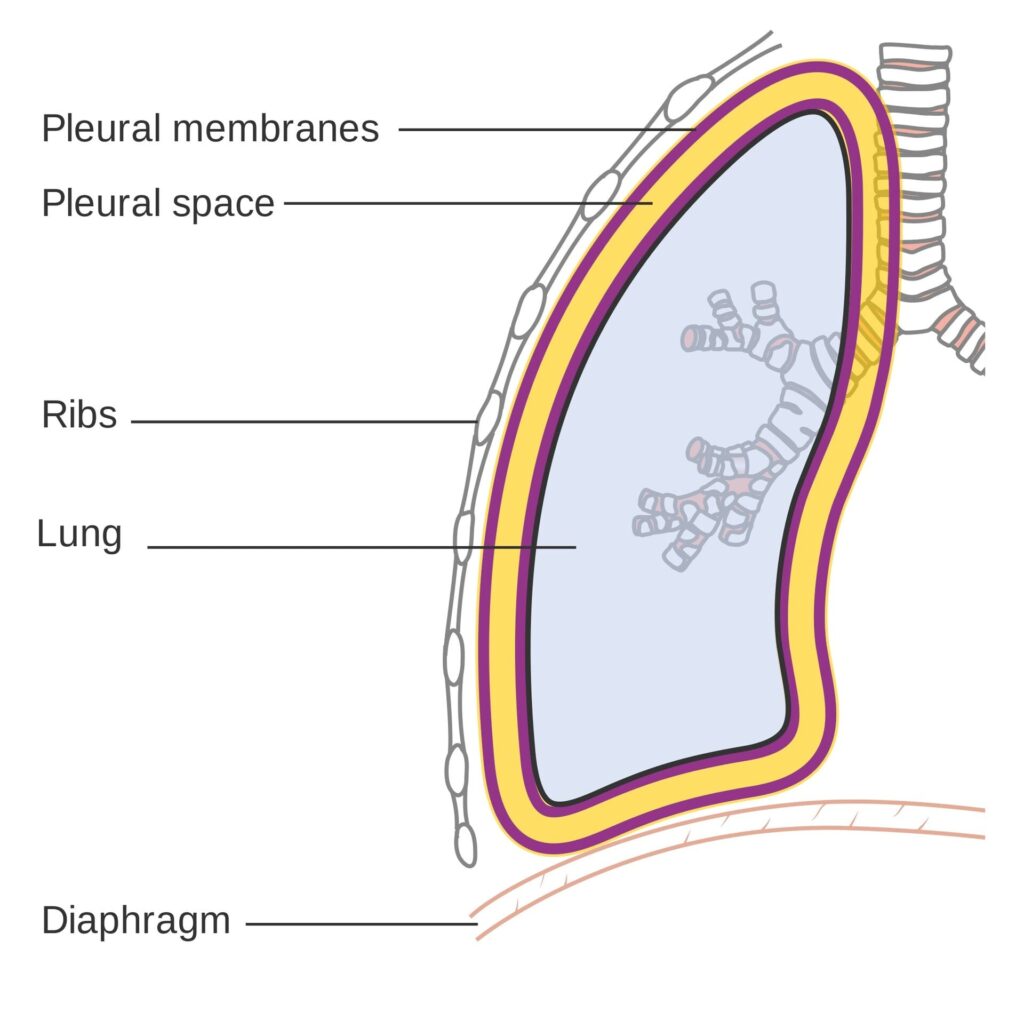
Pleural Space: This is the space between the two layers of pleura, which are thin membranes lining the lungs and the inside of the chest wall. Normally, this space has negative pressure, which helps the lungs stay inflated.
Purpose: The water seal drainage system has two main jobs:
To remove air and fluid: It allows air and fluid that have accumulated in the pleural space to escape out of the chest. Under water seal drainage is used to remove blood, air, pus, or serous fluid from the pleural cavity after thoracotomy, chest injury, pleural effusion, or pneumothorax.
To prevent backflow: It stops air and fluid from going back into the pleural space, especially when you breathe in (inhale). This one-way system is nice for proper lung function.
In simpler terms: Imagine a bottle with a straw dipped in water. When you blow into the straw, bubbles escape, but water doesn’t come back up the straw into your mouth. Water seal drainage works on a similar principle for your chest.
The underwater seal acts as a one-way valve.
Conditions necessitating Underwater Seal Drainage
Traumatic Pneumothorax: This happens when an injury to the chest (like a car accident or stab wound) causes air to leak into the pleural space, collapsing the lung.
Hemopneumothorax: This is a combination of air and blood in the pleural space. It can also be caused by trauma.
Spontaneous Pneumothorax: Sometimes, a lung can collapse on its own, without an obvious injury. This is more common in tall, thin young adults or people with lung diseases.
Iatrogenic Pneumothorax: This occurs unintentionally as a result of a medical procedure, such as inserting a central line or during a lung biopsy.
Broncho-pleural Fistula: This is an abnormal connection between an airway in the lung (bronchus) and the pleural space, causing air to leak into the pleural space.
Emphysema: A chronic lung disease where air sacs in the lungs are damaged. In some cases, it can lead to air leaks into the pleural space.
Malignancy: Lung cancers or other cancers in the chest can sometimes cause fluid buildup in the pleural space (pleural effusion).
Pleural Effusion: This is the buildup of excess fluid in the pleural space. It can be caused by various conditions like heart failure, pneumonia, or cancer.
Thoracic or Thoraco-abdominal Surgeries: After surgeries in the chest or upper abdomen, chest tubes are often placed to drain air and fluid and prevent complications.
In short: Any condition that causes air or fluid to accumulate in the pleural space and disrupt normal lung function may require water seal drainage.
Indications of Water Seal Drainage
The goals of water seal drainage are to:
Permit Drainage of Air and Fluid: The most direct purpose is to remove unwanted air, blood, or fluid from the pleural cavity. This helps to relieve pressure and allow the lung to re-expand.
Establish Normal Negative Pressure: The pleural space normally has a negative pressure, which is essential for keeping the lungs inflated. Water seal drainage helps to restore this negative pressure. Think of it like sucking air out of a balloon to make it inflate inside a jar.
Promote Lung Expansion: By removing air and fluid and restoring negative pressure, water seal drainage allows the collapsed lung to re-inflate and function properly.
Equalize Pressure on Both Sides of the Thoracic Cavity: Conditions like pneumothorax can disrupt the pressure balance in the chest. Water seal drainage helps to restore this balance.
Prevent Tension Pneumothorax: In a tension pneumothorax, air keeps getting trapped in the pleural space and cannot escape, leading to dangerous pressure buildup that can compress the heart and major blood vessels. Water seal drainage prevents this life-threatening situation by providing an escape route for the air.
Provide Continuous Suction (if needed): In some cases, gravity alone may not be enough to drain the air or fluid, or to re-expand the lung quickly. In these situations, gentle suction may be added to the water seal drainage system to assist the process.
In essence: Water seal drainage aims to bring the lung back to its normal, healthy state by removing obstacles and restoring the necessary pressure for it to function.
Site for Chest Tube Insertion
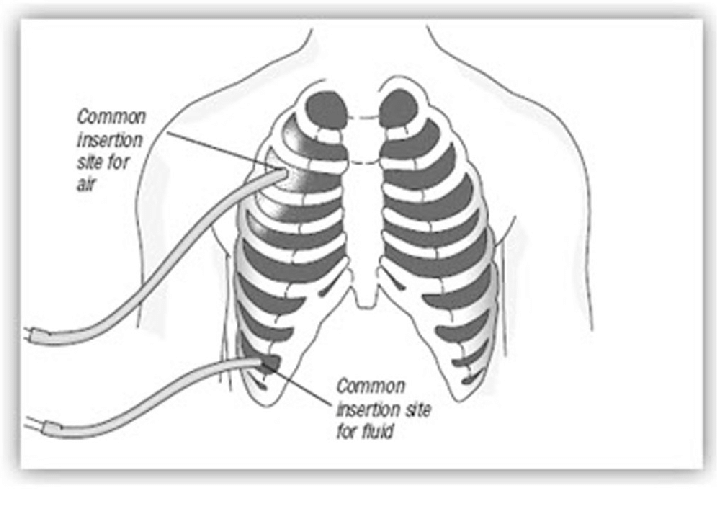
Where is the Chest Tube Inserted? The location of the chest tube depends on the reason for drainage:
For Thoracic Surgery (usually two tubes):
Anterior Chest Tube (Front):
Location: Usually placed in the upper and front part of the chest wall.
Intercostal Space: Inserted in the 2nd intercostal space (the space between the 2nd and 3rd ribs).
Purpose: Primarily to remove air. Air rises, so placing the tube high in the chest helps to drain air that has collected in the upper pleural cavity.
Posterior Chest Tube (Back):
Location: Placed in the back of the chest.
Intercostal Space: Inserted in the 8th or 9th intercostal space at the mid-axillary line (roughly in line with the middle of your armpit).
Purpose: Primarily to remove fluid (like blood or serous fluid). Fluid tends to settle at the bottom of the pleural cavity due to gravity, so a lower tube placement is effective for drainage.
Tube Diameter: Tubes for fluid drainage (posterior tubes) are often wider or longer than tubes for air drainage (anterior tubes) to facilitate better fluid removal.
Advertisements
For Pneumothorax (usually one tube for air removal):
Location: In the front or side of the chest.
Intercostal Space: Usually placed in the 2nd or 3rd intercostal space along the mid-clavicular line (in line with the middle of your collarbone) or anterior axillary line (front of your armpit).
Purpose: To remove air from the pleural space, allowing the lung to re-expand. Since air rises, a higher placement is effective for pneumothorax.
Types of Drainage Systems
Water seal drainage systems can be categorized based on the number of bottles (or chambers in modern systems). The basic principle remains the same, but complexity increases with more bottles.
One-Bottle Drainage System (Simple System)
Components:
Drainage Bottle: A single sterile bottle containing a specific amount of sterile water or saline solution.
Two Tubes:
Patient Tube (A): Connects to the chest tube from the patient. This tube is submerged underwater in the bottle, creating the water seal.
Vent Tube (B): A shorter tube that vents to the atmosphere (or suction). This allows air to escape from the bottle.
How it Works:
Air and fluid drain from the patient’s pleural space through tube A into the bottle.
The underwater seal prevents air from being sucked back into the pleural space during inhalation.
Air from the pleural space bubbles through the water and escapes out through vent tube B.
Drainage fluid collects in the bottle.
Limitations:
As drainage collects in the bottle, the water level rises, increasing the positive pressure needed to push out more fluid. This can slow down drainage if a large amount of fluid needs to be removed.
Not ideal for large amounts of drainage or when suction is needed.
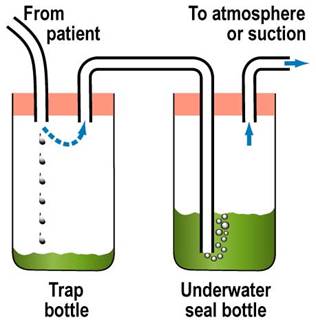
Two-Bottle Drainage System (Improved Drainage and Collection)
Components:
Trap Bottle (Collection Bottle): The first bottle to receive drainage from the patient. It’s simply a collection container and doesn’t contain water.
Underwater Seal Bottle: The second bottle, containing sterile water and acting as the water seal, similar to the one-bottle system.
How it Works:
Drainage from the patient first goes into the Trap Bottle, which collects the fluid.
Air then passes from the Trap Bottle to the Underwater Seal Bottle.
The Underwater Seal Bottle functions exactly as in the one-bottle system, providing the water seal and venting air.
The collection of drainage in a separate bottle prevents the increasing water level issue of the one-bottle system.
Advantages over One-Bottle System:
More efficient drainage, especially for larger volumes, as the water seal is not affected by the amount of drainage.
Allows for more accurate measurement of drainage as it’s collected in a separate bottle.
Three-Bottle Drainage System (Suction Control Added)
Components:
Trap Bottle (Collection Bottle): First bottle, collects drainage.
Underwater Seal Bottle: Second bottle, provides the water seal.
Manometer Bottle (Suction Control Bottle): Third bottle, controls the amount of suction applied to the system. It also contains sterile water.
Adjustable Vent Tube: A tube in the Manometer Bottle that is open to the atmosphere.
How it Works:
Drainage flows through the Trap Bottle and Underwater Seal Bottle as in the two-bottle system.
Suction Control: The Manometer Bottle regulates the suction.
The depth of the vent tube in the water in the Manometer Bottle determines the amount of negative pressure (suction). For example, if the tube is submerged 20 cm underwater, the suction will be approximately -20 cm H₂O.
When suction is applied, air is drawn in through the adjustable vent tube and bubbles through the water in the Manometer Bottle. This bubbling indicates that the suction is working and is being controlled at the desired level.
Excess suction is vented to the atmosphere, preventing excessive negative pressure from being applied to the patient’s pleural space.
Advantages of Three-Bottle System:
Controlled Suction: Allows for the application of gentle suction to aid in lung re-expansion and drainage, especially when gravity drainage is insufficient.
Safety: Prevents excessive suction, which could damage lung tissue.
More efficient drainage: Especially useful for persistent air leaks or when rapid lung re-expansion is needed.
Modern Systems: Today, many systems use pre-assembled, disposable plastic units that combine the functions of these bottles into chambers within a single unit. These are often referred to as multi-chamber drainage systems and are more convenient and easier to manage, but the underlying principles are the same as the bottle systems.
Factors Affecting Water Seal Drainage
Several factors can influence how well a water seal drainage system works. Knowing these factors is key for effective nursing care and management.
1. Proper Placement of Chest Catheter (Chest Tube): Rationale: Correct placement is key for effective drainage. As discussed earlier, tubes placed high are for air, and tubes placed low are for fluid.
Considerations:
Intercostal Space: Using the correct intercostal space (e.g., 2nd for air, 8th-9th for fluid).
Anterior/Posterior: Anterior for air, posterior for fluid in surgical cases with two tubes.
Single Tube: If only one tube is used, it’s often placed lower for general drainage of both air and fluid, although its effectiveness for air drainage alone might be less optimal than a higher placed tube in pneumothorax.
Separate Bottles: If multiple tubes are placed, they should be connected to separate drainage bottles to manage drainage from different areas effectively.
Advertisements
2. Proper Placement of Chest Drainage Apparatus: Rationale: Gravity is key. The drainage system must be lower than the chest for drainage to occur effectively and to prevent backflow.
Considerations:
Below Chest Level: Always ensure the drainage unit is consistently below the patient’s chest level, whether the patient is in bed, sitting, or walking.
Gravity Assist: This helps gravity to pull drainage from the pleural space into the collection system.
Prevent Backflow: Keeping it low prevents fluid in the drainage system from flowing back into the pleural space, which could cause infection or other complications.
During Transfer: When moving the patient (e.g., to another bed or for transport), the drainage unit should be held or placed carefully below chest level. It’s also advisable to briefly clamp the tubing (as instructed by protocol or physician order) during transfer to prevent accidental spillage or backflow, but clamping should be brief and tubing must be unclamped immediately after.
3. Length of Drainage Tubing: Rationale: Tubing length affects drainage efficiency and patient mobility.
Considerations:
Not Too Short: Tubing that is too short can restrict patient movement, potentially dislodge the chest tube, or cause tension on the insertion site.
Not Too Long: Tubing that is too long can create loops that impede drainage flow due to increased resistance and potential fluid collection in loops.
Straight Line: Tubing should ideally run in a relatively straight line from the chest to the drainage system, avoiding kinks or dependent loops.
No Loops: Avoid creating loops in the tubing, as these can trap fluid and air, obstructing drainage.
4. Patency of Chest Tubing: Rationale: The chest tube must be open and clear for drainage to flow.
Considerations:
Frequent Checks: Regularly check the tubing for kinks, clamps, or pressure points that might obstruct flow.
No Kinks or Pressure: Ensure the patient is not lying on the tubing, and that bedding or clothing is not pressing on it.
Mucus Plugs/Clots: Clots or mucus plugs inside the tubing can block drainage.
Milking the Tube: If clots or plugs are suspected, gently “milking” or stripping the tubing (following hospital protocol and physician orders) can help to dislodge them and maintain patency. However, routine stripping/milking is generally discouraged as it can create excessive negative pressure and potentially damage lung tissue. Gentle manipulation to maintain patency is preferred.
Avoid Clamping: Never clamp the chest tubing routinely, as this can lead to tension pneumothorax if air is still leaking into the pleural space. Clamping is generally only done briefly in specific situations, such as changing the drainage system, assessing for air leaks, or prior to removal, and should be done per physician order or hospital protocol.
5. Maintenance of Air Tight Drainage System: Rationale: The system must be airtight to maintain the water seal and suction (if used) and prevent air from entering the pleural space.
Considerations:
Air Tight Seals: Ensure all connections in the drainage system (tubing connections, bottle stoppers, connections to the chest tube at the insertion site) are airtight.
Taping Connections: Tape all tubing connections securely to prevent accidental disconnections and air leaks.
Stoppers and Seals: Make sure bottle stoppers (if using bottle systems) are firmly in place and that any seals in modern systems are intact.
Check for Leaks: Regularly check the system for air leaks. Continuous bubbling in the water seal bottle (when not expected) may indicate an air leak in the system rather than from the patient. To check for system leaks, briefly and sequentially clamp sections of the tubing starting close to the patient. If bubbling stops when you clamp a certain section, the leak is likely in that section or closer to the patient. If bubbling continues even when clamped near the patient, the leak is likely from the patient (e.g., lung air leak) or the chest tube insertion site.
6. Position of the Client: Rationale: Patient position can affect drainage, especially fluid drainage.
Considerations:
Fowler’s Position (Semi- or High-Fowler’s): Elevating the head of the bed (Fowler’s position) is often recommended.
Fluid Localization: Fowler’s position helps to localize fluid in the lower pleural space, making it easier to drain through a lower placed chest tube.
Lung Expansion: It can also improve lung expansion and breathing mechanics.
Regular Repositioning: Encourage the patient to change position regularly (within activity limitations) to promote drainage from different areas of the pleural space and prevent fluid from settling in one area.
7. Application of Mechanical Suction: Rationale: Suction, when used appropriately, can enhance drainage but must be applied correctly.
Considerations:
Continuous and Gentle: Suction should be continuous and gentle, not intermittent or high pressure.
When to Use Suction: Suction is typically used when:
Gravity drainage alone is not enough (e.g., persistent air leak, slow lung re-expansion).
The patient’s respiratory effort and cough are weak.
There’s a fast or significant air leak into the pleural space.
Speedier removal of air or fluid from the pleural space is needed.
–
Physician Order: Suction should always be applied based on a physician’s order.
Proper Setting: Ensure the suction is set to the prescribed level (often indicated by the water level in the suction control bottle or the setting on a modern drainage unit).
Bubbling in Suction Chamber: Gentle, continuous bubbling in the suction control chamber (Manometer Bottle) is a sign that suction is being applied correctly. Vigorous bubbling is usually unnecessary and can increase water evaporation and noise.
Advertisements
8. Activity of the Client: Rationale: Patient activity can promote drainage and lung function.
Considerations:
Movement on Bed: Encourage gentle movement in bed (turning side to side, repositioning). Movement helps to shift fluid and air within the pleural space, promoting drainage.
Coughing and Deep Breathing: Encourage the patient to cough and deep breathe regularly.
Intrapleural and Intrapulmonary Pressure: Coughing and deep breathing help to increase intrapleural and intrapulmonary pressure, which can assist in expelling air and fluid from the pleural space and promote lung expansion.
Walking (if appropriate): If medically appropriate and ordered by the physician, ambulation (walking) can also be beneficial, as it encourages deeper breathing and overall lung function.
Requirements for Under Water Seal Drainage (UWSD)
STERILE TROLLEY – Top Shelf
A trocar and cannula, intercostal tubing, and an introducer
Artery forceps in a receiver
Scalpel
Suturing material
Safety pin
A large Winchester bottle containing water or normal saline to a level of about 6cm
A rubber cork pierced by a short and long glass tube or by rigid plastic tubes
Bottom Shelf
A pair of gloves
Chest X-ray investigations and ultrasound scan results
A dressing pack
A patient’s file
Bedside
Hand washing equipment
Suction machine
Screen
Patient’s file
Emergency tray
Procedure for Underwater Seal Drainage (UWSD)
Step
Action
Rationale
Preparation of equipment
1
Preferably a graduated bottle is used
For correct reading of the drainage fluid
2
Assist Doctor to submerge the long tube in the water at 2 to 3 cm but must not touch the bottom of the bottle. The short tube acts as an escape route for air in the vacuum space in the bottle.
To prevent air from going to pleural cavity
3
Assist the Doctor to connect the tube to the top of the under-water to the patient’s intercostal drainage tube.
To drain fluid from the pleural cavity
Procedure
1
Explain the procedure carefully to the patient; to understand the importance of limited movements during the period of UWSD.
Explanation encourages patients cooperation and relieves anxiety
2
Take the trolley to the bedside, screen the bed and close nearby windows.
To provide privacy
3
Wash and dry hands and be ready to assist the doctor.
Promote hygiene measures
4
Position the patient leaning over the bed table supported by pillows. The patient’s arm which is on the side where the tube will be inserted must be placed forward and supported by a nurse.
This position gives best access to the second or third intercostal space
5
Observe the patient’s colour, pulse and respirations throughout the procedure.
To detect any change in patient condition and manage accordingly
6
The doctor cleans the patient’s skin, places a drape in position and injects local anaesthesia. A scalpel is used to make an incision through the skin and muscle of the intercostal space. Using the introducer, the tubing is inserted and secures it with a stitch.
Local anaesthesia helps to relieve pain
7
The nurse connects the tube to the UWSD bottle once the introducer is removed, then clamps the tube with two pairs of clamps until all the connections of the apparatus are sealed.
To be able to clip the tube so as to prevent air going to the lungs
8
Remove the clamps and check the functioning of the apparatus by noting if the fluid in the tube rises and falls in rhythm with the patient’s respirations.
To ensure that the system is air tight and no air leakages and no risk of emphysema.
9
Apply a dressing to the wound.
A dressing makes an airtight seal at the incision site and prevents infection.
10
Wash hands, clear away the equipment and leave the patient comfortable.
To prevent spread of infections
Changing the bottle
11
• Securely clamp off the drain with two clamps but for a short time.
• Disconnect the tubing and put used apparatus to one side.
• Connect new tubing and bottle and remove the clamps.
Minimise re-infection of the patient.
12
Monitor the fluid in tubing whether it is moving up and down in rhythm with the patient’s respiration rate.
To ensure that the tube is in situ and functioning.
13
Record the amount of drainage on the fluid balance chart and note any abnormalities.
For effective assessment of progress of therapy and the patient
Wash hands, Clear away and clean the used apparatus and equipment.
To prevent spread of infections
Points to remember
Make sure that all connections are secure to avoid leakages
Check that the patient is not compressing or kicking any part of the drainage system, to avoid obstructing the tube.
The bottle must always remain below the level of the patient’s chest and should preferably be in a stand to avoid being easily knocked over, to prevent back flow of fluid from drainage chamber to pleural cavity and to maintain the water seal.
Quick Quiz
UWSD Quiz
FON
Privacy: Your details are used only for quiz tracking and certificates.
Menstrual disorders are abnormalities in menstruation during reproductive life.
Common disorders associated with menstruation are as follows;
Amenorrhoea
Dysmenorrhoea
Menorrhagia
Metrorrhagia
Polymenorrhoea (epimenorrhoea)
Dysfunctional uterine bleeding
Endometriosis
AMENORRHOEA
Amenorrhoea refers to absence of menstruation which occurs in female during their reproductive age.
Types of Amenorrhoea
Primary amenorrhoea. This is the failure of menses to occur by 16 years of age. It could be due to imperforated hymen when she has been menstruating but when blood does not come out.
Secondary amenorrhoea. This is the cessation of menses in a woman who has previously menstruated. It is regarded as secondary when she takes a period of 6 month and above without seeing her menses.
Causes of Amenorrhoea
Physiological like pregnancy and lactation, during pregnancy the levels of oestrogen and progesterone remains high thus ensuring the integrity of the endometrium resulting into amenorrhoea.
During lactation– soon after delivery prolactin is secreted in large quantities by the anterior pituitary. There is partial suppression of LH production so that the ovarian follicles may grow but ovulation does not occur resulting into amenorrhoea.
Hypothalamic dysfunction-such kind of patients have lower levels of follicle stimulating hormone(FSH) and luteinizing hormone (LH). Several congenital syndromes associated with abnormal hypothalamic- gonadal function have been described and these conditions present with primary amenorrhoea and absence of secondary sex characteristics. It is also due to failure to the development of central structures of hypothalamus.
Pituitary disorde r, this is associated with elevated levels of prolactin (hyperplolactinemia).
Congenital abnormalities , like imperforated hymen, vaginal septum, no uterus, no endometrium but with uterus, absence of ovaries, cervical stenosis, and absence of hypothalamus (kallmann’s syndrome). This is a congenital hypogonadotrophic hypogonadism disorder characterized by absence of secondary sex characteristics.
Change of environment or occupation.
Fear, anxiety or excitement
Pseudoamenorrhoea, pseudo means false. Here a woman psychologically thinks that she is pregnant yet she is not.
After hysterectomy or bilateral removal of ovaries
Full doses of radiation
Drugs ,like contraceptives especially hormonal methods
Debilitating diseases like, TB, HIV/AIDS, DM etc
Tumours of the pituitary gland, hypothalamus, ovaries and uterus
Early onset of menopause
Idiopathic
Diagnosis and investigation
A detailed history taking (history of change in weight, presence of stress, questions about excessive weight, presence of excessive body or facial hair) and physical examination.
Urine for HCG to rule out pregnancy
Ultra sound scans of the pelvis to visualize the contents or organs of the pelvic cavity.
Blood for hormone analysis to rule out hormonal imbalance.
Computerized tomography (CT) scans to visualize the organs.
Management of Amenorrhoea
This will depend on the cause. It may be medical, surgical, or psychological.
Nursing Management:
Assessment: Conducting a comprehensive evaluation of the woman’s medical and menstrual history, as well as performing a physical examination to identify the underlying cause of amenorrhea.
Emotional Support: Offering empathetic and non-judgmental support to address any emotional distress associated with the condition.
Education: Providing information on menstrual health, reproductive anatomy and physiology, and the potential causes and treatment options for amenorrhea.
Lifestyle Modifications: Encouraging women to adopt a healthy lifestyle, including regular exercise, balanced nutrition, stress reduction, and sufficient sleep, as these factors can contribute to hormonal balance regulation.
Contraception Counseling: Discussing contraceptive methods and family planning options to prevent unintended pregnancies.
Medical Management: Medical management of amenorrhea encompasses treating the root cause identified through investigations done. Various medical management options include:
Hormone Therapy: If hormonal imbalance, such as polycystic ovary syndrome or hypothalamic dysfunction, is determined as the cause of amenorrhea, hormone therapy may be prescribed to regulate hormone levels and restore menstruation.
Medications: Certain medications like progestins or combined oral contraceptives may be prescribed to induce menstruation or regulate the menstrual cycle.
Treatment of Underlying Conditions: If amenorrhea is a result of an underlying medical condition, such as a thyroid disorder or a pituitary tumor, appropriate medical treatment will be initiated to address the specific condition.
Hyperprolactinaemia is treated by administration of bromocriptine. This is an ergot alkaloid which directly opposes prolactin secretion. Radiotherapy is reserved for those patients who fails to respond to medical therapy.
Surgical Management: Surgical management is rarely required for the treatment of amenorrhea. However, in certain cases, surgery may be necessary to address structural abnormalities or correct anatomical issues contributing to the condition. For example:
Hysteroscopic Surgery: This minimally invasive procedure involves the insertion of a thin, illuminated tube called a hysteroscope through the vagina and cervix to visualize and treat abnormalities within the uterus, such as polyps or adhesions.
I mperforated hymen is treated by incision and drainage. Very large amount of blood may be released, and if the septum is particularly thick, some form of plastic operation may be required.
Surgical Intervention: In some instances, surgical intervention may be essential to correct structural abnormalities in the reproductive organs or to remove tumors or cysts that are interfering with normal menstruation.
Psychological Management: Psychological management plays a crucial role in providing support for women with amenorrhea, as it significantly impacts their emotional well-being. It involves:
Counseling: Offering psychological counseling or referring women to mental health professionals who can assist them in coping with the emotional distress associated with amenorrhea.
Support Groups: Suggesting participation in support groups or facilitating connections with other women who have faced similar challenges to foster a sense of community and validation.
Body Image and Self-esteem: Addressing concerns related to body image and promoting a positive self-image by emphasizing that amenorrhea does not define femininity or a woman’s worth.
DYSMENORRHOEA
Dysmenorrhea is a medical term used to describe painful menstrual cramps that occur just before or during menstruation (the monthly shedding of the uterine lining). OR These are painful menstrual periods.
Nearly 50% of all women have some degree of pain associated with their periods. About 10% are unable to perform their normal activities because of this pain. Dysmenorrhoea can occur at any age, though uncommon in the first 6 months after the onset of menses and relatively uncommon in the years prior to menopause. The most common ages for this problem to occur are in the late teens and early twenties.
Cause
The exact cause of primary dysmenorrhea is not fully understood, but it is believed to be related to the release of certain chemicals called prostaglandins in the uterus. This is due to release of a chemical substance called prostaglandins from the lining cells of the uterus at the time of menstrual period. The prostaglandin causes contractions of the muscle wall of the uterus, that are called menstrual cramps.
Types of dysmenorrhoea
Primary dysmenorrhoea.
This refers to painful menstruation that starts few years after puberty and usually no exact cause can be identified.
Pre-disposing factors
Narrow cervical OS (stenosis) ,which results into tension during contraction of muscles.
Reduced blood supply to the endometrium (ischaemia)
Hormonal imbalance
Retroverted uterus, that is , when the uterus leans backwards resulting into tension.
Psycological or social stress, fear or anxiety
S igns and symptoms
Dysmenorrhea is cyclic with pain most often occurring just before or during the first few days of each period.
Lower abdominal pain (LAP) that varies in severity among individuals, ranging from mild to colicky or crampy, extending to the back, thighs and legs.
Nausea and vomiting
Constipation or diarrhea
Fainting, headache, malaise
Irritability, nervousness, depression
Diagnosis
H istory taking: It is through history taking, ask about the nature of pain, duration and when it occurs. This is often confirmatory.
Physical examination: It is also through physical examination to rule out pelvic tumours, endometriosis which is often absent.
Treatment
Treatment options for dysmenorrhea depend on the severity of symptoms and the underlying cause.
For primary dysmenorrhea, Non steroidal anti inflammatory drugs (NSAIDS) like Iboprufen, mefenamic acid, diclofenac and others. These prevent the formation of prostaglandins in the uterine lining cells. They are more effective if taken before the onset of cramps.
Antispasmodics like Buscopan
Antiemetics like Phenegan for nausea and vomiting.
Heat therapy in the form of a hot water bottle or heating pad applied to the abdomen can also provide relief.
Drugs
Mild analgesics to relieve pain eg ibuprofen 400mg tds.
Oral contraceptives eg COCs. These decrease endometrial proliferation.
Progesterones. Eg dydrogesterone 10mg b.d taken from day 5 of the cycle for 20 days. Mechanism of action is presumably myometrial relaxation.
NOTE
Begin treatment 2 days before menstruation periods begins and continue until 2 days after the period has stopped.
Avoid additive drugs since this treatment is for long period.
Contraceptive drugs like COCs may be given to suppress ovulation and relieve pain. Usually given for 4-6 months and many get permanent relief after this treatment has been stopped.
Dilatation and Curettage (D&C) may be of help to remove necrotic tissue of endometrium, but usually not encouraged since it increases the risk of infections.
Cervical stenosis can be treated by surgical widening of the canal.
Effective counseling is important since pain is usually psychological to avoid drug dependence and abuse.
Delivery or with age will finally treat pain since there will be relaxation of uterine muscles and reduce ischaemia.
Encourage enough rest and sleep as well as exercises, hygiene and good diet.
Other management options may include hypnotherapy and acupuncture.
Secondary dysmenorrhoea
This refers to painful periods which start many years following normal and well established menstrual periods. It is more of pathological occurrence and on investigations the cause is easily established.
Causes
Pelvic inflammatory diseases (PID)
Uterine fibroids. This results into the partial contraction of the uterus resulting into pain.
Endometriosis: This is the growth of the endometrial tissue in other area rather than the uterus.
Endometritis: This is the inflammation of the endometrium.
Signs and symptoms
In addition to signs and symptoms found in primary dysmenorrhoea, there is;
Advertisements
Lower abdominal pain (LAP) usually happens 3-4 days or even a week before menstruation and either pain becomes better or worsens with menstruation.
There may be backache
Signs and symptoms of menorrhagia
Painful coitus
Inability to conceive.
Management
Investigate and treat the cause.
NURSING MANAGEMENT
Nursing diagnosis
Acute pain related to increased uterine contractility evidenced by verbalization of the girl or woman.
Nursing interventions
Warm the abdomen, this causes vasodilation and reduces the spasmodic contractions of the uterus.
Massage the abdominal area that feels pain, this reduces pain due to the stimulus of therapeutic touch.
Perform light exercises ,to blood flow to the uterus and improves muscle tone.
Perform relaxation techniques to reduce pressure to get relaxed.
Administer analgesics as prescribed to block nociceptive receptors
Ineffective individual coping related to emotional stress evidenced by patient’s verbalization.
Nursing interventions
Assess patient’s understanding of the condition. This is because patient’s anxiety of the pain is greatly influenced by knowledge.
Provide an opportunity to discuss how the pain is. Help the patient identify coping mechanisms.
Provide the patient with periods of sleep or rest. Ensures relaxation of the body and mind.
Risk for imbalanced nutrition less than body requirements related to nausea and vomiting.
Nursing interventions
Provide the patient with periods of sleep or rest ,this is to ensure relaxation of the body.
Encourage small frequent feeds. These are easily tolerated by the patient.
Administer anti-emetic drugs like promethazine. This blocks the emetic centres.
Nursing Concerns:
Assessing the severity and characteristics of the pain, including its location, intensity, and duration.
Monitoring vital signs and assessing for any signs of complications or worsening symptoms.
Assessing menstrual patterns, including the duration and heaviness of bleeding.
Evaluating the impact of dysmenorrhea on the patient’s quality of life, emotional well-being, and ability to carry out daily activities.
Assessing for any associated symptoms or complications, such as nausea, vomiting, headaches, or anemia.
Nursing Interventions:
Providing pain management: Administering prescribed pain medications, such as nonsteroidal anti-inflammatory drugs (NSAIDs), as ordered by the healthcare provider. Monitoring the effectiveness of pain relief and reassessing pain levels after medication administration.
Applying heat therapy: Instructing the patient on the use of heat therapy, such as a hot water bottle or heating pad, to relieve pain. Educating the patient on the proper technique and duration of heat application.
Assisting with relaxation techniques: Teaching relaxation techniques, deep breathing exercises, and guided imagery to help the patient manage pain and reduce stress.
Promoting rest and comfort: Encouraging the patient to rest in a comfortable position during painful episodes. Providing supportive pillows, blankets, or cushions to enhance comfort.
Educating the patient about the condition: Providing information about the underlying cause of secondary dysmenorrhea, its management, and treatment options. Answering any questions or concerns the patient may have.
Collaborating with the healthcare team: Communicating and collaborating with the healthcare provider, gynecologist, or other specialists involved in the patient’s care to ensure appropriate management of the underlying condition.
Offering emotional support: Acknowledging and validating the patient’s pain and emotional distress. Providing a supportive environment for the patient to express her feelings and concerns. Referring to counseling or support groups if needed.
MENORRHAGIA
Menorrhagia is a condition characterized by abnormally heavy or prolonged menstrual bleeding. Can be heavy or prolonged menstrual bleeding or both.
Causes
Hormonal imbalances: Fluctuations in estrogen and progesterone levels can disrupt the normal menstrual cycle and lead to excessive bleeding.
Uterine fibroids: These noncancerous growths in the uterus can cause heavy menstrual bleeding.
Adenomyosis: The condition where the inner lining of the uterus (endometrium) grows into the muscular wall of the uterus can result in heavy bleeding.
Polyps: Small, benign growths on the lining of the uterus can contribute to menorrhagia.
Endometrial hyperplasia: Abnormal thickening of the uterine lining can cause heavy bleeding.
Inherited bleeding disorders: Certain inherited conditions, such as von Willebrand’s disease, can lead to excessive bleeding during menstruation.
PID (pelvic inflammatory disease)
Retroverted uterus
Cancers like cancer of the cervix and endometrial cancer
Signs and symptoms
Menstrual bleeding lasting longer than seven days.
Soaking through one or more sanitary pads every hour for several consecutive hours.
Passing large blood clots during menstruation.
Fatigue and tiredness due to excessive blood loss.
Shortness of breath or rapid heart rate caused by anemia.
Feeling lightheaded or dizzy.
Menstrual periods that disrupt daily activities.
Investigations
Complete medical history and physical examination.
Blood tests to assess blood count, iron levels, and hormonal imbalances.
Transvaginal ultrasound to evaluate the structure of the uterus and detect any abnormalities.
Endometrial biopsy to examine a sample of the uterine lining for abnormalities or cancer.
Hysteroscopy, a procedure using a thin, lighted tube inserted into the uterus, to directly visualize the uterine cavity.
Bleeding time to test for coagulopathy
Prothrombin time to test for coagulopathy.
Clotting time to test for availability of platelets.
In the above three tests, results will be abnormal.
Full haemoglobin levels and hormone analysis to rule out hormonal imbalance.
MANAGEMENT
The best management is to investigate and treat the cause
Medical Management of Menorrhagia:
Medications: Nonsteroidal anti-inflammatory drugs (NSAIDs) can help reduce pain and bleeding. Hormonal contraceptives, such as birth control pills or hormonal intrauterine devices (IUDs), can regulate menstrual cycles and decrease bleeding.
Iron supplementation: If anemia is present due to excessive bleeding, iron supplements may be recommended to restore iron levels.
Endometrial ablation: A minimally invasive procedure that destroys the lining of the uterus to reduce menstrual bleeding.
Uterine artery embolization: A procedure in which small particles are injected into the blood vessels supplying the uterus to reduce blood flow and control bleeding.
Nursing management
Symptom management: Assisting patients in managing pain and discomfort during heavy bleeding episodes.
Emotional support: Acknowledging the emotional impact of menorrhagia and providing a safe space for patients to express their concerns.
Education: Providing information on menstrual hygiene, use of sanitary products, and available treatment options.
Lifestyle modifications: Advising patients to maintain a healthy lifestyle, including a balanced diet and regular exercise, to promote overall well-being.
Nursing diagnosis
Ineffective tissue perfusion related to excessive bleeding evidenced by pallor.
Nursing interventions
Assess patient’s vital signs. To obtain baseline data.
Lift the foot of the bed. To allow blood flow to vital centres of the body like brain, kidneys, lungs, heart and liver.
Administer intravenous fluids. To maintain the circulatory volume of fluids.
Administer vitamin k as prescribed to reduce bleeding. Vitamin k activates coagulation factors.
Administer whole blood as prescribed. To maintain circulatory volume of blood.
METRORRHAGIA
Metrorrhagia is a medical term used to describe irregular or abnormal uterine bleeding that occurs between menstrual periods. Can also be defined as cyclic bleeding at normal intervals, the bleeding is either excessive in amount (>80 ml) or duration or both.
This is a symptom of some underlying pathology which may be organic or functional.
Causes
Fibroid uterus
Adenomyosis (A disorder of the glands that secrete cervical mucus and fluids)
Pelvic endometriosis(The presence of endometrium elsewhere than in the lining of the uterus causing premenstrual pain and dysmenorrhea)
Chronic tubo-ovarian mass
Retroverted uterus-due to congestion
Uterine polyp. This is due to vast blood supply to the polyp which makes it bleed easily.
Cervical erosions. This is due to the presence of a wound and an increase in blood supply resulting into bleeding.
Cancer of the cervix or endometrial cancer.
Chronic threatened abortion or incomplete abortion
Retained pieces of placenta. This interferes with contraction of the uterus to seal off blood vessels after birth.
Mole pregnancy. This is due to an abnormal uterine mass which grows after fertilization and is supplied with a lot of blood capillaries resulting into bleeding.
Ovulation bleeding
Short cycles like polymenorrhoea.
Signs and symptoms
Bleeding between menstrual periods.
Irregular menstrual cycles.
Heavier or lighter bleeding than usual during menstrual periods.
Prolonged bleeding that lasts longer than normal.
Pelvic pain or discomfort.
Fatigue or tiredness due to excessive blood loss.
Anemia symptoms, such as shortness of breath, dizziness, or weakness.
Investigations
Medical history and physical examination: A detailed history of menstrual cycles, symptoms, and any relevant medical conditions is obtained. A pelvic examination may be performed to assess the reproductive organs.
Hormone level assessment: Blood tests may be conducted to evaluate hormone levels, including estrogen, progesterone, and thyroid hormones.
Transvaginal ultrasound: This imaging test can provide visualization of the uterus, ovaries, and any structural abnormalities.
Endometrial biopsy: A sample of the uterine lining may be obtained for microscopic evaluation to check for abnormalities or cancer.
Hysteroscopy: A procedure in which a thin, lighted tube is inserted into the uterus to visualize the uterine cavity and detect any abnormalities.
Digital and speculum examination, to visualize the cervix for any abnormality.
Pelvic scan, to visualize pelvic organs and rule out any abnormality.
Management
The best management to investigate and treat the cause.
Medical and Nursing Management of Metrorrhagia:
Hormonal therapy: Depending on the underlying cause, hormonal medications, such as birth control pills or progestin therapy, may be prescribed to regulate the menstrual cycle and reduce abnormal bleeding.
Nonsteroidal anti-inflammatory drugs (NSAIDs): These medications can help manage pain and reduce bleeding during episodes of metrorrhagia.
Treatment of underlying conditions: If metrorrhagia is caused by conditions such as fibroids, polyps, or infections, appropriate treatment strategies will be implemented to address the specific cause.
Surgical interventions: In some cases, surgical procedures may be necessary to remove uterine abnormalities or address the underlying cause of metrorrhagia.
Supportive care: Nursing management focuses on providing emotional support, educating patients about menstrual hygiene and symptom management, and promoting overall well-being.
Monitoring and follow-up: Nurses play a vital role in monitoring patients’ response to treatment, assessing the effectiveness of interventions, and ensuring appropriate follow-up care.
Advertisements
POLYMENORRHOEA/ EPIMENORRHPEA
Polymenorrhea, also known as epimenorrhoea, is a medical condition characterized by frequent menstrual periods that occur more frequently than the normal menstrual cycle. Also refers to menstruation periods that occurs at shorter intervals than usual (14-21 days), but they are frequent and regular.
Causes of Polymenorrhea/Epimenorrhoea:
Hormonal imbalances: Fluctuations in estrogen and progesterone levels can disrupt the normal menstrual cycle and result in more frequent periods.
Thyroid disorders: Overactive thyroid (hyperthyroidism) or underactive thyroid (hypothyroidism) can affect hormone production and menstrual regularity.
Polycystic ovary syndrome (PCOS): This condition is characterized by hormonal imbalances, enlarged ovaries with cysts, and irregular menstrual cycles.
Uterine abnormalities: Conditions such as uterine fibroids, polyps, or adenomyosis can cause abnormal bleeding and frequent periods.
Stress and lifestyle factors: Chronic stress, excessive exercise, drastic weight changes, and poor nutrition can disrupt the hormonal balance and contribute to polymenorrhea.
Signs and Symptoms of Polymenorrhea/Epimenorrhoea:
Menstrual cycles shorter than 21 days.
More frequent periods, with menstrual bleeding occurring every two weeks or less.
Lighter or heavier bleeding than usual.
Increased menstrual discomfort or pain.
Fatigue or tiredness due to frequent blood loss.
Emotional and psychological impact, such as anxiety or mood swings.
Investigations for Polymenorrhea/Epimenorrhoea:
Medical history and physical examination: A thorough evaluation of the menstrual patterns, symptoms, and any underlying medical conditions is conducted. A pelvic examination may be performed to assess the reproductive organs.
Hormone level assessment: Blood tests may be done to measure hormone levels, including estrogen, progesterone, thyroid hormones, and other relevant hormones.
Pelvic ultrasound: This imaging test can provide visual information about the ovaries, uterus, and any structural abnormalities.
Endometrial biopsy: A sample of the uterine lining may be obtained and examined to rule out any abnormalities or cancer.
Medical and Nursing Management of Polymenorrhea/Epimenorrhoea:
Hormonal therapy: Depending on the underlying cause, hormonal medications, such as oral contraceptives or hormone-regulating medications, may be prescribed to regulate the menstrual cycle and reduce the frequency of periods.
Treatment of underlying conditions: If polymenorrhea is caused by conditions such as PCOS or uterine abnormalities, appropriate treatment strategies will be implemented to address the specific cause. Carry out dilatation and curettage (D&C) to remove retained products if its the cause.
Lifestyle modifications: Stress reduction techniques, maintaining a balanced diet, regular exercise, and adequate sleep can help regulate hormonal balance and promote overall well-being.
Supportive care: Nursing management focuses on providing emotional support, educating patients about menstrual hygiene, symptom management, and lifestyle modifications.
Monitoring and follow-up: Monitoring patients’ response to treatment, assessing the effectiveness of interventions, and ensuring appropriate follow-up care should be put into considerations.
DYSFUNCTIONAL UTERINE BLEEDING
Dysfunctional uterine bleeding (DUB) refers to abnormal uterine bleeding that occurs in the absence of organic causes or underlying medical conditions. It is typically characterized by irregular, prolonged, or heavy menstrual bleeding. Can also refers to abnormal bleeding resulting from hormonal changes rather than from trauma, inflammation, pregnancy or a tumour.
Incidence
The prevalence varies widely but an incidence 10% among patients attending the outpatient seems logical. The bleeding may be abnormal in frequency ,amount or duration or combination of both.
Causes
It is due to sustained levels of oestrogen leading to thickening of the endometrium which shed incompletely and irregularly.
Pathophysiology
In most cases, abnormal bleeding is caused by local causes in the endometrium.
However,there is some disturbance of the endometrial blood vessels and capillaries and coagulation of blood in and around these vessels.
These are caused by alteration in the ratio of endometrial prostaglandins which are delicately balanced in hemostasis of menstruation and may be related to incoordination in the hypothalamo-pituitary –ovarian axis.
Signs and Symptoms of Dysfunctional Uterine Bleeding:
Irregular menstrual cycles: Menstrual periods may occur more frequently or infrequently than usual.
Prolonged bleeding: Menstrual bleeding may last longer than the typical duration.
Heavy menstrual bleeding: Excessive or abnormally heavy bleeding during menstrual periods.
Intermenstrual bleeding: Bleeding that occurs between menstrual cycles.
Fatigue or tiredness due to excessive blood loss.
Anemia symptoms: Weakness, lightheadedness, shortness of breath, or pale skin.
NOTE : A diagnosis of dysfunctional uterine bleeding is made only when all other possibilities of causes of bleeding have been excluded.
Investigations
Ultra sound scan to rule out new growth
Blood analysis for hormonal imbalance
Biopsy for histology
MANAGEMENT
Treatment depends on various factors like age, condition of the uterine lining and the woman’s plans regarding pregnancy.
Total hysterectomy is indicated if the woman is over 35 years, uterine lining thickened and contains abnormal cells and she does not want to become pregnant.
When the uterine lining is thickened but contains normal cells, heavy bleeding may be treated with high dose of oral contraceptive oestrogen and progestin(COC) or oestrogen alone usually intravenously, then followed by a progestin given by mouth. Bleeding generally stops within 12-24 hours and then low doses of oral contraceptives may be given in usual manner for atleast 3 months.
Women who have lighter bleeding may be given low doses from the start.
If a woman has contraindications to oestrogen containing drug, progestin only pills may be given by mouth for 10-14 days each month.
D&C may be used if response or hormonal therapy proves ineffective.
If a woman wants to become pregnant, clomiphene drug may be given orally to induce ovulation.
ENDOMETRIOSIS
Endometriosis is a chronic and often painful condition in which tissue similar to the lining of the uterus, called the endometrium, grows outside the uterus. This abnormal tissue growth can occur in various areas of the reproductive system, such as the ovaries, fallopian tubes, and pelvic lining.
Can also refer to growth or presence of endometrial tissue outside the uterus. It may be referred to as a misplaced endometrial tissue.
Incidence
10-15% of women between 25 and 45 years. 25-50% in infertile women.
Common sites that may be affected
Abdominal organs, ovaries, ligaments, intestines, ureters, urinary bladder, vagina, vulva, naval, lungs, nose, conjunctiva and rarely on normal skin.
Cause
The actual cause is not known. But has the following predisposing factors.
Retrograde menstruation: One possible cause is the backward flow of menstrual blood into the fallopian tubes and pelvic cavity, allowing endometrial tissue to implant and grow outside the uterus.
Hormonal imbalance: Estrogen may play a role in promoting the growth of endometrial tissue outside the uterus.
Genetic factors: Having a close relative with endometriosis increases the risk of developing the condition.
Immune system dysfunction: A weakened immune response may allow the abnormal growth and survival of endometrial tissue outside the uterus.
Environmental factors: Exposure to certain chemicals and toxins may contribute to the development of endometriosis.
Surgery involving the uterus like C/S, D&C.
Too late prime para (over 30 years)
Genetic makeup (tend to run in families) especially first degree relatives like mother, sister, daughter.
Race-common in Caucasians
Abnormal uterus like retroverted uterus
Signs and symptoms
Some are asymptomatic
Lower abdominal pain
Irregular periods like spotting before periods
Infertility
Painful coitus (dyspareunia)
Pain during bowel opening
Rectal bleeding during menstruation. This is due to the presence of endometrial tissue in the rectum.
Bleeding from the site during menstruation
Palpable mass (endometrioma)
Adhesions
Diagnosis / investigations
Presence of endometrial tissue in the site after microscopic examinations confirms the disease (biopsy)
To view the tubes and ovaries for the presence of endometrial tissue.
Ultra sound scan. To visualize pelvic organs for any abnormality.
Barium enema with x-ray. To locate the site of the tissue.
Computerized Tomography (CT ) scan. To visualize the tissue.
Magnetic Resonance Imaging (MRI ).
Blood for marker cell (CA-125 ) and antibodies to endometrial tissue.
Medical history and symptom assessment: The healthcare provider will discuss the patient’s symptoms, menstrual patterns, and medical history.
Pelvic examination: A pelvic exam may be performed to check for abnormalities or areas of tenderness.
Imaging tests: Transvaginal ultrasound or MRI may be used to visualize the pelvic organs and detect the presence of endometrial growths.
Laparoscopy: This minimally invasive surgical procedure allows for direct visualization and biopsy of the abnormal tissue, confirming the diagnosis of endometriosis.
Nursing, Medical, and Surgical Management of Endometriosis:
Pain management: Provide education on pain management strategies, including the use of over-the-counter pain relievers or prescribed medications.
Hormonal therapy: Medications such as birth control pills, hormonal patches, or progestin-only therapies may be prescribed to regulate the menstrual cycle and reduce symptoms.
Drugs that suppress the activity of ovaries and slow the growth of endometrial tissue like COCs, progestin and GnRH agonists.
Surgical intervention: In cases of severe pain or infertility, laparoscopic surgery may be performed to remove or destroy endometrial growths. Surgical intervention is primarily to remove as much of the misplaced endometrium tissue as possible
Combination of drugs and surgery or Total hysterectomy when all other treatments fail.
Fertility treatments: Assisted reproductive technologies, such as in vitro fertilization (IVF), may be recommended for individuals experiencing infertility due to endometriosis.
Supportive care: Provide emotional support, educate patients about the condition, and help individuals cope with the physical and emotional challenges associated with endometriosis.
Complications of Endometriosis:
Infertility: Endometriosis can affect fertility by causing scarring, adhesions, and structural abnormalities in the reproductive organs.
Ovarian cysts: Endometriomas, also known as ”chocolate cysts,” can form on the ovaries and may require surgical removal.
Adhesions: Endometriosis can lead to the formation of scar tissue, causing organs and tissues to stick together.
Chronic pain: Severe and persistent pelvic pain can significantly impact a person’s quality of life.
Gynaecology is a branch of medicine which deals with diseases of the female reproductive systems.
OVERVIEW OF ANATOMY AND PHYSIOLOGY OF THE FEMALE REPRODUCTIVE SYSTEM
The female reproductive system is composed of the external genitalia, internal genitalia and the mammary glands.
EXTERNAL GENITALIA
The female external genitalia, also known as the vulva, is a complex structure comprising several distinct parts, each with its unique functions and characteristics:
Mons Pubis: The mons pubis is a rounded, fatty region located over the pubic bone. It becomes covered with hair after puberty and acts as a cushion during sexual intercourse.
Labia Majora: These are two prominent, fatty skin folds that extend from the mons pubis to the perineum. They protect the delicate structures within and typically become thinner with age or after childbirth.
Labia Minora: These are smaller, thinner, and more pigmented skin folds situated inside the labia majora. They encircle the vaginal and urethral openings and contain numerous sweat and oil glands. The labia minora are composed of erectile tissue, which becomes engorged during sexual arousal, and they are highly sensitive to touch.
Clitoris: This is a highly sensitive and erectile organ located at the top of the vulva, partially hidden beneath the upper junction of the labia minora. It is analogous to the male penis and is a central focus of sexual response, becoming swollen with blood and sensitive to stimulation during sexual arousal.
Vestibule: The vestibule is a space or cleft enclosed by the labia minora. It contains the openings to the urethra (the tube that allows urine to exit the body) and the vagina.
Vaginal Opening (Introitus): This is the entrance to the vagina, located within the vestibule. In many women, this opening is partially closed by a membrane called the hymen.
Advertisements
Functions of the Vulva
Protection: The labia majora act as a protective barrier for the internal reproductive organs, helping to shield them from injury and infection.
Sexual Arousal: The clitoris and the highly sensitive nerve endings in the labia minora play a crucial role in sexual arousal and pleasure.
Reproduction: The vaginal opening allows for sexual intercourse and serves as the birth canal during childbirth.
Urination: The urethral opening within the vestibule allows for the passage of urine from the bladder to the outside of the body.
Secretion: The vulva contains numerous sweat and oil glands that secrete fluids to keep the area moist and lubricated.
Childbirth: During childbirth, the vulva and vaginal opening stretch to accommodate the passage of the baby.
INTERNAL GENITALIA
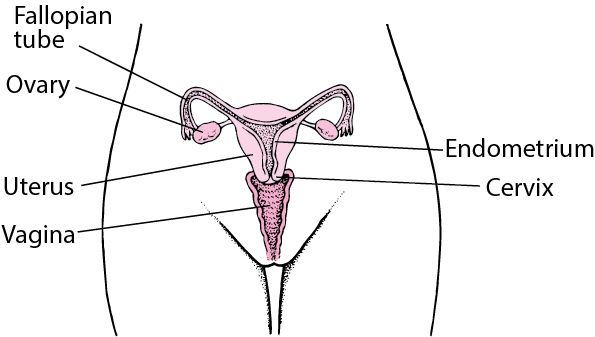
The internal reproductive system comprises the vagina, cervix, uterus, fallopian tubes, and ovaries, all situated within the pelvic region.
Vagina: The vagina is a fibro-muscular tube extending from the vulva’s vestibule to the cervix. Approximately 10 cm in length, it can extend further during childbirth. The vaginal mucous membranes secrete fluids that cleanse and maintain an acidic environment. The hymen may cover the vaginal opening, typically breaking during the first penetrative sexual encounter.
Functions of the Vagina:
Allows the exit of blood and fluids during menstruation.
Serves as a passage for sperm to the fallopian tubes.
Receives the penis and sperm during sexual intercourse.
Provides the pathway for the fetus during vaginal delivery.
Cervix: The cervix, the most inferior part of the uterus, extends into the vaginal canal. It connects the uterus to the vagina, facilitating the passage of menstrual contents, sperm, and the baby during childbirth.
Advertisements
The cervix has two main portions:
The ectocervix (visible during gynecologic examination) and
The endocervix (a tunnel through the cervix leading to the uterus).
During Childbirth: The cervix undergoes changes, becoming soft and dilating to accommodate the fetus. Cervical dilation is indicative of labor initiation.
Uterus: A pear-shaped organ, the uterus lies posterior-superior to the bladder and anterior to the rectum in the female pelvis. It consists of the fundus (top), body (middle), and cervix (lower). The uterus is composed of the endometrium (inner mucosal lining), myometrium (smooth muscular middle layer), and perimetrium.
Functions of the Uterus:
Responsible for menstruation as the endometrium sheds during each monthly period.
The endometrial cavity accommodates the fetus during pregnancy.
Uterine muscles facilitate contractions during labor, enabling the expulsion of the infant through the birth canal.
Fallopian Tubes: Also known as oviducts or salpinges, fallopian tubes measure approximately 10 cm and extend from the uterine fundus to the pelvic wall. They consist of the infundibulum (with fimbriae near the ovary), ampullary region, isthmus (narrowest part linking to the uterus), and interstitial part traversing the uterine musculature.
Functions of the Fallopian Tubes:
Facilitate sperm movement using tubal cilia and transport the ovum from the ovaries to the uterus.
Provide a site for fertilization and guide the zygote to the uterus for implantation.
Supply nutrients to the fertilized ovum during its journey to the uterus.
Ovaries: Two glands on each side of the uterus, ovaries are attached to the uterus by the ovarian ligament and the pelvic wall by the suspensory ligament. Covered by the mesovarium (part of the broad ligament), the ovary’s size varies with age and menstrual cycle stage.
Advertisements
Ovarian Functions:
Produce ova and female sex hormones—predominantly estrogen and progesterone.
Oestrogen promotes the development of secondary sex characteristics, growth, and maturity of reproductive organs.
Progesterone prepares the endometrium for pregnancy, aids in placental development, breast enlargement during pregnancy, and inhibits ovum production during gestation.
Together, estrogen and progesterone regulate menstrual cycle changes in the endometrium.
COMMON TERMS IN GYNAECOLOGY
Menarche: Menarche refers to the first menstrual period and is considered the first sign of puberty and may be the first sign of the possibility of fertility. The average age of menarche usually ranges from 12-13 years.
Precocious puberty: This is the onset of menstruation before the age of 8 years in girls or 9 years in boys. This is an abnormality which requires investigation.
Menorrhagia: Menorrhagia is an excessive amount or prolonged bleeding during the woman’s menstrual period. Blood loss is usually greater than 80 ml per menstrual cycle. It is common during adolescence and perimenopausal. Menorrhagia can be caused by abnormal blood clotting, disruption of normal hormonal regulation of periods, or disorders of the endometrium.
Oligomenorhoea: Oligomenorhoea defines the occurrence of very light or infrequent menstrual periods usually at intervals of more than 35 days.
Post coital bleeding: Post coital bleeding is defined as vaginal bleeding that occurs after sexual intercourse.
COMMON CAUSES OF GYNECOLOGICAL ISSUES
1. Congenital Abnormalities:
Absence of Vagina, Ovaries, Uterus, or Uterine Division.
Structural anomalies present at birth impacting reproductive organs.
2. Environmental Factors:
Physical and Mental Well-being: Stress and anxiety may contribute to menstrual irregularities or the absence of menstruation.
Lifestyle Choices: Unhealthy habits, sedentary lifestyle, or exposure to environmental toxins can affect reproductive health.
Advertisements
3. Pathological Agents:
Infections: Entry of pathogenic microorganisms can result in various infections.
Vaginitis
Vulvitis
Other inflammatory conditions impacting the reproductive system.
4. Trauma:
Instrumental Trauma: Injuries caused by medical instruments during procedures, potentially leading to complications such as fistula.
Accidental Trauma: Physical injuries impacting the genital organs due to accidents or trauma.
5. Hormonal Imbalances:
Endocrine Disorders: Conditions affecting hormone production and regulation.
Nursing Care Management: Answering Questions with Confidence
As nurses prepare for nursing exams, it is important to develop effective strategies for answering questions related to nursing care management. Nursing exams often include questions that require nurses to demonstrate their knowledge of nursing considerations, Nursing concerns, Nursing issues, and Nursing interventions.
In this post, we will expand into each of these areas and provide detailed explanations and examples of how to approach and answer these types of questions with confidence.
Nursing Considerations
Master the critical factors nurses must prioritize to ensure patient safety and effective treatment outcomes.
In Simple Terms:
Considerations are all the important things you must think about before and during a procedure to make sure the patient is safe and the treatment is effective.
In nursing, considerations refer to the factors that nurses must take into account when providing care to their patients. These considerations encompass various aspects, including patient assessment, specific health conditions, treatments, interventions, and potential complications. By considering these factors, nurses can tailor their care plans and interventions to meet the unique needs of each patient.
❓
Question Approach: NURSING CONSIDERATIONS
“What are ten nursing considerations when applying Plaster of Paris on a limb?”
Simulated Examination Script
To effectively answer this question, we need to identify and describe ten essential nursing considerations when applying Plaster of Paris on a limb. Let’s explore each consideration in detail:
1. Assessment of Limb Condition:
Before applying plaster of Paris, assess the condition of the limb thoroughly. This assessment includes evaluating skin integrity, checking for any open wounds or infections, and assessing neurovascular status.
2. Proper Positioning:
Proper positioning is essential to ensure accurate application and alignment of the plaster. Assist the patient in a comfortable position that allows easy access to the limb and facilitates proper molding.
3. Skin Preparation:
Preparing the skin before applying plaster of Paris is crucial to prevent skin complications. Clean the skin thoroughly, remove any hair, and ensure it is dry before applying the plaster.
4. Education and Informed Consent:
Provide education to the patient and their family about the plaster application process, including the expected duration, care instructions, and potential complications. Obtaining informed consent is also a vital nursing consideration.
5. Selection and Preparation of Materials:
Select the appropriate plaster of Paris materials and prepare them according to the manufacturer’s instructions. This involves measuring and cutting the plaster strips to the required length and immersing them in water.
6. Proper Application Technique:
Applying plaster of Paris requires proper technique to ensure a secure and well-fitting cast. Apply the wet plaster strips smoothly and evenly, avoiding wrinkles or excessive pressure that could compromise circulation.
7. Patient Comfort and Pain Management:
During the plaster application process, continuously assess the patient’s comfort and manage any associated pain. This may involve administering analgesics as prescribed, providing positioning support, and offering emotional support.
8. Monitoring Neurovascular Status:
Closely monitor the neurovascular status of the limb after applying the plaster. This includes assessing for signs of impaired circulation, such as changes in color, temperature, sensation, and capillary refill time.
9. Prevention of Complications:
To prevent complications, educate the patient and their family about proper care techniques, such as keeping the cast dry, avoiding putting weight on the cast, and recognizing signs of infection or circulation problems.
10. Follow-Up and Evaluation:
After applying the plaster of Paris, schedule appropriate follow-up appointments to monitor the limb’s progress, assess the cast’s integrity, and ensure proper healing. Regular evaluation is essential to detect any complications early and provide timely interventions.
Nursing Concerns
Learn how to identify and prioritize the "warning lights" of patient care to prevent complications and ensure clinical excellence.
In Simple Terms:
Concerns are the potential problems or dangers you worry might happen to your patient because of their condition. They are like "warning lights" you need to watch for.
Nursing concerns refer to the specific areas of attention or any issues or problems that a nurse recognizes or identifies as something that has potential impact on the health of the patient. These concerns include the actual problems, potential risks, complications, and specific care needs associated with the patient’s health condition. Understanding nursing concerns allows nurses to provide holistic and patient-centered care.
Have you ever wondered what nurses are thinking about when they’re caring for a patient? It’s not just about administering medication and taking vital signs. Nurses are constantly on the lookout for potential problems, known as nursing concerns, that could impact a patient’s health.
❓
Question Approach: NURSING CONCERNS
“Explain five nursing concerns to address when caring for a patient with trigeminal neuralgia?”
Simulated Examination Script
Answer: A nurse would be concerned about:
Risk for Injury:
The pain might make it difficult for the patient to move around safely, increasing the chance of falls.
Impaired Oral Intake:
Eating and drinking can become painful, leading to malnutrition and dehydration.
Ineffective Coping:
Chronic pain can cause anxiety, depression, and social isolation.
Noncompliance with Medication Regimen:
The patient may be hesitant to take medications due to side effects or fear of addiction.
Risk for Adverse Drug Reactions:
Certain medications used to treat trigeminal neuralgia can have serious side effects.
Risk for Social Isolation:
The pain and discomfort can make it difficult for the patient to participate in social activities.
Risk for Impaired Skin Integrity:
The patient may have difficulty maintaining oral hygiene due to pain, leading to skin breakdown.
Nursing Issues
Understand the practical, everyday challenges in patient care and how to navigate them effectively in a clinical setting.
In Simple Terms:
Issues are the real, practical challenges you have to actively solve every day when caring for a patient, especially one with a long-term illness.
Nursing issues refer to the specific challenges or problems that nurses may encounter when managing patients with certain health conditions. These issues encompass the physical, emotional, and social aspects that can impact patient care and require nursing interventions. Understanding nursing issues allows nurses to anticipate and address potential difficulties in providing holistic care.
❓
Question Approach: NURSING ISSUES
“Outline five nursing issues of a patient with Parkinson’s disease?“
Simulated Examination Script
To effectively answer this question, we need to outline five nursing issues encountered when managing a patient with Parkinson’s disease. Let’s explore each issue in detail:
1. Mobility and Gait Disturbances:
Parkinson’s disease often presents with mobility and gait disturbances, including bradykinesia, rigidity, and postural instability. Assess and address these issues by implementing interventions such as physical therapy, assistive devices, and fall prevention strategies.
2. Medication Management:
Patients with Parkinson’s disease require complex medication categories to manage their symptoms. Educate patients and caregivers about the medications, their dosages, possible side effects, and the importance of adherence.
3. Psychosocial Support:
Parkinson’s disease can significantly impact a patient’s mental and emotional well-being. Provide psychosocial support by addressing concerns, facilitating support groups, and connecting patients and caregivers with resources for counseling or therapy.
4. Communication Difficulties:
As the disease progresses, patients with Parkinson’s disease may experience speech and swallowing difficulties. Employ alternative communication methods, such as augmentative and alternative communication devices, to facilitate effective communication.
5. Nutrition and Swallowing:
Impaired swallowing, known as dysphagia, is a common issue in Parkinson’s disease. Collaborate with dieticians and speech therapists to develop appropriate dietary modifications and swallowing techniques to ensure adequate nutrition and prevent aspiration.
Nursing Interventions
Master the "doing" part of nursing. Learn specific clinical actions to promote health, prevent complications, and deliver evidence-based care.
In Simple Terms:
Interventions are the specific actions you take—the "doing" part of nursing—to help your patient, prevent problems, and promote their well-being.
Nursing interventions refer to the actions and activities that nurses perform to promote health, prevent complications, and manage patient care. These interventions encompass a wide range of activities, including assessment, education, medication administration, wound care, and emotional support. Understanding nursing interventions allows nurses to deliver effective and evidence-based care to their patients.
❓
Question Approach: NURSING INTERVENTIONS
“Explain six nursing interventions performed during the care of a patient with a tracheostomy tube?“
Simulated Examination Script
To effectively answer this question, we need to explain six nursing interventions performed during the care of a patient with a tracheostomy tube. Let’s explore each intervention in detail:
1. Tracheostomy Tube Care and Suctioning:
Perform regular tracheostomy tube care, including cleaning and suctioning to maintain airway patency and prevent infection. This involves sterile techniques, monitoring secretion consistency, and assessing for any signs of complications.
2. Humidification and Hydration:
Patients with a tracheostomy tube often require humidification to maintain proper airway moisture. Ensure adequate humidification and hydration to prevent mucus plugs and support optimal respiratory function.
3. Communication Support:
Patients with a tracheostomy tube may face communication challenges. You should provide alternative communication methods, such as communication boards, pen and a paper or electronic devices, to facilitate effective interaction and alleviate patient frustration.
4. Skin and Stoma Care:
Assess and care for the tracheostomy site to prevent infection and skin breakdown. This involves regular cleaning, monitoring for redness or irritation, and applying appropriate dressings or barriers.
5. Mobilization and Positioning:
Proper positioning is crucial for patients with a tracheostomy tube to ensure optimal ventilation and prevent complications. Assist with positioning changes, mobilization, and providing appropriate support and stability during transfers or ambulation.
6. Education and Support:
Provide comprehensive education to patients and caregivers regarding tracheostomy tube care, emergency management, signs of complications, and home care instructions. Emotional support and counseling are also essential to help patients and their families adapt to the lifestyle changes associated with a tracheostomy.
In conclusion, we have covered the question approach for each category, providing detailed explanations and examples. By considering nursing considerations, addressing nursing concerns, understanding nursing issues, and implementing nursing interventions, nurses can excel in their nursing exams and deliver high-quality care to their patients.
A comprehensive guide on how to interpret and answer UNMEB question types: EXPLAIN, OUTLINE, DESCRIBE, MENTION, IDENTIFY, STATE, LIST, WHAT, and GIVE.
This guide explores specific nursing interventions, considerations, concerns, and issues frequently tested in professional medical exams.
EX
The EXPLAIN Approach
In Simple Terms:
"Explain" means to give details and reasons. You need to show *how* or *why* something happens, not just what it is.
1
Understand the question: Carefully read and identify the main concept. Pay attention to specific instructions.
2
Organize your response: Create a mental map. Start with a concise introduction, context, and clear thesis.
3
Provide thorough explanation: Elaborate using clear language. Use nursing terminology and case studies.
Simulated Examination Sheet
Qn: Explain the pathophysiology of diabetes mellitus and its effects on the body.
Diabetes mellitus is a chronic metabolic disorder characterized by high blood
glucose levels due to impaired insulin secretion, insulin action, or both. The
pathophysiology of diabetes involves multiple factors that contribute to the
development and progression of the disease.
Firstly, in type 1 diabetes, an autoimmune process leads to the destruction of
insulin-producing beta cells in the pancreas. This results in a deficiency of
insulin and requires external insulin administration. On the other hand, type 2
diabetes is primarily characterized by insulin resistance, where the body’s
cells become less responsive to insulin.
Insulin is a hormone produced by the beta cells of the pancreas, and its main
function is to regulate glucose metabolism. In diabetes, the lack of insulin or
the body’s inability to use it effectively leads to hyperglycemia. Persistently
high blood glucose levels can have detrimental effects on various organs and
systems in the body.
The effects of diabetes on the body are many. It can lead to macrovascular
complications, such as cardiovascular disease, stroke, and peripheral vascular
disease. Also, microvascular complications may arise, affecting small blood
vessels in the eyes, kidneys, and nerves. Diabetes can also increase the risk of
infections, slow wound healing, and cause diabetic neuropathy and
nephropathy
OU
The OUTLINE Approach
In Simple Terms:
"Outline" means to create a structured summary. Use main headings and sub-points to show parts in an organized way.
1
Analyze the question: Identify main components that need to be outlined.
2
Organize your response: Identify main headings and arrange them in a coherent order.
3
Provide detailed information: Use concise and informative language under each heading. JUMP A LINE, UHPAB HAS VERY MANY BOOKLETS
Simulated Examination Sheet
Qn: Outline the steps involved in the nursing process.
1. Assessment:
Gather relevant patient data, including physical, psychological, social, and
cultural aspects. Perform a comprehensive health history and physical
examination. Utilize assessment tools and techniques to collect objective and
subjective data. Document and organize the collected data systematically.
2. Diagnosis:
Analyze the assessment data to identify health problems, risks, or potential
complications. Formulate nursing diagnoses based on the identified issues.
Ensure that the diagnoses are accurate, concise, and specific.
Collaborate with other healthcare professionals when necessary.
3. Planning:
Establish patient-centered goals and outcomes in collaboration with the patient.
Develop a nursing care plan that includes evidence-based interventions and
strategies. Prioritize nursing actions based on the urgency and importance of each
goal. Ensure that the care plan is feasible, realistic, and adaptable.
4. Implementation:
Execute the planned nursing interventions effectively and efficiently.
Provide safe and compassionate care while considering the patient's preferences.
Document the implementation process and any modifications made. Collaborate with
the interdisciplinary healthcare team to deliver comprehensive care.
5. Evaluation:
Assess the patient's response to the nursing interventions and the achievement
of goals. Compare the actual outcomes with the expected outcomes. Modify the
care plan if needed based on the evaluation findings. Document the evaluation
results and communicate them to the healthcare team.
DE
The DESCRIBE Approach
In Simple Terms:
"Describe" means to paint a picture with words. Give a detailed account of characteristics or features. Describe usually likes STEPS in order, even using IMAGES where applicable!
1
Understand the question: Identify the main topic that needs characterization.
2
Provide comprehensive description: Offer thorough details, features, or components.
3
Use terminology: Accurately describe concepts to demonstrate knowledge.
Simulated Examination Sheet
Qn: Describe the stages of wound healing.
1. Hemostasis:
This initial stage begins immediately after the injury occurs.Blood vessels constrict to reduce blood flow and prevent excessive bleeding.
Platelets aggregate to form a temporary clot. The clotting process releases various
growth factors and cytokines, initiating the subsequent stages of healing.
2. Inflammatory phase:
This phase typically lasts for 2-3 days.Inflammation occurs as a response to tissue injury. Vasodilation and increased
vascular permeability allow immune cells to migrate to the wound site. Neutrophils
arrive first to eliminate debris and prevent infection. Macrophages then remove dead
tissue and release additional growth factors to stimulate healing.
3. Proliferative phase:
This phase generally occurs between days 3 and 20.New blood vessels form to supply oxygen and nutrients to the wound. Fibroblasts
produce collagen, which provides structural support for wound healing. Epithelial
cells migrate from the wound edges to resurface the wound. Granulation tissue
forms, consisting of new blood vessels, fibroblasts, and extracellular matrix.
4. Maturation phase:
This final phase can last for several months to years.Collagen fibers reorganize and remodel, increasing the wound's tensile strength. Scar
tissue forms, but it may not possess the same strength and flexibility as the original
tissue. The scar gradually becomes more refined and fades over time.
ST
MENTION / IDENTIFY / STATE
In Simple Terms:
These words mean "give a short, direct answer." Just name the facts without extra explanation.
1
Identify facts: Read and identify the specific information required.
2
Direct response: Offer a concise response. Avoid unnecessary elaboration.
Simulated Examination Sheet
Qn: State the types of delusions.
Grandiose delusions; the patient believes s/he is somebody great /important
,knowledgeable or powerful contrary to the social cultural ,religious background
and experiences.
Delusion of guilty and worthlessness; the patient believes s/he is not worth to
live even though there’s nothing to justify this belief.
Delusions of jealousy; the patient believes that spouse/partner is being
unfaithful even when there is no evidence to suggest so.
Delusion of persecution: the patient believes they’re being deliberately wronged,
conspired or harmed by another person or agency even when there’s no evidence
to suggest so.
Religious delusions; the individual believes he or she has a special link with God
that is out keeping with people of the same religious belief.
Delusions of control, influence or phenomenon; these are three types; belief
that the person performs activities as a result of an extreme force.
LI
The LIST Approach
In Simple Terms:
"List" means to present points one after another, usually with a short description for each.
1
Identify factors: Carefully identify the elements that need to be listed.
2
Organize: Present items in a logical order using bullet points.
Simulated Examination Sheet
Qn: List the risk factors for cardiovascular disease.
- Hypertension: increases strain on heart.
- Smoking: damages blood vessels.
- Obesity: increases risk of diabetes.
- Sedentary lifestyle: contributes to obesity.
WH
The WHAT Approach
In Simple Terms:
"What" asks for a definition. Give a clear, simple explanation of the term or concept.
1
Identify term: Pinpoint the specific procedure or concept to define.
2
Clear explanation: Offer a concise definition using simple language.
Simulated Examination Sheet
Qn: What is sepsis?
Sepsis is a potentially life-threatening condition that occurs when the body’s response to an infection becomes unregulated, leading to widespread inflammation and organ dysfunction.
Foundational Physiology: What You Must Know Before Exams
Before memorizing the steps of a dressing or a bandage, you must understand the underlying physiology of tissue repair and vascular dynamics. Nursing is not just completing tasks; it is applied physiology. If you understand why a wound heals or how a bone dies from lack of blood, the procedures will make perfect logical sense.
The 4 Phases of Wound Healing
Every wound, from a tiny paper cut to a massive surgical incision, heals through four distinct, overlapping phases. Aseptic dressing techniques are designed to protect these fragile stages:
Hemostasis (Minutes): Blood vessels constrict, and platelets aggregate to form a fibrin clot to stop bleeding.
Inflammation (Days 1-4): White blood cells (neutrophils and macrophages) flood the area to eat dead tissue and kill bacteria. The wound is red, warm, and swollen.
Proliferation (Days 4-21): New blood vessels form (angiogenesis), and fibroblasts lay down collagen. Bright red, bumpy Granulation Tissue fills the wound bed. (Rough bandaging or peeling off a dry dressing rips this new, fragile tissue away!)
Maturation/Remodeling (Months to Years): Collagen cross-links and strengthens, forming a scar.
Venous Return & Bandaging
Veins have one-way valves to push blood back to the heart against gravity. When you bandage a limb, you must always bandage from below, upwards (distal to proximal). This physically squeezes the blood back toward the heart. If you bandage downwards, you trap blood in the extremity, causing massive, painful swelling.
Principles of Asepsis
The skin is heavily colonized with normal flora (like Staphylococcus epidermidis). When the skin breaks, these bacteria become deadly pathogens. Aseptic technique utilizes a strict clean-to-dirty workflow to ensure that zero bacteria are pushed from the outside skin into the sterile wound bed.
Part A: Wound Dressing
A1. Theory — Wound Dressing
Definition
A Dressing is a sterile pad or compress applied directly to a wound to promote healing, protect it, and/or absorb exudate (fluids).
Wound Dressing is the systematic, aseptic procedure of cleaning a wound and applying a sterile covering using strict sterile technique and sterile equipment.
Purposes / Indications of Wound Dressing
Why do we dress wounds? As a nurse, you must know these indications for your OSCEs:
To protect the wound from further mechanical injury or external bacterial infection.
To absorb exudates such as pus, blood, or serum (preventing the skin from macerating).
To immobilise and support the injured part, reducing pain.
To apply pressure on the wound to control bleeding (hemostasis) or to approximate (bring together) the wound edges.
To provide psychological and physical comfort for the patient (hiding a severe, traumatic wound drastically reduces patient anxiety).
To keep the wound environment moist for optimal healing (dry cells die!) and to allow for regular inspection/monitoring of the wound bed.
Types of Wounds that Need Dressing
Surgical wounds: Sutured incisions directly from the operating theatre. These are usually clean, primary-intention wounds.
Traumatic wounds: Abrasions, lacerations, and deep punctures from accidents (high risk for tetanus and gross contamination).
Infected wounds: Wounds actively discharging foul-smelling fluids or pus ("dirty wounds").
Burn wounds: Requiring highly specialized, sterile, non-adherent care to prevent peeling off massive sheets of skin.
Chronic wounds: Pressure sores (bedsores from ischemia), diabetic foot ulcers (neuropathy), and venous leg ulcers.
Types of Dressings Used
Type of Dressing
Clinical Description & Specific Use
Dry sterile dressings (Gauze)
Basic sterile woven/non-woven gauze. Used primarily for covering clean, dry, sutured surgical wounds.
Non-adherent dressings
Dressings treated with petroleum jelly (e.g., Paraffin gauze / Jelonet). They do not stick to the raw, weeping wound surface, making removal completely painless. Ideal for burns, grazes, and fragile skin grafts.
Wet-to-dry dressings
Saline-moistened gauze is packed deep into a dirty wound. As the gauze dries, it physically binds to dead, necrotic tissue. When pulled out, it mechanically debrides (rips out) the dead tissue. Used exclusively for dirty/sloughy wounds.
Occlusive / Semi-permeable films
Clear, waterproof polyurethane films (e.g., Tegaderm). They keep the wound moist while allowing oxygen/carbon dioxide gas exchange. Perfect for protecting IV insertion sites and superficial minor burns.
Hydrocolloid / Alginate / Foam
Advanced modern dressings. Alginates (derived from seaweed) can absorb up to 20x their weight in extremely heavy exudate. Hydrocolloids turn into a soothing gel to promote rapid granulation tissue growth.
Principles of Aseptic Technique
Aseptic technique is the absolute foundation of wound care. The core principles are to:
Prevent cross-infection (spreading nosocomial germs like MRSA from one patient to another) and wound sepsis.
Protect both the patient and the nurse by following Universal Precautions (treating all blood/body fluids as potentially infectious for HIV, Hepatitis B, and C).
Ensure that ONLY sterile articles touch the wound bed.
Maintain a strict clean-to-dirty workflow, performing rigorous hand hygiene before and after the procedure.
Pre-Procedure Wound Assessment
Before you clean a wound, you must scientifically observe and document its status:
Anatomy: Site, exact size (length x width), depth, and shape of the wound.
Exudate: Type and amount of discharge: Serous (clear fluid), Sanguineous (fresh blood), Serosanguineous (pinkish), or Purulent (thick, foul-smelling pus).
Wound Edges: Are they approximated (closed nicely) or gaping open? Check the integrity of any stitches, clips, or surgical drains.
Signs of Infection: Redness (erythema), heat, localized swelling, severe pain out of proportion, fever, or dangerous red streaks tracking up the limb (lymphangitis).
Periwound: The condition of the surrounding skin (is it macerated/soggy?) and the patient's general systemic vital signs.
💡 The Dangers of Poor Dressing Technique:
If a nurse is sloppy with asepsis or aggressive with cleaning, it leads to severe wound sepsis, system-wide bacteremia, drastically delayed healing, wound dehiscence (a horrific complication where a surgical wound bursts completely open), excessive bleeding, or the destruction of fragile new granulation tissue from rough handling. Always respect the sterile field!
A2. Procedure: 7.3 Dressing of Wounds
OSCE EXAM PROCEDURE: 7.3
Examiner Objectives:
1. Mention the indications for wound dressing.
2. Mention the general rules of wound dressing.
3. Identify requirements for wound dressing.
4. Prepare requirements for wound dressing.
5. Perform the wound dressing flawlessly.
General Rules for Wound Dressing (Crucial for Exams)
No.
Clinical Rule
Physiological Rationale
1.
All bed making, mopping of the floor and dusting must be finished at least one hour before the dressing round is started.
To prevent the spread of infections (allows airborne dust and aerosolized bacteria to settle completely).
2.
Before the dressing round, wash the trolley thoroughly with soap and water and dry it.
Mechanical removal of gross organic matter.
3.
Before each individual dressing, wipe the trolley shelves with a potent disinfectant using a moppar.
Chemical destruction of remaining pathogens.
4.
Sterile articles are placed strictly on the TOP shelf; un-sterile articles on the BOTTOM shelf.
Prevents accidental contamination from unsterile items dropping onto sterile ones.
5.
Clean, uninfected wounds are ALWAYS dressed first.
Prevents tracking deadly bacteria from dirty wounds into clean surgical wounds.
6.
Limit movements in the ward; windows/fans near the patient being dressed must be closed.
To prevent drafts from blowing cross-infectious pathogens onto the sterile field.
7.
Do not carry out dressing when having a focal wound or droplet infection (e.g., a cold/flu).
Protects the highly vulnerable patient from the nurse's pathogens.
8.
If possible, 2 nurses should be available to carry out the dressing.
One "clean" nurse handles the patient; one "sterile" nurse handles the instruments. Prevents contamination and saves time.
9.
Apply universal infection prevention and control before and after each procedure.
Standard protocol to prevent the spread of bloodborne infections.
10.
Nails must be cut short; watches and rings MUST be removed.
Jewelry harbors immense colonies of bacteria and tears sterile gloves.
11.
Masks are worn if required. Once in position, they must not be touched. • When removing, handle only the tapes and dispose immediately. • NEVER put a used mask in a uniform pocket.
The front of the mask acts as a filter and is heavily contaminated with bacteria.
12.
Lotions: The dressing assistant should pour only enough lotion for one single dressing. Unused lotion must be disposed of.
To avoid wastage and eliminate the risk of cross-infection from contaminated bottles.
13.
The trolley MUST be reset for each individual dressing.
Maintains strict single-patient use standards.
14.
All used equipment must be decontaminated in chlorine, washed with soapy water, brushed, dried, and sterilised (Autoclaved).
To ensure absolute sterility ready for the next dressing.
15.
The trolley is cleaned with disinfectant post-procedure.
Leaves the environment safe.
Requirements (Setting the Trolley for OSCEs)
You must memorize this exact layout for your practical exams to avoid failing on safety protocols:
Top Shelf (Strictly Sterile)
Bottom Shelf (Unsterile / Clean)
Bed Side / Environment
Sterile Dressing Pack containing:
- 2 dressing towels (drapes).
- 2 non-toothed dissecting forceps.
- 2 dressing forceps.
- 3 gallipots:
• 1 for sterile swabs.
• 1 for the cleaning lotion (e.g., Normal Saline).
• 1 for gauze dressing.
- A pair of stitch scissors or a clip remover (if specifically required).
- A dressing mackintosh (waterproof sheet) and towel.
- Receiver for soiled/dirty dressings.
- Receiver for used/dirty instruments.
- A bottle of approved antiseptic lotions.
- A drum for extra sterile dressings.
- A drum for extra sterile swabs.
- A tray with bandages, scissors, safety pins, strapping/tape.
- A container of Cheatle forceps (for transferring sterile items).
- A pair of sterile gloves and a pair of clean exam gloves.
- A bowl.
- Hand washing equipment (Soap, water, sterile towels, or alcohol hand rub).
🚨 EXAM TRAP: The "DIRTY" Wound Requirements
If the examiner verbally tells you or the scenario dictates that the wound is dirty, necrotic, or infected, you MUST dynamically add these specific items to your trolley setup:
Probe: To assess the depth of sinuses/fistulas.
Hydrogen peroxide (H2O2): For effervescent lifting of dead slough and necrotic debris.
Pedal bin: For immediate disposal of highly infectious waste.
Sinus forceps: For packing deep cavities.
Pus swab + Laboratory form: For collecting a vital microbiology Culture & Sensitivity (C&S) sample before giving antibiotics.
Hypotonic/Hypertonic saline: Based on osmotic requirements for the slough.
The Procedure for Wound Dressing
Step
Nursing Action
Rationale
1.
Refer to general rules. Introduce yourself, identify the patient, and explain the procedure.
To maintain sterility, ensure the correct patient, and reduce anxiety.
2.
Dressing assistant positions the patient appropriately.
Ensures optimal lighting and access to the wound.
3.
Place the mackintosh and towel directly under the part to be dressed.
Provides physical comfort and prevents potentially infectious fluids from soiling the bed linen.
4.
Dressing assistant puts on clean gloves, removes the outer bandage, and loosens the strapping.
For easy and painless removal of the old dressing.
5.
Dressing assistant removes gloves, washes hands, opens the sterile dressing pack, and adds any additional sterile equipment using Cheatle forceps.
To arrange the materials logically for easy use while maintaining an unbroken sterile field.
6.
Add the sterile cleaning solution required into the gallipot.
Preparation for wound irrigation.
7.
Dressing assistant puts on new clean gloves, carefully removes the inner dressing, and discards it directly in the receiver.
To prevent the spread of infections from the saturated old dressing.
8.
Dressing nurse washes hands thoroughly with soap and water and dries with a sterile towel (or uses surgical rub).
To absolutely reduce the transient flora on the hands.
9.
Put on sterile gloves using proper surgical technique.
To maintain strict surgical asepsis.
10.
Drape the wound meticulously with the sterile dressing towels.
To create and provide an isolated sterile environment around the wound.
11.
Using forceps, swab the wound in the following specific way, discarding EACH swab after a single use: • First, wipe the exact centre of the wound. • Then wipe each side of the wound, always working from the middle outwards.
Minimizes the spread of infection. Swabbing from clean (centre) to dirty (periphery) ensures you never drag skin bacteria into the raw wound bed.
12.
For a dirty wound, perform the necessary toilet as prescribed. This may involve the removal of stitches/clips, probing the wound depth, or packing the wound with ribbon gauze.
Removes barriers to healing (slough) and promotes granulation from the base up.
13.
Apply a sterile primary dressing to cover the wound. Add a secondary absorbent pad if oozing or heavy discharge is anticipated.
To protect the wound from trauma and prevent strike-through soiling of the linen.
14.
Place all used, sharp, or contaminated instruments immediately into a dedicated receiver.
To avoid sharps injuries and cross-infections.
15.
Remove gloves, apply strapping (tape) or a supportive bandage over the dressing as required.
To secure the dressing while maintaining hygiene and comfort.
16.
Wash your hands, clear away the trolley, and leave the patient comfortable.
Standard infection control protocol.
17.
Document the procedure (wound appearance, exudate, patient tolerance) and report any abnormalities immediately.
For legal continuity of care and surgical follow-up.
Critical Points to Remember
Use surgical spirit or alcohol for easy, painless removal of sticky adhesive marks from previous strapping.
If the inner strapping/gauze is stuck and adherent to the raw skin, do not rip it! Soften it by soaking it with warm normal saline or antiseptic lotion.
For a dirty wound, Hydrogen Peroxide is used specifically to bubble out hidden debris from deep crevices.
Avoid excessive, aggressive surgical toilet. Scrubbing too hard destroys the delicate, new angiogenesis (blood vessels) required for wound healing and causes unnecessary bleeding.
📝 EXAM TECHNIQUE: The Golden Rule of Wound Cleaning
Always clean in ONE direction only, from the cleanest part to the dirtiest part.
1st swab: Straight down the centre of the surgical incision. (Discard)
2nd swab: Down one side of the wound, moving slightly outward. (Discard)
3rd swab: Down the other side of the wound, moving slightly outward. (Discard)
Physiological Rule: Each swab is discarded after a single continuous stroke. Never return a used swab to the wound bed; doing so carries the patient's own skin flora (bacteria) back into the open tissues, causing iatrogenic infection.
A3. Procedure: 7.4 Removal of Sutures or Clips
OSCE EXAM PROCEDURE: 7.4
Objectives:
1. Identify the exact requirements for the safe removal of sutures/clips.
2. Demonstrate the correct removal of sutures/clips without causing dehiscence.
Requirements: Same trolley setup as standard wound dressing, plus stitch scissors or a specialized clip remover.
Step
Nursing Action
Rationale
1.
Refer to general rules. Review the patient's surgical chart and doctor's orders.
To confirm the correct patient, the correct procedure, and ensure it is the correct postoperative day for removal.
2.
Follow the standard procedure for opening a surgical wound dressing.
To promote strict infection prevention and control.
STITCH (SUTURE) REMOVAL
1.
Grasp the knot of the stitch using a pair of non-toothed dissecting forceps and pull gently upward. Cut the suture wire as close to the skin as possible on the side beneath the knot, and pull the stitch out smoothly.
Crucial: This ensures that the dirty, exposed part of the stitch resting on the outside skin is NOT dragged through the clean internal wound tract, preventing deep infection.
2.
Use antiseptic lotion for dirty wounds after the removal of stitches. If the skin is completely healed, clean, and dry, do not over-clean.
Maintains normal skin integrity.
CLIP (STAPLE) REMOVAL
4.
Insert the lower jaw of the sterile clip remover completely under the centre of the metallic clip; squeeze the handles firmly until the clip bends completely in the middle and the edges lift out.
The clip remover mechanically bends the staple, allowing the prongs to back out of the skin safely without tearing tissue.
5.
When the wound has healed perfectly with no discharge, a new heavy dressing is not necessary. A simple light covering or exposing to air is sufficient.
Exposure to air promotes drying and ultimate epidermization (quick healing).
6.
Strictly COUNT the stitches or clips removed.
To compare against the surgical operation notes and ensure absolutely none are left embedded inside to cause a foreign body reaction or abscess.
7.
Document the procedure, the number of sutures removed, and the status of the wound line.
For legal records and surgical follow-up.
Points to Remember
Stitches or clips are normally removed between the 5th and 10th day post-operatively, depending on the tissue vascularity (face/neck heal fast in 5 days; joints/abdomens take 10-14 days).
Sometimes the stitches or clips are removed alternatively (every other stitch) on day 7, and the rest on day 9. This prevents the nightmare complication of the wound bursting open (dehiscence) prematurely if it hasn't gained enough tensile strength.
On some occasions, absorbable sutures (like Vicryl or Monocryl) may be used internally or subcuticularly, in which case they dissolve and are not removed.
Supplementary Theory: Suture Materials
For advanced exams, know the difference:
Non-absorbable: Silk, nylon, polypropylene, stainless steel clips. The body cannot digest these; they retain strength indefinitely and must be physically cut and removed.
Absorbable: Catgut, Vicryl, Dexon. Broken down via enzymatic digestion or hydrolysis naturally inside the body. Used for deep tissues.
Wound Healing Intentions
First Intention: Clean, neatly sutured edges that heal quickly with minimal scar tissue.
Second Intention: A dirty, infected, or gaping wound that is intentionally left open. It heals slowly by massive granulation tissue filling the defect from the base upwards. Leaves a prominent, large scar.
Part B: Bandaging
B1. Theory — Bandaging
Definition
A Bandage is a continuous strip of material used to bind, support, cover, or immobilise a specific part of the body.
Bandaging is the clinical technique of applying these bandages firmly, evenly, and safely to hold dressings in place, support muscular injuries, or apply hemostatic pressure.
Purposes / Indications of Bandaging
To keep a sterile dressing securely in position on a wound without using skin-damaging adhesive tape.
To apply direct mechanical pressure and control severe bleeding (e.g., a pressure bandage for arterial hemorrhage).
To support and immobilise an injured musculoskeletal part (sprains, strains, or undisplaced fractures).
To prevent or rapidly reduce swelling (using compression combined with elevation).
To secure rigid splints firmly in place against a broken limb.
To correct or prevent physical deformity (e.g., clubfoot strapping) and to provide thermal warmth to a joint.
To mechanically assist in venous blood return and reduce dependent oedema in the lower limbs.
Types of Bandages & Materials
Roller bandages: Long strips rolled tightly on themselves. Made of Cotton (breathable), Crepe (highly elastic for compression), Domette, or Flannel.
Triangular bandages: Extremely versatile First Aid staples! Made by cutting a large square of cloth diagonally. Used for arm slings, tourniquets, and securing massive dressings.
Tubular bandages: E.g., stockinet, tube gauze, or elastic tubing. Slipped seamlessly over fingers, arms, and legs.
Adhesive strapping (plaster): Sticky tape for exact fixation of dressings or strapping joints (e.g., sports taping).
Plaster of Paris (POP) bandage: Gauze infused with dry calcium sulfate dihydrate. When soaked in water, it undergoes an exothermic reaction and hardens into rigid splints/casts for broken bones.
Basic Bandaging Turns/Patterns
Turn / Pattern Name
Clinical Description & Specific Use
Fixing (anchor) turn
2 overlapping circular turns applied to firmly anchor the bandage to the limb before the real directional bandaging starts.
Circular turns
Each turn goes directly over the exact previous one. Used at the start/end of bandaging, or on perfectly cylindrical parts like fingers and toes.
Spiral turns
Each turn overlaps the previous by ½ to ⅔ of the width, ascending the limb smoothly and evenly.
Spiral-reverse turns
Required for limbs that rapidly change width or taper (like the muscular forearm or calf). You must fold/reverse the bandage 180 degrees at each turn to make it lie flat against the conical shape.
Figure-of-eight turns
The classic pattern used specifically for hinge joints (ankle, wrist, knee, elbow). It allows for movement while providing immense structural support.
Spica (basket-weave) turns
Crossing turns over a fixed joint or specific anatomical area (shoulder, hip, thumb). A Divergent spica is used for joints bent at an angle with fixed dressings (knee/elbow/heel).
Recurrent turns
Folding the bandage forwards and backwards over a blind stump/end (e.g., finger tip, severe amputation stump, or the dome of the head).
🚨 The Dangers of Wrong Bandaging
Too tight (The Ischemic Threat): Obstructs arterial blood flow and venous return, causing severe distal swelling, excruciating throbbing pain, numbness, a cold/blue (cyanotic) limb, and eventual tissue death (gangrene) requiring amputation.
Too loose: Slips off instantly as the patient moves, completely failing to support the injury or apply life-saving pressure to bleeding.
Too much tension on fragile skin: Causes severe friction blisters, shear tears, and pressure sores over bony prominences.
THE GOLDEN RULE - ALWAYS CHECK CSM: After applying ANY bandage, immediately check the Circulation (capillary refill < 2 secs), Sensation (can they feel you touching?), and Movement (can they wiggle their toes/fingers?) of the part beyond the bandage. Recheck rigorously after 15–30 minutes!
B2. Procedure: 17.10 Bandaging
OSCE EXAM PROCEDURE: 17.10
Objectives:
1. Mention the general physiological principles of bandaging.
2. Outline indications for bandaging.
3. Identify requirements for bandaging.
4. Prepare materials for bandaging.
5. Perform bandaging of various body parts flawlessly.
General Rules of Bandaging
No.
Rule
Rationale
1.
Use a tightly rolled bandage of suitable width (narrow for fingers, wide for thighs) and appropriate material.
To promote neatness, prevent wrinkling, and ensure efficiency.
2.
Always face the patient when bandaging limbs.
To constantly observe the patient's facial expression for wincing/signs of sudden pain indicating the bandage is too tight.
3.
Hold the head (roll) of the bandage uppermost (facing you).
Allows the bandage to unroll naturally, applying even tension and pressure without dropping it.
4.
Bandage the limb well aligned in its natural anatomical position.
To prevent long-term joint deformity, contractures, and extreme discomfort.
5.
Hold the bandage in the right hand when bandaging a left limb and vice versa.
To promote ergonomic, correct bandaging technique.
6.
Bandage the limb from inside outwards and from BELOW upwards, keeping the bandage even throughout.
Absolutely vital: Wrapping distal-to-proximal mechanically supports venous return and lymphatic drainage back to the heart, preventing distal pooling and severe oedema.
7.
Ensure that the bandage is neither too tight nor too loose.
To prevent catastrophic interference with arterial circulation, while avoiding useless slippage.
8.
Finish off the bandage with a straight circular turn, fold in the raw end, and secure it. Always avoid placing the pin over joints, bony prominences, or the actual site of injury.
To prevent localized pressure necrosis, irritation, and extreme discomfort when the patient rests.
9.
Fasten with safety pins or with the provided elastic metal fastener.
To prevent unravelling and loosening of the compression.
10.
Apply medical tape in psychiatric, mentally handicapped, or paediatric patients instead of metal pins or sharp clips.
Safety protocol to prevent severe injury (e.g., children swallowing pins or psychiatric patients using pins for self-harm).
Materials Used to Make Various Bandages
Material Type
Clinical Description / Use
Cotton
Heavy weaves are strong and used for slings. Thin, porous ones form "open weave" bandages which are cheap, light, highly breathable, and disposable. Firmer cotton can be washed and autoclaved repeatedly.
Domette
This woven material with a slightly fluffed, soft surface makes a firm supporting bandage. It has mild resilience but provides robust, comfortable support for splints.
Flannel
Soft, warm strips. Historically used for dressing and padding rigid splints like the heavy metal Thomas splint.
Crepe
These bandages are highly elastic. The degree to which they are stretched when applied dictates the exact amount of hydrostatic pressure they exert. Widely used for compressing massive sprains and treating varicose veins.
Plaster (POP)
Plaster muslin is the fabric basis for making plaster of Paris (POP) rigid bandages.
Stockinet
A soft, seamless tubular cotton material. Applied directly to the skin beneath harsh fiberglass or plaster casts to protect the skin from friction and plaster burns.
Proprietary Tubular
Such as TubeGauze or Helodast. Applied with a special metal applicator for fast, seamless, perfectly even coverage over fingers and toes.
Bandaging Patterns — Step-by-Step OSCE Procedures
A. Figure of Eight (The Standard for Joints like Ankle/Wrist)
Step
Nursing Action
Rationale
1.
Observe general rules of all nursing procedures (Hand hygiene, patient ID, explanation).
To maintain clinical standards.
2.
Put patient in a comfortable position, fully exposing the affected joint.
To promote comfort, assess baseline circulation, and prevent deformity.
3.
Hold bandage with the roll (drum) facing upwards in your hand.
Allows smooth unrolling and application of even tension/pressure.
4.
Wrap the bandage around the limb twice (fixing turns) distally (below) the joint.
To securely anchor and stabilize the bandage and provide a firm starting base.
5.
Use alternating ascending and descending diagonal turns across the joint to form a continuous "figure of eight". Overlap each turn of the bandage by one-half to two-thirds the width of the strip.
Provides dynamic, flexible support that allows joint mobility while maintaining strict compression. Overlapping promotes firmness and aesthetic neatness.
6.
Wrap the bandage around the limb twice, proximally (above) the joint to anchor the final tail and secure with a clip, tape, or safety pin.
Locks the entire structural weave in place.
7.
Elevate the newly bandaged extremity for 15 to 30 minutes after application.
Gravity assists venous return, working with the compression to rapidly reduce oedema and throbbing pain.
8.
Assess the skin beyond the bandage for colour, integrity, pain, and temperature (CSM Check).
To detect deadly complications (like blocked arterial circulation or nerve compression) extremely early.
9.
Leave the patient comfortable, clean away the trolley, and document.
Maintain standards and legal records.
B. Spiral Bandaging (e.g., Bandaging the Ear or Tapered Limbs)
Used when simple circular turns would leave gaping gaps due to anatomy.
Make a fixing (anchor) turn firmly around the forehead/head.
Bring the bandage diagonally under the affected ear, pulling it straight over the head and down the back, deliberately leaving the normal, healthy ear un-bandaged for hearing and comfort.
Repeat these diagonal turns three or four times, overlapping each by 2/3, until the thick dressing on the affected ear is gradually and completely covered.
Finish with a final circular fixing turn and secure the bandage at the centre of the forehead (where the patient isn't resting their head) using a safety pin, clip, or medical tape.
C. Divergent Spica (For heavily bent, fixed joints like Knee, Heel, Elbow)
This pattern weaves away from the centre, accommodating extreme angles.
Make two locking anchor turns directly over the exact centre (apex) of the bent joint (e.g., right over the point of the elbow or kneecap). (Rationale: To instantly stabilize the dressing at the point of highest tension).
Now make alternate figure-of-8 turns spreading outwards: one turn above the joint, then the next turn below the joint, diverging further outward each time. This forms a perfect, snug basket-weave pattern at each side of the joint without bunching up in the crease.
D. Triangular Bandaging / Broad Arm Sling
The ultimate first-aid tool for stabilizing upper extremity fractures.
Place the injured arm gently across the patient's chest so that the fingers are elevated and almost touching the opposite (healthy) shoulder. (Rationale: To physically mobilise the fracture, reduce muscle spasm, and relieve severe pain).
Slide the unfolded triangular bandage between the chest and the injured arm. Place one upper corner over the uninjured shoulder, letting the right-angled corner (the point) stick out just beyond the elbow on the injured side.
Bring the bottom corner up over the injured forearm, carrying it over the injured shoulder.
Carry both corner ends around the back of the neck and tie the ends securely with a reef knot (square knot). The knot MUST lie in the fleshy hollow just above the clavicle on the UNINJURED side.(Rationale: Never tie a knot directly on the cervical spine/neck bone; the weight of the arm will cause excruciating pressure and nerve damage).
The protruding right-angle point at the elbow is neatly folded forward and pinned securely to the front of the sling to enclose the elbow tightly in a pocket. (Rationale: To prevent the elbow from sliding out and prevent raw edge skin irritation).
E. Bandaging the Eye
Facing the patient, hold the sterile eye pad firmly in position over the affected eye until the first turn of the bandage locks it. (Rationale: To secure the dressing and maintain gentle pressure).
Begin from the affected side, pulling toward the normal side. Go across the forehead and round the head in a circular fixing turn.
From the back of the head, bring the bandage under the ear on the affected side, diagonally up across the cheek, covering the lower (nasal) side of the eye pad, and pull it straight over the top of the head and down the back.
The next turn repeats this, but comes slightly higher, overlapping the first eye turn by 2/3. It crosses the fixing turn at the exact same point above the ear, covers the rest of the pad, and comes round to the front.
Fix a safety pin or tape safely in the centre of the forehead.
F. Capeline Bandage (For massive head trauma - requires a double-headed roller)
Position the patient comfortably in a sitting up position and stand directly behind them.
Place the centre of the outer surface of the bandage precisely in the centre of the forehead/head.
Bring both heads of the bandage round the sides, over the temples, and strictly above the ears to the nape of the neck where the ends cross over each other. (Rationale: Ensure that the delicate cartilage of the ear is not caught or folded over).
Bring one bandage horizontally around the head (the locking band), while the other bandage is pulled vertically over the centre of the top of the scalp (the dome) down to the root of the nose.
Bring the horizontal locking bandage over the forehead, pinning down the vertical bandage. The vertical bandage is then flipped back over the head to the nape of the neck.
Ensure that each vertical turn across the scalp overlaps 2/3 of the previous turn. (Rationale: Ensures the bandage adheres snugly to the spherical shape of the skull without slipping).
Cross it again at the back, lock it with the horizontal bandage, and bring it forward over the scalp to the opposite side of the midline.
Repeat these alternating backward and forward turns to the left and right of the centre until the entire scalp is completely woven and covered.
Take two final, tight circular turns entirely around the head with the horizontal bandage to lock all the pleats, and secure with a safety pin or tape.
G. Recurrent Bandaging (For amputation stumps / fingertips)
Apply longitudinal strips back and forth over the end of the stump. Overlap each layer by half to two-thirds the width. Wrap firmly to shape the stump, but not tightly enough to cause ischemia. Ask the patient frequently if they feel any numbness, tingling, loose skin rubbing, tightening, aching, or throbbing pain.
Stand directly facing the patient and take a circular fixing turn around the base of the stump. (Rationale: To constantly observe their facial expression for signs of hidden pain).
Fold the bandage forward across the front of the stump at a 45° angle, fold it over the blind end, and bring it backwards. Lock it in place by crossing the first circular turn at a right angle.
Repeat these recurrent, folding turns—locking each one with a circular turn—until the stump is fully enclosed and protected.
B3. Theory — Specific Types of Slings
You must know the specific indications for each sling type for clinical scenarios:
Triangular arm sling (Broad Arm Sling): Supports the entire weight of the forearm and the wrist horizontally. Used primarily for fractures of the radius/ulna (forearm) or wrist sprains.
High arm (Elevation) sling: The arm is folded tightly and elevated high against the opposite chest wall, with the fingers pointing to the collarbone. Used to drastically reduce severe swelling of the hand/wrist post-injury, and to use gravity to control severe arterial bleeding from the arm.
Collar-and-cuff sling: A simple loop of material forming a clove hitch around the wrist, suspended from the neck. It supports ONLY the wrist. Used specifically for fractures of the upper arm (humerus), shoulder, or clavicle. Rationale: It allows the heavy humerus bone to hang vertically by gravity, pulling the broken bone ends into perfect, natural alignment without needing a heavy cast.
Part C: Splinting & Orthopaedics
C1. Theory — Splinting
Definition
A Splint is any rigid or flexible device used to immobilise, structurally support, and protect an injured part of the musculoskeletal system (such as a bone fracture, joint dislocation, or severe tendon/ligament sprain) or to forcefully maintain a body part in correct anatomical alignment during the long healing process.
Splinting is the precise clinical act of applying this device safely.
Purposes / Indications of Splinting
Why is splinting a life-saving first aid skill?
To strictly immobilise unstable fractures and dislocations. Rationale: Broken bone ends are as sharp as razor blades. If they move, they will slice through nearby major nerves and deadly arteries (converting a closed fracture into a massive internal hemorrhage).
To drastically relieve excruciating pain and instantly reduce severe, damaging muscle spasms around the break.
To prevent or mechanically correct severe deformity, maintaining proper alignment during bone healing (callus formation).
To support massively injured soft tissues (severe Grade III sprains and muscle tears).
To secure and protect life-saving dressings and IV lines inserted on agitated patients' limbs.
To allow the safe, pain-free, and shock-preventing transport of the injured casualty from the field to the hospital.
Types of Splints
Rigid splints: Made of wood, solid metal, hard plastic, or stiff cardboard. Rule: They must be physically long enough to completely immobilise the joint ABOVE and the joint BELOW the fracture.
Soft splints: Using a thick pillow wrapped around an ankle, a heavy blanket roll, or a simple arm sling tied to the torso. Used for minor/stable injuries.
Traction splints (e.g., The Thomas Splint): Used specifically and exclusively for mid-shaft Femur (thigh) fractures. The thigh muscles are massive; when the femur breaks, the muscles spasm and pull the bone ends over each other, causing massive internal bleeding (up to 1.5 Liters!). The traction splint applies continuous, powerful mechanical pulling (traction) to realign the massive bone, stopping the spasm and saving the leg.
Plaster of Paris (POP) casts / slabs: Used definitively in hospitals for long-term (6-8 weeks) rigid immobilisation while the bone fuses.
Air (pneumatic) splints: Inflatable, clear plastic sleeves commonly used in modern ambulance/field rescue. They provide uniform 360-degree compression to stop bleeding and immobilize simultaneously.
General Rules of Emergency Splinting
If you fail to follow these golden rules in the field, you can cause permanent paralysis, massive bleeding, or forced amputation:
Always assess the casualty's ABCs first (DRABC) and definitively control severe, spurting arterial bleeding before attempting to apply a splint.
Splint the limb in the EXACT position it was found. NEVER, ever attempt to forcefully straighten or realign a severe fracture or dislocation in the field. You will sever the artery. Let the ER doctors do it under X-ray.
Always immobilise the joint strictly above and the joint strictly below the fracture site. (e.g., For a shin/tibia fracture, you must lock both the knee and the ankle).
Pad the rigid splint extremely well with cotton or clothing, especially around bony prominences (ankles, knees). Secure it with bandages tightly above and below the fracture site — never tie a constricting knot directly over the broken bone.
Always expose the tips of the fingers or toes. Check CSM (Circulation, Sensation, Movement) before applying the splint, AND immediately after tying it. Recheck every 15 minutes!
The splint must be mechanically snug, but never tight enough to act as a tourniquet and cut off blood flow.
Elevate the shattered limb after splinting, treat the patient for systemic hemorrhagic shock (keep them warm, lie them flat), and arrange urgent surgical referral.
🚨 DEADLY COMPLICATION: Compartment Syndrome
This is an absolute orthopaedic emergency. It occurs when a bone breaks, causing massive internal bleeding and swelling inside a rigid, non-expanding muscle compartment (or inside a tight POP cast/bandage). The pressure builds until it crushes and collapses the arteries and veins. Muscle tissue and nerves begin to die (necrosis) within 4-6 hours, leading to irreversible paralysis and amputation.
You must continuously check the "6 Ps" of arterial ischemia:
1. Pain: Severe, relentless, out of proportion to the injury, and agonizingly worse on passive stretching of the toes/fingers.
2. Pallor: The skin becomes pale, white, and completely drained of blood.
3. Paresthesia: Numbness, tingling, or "pins and needles" (the nerves are screaming as they die).
4. Paralysis: The patient is completely unable to move the fingers/toes.
5. Pulselessness: No palpable pulse beyond the cast (a very late, ominous sign).
6. Poikilothermia: The limb feels ice cold to the touch compared to the rest of the body.
Action: This is a massive EMERGENCY. The cast or tight bandage must be split down the middle (bivalved) or removed entirely immediately! If pressure doesn't drop, the surgeon must perform an emergency fasciotomy (slicing the leg open to relieve pressure).
Nursing Care of a Patient in a Splint/Cast (POP Care)
While the plaster dries (The critical first 24–48 hours): A wet cast is fragile. Handle it using the flat palms of your hands only! Using your fingertips will create inward dents in the wet plaster; when it dries hard as rock, these dents will press into the patient's skin, cutting off blood supply and causing deep, rotting pressure sores. Support the wet cast on soft, plastic-covered pillows. Keep it completely uncovered and exposed to room air to facilitate rapid drying. Use a bed cradle (a metal cage) to keep the heavy weight of bedclothes off a wet leg plaster.
After drying: Keep the plaster strictly clean and dry. (Cover it with a plastic bag when washing/sponging the patient, but do not leave the plastic enclosed long-term, or the trapped sweat will macerate the skin). Keep the hard edges of the cast smooth and heavily padded with adhesive tape (petaling) to prevent it from slicing into the skin.
Neurovascular observations (CSM): As the nurse, you must constantly, obsessively check the colour, warmth, capillary refill, pulses, sensation, and movement of the exposed fingers/toes. Always compare them directly with the uninjured, normal limb. Report coldness, blueness (cyanosis), massive swelling, numbness, or severe unremitting pain immediately!
Elevate: Keep the casted limb elevated high on pillows above the level of the heart for the first 24–48 hours. Gravity is your best friend to drastically reduce massive inflammatory swelling.
Exercises: Forcefully encourage the patient to actively and frequently move their fingers/toes and the joints that are NOT locked inside the cast. Rationale: This prevents severe joint stiffness, muscle atrophy, and promotes venous return, preventing deadly Deep Vein Thrombosis (DVT) blood clots.
The "Itch" Warning: Warn the patient to never, ever insert foreign objects (like rulers, knitting needles, or pens) deep inside a cast to scratch a maddening itch. It breaks the fragile, unseen skin, introduces bacteria, and causes horrific hidden, rotting staph infections under the plaster.
Objectives:
1. Identify the exact clinical requirements used for preparing and applying orthopaedic POP splints.
2. Demonstrate the application of an orthopaedic splint correctly and safely.
Requirements for Application of Plaster of Paris (POP) — Trolley Setup
Top Shelf (Application Tools)
Bottom Shelf (Heavy/Cutting Tools)
At the Bed Side (Cleanup)
• Basin of warm water (Speeds up the exothermic hardening reaction).
• A tray of dry plaster (POP) bandages of various widths.
• Skin marking pencil, bandage scissors, and thick orthopaedic cotton wool (Webril) for padding.
• Stockinet (tubular cotton to protect the skin).
• Tape measure (to accurately measure the slab length).
• Long protective mackintoshes (for the bed).
• Plastic mackintosh (for the nurse).
• Heavy-duty Plaster Shears (for cutting or modifying hardened casts).
• Crepe rolled bandages (to secure the wet slab to the limb).
• Used/dirty dressing container.
• A separate basin of warm water.
• Flannel washcloth, towel, and mild soap. (Crucial Rationale: This must be kept purely for scrubbing and cleaning pieces of wet plaster splashes off the patient's delicate skin immediately after application, before it sets like concrete into their arm hair).
How to Dry a Plaster Cast Safely
Understand the chemistry: Plaster sets (hardens) in just a few minutes due to an exothermic chemical reaction (it gets very warm), but it takes several hours to up to 48 hours to dry completely and reach maximum structural strength.
To assist the splint in maintaining the exact correct anatomical position, allow absolutely nothing hard to press against a wet plaster (e.g., resting it on the metal bed frame, a chair edge, or a cradle). Keep the rest of the patient's body warm with blankets to prevent systemic chilling from the wet, evaporating cast.
Leave the new plaster completely exposed to the circulating room air, supported gently on soft, yielding pillows if necessary.
For a massive leg plaster, a bed cradle should be used to suspend the heavy, warm bed clothes off the wet cast, allowing air flow and preventing deformation.
Critical Points to Remember When Applying Plaster to an Arm
The patient should receive a thorough, soapy bath of the limb before the plaster is applied to remove oils and dead skin; fingernails should also be cut very short to prevent the patient from blindly scratching inside the cast and causing infection.
The fingernails must be completely clean, and absolutely no plaster splash should be left dried on them. (Rationale: Plaster stuck on nails makes it physically impossible for nurses to accurately check capillary refill and assess life-saving circulation).
The fingers and toes should feel subjectively warm to the patient and be completely free to move voluntarily.
REPORT IMMEDIATELY to the surgeon if the fingers become ice cold, pale, or blue (cyanotic) in colour! This is an active compartment syndrome.
The patient should be able to move their fingers and toes freely without agony, and neurological sensation (sharp vs dull touch) should be tested regularly to ascertain that the neurovascular circulation is perfectly satisfactory and the cast is not crushing a major nerve (like the radial or peroneal nerve).
References
Note: Content required for references was not provided in the source text.
Quick Quiz
Dressings, Bandages and Splints Quiz
First Aid
Privacy: Your details are used only for quiz tracking and certificates.
An injury is defined as damage to the body caused by an external force or agent. This external force can be mechanical (a blow), thermal (heat/fire), chemical (acids), electrical, or radiant energy. Injuries may be intentional (e.g., violence, assault, suicide attempts) or unintentional/accidental (e.g., falls, burns, drowning, occupational accidents).
1.2 Classification of Injuries
To treat an injury correctly, a nurse must rapidly classify it using the following criteria:
(a) By Nature of the Breaking of Skin/Tissue
Open injuries: The skin is completely broken, and the underlying tissues are exposed to the outside environment. Blood escapes externally, and there is a high risk of bacterial infection. Examples: Abrasions, lacerations, incisions, punctures, avulsions, amputations, and open (compound) fractures.
Closed injuries: The skin remains intact, meaning the damage is entirely under the surface. Blood and tissue fluid collect internally. Examples: Contusions (bruises), closed simple fractures, dislocations, sprains, strains, internal bleeding, and severe crush injuries.
(b) By Severity
Minor injuries: Small wounds, superficial (first-degree) burns, mild sprains. These can usually be managed effectively at home or at the basic first aid level.
Major injuries: Deep/large wounds, severe arterial bleeding, fractures, head/spinal/chest/abdominal injuries, burns covering >10% of the body surface, and crush injuries. These ALWAYS require urgent professional medical attention.
(c) By Mechanism (Cause of Injury)
Mechanical / Physical: Blunt force (falls, blows from a stick, road crashes) or sharp force (cuts, stabs from a knife).
Thermal: Burns and scalds from fire/hot water, or extreme cold (frostbite).
Chemical: Damage from acids, alkalis (like bleach or caustic soda), and irritant gases.
Electrical: Household electric current, high-voltage power lines, or natural lightning strikes.
Radiation: Severe sunburn (UV rays), X-ray overexposure, or radioactive sources.
Asphyxia-type / Environmental: Drowning, choking, and poisoning-related injuries.
Bone and joint injuries (fractures, dislocations).
Head and spinal injuries (central nervous system).
Chest, abdominal, and pelvic injuries (involving delicate internal organs like the liver or lungs).
Special sense organ injuries (eye, ear, nose trauma).
📝 Why Classification Matters (The Nurse's Thinking)
If you see an Open injury, your immediate priority is bleeding control followed by infection prevention (cleaning the wound, applying a sterile dressing, and checking the patient's tetanus vaccination status).
If you see a Closed injury, you must anticipate the severe danger of hidden internal bleeding and shock. Always suspect that there is much more damage than what you can visually see on the skin surface.
For a Major injury, you must immediately drop everything and perform a primary survey (DRABC), treat life threats first, immobilise the patient, and arrange an urgent referral.
Topic 2: Wounds (Minor and Major)
2.1 Definition
A wound is a break in the continuity of the skin or mucous membrane, caused by physical means. It opens a doorway for massive blood loss and deadly infections.
2.2 Types of Wounds
Memorize this table to quickly identify the type of wound and its specific risks:
Type
Description & Appearance
Typical Causes
Bleeding & Infection Risk
Abrasion (Graze)
Superficial scraping of the top layer of skin (epidermis) only. Leaves a raw, weeping surface.
Falls on rough ground, road rash from a boda-boda fall.
Oozes slightly (minor bleeding). Moderate infection risk due to embedded dirt.
Incision
A clean, straight, neat cut completely through the tissues.
Knife, razor blade, broken glass, surgical cuts.
Usually moderate to heavy; cuts bleed freely. Lower infection risk due to clean edges.
Laceration
Irregular, messy tearing of skin and underlying tissue with jagged, crushed edges.
Machinery accidents, barbed wire, blunt trauma tearing the skin.
Often heavy bleeding. High infection risk because tissue edges are crushed and contaminated.
Puncture / Stab
Deep, narrow wound. Has a very small surface opening but a deep, dangerous track inside.
Stepping on a nail, needles, spear, bullet entry, deep thorn.
Often very little external bleeding, but massive deep internal damage. Very high infection risk (especially tetanus, as the deep track lacks oxygen/anaerobic).
Avulsion
Tissue is forcibly torn away and left hanging loose (a flap), or is completely detached (amputation).
Heavy machinery, animal bites, explosions.
Often severe and life-threatening bleeding. High infection risk.
Contusion (Bruise)
A blunt blow damages small blood vessels under intact skin. (A closed wound).
Blows from a stick, falls, seatbelt trauma.
Internal oozing leads to swelling and discolouration. Low surface infection risk, but watch for deeper organ injury.
Gunshot Wound
High-velocity entry (and sometimes exit) wound. Features a deep tract and massive internal tissue cavitation.
Firearms (bullets, shrapnel).
Variable bleeding — but often severe internal organ destruction. Very high infection risk.
Bite Wound
A nasty mix of a crush, puncture, and laceration all at once.
Human, dog, or wild animal bites.
Moderate to severe bleeding. Extremely high infection risk (plus massive risk of Rabies from animal saliva).
2.3 General First Aid for Wounds
The core aims of wound care are: Stop bleeding, prevent infection, prevent shock, and promote healing.
DRABC first: Treat immediate life threats before focusing on the messy wound.
Protect yourself: Wash your hands or wear gloves if possible. Standard precautions are vital to protect yourself from blood-borne infections like HIV and Hepatitis B.
Control bleeding: Apply direct, firm pressure over the wound using a clean dressing or cloth (detailed in Topic 3).
Clean the wound (For MINOR wounds only): Rinse thoroughly with clean running water or normal saline. Clean the intact skin around the wound with soap and water. Use clean tweezers to pick out visible loose dirt. DO NOT scrub deep wounds. DO NOT use strong antiseptics like concentrated hydrogen peroxide or undiluted iodine inside the open wound (it destroys exposed healthy tissue and delays healing).
Let it bleed slightly: If it is a very minor wound, leaving it to bleed for a few seconds actually helps flush microscopic germs out from the inside, before you apply pressure.
Apply a dressing: Use a sterile/clean non-adherent dressing. Bandage it firmly enough to hold it in place, but not so tight that it acts as a tourniquet and cuts off distal circulation.
Do NOT close deep/dirty wounds: Never attempt home suturing or using superglue on deep cuts. Deep wounds require professional medical assessment, surgical cleaning (debridement), tetanus prophylaxis, and proper sterile stitches.
Check Tetanus Status: The patient needs a Tetanus Toxoid (TT) booster if they are not fully immunised, or if the wound is dirty/deep and their last dose was more than 5 years ago (per Uganda Clinical Guidelines).
Raise and rest: Elevate the injured part to reduce throbbing pain and bleeding. Give nothing by mouth if a referral for surgery is likely.
Monitor for infection: Advise the patient to watch for danger signs over the following days: increasing throbbing pain, expanding redness, unnatural warmth, massive swelling, yellow pus, high fever, or red streaks traveling up the limb toward the heart (lymphangitis).
2.4 Wounds That Must ALWAYS Be Referred (Major Wounds)
Never try to manage these at home. Send immediately to the hospital:
Deep, gaping wounds, or any wound where yellow fat, muscle, or bone is visible.
Wounds that will not stop bleeding even after 10 full minutes of hard direct pressure.
All puncture/stab wounds (due to the hidden deep track and high tetanus risk).
All bites (human or animal, due to massive infection and rabies risk).
Wounds situated over major joints, on the face, hands, or genitals (high risk of permanent disability or scarring).
Wounds with deeply embedded foreign bodies (like glass or knives).
Amputations: Wrap the severed body part in a clean, slightly moist cloth. Place it inside a sealed, water-tight plastic bag. Put that bag onto ice or in cold water. Never immerse the severed part directly into water or ice, as it destroys the tissue and ruins any chance of surgical replantation!
Any wound in a casualty who is showing signs of clinical shock (cold, clammy, confused).
Topic 3: Bleeding and Haemorrhage Control
3.1 Definitions
Haemorrhage: The loss of blood from a ruptured blood vessel. It may be external (visible on the skin) or internal (concealed inside body cavities).
Mild haemorrhage: Bleeding from injured superficial capillaries; the blood oozes slowly or flows in a steady, manageable stream.
Severe haemorrhage: Bleeding from a severed artery or large vein; blood exits with massive force (arterial) or in a heavy steady flow (venous). Large volumes of blood are lost very quickly, leading rapidly to Hypovolaemic Shock and death.
3.2 Classification of Haemorrhage
(a) By Time of Occurrence
Primary haemorrhage: Occurs exactly at the time of the injury.
Reactionary haemorrhage: Occurs within 24 hours of the injury. When the patient's blood pressure eventually recovers after the initial shock, the rising pressure physically dislodges the weak blood clot that had formed, restarting the bleeding.
Secondary haemorrhage: Occurs after 48 hours up to 7 days later. It is usually caused by severe bacterial infection (sepsis) that rots and erodes the wall of the injured blood vessel, causing it to burst open again.
(b) By Vessel (Source)
Arterial bleeding: The blood is bright red (highly oxygenated). It spurts out in violent jets synchronized with each heartbeat. This is the MOST dangerous type due to rapid, high-pressure blood loss.
Venous bleeding: The blood is dark red/purplish (deoxygenated). It flows in a heavy, steady stream. It can also be rapidly life-threatening if a major deep vein (like the jugular or femoral) is cut.
Capillary bleeding: Dark red blood that oozes slowly from the entire surface of the wound. It is the most common and is usually self-limiting (stops on its own).
(c) By Site — Internal vs External
External: Bleeding is clearly visible on the body surface.
Internal (Concealed): Blood collects silently inside body cavities (chest, abdomen, skull). It is extremely dangerous because it is hidden from the first aider. Blood eventually appears at natural body orifices. As a nurse, memorize these clinical terms:
Haemoptysis: Bright red, frothy blood coughed up from the lungs/respiratory airways.
Haematemesis: Blood vomited from the upper GI tract (stomach). If it looks like dark red "coffee-grounds", it means stomach acid has digested a bleeding stomach ulcer.
Haematuria: Smoky or blood-stained urine, indicating severe kidney or bladder trauma.
Melaena: Black, tarry, highly offensive-smelling stool. Indicates massive bleeding from the upper bowel (the blood is digested as it travels down).
Fresh bright red blood per rectum indicates bleeding from the lower bowel or anus.
Vaginal bleeding: Can indicate a miscarriage, heavy menstruation, injury to the genital tract, or a deadly ectopic pregnancy.
Thin, watery blood leaking from the ear or nose after a head injury = highly suspicious for a CSF (Cerebrospinal Fluid) leak from a skull fracture.
The Golden Rule: After any severe blunt injury, if the casualty shows signs of clinical shock without any obvious external blood loss — suspect massive internal bleeding immediately.
3.3 The Clotting Mechanism (How the Body Stops Bleeding)
When a vessel is cut, the body triggers a highly complex chemical cascade to save your life. You must understand these physiological steps:
The injured blood vessel constricts (narrows) immediately to reduce the size of the hole.
Local blood pressure drops slightly, slowing the flow of blood escaping.
Platelets rapidly collect at the rough, injured site and stick together to form a temporary "plug" in the gap.
The damaged platelets and surrounding torn tissues release a chemical enzyme called thrombokinase (thromboplastin).
Thrombokinase converts the inactive blood protein prothrombin into active thrombin.
Thrombin then acts as an enzyme to convert soluble fibrinogen (found in blood plasma) into insoluble solid threads called fibrin.
Fibrin forms a dense, sticky mesh web across the wound. This web traps more platelets and red blood cells, forming a solid clot (scab) as the clear yellowish serum oozes away.
3.4 Signs and Symptoms of Significant Haemorrhage
Whether the bleeding is external or internal, massive blood loss triggers identical systemic shock signs:
History of severe injury or known medical condition (e.g., bleeding stomach ulcer).
Pain and severe tenderness over the injury site; rapid swelling; visible deformity.
Pale face and lips; cold, clammy (sweaty) skin; profuse cold sweating.
A rapid, very weak (thready) pulse.
Breathing becomes very shallow, fast, and is often accompanied by "air hunger" (deep sighing or yawning as the brain begs for oxygen).
Dizziness, blurred vision, roaring in the ears, and fainting.
Intense, unquenchable thirst; extreme anxiety, restlessness, and a feeling of impending doom.
Falling blood pressure (a late and very dangerous sign!); lower body temperature; significantly reduced urine output (oliguria) as the kidneys shut down to save fluid.
In internal bleeding: Blood appearing at orifices + the shock signs above.
3.5 General Management of Haemorrhage
Primary Aim: STOP THE BLEEDING immediately and arrange fast medical aid. The principles of controlling blood loss are to restrict blood flow to the wound and encourage rapid clotting. This is achieved by Direct Pressure and Elevation.
Step-by-Step Management
Put your gloves on (standard precautions).
Place the casualty in a suitable, safe position (usually lying down flat to prevent fainting and protect the brain).
Expose the wound: Remove or cut around as little clothing as possible to clearly see where the blood is coming from.
Apply DIRECT PRESSURE on the wound:
Use a clean dressing, thick pad, or cloth and press down extremely hard with your palm.
Hold the pressure continuously for 10 to 15 minutes without peeking! Lifting the pad to check if it has stopped simply rips off the fragile fibrin clot that is forming, restarting the bleeding.
If a foreign body (like a knife or glass) is embedded — press firmly AROUND it, never ON it, and build up padding around it.
If blood soaks completely through your pad — add more dry layers directly on top. NEVER remove the first blood-soaked pad.
Elevate: Raise the bleeding limb high above heart level and support it. Gravity reduces the hydrostatic blood pressure reaching the wound. (Do not elevate if you suspect a bone fracture in that limb, as movement will cause agony and sever nerves).
Bandage: Wrap a bandage firmly over the pad to maintain the pressure. Ensure it is not so tight that it cuts off arterial circulation (check that fingers/toes remain warm).
Immobilise: Keep the injured part perfectly still.
Treat/prevent shock: Lay them flat, raise their uninjured legs to send blood to the brain, keep them warm with a blanket, reassure them constantly, and give absolutely nothing by mouth.
Urgent transport: Rush to the hospital — a severe severed artery can drain a human body of blood in under 3 minutes.
Indirect Pressure (Pressure Points)
This is used only if direct pressure fails or is physically impossible. You physically compress the main supplying artery against the underlying bone, located between the heart and the wound.
For an upper limb bleed: Compress the brachial artery (on the inside of the upper arm).
For a lower limb bleed: Compress the femoral artery (deep in the groin crease).
Danger: Prolonged pressure point compression deprives the entire healthy limb of oxygen. Only use it as a temporary bridge while arranging urgent help, and carefully note the time.
🚑 OSCE FOCUS: The Tourniquet (Exams & Real Life)
A tourniquet is the absolute last resort for life-threatening limb bleeding that massive direct pressure cannot stop (e.g., traumatic amputation).
Place it 5 to 7 cm exactly above the wound (between the wound and the heart). Never place it directly over a joint like a knee or elbow.
Tighten the windlass twisting stick until the bright red bleeding completely stops, and the distal pulse disappears.
CRITICAL: WRITE THE EXACT TIME OF APPLICATION on the casualty's forehead or on a highly visible tag.
Never loosen it once applied. Only a surgeon in an operating theatre should remove a tourniquet, to prevent fatal toxins that built up in the dead limb from rushing back into the heart.
If improvising, use a very wide band of cloth (at least 5cm wide). Never use thin wire or shoe strings, as they will slice straight through the skin and permanently sever nerves.
3.6 Bleeding from Special Sites
(a) Scalp Wounds
Dangers: The scalp has an incredibly rich blood supply, so even minor cuts bleed profusely and look terrifying. Furthermore, a heavy scalp bleed may hide a depressed skull fracture underneath.
Signs: Severe pain, massive bleeding, rapid swelling (a "goose egg"). Possible loss of consciousness. If you see blood or clear fluid leaking from the nose or ears, strongly suspect a basal skull fracture.
Management: Apply direct pressure on the wound. However, press very gently at first—if the skull feels soft or dented inward (depressed fracture), do not press on it! Build a thick ring pad around the dent instead. Bandage firmly. If the casualty is unconscious, keep their head slightly raised (if spinal injury is ruled out), monitor breathing, and refer urgently.
(b) Epistaxis (Nosebleed)
Bleeding from the delicate vessels inside the nostrils. It may follow a punch to the face, violent nose picking, heavy sneezing, extreme high blood pressure (hypertension), or it may be a deadly sign of a skull fracture (thin watery blood mixed with CSF).
Aims: Safeguard the airway (prevent blood from being swallowed or inhaled into the lungs) and stop the bleeding.
Management:
Sit the casualty down and have them lean SLIGHTLY FORWARD. (Exam Trap: NEVER tilt the head back! Blood will run down the throat, causing violent coughing, choking, or severe vomiting when it hits the stomach).
Loosen any tight clothing around the neck.
Advise them to breathe exclusively through their mouth.
Pinch the soft, fleshy part of the nose (not the hard bony bridge) tightly closed for 10 to 15 uninterrupted minutes.
Instruct them: No speaking, no swallowing, no coughing, and no spitting during this time. Let any blood in the mouth simply dribble out into a bowl.
Do not stuff the nose with raw cotton wool (it pulls the clot out when removed).
After bleeding stops: Clean gently around the nose with lukewarm water. Advise them to have no hot drinks for several hours (heat dilates vessels and restarts bleeding), and avoid blowing or picking the nose for 24 hours.
Refer if: Bleeding lasts more than 30 minutes, keeps recurring, or follows a significant head injury.
(c) Bleeding from the Mouth / Tooth Socket
Causes: Severe cuts to the tongue/cheeks, knocked-out teeth, recent tooth extractions, or a fractured jaw.
Aims: Protect the airway (blood is easily inhaled) and control the bleeding.
Management:
Sit the casualty up, with their head tilted slightly toward the bleeding side to let blood drain out.
Apply direct pressure — use a thick sterile gauze pad over the bleeding tooth socket and ask the casualty to bite down hard on it for 10 to 20 minutes.
If a thick dark clot has formed in the socket, do not disturb it! Change pads carefully without pulling the clot out.
No vigorous rinsing or washing of the mouth. No hot drinks for 12 hours (hot liquids dissolve the fragile blood clot). Tell them to gently spit out blood, not swallow it.
Knocked-out permanent tooth: Handle it only by the white crown (never touch the delicate root). Rinse it very briefly if dirty. Store it submerged in a cup of milk, sterile saline, or have the casualty hold it carefully inside their cheek. Rush to a dentist within one hour for successful replantation.
Refer if bleeding persists heavily or recurs.
3.7 Complications of Haemorrhage
Hypovolaemic (Haemorrhagic) Shock: The absolute killer complication.
Anaemia: A delayed complication due to massive red blood cell loss.
Asphyxia: If bleeding occurs in the mouth/airway and blood is inhaled into the lungs.
Unconsciousness and eventual death due to brain hypoxia.
Hypothermia if bleeding is prolonged and the body loses its warm fluid.
📝 When to Suspect Internal Bleeding (Summary)
If a patient suffers a severe injury (e.g., a femur fracture, a high-speed car crash, a penetrating stab wound, a ruptured spleen from a fall, a bleeding stomach ulcer, or a ruptured ectopic pregnancy) AND they exhibit signs of severe shock (pale, sweating, fast weak pulse) WITHOUT any visible pools of blood on the floor = Treat it as massive internal haemorrhage until proven otherwise by a doctor. First aid: Lay flat, enforce complete rest, loosen tight clothing, keep them warm, monitor pulse/breathing, save any vomit/urine specimens for the doctor to examine, give absolutely nothing by mouth (they will need emergency surgery), and arrange extremely urgent, gentle transport.
This category involves damage to the skin, subcutaneous fat, muscles, tendons, and ligaments. Mechanisms include blunt force (causing contusions or crush injuries) and overstretching/overuse (causing sprains, strains, and tendon tears).
4.2 Contusion (Bruise) — Closed Injury
A blunt blow violently ruptures tiny blood vessels under intact skin. This leads to throbbing pain, rapid swelling, and a blue-black discolouration (which slowly changes to green/yellow over days as the blood is reabsorbed).
Management: Apply a cold compress or ice wrapped in a thick cloth to the area for up to 20 minutes to constrict bleeding vessels. Rest the injured part. Elevate it to reduce swelling. (Later, after 48 hours have passed, gentle warmth may help the body absorb the old blood).
Refer if: There is a huge, expanding swelling (could hide a bone fracture or a much deeper severed artery), if the bruise is over the soft abdomen/chest after severe trauma (internal organ bleeding), or if the casualty is taking prescribed blood-thinning medicines.
4.3 Sprain
A sprain is the severe stretching or tearing of LIGAMENTS (the tough, inelastic fibrous bands that hold bone firmly to bone around a joint).
Causes: A joint is violently forced beyond its normal range of motion — e.g., twisting an ankle on uneven ground, twisting a knee during football, or bending a wrist backward during a fall.
Common sites:Ankle, knee, wrist, and fingers.
Signs: Intense, immediate pain, rapid and massive swelling, severe bruising appearing shortly after, extreme joint instability, and painful restricted movement. The casualty usually cannot bear any weight on the joint.
4.4 Strain
A strain is the severe stretching or tearing of MUSCLES or TENDONS (the thick cords attaching muscle to bone).
Causes: Chronic overuse, sudden unaccustomed violent effort, lifting heavy loads with poor posture, or athletic sprinting without a proper warm-up.
Common sites:Lower back, thigh (hamstrings), calf, and neck.
Signs: Deep muscle pain, severe stiffness, profound muscle weakness, painful muscle spasms/cramps, mild swelling. Sometimes a loud "pop" or "snap" is felt or heard at the exact moment of injury.
📝 Sprain vs. Strain — Quick Comparison Table
Feature
SPRAIN
STRAIN
Tissue injured
Ligament (Connects Bone to Bone)
Muscle or Tendon (Connects Muscle to Bone)
Usual site
Joints (ankle, knee, wrist)
Large muscle bellies (back, thigh, calf)
Swelling / Bruising
Marked and rapid
Mild to moderate
Movement
Painful, joint feels loose/unstable
Painful, muscle feels extremely weak
First aid
RICE / POLICE protocol
RICE / POLICE protocol
4.6 First Aid: The RICE / POLICE Protocol
For any soft tissue injury, immediately apply this standard protocol:
P — Protect: Stop the activity immediately. Protect the injured part from further weight-bearing or trauma.
OL — Optimal Loading: Allow gentle, pain-free movement as tolerated. (Modern sports medicine guidance states that total, prolonged rest is no longer advised, as it causes stiffening. Moving it gently promotes blood flow and healing).
I — Ice: Apply a cold pack (or ice wrapped inside a wet cloth) to the injury for 15–20 minutes at a time, several times a day. Cold constricts bleeding vessels and numbs pain. (Warning: NEVER put raw ice directly onto bare skin, it causes severe frostbite tissue damage).
C — Compression: Wrap the joint firmly with an elastic (crepe) bandage to physically squeeze the swelling out. It must be firm, but not tight! Always check that the toes/fingers below the bandage stay warm and pink.
E — Elevation: Raise the injured limb high above heart level using pillows. Gravity pulls the inflammatory fluid away from the injury, drastically limiting swelling.
Other actions: Remove rings or tight watches early, before the swelling becomes massive and cuts off circulation. For analgesia, give paracetamol. Avoid giving aspirin early on, as it thins the blood and increases bleeding into the torn tissues.
4.7 When to Refer a Soft Tissue Injury
If the casualty absolutely cannot bear weight or use the limb at all → treat it as a suspected fracture and refer for an X-ray.
If there is obvious unnatural deformity, extreme bony tenderness, severe swelling, numbness/tingling, or loss of circulation in the toes/fingers below the injury.
If there is no improvement after a few days of RICE, or if the pain/swelling worsens.
The Golden Rule: If you are in any doubt whether an injury is a severe sprain, a strain, or a broken bone — always treat it and splint it as a fracture.
Topic 5: Fractures and Dislocations
5.1 Definitions
Fracture: A break or crack in the continuity of a bone. It can be a complete snap or a partial crack. (Note: A "broken bone" and a "fracture" mean the exact same thing medically).
Dislocation: The bones that form a joint are violently forced out of their normal anatomical position, severely tearing or lengthening the surrounding joint capsule and ligaments. (If it pops out and then pops back into place by itself, it is called a subluxation).
5.2 Types of Fractures
Closed (Simple) fracture: The bone breaks, but the skin above it remains perfectly intact.
Open (Compound) fracture: The sharp, broken bone end violently pierces and breaks through the skin, or an external wound leads deep down to the broken bone. This is a massive emergency due to severe bleeding and the extreme risk of deep bone infection (osteomyelitis).
Complicated fracture: The sharp bone ends damage vital nearby structures (e.g., severing major blood vessels, slicing nerves, or a broken rib puncturing a lung).
Displaced vs. Non-displaced: Displaced means the bone ends are out of alignment (crooked). Non-displaced means the bone cracked but the pieces remained perfectly aligned.
Greenstick fracture: The bone bends and cracks only partway down one side, like trying to snap a young, green tree branch. This is extremely common in children because their bones are soft and flexible. It may look like mild swelling only, with no obvious deformity.
Comminuted fracture: The bone is violently shattered into several small fragments (usually from high-energy injuries like high-speed car crashes or bullet wounds).
Stress fracture: A tiny hairline crack resulting from repeated, prolonged minor stress (common in long-distance athletes or marching soldiers).
Colles' fracture: A very specific break of the distal radius bone in the wrist, causing a distinct "dinner fork" upward deformity. Extremely common when people fall and catch themselves on an outstretched hand.
Pathological fracture: The bone breaks due to an underlying disease (like bone cancer tumours or severe osteoporosis weakening the bone). It often breaks with trivial, everyday force, like simply standing up.
5.3 Signs and Symptoms of Fracture / Dislocation
Intense pain exactly at the site of the break, massively worsened by any movement or pressure.
Rapid swelling and severe bruising over the area.
Deformity / Angulation: The limb looks bent at an unnatural angle, shortened, or the joint looks weirdly "locked" out of place.
Loss of function: The casualty simply cannot move the limb or bear any weight on it.
Extreme bony tenderness when touched gently. Abnormal mobility (the limb bends where there is no joint).
Grating (Crepitus): The horrifying sound or feeling of dry bone ends grinding against each other. (Never intentionally try to feel for this!).
A loud "snapping" sound heard or felt at the exact moment of injury.
Numbness, tingling, or a pale, cold limb below the injury (indicating the broken bone has sliced a nerve or artery).
Signs of profound systemic shock — especially with femur, pelvic, and open fractures. A single closed femur fracture can hide up to 1.5 Liters of internal blood loss; a smashed pelvis can hide even more, causing death by hidden bleeding.
🔍 Fracture vs. Dislocation — Telling Them Apart
Feature
FRACTURE
DISLOCATION
What happened
The hard shaft of the bone cracked/snapped.
The joint surfaces were forced entirely apart.
Look
Swelling, bruising, bent deformity in the middle of a limb.
The joint feels completely locked, stuck, and fixed in place.
Common sites
Wrist, ankle, hip, collarbone, shin.
Shoulder, elbow, finger, knee cap.
Can occur together?
Yes — always consider both.
Yes — a dislocation may hide a severe fracture inside the joint.
5.5 General First Aid Management for Fractures
Aims: Prevent any further tissue damage, control bleeding, treat/prevent shock, and arrange safe transport.
DRABC first. Control any life-threatening bleeding before looking at the broken bone. If it is an open fracture, cover the exposed bone with a large sterile dressing.
Ask the casualty to keep absolutely still. Do not allow them to try and walk or move the broken limb.
Do NOT try to straighten it! Never try to push a protruding bone back under the skin, and never try to "pop" a dislocated joint back into place. You will sever nerves and arteries. Immobilise it exactly in the bizarre position you found it.
Immobilise (Splint) the fracture:
The golden rule of splinting: Immobilise the joint above AND the joint below the fracture site.
Use a rigid splint (smooth wood, stiff cardboard, rolled thick newspaper) heavily padded with cloth. Tie broad bandages above and below the fracture site.
For a broken leg, tie the feet/ankles together securely so the leg cannot rotate outward and grind the bone.
An injured arm can simply be splinted by tying it firmly to the patient's own body. An injured leg can be tied gently to the uninjured, healthy leg, using it as a biological splint.
For a fractured collarbone (clavicle) — support the arm on the injured side in a tight sling (e.g., St John elevation sling).
Check CSM (Circulation–Sensation–Movement): Check the fingers/toes below the injury before and after you tie the splint. If the limb becomes cold, blue, pale, or numb after you tie it, your bandages are too tight! Loosen them immediately and recheck every 15 minutes.
Apply a cold pack wrapped in cloth to the area to relieve pain and limit swelling.
Treat for shock: Lay them flat, keep them warm. Remember that femur, pelvic, and open fractures bleed massively internally.
Suspected spinal fracture: DO NOT move them unless they are in immediate danger of death (like a fire). Support their head and neck firmly in a neutral straight position with your hands. Wait for skilled paramedic help. If you absolutely must move them, use a team to "log-roll" them, keeping the spine perfectly straight.
Urgent transport: Transport to the hospital with the limb heavily supported. Monitor CSM and vital signs continuously in transit.
5.6 Open Fracture — Extra Emergency Points
Cover the horrific wound with a large sterile dressing. Do not attempt to wash dirt out deep inside, do not push the sticking-out bone back in, and do not probe the wound with fingers.
Control bleeding by applying firm pressure around the wound edges, never pressing down directly on the broken bone.
Immobilise the limb very carefully without disturbing the wound dressing.
This is an extreme surgical emergency — there is a massive infection risk to the bone marrow; IV antibiotics and urgent tetanus prophylaxis will be needed at the hospital.
🚨 WHAT NOT TO DO (First Aid Errors)
Never attempt to realign a crooked bone or relocate a dislocated joint (you will slice blood vessels, sever nerves, and crush muscle).
Never move a casualty with a suspected spinal injury unnecessarily.
Never let the casualty eat or drink anything (painkillers, water, or food), as they will likely need emergency surgery under general anaesthesia within hours.
Never bind a splint so tightly that distal circulation is cut off.
Topic 6: Head Injuries
6.1 Definition
A head injury involves any trauma to the scalp, skull, or the brain itself. It ranges from a minor, bloody scalp cut to a rapidly fatal, life-threatening brain injury. Crucial Concept: The brain can be severely injured even when the hard skull remains perfectly intact. The soft brain is violently shaken and slammed against the hard inside walls of the skull during an impact. Always suspect a hidden neck (cervical spine) injury whenever there is a significant head injury — especially in falls from a height, road crashes, or heavy blows that throw the head violently backwards.
6.2 Three Key Patterns to Recognise
(a) Scalp Injury
The scalp has a massive, rich blood supply. Even tiny superficial wounds bleed profusely, making the injury look terrifying. This heavy bleeding may hide a severe skull fracture underneath. Management: Apply direct pressure to stop bleeding, but press gently around the wound first to ensure there is no soft, depressed (caved-in) skull fracture beneath your hand. Bandage firmly and refer.
(b) Concussion (Mild Traumatic Brain Injury)
The brain is violently "shaken" inside the skull, temporarily disrupting its normal electrical function.
Signs: Brief, temporary unconsciousness (seconds to a few minutes), or no unconsciousness at all. The casualty feels dizzy, confused, nauseated, pale, and sweaty. They complain of a mild, all-over headache. They often suffer from amnesia (they cannot recall the accident or the events leading up to it). They may have blurred vision.
Prognosis: The casualty usually recovers fully. However, they must be strictly observed for 24–48 hours because deadly bleeding (compression) can develop slowly and delayed over hours.
(c) Cerebral Compression (Serious — Rising Pressure Inside the Skull)
This is a lethal emergency. Bleeding from a torn vessel or massive swelling of brain tissue causes pressure to build up inside the rigid, closed box of the skull. The rising pressure slowly squeezes and crushes the brain downwards toward the spinal cord.
Signs develop progressively and worsen:
An intense, severely worsening headache.
Declining level of consciousness: The patient becomes increasingly drowsy, hard to wake up, and eventually slips into a deep coma. (This is the most critical key sign!).
Unequal pupils: One pupil becomes huge and blown, while the other remains small.
Flushed, hot, dry skin with a rapidly raised body temperature.
A very slow, strong, bounding pulse, accompanied by very slow, noisy, irregular breathing.
Severe vomiting, and eventually fitting/seizures as the brain is crushed.
Prognosis: Without urgent neurosurgery to drill a hole and relieve the pressure, it is 100% fatal. Immediate emergency referral is required.
📝 Concussion vs. Compression — Master Table
Clinical Sign
CONCUSSION (Shaken Brain)
COMPRESSION (Crushed Brain)
Consciousness
Brief loss, then rapidly recovering and waking up.
Gradually deteriorating, becoming increasingly drowsy and comatose.
Skin
Pale, cold, clammy (sweaty).
Flushed red, dry, intensely hot.
Pulse
Rapid and weak.
Very slow, full, and bounding.
Pupils
Normal, equal, reactive to light.
Unequal (one dilated, one pinpoint), unreactive.
Headache
Mild, generalized.
Intense, severe, rapidly worsening.
Breathing
Normal, perhaps shallow.
Very slow, noisy, snoring, irregular.
Clinical Course
Slowly improves with rest.
Rapidly worsens — a life-threatening surgical emergency.
6.4 Danger Signs — Emergency Referral Immediately
If a casualty with a head bump shows ANY of these signs, rush them to the hospital:
Loss of consciousness (even for a second), or rapidly increasing drowsiness / extremely hard to wake up.
Repeated, forceful vomiting.
A severe or rapidly worsening headache.
Unequal pupils, or complaining of double/blurred vision.
Blood or clear, watery fluid leaking from the nose or ears (CSF leak).
Sudden seizures, slurred speech, deep confusion, or highly unusual aggressive behaviour.
Weakness, numbness, or poor coordination/paralysis of their arms or legs.
A massive soft bump on the head, or dark bruising appearing around both eyes ("raccoon eyes") or dark bruising behind the ears (Battle's sign).
If the casualty is on prescribed blood-thinning medicines, is over 65 years old, is heavily intoxicated with alcohol (hides symptoms), or lives alone with no one to observe them overnight.
6.5 First Aid Management for Head Injuries
DRABC: If they are unconscious but breathing normally, place them very carefully into the recovery position (mind the neck — keep the head, neck, and spine perfectly in line while rolling them).
Support the head and neck: Hold the head firmly in a neutral, straight-ahead position. Do not twist, bend, or tilt the neck. Do not remove a motorcycle helmet unless it is absolutely necessary to maintain an open airway or perform CPR.
Control scalp bleeding: Use gentle direct pressure around, not on, any depressed/caved-in skull area.
Conscious casualty: Have them sit or lie down quietly in a very comfortable, dark position. Apply a cold pack wrapped in cloth to the painful bump for up to 20 minutes to reduce swelling.
Nothing to eat or drink: They may need emergency brain surgery within hours.
Monitor and record: Track their level of response (AVPU), pulse, breathing, and pupil size every 10 minutes. Watch like a hawk for the danger signs above — deterioration from a slow brain bleed can be delayed for several hours.
Arrange urgent referral: To the hospital for anything beyond a trivial, tiny bump, and ALWAYS if the mechanism of injury was significant (e.g., fall from a height, road crash, heavy blow with a weapon, or penetration).
6.6 Aftercare Advice (Mild Head Injury, Observed at Home)
If the doctor discharges a mild concussion patient to go home, give this strict advice:
Strict rest; totally avoid looking at TV/phone screens and avoid any strenuous physical activity for 24–48 hours.
Do not take aspirin or ibuprofen (these thin the blood and increase the massive risk of a brain bleed) — use only simple paracetamol if pain relief is needed.
A responsible adult MUST stay with the casualty for 24 hours. The adult must wake the casualty up and check on their responses every few hours during the night.
Return IMMEDIATELY to the emergency room if: a worsening headache develops, vomiting starts, extreme drowsiness occurs, confusion sets in, pupils become unequal, weakness is felt, or fits/seizures happen.
Note: Any infant/child who is knocked out cold, or shows any danger signs, must be observed in the hospital, never at home.
Topic 7: Burns and Scalds
7.1 Definitions
Burn: Severe tissue injury caused by dry heat (open flames, hot metal objects), extreme cold, corrosive chemicals, severe friction, electricity, or radiation.
Scald: Severe tissue injury caused by wet heat (hot liquids like boiling water, hot cooking oil, hot porridge, soup, and extremely hot steam/vapour).
Clinical Note: Scalds are usually more superficial because the hot liquid quickly runs off the body, but they tend to cover much larger surface areas. Dry flame burns are usually much deeper and more destructive locally.
7.2 People at High Risk of Burns
As a nurse teaching prevention, focus on these vulnerable groups:
Children under 5 years: Pulling pots of boiling food/water off tables, or falling into hot bathing basins.
The elderly: They have very slow reaction times and thin, fragile skin.
Epileptics & people who faint: Frequently suffer horrific burns after collapsing face-first into cooking fires or hot stoves during a seizure.
Diabetics & Leprosy patients: Suffer from severe peripheral nerve damage (reduced sensation) — they may rest their feet against a boiling hot object and literally not feel their flesh burning.
Albinos: Lack protective melanin, suffering extreme sunburns (UV radiation burns) leading to skin cancer.
Factory workers, petrol station attendants, and commercial cooks.
People living in crowded slums using charcoal stoves, open fires, or cheap paraffin ("kerosene") stoves.
7.4 Types of Burns
Dry burns: Direct physical contact with roaring flames, glowing hot objects, or severe friction (road rash).
Electrical burns: High-voltage current passes violently through the body. Leaves distinctive, deep, charred "entry" and "exit" wounds. The deep internal tissue and muscle damage along the current's path is far worse than the tiny skin wound suggests. Extreme Danger: Immediate cardiac arrest.
Chemical burns: Strong acids or alkalis (like bleach, caustic soda, battery acid). Tissue destruction signs may develop very slowly (unlike instant heat burns). Alkalis are worse because they penetrate deep into the flesh like butter.
Radiation burns: Severe UV exposure (sunburn), X-ray overexposure, or "flash burns" to the eyes from industrial welding without a mask.
Cold injury (Frostbite/Cold burns): Exposure to extreme freezing temperatures or industrial cold liquid gases. The skin becomes numb, pale, waxy, and rock-hard.
7.5 Signs and Symptoms of Burns
Intense reddening of the skin (erythema), rapid swelling, and massive painful blisters.
Agonizing pain (paradoxically, pain is most severe in partial-thickness burns because the raw nerve endings are exposed but still alive).
Peeling of dead skin; dry, charred, black, or leathery white skin in deep burns.
Extreme restlessness and profound dehydration (fluid rapidly evaporates from the missing skin).
Airway burns (Inhalation injury): A deadly emergency. Look for singed nasal hairs, black soot around the mouth/nose, a hoarse raspy voice, severe difficulty breathing, and a high-pitched stridor sound. The airway will swell shut in minutes.
Violent shivering (massive heat loss) — this happens even if the casualty feels hot to the touch.
7.6 Classification by Depth
Depth
Clinical Features & Prognosis
Superficial (First-degree)
Damages the top layer (Epidermis) only. Causes intense redness, pain, tenderness, and mild swelling. There are NO blisters. Heals completely and well within days with simple prompt first aid.
Partial-thickness (Second-degree)
Damages the Epidermis + the deeper Dermis. Features massive blisters, incredibly severe pain (raw nerve endings exposed), a wet weeping surface, and moderate swelling. The skin often peels off. High risk of infection. Heals in 1–3 weeks, often requiring medical dressings.
Full-thickness (Third-degree)
Destroys ALL skin layers (epidermis, dermis, hypodermis) and may reach down to fat, muscle, and tendon. The skin looks absolutely dry, waxy, leathery, white, or charred black. Crucially, there is NO PAIN in the centre because the pain nerves are completely burned away and dead. This painlessness severely MISLEADS bystanders about how fatal the injury is. Always requires urgent, specialized hospital surgical care and skin grafting.
Fourth-degree burn
Extends violently straight through to deep muscle, bone, tendons, and ligaments. Threatens the entire limb and function. Extremely life-threatening.
7.7 Extent of Burns
The larger the surface area burned, the greater the massive fluid loss (plasma weeping from the skin), the greater the heat loss, and the higher the risk of fatal hypovolaemic shock and acute kidney failure.
🔍 The Rule of Nines (Wallace) — For Adults
Used to rapidly estimate the percentage of body surface area burned:
Head and neck — 9%
Front of trunk (chest/belly) — 18%
Back of trunk — 18%
Each arm — 9% (both arms total = 18%)
Each leg — 18% (both legs total = 36%)
Perineum (genitals) — 1%
Total = 100%
(Note for Children: Use the "Rule of Sevens" or modified Lund & Browder chart, because a baby's head is proportionally massive [approx. 18-28%] and their legs are much smaller). Approximate Palm Method: The casualty's own flat palm (including their fingers) equals exactly 1% of their body surface. This is highly useful for measuring small, scattered splash burns.
Clinical Danger Zones: If >60% of the body is burned (or just 40% in very young babies or the elderly), fatal kidney failure is highly likely up to 6 weeks later. Any burn covering 30–40% is incredibly severe and requires urgent hospitalization. Any burn >10% requires immediate IV fluid resuscitation.
7.8 First Aid Management of Burns
(a) MINOR Burns (Superficial, small area)
Aims: Relieve pain, halt the burning process, prevent infection, reassure.
Stop the burning: Pour water immediately on flames. If a person is on fire, wrap them tightly in a heavy blanket and roll them on the ground to smother the fire. Do NOT let a burning person run about in panic (running feeds oxygen to the flames and makes them burn hotter).
Cool the burn immediately: Flood the area with cool (not freezing ice-cold) running tap water for at least 10 full minutes (up to 20 minutes for chemical burns). The heat continues to burn deeper into the flesh long after the fire is out; water stops this. Never put raw ice directly on burned skin, as the freezing causes further cellular tissue destruction.
If running water is absent, a clean, cold, soaking wet towel may be applied.
Leave blisters totally intact: Never pop or burst them! The blister roof is nature's perfect sterile dressing. Bursting it opens a massive doorway for fatal infection.
Gently pat the area dry. Cover it loosely with a dry, sterile, non-adherent dressing or a clean plastic bag (which won't stick). Never put raw cotton wool directly onto a wet burn; it will stick permanently.
Absolutely no home remedies: Do not apply butter, cooking oil, toothpaste, raw egg, ash, mud, or aloe vera from unknown sources. They trap the heat inside the skin and cause horrific infections.
Protect the burn from pressure and rough friction. Reassure the casualty.
Check their tetanus immunisation status.
Refer to hospital if: The minor burn involves the delicate face, airway, eyes, hands, feet, genitals, covers a major flexing joint, wraps entirely around a limb (circumferential), is caused by chemicals/electricity, or begins showing signs of yellow pus infection days later.
(b) SUPERFICIAL BUT EXTENSIVE Burns (Large areas)
Call for professional help immediately.
Stop the burning process (water/heavy blanket).
Remove smouldering clothing ONLY if it comes off easily. If melted synthetic clothing is firmly stuck/melted into the flesh, never pull it off! Cut around the stuck pieces carefully with scissors.
Rapidly remove rings, tight watches, belts, and tight shoes — the burned area will swell massively within minutes, and jewelry will act like a tourniquet, cutting off the limb's blood supply.
Cooling rules for LARGE burns: If the burn is smaller than the casualty's chest → cool heavily with running water. If the burn is LARGER than the chest → do NOT immerse them in cold water or use cold showers. Because they have lost so much skin, massive cold water will cause fatal systemic hypothermia. Simply cover the vast burn with clean, dry, non-adherent sheets.
Carefully separate severely burnt fingers/toes with dry sterile dressings so the raw flesh does not heal and fuse together.
Treat for massive shock: Lay them flat, keep the unburned parts of their body warm with blankets (burnt skin loses body heat extremely fast).
Urgent hospital transfer. Keep their head still and supported during transit.
🚑 General Referral Criteria for Burns (Exam Gold)
You must refer the patient to a major hospital burn unit if you see ANY of the following:
Full-thickness (3rd degree) burns of absolutely any size.
Partial-thickness (2nd degree) burns covering > 5% of the body surface.
Any burn whatsoever on the face, hands, feet, genitals, perineum, or major joints.
Circumferential burns (burns wrapping entirely around an arm, leg, or the chest, which act like a shrinking corset and cut off blood/breathing).
All electrical, chemical, and inhalation (airway/smoke) burns.
Burns in tiny children, the frail elderly, or people with serious pre-existing illnesses (diabetes, epilepsy).
Any burn where you highly suspect non-accidental injury (child abuse/torture).
7.9 Complications of Burns
Immediate: Destruction of vessels, nerves, and tendons; melted foreign bodies embedded in the flesh; profound skin loss and necrosis; deadly airway obstruction/respiratory distress from inhaling superheated smoke.
Intermediate (Hours/Days later): Severe secondary bacterial infection; massive clinical shock from unbearable pain; profound dehydration and dangerously reduced circulating blood volume (gallons of plasma weep constantly from the raw burn); severe electrolyte imbalance.
Late (Weeks/Years later): Fatal sepsis; severe contractures (the thick scar tissue shrinks and tightly binds across joints, physically preventing the patient from straightening their arm or neck); massive renal (kidney) failure; ugly unstable/keloid scars; permanent alopecia (hair loss); and Marjolin's ulcer (a highly aggressive squamous cell carcinoma skin cancer that develops inside an old, severe burn scar years later).
7.10 Electrical Burns
Dangers: The massive, hidden danger is Cardiac Arrest (as the raw current passes straight through the heart, destroying its electrical rhythm). It causes severe, extremely deep internal burns (leaving small entry and exit wounds on the skin). The deep muscle and nerve tissue damage along the current's hidden path inside the body is far worse than the tiny skin wound suggests. It causes violent muscle spasms that throw the casualty across the room, causing secondary spine/head fractures. Note: Wearing damp clothing or wet footwear, or standing on wet ground, drastically increases conduction and makes the electrical damage fatal.
Management of Electrical Injury
Switch off the current / pull the plug immediately at the wall. NEVER touch the casualty while they are still in contact with the live source. You will be electrocuted instantly and become the second body on the floor.
If the casualty is lying in a pool of electrified water — stay completely out of it; water conducts electricity perfectly.
If you absolutely cannot find the switch and they are actively frying on a live wire: forcefully separate them from the wire using a long, completely dry wooden stick (like a broom handle). Stand on a dry, non-conductive surface (a wooden pallet, a thick pile of dry newspapers, or a rubber mat). Wear thick rubber gloves if available.
High-Voltage Power Lines: If a power pole falls on a car, do not approach within 18 meters! The ground itself is electrified. Wait until the national power company officially confirms the grid is dead.
Once contact is broken, perform DRABC. Give CPR immediately if they are unresponsive and not breathing (cardiac arrest is extremely common here).
Flood the visible skin burns with cool water for ≥ 10 minutes.
Remove jewellery/constrictions before massive swelling occurs. Cover with a sterile non-adherent dressing and bandage loosely.
Treat for shock. Give oral fluids if they are fully conscious. Monitor and record vital signs carefully.
URGENT hospital referral: Deep internal heart muscle damage and deadly arrhythmias may suddenly appear hours later. Therefore, ALL electrical injuries must be evaluated in a hospital with an ECG.
7.11 Chemical Burns
Caused by strong industrial acids or alkalis. The intense stinging pain is immediate, but the visible discoloration, massive blistering, peeling, and swelling develop very slowly over time (unlike instant heat burns). Note: Alkalis (like drain cleaner) are far more dangerous than acids because they penetrate deep into the flesh, liquefying fat and tissue.
Management (Aims: Disperse the chemical rapidly, make the area safe)
Assess scene safety (beware of toxic fumes or gas clouds; wear thick gloves and eye protection to protect yourself).
Move the casualty far away from the chemical spill zone.
Flood the affected area with massive amounts of copious running water for at least 20 full minutes. (Water dilutes and washes away the corrosive agent).
Gently remove contaminated, soaked clothing while you are flooding the area with water. (Use scissors to cut shirts off; do not pull chemical-soaked shirts over the face/head, or you will blind them).
Do NOT attempt to "neutralise" the burn (e.g., do not pour vinegar on an alkali burn). The chemical reaction will generate explosive thermal heat and boil the flesh. Do not delay washing while searching for a specific chemical antidote. Just use endless water!
Identify the chemical (grab the bottle or read the hazardous label) and pass this vital information to the hospital doctors.
Watch the airway closely if fumes were inhaled. Urgent referral.
7.12 Chemical Burn to the Eye — A FIRST AID EMERGENCY
Corrosive chemicals splashed into the delicate eye can scar the clear cornea in seconds, leading to permanent, irreversible blindness. Treatment speed is everything.
Irrigate immediately: Hold the affected eye under gently running, cold tap water for at least 10 minutes (ideally 15–20 minutes continuously).
Ensure the water flushes deeply under both sides of the eyelid. This is easier if you pour from a glass/jug, use a tap, or a proper eyewash station.
The intense pain will cause the eyelid to shut in a violent spasm. You must gently but firmly force the eyelid open with your fingers to let the water inside.
Ensure the contaminated, toxic rinse water drains away down the side of the face. Do NOT let it flow over the bridge of the nose and splash into the good, uninjured eye!
Wear gloves. Do not forcibly remove melted contact lenses. The casualty must not rub the eye under any circumstances.
After 20 minutes of irrigation: cover the eye gently with a sterile eye pad.
Rush to the hospital immediately. Bring the chemical bottle with you.
Topic 8: Eye, Ear and Nose Injuries
8.1 Eye Injuries
Core Principles for ALL Eye Injuries:
Do not let the patient rub, touch, or press the injured eye. Do not attempt to pull out embedded objects. Do not apply any random ointments or eye drops. Give absolutely NO aspirin or ibuprofen (these thin the blood and will cause massive bleeding inside the delicate eyeball). Rush them to an eye clinic. Crucial trick: Because human eyes are biologically wired to move together synchronously, you must cover the uninjured, good eye too with a pad. If the good eye is blindfolded, the patient will stop looking around, which perfectly paralyses and rests the injured eye.
(a) Foreign Body on the Eye (Dust, loose eyelash, flying grit, small insect)
Wash your hands thoroughly.
Tell the casualty not to rub. Ask them to blink repeatedly and let their natural tears wash the object out.
Gently pull the upper eyelid out and down over the lower lid (the lower eyelashes act as a brush to sweep the particle out from under the top lid).
Rinse the eye gently with clean water or sterile saline, pouring from the inner corner (near the nose) outward.
If it does not wash out easily, or feels scratched → cover the eye with a pad and refer to a clinic.
(b) Embedded / Penetrating Object in the Eye (Metal shard, broken glass, sharp stick)
MASSIVE EMERGENCY. Never attempt removal! Pulling it out will rip the eyeball open, causing all the internal fluids to leak out, leading to instant blindness and massive bleeding.
Leave the sharp object exactly in place. Do not press on it or touch it.
Pad around the object: Build a thick ring of sterile gauze (a "doughnut" pad) around the stick/glass, or place a hard plastic paper cup/shield over the entire large object. Tape the shield to the facial bones so that absolutely nothing touches or bumps the embedded object.
Cover the other, healthy eye with a dark pad to completely stop all eye movement.
Keep the casualty perfectly still (lying flat on their back if possible) and arrange immediate, smooth hospital transfer.
(c) Blow to the Eye / Black Eye / Blunt Eyeball Injury
Apply a cold compress very gently (for 10 minutes) to the surrounding bruising to reduce swelling. If the severe pain persists, vision becomes blurred or double, or the inside of the eye looks filled with pooling red blood (hyphaema) → refer instantly. There may be a devastating internal blowout fracture or retinal detachment. Never press hard on a swollen, painful eye.
8.2 Ear Injuries
(a) Foreign Body in the Ear (Beans, plastic beads, insects — very common in kids)
Do NOT poke blindly inside with matchsticks, hairpins, or cotton buds! You will push the hard object deeper and permanently rupture the delicate eardrum. For a live, buzzing insect: Tilt the head sideways and gently pour in a little warm (body-temperature) cooking oil or clean water to drown and float the insect out.
For any other solid object, leave it alone and refer to a health worker with proper suction/forceps.
(b) Bleeding / Clear Fluid from the Ear
If bleeding occurs after a severe head injury, and the blood is thin, watery, or mixed with clear yellowish fluid, this is a CSF (Cerebrospinal Fluid) leak indicating a catastrophic basal skull fracture. EMERGENCY:
Do NOT plug the ear with tight cotton wool! Plugging it traps the fluid, forcing bacteria backward into the brain, causing fatal meningitis. Let the fluid drain freely.
Do not clean deep inside. Simply tape a sterile pad loosely over the outer ear to catch the drips.
Keep the casualty completely still; arrange urgent referral; treat them as having a severe head and possible broken neck injury.
If the ear bleeds without a head injury history (e.g., eardrum rupture from a vicious slap to the side of the head, blast wave, loud noise, or severe middle ear infection): keep the ear totally dry, insert absolutely no ear drops, and refer.
(c) Perforated Eardrum
Signs: The patient had severe ear pain that suddenly felt "relieved" after a pop, followed by hearing loss, loud ringing (tinnitus), and sometimes a little blood trickling out. Keep the ear completely dry (no swimming, place cotton wool loosely when bathing to stop water entering). Apply absolutely no ear drops unless prescribed by a doctor. Refer. Most heal naturally in a few weeks, but infections need antibiotics.
8.3 Nose Injuries
(a) Fractured Nose
Signs: Extreme pain, massive rapid swelling, visible crooked deformity, profuse nosebleed, blocked nasal breathing, and dark black bruising developing under both eyes. Management: Have them sit leaning forward. Apply a cold compress gently on the bony bridge. Control bleeding by pinching the soft fleshy part. Do not try to forcefully straighten the crooked nose yourself. Encourage mouth-breathing. Urgent referral (doctors get the best cosmetic reduction results if it is fixed within the first few days before the bone sets).
(b) Foreign Body in the Nose (Children pushing beans/beads)
Do not attempt removal at home using tweezers (massive risk of pushing the smooth object backward down the throat into the airway, causing fatal choking). Keep the panicked child calm, tell them to breathe through their mouth, and refer to a clinic.
Topic 9: Bites and Stings
9.1 Human Bites
Human mouths carry incredibly dangerous, aggressive bacteria. There is a massive infection risk. Bites occurring over the knuckles (when someone punches another person in the teeth, known as a "fight bite") infect the deep joint capsule quickly and violently. Management: Wash the wound intensely and thoroughly with soap and running water. Control bleeding. Cover with a clean dressing. Refer immediately. The casualty will almost certainly need strong prophylactic antibiotics. The doctor will also check their tetanus status and assess the risk of Hepatitis B or HIV transmission. Document carefully and report if it was a violent assault.
Why it matters in Uganda: Uganda is highly rabies-endemic. Rabies is a terrifying viral disease that attacks the brain. It is 100% fatal once neurological symptoms start (killing ~59,000 people globally per year, mostly children in Africa). However, Post-Exposure Prophylaxis (PEP) given BEFORE symptoms appear is nearly 100% protective and life-saving. Stray dog bites are the main source. Unfortunately, studies in Uganda show that many poor bite victims delay treatment or consult useless traditional healers, and die. The nurse must insist on immediate hospital referral.
First Aid for a Rabid Animal Bite
Wash the wound IMMEDIATELY and vigorously with soap and running water for at least 15 uninterrupted minutes. This single mechanical step physically washes the fragile rabies virus out of the torn flesh, and combined with PEP, reduces rabies risk by up to 90%.
If available, apply a strong antiseptic that kills viruses (povidone-iodine or 70% alcohol) directly into the wound after washing.
Control severe bleeding with direct pressure and cover with a clean dressing.
Do NOT suture (stitch) the wound closed unless it is absolutely essential to stop fatal arterial bleeding. Stitching physically traps the deadly virus deep inside the tissues. If stitches are essential, doctors will do them loosely, and only after PEP injections have started.
URGENT referral to a major hospital for Rabies PEP and Tetanus prophylaxis.
Rabies Post-Exposure Prophylaxis (PEP) — WHO Categories
As a nurse, you must know how to categorize the exposure to give the right treatment:
Category
Type of Contact with Animal
Required Medical Action
Category I
Touching or feeding the animal; animal licks on perfectly intact, unbroken skin.
No exposure risk. Wash the skin with soap. No vaccine needed.
Category II
Animal nibbling on uncovered skin; minor scratches or tiny abrasions without drawing blood.
The Vaccine: A modern cell-culture vaccine given Intramuscularly on a strict schedule: Days 0, 3, 7, 14, and 28. You must strongly emphasise to the patient that they must return to complete all 5 doses, or they will die.
Rabies Immunoglobulin (RIG): For severe Category III bites, ready-made antibodies are injected directly into and around the bite wound ASAP to neutralize the virus before it reaches the nerves. Dose is 20 IU/kg (human) or 40 IU/kg (equine). Any remaining volume is injected IM at a distant site.
Observe the biting animal for 10 days (by vet authorities) if possible to see if it dies of rabies — but never delay starting the PEP injections while waiting for the dog to die!
9.3 Snake Bites
Uganda is home to highly venomous snakes (Cobras, Mambas, Vipers, Puff Adders). Most bites occur on the bare legs, feet, and hands of farmers working in bushes or reaching into dark holes. Many victims die or suffer horrific amputations because they visit traditional healers who cut the wound, delaying modern medical care. Antivenom is the ONLY definitive treatment that saves lives.
First Aid (What TO do)
Move the casualty safely away from the snake. Do not act brave and try to catch or kill it (the severed head of a snake can still bite and inject venom reflexively hours after death!). A quick photo from a safe distance helps doctors choose the right antivenom.
Keep the casualty completely STILL and CALM. Extreme panic, a racing heartbeat, and running around wildly pumps the deadly venom rapidly through their lymphatic system into the heart and brain. Lay them down. Splint the bitten limb heavily to completely stop muscle movement. Keep the limb roughly at heart level (or slightly below if you suspect a neurotoxic cobra bite).
Rapidly remove rings, bracelets, and tight clothing near the bite before massive, crushing swelling begins.
Wash the bloody bite wound gently with soap and water.
Use a pen to draw a circle around the leading edge of the swelling and write the exact time next to it. This brilliantly helps doctors track how fast the venom is destroying tissue.
Arrange incredibly urgent transport to a major facility stocking antivenom. Carry the casualty to the vehicle if possible (walking pumps the venom!).
Monitor breathing and pulse constantly. Be ready for CPR. If you see weak drooping eyelids, drooping face, or the patient complains of difficulty swallowing or breathing = this is a massive neurotoxic emergency. Their diaphragm is paralysing. Support their breathing with an Ambu bag and drive faster.
🚨 WHAT NOT TO DO (Classic Exam Traps & Deadly Myths)
Do NOT cut the wound open or make "X" incisions with a razor. It causes fatal bleeding and introduces tetanus.
Do NOT suck the venom out using your mouth or a pump. It does absolutely nothing to extract venom that has already bonded to tissues, and the bacteria in your mouth will infect the wound.
Do NOT apply a tight tourniquet that cuts off all arterial blood. It traps the highly destructive venom in the limb, concentrating the acid and guaranteeing the leg will rot and require amputation.
No ice packs, no electric shocks, no herbal poultices, no traditional "black stones", and no alcohol (which speeds up heart rate).
Do not give aspirin (snake venom already destroys the blood's ability to clot; aspirin will cause massive internal bleeding).
Note on bandages: A firm pressure-immobilisation bandage (like wrapping a sprain) is endorsed internationally for neurotoxic elapid bites (cobras/mambas) to slow lymph flow. However, for viper bites (puff adders) which cause massive blistering swelling, a tight bandage acts like a tourniquet and dramatically worsens flesh rotting. Because laypeople cannot identify snakes accurately, the safest universal rule taught in Uganda is: Splint it, keep them totally still, and transport extremely fast.
Signs of Envenomation (For clinical monitoring)
Local signs: Searing severe pain, massive rapid swelling, dark purple bruising, huge blood blisters, and continuous oozing bleeding from the tiny puncture fangs.
Haemotoxic (Vipers): Destroys blood clotting. Look for spontaneous bleeding from the gums, nose, blood in urine, or vomiting blood.
Neurotoxic (Cobras/Mambas): Paralyzes nerves. Look for drooping eyelids (ptosis), blurred/double vision, slurred drunken speech, trouble swallowing saliva, general severe weakness, and finally fatal respiratory muscle paralysis.
Profound shock, severe nausea, vomiting, and fainting.
9.4 Insect Stings (Bees, Wasps, Ants)
Most stings cause intense local burning pain, redness, and a swollen welt. Management: Swiftly scrape the stinger off sideways using a fingernail or the hard edge of a credit card. Do not squeeze the stinger with tweezers! Squeezing it acts like a syringe plunger, injecting the remaining venom sac into the skin. Wash the area, apply a cold compress to relieve pain, and observe. Dangerous situations: Multiple stings (disturbing a swarm of angry bees) or a sting directly inside the mouth/throat (the resulting massive swelling can quickly block the airway and choke the patient to death — give them ice cubes to suck on continuously and refer instantly). Anaphylaxis (Severe Deadly Allergy): A patient allergic to bee stings will develop sudden facial/tongue swelling, massive hives all over the body, severe wheezing/stridor, a hoarse voice, dizziness, and collapse. Treatment: Lay flat with legs raised (or sit up if struggling to breathe). Administer Adrenaline 0.5 mg IM (1:1000) deep into the anterolateral thigh immediately. Repeat every 5–10 minutes if no response. Use antihistamines + steroids as adjuncts. Urgent hospital referral. Casualties with known severe allergies should carry an adrenaline auto-injector (EpiPen) at all times.
9.5 Tick Bites
Ticks bury their heads in the skin and suck blood, transmitting dangerous fevers. Management: Grasp the tick's head with fine tweezers as close to the human skin as possible. Pull straight upward with steady, even pressure. Do not twist or jerk the tick (the head will snap off and remain stuck in the flesh). Do not burn it with a match or cover it in petrol/vaseline (this causes the tick to vomit its infected stomach contents into the patient's bloodstream before dying). Clean the site with alcohol. Watch for a strange rash or high fever in the following weeks, and refer to a clinic if illness develops.
Quick Revision Summary (High-Yield Exam Points)
Injury Type
KEY Action / Management
Severe bleeding
Direct pressure 10–15 mins, add layers, elevate, immobilise.
Arterial bleed
Bright red, spurting → brutal direct pressure, use pressure points (brachial/femoral).
Internal bleeding
Shock signs without visible blood → lay flat, strict NPO (nothing by mouth), urgent transport.
Epistaxis (Nosebleed)
Lean FORWARD, pinch the SOFT part of nose 10–15 mins continuously.
A medical emergency is a sudden illness or medical condition that threatens a person's life or long-term health, requiring immediate treatment.
Unlike trauma emergencies (which are caused by physical external forces like wounds, fractures, or burns), medical emergencies arise from inside the body due to failures in organs (heart, brain, lungs), metabolism, poisoning, or extreme heat.
When approaching someone who is suddenly ill, always follow a systematic approach to ensure you do not miss a life-threatening issue:
D — Danger: Check the scene is safe for you, the casualty, and bystanders. Look out for traffic, fire, chemical fumes, or live wires. (Remember: A dead rescuer helps no one!)
R — Response: Check if the casualty is responsive using the AVPU scale:
A — Alert (fully awake, eyes open).
V — Responds to Voice (opens eyes when you shout).
P — Responds to Pain (reacts when you firmly pinch their shoulder or earlobe).
U — Unresponsive (completely unconscious).
A — Airway: Open the airway using the head-tilt, chin-lift maneuver. Look inside for any visible obstruction (like vomit or food).
B — Breathing: Look, listen, and feel for normal breathing for up to 10 seconds.
If breathing normally but unconscious ➔ place them in the recovery position to keep the airway clear.
If NOT breathing normally (or just gasping) ➔ call for help and start CPR immediately.
C — Circulation: Check the pulse, note the skin colour (pale or blue?), check temperature (hot or cold?), and control any severe bleeding if present.
Call for help early: Shout for a bystander to call an ambulance or arrange transport to the nearest Health Centre while you stay with the casualty.
Reassure the casualty constantly: Severe anxiety makes the heart work harder and worsens most medical emergencies.
Do no harm: Never give food, drink, or oral medicine to a drowsy or unconscious casualty (they will aspirate/choke on it).
🧠 HISTORY-TAKING MNEMONIC: SAMPLE
To figure out exactly why the person is sick, ask these questions to them or their relatives:
Letter
Meaning
Description
S
Signs & Symptoms
What do you see? What does the casualty feel? (e.g., "My chest hurts").
A
Allergies
Are they allergic to any drugs, foods, or insect stings?
M
Medicines
What medicines do they take daily? (e.g., insulin, asthma inhalers, antihypertensives). This is a huge clue to their underlying disease.
P
Past Medical History
Do they suffer from diabetes, asthma, epilepsy, hypertension, or heart disease?
L
Last Meal
When did they last eat or drink? (Crucial if they need emergency surgery, or if they are hypoglycaemic).
E
Events
What exactly were they doing leading up to the emergency? (e.g., running in the hot sun).
1.4 The Nurse's Role in a Medical Emergency
Assess and recognise the emergency quickly (primary survey + SAMPLE history).
Give immediate first aid within your scope of practice to stabilize the patient.
Arrange urgent referral along the Uganda referral chain (Village Health Team ➔ HC II ➔ HC III ➔ HC IV/Hospital). You must write a clear referral note detailing what happened and what you did.
Document: Record the time of onset, vital signs, treatment given, and the patient's response.
Educate: Teach the casualty and family on how to prevent a recurrence of the emergency.
Topic 2: Fainting (Syncope)
2.1 Definition
Fainting (syncope) is a sudden, temporary loss of consciousness and postural tone (they collapse) caused by a short-lived reduction of blood flow (and therefore oxygen) to the brain.
Why it happens: The brain requires a constant, heavy supply of oxygenated blood. If blood pressure drops suddenly, gravity pulls blood away from the head. The brain shuts down consciousness to force the body to fall flat, putting the head and heart on the same level so blood can easily flow back to the brain! It usually lasts only seconds to a few minutes, and recovery is rapid and complete if the casualty is laid flat.
2.2 Types of Syncope
Vasovagal syncope (Commonest, ~50%+): A reflex drop in heart rate and blood pressure triggered by sudden pain, extreme fear, emotional shock, the sight of blood, or prolonged standing in a hot environment.
Orthostatic (postural) hypotension: Blood pools in the legs when standing up too quickly, causing dizzy spells. Very common in dehydration, older adults, pregnant women, and patients taking strong blood pressure drugs.
Situational syncope: Triggered by specific bodily actions like violent coughing, sneezing, swallowing, urination (micturition syncope), or severe straining during defecation.
Cardiac syncope: Caused by an abnormal heart rhythm (arrhythmia) or heart valve disease. This is serious and may occur suddenly during exertion, with absolutely no warning signs.
Other causes: Hypoglycaemia (low sugar), anaemia (low blood count), heat exposure, severe pain, vaginal bleeding (e.g., a ruptured ectopic pregnancy), and stroke (rare).
2.3 Signs and Symptoms
Before fainting (Prodrome/warning signs):
Light-headedness / dizziness ("feeling like the world is spinning").
Nausea, yawning heavily, feeling suddenly very warm.
Sweating, with cold, clammy (moist) skin.
Extreme paleness (pallor), blurring or narrowing of vision ("tunnel vision"), and ringing in the ears.
Pulse is initially slow, but may later quicken to compensate.
During fainting:
The person collapses; brief loss of consciousness. Usually recovers within 20–60 seconds once they are lying flat.
Brief, mild muscle twitching may occur (do not confuse this with full epilepsy).
After fainting:
Rapid recovery, but they may feel weak, embarrassed, and nauseated.
2.4 First Aid Management
Check DRABC. If you see the casualty falling, step in to ease them to the ground and protect their head from hitting hard surfaces.
Lay the casualty flat on their back and raise their legs about 30 cm (above heart level). Explanation: Raising the legs allows gravity to pull pooled blood from the legs directly back to the heart, which then pumps it straight to the brain, waking them up instantly. Loosen tight clothing (collar, belt, tie) to improve blood flow.
Ensure a good supply of fresh air — open windows and firmly ask crowds of bystanders to stand back and give them space.
Reassure the casualty once they recover; explain gently what happened to calm them down.
When fully recovered, let them sit up gradually (sitting for a few minutes first, then standing slowly to observe if the dizziness returns).
Once they are fully alert and can swallow perfectly, give them water or a sweet drink (especially if the faint was caused by hunger, dehydration, or heat).
If they are NOT breathing normally at any point ➔ assume cardiac arrest, start CPR, and call for emergency help.
🚨 What NOT To Do
Do not give anything to eat or drink while the casualty is drowsy or not fully awake (massive risk of choking and aspirating fluid into the lungs).
Do not crowd around the casualty or allow panic to spread.
Do not slap their face, shake them violently, or pour buckets of water over their face to "wake them up".
Do not let the person stand up quickly or walk away immediately; they will likely faint again.
2.6 When to Refer / Seek Medical Help
Urgently refer the patient to a health facility if:
Fainting occurred suddenly without warning, during exercise, or while they were lying down (this points to a dangerous heart problem).
The casualty does not wake up within 1 minute, or recovers but remains highly confused.
There is associated chest pain, severe breathlessness, or palpitations.
They sustained an injury during the collapse (e.g., they hit their head — watch closely for later drowsiness or vomiting indicating bleeding in the brain).
The casualty is pregnant, elderly, or has a history of heart disease, diabetes, or severe anaemia.
The fainting spells are recurrent.
Topic 3: Diabetic Emergencies
3.1 Background
Diabetes mellitus is a chronic metabolic condition where blood glucose (sugar) is poorly controlled due to issues with the hormone Insulin.
Type 1: The pancreas produces little to no insulin. The patient absolutely needs daily insulin injections to survive.
Type 2: The body has insulin resistance (it produces insulin, but the cells ignore it). Managed with diet, oral tablets, and sometimes insulin injections.
Normal fasting blood glucose is 3.9–6.1 mmol/L (70–110 mg/dL).
There are two major diabetic emergencies: HYPOglycaemia (dangerously low sugar) and HYPERglycaemia (dangerously high sugar, which may lead to DKA/HHS coma). Hypoglycaemia is the most common diabetic emergency in the community. It develops incredibly fast and can kill the brain quickly.
3.2 HYPOGLYCAEMIA (Low Blood Sugar)
Definition: Blood glucose falls to < 3.9 mmol/L (< 70 mg/dL) with symptoms.
Why it kills: The brain cannot store its own glucose. It relies on a continuous supply from the blood every single second. If blood sugar drops too low, the brain starves, leading to confusion, seizures, coma, and permanent brain death.
Causes (Think: "Too much insulin or Too little sugar")
Missed or delayed meals, or eating an inadequate amount of food.
Taking too much insulin or diabetes tablets (accidental overdose, or taking the wrong dose).
Unusual, heavy physical exertion or exercise without eating extra food to compensate.
Drinking alcohol (especially on an empty stomach, which blocks the liver from releasing stored sugar).
Vomiting or diarrhoea; severe fever or infection.
Signs and Symptoms (Develop SUDDENLY — in minutes)
Skin becomes very sweaty, cold, and clammy (moist).
Palpitations (heart pounding fast) and rapid pulse.
Pale skin.
Anxiety, irritability, sudden confusion, unusual bizarre behaviour, or aggression (the person may look and act like they are drunk!).
Blurred vision, dizziness, severe headache, and slurred speech.
Drowsiness progressing to deep unconsciousness and violent seizures if left untreated.
First Aid — CONSCIOUS Casualty
Give fast-acting sugar IMMEDIATELY (about 15–20 g):
3–4 glucose tablets, OR
150 ml of fruit juice or a regular (NOT diet) sugary soft drink, OR
2–3 teaspoons of ordinary sugar or honey dissolved in a little water.
Wait 15 minutes, then recheck their symptoms (or recheck blood glucose if you have a glucometer).
If their sugar is still low or they are still symptomatic ➔ repeat the fast-acting sugar dose.
Once they have recovered and feel better ➔ give them a longer-acting carbohydrate snack (like a slice of bread, a banana, or a glass of milk). Explanation: Fast sugar spikes the blood level quickly, but it crashes fast too. The complex carbs provide a slow, steady release of energy to prevent a relapse.
Help them find the cause of the drop, and advise the casualty to inform their health worker to review their treatment doses.
First Aid — UNCONSCIOUS Casualty (Severe Hypoglycaemia)
Do NOT give anything by mouth! (They will choke and die).
Place them carefully in the recovery position to protect their airway; check breathing continuously.
If at a health facility: Administer 50% Dextrose 50 ml IV slowly (this is a critical nursing role), or give Glucagon 1 mg IM/SC if available.
If in the community: You can carefully rub a thick paste of sugar or honey into their gums/buccal cavity (inside the cheek). It absorbs slowly through the lining of the mouth. Meanwhile, arrange URGENT transport to a health facility.
After regaining full consciousness, give oral sugar and a solid carbohydrate snack.
3.3 HYPERGLYCAEMIA (High Blood Sugar)
Definition: Persistently high blood glucose, usually > 11 mmol/L (> 200 mg/dL) causing symptoms. Severe untreated forms lead to Diabetic Ketoacidosis (DKA) or Hyperosmolar Hyperglycaemic State (HHS).
Causes
Missed insulin doses or running completely out of insulin.
Severe infection (e.g., Malaria, Pneumonia, Urinary Tract Infection), illness, injury, or surgery. (Infections cause the body to release stress hormones which drastically raise blood sugar).
Extreme stress, eating a very poor high-sugar diet, or being an undiagnosed diabetic.
Signs and Symptoms (Develop GRADUALLY — over hours to days)
Intense, unquenchable thirst (polydipsia) and exceptionally frequent urination (polyuria). The body is trying to flush the toxic levels of sugar out through the urine.
Dry mouth and extremely dry skin; a flushed, warm face.
Deep weakness, fatigue, and blurred vision.
Rapid, deep, sighing breathing (Kussmaul breathing). The body is trying to blow off toxic acids from the blood.
Fruity or acetone smell on the breath (smells like nail polish remover or rotting apples, caused by ketones).
Nausea, severe vomiting, and acute abdominal pain.
Confusion and drowsiness leading slowly to a deep coma (DKA/HHS).
First Aid
Sit or lay the casualty down comfortably; reassure them.
If they are fully conscious: give them plain water to sip (they are severely dehydrated from urinating so much). Do not give sugary drinks.
Urgent referral to hospital — DKA and HHS are highly life-threatening and require IV insulin drips and massive IV fluid replacement. You cannot fix this with first aid.
If unconscious: place in the recovery position, give absolutely nothing by mouth, check breathing constantly, and transport urgently.
📝 EXAM STRATEGY: Hypo vs Hyper Comparison
Feature
HYPOglycaemia (Low Sugar)
HYPERglycaemia (High Sugar)
Onset
Sudden (Minutes)
Gradual (Hours to Days)
Skin
Pale, cold, sweaty (clammy)
Dry, flushed, warm
Breathing
Normal
Rapid and deep (Kussmaul)
Breath Smell
Normal
Fruity / Acetone (Ketones)
Consciousness
Confused, aggressive ➔ sudden collapse
Drowsy, lethargic ➔ slow coma
Food Response
Responds very quickly to sugar
Does NOT improve with sugar
Emergency Action
Give sugar NOW!
Give water + Urgent hospital referral
Topic 4: Asthma Attack
4.1 Definition
Asthma is a chronic inflammatory disease of the airways characterized by reversible narrowing (bronchospasm), excess thick mucus production, and airway swelling. An asthma attack is a sudden, severe worsening of these symptoms; severe attacks can completely block the airway and be fatal.
4.2 Common Triggers
Dust, pollen, smoke (including firewood smoke — a massive trigger in rural Uganda), and animal dander (hair/skin flakes).
Respiratory infections like the common cold or flu.
Heavy exercise, breathing very cold air, or sudden weather changes.
Strong smells, harsh chemicals, and sprays (including some strong insecticides).
Extreme emotional stress, severe anxiety, or even violent laughter.
Certain medicines (like Aspirin, NSAIDs, or Beta-blockers) and some food preservatives.
4.3 Signs and Symptoms
Wheezing: A high-pitched whistling sound heard primarily when the patient is breathing out (exhaling).
Persistent dry cough (especially severe at night).
Extreme difficulty breathing; complaining of severe chest tightness.
Speaking in short sentences or single words because they are too breathless to complete a full thought.
Using accessory muscles to breathe (you can see the skin between their ribs sucking in deeply); sitting hunched forward in the "tripod" position to force air into their lungs.
Severe anxiety and visible fear in their eyes.
IN A SEVERE ATTACK:
Cyanosis: Blue lips and fingertips due to lack of oxygen.
They become utterly exhausted and drowsy.
"Silent Chest": You hear no wheeze at all. This is terrifying because it means the airways are so tight that air is hardly moving in or out. This is a pre-arrest sign!
4.4 First Aid Management
Keep the casualty UPRIGHT (Sitting): Have them sit leaning slightly forward with their arms resting on a table or their knees. Explanation: Sitting upright allows gravity to pull the diaphragm down, giving the lungs maximum room to expand. NEVER lay an asthma casualty flat on their back; they will suffocate.
Stay extremely calm and reassuring. Do not panic, and do not leave the casualty alone. Anxiety makes the airways constrict even tighter.
Help them take their RELIEVER inhaler (usually Blue — Salbutamol):
With a spacer (Best method): Spray 1 puff into the plastic spacer chamber, then have them take 4–6 deep breaths in and out of the spacer. Repeat this up to 4 puffs.
Without a spacer: Spray 1 puff while they are breathing in slowly and deeply; ask them to hold their breath for ~4 seconds so the medicine settles in the lungs. Repeat to 4 puffs.
Wait for 4 minutes. If their breathing has not returned to normal ➔ give another 4 puffs in the exact same way.
If there is little or no relief, or the attack was incredibly severe from the very start ➔ call an ambulance / arrange urgent transport immediately. Continue giving 4 puffs every 4 minutes while travelling to the hospital.
If the casualty becomes unconscious ➔ check DRABC, place in the recovery position if breathing, or start CPR if not breathing.
🚨 What NOT To Do
Do not lay the casualty flat.
Do not give them a paper or plastic bag to breathe into! (That technique is strictly for anxiety/hyperventilation, NOT asthma. An asthmatic desperately needs fresh oxygen, not their own recycled carbon dioxide).
Do not let them walk long distances to a health facility — the exertion will worsen the attack. Carry them or arrange transport.
Topic 5: Acute Chest Pain (Cardiac Emergency)
5.1 Definition and Causes
Chest pain becomes a critical cardiac emergency when it is caused by a severely reduced blood supply to the heart muscle itself.
Angina pectoris: A temporary, reversible narrowing of the coronary arteries. The pain is often triggered by heavy exertion or strong emotion, and is typically relieved by rest or medication.
Myocardial Infarction (Heart Attack): A coronary artery becomes completely blocked by a blood clot. The heart muscle begins to die from oxygen starvation. This is a massive emergency.
Other causes of chest pain: Pulmonary embolism, pneumonia, pleurisy, severe acid reflux, peptic ulcers, muscular strain, or extreme anxiety. Always rule out a heart attack first!
5.2 Signs and Symptoms of a Heart Attack
Central chest pain: Described as a crushing pressure, squeezing, tightness, or heavy ache ("It feels like an elephant is sitting on my chest"). It lasts more than a few minutes or comes and goes.
Radiation: The pain often radiates (spreads) to the left arm, both arms, up into the neck, the jaw, the back, or the upper abdomen.
Associated signs: Profuse, cold sweating; severe nausea and vomiting; sudden breathlessness; dizziness.
An overwhelming sense of impending doom and extreme anxiety. The skin turns pale, grey, and ashen.
Atypical signs: Women, the elderly, and diabetics may not have the classic crushing chest pain. They may present with unusual extreme fatigue, nausea, unexplained back or jaw pain, or mild abdominal discomfort. Do not ignore these!
May progress suddenly to cardiac arrest (they collapse and stop breathing normally).
5.3 First Aid Management
Stop all activity immediately. Sit the casualty down in a comfortable half-sitting (semi-reclined) position (e.g., sitting on the floor leaning back against a wall, with their knees bent and back supported). This eases the strain on the heart and makes breathing easier. Reassure them constantly.
Call for emergency help immediately (ambulance or transport to a facility with oxygen and ECG capabilities). In heart attacks, "Time equals Heart Muscle."
Loosen tight clothing around the neck, chest, and waist. Keep the casualty warm but not overheated.
Chewable Aspirin: If available, if the casualty is an adult, fully conscious, and has no known aspirin allergy or active bleeding disorder (like a stomach ulcer) ➔ give them Aspirin 300 mg to CHEW. Explanation: Aspirin is an anti-platelet drug. Chewing it absorbs it quickly into the blood, where it helps stop the deadly clot in the heart from growing larger.
If the casualty has their own prescribed Angina medication (like GTN spray or tablets under the tongue), help them take it.
Monitor them very closely: pulse, breathing, and level of response. Have your hands ready to start CPR the moment they collapse and stop breathing normally.
Urgent referral: Never let a suspected heart attack casualty walk to the car or drive themselves. Carry them.
Topic 6: Stroke (Cerebrovascular Accident)
6.1 Definition
A stroke is a sudden, catastrophic interruption of blood supply to a part of the brain.
Ischaemic stroke (~85%): An artery in the brain is completely blocked by a blood clot.
Haemorrhagic stroke (~15%): An artery bursts and bleeds heavily into or around the brain, creating crushing pressure.
Without fresh blood, brain cells begin dying within minutes. The medical mantra is "TIME IS BRAIN."
6.2 Risk Factors
Hypertension (high blood pressure) is the biggest risk factor — it is incredibly common and often undiagnosed in Uganda. Other risks include Diabetes, high cholesterol, smoking, excessive alcohol, heart arrhythmias (like Atrial Fibrillation), Sickle Cell Disease, obesity, physical inactivity, family history, and previous strokes.
6.3 Recognising Stroke — The FAST Test
If you suspect a stroke, perform this rapid test immediately:
F — Face: Ask the person to smile. Does one side of their face droop downwards?
A — Arms: Ask them to raise both arms in front of them. Does one arm drift downward, or can they not lift it at all? (Look for sudden weakness or numbness on one side of the body).
S — Speech: Ask them to repeat a simple, normal sentence ("The sky is blue"). Is their speech slurred, strange, or can they not understand what you are saying?
T — Time: If you see ANY ONE of these signs, it is TIME to call for emergency help immediately. Note the exact time the symptoms first started!
Other Sudden Signs of Stroke
Sudden weakness or numbness of one complete side of the body (face, arm, leg).
Sudden severe confusion, trouble speaking or understanding language.
Sudden trouble seeing in one or both eyes (vision goes black or blurred).
Sudden trouble walking, severe dizziness, loss of balance or coordination.
Sudden, inexplicably severe headache "like a bolt of lightning from the blue" (highly indicative of a bleeding Haemorrhagic stroke).
6.4 First Aid Management
Act FAST — arrange urgent transport immediately. Every passing minute delays hospital treatment and permanently increases brain damage.
Record the EXACT TIME the symptoms started. (This is critical because doctors only have a very short window of a few hours to give clot-busting drugs. If they don't know the time, they cannot give the drug safely).
Lay the casualty down with their head and shoulders slightly raised (on one pillow if available) to reduce pressure inside the skull.
Nothing by mouth (NPO): Give absolutely no food, water, or oral medicines. Explanation: Stroke heavily impairs the swallowing reflex. Giving them water will cause them to choke and aspirate fluid directly into their lungs, causing deadly pneumonia.
If they become unconscious but are still breathing ➔ place them in the recovery position. If possible, lay them on their affected/paralyzed side to keep the healthy lung clear. Monitor breathing continuously.
Reassure them constantly (they may understand you even if they cannot speak); keep them warm; loosen tight clothing.
🚨 What NOT To Do
Do NOT give Aspirin! You do not know if they are having a bleeding (haemorrhagic) stroke. If their brain is bleeding, Aspirin will thin the blood and cause them to bleed to death inside their skull.
Do NOT "wait and see" if they get better. Even if symptoms disappear quickly (a TIA or "mini-stroke"), it is a massive warning sign that a full, fatal stroke is coming soon.
Topic 7: Poisoning
7.1 Definition & Background
Poisoning is injury or illness caused by exposure to a harmful substance. A poison is any substance which, when taken into the body in sufficient quantities, can cause severe injury to health or completely destroy life. It can be taken either accidentally (children) or intentionally (suicide attempts).
How Poisons Enter the Body
Ingestion (Swallowing): The most common route. By eating or drinking a poisonous substance, it enters the circulatory system through the walls of the stomach and intestines.
Inhalation (Breathing in): Inhaling toxic fumes, gases (like Carbon Monoxide), or smoke from burning poisonous substances into the lungs.
Injection: Introduced directly into the bloodstream or tissues via needles, or venomous bites/stings (e.g., snake bites).
Absorption (Skin Contact): A strong acid or agricultural spray (like organophosphate pesticides) comes into contact with the skin and is absorbed directly into the blood.
Effects of Poisons on Our Bodies
When poisons reach inside the body, they cause massive destruction in various ways:
Central Nervous System (CNS) Depression: Once in the bloodstream, they suppress the brain, preventing vital activities like breathing, causing the patient to stop breathing and die.
Heart & Vital Organs: They affect the electrical action of the heart causing deadly arrhythmias.
Oxygen Distribution: Toxins like Carbon Monoxide bind to red blood cells, preventing them from carrying adequate oxygen to the tissues, leading to suffocation at the cellular level.
Brain Irritation: When poisons reach the brain, the person may suffer violent convulsions or become delirious/hallucinate.
Gastrointestinal Tract Damage: Swallowed poisons affect the food passages directly, causing severe vomiting, violent abdominal pain, and explosive diarrhea.
Corrosive Burns: If a person swallows a corrosive poison (strong acid or alkali), it literally burns and destroys the lips, mouth, throat, and the whole food passage.
Organ Failure: An overload of poison will overwhelm and completely damage the body’s poison filters — the liver and the kidneys.
7.2 Common Types of Poisoning in Uganda
A. Food Poisoning
Foodborne illness caused by consuming contaminated food or beverages. Contamination occurs due to harmful bacteria, viruses, parasites, or toxins.
Bacterial: Salmonella, E. coli, Listeria. Due to improper cooking, poor refrigeration, and bad hygiene.
Viral: Rotavirus, Hepatitis A. Usually through improper hand hygiene by food handlers.
Parasitic: Giardia, Cryptosporidium. From raw/undercooked meat or dirty water.
Toxins/Chemicals: Bacteria like Staphylococcus aureus leave toxins in food. Chemical contaminants include pesticide residue on unwashed fruits.
Symptoms: Nausea, vomiting, severe abdominal pain, explosive diarrhea, bloody stools. Systemic symptoms include fever, muscle aches, fatigue, and sometimes shock from dehydration.
Treatment: Give plenty of fluids (ORS) to prevent fatal dehydration. Collect vomitus for lab examination. Do not give anti-diarrheal drugs immediately (let the body flush the bacteria).
Prevention: Safe food handling, strict handwashing, proper cooking/storage temps, and avoiding cross-contamination (using different boards for raw meat and veg).
B. Alcohol Poisoning
A severe, potentially fatal condition when blood alcohol concentration rises to toxic levels, usually from binge drinking large amounts in a short period. Alcohol is a CNS depressant.
Symptoms: Confusion, disorientation, severe agitation, slow/irregular breathing, pale/bluish skin, severe vomiting, hypothermia, seizures, and progressing to respiratory failure or cardiac arrest.
First Aid: Call for emergency help. Do NOT leave the person alone. Place them strictly in the recovery position so they do not choke on their own vomit. Monitor breathing closely; be prepared to do CPR.
Complications: Brain damage from hypoxia, liver damage, choking death.
C. Drug Poisoning (Overdose)
Harmful effects caused by excessive amounts of medication, accidental overdoses, intentional self-harm (suicide), or dangerous interactions between drugs.
Cardiovascular Symptoms: Rapid/irregular heartbeat, very high/low blood pressure, chest pain.
Respiratory Symptoms: Shallow, slow, or labored breathing leading to respiratory failure.
Treatment: If conscious, place comfortably and quickly ask exactly what they took and how much. Keep empty pill bottles for the doctor. Monitor vitals. Refer immediately.
D. Industrial / Agricultural Poisoning
Exposure to hazardous substances in work environments (chemicals, heavy metals, biological agents).
🚨 CLASSIC EXAM FINDING: Organophosphate Poisoning
Agricultural pesticides are extremely common in suicides and accidental farmer poisonings in Uganda. Memorize the SLUDGE signs:
Salivation (drooling)
Lacrimation (crying/tears)
Urination (loss of bladder control)
Defecation (diarrhea)
GI cramps (stomach pain)
Emesis (vomiting)
Plus: Pinpoint (tiny) pupils, severe sweating, muscle twitching, progressing to coma and respiratory failure.
7.4 General Aims & Treatment for Poisoning
Aims of First Aid: Maintain ABCs (Airway, Breathing, Circulation), identify the type of poison, obtain medical aid rapidly, remove contaminated clothing, and remove the casualty from further danger.
General Rules for Swallowed Poisons:
Get medical aid as soon as possible (this can become a medico-legal case!).
Protect yourself first — wear gloves, do not touch the poison.
Keep any container, pill bottle, or leaf which you think might help doctors identify the poison.
Do not throw away the vomitus; keep a sample for laboratory examination.
Check the lips for signs of chemical burning. DO NOT induce vomiting if they swallowed a corrosive acid or alkali! (Vomiting brings the burning chemical back up the throat, causing double the damage and risking the chemical spilling into the lungs).
If the casualty is conscious and swallowed a non-corrosive substance, some guidelines suggest giving fluids to dilute it, but modern protocols prefer rapid transport without oral fluids unless directed by a doctor. Give soothing drinks (like milk or egg white) only if specifically trained/directed for certain corrosives to coat the stomach.
If the casualty is unconscious, place them in a semi-prone (recovery) position with the head turned to one side to prevent choking on vomit. Watch their breathing continuously. Start artificial respiration if necessary (use a pocket mask, NOT bare mouth-to-mouth if poison is on their lips!).
Keep the casualty warm, treat for shock, and loosen tight clothing.
Specific Poisoning Management
Acid Poisoning (e.g., Battery acid): Rinse affected skin areas with copious water for 20 mins. Do NOT induce vomiting. For ingestion, some traditional texts suggest giving an alkaline like sodium bicarbonate to counteract, but modern emergency medicine strongly prefers giving nothing by mouth and rushing to the hospital to avoid chemical reactions releasing massive heat in the stomach. Keep calm and transport.
Alkali Poisoning (e.g., Bleach/Lye): Rinse skin with huge amounts of water. If ingested, do NOT induce vomiting. Traditional first aid suggests small sips of water or milk to dilute, or a weak acid like diluted lime juice, but rapid transport is the absolute safest priority.
Mercury Poisoning (Liquid mercury): Isolate the area. Do not touch with bare hands (use gloves/barrier). Ventilate the room immediately by opening windows to let the toxic vapor disperse. Call emergency services for proper cleanup. Seek medical attention immediately.
Opium / Narcotic Overdose (e.g., Heroin, strong painkillers): The drug stops the brain's breathing center. If unconscious with slow/no breathing, call EMS immediately. Do not induce vomiting. Put in recovery position if breathing. Start CPR if breathing stops. (Hospital will administer Naloxone as an antidote).
Prevention of Poisoning
All medicine bottles and agricultural chemicals should be strictly labeled. Unlabeled medicines must be destroyed.
Toxic medicines must clearly indicate the word "POISON" (often with a skull and crossbones) and be kept under lock and key.
Always read the label 3 times before giving any medication.
All poisonous substances (including bleach, paraffin) MUST be kept strictly out of the reach of children. Never store kerosene in empty soda or water bottles!
Topic 8: Heat Stroke & Heat Exhaustion
Heat-related illnesses form a spectrum of severity, usually resulting from exposure to high environmental temperatures, high humidity, dehydration, and heavy physical work in the sun.
Painful muscle cramps or spasms (usually in the legs or abdomen) occurring after heavy sweating and physical exertion in the heat. The body loses salt and water. First aid: Stop the activity, rest in a cool shaded place, gently stretch and massage the cramping muscle, give fluids (water, ORS, or sports drinks). Avoid giving concentrated salt tablets.
8.2 Heat Exhaustion
Causes: Heavy sweating in hot/humid conditions leading to massive loss of water AND salts. Very common in farmers, builders, athletes, and boda boda riders working under the midday sun without drinking enough fluids.
Signs and Symptoms:
Heavy, profuse sweating; skin feels cool, pale, and clammy (moist). (The body's cooling system is still working, trying desperately to cool down).
Severe weakness, extreme tiredness, dizziness, and headache.
Nausea, vomiting, and muscle cramps.
Faintness when trying to stand up (blood pressure is dropping).
Body temperature is normal or only slightly raised.
First Aid Management:
Move the casualty immediately to a cool, shaded, and well-ventilated place. Loosen and remove any excess heavy clothing.
Lay them down flat and raise their legs slightly to prevent fainting/shock.
Cool the skin: Apply cool wet cloths or sponges to their skin, fan them vigorously, or spray them with cool water.
Give them small, frequent sips of cool water or ORS (about 100–120 ml every 15 minutes if they are fully awake). Do not let them gulp it, as they will vomit.
They should improve within 30 minutes. If they do not improve, begin vomiting, or their consciousness level drops ➔ treat it as Heat Stroke and refer urgently!
8.3 Heat Stroke (A Massive Emergency)
Definition: A highly life-threatening emergency in which the body's internal temperature-regulating system completely FAILS. The body temperature rises dangerously high (≥ 40°C / 104°F), cooking the brain and organs.
Two Types: Classic (occurs in hot weather, usually affecting the elderly or chronically ill) and Exertional (strenuous exercise in extreme heat, like soldiers or athletes).
Signs and Symptoms
Very high body temperature.
The skin is HOT, RED, and DRY (or only slightly moist). Sweating has completely stopped because the brain's thermostat has failed!
Severe confusion, extreme agitation, staggering, bizarre combative behaviour, slurred speech.
Violent seizures (fits), leading rapidly to collapse and coma.
First Aid Management
Call for emergency help / arrange URGENT transport immediately. Heat stroke kills quickly.
Move to a cool place. Remove as much outer clothing as possible.
Cool the body RAPIDLY and continuously:
Best method: Immerse the body (up to the neck) in cold water if a tub is feasible, OR douse and spray them with cold water continuously.
Alternative: Wrap them completely in a cold wet sheet and keep pouring cold water over the sheet while fanning them vigorously to force evaporation.
Apply ice packs or cold packs to the neck, armpits, and groin (where large blood vessels are close to the surface, cooling the blood rapidly).
Continue this aggressive cooling until their temperature falls to about 38°C, or their clinical state improves. (If you have no thermometer, cool them aggressively for ~20 minutes).
If they are conscious and alert: give sips of cool water. If they are drowsy or confused — give absolutely nothing by mouth (choking risk).
If unconscious but breathing ➔ place in the recovery position, monitor breathing constantly; perform CPR if breathing stops.
Even if they completely recover at the scene, they MUST be referred to a hospital for review — severe internal organ damage can follow hours later.
📝 Comparison Table: Exhaustion vs. Stroke
Feature
HEAT EXHAUSTION
HEAT STROKE
Severity
Moderate
LIFE-THREATENING EMERGENCY
Skin
Cool, pale, CLAMMY, heavy sweating
HOT, RED, DRY (or slightly moist)
Temperature
Normal or slightly raised
Very high (≥ 40°C)
Consciousness
Dizzy, weak but alert
Confused, bizarre behavior, seizures, coma
Sweating
Yes (The body is still trying to cool itself)
May have completely stopped (System failure)
First Aid Action
Rest, fluids, gentle cooling — improves in 30 min
RAPID aggressive cooling + Urgent hospital transport
Topic 9: Other Common Medical Emergencies
9.1 Seizures / Convulsions
Sudden, uncontrolled electrical activity in the brain causing violent jerking movements, loss of consciousness, incontinence, and tongue biting. In Uganda, always heavily suspect severe Malaria as the cause in children! Other causes: hypoglycaemia, meningitis, head injury, or eclampsia in pregnant women.
First Aid: Protect from injury (move hard objects, cushion the head). Note the exact time it started. Do NOT restrain them. Do NOT put spoons or cloths in their mouth. When the fit stops, place in the recovery position. Refer urgently if: the fit lasts > 5 minutes, repeats without waking up, it is their first-ever fit, they are pregnant, diabetic, or a child with a high fever.
A convulsion triggered strictly by a rapid rise in body temperature (fever), often from Malaria or severe respiratory infections. Usually brief and self-limiting. First Aid: Protect the child from injury as above. Actively cool the child (remove heavy blankets/sweaters, use tepid sponging, give paracetamol syrup if conscious). Place in recovery position after, and refer immediately for cause-finding (like a Malaria RDT test).
9.3 Anaphylaxis (Severe Allergic Reaction)
A severe, incredibly rapid allergic reaction to drugs (Penicillin), bee/wasp stings, or certain foods (peanuts). Signs include massive swelling of the face/lips/tongue, hives, severe wheezing/stridor, hoarse voice, crashing blood pressure, and collapse. First Aid: Call for help urgently. Lay flat with legs raised (or sit up ONLY if breathing is heavily impaired). The only life-saving treatment is Adrenaline (Epinephrine) 0.5 mg IM into the anterolateral thigh — repeat every 5–10 mins as needed per clinical guidelines. Referral is mandatory!
9.5 Hyperventilation (Anxiety/Panic)
Rapid over-breathing, often from extreme anxiety or panic. Signs: fast deep breathing, extreme dizziness, tingling/numbness in fingers and lips, chest tightness, feeling of suffocation. First Aid: First, rule out asthma or a heart attack! Once confirmed as anxiety, offer calm, firm reassurance. Take the casualty to a quiet place. Coach them to breathe slowly with you (in for 4 seconds, out for 4 seconds). Do NOT use a paper bag (modern guidelines reject this due to hypoxia risks). Refer if the cause is unclear.
9.6 Acute Abdominal Emergencies
Conditions like acute appendicitis, intestinal obstruction, perforated ulcers, or ectopic pregnancy. Red flags: Worsening pain localising to the lower right abdomen, a rigid "board-like" stomach, vomiting, inability to pass gas/stool, or fainting in a woman of child-bearing age (huge sign of ectopic internal bleeding!). First Aid: Give absolutely NOTHING by mouth (NPO). Rest, monitor vitals, arrange urgent surgical referral. Do NOT give strong painkillers that hide the symptoms from the surgeon, and NEVER give laxatives.
9.7 Severe Malaria (Ugandan Context)
In Uganda, malaria is a leading cause of emergency illness. Think of it in ANY case of fever, convulsions, confusion, severe anaemia, or "flu-like" illness. Danger signs: Impaired consciousness, violent convulsions, severe paleness (anaemia), jaundice (yellow eyes), dark coca-cola coloured urine, extreme weakness, and breathing difficulty. Action: Refer urgently. Facility management involves testing (RDT), IV Artesunate, treating convulsions with diazepam, correcting low sugar, and giving fluids very carefully.
9.8 Suffocation
Suffocation results when fresh air is prevented from reaching the air passages by an external physical obstruction. Causes include a plastic bag tied over the head, a soft pillow pressed over the face, or falling face-first into loose sand. A baby may easily be suffocated by simply lying face down on a soft pillow or cushion.
General Signs and Symptoms:
Severe difficulty in breathing. The rate and depth of breathing massively increases as they fight for air.
Breathing may become incredibly noisy, presenting with loud snoring or gurgling (a low bubbling sound).
Possible frothing at the mouth.
Cyanosis: Deep blueness of the face, lips, and fingernails due to oxygen starvation.
Severe confusion, extreme panic, and a rapid lowering of the level of responsiveness.
Possible unconsciousness, and eventually, breathing may stop completely.
Aim of First Aid: Restore the supply of fresh air to the casualty instantly and seek medical aid.
Management:
Immediately remove any obstruction (pull off the plastic bag, remove the pillow) or move the casualty to fresh air.
If the casualty is conscious and breathing: reassure them constantly and observe their breathing carefully.
If the casualty is unconscious: open the airway (head-tilt, chin-lift) and check breathing for 10 seconds.
Complete the ABC of resuscitation if required (start CPR if they are not breathing).
If they are unconscious but breathing normally, place the casualty safely in the recovery position.
Seek medical aid immediately. If in any doubt about their recovering condition, arrange for moving them to the hospital, as brain damage from suffocation can be delayed.
Quick Revision Summary (Exam Points)
Emergency
KEY Action to Memorize
Fainting
Lay flat, raise legs 30cm, fresh air, sit up gradually.
Hypoglycaemia
Give fast Sugar NOW (15g), repeat in 15 min. If unconscious ➔ IV dextrose/glucagon, give strictly NPO (nothing by mouth).
Hyperglycaemia
Give plain water + URGENT hospital referral (treats DKA).
Asthma attack
Sit UPRIGHT leaning forward, Salbutamol 4 puffs every 4 min, NEVER lay them flat.
A first aid kit is a portable container/box stocked with equipment, materials and basic medicines used by a trained first aider to give immediate care to an injured or suddenly ill person before professional medical help is available. First aid kit or medical kit is a collection of supplies and equipment used to give immediate medical treatment, primarily to treat injuries and other mild or moderate medical conditions.
📝 Exam Tip: When defining a first aid kit, ensure you mention that it is portable, used by a trained person, and serves to bridge care until professional help arrives.
It is mandatory to have a first aid kit in every workplace like school, college, house, and vehicles. It should be kept at such a place that is easily accessible. Also, everyone should be aware of it. It should be labeled as “First Aid” and should have a red cross on a white background. From time to time, its items should be checked and replaced. All the required items should be available and ready for use at all times.
1.2 Principles/Qualities of a Good First Aid Kit
A good first aid kit must meet the following criteria:
Portable and easy to carry to the scene.
Water-resistant and dust-proof (protects the sterile contents).
Durable and firmly closable (the lid must fit tight).
Clearly LABELLED "FIRST AID KIT" in bold, visible letters (often with a white cross on a green background).
Contents must be organised (have compartments; frequently used items placed on top).
Contents appropriate to the setting (a home kit is very different from a military combat kit).
Stocked with non-expired items; checked regularly.
Kept in an accessible but child-safe location.
Simple to open in an emergency (but not so simple that toddlers can open it).
Accompanied by a list of contents and emergency numbers taped inside the lid.
Components of a First Aid Kit (Minimum Contents)
The minimum contents of the first aid box are as follows:
Torch (01) & Thermometer (01)
Tongue Depressor (Disposable ice cream spatula)
Writing pad and Pen/pencil
Bandages of various types, Gauze pieces, Cotton
Eye pads, Plaster, Safety pins
Scissors & Tourniquet
ORS packets & Glucose packets
Methylated spirit, Tincture of iodine, Tincture of benzoin
1.3 Components of a First Aid Kit (Detailed)
As a nurse, you must know exactly what is inside the kit and how to improvise if an item runs out.
GROUP A: WOUND CARE ITEMS
1. Sterile gauze swabs/pads: Used for cleaning wounds, as a primary wound dressing, and to apply direct pressure to bleeding. Improvisation: Clean boiled-and-cooled cloth, or clean cotton from a brand new pillow (last resort).
2. Cotton wool: Used for cleaning around (not inside) wounds, applying antiseptic, and padding. Improvisation: Soft clean cloth.
3. Adhesive dressings (Plasters/Band-Aids): Various sizes for minor cuts, blisters, and small grazes.
4. Roller bandages (5cm, 7.5cm, 10cm): Used to hold dressings in place, apply even pressure, support sprains, and immobilise. Improvisation: Clean torn sheets, pagne (kitenge) cloth.
5. Triangular bandages: Extremely versatile! Used for arm slings, broad-fold/cravat bandages, immobilising limbs, or improvising a splint tie. Improvisation: A square piece of clean cloth folded diagonally.
6. Adhesive tape (Zinc oxide/plaster): Securing dressings and splints.
7. Elastic (Crepe) bandage: Provides compression for sprains/strains and joint support.
8. Antiseptic solutions:
Hydrogen Peroxide (H2O2): Used for DIRTY/contaminated wounds. It effervesces (bubbles) to lift dirt and debris out of the wound.
Povidone-iodine (Betadine): Used for CLEAN wounds.
Surgical Spirit: Used to clean intact skin around the wound. NEVER put spirit inside an open wound — it damages exposed tissue and delays healing.
Plain soap and clean water: The first-line and best/cheapest method for wound cleaning.
9. Antibiotic ointment/cream: E.g., Gentian violet or tetracycline eye ointment (as per local protocol) to prevent infection in minor wounds.
10. Sterile saline/Eye wash: For irrigating eyes and flushing wounds.
11. Sterile eye pads: Specifically shaped for eye injuries.
🚨 EXAM TRAP: Antiseptic Selection
Examiners love asking: "Which antiseptic for a dirty wound and why?" Answer: Hydrogen Peroxide (H2O2) because its effervescence (bubbling action) physically lifts debris and grit out of the wound bed, and it has virucidal/bactericidal properties.
GROUP B: BLEEDING CONTROL ITEMS
12. Tourniquet: (Commercial windlass type preferred). Used as a last-resort to control life-threatening limb bleeding. Improvisation: A wide cloth + a strong stick. NEVER use wire or thin cord (it cuts tissue). ALWAYS write the time of application on the casualty.
13. Hemostatic dressing/gauze: Special gauze coated with clotting agents used for packing deep wounds.
14. Safety pins: Securing bandages, slings, and fastening splints.
15. Scissors: (Bandage scissors with a blunt tip to avoid cutting the patient) for cutting bandages, gauze, and exposing wounds by cutting clothing.
16. Tweezers/Forceps: Removing splinters, stings, ticks, and debris.
GROUP C: MEDICINES (As per scope/protocol)
17. Oral analgesics: Paracetamol (pain/fever), Ibuprofen (pain/inflammation — avoid in bleeding/ulcer/asthma), Aspirin 300 mg (have the casualty chew it if suspecting a heart attack).
18. Oral Rehydration Salts (ORS): For dehydration from diarrhoea, vomiting, or heat illness.
19. Antihistamine tablets/cream: For allergic reactions, insect bites/stings.
20. Glucose powder/tablets or sugar sachets: For hypoglycaemia (low blood sugar).
21. Antacid tablets: For heartburn and severe indigestion.
22. Anti-diarrhoeal: (Only per local medical guidance).
23. Anti-emetic: (Per protocol/scope).
GROUP D: PROTECTIVE/PPE ITEMS
24. Disposable gloves: (Latex/Nitrile — use Nitrile if there is a latex allergy). To avoid contact with blood and body fluids.
25. Face masks: To protect the casualty and first aider from respiratory droplet spread.
26. Face shield / Pocket mask: With a one-way valve for safer rescue breaths during CPR.
27. Apron/Gown: To protect clothing during heavy bleeding care or childbirth.
GROUP E: INSTRUMENTS & DIAGNOSTIC ITEMS
28. Digital thermometer: To check temperature.
29. Torch/Flashlight + Spare batteries: Essential for night scenes and examining pupil reactivity.
Contents: Elastic bandages, triangular bandages, splints, cold packs/instant ice, antiseptics, gloves, scissors, ORS. Kept by the team first aider at every game.
MILITARY / Combat Kit:
Purpose: War/combat wounds — severe bleeding, chest wounds, blast injuries.
Contents: Tourniquets, hemostatic dressings, field dressings, bandages, chest seals, morphine (for trained personnel), airway adjuncts. Rugged, camouflaged design carried on body armour.
FIRST RESPONDER Kit (Ambulance/Community Responder):
Purpose: Pre-hospital care while awaiting evacuation.
Choose a large, flexible, water-resistant plastic container with a tight-fitting lid.
Make a list of items needed (based on common home accidents in your specific family: are there children? elderly? risk of burns?).
Stock the container with all the listed items.
Inform ALL adult family members where the kit is kept.
Train adults how to use each item (e.g., practice bandaging together!).
Label the outside boldly "FIRST AID KIT".
Store safely — easily accessible to adults, but OUT of children's reach.
Inspect regularly: check expiry dates; restock immediately after every use; tick against the checklist.
1.6 Care and Maintenance of the Kit
Keep it closed, clean, dry, and away from direct sunlight (Ugandan heat rapidly degrades drugs and destroys glove elasticity).
Check monthly: expiry dates, completeness, and the sterility of sealed items.
Replace items immediately after use so the kit is always 100% ready.
Never store strong, unlabelled medicines loose in the box (major child safety hazard).
Wash reusable instruments; sterilise them per protocol.
Keep the emergency-number card updated.
1.7 Why Each Expired Item is Dangerous (Essay Depth)
As a nurse, do not just say "it is bad." Explain the clinical danger:
Expired antiseptics lose potency ➔ failure to kill bacteria ➔ severe wound infection.
Expired gloves perish, become brittle and tear during use ➔ massive blood exposure (HIV/HBV risk for the first aider).
Expired drugs may be completely ineffective (casualty gets no relief) or toxic (causes poisoning).
Damp/Expired gauze is no longer sterile ➔ introduces deadly hospital-acquired infections directly into the bloodstream.
Topic 2: Personal Protection (Standard Precautions)
2.1 Definitions
Personal Protection: Measures taken by the first aider to protect themselves and others from injury or infection while giving care.
Standard Precautions: (Formerly known as "universal precautions"). This means treating ALL blood and body fluids (except sweat) from EVERY casualty as potentially infectious, regardless of the casualty's known status — because in an emergency, their status is often UNKNOWN.
Body substances requiring precautions: Blood, vomit, saliva, sputum, urine, faeces, pus, wound drainage, semen/vaginal fluids, amniotic fluid, Cerebrospinal fluid (CSF). (Note: Sweat is generally considered low risk).
2.2 Why it Matters — Transmissible Infections
Nurses and first aiders are exposed to high-risk fluids. You must protect yourself from:
HIV: Needle-stick risk is ~0.3%; mucous membrane exposure is ~0.09%. Post-Exposure Prophylaxis (PEP) is highly effective if started within 72 hours.
Hepatitis B (HBV): Much more infectious than HIV via blood (needle-stick risk is ~30% if unvaccinated!). A highly effective vaccine is available — all nurses should be fully vaccinated!
Hepatitis C (HCV): Needle-stick risk is ~1.8%; there is no vaccine available.
Others: Ebola/Marburg (epidemics in Uganda!), Cholera, Typhoid, TB, COVID-19, and other respiratory viruses.
Uganda-specific Context: Due to Ebola outbreaks (2014 West Africa, 2022 Uganda Sudan ebolavirus outbreak, 2025 Kampala/Wakiso outbreak) ➔ ALWAYS take precautions; never assume a casualty is "safe".
2.3 PPE — When to Use Each Item
PPE Item
Protects
When to Use
Gloves (Nitrile/Latex)
Hands from blood/fluids
Touching blood, wounds, mucous membranes, body fluids; handling contaminated items.
Face mask (Surgical)
Mouth/Nose
Casualty with coughing/respiratory symptoms (TB, COVID); or when splashes are likely.
Eye goggles / Face shield
Eyes
Splashing/spraying blood or fluids is likely (e.g., major arterial bleeding, explosive vomiting, suctioning).
Apron / Gown
Body/Clothing
Heavy bleeding, vomiting, cholera care, assisting in childbirth.
Heavy contamination, epidemic/Operating Theatre settings.
Resuscitation face shield / pocket mask / Ambu bag
Mouth
Giving rescue breaths — NEVER do bare mouth-to-mouth where a barrier exists.
2.4 Hand Hygiene
WHEN: Before contact with the casualty, immediately after contact with blood/fluids, after removing gloves, and after the whole event is concluded.
HOW: Use soap + running water, rub all surfaces vigorously for 40–60 seconds; dry with a clean towel or air dry. If there is absolutely no water available: use an alcohol-based hand rub (≥60% alcohol) and rub until completely dry.
Remember: Gloves are NOT a substitute for hand washing! Gloves can have microscopic holes. Always wash hands after doffing gloves.
2.5 Steps of Donning and Doffing PPE (Order Matters!)
DONNING (Putting on):
Remove all jewellery and watches; ensure nails are short; cover your own cuts with a waterproof plaster.
Perform Hand Hygiene.
Put on the Gown/Apron.
Put on the Face mask (cover nose + mouth; mould the metal nose clip).
Put on Eye protection (goggles/face shield).
Put on Gloves (pull them over the gown cuffs if wearing one).
DOFFING (Taking off — The highest risk step!):
Reverse order, avoiding touching the contaminated outside surfaces:
Sharps Safety: Never recap, bend, or break needles by hand. Use yellow puncture-proof safety boxes and dispose immediately at the point of use. Never pass a sharp hand-to-hand — place it in a kidney dish/tray.
Waste Disposal Colour-Coding (Memorize this!):
BLACK bins/bags: General (non-infectious) waste: food remains, packaging, ordinary paper.
RED bins/bags: Highly infectious waste and Infectious waste: HIV/HBV waste, laboratory cultures (must burn/incinerate), blood-soaked dressings, used gloves, specimen containers.
BROWN bins/bags: Pharmaceutical and laboratory waste.
If you suffer a needle-stick injury or blood splash:
First aid: Wash the wound thoroughly with soap and running water. If splashed in mucous membranes (eyes/mouth), flush with plain water/saline for 10+ minutes.
Do NOT: Do not apply strong bleach or caustics. Do not squeeze or suck the wound!
Report: Immediately report to the occupational health officer or Sister-in-charge.
Risk assessment & Treatment: Start HIV PEP within 72 hours (sooner is better; ideally ≤2 hours). Administer Hepatitis B immunoglobulin/vaccine if unvaccinated.
Follow-up: Take baseline labs (HIV, HBsAg, HCV), receive counselling, and return for follow-up testing at 6 weeks, 12 weeks, and 6 months.
Document: Write a formal incident report.
💡 EXAM TIP: Cleaning, Disinfection & Sterilisation (Levels)
Examiners love to ask the difference between these three levels:
Cleaning: The physical removal of dirt/organic matter with soap + water. (This is always the first step, as dirt blocks disinfectants).
Disinfection: Kills most pathogens (but not all spores). Methods include boiling for 20 mins, using chlorine solutions (0.05% for hands/skin; 0.1% for surfaces/instruments per MoH), and 70% alcohol for intact skin/instruments.
Sterilisation: Kills ALL microbes, including highly resistant bacterial spores. Achieved by Autoclaving (121°C, 15 psi, 15–20 mins). Note: Boiling is NOT sterilisation; it is only high-level disinfection!
2.10 Scene Safety Behaviours (Beyond PPE)
Wear highly reflective clothing at road traffic accidents (night risk is huge!).
Switch off vehicle engines, apply the parking brake; put on hazard lights; assign a bystander far back to warn oncoming traffic.
Do not enter unstable buildings, fast-flowing flood water, or fires without professional rescue services.
Beware of crowd violence — ask the police to secure the scene when handling mob justice or riot casualties.
Quick Quiz
First Aid Kit and Life Threatening Conditions Quiz
First Aid
Privacy: Your details are used only for quiz tracking and certificates.
First Aid: Principles, Practice, and Legal Considerations
1. Introduction & Definition of First Aid
First aid is the immediate, temporary care given to a person who is suddenly injured or taken ill, using available materials, before professional medical treatment can be obtained.
As a nursing student, when asked to define First Aid in an exam, ensure you include all these elements for full marks:
Initial/temporary: It is not a substitute for definitive medical care; it bridges the critical gap until professional help arrives.
Given by a trained person (first aider): While anyone can help, a qualified first aider is formally trained by a recognized institution (e.g., Uganda Red Cross Society, St. John Ambulance).
Uses available materials: Improvisation is highly allowed and expected (e.g., using a clean shirt as a pressure dressing or a strong stick as a splint).
Given at the scene: Wherever the casualty is found (on the roadside, at home, or in the workplace).
Aimed at the 3 Ps: Preserve life, Prevent worsening (further harm/illness or injury), and Promote recovery.
A person trained by a recognised institution and qualified to give first aid.
Don't just say "anyone who helps".
Casualty / Victim
A person who is suddenly injured or ill and requires immediate treatment.
Focus on "sudden".
Bystander
A person at the scene who is called upon by the first aider to help (e.g., calling an ambulance, holding a dressing, controlling crowds).
Bystanders HELP.
Passer-by
Someone who passes the scene but does NOT stop to help.
Passes = passes on.
Onlooker
Someone who simply watches the scene but gives NO help.
Looks only.
Scene
The exact place where the accident/emergency occurred.
Location of incident.
Accident
A sudden, unexpected event causing injury or damage.
Unplanned.
Emergency
A serious, unexpected situation requiring immediate action to prevent loss of life or limb.
"Urgent + immediate intervention."
Complication
A secondary negative effect arising from the condition itself OR from poor/incorrect management by the rescuer.
Has two causes – memorise both!
Triage
Sorting casualties according to severity/priority, treating the most life-threatening first when resources are limited.
From French "trier" = to sort.
First aid kit
A box containing specialized equipment and materials used to give first aid.
The essential toolkit.
2. Aims, Objectives & Importance of First Aid
The aims of First Aid are built strictly on the 3 Ps. Let us break them down in detail.
P1: PRESERVE LIFE
Your primary goal is to keep the casualty alive until medical help arrives. This is achieved through ensuring ABC:
A – Airway: Make sure the airway is OPEN. If the casualty is unconscious, the tongue often falls back and blocks the airway. Use the head-tilt chin-lift maneuver to open the trachea. Clear any visible obstruction (like food, vomit, or broken teeth).
B – Breathing: Check for breathing using your senses:
LOOK: For chest/abdominal rising and falling movements.
LISTEN: For breath sounds at the casualty's mouth.
FEEL: For breath on your cheek.
Action: If not breathing, commence artificial respiration (mouth-to-mouth or using an Ambu bag).
C – Circulation: Check blood flow and perfusion. Feel for a pulse (check the carotid artery in adults, and the brachial artery in infants). Also, check the skin colour for critical signs:
Cyanosis: Bluish discoloration, especially on the lips/tongue, indicating a severe lack of oxygen.
Jaundice: Yellow discoloration of the skin and sclera (eyes), indicating liver issues.
Pallor: Extreme paleness/whitish skin indicating poor blood flow, shock, or severe anaemia.
Action: If there is no pulse/no circulation, start CPR immediately. Control any life-threatening severe bleeding. Treat for shock by elevating the legs if appropriate.
P2: PROMOTE RECOVERY
Help the casualty recover and prevent their condition from deteriorating while waiting for the ambulance:
Apply splints for suspected fractures. (Preventing bone movement stops the sharp bone edges from causing further internal tissue/nerve damage).
Apply sterile dressings to wounds to stop bleeding and prevent infection.
Place the casualty in the recovery position (lateral recumbent). This is crucial because it protects the airway in an unconscious, breathing casualty by allowing vomit/fluids to drain out, preventing fatal choking.
P3: PREVENT FURTHER COMPLICATIONS (Worsening)
Stop the injury or illness from getting worse before reaching the hospital:
Maintain correct body alignment, especially with a suspected spinal injury – do not move them unnecessarily! Bending a broken spine can paralyze or kill the casualty.
Prevent exposure. Keep them warm using blankets to prevent hypothermia, which heavily worsens shock.
Remove danger from the casualty, or carefully remove the casualty from danger (only if it is safe for you to do so).
Arrange swift transportation/referral to a hospital for definitive care.
📝 Essay Points: The Importance of First Aid
If asked to write an essay on the importance of First Aid, expand on these 8 key points:
Saves lives: Directly achieves the preservation of life through ABC management.
Prevents the condition from worsening: Stopping bleeding keeps the patient stable.
Reduces pain and suffering: Proper splinting stops the agony of broken bones grinding together.
Prevents permanent disability: Correct handling of spinal injuries ensures the patient can walk again.
Provides psychological comfort: Reassuring the casualty and panicking relatives calms the situation.
Bridges the gap: Covers the crucial time between the injury happening and reaching professional medical care.
Mass casualty management: Allows for Triage, ensuring the maximum number of lives are saved with limited resources.
3. Principles, Pillars & Golden Rules of First Aid
A. The Three Pillars of First Aid Assessment
Accurate assessment of any casualty rests solidly on 3 pillars. This is how you figure out what is wrong:
HISTORY TAKING:
Gathering information about the injury/illness: what exactly happened, when it happened, where, and what interventions have been done so far. You get this directly from the casualty (if conscious) OR from bystanders (if the casualty is unconscious).
In your secondary survey, use the AMPLE history mnemonic:
A – Allergy: Are they allergic to any drugs (like Penicillin) or foods?
M – Medication: Are they currently taking any medicines? (e.g., insulin, blood thinners).
P – Past medical history: Do they have asthma, epilepsy, or a heart condition?
L – Last meal: When did they last eat or drink? (Crucial if they need emergency surgery/anaesthesia).
E – Events: What events led up to the incident? (e.g., "He grabbed his chest, then fell").
SIGNS (Objective):
Signs are what YOU observe/find as the trained first aider. They are objective facts you can physically verify.
Mnemonic: Signs = SEEN (Objective, observable).
Examples: Active bleeding, a swollen ankle, visible bone deformity, cyanosis (blue lips), dilated pupils, smelling alcohol on their breath, or watching them vomit.
SYMPTOMS (Subjective):
Symptoms are what the CASUALTY complains of. You cannot see a symptom; you must rely on what they tell you.
Mnemonic: Symptoms = SAID (Subjective, complained).
Examples: "My chest hurts" (Pain), "I feel like vomiting" (Nausea), thirst, dizziness, a headache, or feeling short of breath.
🚨 EXAM TRAP: Signs vs. Symptoms
Examiners love to test if you know the difference. Be ready to classify them correctly in a multiple-choice setting. Rule: "Bleeding is a SIGN (you see it), pain is a SYMPTOM (they say it)."
B. Scope of First Aid (The 4 Main Steps)
Emergency assessment: Find out the problem via history, observation, and a head-to-toe physical examination. This phase also ensures the safety of the first aider.
Diagnosis: Identify the casualty's specific problem from your assessment findings (e.g., you see heavy bleeding ➔ Diagnosis: Severe Haemorrhage).
Immediate treatment: Give the appropriate first aid for the identified problem (e.g., applying a tight pressure dressing to stop the bleeding).
Referral/Transport: Arrange transfer to the nearest hospital. The method of transport depends entirely on the nature and severity of the injury (e.g., suspected spinal injury requires a rigid stretcher and ambulance, not a boda-boda).
C. Methods of Assessing a Casualty
History taking: Asking AMPLE questions.
Observation: Looking around the scene for clues (e.g., empty poison bottles, live wires) and looking at the casualty's general state.
Physical examination: A careful, systematic head-to-toe check for hidden injuries.
D. Importance of Assessing a Casualty First
Why not just start treating immediately? Because assessing first:
Protects you and bystanders: Identifies hidden scene dangers (live electrical wires, fire, speeding traffic, toxic gases).
Prioritizes life-threats: Identifies conditions in order of priority (ABC).
Leads to correct diagnosis: Helps collect accurate signs and symptoms.
Forms the basis of Triage: In mass casualties, assessment tells you who needs the doctor first.
Prevents harm: Stops you from giving inappropriate treatment (e.g., giving water to a patient needing surgery).
E. The 13 Golden Rules of First Aid
Memorize this list. As a certificate student, knowing these rules guides your entire approach to emergency care:
Be calm and act quickly but carefully: Panic spreads fast and causes deadly mistakes.
Assess the scene first: Use history, observation, and physical exam. Do not rush in blindly.
Ensure safety (Danger first!): For yourself, the casualty, and bystanders. You absolutely cannot help if you become a second casualty yourself.
Call for help early: Call bystanders to assist. Call 999/112 (Uganda national emergency line) or the Uganda Red Cross toll-free at 0800 211 088 for an ambulance.
Follow the ABC / DRABC approach: Treat life threats strictly in order of priority.
Reassure the casualty and bystanders constantly: Talk calmly; severe anxiety heavily worsens clinical shock.
Preserve life ➔ promote recovery ➔ prevent complications: Always follow the 3 Ps.
Do no further harm: Avoid unnecessary movement (especially with suspected fractures or spinal injury). Never give food or drink to a casualty who may need emergency surgery or anaesthesia.
Keep the casualty warm: Cover them with a blanket or sheet. This prevents hypothermia and combats shock.
Improvise when equipment is lacking: Being resourceful saves lives (e.g., use clean torn clothing as bandages, or clean plastic bags over your hands if you have no gloves).
Arrange transport/referral: To the nearest appropriate hospital after giving first aid.
Hand over properly to medical personnel: Give a clear verbal report: what happened, what you found, what you did, and how the casualty responded.
Document (crucial for nurses): Write down the time of the incident, findings, interventions, and the casualty's response.
4. Legal and Ethical Considerations in First Aid
Providing first aid involves interacting with people in vulnerable states. You must understand your legal and ethical boundaries to protect both the patient and yourself from lawsuits.
A. Consent
You cannot touch a person without their permission. There are three types of situations:
Expressed consent: The casualty is conscious, alert, and agrees to treatment. Always ask first: "My name is Mary, I am a nurse/trained first aider. Can I help you?"
Implied consent: The casualty is unconscious or unresponsive. In this case, the law assumes consent (a reasonable person would want their life saved). It is also implied when any delay would risk their life.
Refusal of care: A conscious adult of sound mind has the legal right to refuse your help. If they say no, respect it! Do not force them. Instead, explain the severe risks of refusing, stay near them, and call for professional help.
Children: Get consent from a parent or guardian if they are present. If the situation is life-threatening and no guardian is around, treat the child immediately under implied consent.
B. Duty of Care and Abandonment
Once you voluntarily start giving first aid, you establish a "Duty of Care." You must not leave the casualty until:
A rescuer of equal or higher ability (like a doctor or paramedic) takes over, OR
The scene becomes too dangerous/unsafe for you to continue, OR
The casualty is formally handed over to EMS/medical personnel.
Leaving halfway without a valid reason is called Abandonment, and you can be sued for it.
C. Negligence
Negligence means failing to provide a standard of care, resulting in harm. Understand the three levels:
Ordinary negligence: Honest mistakes a reasonable person might make under extreme pressure (e.g., accidentally cracking a brittle rib while performing life-saving CPR). The law generally protects you here.
Gross negligence: Reckless, conscious disregard for safety. (e.g., giving powerful drugs beyond your training level, dragging a casualty with a broken spine by the legs, or performing unnecessary surgical procedures). The law will NOT protect you here.
Willful misconduct: Intentionally causing harm to the casualty. Never protected.
D. The Good Samaritan Principle (Important Context)
This is a legal principle protecting people who voluntarily give reasonable emergency care in good faith, without expecting payment, and within their level of training.
Ugandan Context: In Uganda (and Africa generally), there is NO formal, written Good Samaritan statute passed by parliament. However, protection comes from common-sense common law principles: act in good faith, within your training, and do not charge money.
As a nurse in Uganda: Volunteer care done carefully and within your scope of practice is highly defensible in court. Reckless care, or demanding payment at the scene, destroys your protection.
Never accept payment for first aid at the roadside scene.
Do not perform procedures beyond your certificate training (e.g., an untrained student trying to cut open a throat for a surgical airway = gross negligence).
E. Confidentiality
Keep all information about the casualty totally private. Do not discuss their medical condition, HIV status, or cause of injury with curious onlookers, the media, or post photos on social media! Share medical information ONLY with the ambulance or hospital team taking over.
F. Other Ethical Issues
Right to privacy/dignity: Shield the casualty from curious onlookers. Expose only the specific body area being treated. Respect cultural norms and modesty (especially for female casualties).
Honesty: Do not lie or promise outcomes you cannot guarantee (e.g., never say, "You will be completely fine"). Instead, reassure them honestly: "Help is coming, and you are being cared for."
Non-maleficence & Beneficence: The core medical ethics: Do good, and avoid doing harm.
Reporting requirements: In Uganda, certain cases MUST be reported to the police (e.g., Road traffic accidents, assault, gunshot wounds, suspected child abuse). Document accurately and avoid altering the crime scene more than is necessary to save the life.
G. Records / Documentation (Nurse-Specific)
As a nurse, your memory is not enough; you must write it down. Record the exact time of the incident, time of arrival, condition found (vital signs), the AMPLE history, specific first aid given, how the casualty responded, the time and mode of transport, destination, and who you handed the patient over to. Accurate records protect both you and the casualty legally.
📝 EXAM STRATEGY: Legal & Ethical Considerations
If asked: "Discuss the legal and ethical considerations when giving first aid."
Structure your answer logically: Consent ➔ Duty of care/abandonment ➔ Negligence / Good Samaritan ➔ Confidentiality ➔ Dignity ➔ Documentation. Writing one strong, detailed paragraph for each of these 6 points will guarantee full marks.
5. Chain of Survival
Definition: The Chain of Survival is a rapid sequence of critical actions that must occur immediately after a sudden cardiac arrest to maximize the patient's chance of survival. The concept is that "the chain is only as strong as its weakest link."
The 6 Links (Classic Teaching - Still tested heavily)
Early recognition of cardiac arrest & activation of EMS: Recognize that the patient is unresponsive with no normal breathing. Immediately call for help (999/112, or Uganda Red Cross ambulance 0800 211 088).
Early CPR: High-quality chest compressions to keep blood flowing to the brain. (Rate of 100–120 compressions per minute, depth of 5–6 cm in adults, allowing full chest recoil, with minimal interruptions).
Early defibrillation: Using an Automated External Defibrillator (AED) to shock the heart as soon as it is available. Survival drops by about 10% for every minute the shock is delayed!
Advanced resuscitation: Interventions provided by EMS paramedics or the hospital team (advanced airway management, IV drugs, ECG monitoring).
Post-cardiac arrest care: Specialized ICU care, targeted temperature management (cooling the brain), and treating the underlying cause of the arrest.
Recovery: Long-term rehabilitation, physical/cognitive/psychological support, and follow-up care.
2025 AHA Updates (Crucial for up-to-date marks)
The American Heart Association (AHA) continuously updates these guidelines. For 2025, you must know these changes:
The AHA replaced the old four separate chains (adult/paediatric, in/out-of-hospital) with ONE unified 6-link chain of survival applicable to all ages and settings.
There is a massive new emphasis on prevention and preparedness as a surrounding concept before the arrest even happens.
Choking updates: Formal guidance requires 5 back blows alternating with 5 abdominal thrusts for adults. For infants: 5 back blows alternating with 5 chest thrusts.
Opioid overdose updates: If an overdose is suspected, administer Naloxone + commence CPR immediately.
Compression rules: The rate is strictly 100–120/minute for ALL ages. For adults, depth must be at least 5 cm, but avoid going deeper than 6 cm.
"Rescue breaths" are now simply called "breaths". Telecommunicator CPR (dispatcher-assisted CPR over the phone) is now given Class 1 priority.
🧠 SIMPLE PUBLIC MNEMONIC: CALL — PUSH — SHOCK
Call emergency services ➔ Push hard and fast (hands-only CPR) ➔ Shock (use the AED).
Why the Chain Matters (Essay Tip): Explain the "weakest link" concept. Each link is time-critical. Without early recognition, CPR never starts. Without early defibrillation, CPR alone rarely restores a normal heart rhythm. Without advanced hospital care, the brain and heart suffer re-injury. Without recovery support, survivors face severe lifelong disability.
6. Role of the Nurse in Emergencies
Different people at the scene have different responsibilities. You must distinguish between what a basic first aider does, what a trained nurse does, and what a bystander does.
Roles of the First Aider (Any trained person)
Assess the scene and ensure safety (Danger first).
Carry out the primary survey (DRABC) and secondary survey.
Give immediate life-saving care (ABC, CPR, bleeding control, placing in recovery position).
Call and arrange for professional help and transport.
Reassure and comfort the casualty and their relatives.
Prevent further injury (immobilization, warmth, stopping unnecessary movement).
Hand over the casualty with a clear verbal report to the EMS/medical team.
Specific Roles of the NURSE (Expanded for Nursing Exams)
As a nursing student, your scope of practice is much wider than a basic first aider. If an exam asks for YOUR role, include these 12 clinical points:
Triage: Sort casualties accurately in mass emergencies to prioritize life threats.
Advanced Assessment: Conduct rapid primary surveys (DRABC), take accurate vital signs, and perform a thorough secondary head-to-toe survey using SAMPLE history.
Life Support: Perform high-quality CPR, artificial ventilation (using an Ambu bag if available), advanced bleeding control, and clinical shock management.
Wound Care: Professional cleaning, sterile dressing, bandaging, and splinting.
Drug Administration: Administer emergency drugs within your legal scope and protocols (e.g., Adrenaline for anaphylaxis, Aspirin for suspected cardiac chest pain, oral Glucose for severe hypoglycaemia).
Airway Management: Positioning, using mechanical suction, and inserting airway adjuncts (e.g., Guedel airway) within your scope.
Coordination: Mobilize bystanders, communicate professionally with EMS/doctors, and arrange formal referral and transport.
Clinical Documentation: Write an accurate, legal record of findings, interventions, and patient response.
Communication & Psychosocial Support: Counsel the casualty and family, communicate with the community, and provide psychological debriefing after traumatic events.
Health Education & Prevention: Teach first aid in the community and schools, advocating for emergency preparedness (like having first aid kits).
Infection Prevention: Strictly use standard precautions and safe handling of sharps/blood to prevent HIV/Hepatitis transmission at the scene.
Follow-up Care: Continued monitoring of vital signs during transport, post-emergency care, and completing referral paperwork.
🚑 OSCE FOCUS: Roles of Bystanders (Common Exam Question)
Examiners often ask how you utilize bystanders. Bystanders are crucial. Instruct them clearly to:
Call for help / call the ambulance (999/112 or 0800 211 088).
Help control bleeding (instruct them to apply direct pressure or hold a dressing tightly).
Help move the casualty only when instructed and safe to do so.
Fetch the first aid kit, blankets, or water as directed.
Give information/history about what they saw happen.
Guide and direct the ambulance to the exact scene location.
Control the crowd and keep noisy onlookers away.
Provide comfort and reassurance to crying relatives.
7. The First Aider – Qualities of a Good First Aider
Definition: A first aider is a person trained by a recognised institution and formally qualified to give first aid.
11 Essential Qualities
To be effective in an emergency, a first aider must possess these specific traits (expand on each point in an essay):
Knowledgeable & Skilled: Must be properly trained, competent in first aid techniques, and keep their skills up to date.
Observant / Critical: Must notice subtle, critical signs that others miss (e.g., pale skin color, abnormal breathing patterns, unequal pupils, or the smell of poison/alcohol).
Confidential: Must strictly keep the casualty's medical and personal information private, sharing it only with doctors.
Trustworthy & Honest: Must safeguard the casualty's property (wallets, phones) and return it safely. Must be completely honest in their medical reports.
Resourceful & Improvisative: Must be able to think outside the box and use available materials when medical supplies run out (e.g., using clean polythene bags as gloves, or strong sticks and umbrellas as splints).
Courageous & Brave: Must act decisively despite unpleasant sights, massive blood, or danger (after ensuring reasonable safety protocols).
Empathetic & Compassionate: Must put themselves in the casualty's shoes, offering genuine hope, and calming their deep fears.
Calm & Composed: Must think clearly and systematically under massive pressure. They do not panic, because panic spreads to the casualty.
Patient: Must persist with long, exhausting resuscitation efforts (like continuous CPR) without giving up too soon.
Physically Fit: Performing CPR, lifting heavy patients, and carrying them to safety requires significant physical strength and stamina.
Good Communicator: Must give clear, authoritative instructions to bystanders, hand over effectively to paramedics, and provide soothing reassurance to the casualty.
📝 EXAM STRATEGY: Memorizing Qualities
Group them logically in your mind to remember all 11 for an essay:
Professional Traits: Knowledgeable, Observant, Confidential, Trustworthy.
Reach accident spot quickly. This will help to save life of the casualty.
Shout for help. Organize labour or onlookers or bystanders to help in any possible way. Make sure there are enough people to help you.
Be calm, methodical and quick. By doing so, you can minimize the pain and the effect of the injuries, which may save life. Handling casualty clumsily will make the final recovery difficult.
Remove the casualty from danger or danger from casualty.
Look for the following:
Is there failure of breathing?
Is there severe bleeding?
Is the shock high or severe? Is there any signs/ symptoms of shock?
Attend to these and then treat easily observable injuries.
Start artificial respiration, if the casualty is not breathing, it must begin at once, as every second gained is helpful.
Stop bleeding by pressing on the pressure point, press firmly on the bleeding area for at least a few minutes (minimum 3 minutes) by watch – take help if available.
Treat shock.
Avoid handling casualty unnecessarily.
Note:Never give anything by mouth to the patient who is unconscious.
Use the first aid articles if available (All trains, railway stations, Lorries and buses keep first aid box). Make use of material so obtained. In case, first aid box is not available, improvise and make use of available resources.
Assess the situation sensibly in regard to medical aid treatment which may be needed.
Make a written note on the general condition and your findings about the casualty.
Inspect the area: Take the casualty away from live wire, fallen walls, beams, fire, broken gas chamber, moving machinery, etc. to safer place.
Clear the crowd with polite words. Do not allow people to crowd around the casualty as the casualty needs fresh air. If a doctor is present, he will guide you. Any other first aider should be asked to help, otherwise take the assistance of by standers by giving them correct instructions.
Note the weather: If it is not raining, too hot or cold, treat in open, otherwise move the casualty into an airy room. If no suitable house or shelter is available nearby, it’s best to protect the casualty with an umbrella or a sheet of cloth or even a newspaper.
Reassure the casualty by soft words and encourage talking. This will help the casualty to take things lightly and lie quietly. This will help in recovery.
Arrange for dispatch of the casualty to the care of a doctor or to a nearby hospital. At the same time inform relatives as to where the casualty is being taken to.
Do not attempt too much. You are only a first aider, give minimum assistance so that condition does not become worse and life can be saved.
Do's and Don'ts
Do not forget that you are not a doctor hence, do not attempt to overdo things.
Do not handle the victim unnecessarily as that condition may worsen.
Do not expose the casualty unnecessarily.
Do not open any wounds / dressing, if bandaged previously by anybody.
Do not move any fracture case without putting proper splints.
Do not tie tourniquet at bleeding site and forget about it.
Attend to casualty as per priority.
Attend to children and women first.
Ensure self – safety and security before jumping into heroic attempts to save casualty.
Follow precautions in handling communicable / infectious cases.
Never declare any casualty dead, it is that doctor’s job.
The Management of the Case
The first aider must always:
Respond quickly to calls for assistance, the saving of a life may depend on promptness of action.
Adopt a calm and methodical approach to the casualty, quick and confident examination and treatment will relieve pain and distress, lessen the effect of injury and may save life. Time spent on long and elaborate examination of a casualty may be time lost in his ultimate recovery.
Treat obvious injuries and conditions endangering life such as failure of breathing, severe shock, before making a complete diagnosis.
Take first aid material. If this is immediately available. If standard equipment is not available the first aider must depend on material to hand which will have to be provided as required.
Study the surroundings carefully. These may influence the action to be taken and therefore require careful consideration for example:
Danger: From falling building, moving machinery, electric current, fire, poisonous gases and similar hazards.
Weather: If the accident occurs out of doors, the casualty may be treated in the open if the weather is fine, if the weather is bad, he must be removed to shelter as soon as is reasonably possible.
Shelter: Note houses and buildings near at hand, whether occupied or unoccupied and whether likely to be particularly useful, such as a chemist’s shop, otherwise, temporary shelter may be provided by means of umbrellas, rugs and the like.
Assistance: Crowds must be tactfully controlled. If a doctor is present, work under his direction. If not, ask if anyone with knowledge of first aid is present. If neither is available make use of bystanders to the best advantage.
Reassure the casualty by speaking encouragingly to him. Warm him to be still and tell him that he is in trained hands.
Step by Step Action to be Taken by the First Aider
Examination and Diagnosis: This is taking account of the casualty‘s history and that of incident, symptoms, signs and level of responsiveness.
History: This is the full story of how the incident occurred or the illness began, and should be taken directly from the casualty and a responsible bystander wherever possible. Never hurry the casualty and remember to pass on all information you have obtained when skilled help arrives.
Symptoms: These are sensations that the casualty feels and describes to you the most useful of these is pain. If the casualty is unconscious or unreliable because dazed (confused) or in shock, their diagnosis cannot be based on symptoms but has to be based on information obtained from bystanders and signs.
Sign: These are details ascertained by you using your senses – sight, touch, hearing and smell. These may be signs of injury such as: bleeding, swelling, deformity, or signs of illness such as raised temperature and rapid or regular pulse.
Key Interventions / Actions:
Cardiopulmonary resuscitation (every second).
Control bleeding.
Treat shock and special care of unconscious cases.
Fracture immobilization.
Burn cover, with clean washed or dressing and treat shock.
Eye, nose and ear injuries.
Multiple superficial injuries.
Transportation.
Responsibilities of a First Aider in the Management of Casualties
Gain access to the patient in easiest and safest way.
Observe the accidents scene and assess the situation.
If necessary, direct others to direct traffic keep bystanders at a safe distance and make essential telephone calls. Turn off all engines that may be still running.
To find out whether is unconscious, conscious alive dead.
Identify the disease or condition from which the casualty is suffering.
Give immediate, appropriate and treatment considering priority of the first aid measures. Such as first priority will be of restoration of breathing and circulation, while second will be stopping the bleeding.
Should bear in mind that a casualty may have more than one injury and that some casualties will require more urgent attention than others.
Arranging without delay for shifting of the casualty to a doctor, hospital or home according to the condition in such a manner that injury is not complicated or the victim is not subjected to unnecessary discomfort.
Keeping the record of the patient and of incidence, addresses and witness.
Once a first aider has voluntarily started care, he should not leave the scene, or stop the care until a qualified and responsible person relieves him.
To report your observations to those taking over care of the casualty and to give further assistance if required.
To prevent cross infection between yourself and casualty as much as possible.
Limitations of the First Aider
The first aider should be observant with the rules or objectives of first aid and act quickly and vigilantly.
He should inspire confidence in the patient and others closely related to the patient.
To save lives, there are three conditions that call for first aid: stoppage of breathing, severe bleeding and shock.
If breathing movements are not proper, the lips, tongue and finger nails become blue, in such a situation, artificial respiration should be started immediately.
If there is heavy bleeding: It may be from wounds through one or more large vessels. In this condition, pressure should be applied directly over the wound. For this, a clean handkerchief or a pad may be kept on the wound and pressed firmly with one or both hands, then apply affirm bandage.
The important factor to be attended immediately is shock. Shock accompanies severe injury or emotional disturbance. Cold and clammy skin, beads of perspiration on the fore head and palms. Pale face, nausea and vomiting are the common symptoms of shock.
Skills Required for the First Aider
Control the scene of accident.
Gain access to the patient.
Evaluate the scene in terms of safety and possible cause of accident.
Determine diagnostic signs and relate those to possible injuries or sudden illnesses that require emergency care.
Perform the necessary ABC’S of emergency care:
Open air way.
Breathing (breathlessness - provide artificial ventilation).
Circulation (pulseless - provide one and two rescuer cardiopulmonary resuscitation).
Bleeding control (haemorrhage controlled by direct pressure and elevation, pressure points and tourniquets).
Diagnosis and care for shock.
Diagnosis and care for open and closed fractures, sprains (tearing of ligaments), strains (muscle injured by overstretching) and dislocations, including cold treatment and basic splinting techniques.
Diagnosis and care for soft tissue and internal injuries including basic dressing and bandaging techniques.
Detect and care for poisoning including alcohol and drug abuse.
Diagnosis and care for heart attack, stroke, diabetes, coma, insulin shock, and epileptic or other seizures.
Diagnosis and care for facial injuries, head injuries, neck and spinal injuries and chest injuries including fracture ribs and penetrating chest wounds.
Diagnosis and care for burns and smoke inhalation.
Diagnosis and care for exposure to heat and cold, which includes heat exhaustion, heat cramps, heat stroke, hypothermia and frostbite.
Assist in child birth and care of the new born.
Psychological and proper emergency care to victims of crisis and disasters.
Perform proper transformation techniques.
Quick Quiz
First Aid Intro Quiz
First Aid
Privacy: Your details are used only for quiz tracking and certificates.